SUBARU LEGACY 1999 Service Repair Manual
Manufacturer: SUBARU, Model Year: 1999, Model line: LEGACY, Model: SUBARU LEGACY 1999Pages: 1456, PDF Size: 59.93 MB
Page 811 of 1456
G4M0113
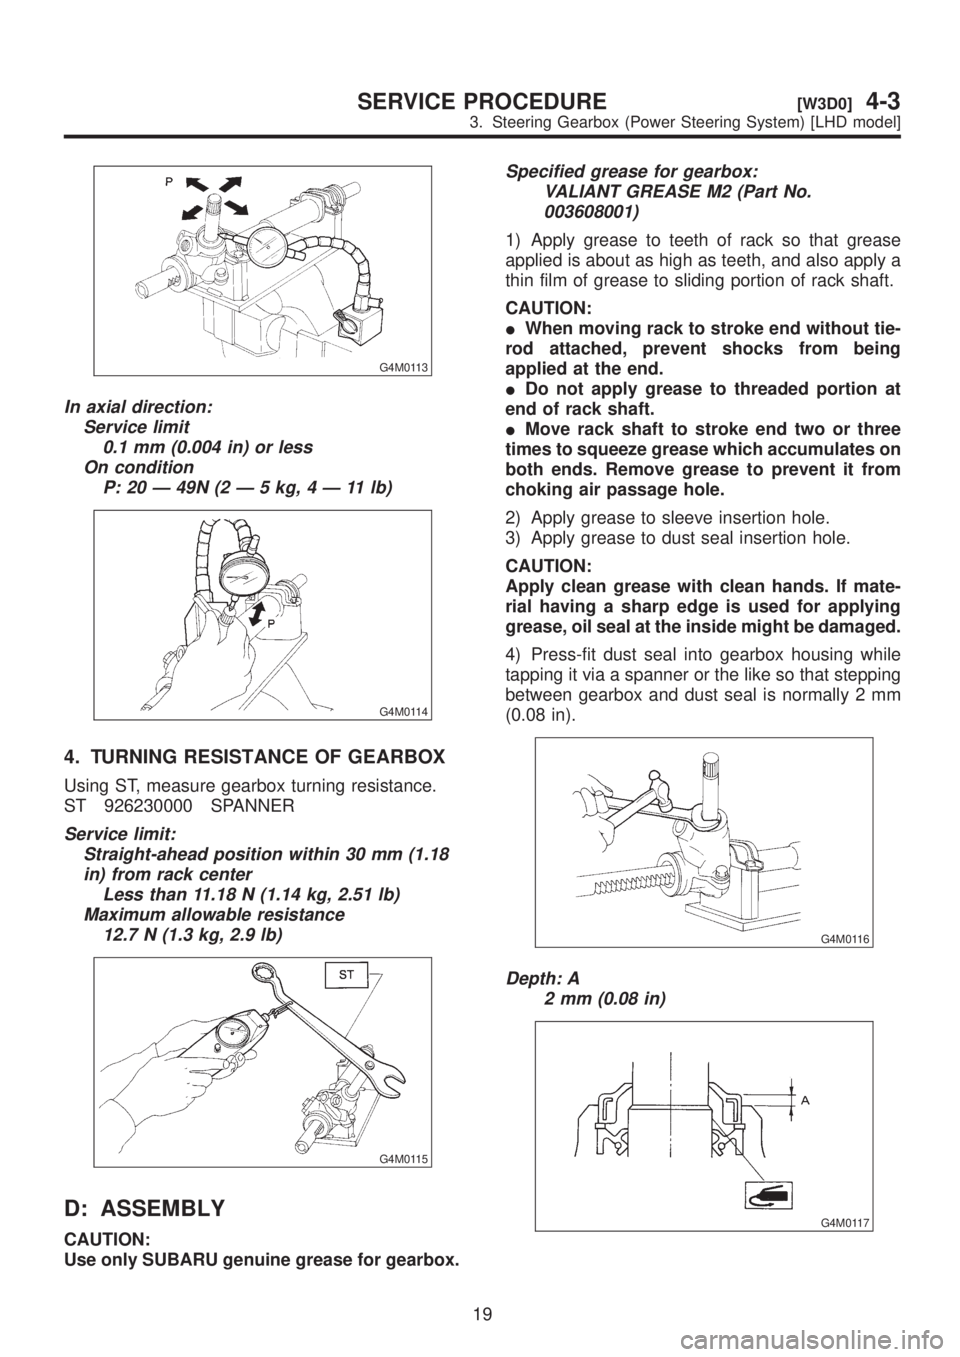
In axial direction:
Service limit
0.1 mm (0.004 in) or less
On condition
P:20Ð49N(2Ð5kg,4Ð11lb)
G4M0114
4. TURNING RESISTANCE OF GEARBOX
Using ST, measure gearbox turning resistance.
ST 926230000 SPANNER
Service limit:
Straight-ahead position within 30 mm (1.18
in) from rack center
Less than 11.18 N (1.14 kg, 2.51 lb)
Maximum allowable resistance
12.7 N (1.3 kg, 2.9 lb)
G4M0115
D: ASSEMBLY
CAUTION:
Use only SUBARU genuine grease for gearbox.
Specified grease for gearbox:
VALIANT GREASE M2 (Part No.
003608001)
1) Apply grease to teeth of rack so that grease
applied is about as high as teeth, and also apply a
thin film of grease to sliding portion of rack shaft.
CAUTION:
IWhen moving rack to stroke end without tie-
rod attached, prevent shocks from being
applied at the end.
IDo not apply grease to threaded portion at
end of rack shaft.
IMove rack shaft to stroke end two or three
times to squeeze grease which accumulates on
both ends. Remove grease to prevent it from
choking air passage hole.
2) Apply grease to sleeve insertion hole.
3) Apply grease to dust seal insertion hole.
CAUTION:
Apply clean grease with clean hands. If mate-
rial having a sharp edge is used for applying
grease, oil seal at the inside might be damaged.
4) Press-fit dust seal into gearbox housing while
tapping it via a spanner or the like so that stepping
between gearbox and dust seal is normally 2 mm
(0.08 in).
G4M0116
Depth: A
2 mm (0.08 in)
G4M0117
19
[W3D0]4-3SERVICE PROCEDURE
3. Steering Gearbox (Power Steering System) [LHD model]
Page 812 of 1456
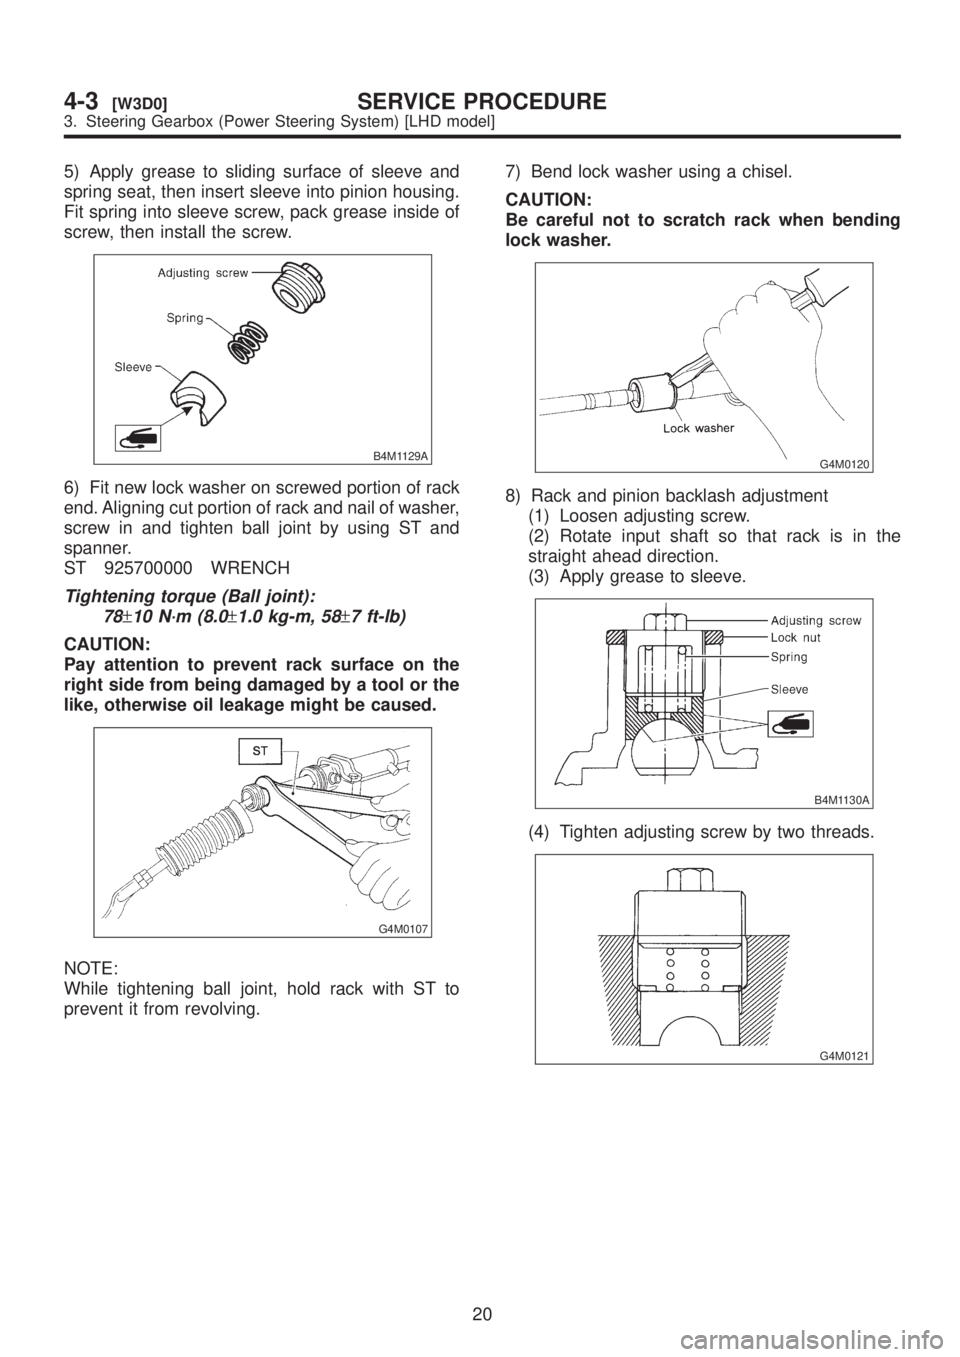
5) Apply grease to sliding surface of sleeve and
spring seat, then insert sleeve into pinion housing.
Fit spring into sleeve screw, pack grease inside of
screw, then install the screw.
B4M1129A
6) Fit new lock washer on screwed portion of rack
end. Aligning cut portion of rack and nail of washer,
screw in and tighten ball joint by using ST and
spanner.
ST 925700000 WRENCH
Tightening torque (Ball joint):
78
±10 N´m (8.0±1.0 kg-m, 58±7 ft-lb)
CAUTION:
Pay attention to prevent rack surface on the
right side from being damaged by a tool or the
like, otherwise oil leakage might be caused.
G4M0107
NOTE:
While tightening ball joint, hold rack with ST to
prevent it from revolving.7) Bend lock washer using a chisel.
CAUTION:
Be careful not to scratch rack when bending
lock washer.
G4M0120
8) Rack and pinion backlash adjustment
(1) Loosen adjusting screw.
(2) Rotate input shaft so that rack is in the
straight ahead direction.
(3) Apply grease to sleeve.
B4M1130A
(4) Tighten adjusting screw by two threads.
G4M0121
20
4-3[W3D0]SERVICE PROCEDURE
3. Steering Gearbox (Power Steering System) [LHD model]
Page 813 of 1456
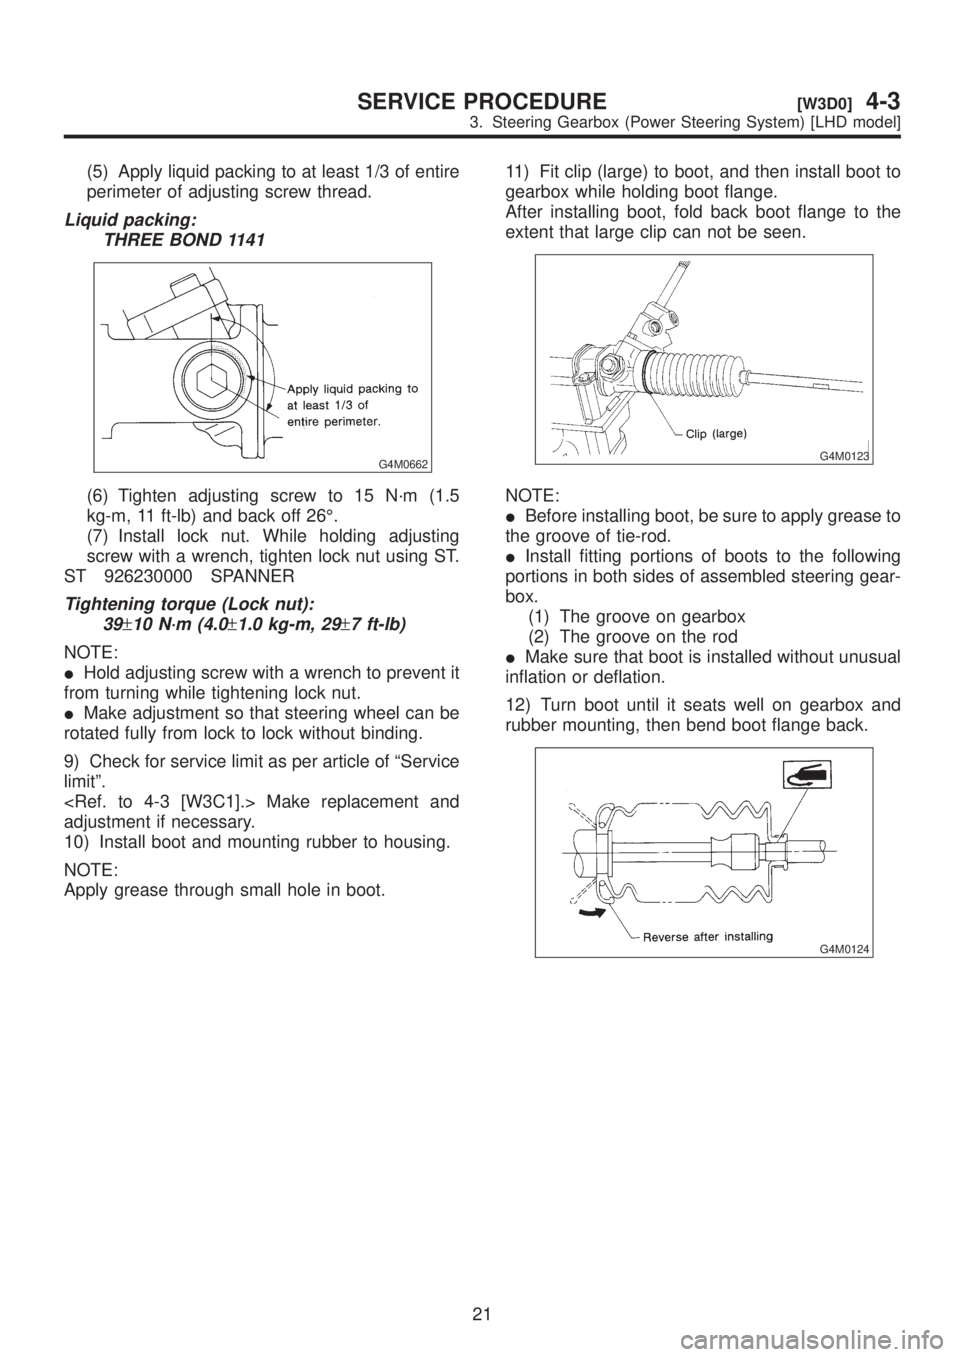
(5) Apply liquid packing to at least 1/3 of entire
perimeter of adjusting screw thread.
Liquid packing:
THREE BOND 1141
G4M0662
(6) Tighten adjusting screw to 15 N´m (1.5
kg-m, 11 ft-lb) and back off 26É.
(7) Install lock nut. While holding adjusting
screw with a wrench, tighten lock nut using ST.
ST 926230000 SPANNER
Tightening torque (Lock nut):
39
±10 N´m (4.0±1.0 kg-m, 29±7 ft-lb)
NOTE:
IHold adjusting screw with a wrench to prevent it
from turning while tightening lock nut.
IMake adjustment so that steering wheel can be
rotated fully from lock to lock without binding.
9) Check for service limit as per article of ªService
limitº.
adjustment if necessary.
10) Install boot and mounting rubber to housing.
NOTE:
Apply grease through small hole in boot.11) Fit clip (large) to boot, and then install boot to
gearbox while holding boot flange.
After installing boot, fold back boot flange to the
extent that large clip can not be seen.
G4M0123
NOTE:
IBefore installing boot, be sure to apply grease to
the groove of tie-rod.
IInstall fitting portions of boots to the following
portions in both sides of assembled steering gear-
box.
(1) The groove on gearbox
(2) The groove on the rod
IMake sure that boot is installed without unusual
inflation or deflation.
12) Turn boot until it seats well on gearbox and
rubber mounting, then bend boot flange back.
G4M0124
21
[W3D0]4-3SERVICE PROCEDURE
3. Steering Gearbox (Power Steering System) [LHD model]
Page 814 of 1456
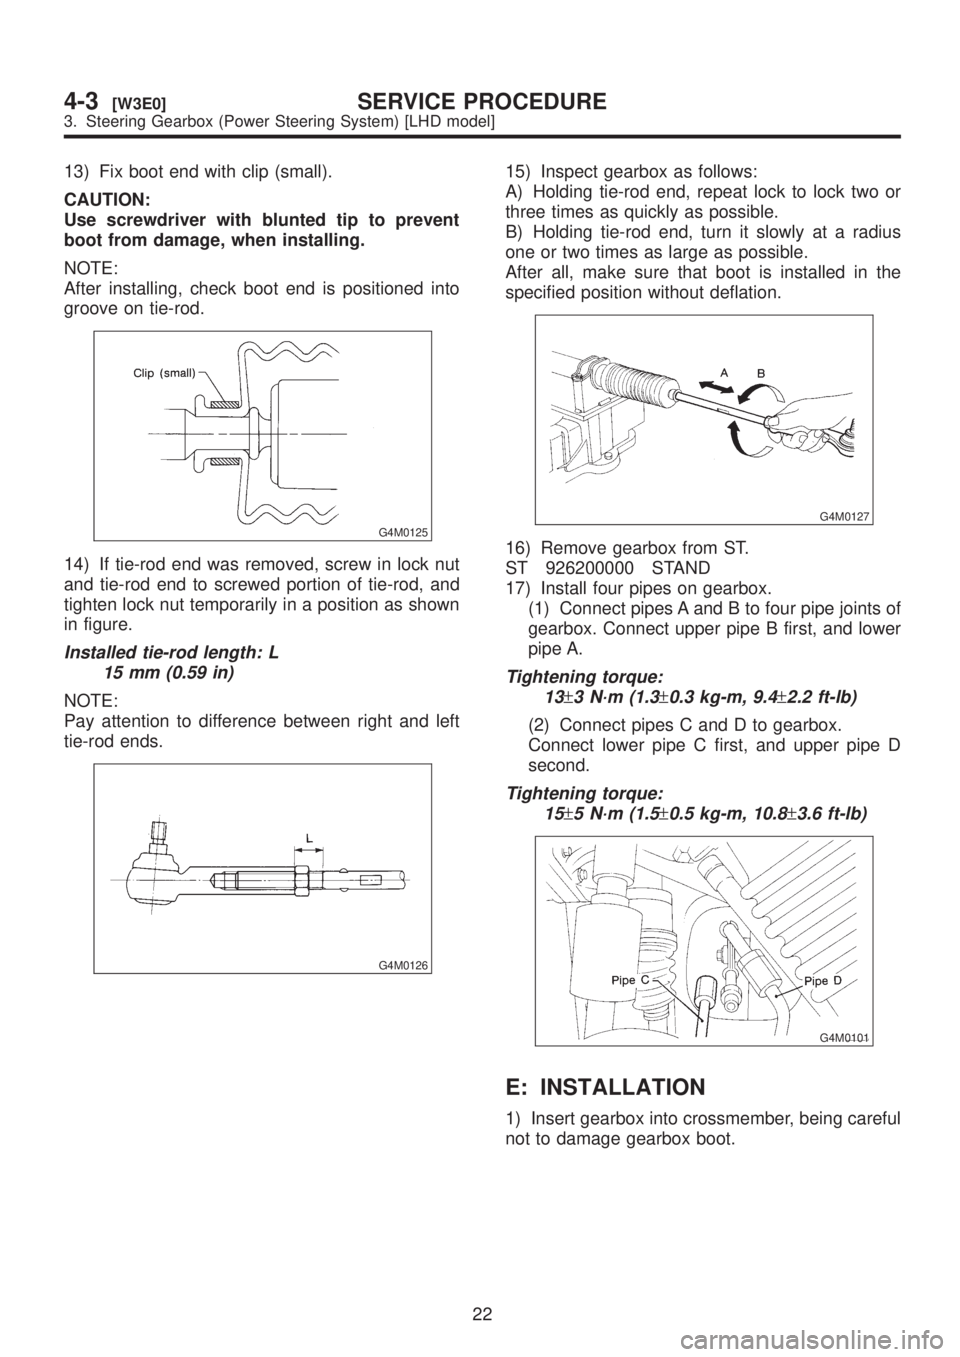
13) Fix boot end with clip (small).
CAUTION:
Use screwdriver with blunted tip to prevent
boot from damage, when installing.
NOTE:
After installing, check boot end is positioned into
groove on tie-rod.
G4M0125
14) If tie-rod end was removed, screw in lock nut
and tie-rod end to screwed portion of tie-rod, and
tighten lock nut temporarily in a position as shown
in figure.
Installed tie-rod length: L
15 mm (0.59 in)
NOTE:
Pay attention to difference between right and left
tie-rod ends.
G4M0126
15) Inspect gearbox as follows:
A) Holding tie-rod end, repeat lock to lock two or
three times as quickly as possible.
B) Holding tie-rod end, turn it slowly at a radius
one or two times as large as possible.
After all, make sure that boot is installed in the
specified position without deflation.
G4M0127
16) Remove gearbox from ST.
ST 926200000 STAND
17) Install four pipes on gearbox.
(1) Connect pipes A and B to four pipe joints of
gearbox. Connect upper pipe B first, and lower
pipe A.
Tightening torque:
13
±3 N´m (1.3±0.3 kg-m, 9.4±2.2 ft-lb)
(2) Connect pipes C and D to gearbox.
Connect lower pipe C first, and upper pipe D
second.
Tightening torque:
15
±5 N´m (1.5±0.5 kg-m, 10.8±3.6 ft-lb)
G4M0101
E: INSTALLATION
1) Insert gearbox into crossmember, being careful
not to damage gearbox boot.
22
4-3[W3E0]SERVICE PROCEDURE
3. Steering Gearbox (Power Steering System) [LHD model]
Page 815 of 1456
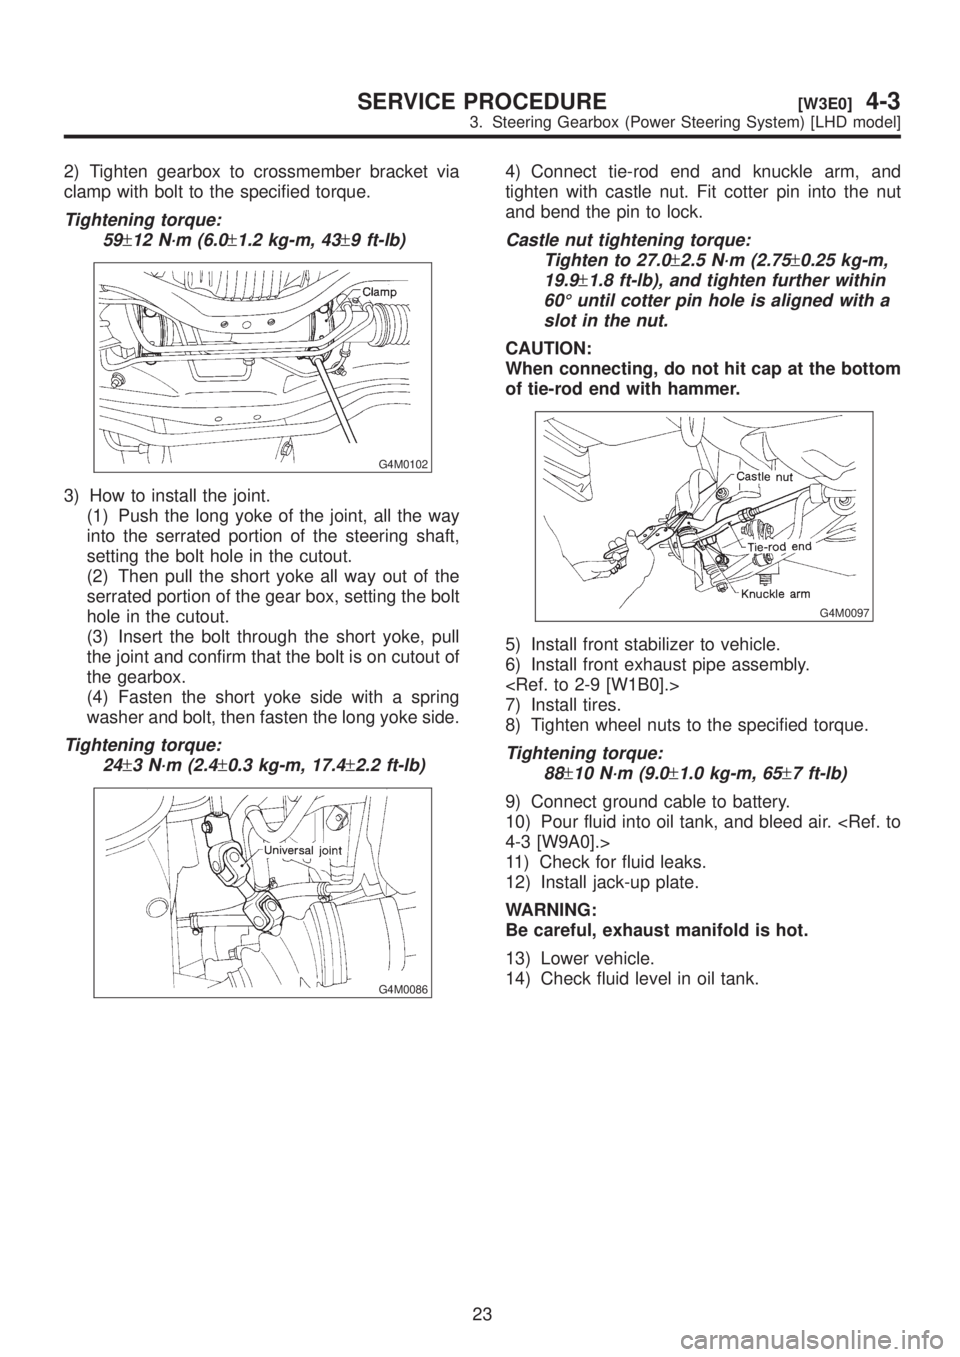
2) Tighten gearbox to crossmember bracket via
clamp with bolt to the specified torque.
Tightening torque:
59
±12 N´m (6.0±1.2 kg-m, 43±9 ft-lb)
G4M0102
3) How to install the joint.
(1) Push the long yoke of the joint, all the way
into the serrated portion of the steering shaft,
setting the bolt hole in the cutout.
(2) Then pull the short yoke all way out of the
serrated portion of the gear box, setting the bolt
hole in the cutout.
(3) Insert the bolt through the short yoke, pull
the joint and confirm that the bolt is on cutout of
the gearbox.
(4) Fasten the short yoke side with a spring
washer and bolt, then fasten the long yoke side.
Tightening torque:
24
±3 N´m (2.4±0.3 kg-m, 17.4±2.2 ft-lb)
G4M0086
4) Connect tie-rod end and knuckle arm, and
tighten with castle nut. Fit cotter pin into the nut
and bend the pin to lock.
Castle nut tightening torque:
Tighten to 27.0
±2.5 N´m (2.75±0.25 kg-m,
19.9
±1.8 ft-lb), and tighten further within
60É until cotter pin hole is aligned with a
slot in the nut.
CAUTION:
When connecting, do not hit cap at the bottom
of tie-rod end with hammer.
G4M0097
5) Install front stabilizer to vehicle.
6) Install front exhaust pipe assembly.
7) Install tires.
8) Tighten wheel nuts to the specified torque.
Tightening torque:
88
±10 N´m (9.0±1.0 kg-m, 65±7 ft-lb)
9) Connect ground cable to battery.
10) Pour fluid into oil tank, and bleed air.
11) Check for fluid leaks.
12) Install jack-up plate.
WARNING:
Be careful, exhaust manifold is hot.
13) Lower vehicle.
14) Check fluid level in oil tank.
23
[W3E0]4-3SERVICE PROCEDURE
3. Steering Gearbox (Power Steering System) [LHD model]
Page 816 of 1456
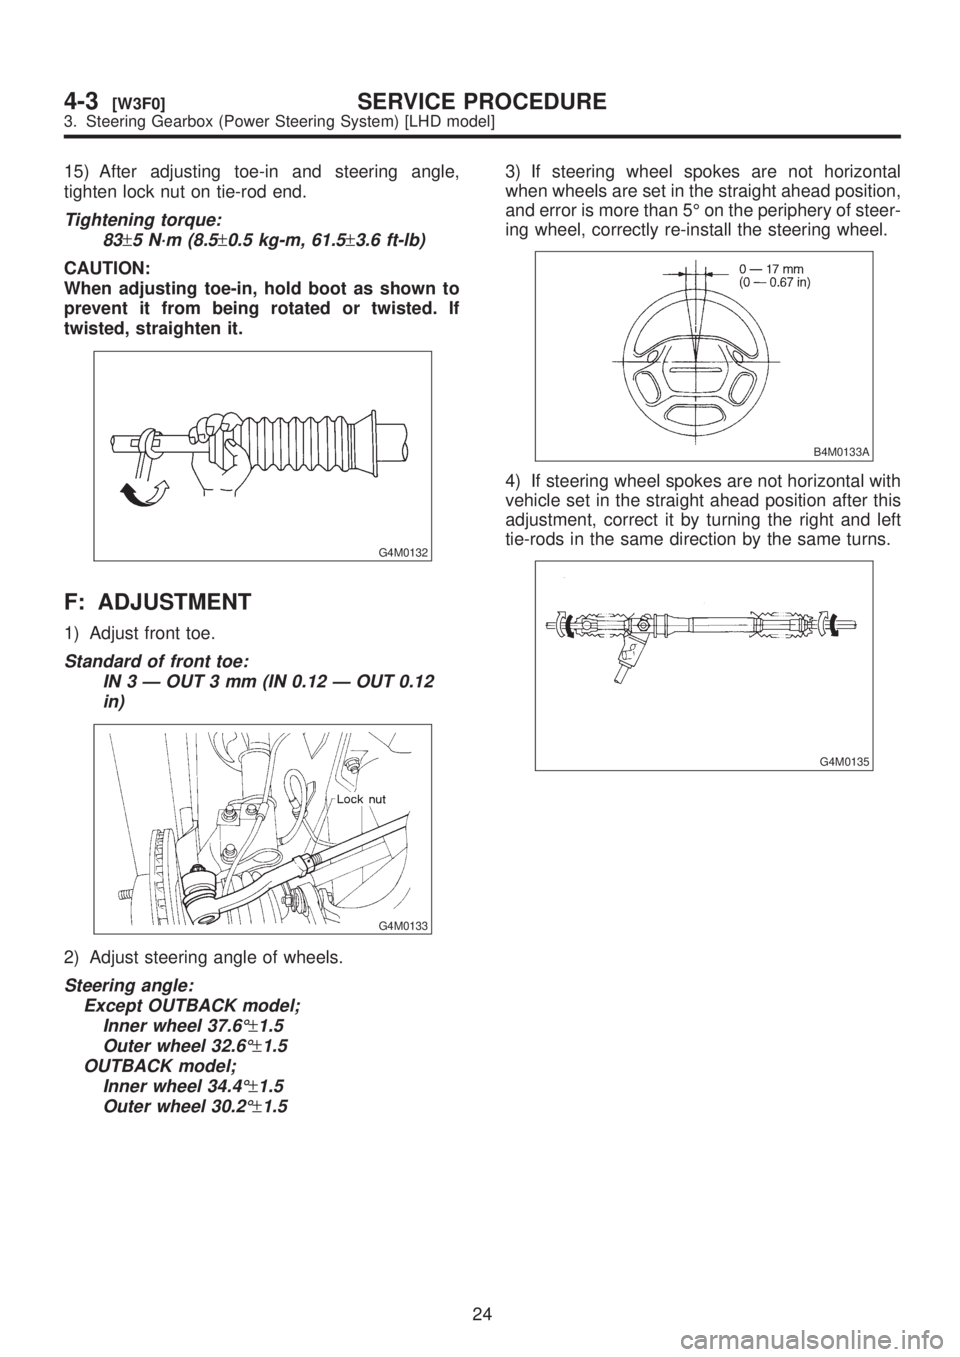
15) After adjusting toe-in and steering angle,
tighten lock nut on tie-rod end.
Tightening torque:
83
±5 N´m (8.5±0.5 kg-m, 61.5±3.6 ft-lb)
CAUTION:
When adjusting toe-in, hold boot as shown to
prevent it from being rotated or twisted. If
twisted, straighten it.
G4M0132
F: ADJUSTMENT
1) Adjust front toe.
Standard of front toe:
IN 3 Ð OUT 3 mm (IN 0.12 Ð OUT 0.12
in)
G4M0133
2) Adjust steering angle of wheels.
Steering angle:
Except OUTBACK model;
Inner wheel 37.6É
±1.5
Outer wheel 32.6É
±1.5
OUTBACK model;
Inner wheel 34.4É
±1.5
Outer wheel 30.2É
±1.5
3) If steering wheel spokes are not horizontal
when wheels are set in the straight ahead position,
and error is more than 5É on the periphery of steer-
ing wheel, correctly re-install the steering wheel.
B4M0133A
4) If steering wheel spokes are not horizontal with
vehicle set in the straight ahead position after this
adjustment, correct it by turning the right and left
tie-rods in the same direction by the same turns.
G4M0135
24
4-3[W3F0]SERVICE PROCEDURE
3. Steering Gearbox (Power Steering System) [LHD model]
Page 817 of 1456
![SUBARU LEGACY 1999 Service Repair Manual 4. Steering Gearbox (Power
Steering System) [RHD model]
A: REMOVAL
NOTE:
For disassembly and assembly of gearbox unit,
refer to section Control Valve (Power Steering
Gearbox) [RHD model]. <Ref. to 4-3 SUBARU LEGACY 1999 Service Repair Manual 4. Steering Gearbox (Power
Steering System) [RHD model]
A: REMOVAL
NOTE:
For disassembly and assembly of gearbox unit,
refer to section Control Valve (Power Steering
Gearbox) [RHD model]. <Ref. to 4-3](/img/17/57435/w960_57435-816.png)
4. Steering Gearbox (Power
Steering System) [RHD model]
A: REMOVAL
NOTE:
For disassembly and assembly of gearbox unit,
refer to section Control Valve (Power Steering
Gearbox) [RHD model].
B4M0666B
(1) Dust cover
(2) Valve housing
(3) Y-packing
(4) Ball-bearing
(5) Spacer
(6) Pinion
(7) Shim
(8) Dust seal(9) Clip
(10) Tie-rod end
(11) Clip
(12) Boot
(13) Wire
(14) Tie-rod RH
(15) Lock washer
(16) Sleeve(17) Spring
(18) Adjusting screw
(19) Lock nut
(20) Pipe A
(21) Pipe B
(22) Adapter
(23) Housing ASSY
(24) Back-up washer
25
[W4A0]4-3SERVICE PROCEDURE
4. Steering Gearbox (Power Steering System) [RHD model]
Page 818 of 1456
(25) Oil seal
(26) Rack
(27) O-ring
(28) Oil seal
(29) Y-packing
(30) Bush(31) Holder
(32) Tie-rod LHTightening torque: N´m (kg-m, ft-lb)
T1:
20±4 (2.0±0.4, 14.5±2.9)
T2:25±5 (2.5±0.5, 18.1±3.6)
T3:39±10 (4.0±1.0, 29±7)
T4:64±10 (6.5±1.0, 47±7)
T5:78±10 (8.0±1.0, 58±7)
T6:83±5 (8.5±0.5, 61.5±3.6)
26
4-3[W4A0]SERVICE PROCEDURE
4. Steering Gearbox (Power Steering System) [RHD model]
Page 819 of 1456
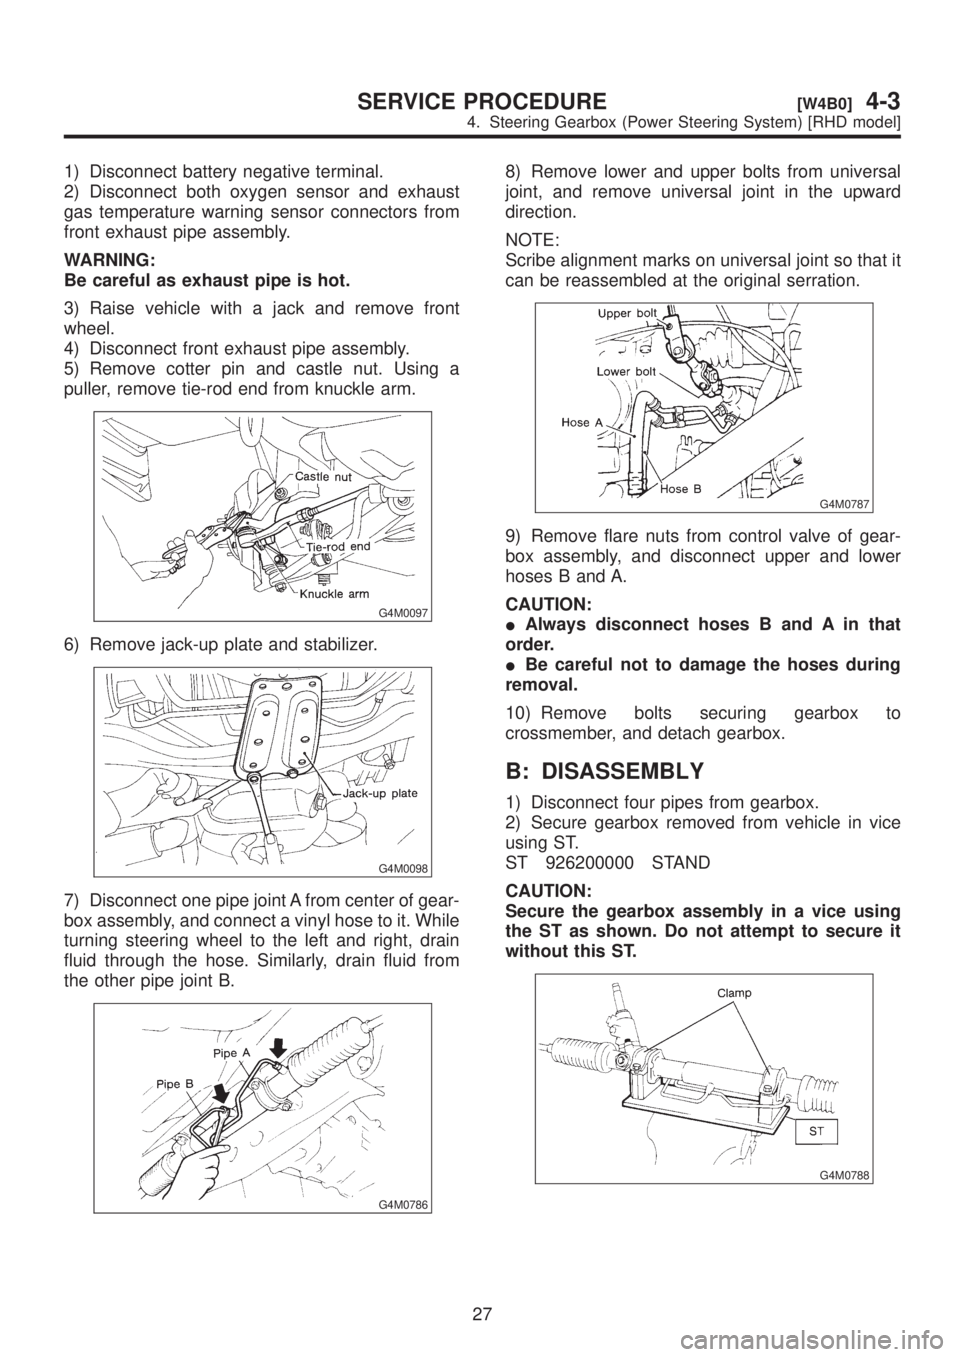
1) Disconnect battery negative terminal.
2) Disconnect both oxygen sensor and exhaust
gas temperature warning sensor connectors from
front exhaust pipe assembly.
WARNING:
Be careful as exhaust pipe is hot.
3) Raise vehicle with a jack and remove front
wheel.
4) Disconnect front exhaust pipe assembly.
5) Remove cotter pin and castle nut. Using a
puller, remove tie-rod end from knuckle arm.
G4M0097
6) Remove jack-up plate and stabilizer.
G4M0098
7) Disconnect one pipe joint A from center of gear-
box assembly, and connect a vinyl hose to it. While
turning steering wheel to the left and right, drain
fluid through the hose. Similarly, drain fluid from
the other pipe joint B.
G4M0786
8) Remove lower and upper bolts from universal
joint, and remove universal joint in the upward
direction.
NOTE:
Scribe alignment marks on universal joint so that it
can be reassembled at the original serration.
G4M0787
9) Remove flare nuts from control valve of gear-
box assembly, and disconnect upper and lower
hoses B and A.
CAUTION:
IAlways disconnect hoses B and A in that
order.
IBe careful not to damage the hoses during
removal.
10) Remove bolts securing gearbox to
crossmember, and detach gearbox.
B: DISASSEMBLY
1) Disconnect four pipes from gearbox.
2) Secure gearbox removed from vehicle in vice
using ST.
ST 926200000 STAND
CAUTION:
Secure the gearbox assembly in a vice using
the ST as shown. Do not attempt to secure it
without this ST.
G4M0788
27
[W4B0]4-3SERVICE PROCEDURE
4. Steering Gearbox (Power Steering System) [RHD model]
Page 820 of 1456
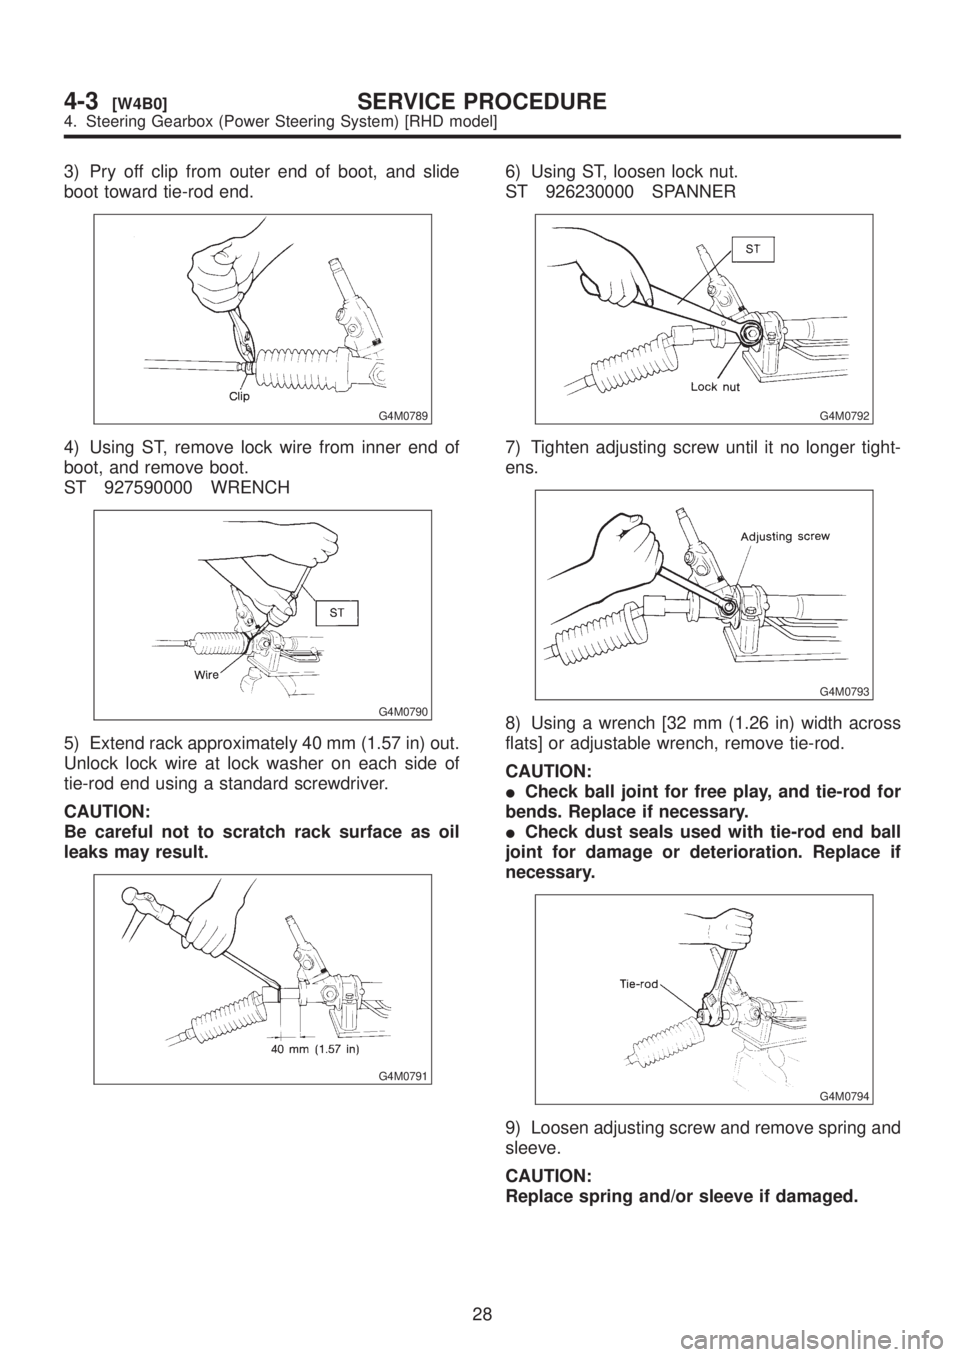
3) Pry off clip from outer end of boot, and slide
boot toward tie-rod end.
G4M0789
4) Using ST, remove lock wire from inner end of
boot, and remove boot.
ST 927590000 WRENCH
G4M0790
5) Extend rack approximately 40 mm (1.57 in) out.
Unlock lock wire at lock washer on each side of
tie-rod end using a standard screwdriver.
CAUTION:
Be careful not to scratch rack surface as oil
leaks may result.
G4M0791
6) Using ST, loosen lock nut.
ST 926230000 SPANNER
G4M0792
7) Tighten adjusting screw until it no longer tight-
ens.
G4M0793
8) Using a wrench [32 mm (1.26 in) width across
flats] or adjustable wrench, remove tie-rod.
CAUTION:
ICheck ball joint for free play, and tie-rod for
bends. Replace if necessary.
ICheck dust seals used with tie-rod end ball
joint for damage or deterioration. Replace if
necessary.
G4M0794
9) Loosen adjusting screw and remove spring and
sleeve.
CAUTION:
Replace spring and/or sleeve if damaged.
28
4-3[W4B0]SERVICE PROCEDURE
4. Steering Gearbox (Power Steering System) [RHD model]