display SUBARU OUTBACK 2020 Getting Started Guide
[x] Cancel search | Manufacturer: SUBARU, Model Year: 2020, Model line: OUTBACK, Model: SUBARU OUTBACK 2020Pages: 132, PDF Size: 5.99 MB
Page 7 of 132
Automatic Door Locking/Unlocking
With this function, all doors and the fuel lid will automatically lock or unlock when certain
conditions are met based on your preference. You can set the doors to lock when your
Subaru reaches 12 mph or you shift the select lever out of the “P” position. You can set the
doors to unlock when you shift the select lever into the “P” position, turn the ignition “OFF”
or open the driver’s door. You can change the setting in the Combination Meter Display
(CMD) or the touchscreen.
Automatic
LockingVehicle Speed
(12 mph) Shift Out of
ParkOff
Automatic
Unlocking Shift into Park Ignition Off Drive Door
OpenOff
KEYLESS ACCESS WITH PUSH BUTTON START
(if
equipped)
Your Subaru allows for customizing of the door unlock settings. The default setting is when
you unlock the vehicle, only the driver’s door and fuel lid unlock. If preferred, you can set
the vehicle to unlock all doors, the rear gate and the fuel lid. This adjustment can be
performed through the SUBARU STARLINK™ Multimedia Touchscreen under “Settings”,
then “Vehicle”.
Unlock Using Door Handles
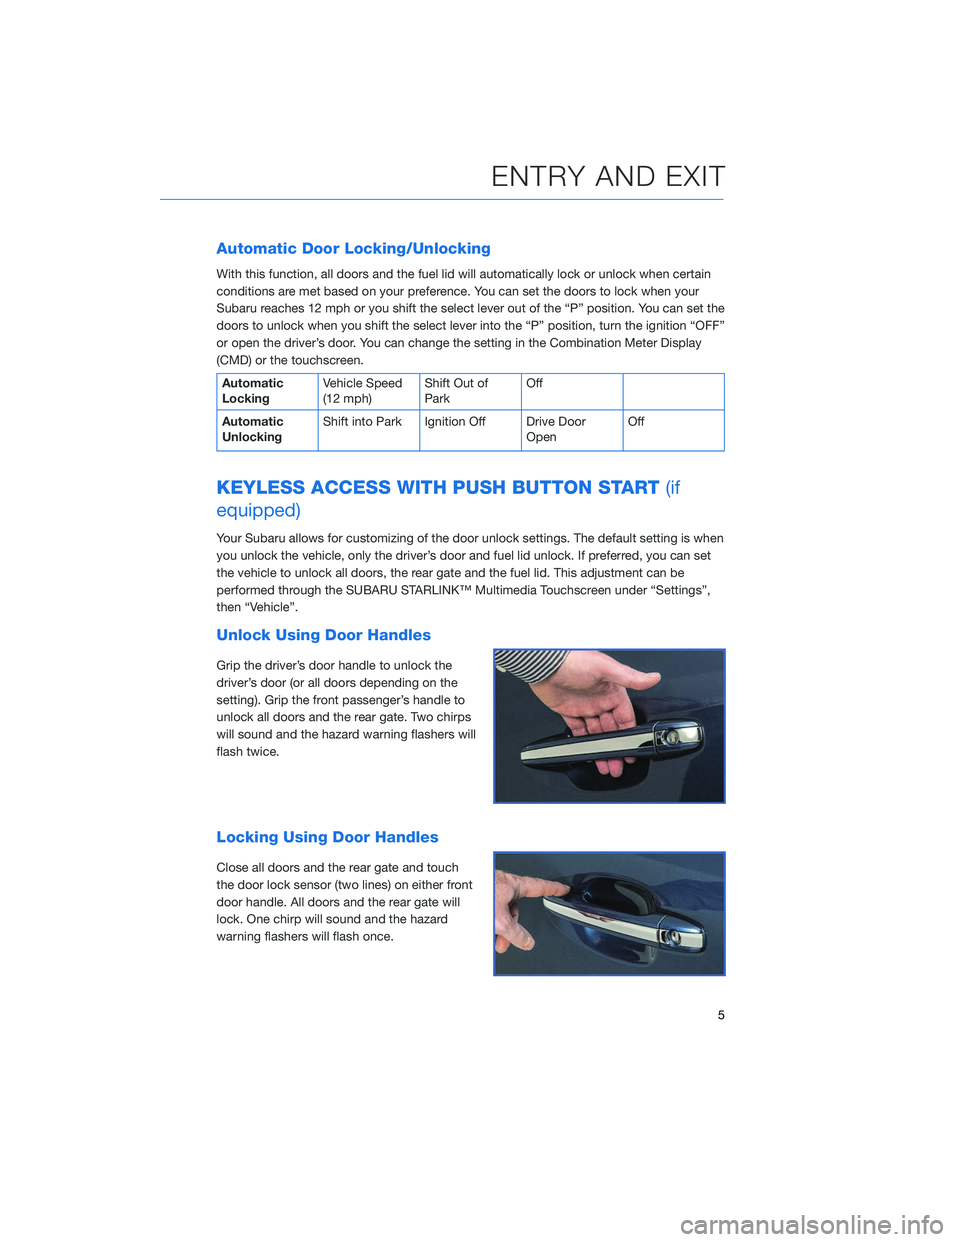
Grip the driver’s door handle to unlock the
driver’s door (or all doors depending on the
setting). Grip the front passenger’s handle to
unlock all doors and the rear gate. Two chirps
will sound and the hazard warning flashers will
flash twice.
Locking Using Door Handles
Close all doors and the rear gate and touch
the door lock sensor (two lines) on either front
door handle. All doors and the rear gate will
lock. One chirp will sound and the hazard
warning flashers will flash once.
ENTRY AND EXIT
5
Page 11 of 132
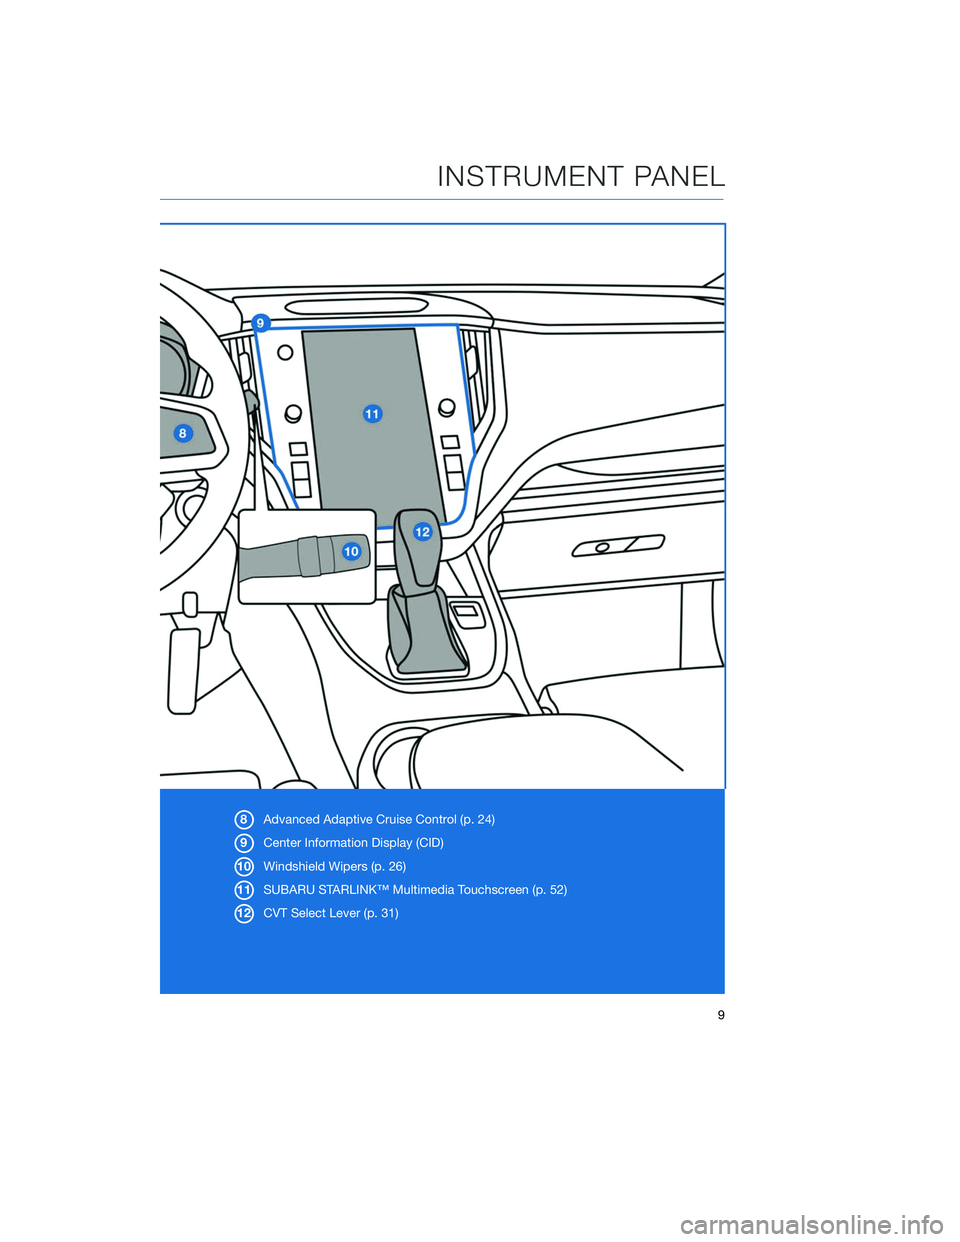
8Advanced Adaptive Cruise Control (p. 24)
9 Center Information Display (CID)
10 Windshield Wipers (p. 26)
11 SUBARU STARLINK™ Multimedia Touchscreen (p. 52)
12 CVT Select Lever (p. 31)
INSTRUMENT PANEL
9
Page 20 of 132
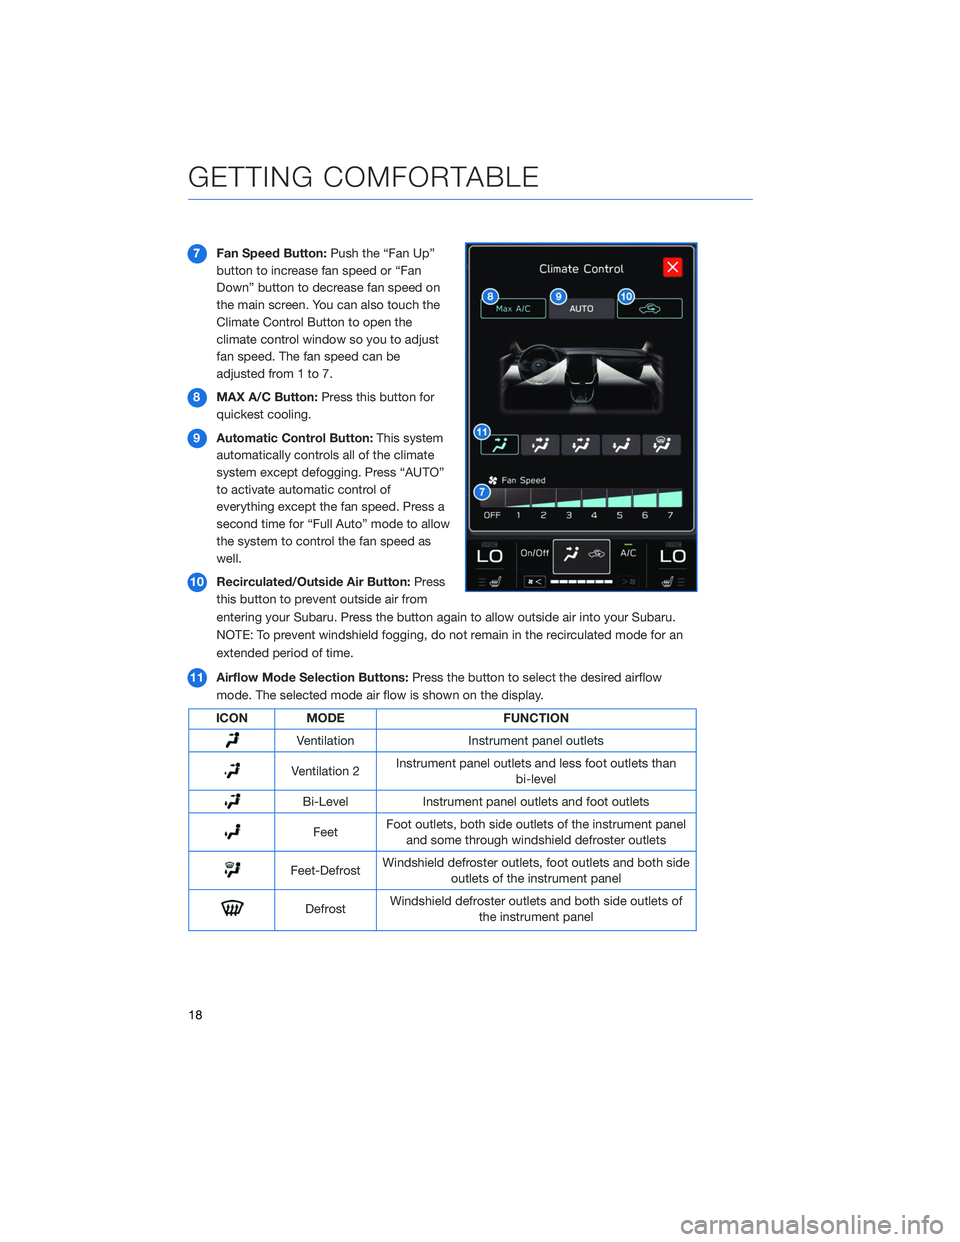
7Fan Speed Button: Push the “Fan Up”
button to increase fan speed or “Fan
Down” button to decrease fan speed on
the main screen. You can also touch the
Climate Control Button to open the
climate control window so you to adjust
fan speed. The fan speed can be
adjusted from 1 to 7.
8 MAX A/C Button: Press this button for
quickest cooling.
9 Automatic Control Button: This system
automatically controls all of the climate
system except defogging. Press “AUTO”
to activate automatic control of
everything except the fan speed. Press a
second time for “Full Auto” mode to allow
the system to control the fan speed as
well.
10 Recirculated/Outside Air Button: Press
this button to prevent outside air from
entering your Subaru. Press the button again to allow outside air into your Subaru.
NOTE: To prevent windshield fogging, do not remain in the recirculated mode for an
extended period of time.
11 Airflow Mode Selection Buttons: Press the button to select the desired airflow
mode. The selected mode air flow is shown on the display.
ICON MODE FUNCTION
VentilationInstrument panel outlets
Ventilation 2Instrument panel outlets and less foot outlets than
bi-level
Bi-Level Instrument panel outlets and foot outlets
FeetFoot outlets, both side outlets of the instrument panel
and some through windshield defroster outlets
Feet-Defrost Windshield defroster outlets, foot outlets and both side
outlets of the instrument panel
Defrost Windshield defroster outlets and both side outlets of
the instrument panel
GETTING COMFORTABLE
18
Page 22 of 132
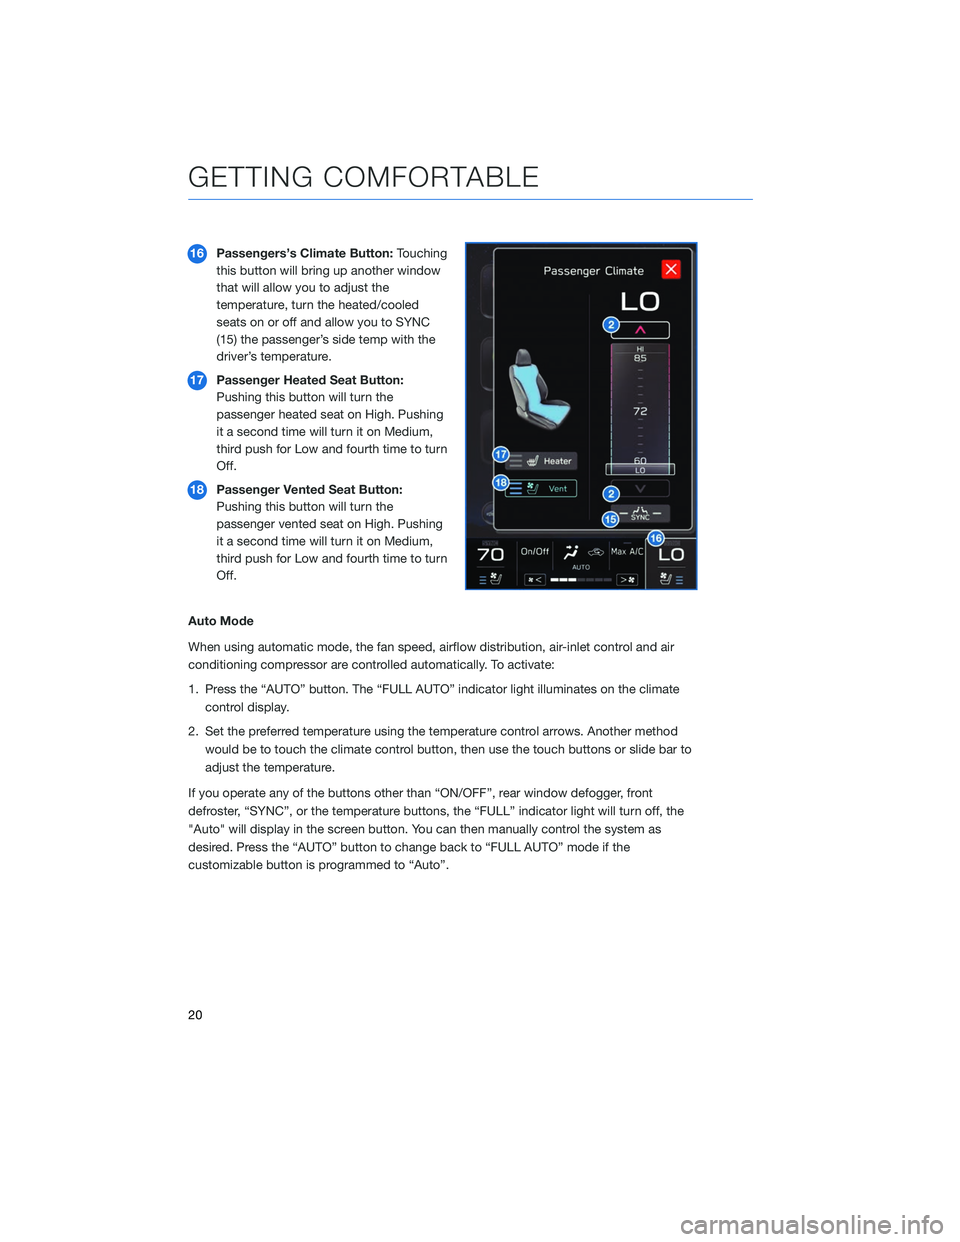
16Passengers’s Climate Button: Touching
this button will bring up another window
that will allow you to adjust the
temperature, turn the heated/cooled
seats on or off and allow you to SYNC
(15) the passenger’s side temp with the
driver’s temperature.
17 Passenger Heated Seat Button:
Pushing this button will turn the
passenger heated seat on High. Pushing
it a second time will turn it on Medium,
third push for Low and fourth time to turn
Off.
18 Passenger Vented Seat Button:
Pushing this button will turn the
passenger vented seat on High. Pushing
it a second time will turn it on Medium,
third push for Low and fourth time to turn
Off.
Auto Mode
When using automatic mode, the fan speed, airflow distribution, air-inlet control and air
conditioning compressor are controlled automatically. To activate:
1. Press the “AUTO” button. The “FULL AUTO” indicator light illuminates on the climate control display.
2. Set the preferred temperature using the temperature control arrows. Another method would be to touch the climate control button, then use the touch buttons or slide bar to
adjust the temperature.
If you operate any of the buttons other than “ON/OFF”, rear window defogger, front
defroster, “SYNC”, or the temperature buttons, the “FULL” indicator light will turn off, the
"Auto" will display in the screen button. You can then manually control the system as
desired. Press the “AUTO” button to change back to “FULL AUTO” mode if the
customizable button is programmed to “Auto”.
GETTING COMFORTABLE
20
Page 23 of 132
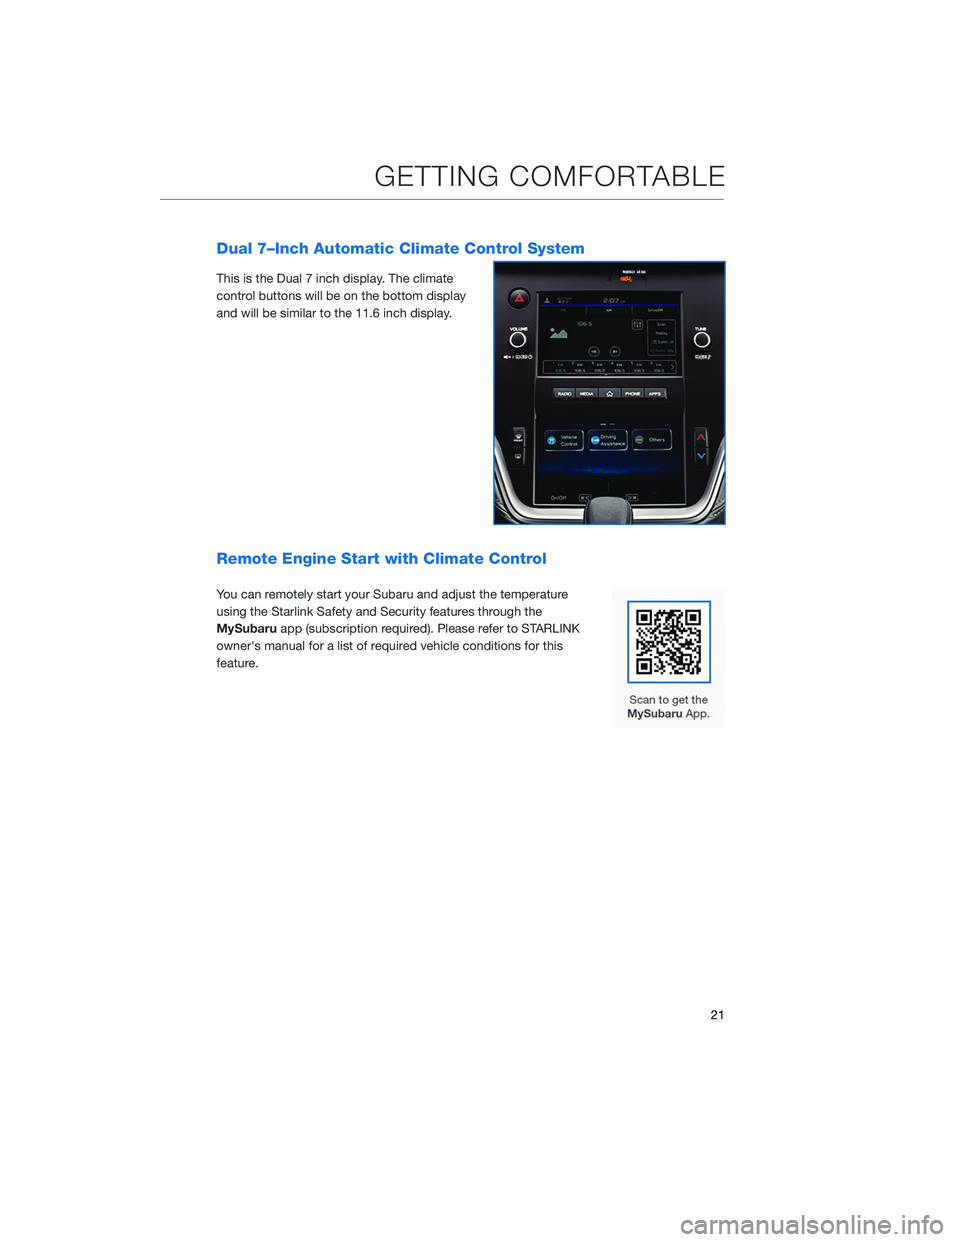
Dual 7–Inch Automatic Climate Control System
This is the Dual 7 inch display. The climate
control buttons will be on the bottom display
and will be similar to the 11.6 inch display.
Remote Engine Start with Climate Control
You can remotely start your Subaru and adjust the temperature
using the Starlink Safety and Security features through the
MySubaruapp (subscription required). Please refer to STARLINK
owner's manual for a list of required vehicle conditions for this
feature.
GETTING COMFORTABLE
21
Page 27 of 132
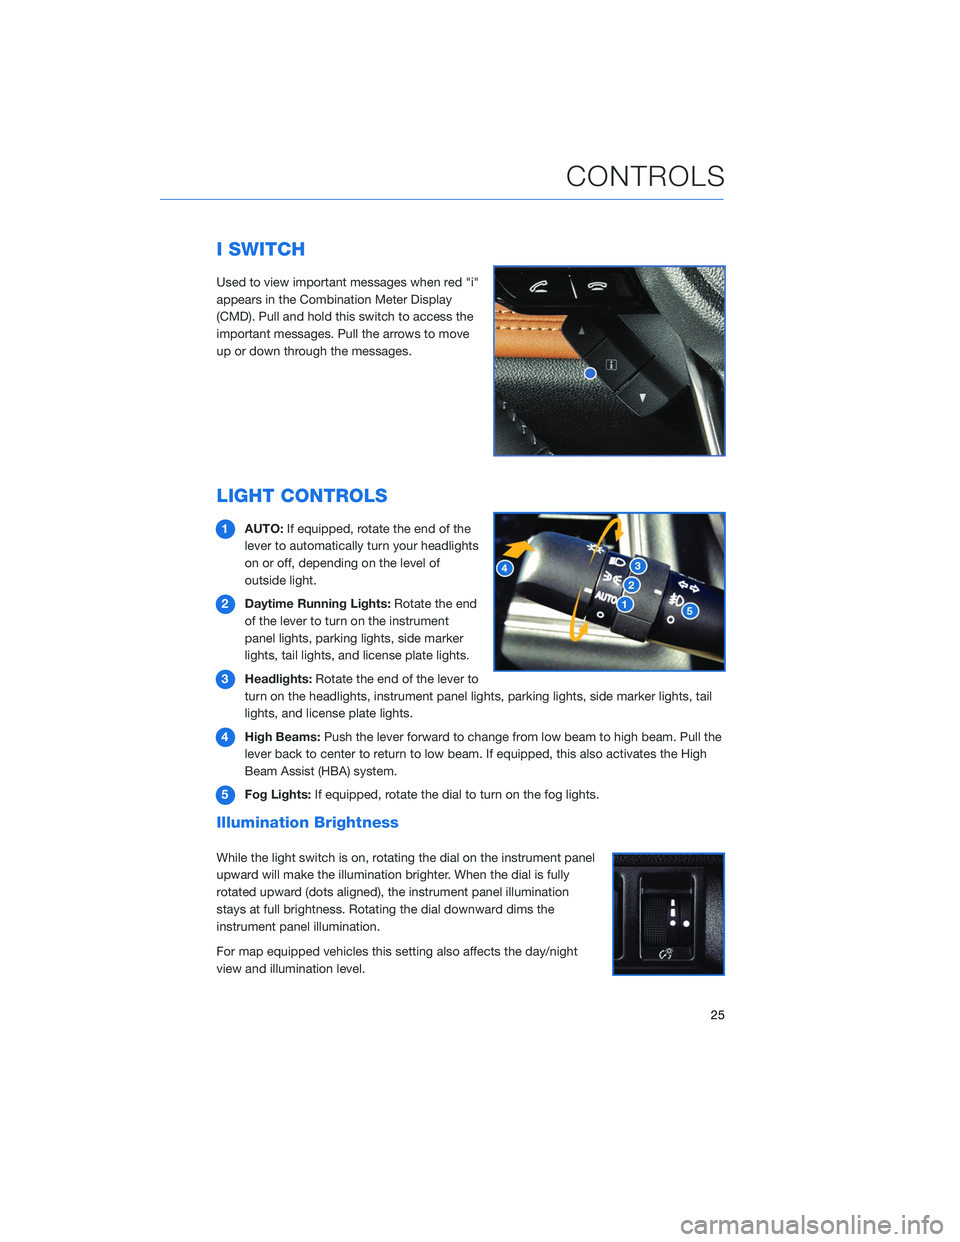
I SWITCH
Used to view important messages when red "i"
appears in the Combination Meter Display
(CMD). Pull and hold this switch to access the
important messages. Pull the arrows to move
up or down through the messages.
LIGHT CONTROLS
1AUTO: If equipped, rotate the end of the
lever to automatically turn your headlights
on or off, depending on the level of
outside light.
2 Daytime Running Lights: Rotate the end
of the lever to turn on the instrument
panel lights, parking lights, side marker
lights, tail lights, and license plate lights.
3 Headlights: Rotate the end of the lever to
turn on the headlights, instrument panel lights, parking lights, side marker lights, tail
lights, and license plate lights.
4 High Beams: Push the lever forward to change from low beam to high beam. Pull the
lever back to center to return to low beam. If equipped, this also activates the High
Beam Assist (HBA) system.
5 Fog Lights: If equipped, rotate the dial to turn on the fog lights.
Illumination Brightness
While the light switch is on, rotating the dial on the instrument panel
upward will make the illumination brighter. When the dial is fully
rotated upward (dots aligned), the instrument panel illumination
stays at full brightness. Rotating the dial downward dims the
instrument panel illumination.
For map equipped vehicles this setting also affects the day/night
view and illumination level.
CONTROLS
25
Page 31 of 132
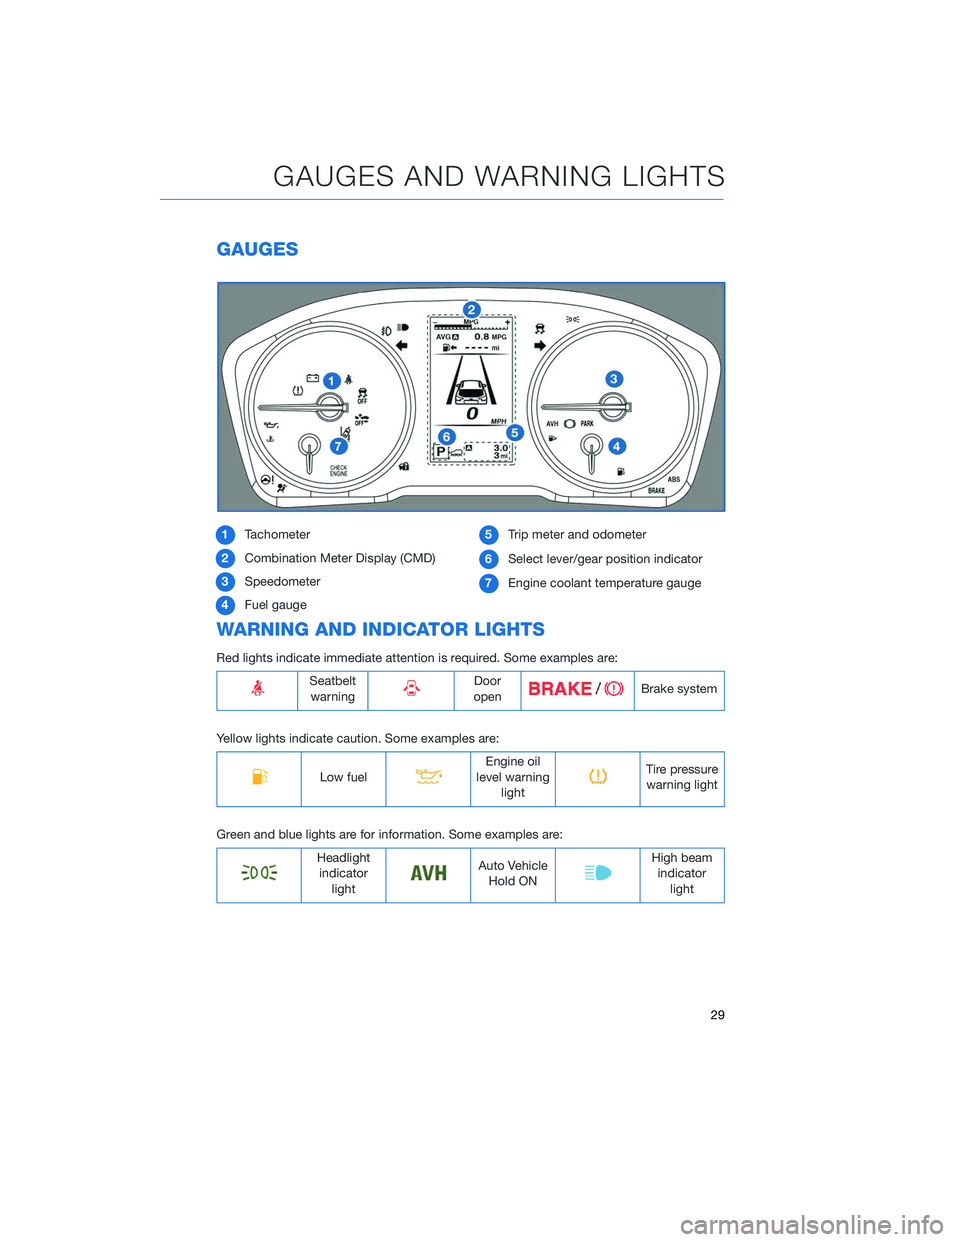
GAUGES
1Tachometer
2 Combination Meter Display (CMD)
3 Speedometer
4 Fuel gauge 5
Trip meter and odometer
6 Select lever/gear position indicator
7 Engine coolant temperature gauge
WARNING AND INDICATOR LIGHTS
Red lights indicate immediate attention is required. Some examples are:
Seatbelt
warningDoor
openBrake system
Yellow lights indicate caution. Some examples are:
Low fuelEngine oil
level warning lightTire pressurewarning light
Green and blue lights are for information. Some examples are:
Headlight indicator lightAuto VehicleHold ONHigh beamindicator light
GAUGES AND WARNING LIGHTS
29
Page 33 of 132
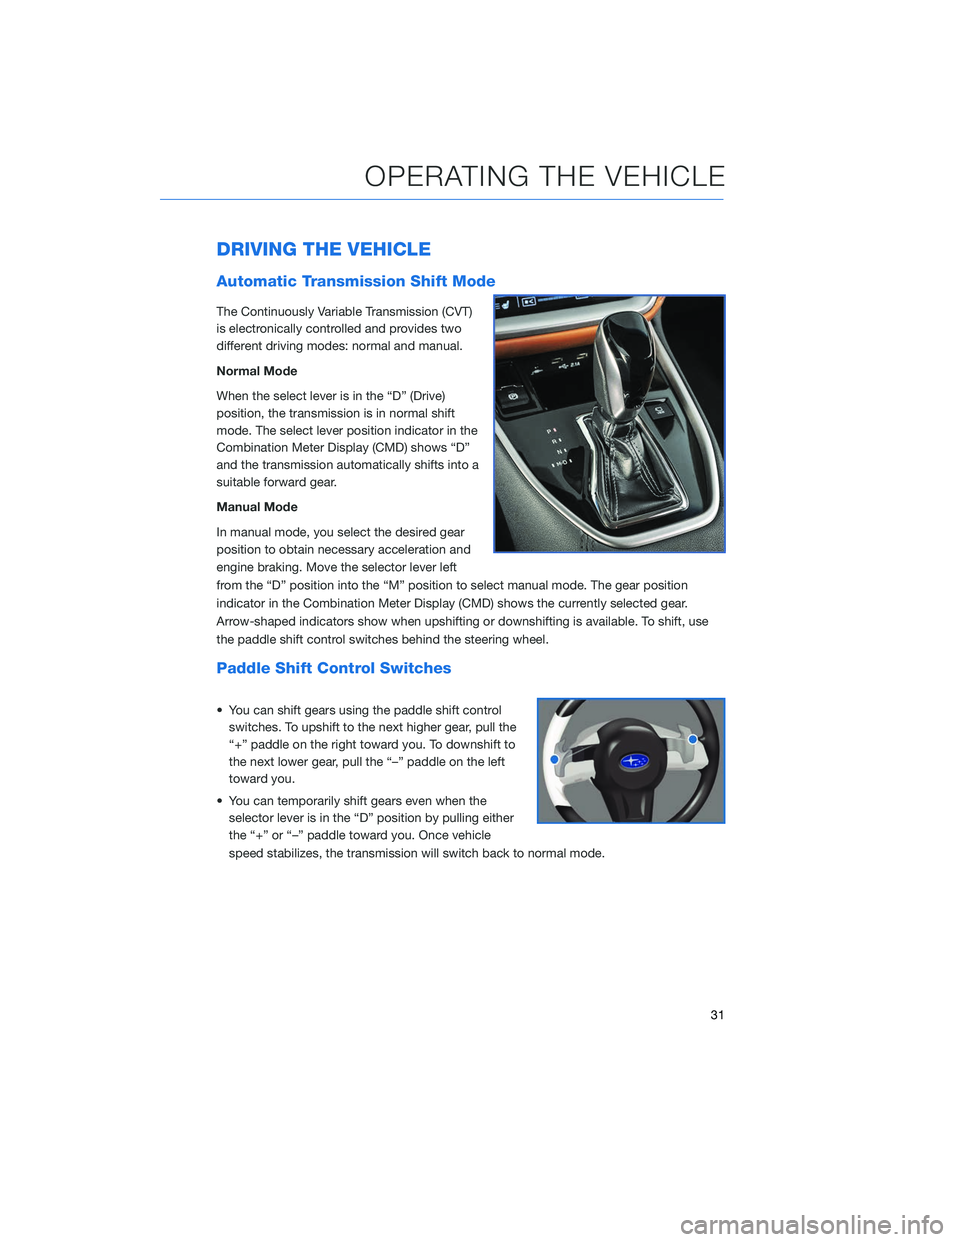
DRIVING THE VEHICLE
Automatic Transmission Shift Mode
The Continuously Variable Transmission (CVT)
is electronically controlled and provides two
different driving modes: normal and manual.
Normal Mode
When the select lever is in the “D” (Drive)
position, the transmission is in normal shift
mode. The select lever position indicator in the
Combination Meter Display (CMD) shows “D”
and the transmission automatically shifts into a
suitable forward gear.
Manual Mode
In manual mode, you select the desired gear
position to obtain necessary acceleration and
engine braking. Move the selector lever left
from the “D” position into the “M” position to select manual mode. The gear position
indicator in the Combination Meter Display (CMD) shows the currently selected gear.
Arrow-shaped indicators show when upshifting or downshifting is available. To shift, use
the paddle shift control switches behind the steering wheel.
Paddle Shift Control Switches
• You can shift gears using the paddle shift controlswitches. To upshift to the next higher gear, pull the
“+” paddle on the right toward you. To downshift to
the next lower gear, pull the “–” paddle on the left
toward you.
• You can temporarily shift gears even when the selector lever is in the “D” position by pulling either
the “+” or “–” paddle toward you. Once vehicle
speed stabilizes, the transmission will switch back to normal mode.
OPERATING THE VEHICLE
31
Page 34 of 132
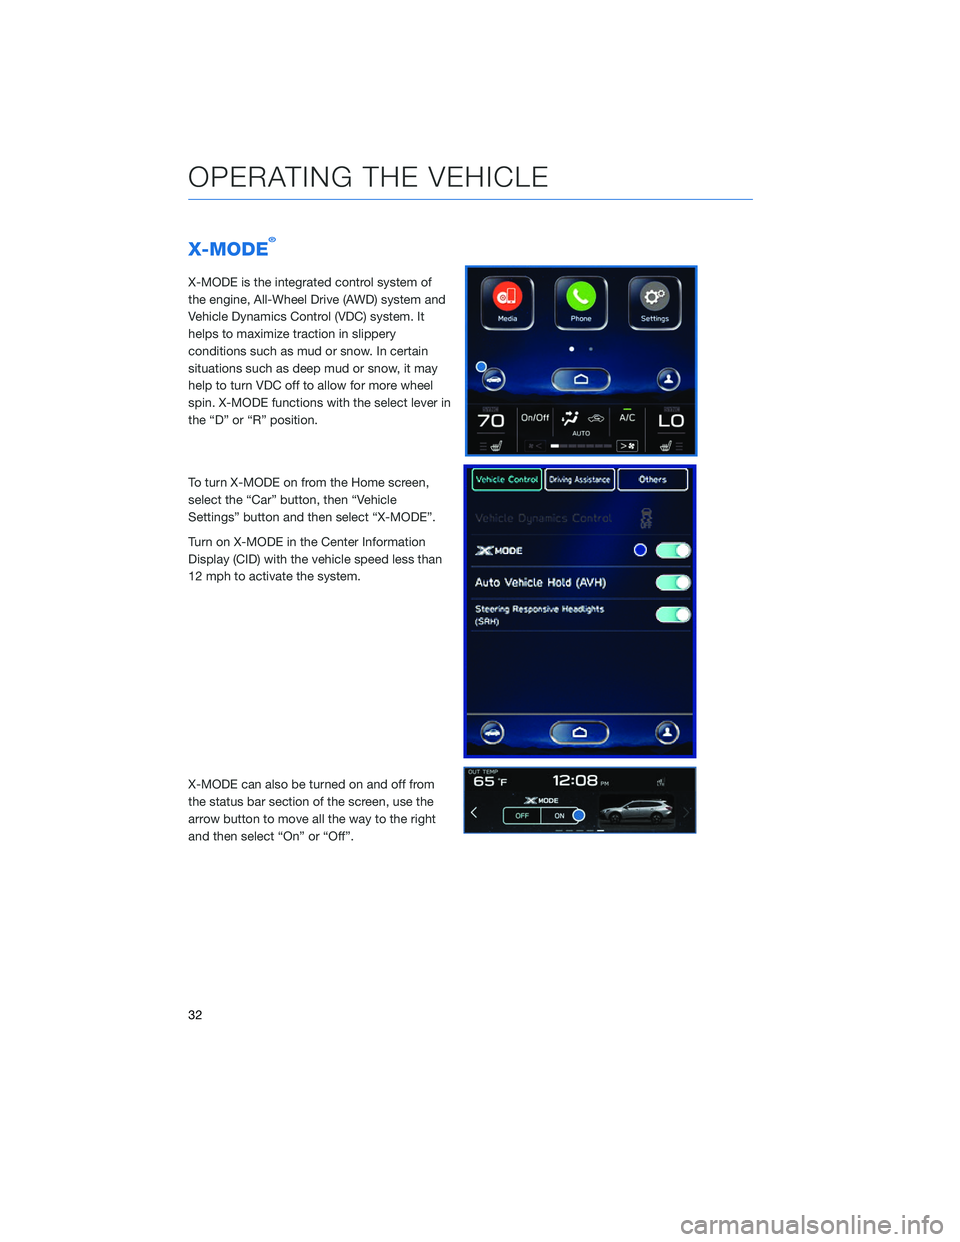
X-MODE®
X-MODE is the integrated control system of
the engine, All-Wheel Drive (AWD) system and
Vehicle Dynamics Control (VDC) system. It
helps to maximize traction in slippery
conditions such as mud or snow. In certain
situations such as deep mud or snow, it may
help to turn VDC off to allow for more wheel
spin. X-MODE functions with the select lever in
the “D” or “R” position.
To turn X-MODE on from the Home screen,
select the “Car” button, then “Vehicle
Settings” button and then select “X-MODE”.
Turn on X-MODE in the Center Information
Display (CID) with the vehicle speed less than
12 mph to activate the system.
X-MODE can also be turned on and off from
the status bar section of the screen, use the
arrow button to move all the way to the right
and then select “On” or “Off”.
OPERATING THE VEHICLE
32
Page 37 of 132
AUTO START–STOP SYSTEM
The Auto Start-Stop system is designed to automatically stop and restart the engine when
the vehicle is stationary for a short period of time (while waiting for a traffic light or in a
traffic jam) after the engine has warmed up. The system operates in order to reduce fuel
consumption, exhaust emissions and undesired idling noise.
System Operation
So that it can be used safely and comfortably, in addition to driver operations, the Auto
Start-Stop system is designed to constantly monitor the vehicle conditions as well as the
environment inside and outside the vehicle, in order to control stopping and restarting of
the engine.
After the vehicle has been completely stopped by depressing the brake pedal
with the select lever in the “D” position, the engine will be automatically
stopped.
If you release the brake pedal with the select lever kept in the “D” position, the
engine will be automatically restarted.
Auto Vehicle Hold (AVH) also integrates seamlessly with Auto Start-Stop functions. With
AVH, the parking brake automatically applies, so you can sit without your foot on the brake
pedal. To restart the engine, just gently press down on the accelerator pedal.
If the engine is temporarily stopped by the system, the Auto Start-Stop indicator light on
the combination meter will illuminate in green. This indicator light will turn off when the
system restarts the engine.
There are several operating conditions for this system to operate as intended. Please refer
to the Owner’s Manual for further information.
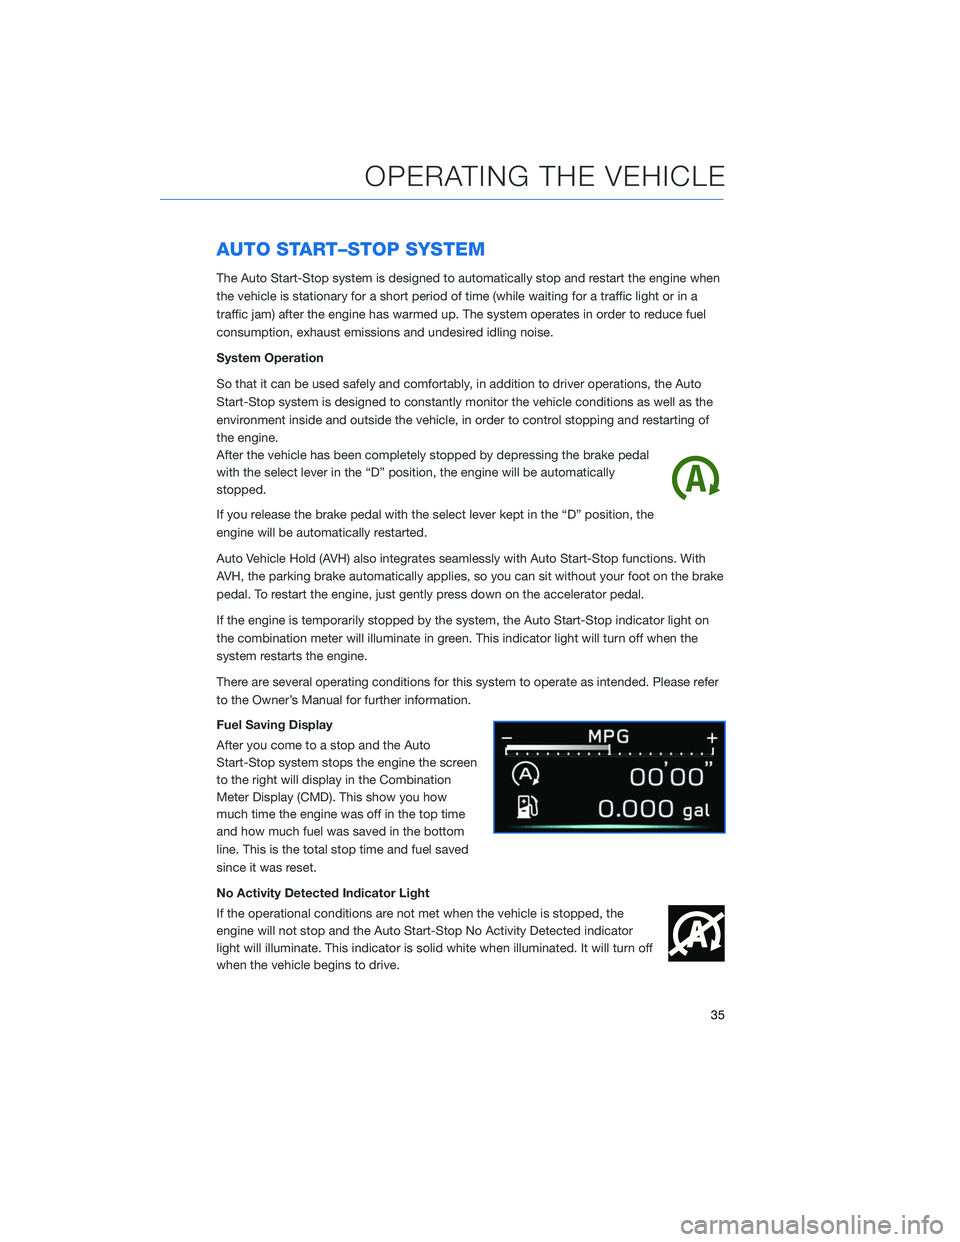
Fuel Saving Display
After you come to a stop and the Auto
Start-Stop system stops the engine the screen
to the right will display in the Combination
Meter Display (CMD). This show you how
much time the engine was off in the top time
and how much fuel was saved in the bottom
line. This is the total stop time and fuel saved
since it was reset.
No Activity Detected Indicator Light
If the operational conditions are not met when the vehicle is stopped, the
engine will not stop and the Auto Start-Stop No Activity Detected indicator
light will illuminate. This indicator is solid white when illuminated. It will turn off
when the vehicle begins to drive.
OPERATING THE VEHICLE
35