turn SUBARU OUTBACK 2022 Getting Started Guide
[x] Cancel search | Manufacturer: SUBARU, Model Year: 2022, Model line: OUTBACK, Model: SUBARU OUTBACK 2022Pages: 172, PDF Size: 58.6 MB
Page 3 of 172
PURPOSE OF THIS GUIDE
WELCOME................. 4
IMPORTANT SAFETY
INFORMATION.............. 4
OWNER’S RESOURCES....... 4
IN CASE OF EMERGENCY..... 5
TOWING YOUR ALL-WHEEL
DRIVE SUBARU............. 6
ENTRY AND EXIT
KEYLESS ENTRY............ 7
KEYLESS ACCESS WITH
PUSH BUTTON START....... 8
POWER REAR GATE (PRG)....10
INSTRUMENT PANEL........14
GETTING COMFORTABLE
SEATING...................16
TILT AND TELESCOPIC
STEERING COLUMN.........19
POWER EXTERIOR MIRRORS . . . 20
REAR VIEW MIRROR.........22
POWER WINDOWS..........23
CENTER CONSOLE
STORAGE..................23
POWER MOONROOF........24
CLIMATE CONTROL..........25
ACCESSORY CONNECTIONS . . . 33
CONTROLS
INSTRUMENT PANEL SWITCHES
(LOWER LEFT)..............34
AUDIO CONTROLS...........34
ADVANCED ADAPTIVE CRUISE
CONTROL..................35
I SWITCH...................35
LIGHT CONTROLS...........36
TURN SIGNALS.............37
WINDSHIELD WIPERS........37
REAR WINDOW WIPER.......38
OVERHEAD CONSOLE........39
GAUGES AND WARNING
LIGHTS
COMBINATION METER.......40
WARNING AND INDICATOR
LIGHTS....................41
OPERATING THE VEHICLE
IGNITION SWITCH...........42
PUSH-BUTTON IGNITION
SWITCH...................42
STARTING THE VEHICLE......42
DRIVING THE VEHICLE.......43
AUTO START–STOP..........44
ELECTRONIC PARKING BRAKE
(EPB).....................46
X-MODE
®..................48
TURNING OFF THE VEHICLE...50
TABLE OF CONTENTS
Page 15 of 172
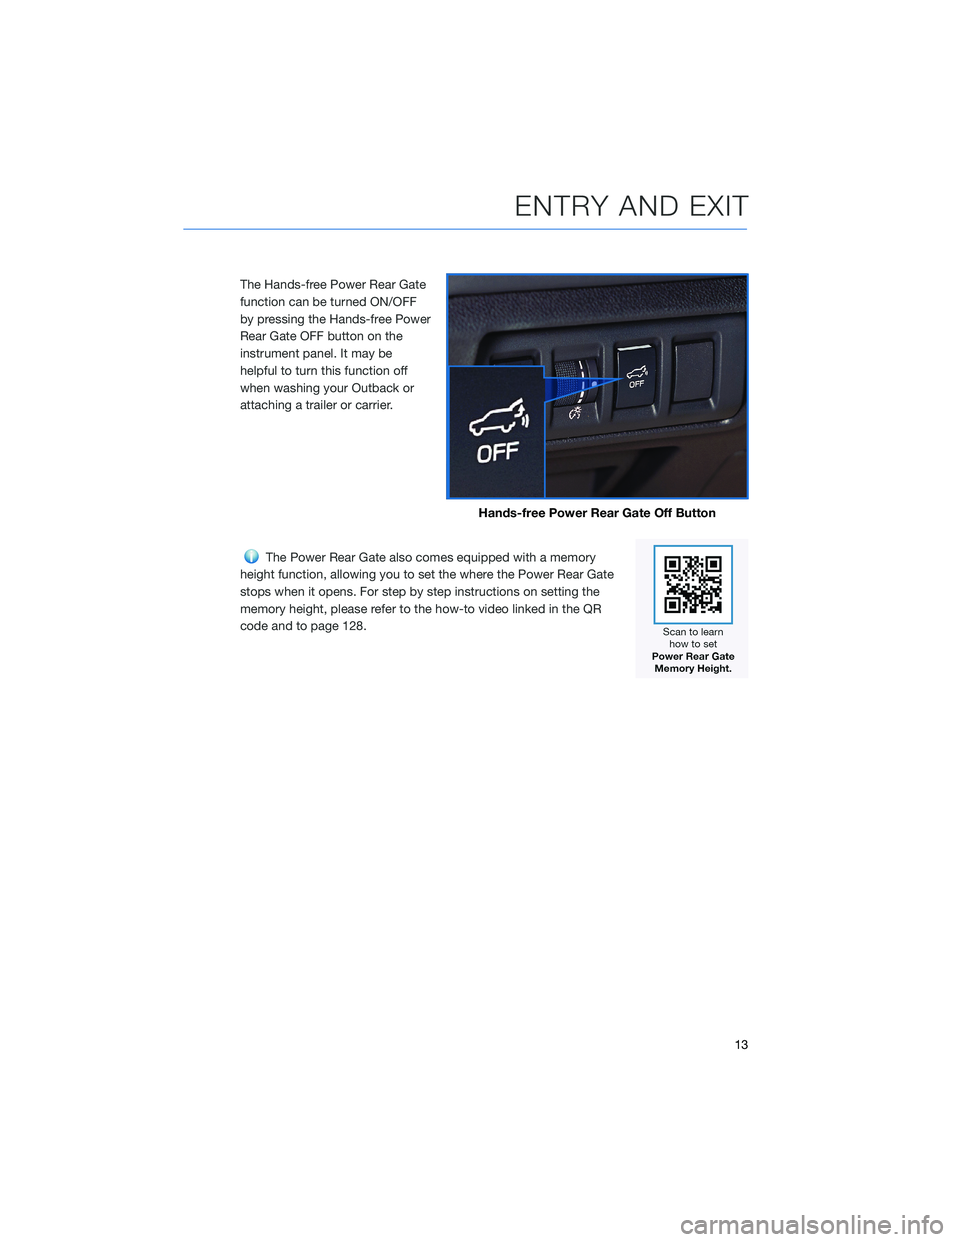
The Hands-free Power Rear Gate
function can be turned ON/OFF
by pressing the Hands-free Power
Rear Gate OFF button on the
instrument panel. It may be
helpful to turn this function off
when washing your Outback or
attaching a trailer or carrier.
The Power Rear Gate also comes equipped with a memory
height function, allowing you to set the where the Power Rear Gate
stops when it opens. For step by step instructions on setting the
memory height, please refer to the how-to video linked in the QR
code and to page 128.
Hands-free Power Rear Gate Off Button
ENTRY AND EXIT
13
Page 20 of 172
Head Restraint Adjustment
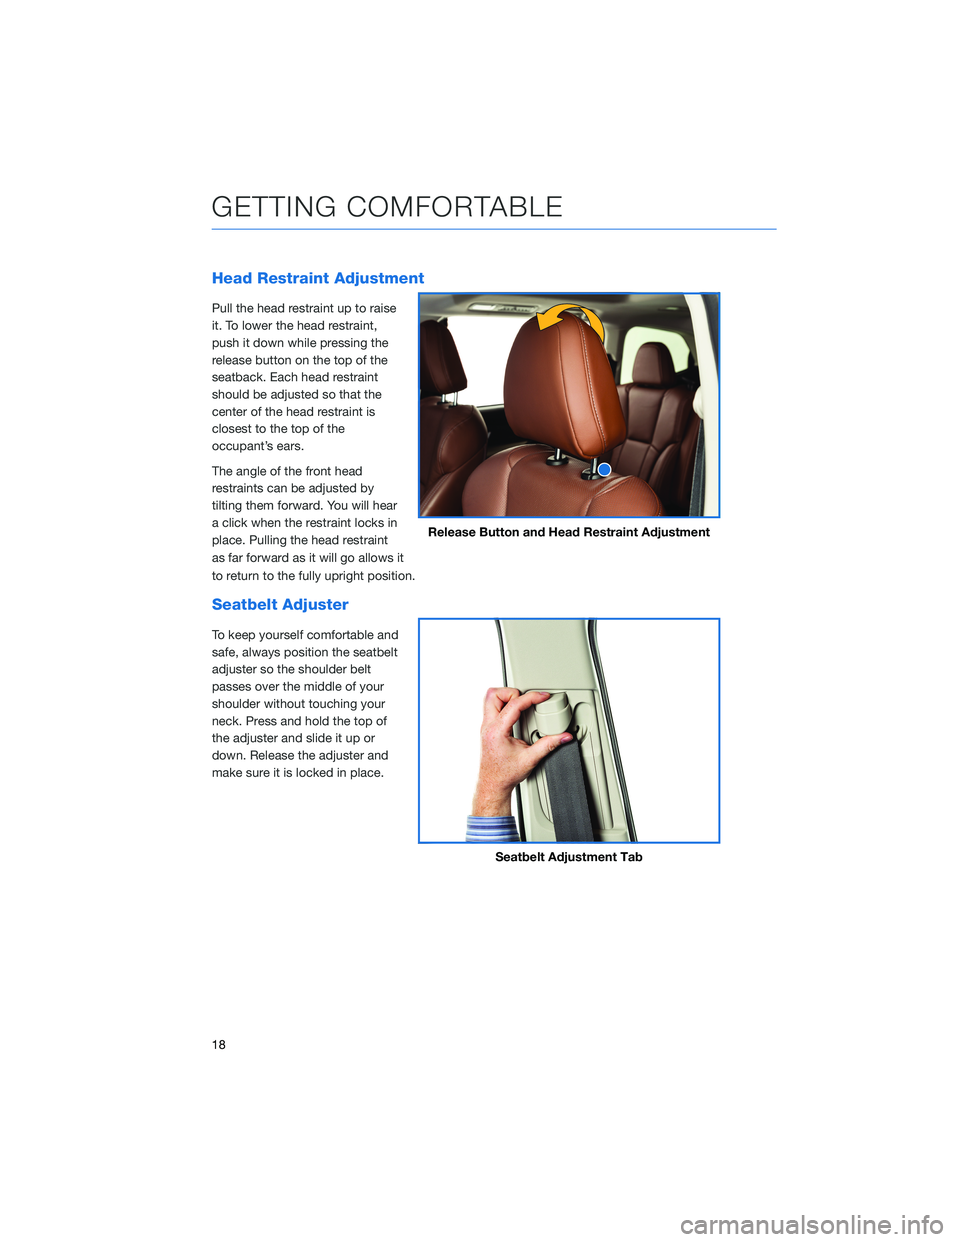
Pull the head restraint up to raise
it. To lower the head restraint,
push it down while pressing the
release button on the top of the
seatback. Each head restraint
should be adjusted so that the
center of the head restraint is
closest to the top of the
occupant’s ears.
The angle of the front head
restraints can be adjusted by
tilting them forward. You will hear
a click when the restraint locks in
place. Pulling the head restraint
as far forward as it will go allows it
to return to the fully upright position.
Seatbelt Adjuster
To keep yourself comfortable and
safe, always position the seatbelt
adjuster so the shoulder belt
passes over the middle of your
shoulder without touching your
neck. Press and hold the top of
the adjuster and slide it up or
down. Release the adjuster and
make sure it is locked in place.
Release Button and Head Restraint Adjustment
Seatbelt Adjustment Tab
GETTING COMFORTABLE
18
Page 22 of 172
POWER EXTERIOR MIRRORS
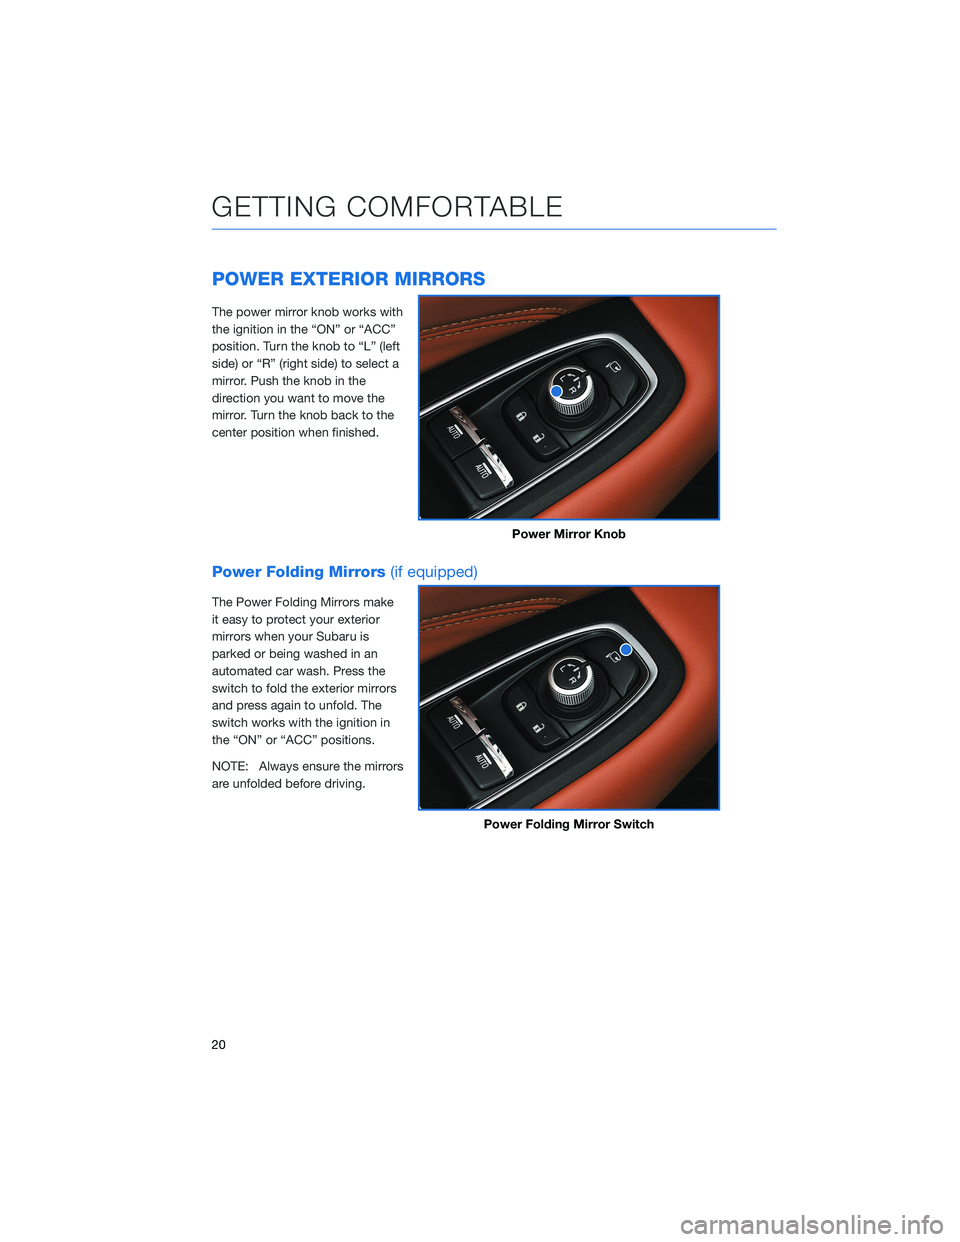
The power mirror knob works with
the ignition in the “ON” or “ACC”
position. Turn the knob to “L” (left
side) or “R” (right side) to select a
mirror. Push the knob in the
direction you want to move the
mirror. Turn the knob back to the
center position when finished.
Power Folding Mirrors(if equipped)
The Power Folding Mirrors make
it easy to protect your exterior
mirrors when your Subaru is
parked or being washed in an
automated car wash. Press the
switch to fold the exterior mirrors
and press again to unfold. The
switch works with the ignition in
the “ON” or “ACC” positions.
NOTE: Always ensure the mirrors
are unfolded before driving.
Power Mirror Knob
Power Folding Mirror Switch
GETTING COMFORTABLE
20
Page 23 of 172
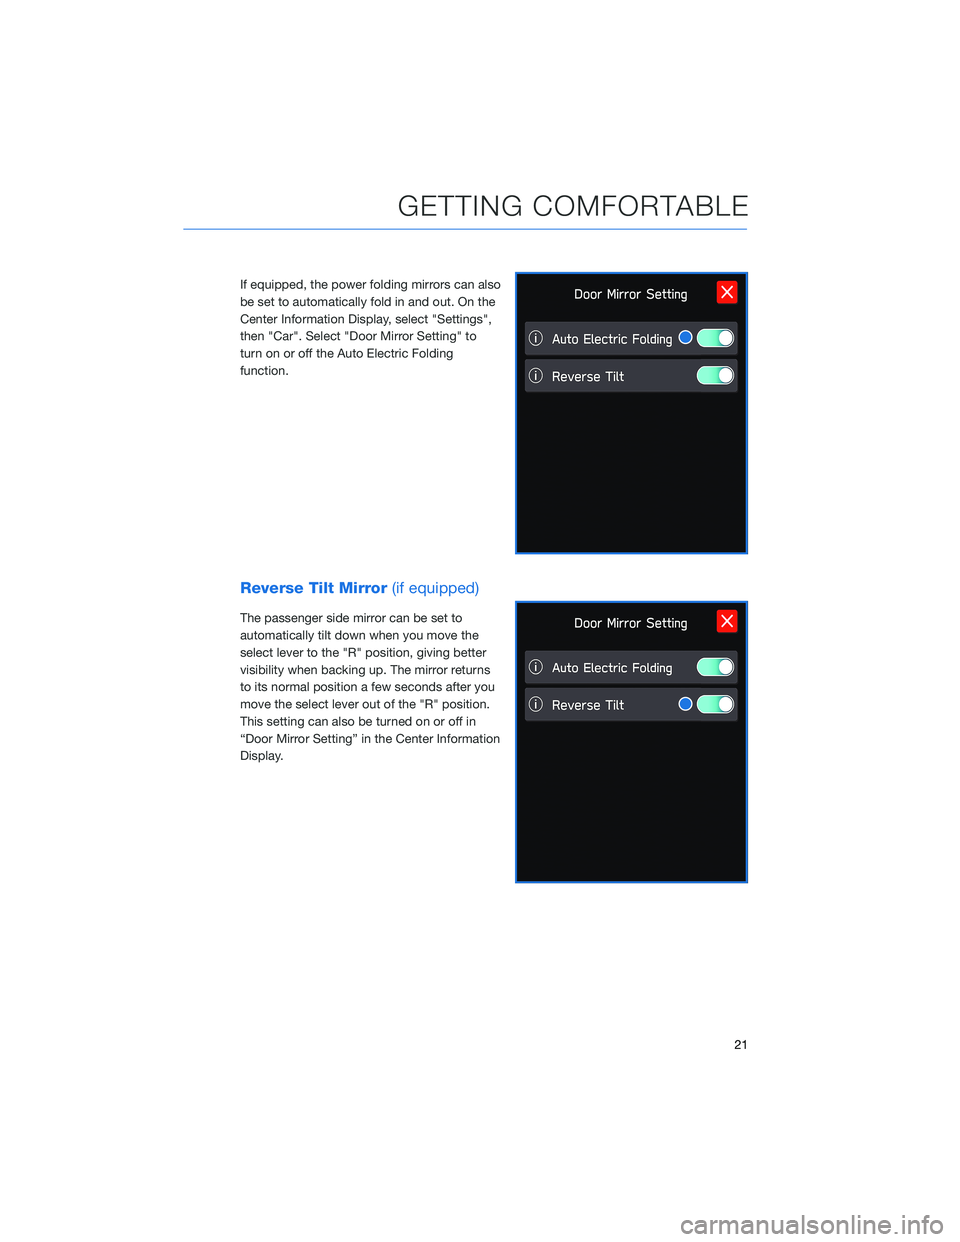
If equipped, the power folding mirrors can also
be set to automatically fold in and out. On the
Center Information Display, select "Settings",
then "Car". Select "Door Mirror Setting" to
turn on or off the Auto Electric Folding
function.
Reverse Tilt Mirror(if equipped)
The passenger side mirror can be set to
automatically tilt down when you move the
select lever to the "R" position, giving better
visibility when backing up. The mirror returns
to its normal position a few seconds after you
move the select lever out of the "R" position.
This setting can also be turned on or off in
“Door Mirror Setting” in the Center Information
Display.
GETTING COMFORTABLE
21
Page 24 of 172
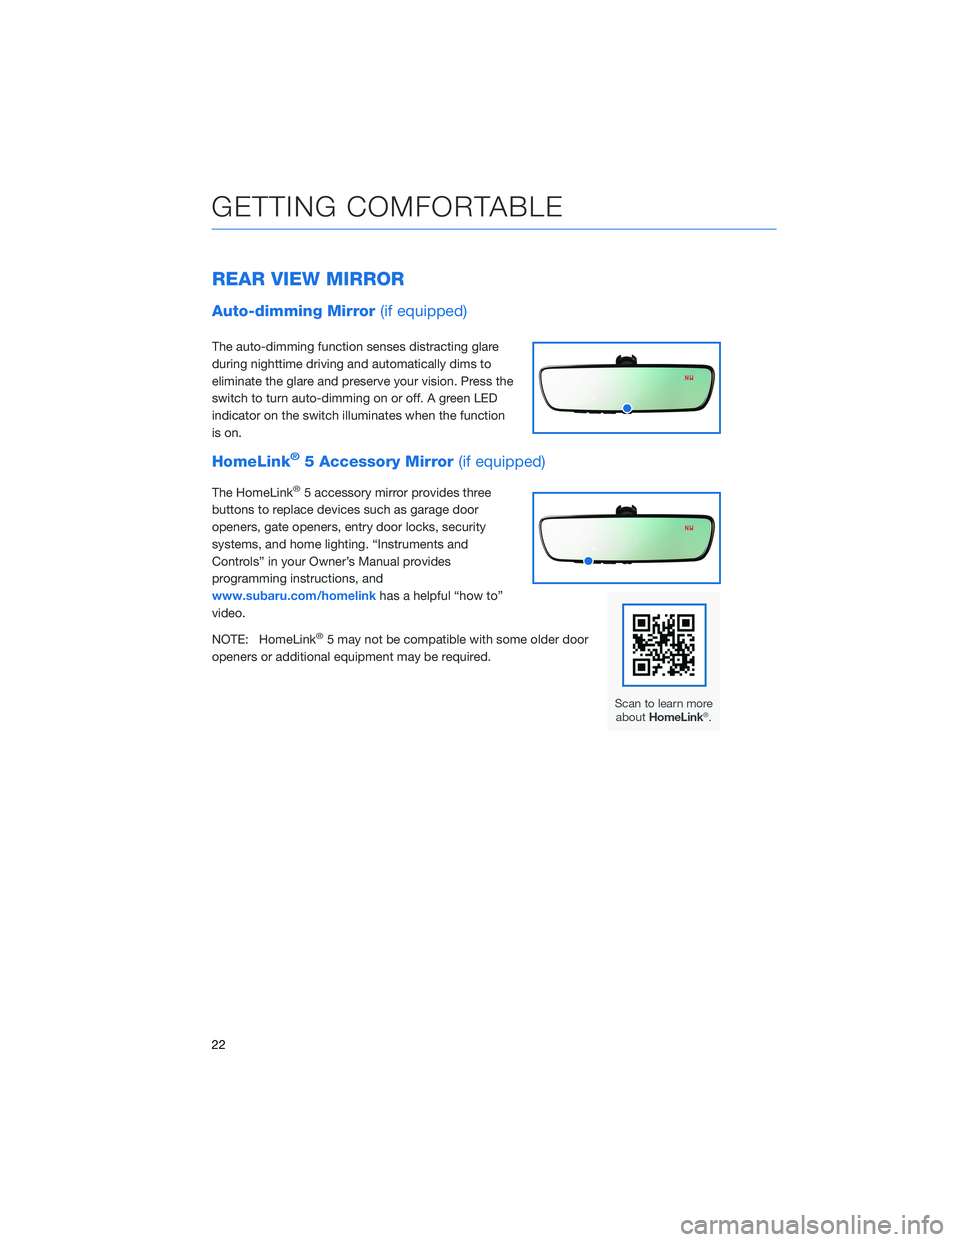
REAR VIEW MIRROR
Auto-dimming Mirror(if equipped)
The auto-dimming function senses distracting glare
during nighttime driving and automatically dims to
eliminate the glare and preserve your vision. Press the
switch to turn auto-dimming on or off. A green LED
indicator on the switch illuminates when the function
is on.
HomeLink®5 Accessory Mirror(if equipped)
The HomeLink®5 accessory mirror provides three
buttons to replace devices such as garage door
openers, gate openers, entry door locks, security
systems, and home lighting. “Instruments and
Controls” in your Owner’s Manual provides
programming instructions, and
www.subaru.com/homelinkhas a helpful “how to”
video.
NOTE: HomeLink
®5 may not be compatible with some older door
openers or additional equipment may be required.
GETTING COMFORTABLE
22
Page 28 of 172
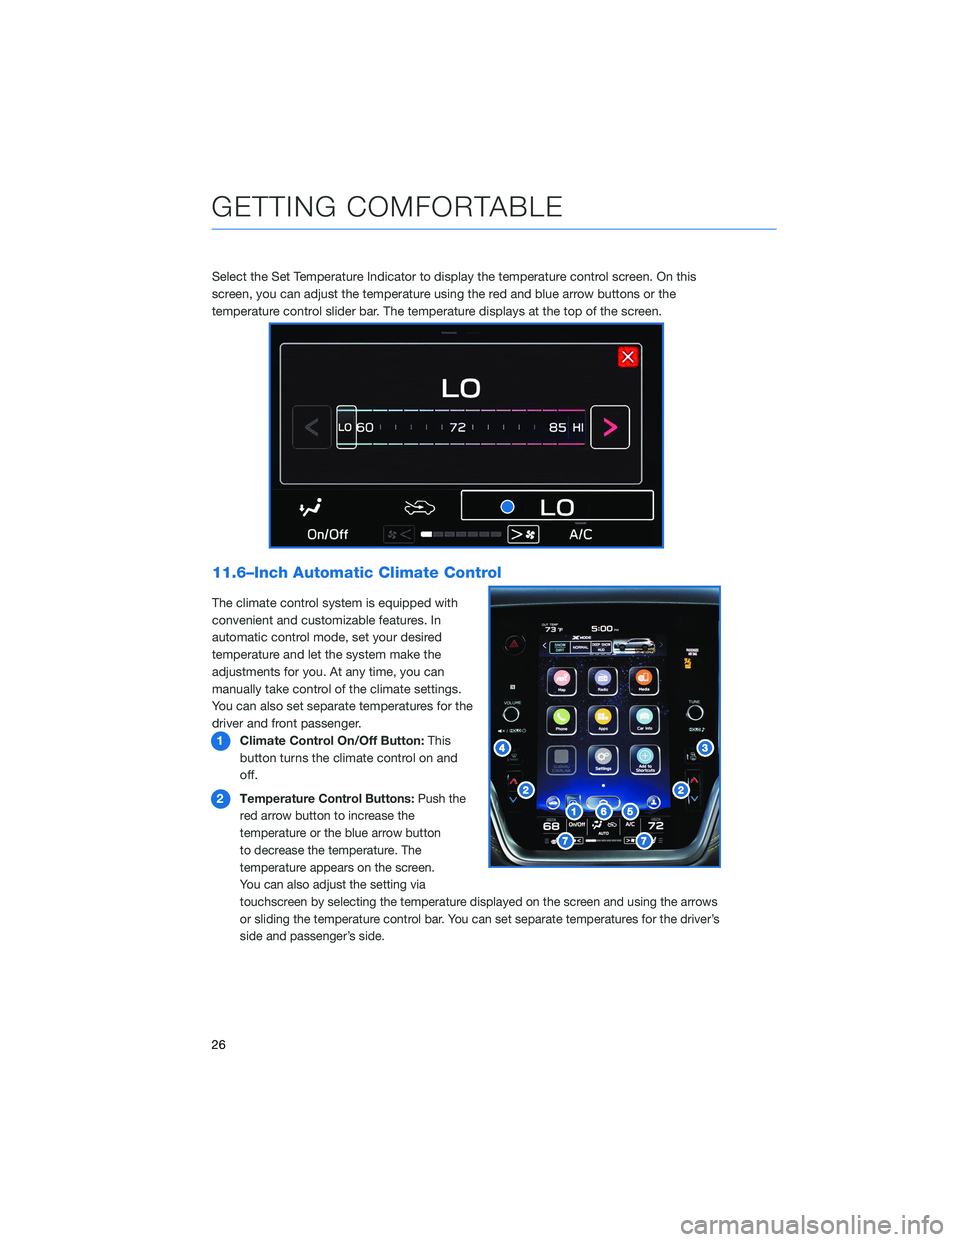
Select the Set Temperature Indicator to display the temperature control screen. On this
screen, you can adjust the temperature using the red and blue arrow buttons or the
temperature control slider bar. The temperature displays at the top of the screen.
11.6–Inch Automatic Climate Control
The climate control system is equipped with
convenient and customizable features. In
automatic control mode, set your desired
temperature and let the system make the
adjustments for you. At any time, you can
manually take control of the climate settings.
You can also set separate temperatures for the
driver and front passenger.
1Climate Control On/Off Button:This
button turns the climate control on and
off.
2
Temperature Control Buttons:Push the
red arrow button to increase the
temperature or the blue arrow button
to decrease the temperature. The
temperature appears on the screen.
You can also adjust the setting via
touchscreen by selecting the temperature displayed on the screen and using the arrows
or sliding the temperature control bar. You can set separate temperatures for the driver’s
side and passenger’s side.
GETTING COMFORTABLE
26
Page 29 of 172
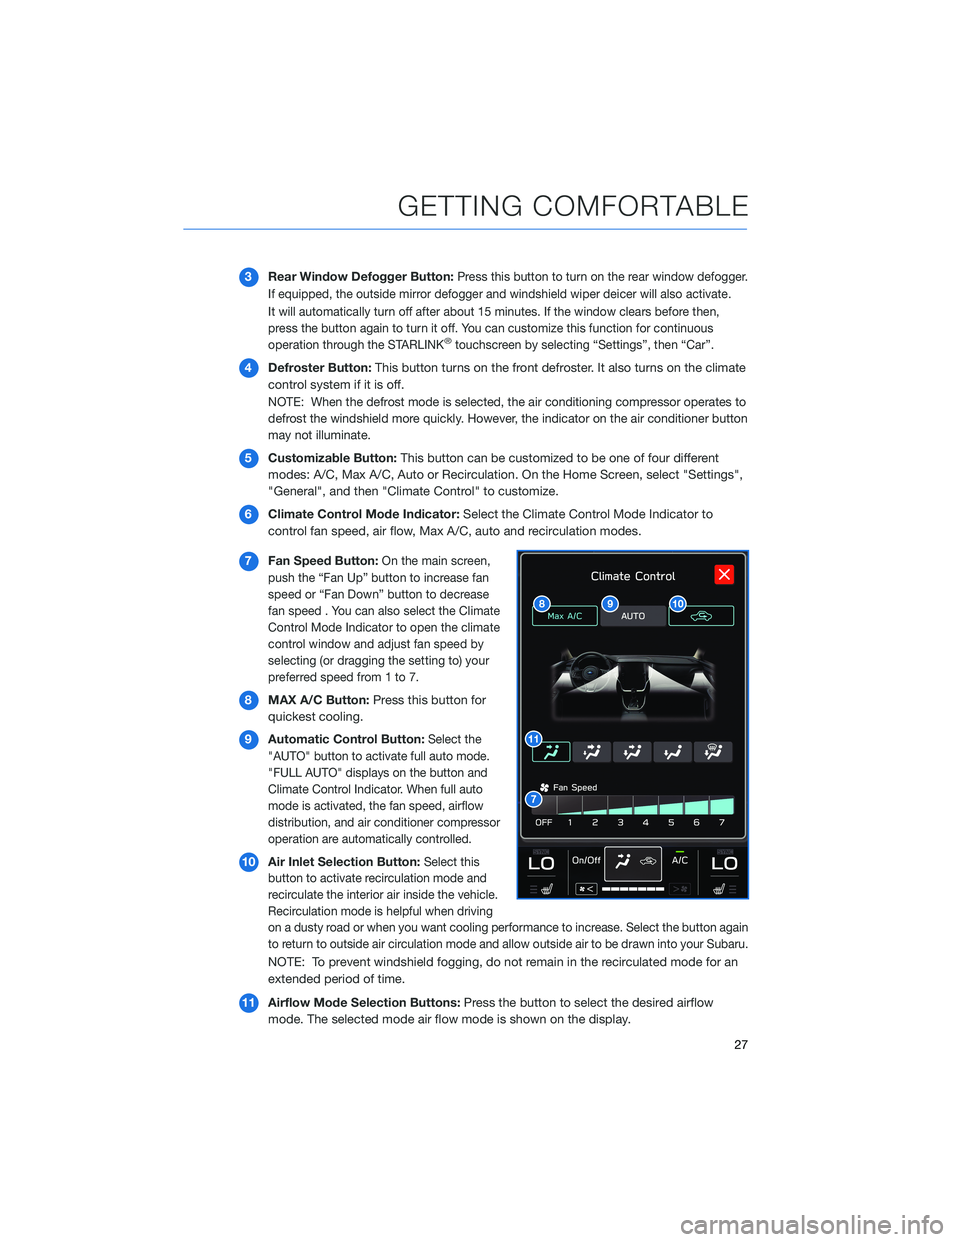
3Rear Window Defogger Button:Press this button to turn on the rear window defogger.
If equipped, the outside mirror defogger and windshield wiper deicer will also activate.
It will automatically turn off after about 15 minutes. If the window clears before then,
press the button again to turn it off. You can customize this function for continuous
operation through the STARLINK
®touchscreen by selecting “Settings”, then “Car”.
4Defroster Button:This button turns on the front defroster. It also turns on the climate
control system if it is off.
NOTE: When the defrost mode is selected, the air conditioning compressor operates to
defrost the windshield more quickly. However, the indicator on the air conditioner button
may not illuminate.
5Customizable Button:This button can be customized to be one of four different
modes: A/C, Max A/C, Auto or Recirculation. On the Home Screen, select "Settings",
"General", and then "Climate Control" to customize.
6Climate Control Mode Indicator:Select the Climate Control Mode Indicator to
control fan speed, air flow, Max A/C, auto and recirculation modes.
7Fan Speed Button:
On the main screen,
push the “Fan Up” button to increase fan
speed or “Fan Down” button to decrease
fan speed . You can also select the Climate
Control Mode Indicator to open the climate
control window and adjust fan speed by
selecting (or dragging the setting to) your
preferred speed from 1 to 7.
8MAX A/C Button:Press this button for
quickest cooling.
9Automatic Control Button:
Select the
"AUTO" button to activate full auto mode.
"FULL AUTO" displays on the button and
Climate Control Indicator. When full auto
mode is activated, the fan speed, airflow
distribution, and air conditioner compressor
operation are automatically controlled.
10Air Inlet Selection Button:Select this
button to activate recirculation mode and
recirculate the interior air inside the vehicle.
Recirculation mode is helpful when driving
on a dusty road or when you want cooling performance to increase. Select the button again
to return to outside air circulation mode and allow outside air to be drawn into your Subaru.
NOTE: To prevent windshield fogging, do not remain in the recirculated mode for an
extended period of time.
11Airflow Mode Selection Buttons:Press the button to select the desired airflow
mode. The selected mode air flow mode is shown on the display.
GETTING COMFORTABLE
27
Page 31 of 172
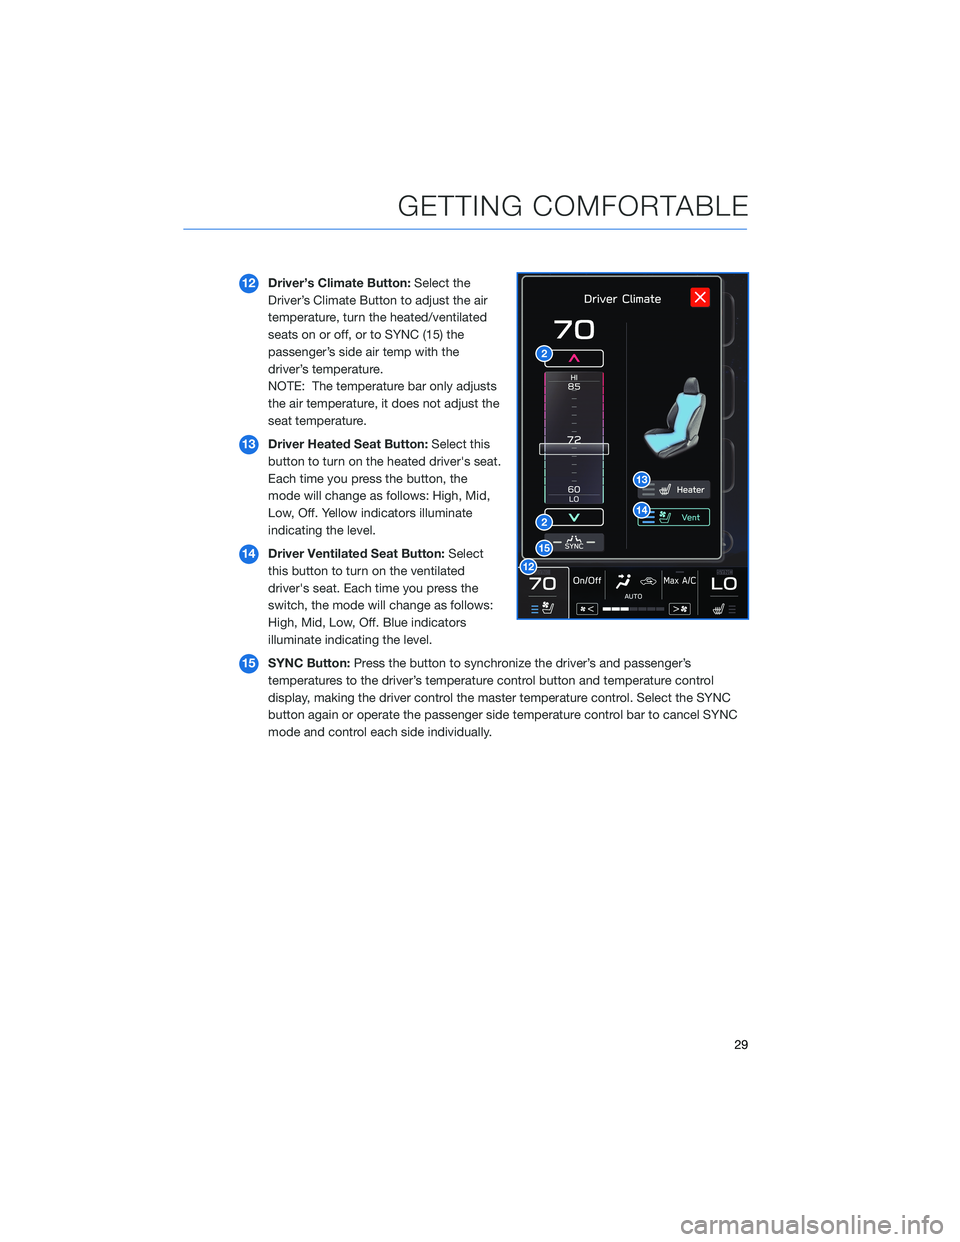
12Driver’s Climate Button:Select the
Driver’s Climate Button to adjust the air
temperature, turn the heated/ventilated
seats on or off, or to SYNC (15) the
passenger’s side air temp with the
driver’s temperature.
NOTE: The temperature bar only adjusts
the air temperature, it does not adjust the
seat temperature.
13Driver Heated Seat Button:Select this
button to turn on the heated driver's seat.
Each time you press the button, the
mode will change as follows: High, Mid,
Low, Off. Yellow indicators illuminate
indicating the level.
14Driver Ventilated Seat Button:Select
this button to turn on the ventilated
driver's seat. Each time you press the
switch, the mode will change as follows:
High, Mid, Low, Off. Blue indicators
illuminate indicating the level.
15SYNC Button:Press the button to synchronize the driver’s and passenger’s
temperatures to the driver’s temperature control button and temperature control
display, making the driver control the master temperature control. Select the SYNC
button again or operate the passenger side temperature control bar to cancel SYNC
mode and control each side individually.
GETTING COMFORTABLE
29
Page 32 of 172
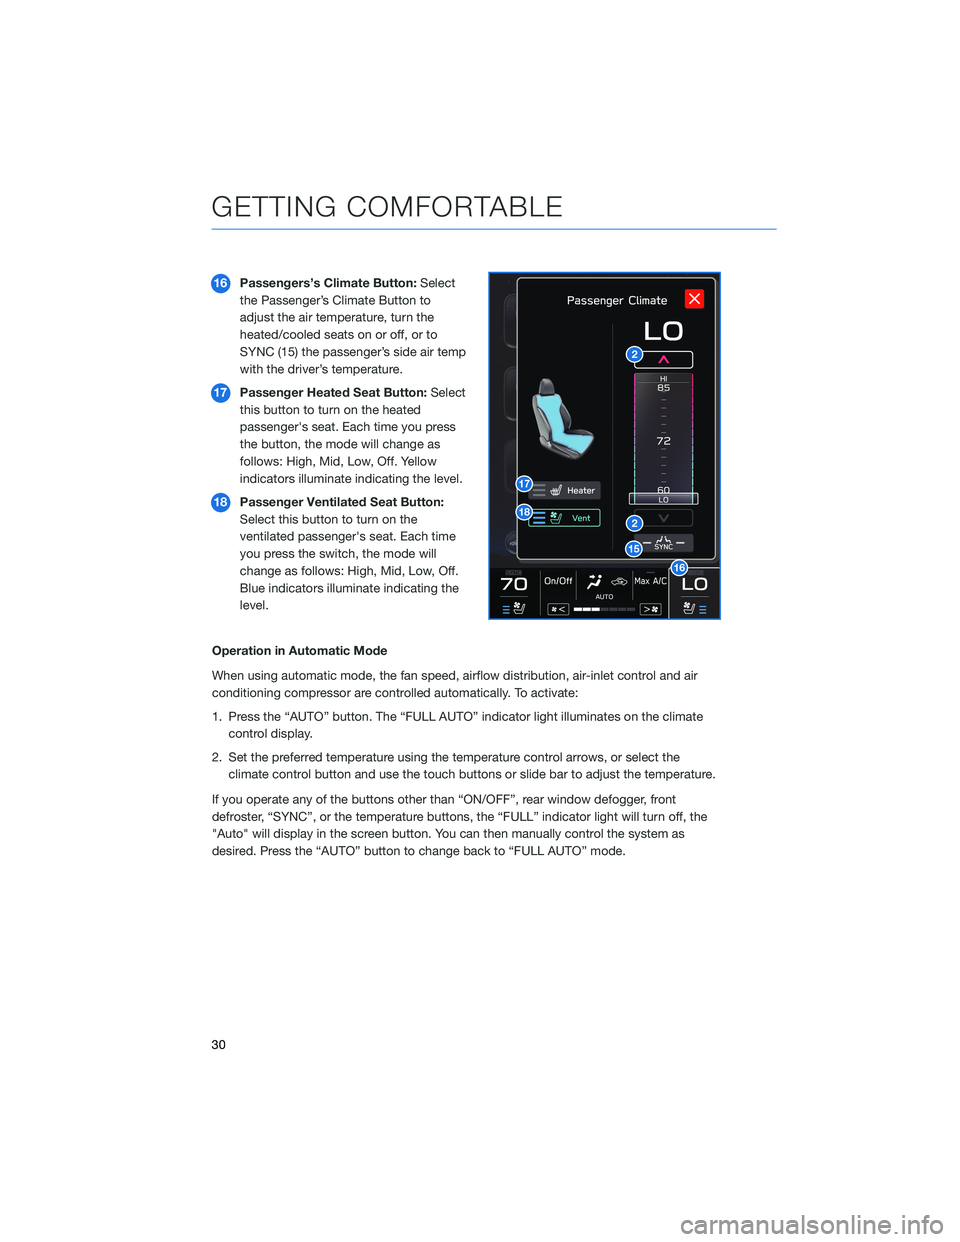
16Passengers’s Climate Button:Select
the Passenger’s Climate Button to
adjust the air temperature, turn the
heated/cooled seats on or off, or to
SYNC (15) the passenger’s side air temp
with the driver’s temperature.
17Passenger Heated Seat Button:Select
this button to turn on the heated
passenger's seat. Each time you press
the button, the mode will change as
follows: High, Mid, Low, Off. Yellow
indicators illuminate indicating the level.
18Passenger Ventilated Seat Button:
Select this button to turn on the
ventilated passenger's seat. Each time
you press the switch, the mode will
change as follows: High, Mid, Low, Off.
Blue indicators illuminate indicating the
level.
Operation in Automatic Mode
When using automatic mode, the fan speed, airflow distribution, air-inlet control and air
conditioning compressor are controlled automatically. To activate:
1. Press the “AUTO” button. The “FULL AUTO” indicator light illuminates on the climate
control display.
2. Set the preferred temperature using the temperature control arrows, or select the
climate control button and use the touch buttons or slide bar to adjust the temperature.
If you operate any of the buttons other than “ON/OFF”, rear window defogger, front
defroster, “SYNC”, or the temperature buttons, the “FULL” indicator light will turn off, the
"Auto" will display in the screen button. You can then manually control the system as
desired. Press the “AUTO” button to change back to “FULL AUTO” mode.
GETTING COMFORTABLE
30