check engine SUBARU TRIBECA 2009 1.G Service Workshop Manual
[x] Cancel search | Manufacturer: SUBARU, Model Year: 2009, Model line: TRIBECA, Model: SUBARU TRIBECA 2009 1.GPages: 2453, PDF Size: 46.32 MB
Page 1374 of 2453
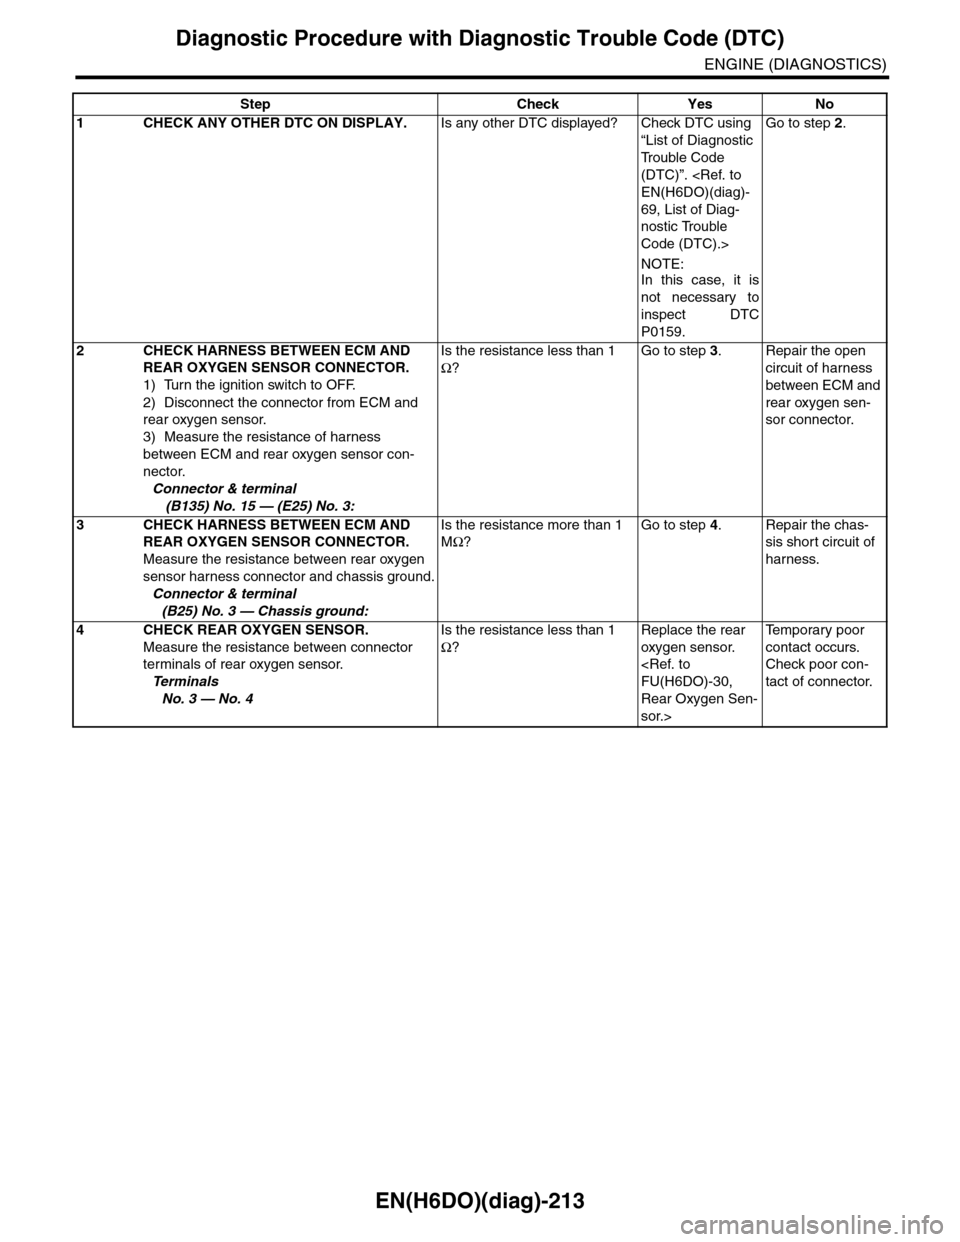
EN(H6DO)(diag)-213
Diagnostic Procedure with Diagnostic Trouble Code (DTC)
ENGINE (DIAGNOSTICS)
Step Check Yes No
1CHECK ANY OTHER DTC ON DISPLAY.Is any other DTC displayed? Check DTC using
“List of Diagnostic
Tr o u b l e C o d e
(DTC)”.
69, List of Diag-
nostic Trouble
Code (DTC).>
NOTE:
In this case, it is
not necessary to
inspect DTC
P0159.
Go to step 2.
2CHECK HARNESS BETWEEN ECM AND
REAR OXYGEN SENSOR CONNECTOR.
1) Turn the ignition switch to OFF.
2) Disconnect the connector from ECM and
rear oxygen sensor.
3) Measure the resistance of harness
between ECM and rear oxygen sensor con-
nector.
Connector & terminal
(B135) No. 15 — (E25) No. 3:
Is the resistance less than 1
Ω?
Go to step 3.Repair the open
circuit of harness
between ECM and
rear oxygen sen-
sor connector.
3CHECK HARNESS BETWEEN ECM AND
REAR OXYGEN SENSOR CONNECTOR.
Measure the resistance between rear oxygen
sensor harness connector and chassis ground.
Connector & terminal
(B25) No. 3 — Chassis ground:
Is the resistance more than 1
MΩ?
Go to step 4.Repair the chas-
sis short circuit of
harness.
4CHECK REAR OXYGEN SENSOR.
Measure the resistance between connector
terminals of rear oxygen sensor.
Te r m i n a l s
No. 3 — No. 4
Is the resistance less than 1
Ω?
Replace the rear
oxygen sensor.
Rear Oxygen Sen-
sor.>
Te m p o r a r y p o o r
contact occurs.
Check poor con-
tact of connector.
Page 1377 of 2453
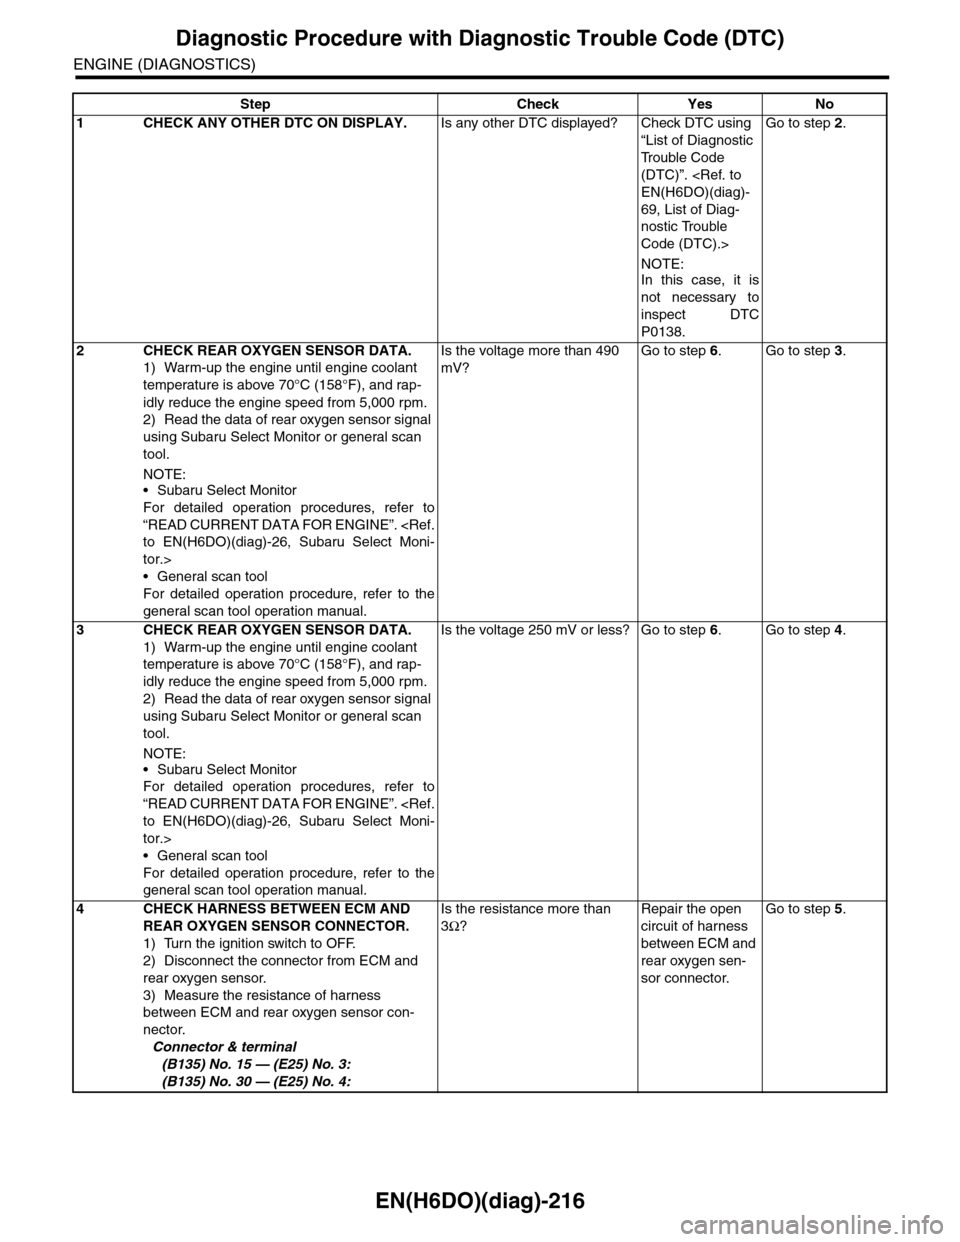
EN(H6DO)(diag)-216
Diagnostic Procedure with Diagnostic Trouble Code (DTC)
ENGINE (DIAGNOSTICS)
Step Check Yes No
1CHECK ANY OTHER DTC ON DISPLAY.Is any other DTC displayed? Check DTC using
“List of Diagnostic
Tr o u b l e C o d e
(DTC)”.
69, List of Diag-
nostic Trouble
Code (DTC).>
NOTE:
In this case, it is
not necessary to
inspect DTC
P0138.
Go to step 2.
2CHECK REAR OXYGEN SENSOR DATA.
1) Warm-up the engine until engine coolant
temperature is above 70°C (158°F), and rap-
idly reduce the engine speed from 5,000 rpm.
2) Read the data of rear oxygen sensor signal
using Subaru Select Monitor or general scan
tool.
NOTE:•Subaru Select Monitor
For detailed operation procedures, refer to
“READ CURRENT DATA FOR ENGINE”.
tor.>
•General scan tool
For detailed operation procedure, refer to the
general scan tool operation manual.
Is the voltage more than 490
mV?
Go to step 6.Go to step 3.
3CHECK REAR OXYGEN SENSOR DATA.
1) Warm-up the engine until engine coolant
temperature is above 70°C (158°F), and rap-
idly reduce the engine speed from 5,000 rpm.
2) Read the data of rear oxygen sensor signal
using Subaru Select Monitor or general scan
tool.
NOTE:
•Subaru Select Monitor
For detailed operation procedures, refer to
“READ CURRENT DATA FOR ENGINE”.
tor.>
•General scan tool
For detailed operation procedure, refer to the
general scan tool operation manual.
Is the voltage 250 mV or less? Go to step 6.Go to step 4.
4CHECK HARNESS BETWEEN ECM AND
REAR OXYGEN SENSOR CONNECTOR.
1) Turn the ignition switch to OFF.
2) Disconnect the connector from ECM and
rear oxygen sensor.
3) Measure the resistance of harness
between ECM and rear oxygen sensor con-
nector.
Connector & terminal
(B135) No. 15 — (E25) No. 3:
(B135) No. 30 — (E25) No. 4:
Is the resistance more than
3Ω?
Repair the open
circuit of harness
between ECM and
rear oxygen sen-
sor connector.
Go to step 5.
Page 1378 of 2453
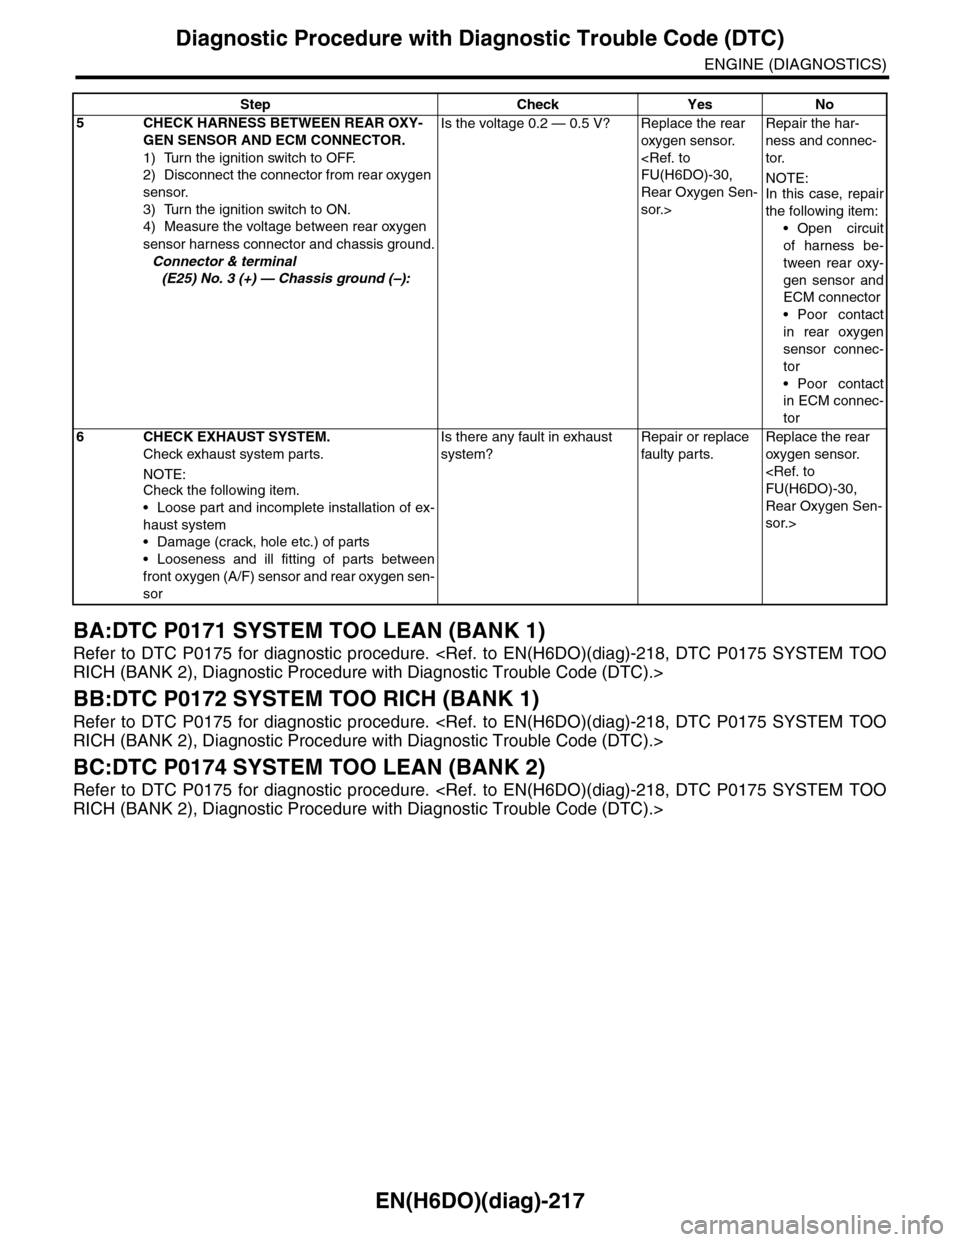
EN(H6DO)(diag)-217
Diagnostic Procedure with Diagnostic Trouble Code (DTC)
ENGINE (DIAGNOSTICS)
BA:DTC P0171 SYSTEM TOO LEAN (BANK 1)
Refer to DTC P0175 for diagnostic procedure.
BB:DTC P0172 SYSTEM TOO RICH (BANK 1)
Refer to DTC P0175 for diagnostic procedure.
BC:DTC P0174 SYSTEM TOO LEAN (BANK 2)
Refer to DTC P0175 for diagnostic procedure.
5CHECK HARNESS BETWEEN REAR OXY-
GEN SENSOR AND ECM CONNECTOR.
1) Turn the ignition switch to OFF.
2) Disconnect the connector from rear oxygen
sensor.
3) Turn the ignition switch to ON.
4) Measure the voltage between rear oxygen
sensor harness connector and chassis ground.
Connector & terminal
(E25) No. 3 (+) — Chassis ground (–):
Is the voltage 0.2 — 0.5 V? Replace the rear
oxygen sensor.
Rear Oxygen Sen-
sor.>
Repair the har-
ness and connec-
tor.
NOTE:In this case, repair
the following item:
•Open circuit
of harness be-
tween rear oxy-
gen sensor and
ECM connector
•Poor contact
in rear oxygen
sensor connec-
tor
•Poor contact
in ECM connec-
tor
6 CHECK EXHAUST SYSTEM.
Check exhaust system parts.
NOTE:Check the following item.
•Loose part and incomplete installation of ex-
haust system
•Damage (crack, hole etc.) of parts
•Looseness and ill fitting of parts between
front oxygen (A/F) sensor and rear oxygen sen-
sor
Is there any fault in exhaust
system?
Repair or replace
faulty par ts.
Replace the rear
oxygen sensor.
Rear Oxygen Sen-
sor.>
Step Check Yes No
Page 1379 of 2453
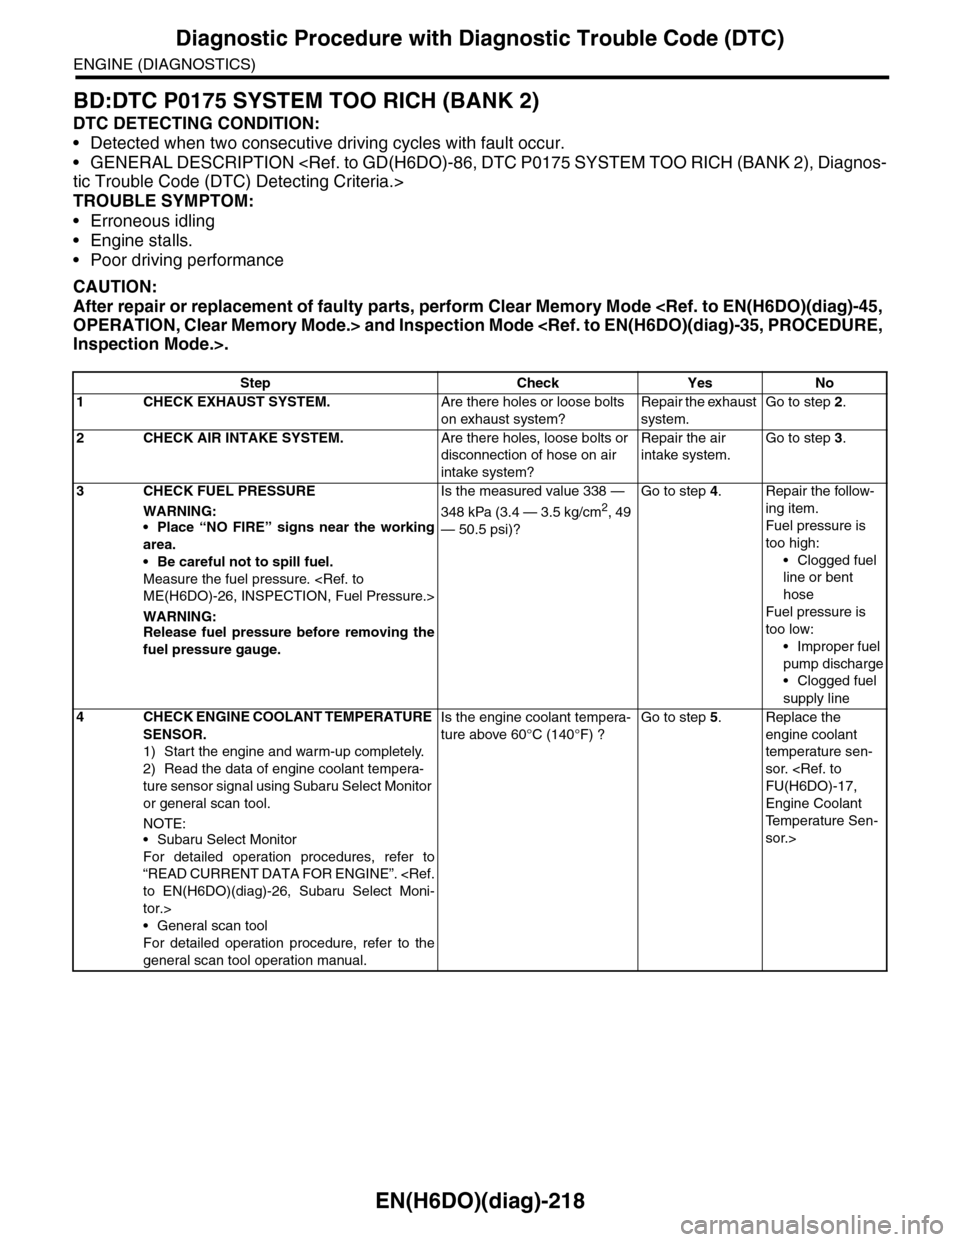
EN(H6DO)(diag)-218
Diagnostic Procedure with Diagnostic Trouble Code (DTC)
ENGINE (DIAGNOSTICS)
BD:DTC P0175 SYSTEM TOO RICH (BANK 2)
DTC DETECTING CONDITION:
•Detected when two consecutive driving cycles with fault occur.
•GENERAL DESCRIPTION
TROUBLE SYMPTOM:
•Erroneous idling
•Engine stalls.
•Poor driving performance
CAUTION:
After repair or replacement of faulty parts, perform Clear Memory Mode
Step Check Yes No
1 CHECK EXHAUST SYSTEM.Are there holes or loose bolts
on exhaust system?
Repair the exhaust
system.
Go to step 2.
2CHECK AIR INTAKE SYSTEM.Are there holes, loose bolts or
disconnection of hose on air
intake system?
Repair the air
intake system.
Go to step 3.
3CHECK FUEL PRESSURE
WARNING:
•Place “NO FIRE” signs near the working
area.
•Be careful not to spill fuel.
Measure the fuel pressure.
WARNING:Release fuel pressure before removing the
fuel pressure gauge.
Is the measured value 338 —
348 kPa (3.4 — 3.5 kg/cm2, 49
— 50.5 psi)?
Go to step 4.Repair the follow-
ing item.
Fuel pressure is
too high:
•Clogged fuel
line or bent
hose
Fuel pressure is
too low:
•Improper fuel
pump discharge
•Clogged fuel
supply line
4CHECK ENGINE COOLANT TEMPERATURE
SENSOR.
1) Start the engine and warm-up completely.
2) Read the data of engine coolant tempera-
ture sensor signal using Subaru Select Monitor
or general scan tool.
NOTE:•Subaru Select Monitor
For detailed operation procedures, refer to
“READ CURRENT DATA FOR ENGINE”.
tor.>
•General scan tool
For detailed operation procedure, refer to the
general scan tool operation manual.
Is the engine coolant tempera-
ture above 60°C (140°F) ?
Go to step 5.Replace the
engine coolant
temperature sen-
sor.
Engine Coolant
Te m p e r a t u r e S e n -
sor.>
Page 1380 of 2453
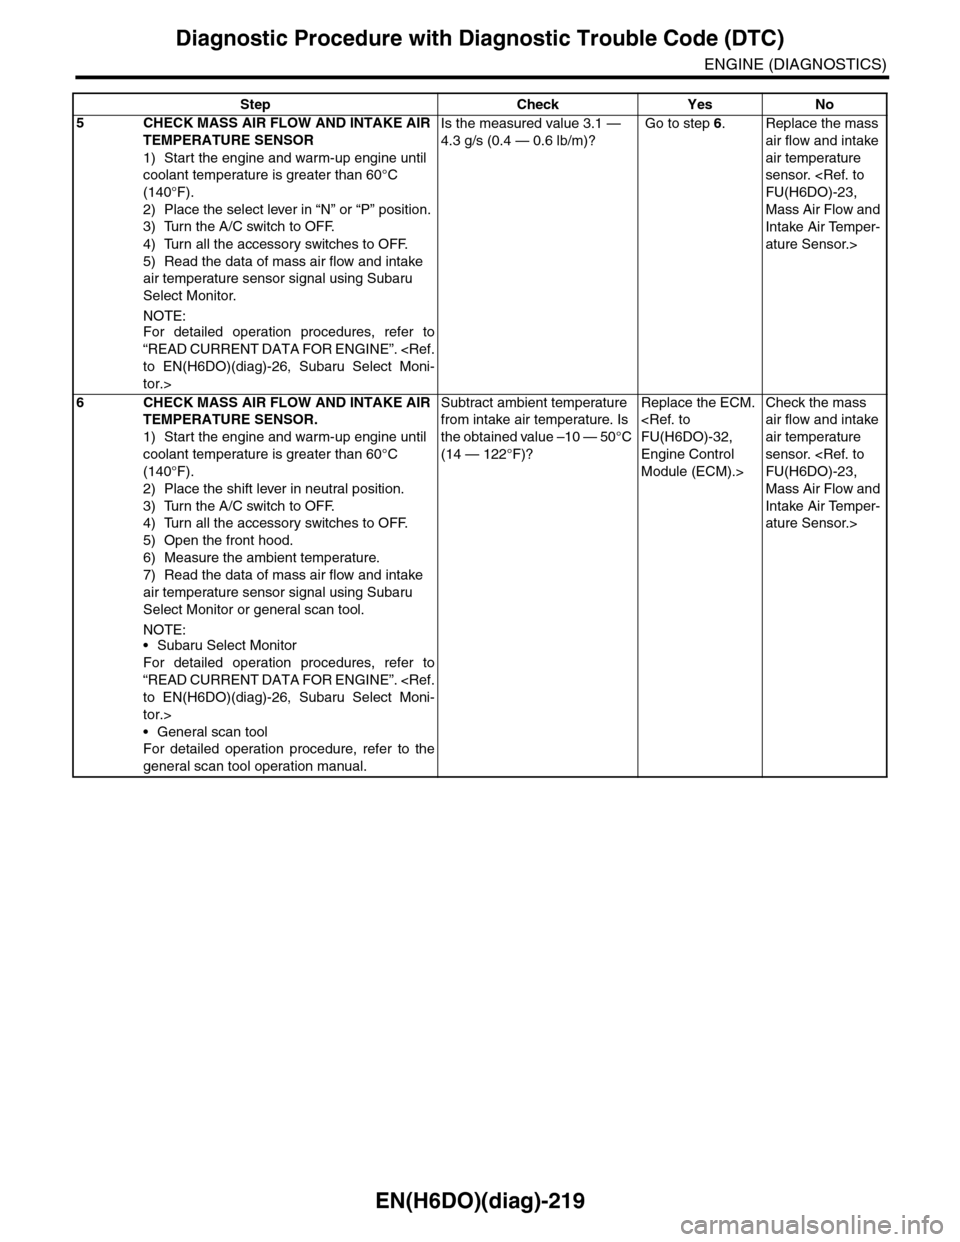
EN(H6DO)(diag)-219
Diagnostic Procedure with Diagnostic Trouble Code (DTC)
ENGINE (DIAGNOSTICS)
5CHECK MASS AIR FLOW AND INTAKE AIR
TEMPERATURE SENSOR
1) Start the engine and warm-up engine until
coolant temperature is greater than 60°C
(140°F).
2) Place the select lever in “N” or “P” position.
3) Turn the A/C switch to OFF.
4) Turn all the accessory switches to OFF.
5) Read the data of mass air flow and intake
air temperature sensor signal using Subaru
Select Monitor.
NOTE:
For detailed operation procedures, refer to
“READ CURRENT DATA FOR ENGINE”.
tor.>
Is the measured value 3.1 —
4.3 g/s (0.4 — 0.6 lb/m)?
Go to step 6.Replace the mass
air flow and intake
air temperature
sensor.
Mass Air Flow and
Intake Air Temper-
ature Sensor.>
6CHECK MASS AIR FLOW AND INTAKE AIR
TEMPERATURE SENSOR.
1) Start the engine and warm-up engine until
coolant temperature is greater than 60°C
(140°F).
2) Place the shift lever in neutral position.
3) Turn the A/C switch to OFF.
4) Turn all the accessory switches to OFF.
5) Open the front hood.
6) Measure the ambient temperature.
7) Read the data of mass air flow and intake
air temperature sensor signal using Subaru
Select Monitor or general scan tool.
NOTE:•Subaru Select Monitor
For detailed operation procedures, refer to
“READ CURRENT DATA FOR ENGINE”.
tor.>
•General scan tool
For detailed operation procedure, refer to the
general scan tool operation manual.
Subtract ambient temperature
from intake air temperature. Is
the obtained value –10 — 50°C
(14 — 122°F)?
Replace the ECM.
Engine Control
Module (ECM).>
Check the mass
air flow and intake
air temperature
sensor.
Mass Air Flow and
Intake Air Temper-
ature Sensor.>
Step Check Yes No
Page 1382 of 2453
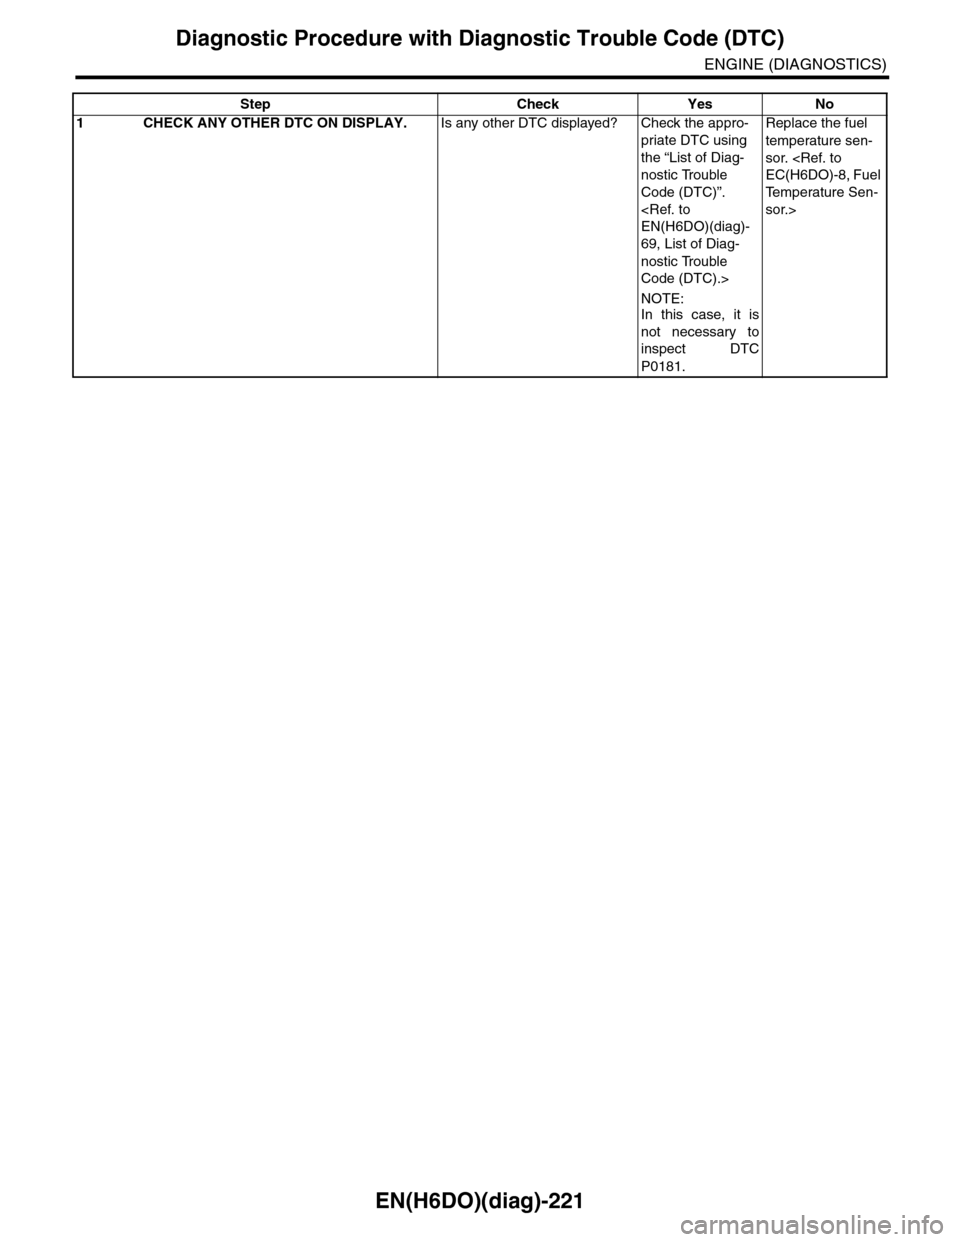
EN(H6DO)(diag)-221
Diagnostic Procedure with Diagnostic Trouble Code (DTC)
ENGINE (DIAGNOSTICS)
Step Check Yes No
1CHECK ANY OTHER DTC ON DISPLAY.Is any other DTC displayed? Check the appro-
priate DTC using
the “List of Diag-
nostic Trouble
Code (DTC)”.
69, List of Diag-
nostic Trouble
Code (DTC).>
NOTE:In this case, it is
not necessary to
inspect DTC
P0181.
Replace the fuel
temperature sen-
sor.
Te m p e r a t u r e S e n -
sor.>
Page 1384 of 2453
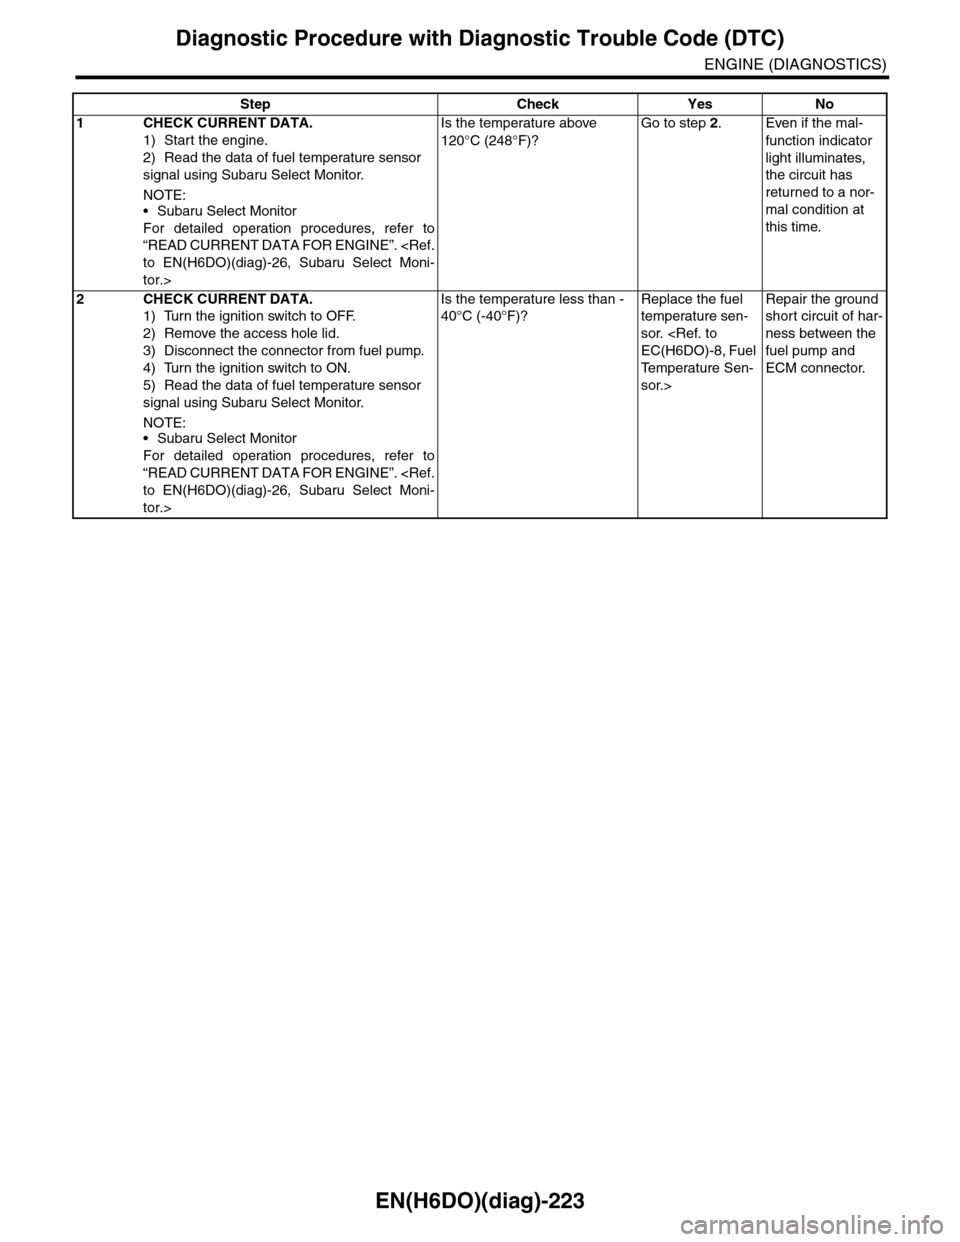
EN(H6DO)(diag)-223
Diagnostic Procedure with Diagnostic Trouble Code (DTC)
ENGINE (DIAGNOSTICS)
Step Check Yes No
1CHECK CURRENT DATA.
1) Start the engine.
2) Read the data of fuel temperature sensor
signal using Subaru Select Monitor.
NOTE:•Subaru Select Monitor
For detailed operation procedures, refer to
“READ CURRENT DATA FOR ENGINE”.
tor.>
Is the temperature above
120°C (248°F)?
Go to step 2.Even if the mal-
function indicator
light illuminates,
the circuit has
returned to a nor-
mal condition at
this time.
2CHECK CURRENT DATA.
1) Turn the ignition switch to OFF.
2) Remove the access hole lid.
3) Disconnect the connector from fuel pump.
4) Turn the ignition switch to ON.
5) Read the data of fuel temperature sensor
signal using Subaru Select Monitor.
NOTE:•Subaru Select Monitor
For detailed operation procedures, refer to
“READ CURRENT DATA FOR ENGINE”.
tor.>
Is the temperature less than -
40°C (-40°F)?
Replace the fuel
temperature sen-
sor.
Te m p e r a t u r e S e n -
sor.>
Repair the ground
short circuit of har-
ness between the
fuel pump and
ECM connector.
Page 1386 of 2453
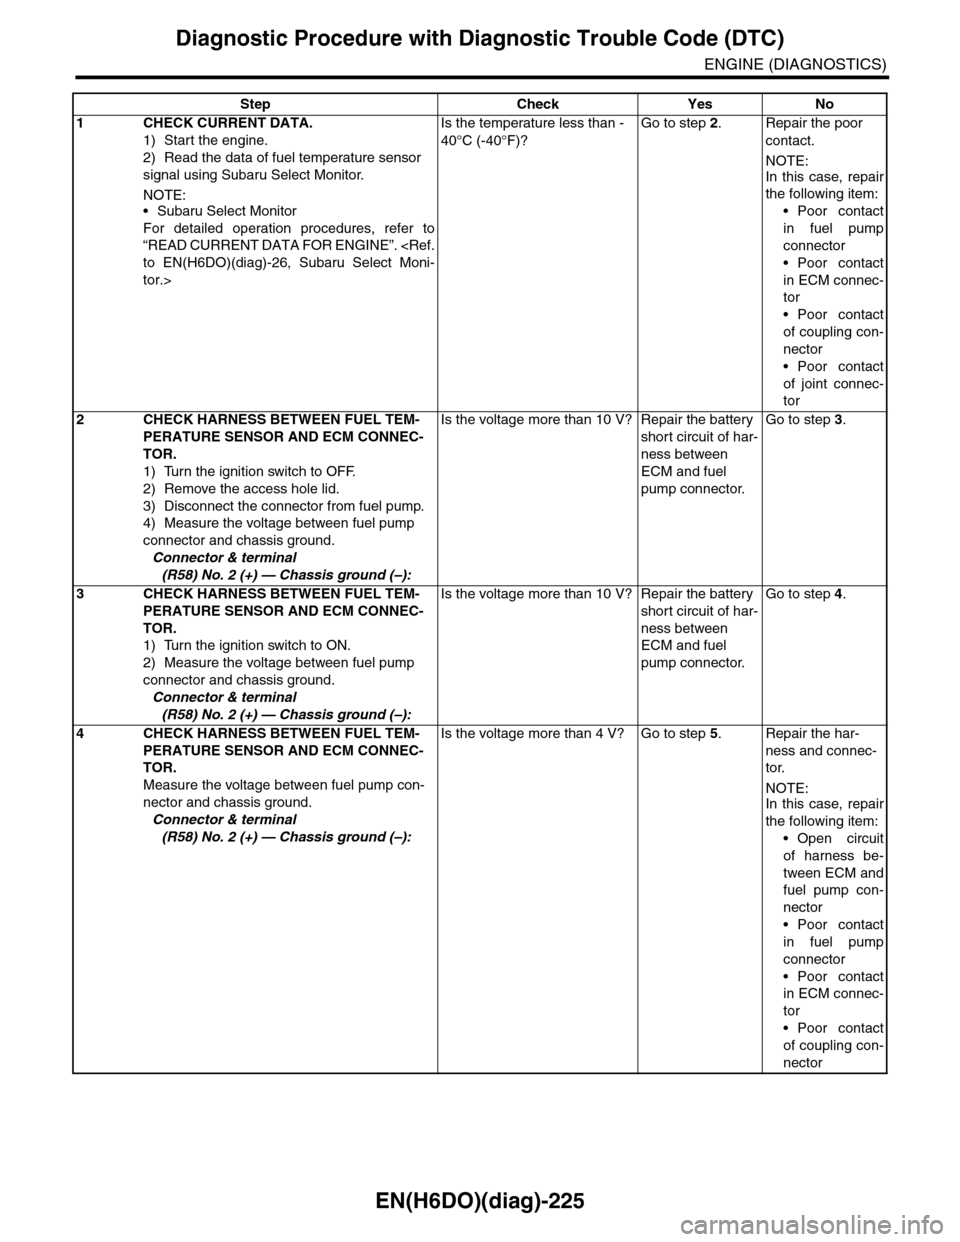
EN(H6DO)(diag)-225
Diagnostic Procedure with Diagnostic Trouble Code (DTC)
ENGINE (DIAGNOSTICS)
Step Check Yes No
1CHECK CURRENT DATA.
1) Start the engine.
2) Read the data of fuel temperature sensor
signal using Subaru Select Monitor.
NOTE:•Subaru Select Monitor
For detailed operation procedures, refer to
“READ CURRENT DATA FOR ENGINE”.
tor.>
Is the temperature less than -
40°C (-40°F)?
Go to step 2.Repair the poor
contact.
NOTE:
In this case, repair
the following item:
•Poor contact
in fuel pump
connector
•Poor contact
in ECM connec-
tor
•Poor contact
of coupling con-
nector
•Poor contact
of joint connec-
tor
2 CHECK HARNESS BETWEEN FUEL TEM-
PERATURE SENSOR AND ECM CONNEC-
TOR.
1) Turn the ignition switch to OFF.
2) Remove the access hole lid.
3) Disconnect the connector from fuel pump.
4) Measure the voltage between fuel pump
connector and chassis ground.
Connector & terminal
(R58) No. 2 (+) — Chassis ground (–):
Is the voltage more than 10 V? Repair the battery
short circuit of har-
ness between
ECM and fuel
pump connector.
Go to step 3.
3 CHECK HARNESS BETWEEN FUEL TEM-
PERATURE SENSOR AND ECM CONNEC-
TOR.
1) Turn the ignition switch to ON.
2) Measure the voltage between fuel pump
connector and chassis ground.
Connector & terminal
(R58) No. 2 (+) — Chassis ground (–):
Is the voltage more than 10 V? Repair the battery
short circuit of har-
ness between
ECM and fuel
pump connector.
Go to step 4.
4 CHECK HARNESS BETWEEN FUEL TEM-
PERATURE SENSOR AND ECM CONNEC-
TOR.
Measure the voltage between fuel pump con-
nector and chassis ground.
Connector & terminal
(R58) No. 2 (+) — Chassis ground (–):
Is the voltage more than 4 V? Go to step 5.Repair the har-
ness and connec-
tor.
NOTE:In this case, repair
the following item:
•Open circuit
of harness be-
tween ECM and
fuel pump con-
nector
•Poor contact
in fuel pump
connector
•Poor contact
in ECM connec-
tor
•Poor contact
of coupling con-
nector
Page 1387 of 2453
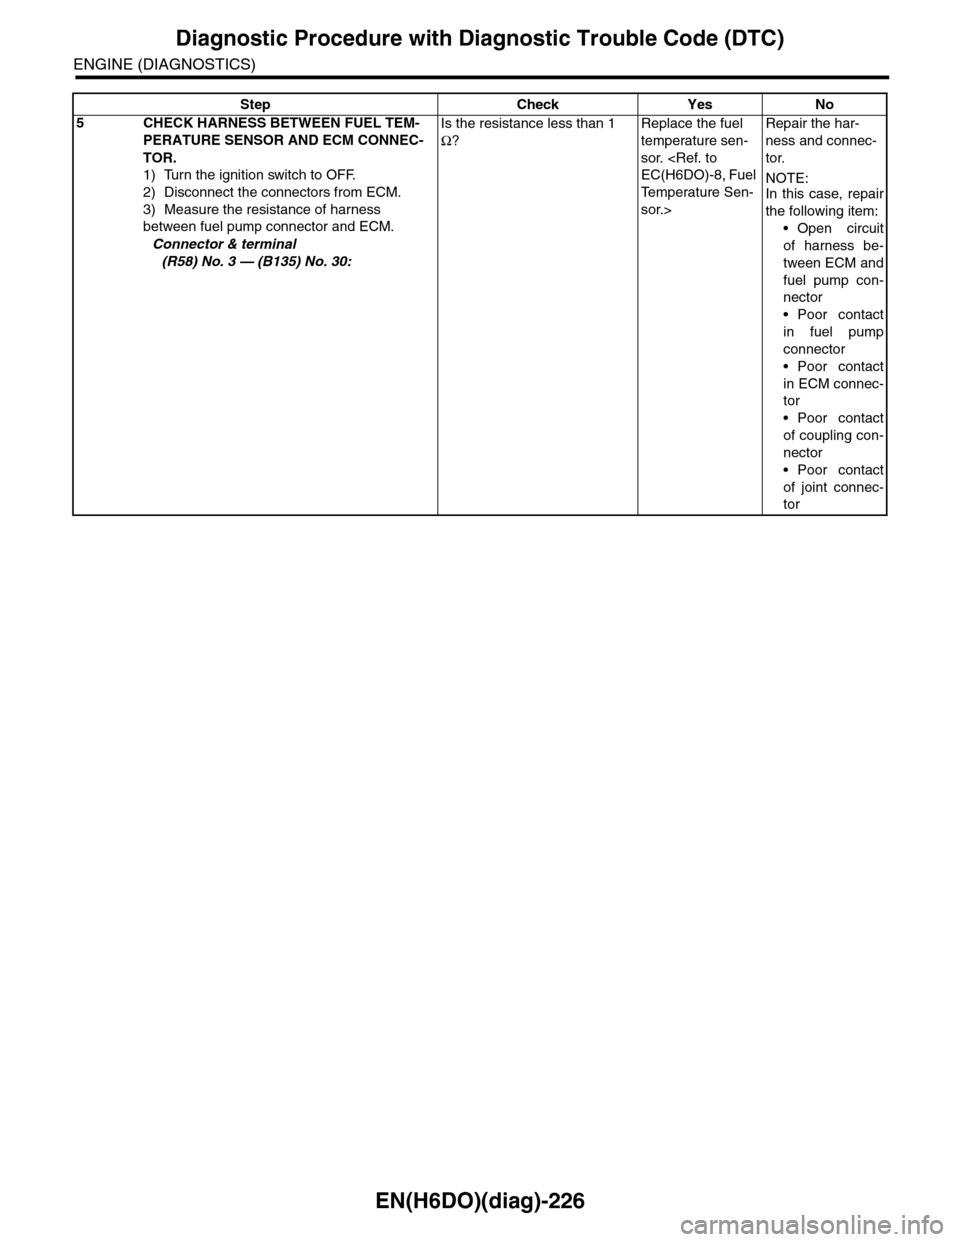
EN(H6DO)(diag)-226
Diagnostic Procedure with Diagnostic Trouble Code (DTC)
ENGINE (DIAGNOSTICS)
5 CHECK HARNESS BETWEEN FUEL TEM-
PERATURE SENSOR AND ECM CONNEC-
TOR.
1) Turn the ignition switch to OFF.
2) Disconnect the connectors from ECM.
3) Measure the resistance of harness
between fuel pump connector and ECM.
Connector & terminal
(R58) No. 3 — (B135) No. 30:
Is the resistance less than 1
Ω?
Replace the fuel
temperature sen-
sor.
Te m p e r a t u r e S e n -
sor.>
Repair the har-
ness and connec-
tor.
NOTE:In this case, repair
the following item:
•Open circuit
of harness be-
tween ECM and
fuel pump con-
nector
•Poor contact
in fuel pump
connector
•Poor contact
in ECM connec-
tor
•Poor contact
of coupling con-
nector
•Poor contact
of joint connec-
tor
Step Check Yes No
Page 1389 of 2453
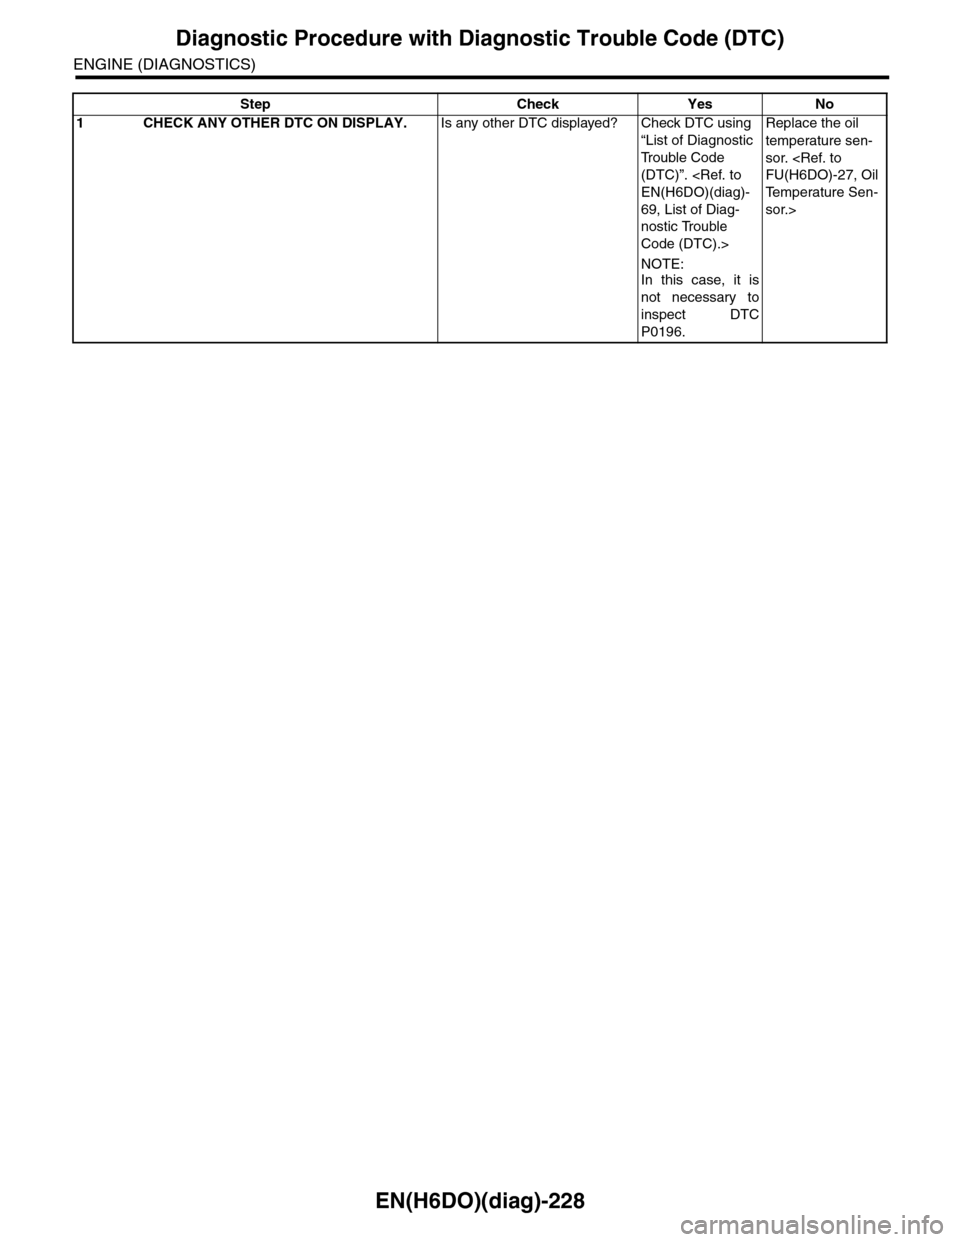
EN(H6DO)(diag)-228
Diagnostic Procedure with Diagnostic Trouble Code (DTC)
ENGINE (DIAGNOSTICS)
Step Check Yes No
1CHECK ANY OTHER DTC ON DISPLAY.Is any other DTC displayed? Check DTC using
“List of Diagnostic
Tr o u b l e C o d e
(DTC)”.
69, List of Diag-
nostic Trouble
Code (DTC).>
NOTE:
In this case, it is
not necessary to
inspect DTC
P0196.
Replace the oil
temperature sen-
sor.
Te m p e r a t u r e S e n -
sor.>