SUBARU TRIBECA 2009 1.G Service Workshop Manual
Manufacturer: SUBARU, Model Year: 2009, Model line: TRIBECA, Model: SUBARU TRIBECA 2009 1.GPages: 2453, PDF Size: 46.32 MB
Page 931 of 2453
PS-51
General Diagnostic Table
POWER ASSISTED SYSTEM (POWER STEERING)
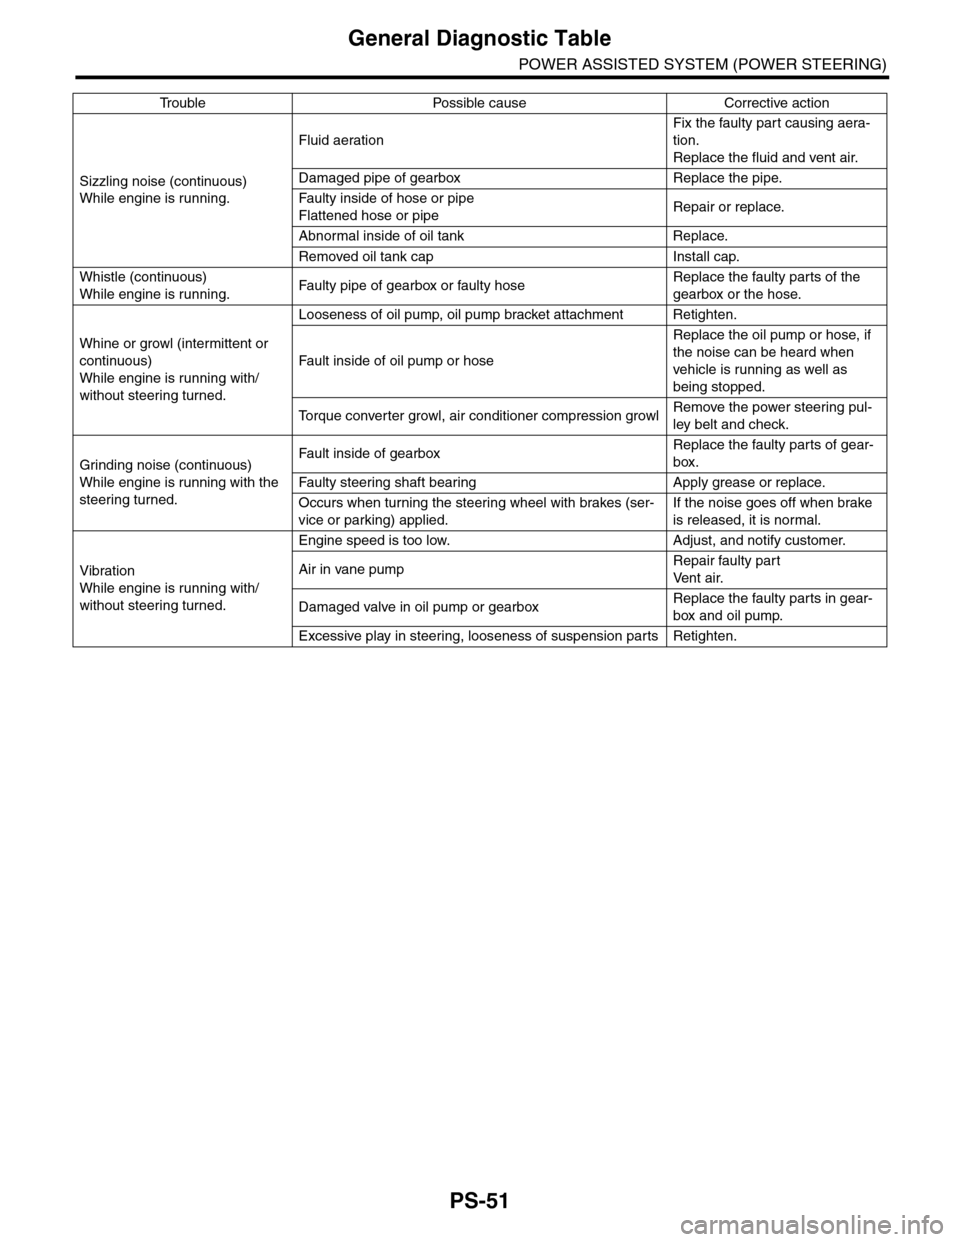
Sizzling noise (continuous)
While engine is running.
Fluid aeration
Fix the faulty part causing aera-
tion.
Replace the fluid and vent air.
Damaged pipe of gearbox Replace the pipe.
Fa u lt y i n si de of h os e o r pi p e
Flattened hose or pipeRepair or replace.
Abnormal inside of oil tank Replace.
Removed oil tank cap Install cap.
Whistle (continuous)
While engine is running.Fa u lt y p i pe of g ea r b ox o r fa ul t y h os eReplace the faulty parts of the
gearbox or the hose.
Whine or growl (intermittent or
continuous)
While engine is running with/
without steering turned.
Looseness of oil pump, oil pump bracket attachment Retighten.
Fa u lt in s id e o f oi l p u mp o r h os e
Replace the oil pump or hose, if
the noise can be heard when
vehicle is running as well as
being stopped.
To r q u e c o n v e r t e r g r o w l , a i r c o n d i t i o n e r c o m p r e s s i o n g r o w lRemove the power steering pul-
ley belt and check.
Grinding noise (continuous)
While engine is running with the
steering turned.
Fa u lt in s id e o f ge a rb oxReplace the faulty parts of gear-
box.
Fa u lt y s t ee r i ng sh af t b ea r i ng A pp l y gr ea s e o r r e p la ce.
Occurs when turning the steering wheel with brakes (ser-
vice or parking) applied.
If the noise goes off when brake
is released, it is normal.
Vibration
While engine is running with/
without steering turned.
Engine speed is too low. Adjust, and notify customer.
Air in vane pumpRepair faulty part
Ve n t a i r.
Damaged valve in oil pump or gearboxReplace the faulty parts in gear-
box and oil pump.
Excessive play in steering, looseness of suspension parts Retighten.
Tr o u b l e P o s s i b l e c a u s e C o r r e c t i v e a c t i o n
Page 932 of 2453
PS-52
General Diagnostic Table
POWER ASSISTED SYSTEM (POWER STEERING)
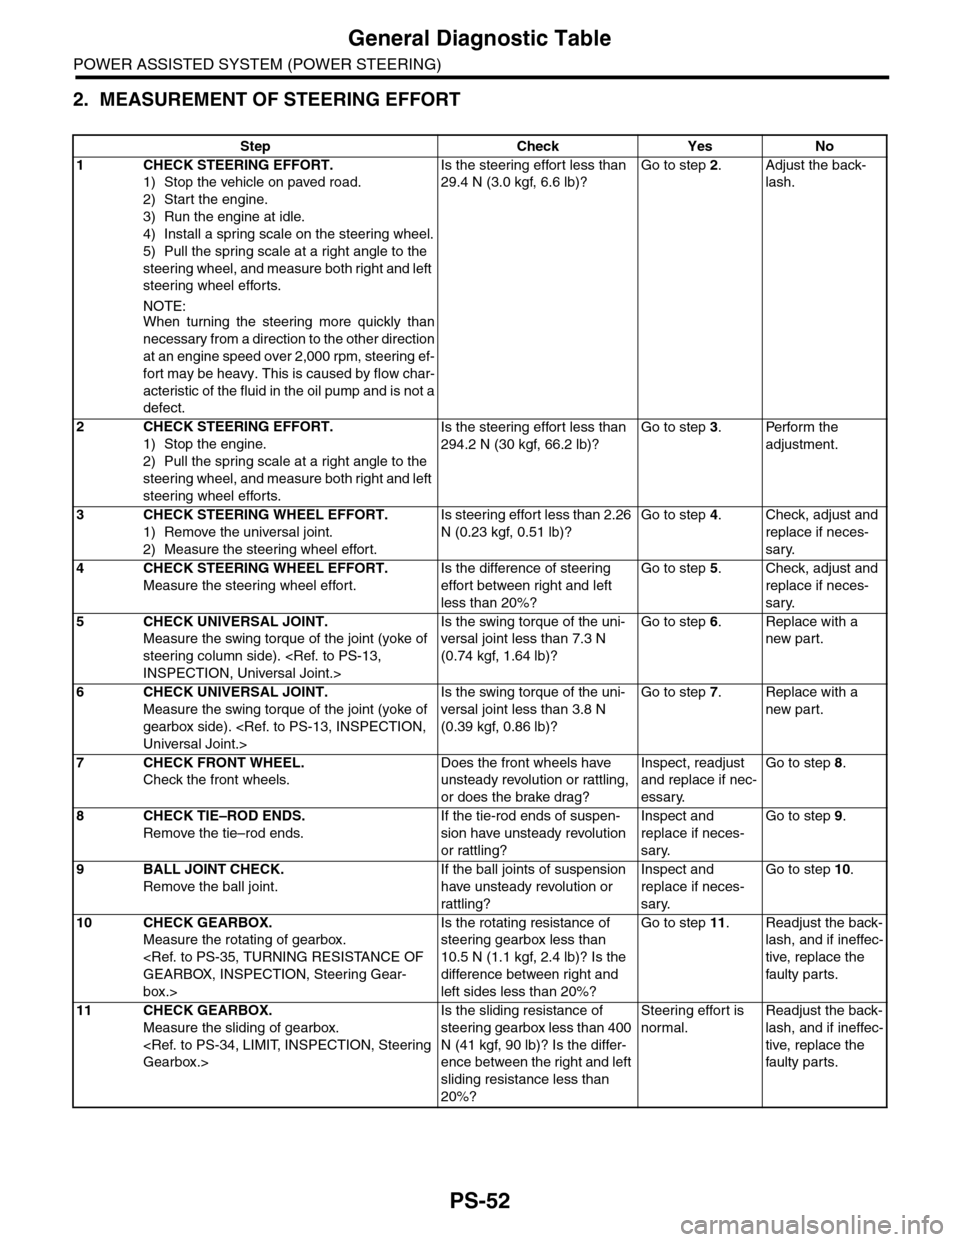
2. MEASUREMENT OF STEERING EFFORT
Step Check Yes No
1CHECK STEERING EFFORT.
1) Stop the vehicle on paved road.
2) Start the engine.
3) Run the engine at idle.
4) Install a spring scale on the steering wheel.
5) Pull the spring scale at a right angle to the
steering wheel, and measure both right and left
steering wheel efforts.
NOTE:When turning the steering more quickly than
necessary from a direction to the other direction
at an engine speed over 2,000 rpm, steering ef-
fort may be heavy. This is caused by flow char-
acteristic of the fluid in the oil pump and is not a
defect.
Is the steering effort less than
29.4 N (3.0 kgf, 6.6 lb)?
Go to step 2.Adjust the back-
lash.
2CHECK STEERING EFFORT.
1) Stop the engine.
2) Pull the spring scale at a right angle to the
steering wheel, and measure both right and left
steering wheel efforts.
Is the steering effort less than
294.2 N (30 kgf, 66.2 lb)?
Go to step 3.Perform the
adjustment.
3CHECK STEERING WHEEL EFFORT.
1) Remove the universal joint.
2) Measure the steering wheel effort.
Is steering effort less than 2.26
N (0.23 kgf, 0.51 lb)?
Go to step 4.Check, adjust and
replace if neces-
sary.
4CHECK STEERING WHEEL EFFORT.
Measure the steering wheel effort.
Is the difference of steering
effort between right and left
less than 20%?
Go to step 5.Check, adjust and
replace if neces-
sary.
5CHECK UNIVERSAL JOINT.
Measure the swing torque of the joint (yoke of
steering column side).
Is the swing torque of the uni-
versal joint less than 7.3 N
(0.74 kgf, 1.64 lb)?
Go to step 6.Replace with a
new part.
6CHECK UNIVERSAL JOINT.
Measure the swing torque of the joint (yoke of
gearbox side).
Is the swing torque of the uni-
versal joint less than 3.8 N
(0.39 kgf, 0.86 lb)?
Go to step 7.Replace with a
new part.
7CHECK FRONT WHEEL.
Check the front wheels.
Does the front wheels have
unsteady revolution or rattling,
or does the brake drag?
Inspect, readjust
and replace if nec-
essary.
Go to step 8.
8CHECK TIE–ROD ENDS.
Remove the tie–rod ends.
If the tie-rod ends of suspen-
sion have unsteady revolution
or rattling?
Inspect and
replace if neces-
sary.
Go to step 9.
9BALL JOINT CHECK.
Remove the ball joint.
If the ball joints of suspension
have unsteady revolution or
rattling?
Inspect and
replace if neces-
sary.
Go to step 10.
10 CHECK GEARBOX.
Measure the rotating of gearbox.
box.>
Is the rotating resistance of
steering gearbox less than
10.5 N (1.1 kgf, 2.4 lb)? Is the
difference between right and
left sides less than 20%?
Go to step 11.Readjust the back-
lash, and if ineffec-
tive, replace the
faulty par ts.
11 CHECK GEARBOX.
Measure the sliding of gearbox.
Is the sliding resistance of
steering gearbox less than 400
N (41 kgf, 90 lb)? Is the differ-
ence between the right and left
sliding resistance less than
20%?
Steering effort is
normal.
Readjust the back-
lash, and if ineffec-
tive, replace the
faulty par ts.
Page 933 of 2453
PS-53
General Diagnostic Table
POWER ASSISTED SYSTEM (POWER STEERING)
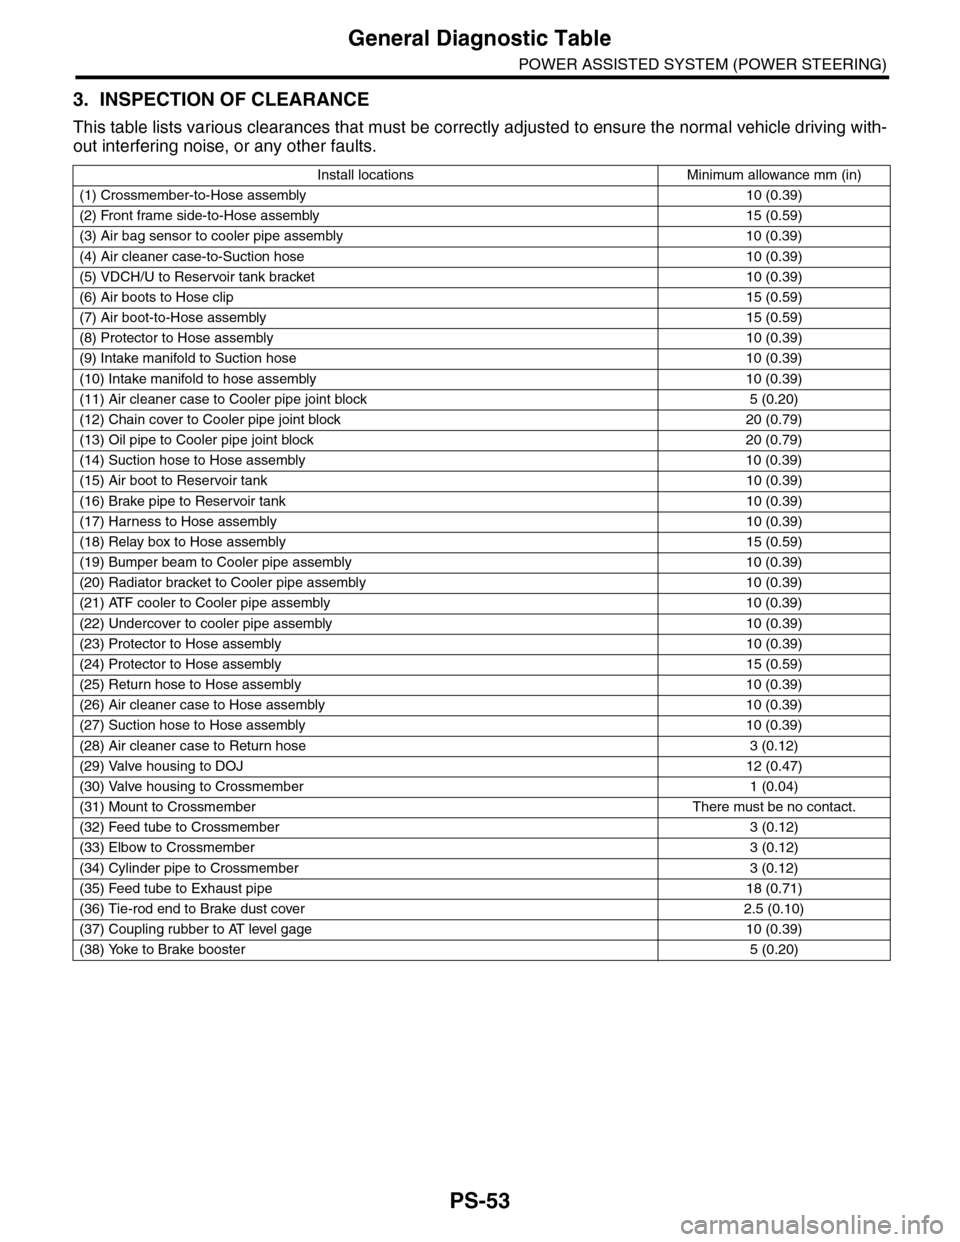
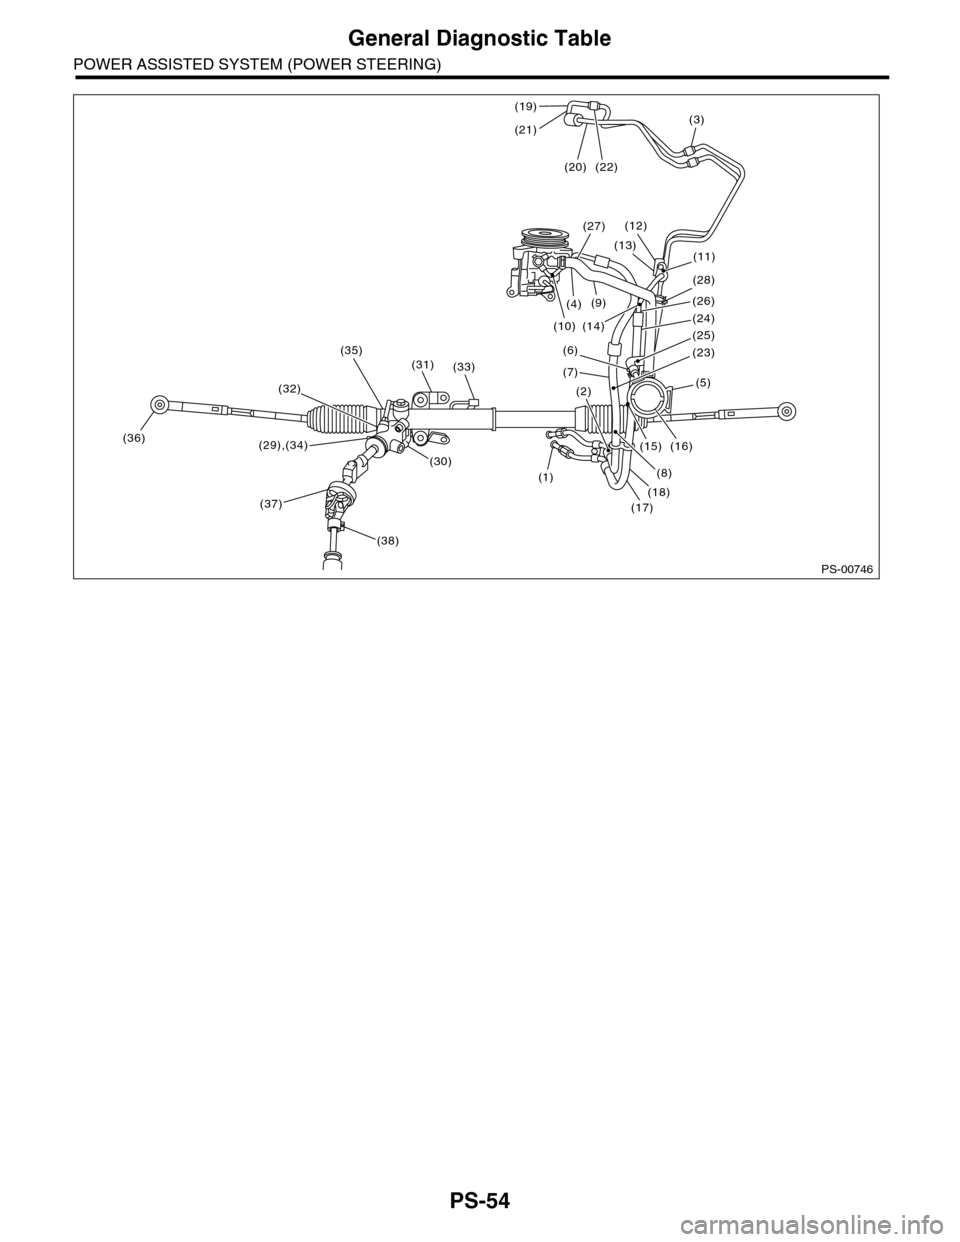
3. INSPECTION OF CLEARANCE
This table lists various clearances that must be correctly adjusted to ensure the normal vehicle driving with-
out interfering noise, or any other faults.
Install locations Minimum allowance mm (in)
(1) Crossmember-to-Hose assembly 10 (0.39)
(2) Front frame side-to-Hose assembly 15 (0.59)
(3) Air bag sensor to cooler pipe assembly 10 (0.39)
(4) Air cleaner case-to-Suction hose 10 (0.39)
(5) VDCH/U to Reservoir tank bracket 10 (0.39)
(6) Air boots to Hose clip15 (0.59)
(7) Air boot-to-Hose assembly15 (0.59)
(8) Protector to Hose assembly10 (0.39)
(9) Intake manifold to Suction hose 10 (0.39)
(10) Intake manifold to hose assembly 10 (0.39)
(11) Air cleaner case to Cooler pipe joint block 5 (0.20)
(12) Chain cover to Cooler pipe joint block 20 (0.79)
(13) Oil pipe to Cooler pipe joint block 20 (0.79)
(14) Suction hose to Hose assembly 10 (0.39)
(15) Air boot to Reservoir tank10 (0.39)
(16) Brake pipe to Reservoir tank10 (0.39)
(17) Harness to Hose assembly10 (0.39)
(18) Relay box to Hose assembly15 (0.59)
(19) Bumper beam to Cooler pipe assembly 10 (0.39)
(20) Radiator bracket to Cooler pipe assembly 10 (0.39)
(21) ATF cooler to Cooler pipe assembly 10 (0.39)
(22) Undercover to cooler pipe assembly 10 (0.39)
(23) Protector to Hose assembly10 (0.39)
(24) Protector to Hose assembly15 (0.59)
(25) Return hose to Hose assembly 10 (0.39)
(26) Air cleaner case to Hose assembly 10 (0.39)
(27) Suction hose to Hose assembly 10 (0.39)
(28) Air cleaner case to Return hose 3 (0.12)
(29) Valve housing to DOJ12 (0.47)
(30) Valve housing to Crossmember 1 (0.04)
(31) Mount to Crossmember There must be no contact.
(32) Feed tube to Crossmember3 (0.12)
(33) Elbow to Crossmember3 (0.12)
(34) Cylinder pipe to Crossmember 3 (0.12)
(35) Feed tube to Exhaust pipe18 (0.71)
(36) Tie-rod end to Brake dust cover 2.5 (0.10)
(37) Coupling rubber to AT level gage 10 (0.39)
(38) Yoke to Brake booster5 (0.20)
Page 934 of 2453
PS-54
General Diagnostic Table
POWER ASSISTED SYSTEM (POWER STEERING)
PS-00746
(29),(34)
(30)
(38)
(31)(33)
(35)
(37)
(10)(14)
(6)
(7)
(2)
(1)
(17)(18)
(16)(15)
(23)
(25)
(24)
(26)
(28)
(11)
(36)
(32)
(22)(20)
(27)
(21)
(19)(3)
(13)
(12)
(4)(9)
(8)
(5)
Page 935 of 2453
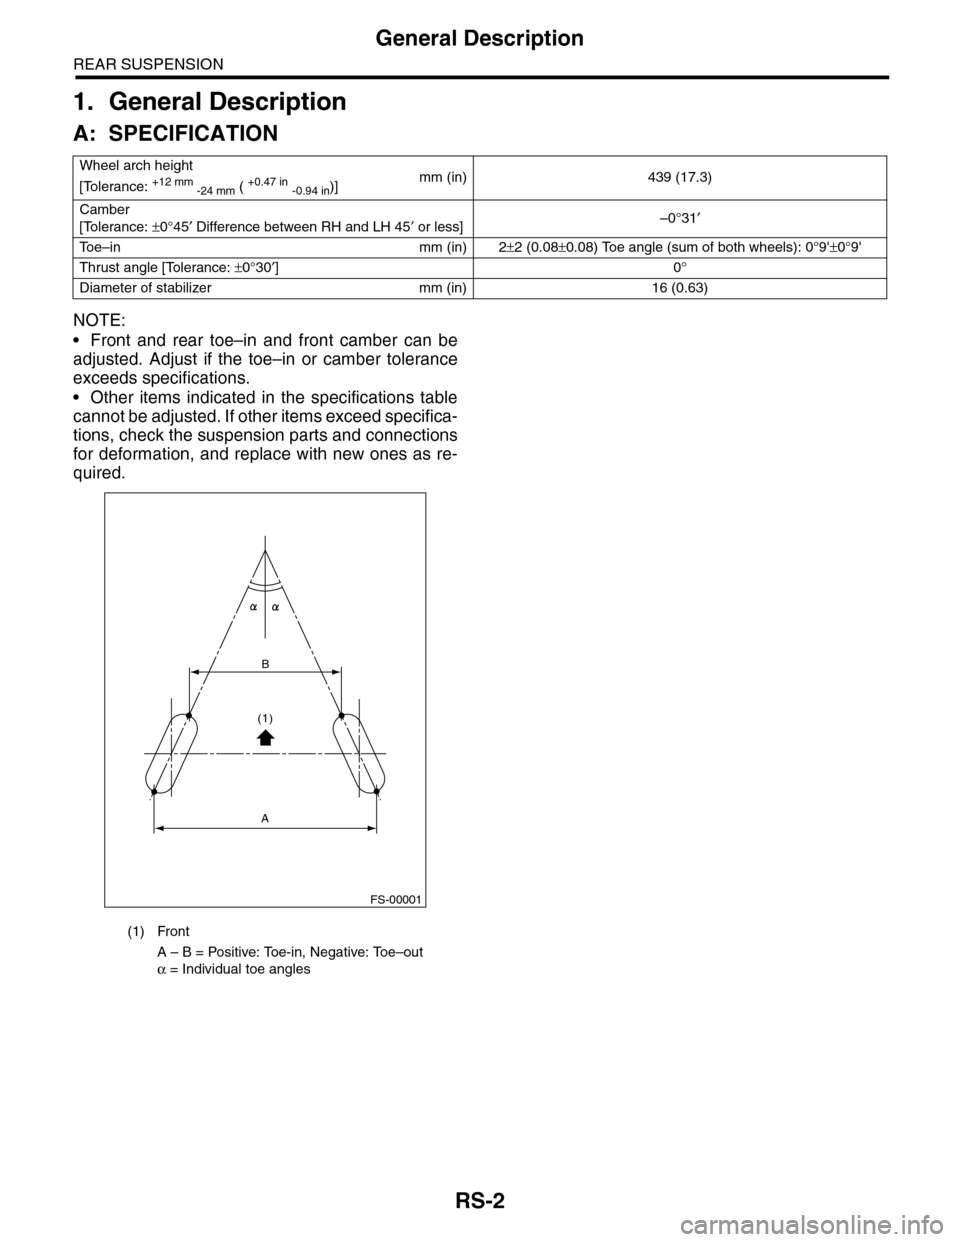
RS-2
General Description
REAR SUSPENSION
1. General Description
A: SPECIFICATION
NOTE:
•Front and rear toe–in and front camber can be
adjusted. Adjust if the toe–in or camber tolerance
exceeds specifications.
•Other items indicated in the specifications table
cannot be adjusted. If other items exceed specifica-
tions, check the suspension parts and connections
for deformation, and replace with new ones as re-
quired.
Wheel arch height
[Tolerance: +12 mm -24 mm ( +0.47 in -0.94 in)]mm (in) 439 (17.3)
Camber
[Tolerance: ±0°45′ Difference between RH and LH 45′ or less]–0°31′
To e – i n m m ( i n ) 2±2 (0.08±0.08) Toe angle (sum of both wheels): 0°9'±0°9'
Thrust angle [Tolerance: ±0°30′]0°
Diameter of stabilizer mm (in) 16 (0.63)
(1) Front
A – B = Positive: Toe-in, Negative: Toe–out
α = Individual toe angles
FS-00001
B
A
(1)
Page 936 of 2453
RS-3
General Description
REAR SUSPENSION
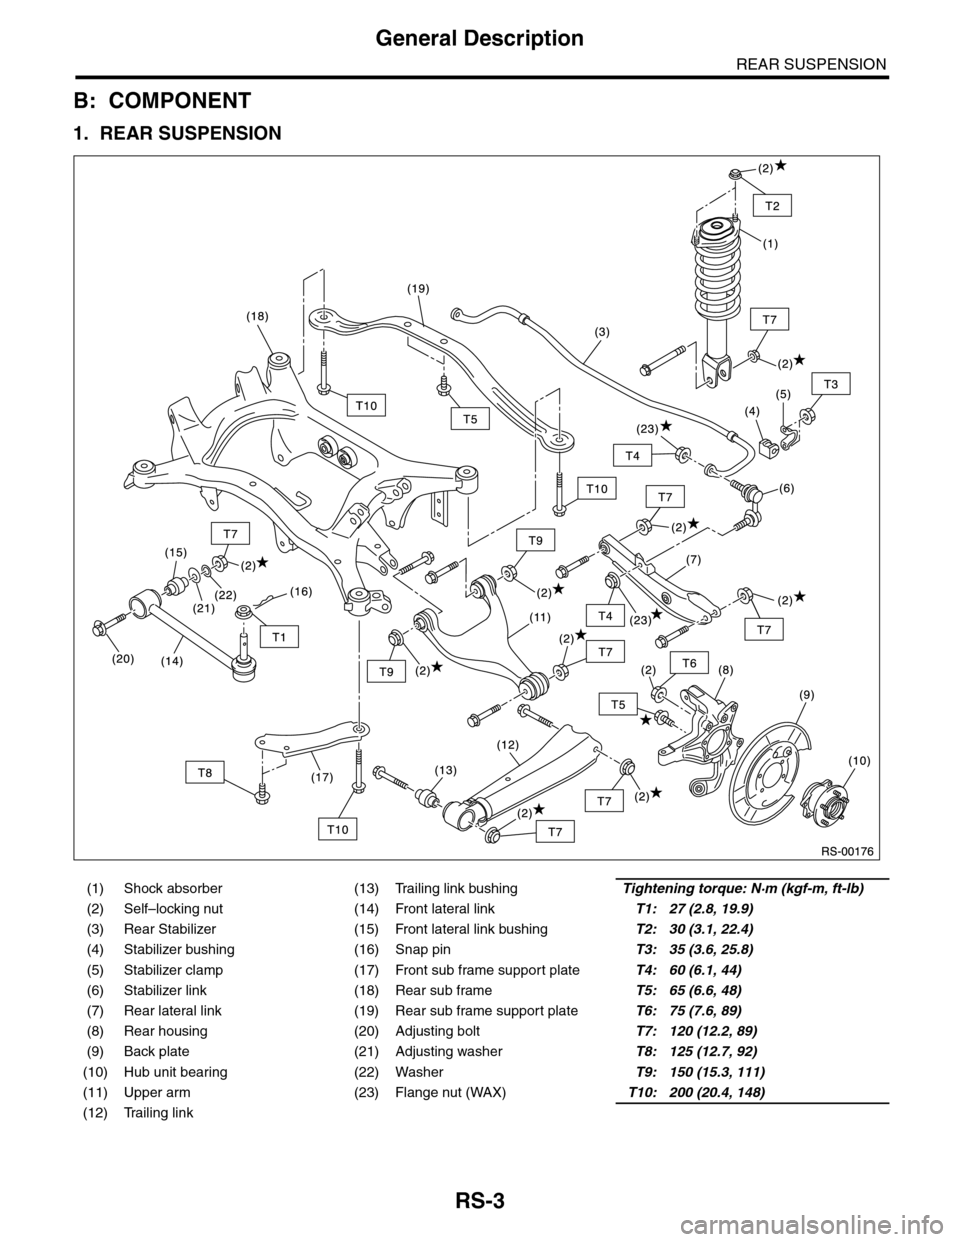
B: COMPONENT
1. REAR SUSPENSION
(1) Shock absorber (13) Trailing link bushingTightening torque: N·m (kgf-m, ft-lb)
(2) Self–locking nut (14) Front lateral linkT1: 27 (2.8, 19.9)
(3) Rear Stabilizer (15) Front lateral link bushingT2: 30 (3.1, 22.4)
(4) Stabilizer bushing (16) Snap pinT3: 35 (3.6, 25.8)
(5) Stabilizer clamp (17) Front sub frame support plateT4: 60 (6.1, 44)
(6) Stabilizer link (18) Rear sub frameT5: 65 (6.6, 48)
(7) Rear lateral link (19) Rear sub frame support plateT6: 75 (7.6, 89)
(8) Rear housing (20) Adjusting boltT7: 120 (12.2, 89)
(9) Back plate (21) Adjusting washerT8: 125 (12.7, 92)
(10) Hub unit bearing (22) WasherT9: 150 (15.3, 111)
(11) Upper arm (23) Flange nut (WAX)T10: 200 (20.4, 148)
(12) Trailing link
Page 937 of 2453
RS-4
General Description
REAR SUSPENSION
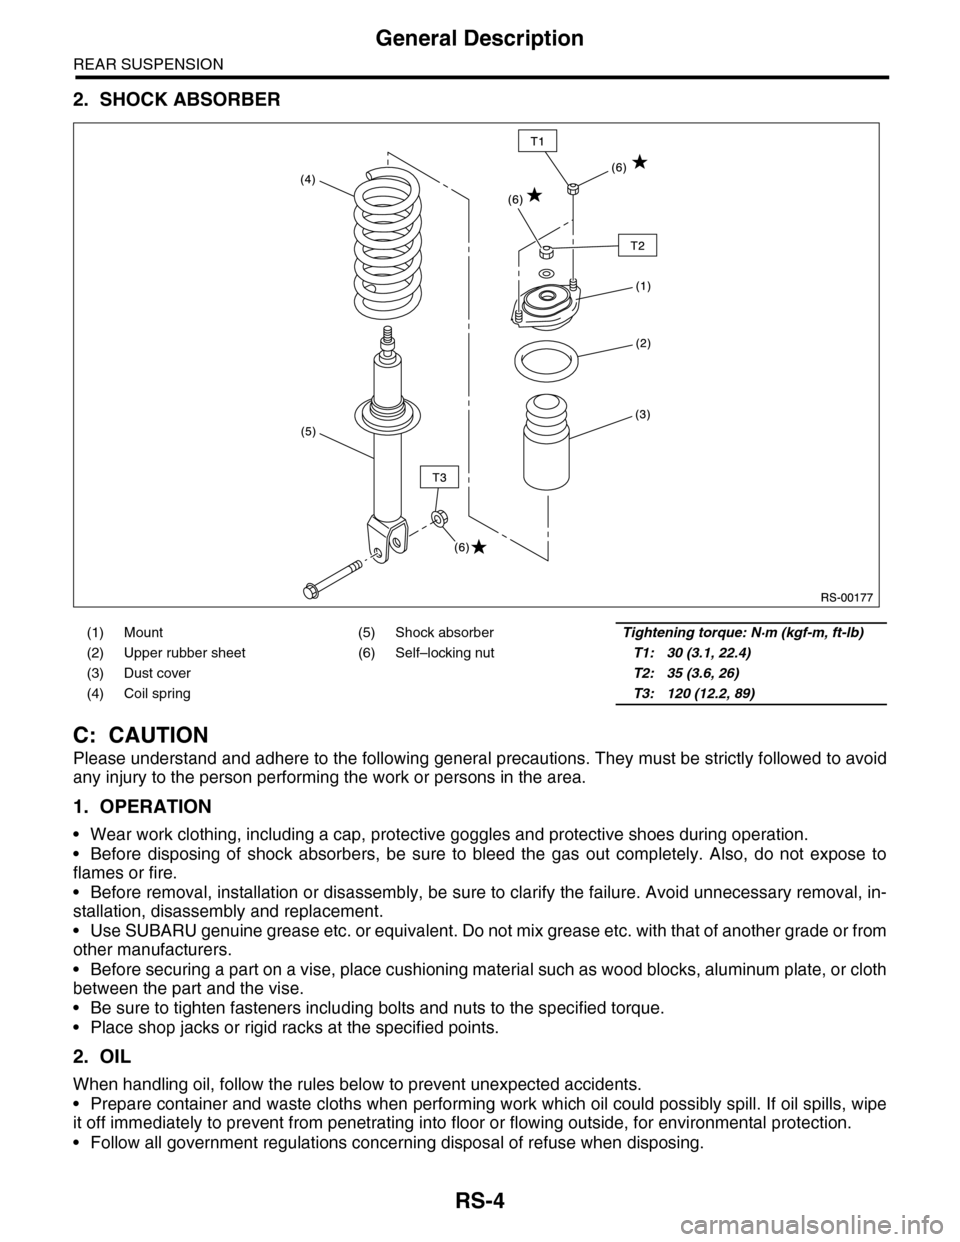
2. SHOCK ABSORBER
C: CAUTION
Please understand and adhere to the following general precautions. They must be strictly followed to avoid
any injury to the person performing the work or persons in the area.
1. OPERATION
•Wear work clothing, including a cap, protective goggles and protective shoes during operation.
•Before disposing of shock absorbers, be sure to bleed the gas out completely. Also, do not expose to
flames or fire.
•Before removal, installation or disassembly, be sure to clarify the failure. Avoid unnecessary removal, in-
stallation, disassembly and replacement.
•Use SUBARU genuine grease etc. or equivalent. Do not mix grease etc. with that of another grade or from
other manufacturers.
•Before securing a part on a vise, place cushioning material such as wood blocks, aluminum plate, or cloth
between the part and the vise.
•Be sure to tighten fasteners including bolts and nuts to the specified torque.
•Place shop jacks or rigid racks at the specified points.
2. OIL
When handling oil, follow the rules below to prevent unexpected accidents.
•Prepare container and waste cloths when performing work which oil could possibly spill. If oil spills, wipe
it off immediately to prevent from penetrating into floor or flowing outside, for environmental protection.
•Follow all government regulations concerning disposal of refuse when disposing.
(1) Mount (5) Shock absorberTightening torque: N·m (kgf-m, ft-lb)
(2) Upper rubber sheet (6) Self–locking nutT1: 30 (3.1, 22.4)
(3) Dust cover T2: 35 (3.6, 26)
(4) Coil spring T3: 120 (12.2, 89)
Page 938 of 2453
RS-5
General Description
REAR SUSPENSION
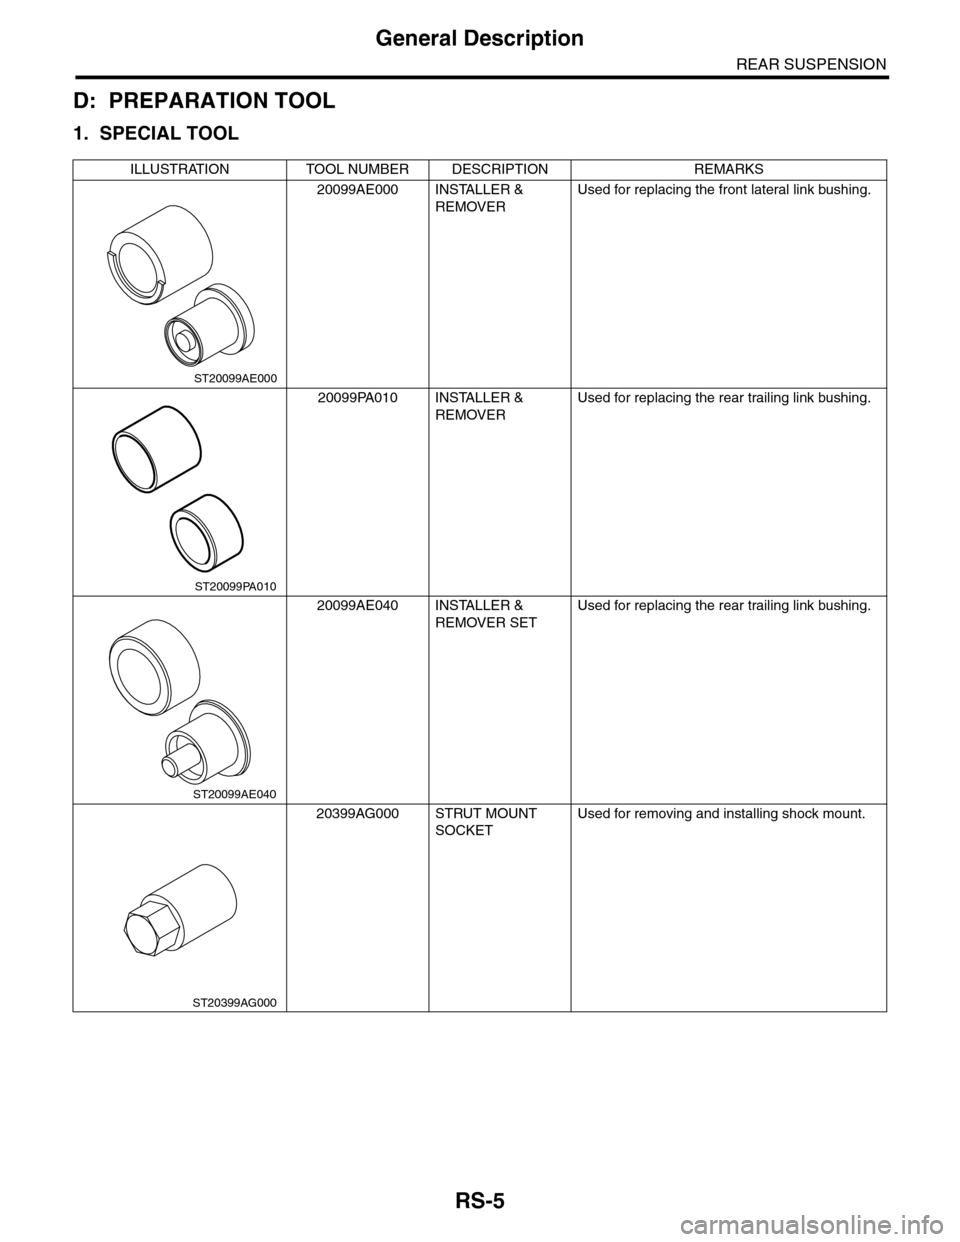
D: PREPARATION TOOL
1. SPECIAL TOOL
ILLUSTRATION TOOL NUMBER DESCRIPTION REMARKS
20099AE000 INSTALLER &
REMOVER
Used for replacing the front lateral link bushing.
20099PA010 INSTALLER &
REMOVER
Used for replacing the rear trailing link bushing.
20099AE040 INSTALLER &
REMOVER SET
Used for replacing the rear trailing link bushing.
20399AG000 STRUT MOUNT
SOCKET
Used for removing and installing shock mount.
ST20099AE000
ST20099PA010
ST20099AE040
ST20399AG000
Page 939 of 2453
RS-6
General Description
REAR SUSPENSION
2. GENERAL TOOL
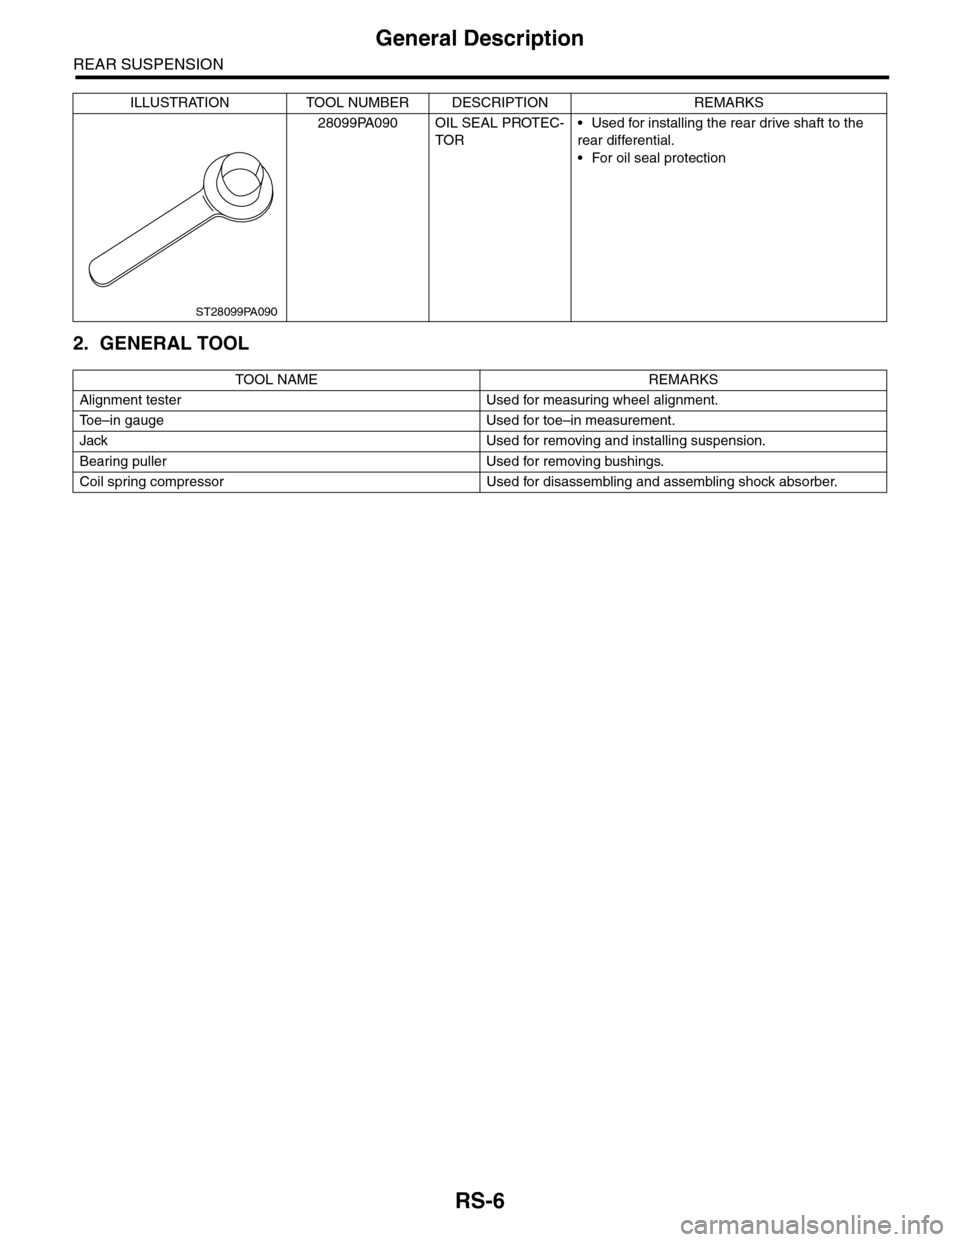
28099PA090 OIL SEAL PROTEC-
TOR
•Used for installing the rear drive shaft to the
rear differential.
•For oil seal protection
TOOL NAME REMARKS
Alignment tester Used for measuring wheel alignment.
To e – i n g a u g e U s e d f o r t o e – i n m e a s u r e m e n t .
Jack Used for removing and installing suspension.
Bearing puller Used for removing bushings.
Coil spring compressor Used for disassembling and assembling shock absorber.
ILLUSTRATION TOOL NUMBER DESCRIPTION REMARKS
ST28099PA090
Page 940 of 2453
RS-7
Wheel Alignment
REAR SUSPENSION
2. Wheel Alignment
A: INSPECTION
NOTE:
Measure and adjust the front and rear wheel align-
ment at a time. Refer to the section “FS” for mea-
surement and adjustment of wheel alignment.