Steering Terminal SUBARU TRIBECA 2009 1.G Service Workshop Manual
[x] Cancel search | Manufacturer: SUBARU, Model Year: 2009, Model line: TRIBECA, Model: SUBARU TRIBECA 2009 1.GPages: 2453, PDF Size: 46.32 MB
Page 80 of 2453
AB(diag)-56
Diagnostic Chart with Trouble Code
AIRBAG SYSTEM (DIAGNOSTICS)
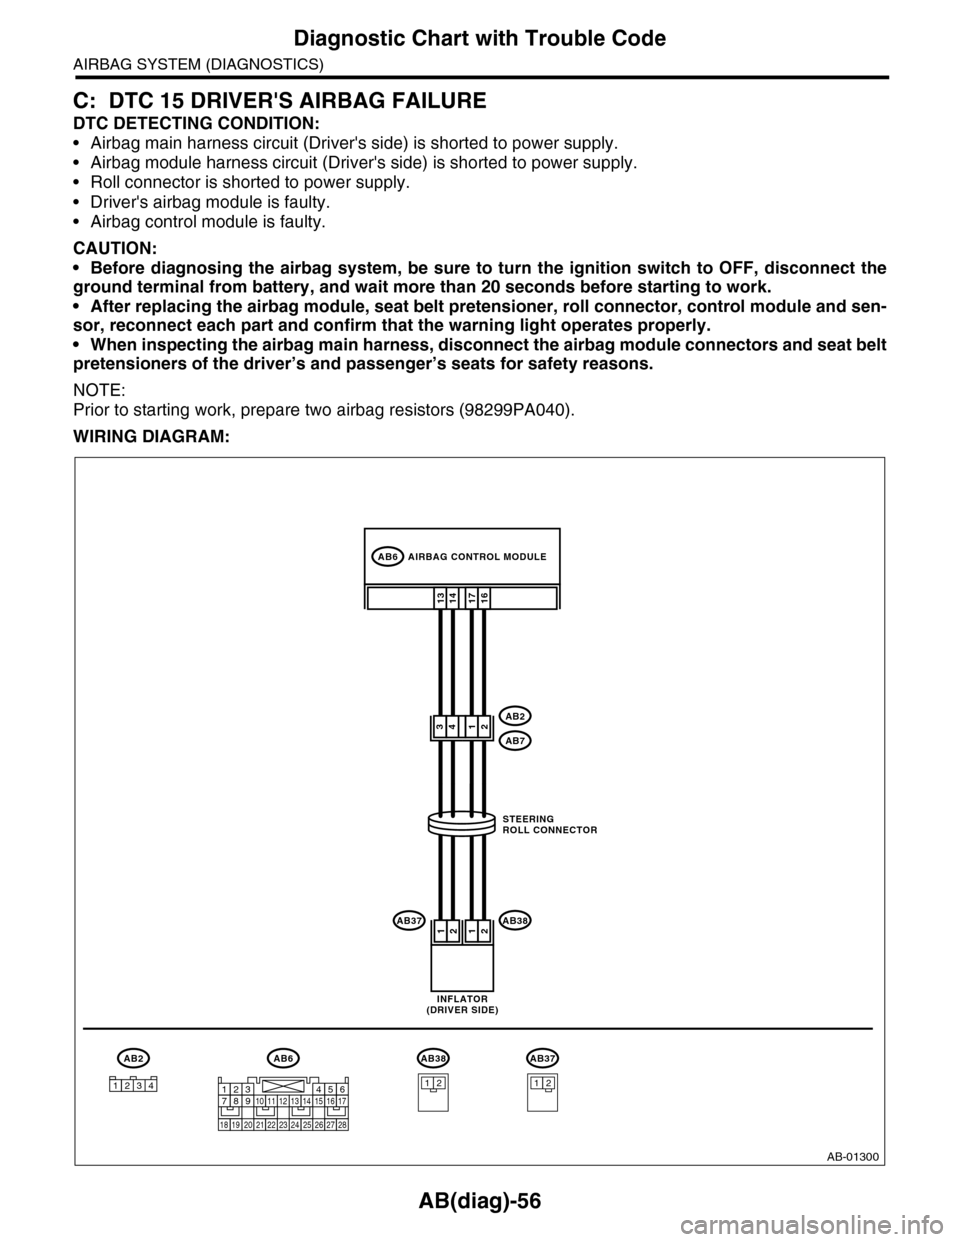
C: DTC 15 DRIVER'S AIRBAG FAILURE
DTC DETECTING CONDITION:
•Airbag main harness circuit (Driver's side) is shorted to power supply.
•Airbag module harness circuit (Driver's side) is shorted to power supply.
•Roll connector is shorted to power supply.
•Driver's airbag module is faulty.
•Airbag control module is faulty.
CAUTION:
•Before diagnosing the airbag system, be sure to turn the ignition switch to OFF, disconnect the
ground terminal from battery, and wait more than 20 seconds before starting to work.
•After replacing the airbag module, seat belt pretensioner, roll connector, control module and sen-
sor, reconnect each part and confirm that the warning light operates properly.
•When inspecting the airbag main harness, disconnect the airbag module connectors and seat belt
pretensioners of the driver’s and passenger’s seats for safety reasons.
NOTE:
Prior to starting work, prepare two airbag resistors (98299PA040).
WIRING DIAGRAM:
AB-01300
16171314
AB6
AB2
AB2
AB71234
AB6
AB381212
21
AB38
AB37
123421
AB37
1234567891011121314151617
1819202122232425262728
AIRBAG CONTROL MODULE
STEERINGROLL CONNECTOR
INFLATOR(DRIVER SIDE)
Page 87 of 2453
AB(diag)-63
Diagnostic Chart with Trouble Code
AIRBAG SYSTEM (DIAGNOSTICS)
This DTC is indicated when the front airbag module and the pretensioner are deployed.
Once this DTC is displayed, the memory cannot be cleared. Therefore replace the following parts.
•Airbag control module
•Driver's airbag module
•Passenger's airbag module
•Front sub sensor of both sides
•Front seat belt outer with pretensioner of both sides.
•Steering roll connector
•Occupant detection system (passenger’s seat cushion & frame assembly)
G: DTC 23 CONNECTOR TO AIRBAG ECU FAILURE
DTC DETECTING CONDITION:
Connection of (AB6), (AB17) and (AB18) to airbag control module is improper.
CAUTION:
Before diagnosing the airbag system, be sure to turn the ignition switch to OFF, disconnect the
ground terminal from battery, and wait more than 20 seconds before starting to work.
Step Check Yes No
1CHECK POOR CONTACTS OF CONNEC-
TORS (AB6), (AB17) AND (AB18).
1) Turn the ignition switch to OFF, disconnect
the battery ground cable, and wait more than
20 seconds.
2) Disconnect the connectors (AB6), (AB17)
and (AB18) from airbag control module.
Is there rust or damage on the
harness connector and the
control module connector?
Replace the airbag
control module.
Module.> Replace
the body harness
with the airbag
main harness or
replace the body
harness with the
side airbag har-
ness.
Go to step 2.
2CHECK POOR CONTACTS OF CONNEC-
TORS (AB6), (AB17) AND (AB18).
1) Reconnect the connector securely.
2) Connect the battery ground terminal and
turn the ignition switch to ON.
Does the airbag warning light
illuminate for 6 seconds and go
off?
Go to step 3.Replace the airbag
control module.
Module.>
3CHECK AIRBAG CONTROL MODULE.
1) Connect all the connectors.
2) Erase the memory.
3) Perform the inspection mode.
4) Read the DTC.
Is the same DTC displayed? Replace the airbag
control module.
Module.>
Go to step 4.
4CHECK ANY OTHER DTC ON DISPLAY.Is any other DTC displayed? Check DTC using
“List of Diagnostic
Tr o u b l e C o d e
(DTC)”.
of Diagnostic Trou-
ble Code (DTC).>
Finish the diagno-
sis.
Page 138 of 2453
AB(diag)-114
Diagnostic Chart with Trouble Code
AIRBAG SYSTEM (DIAGNOSTICS)
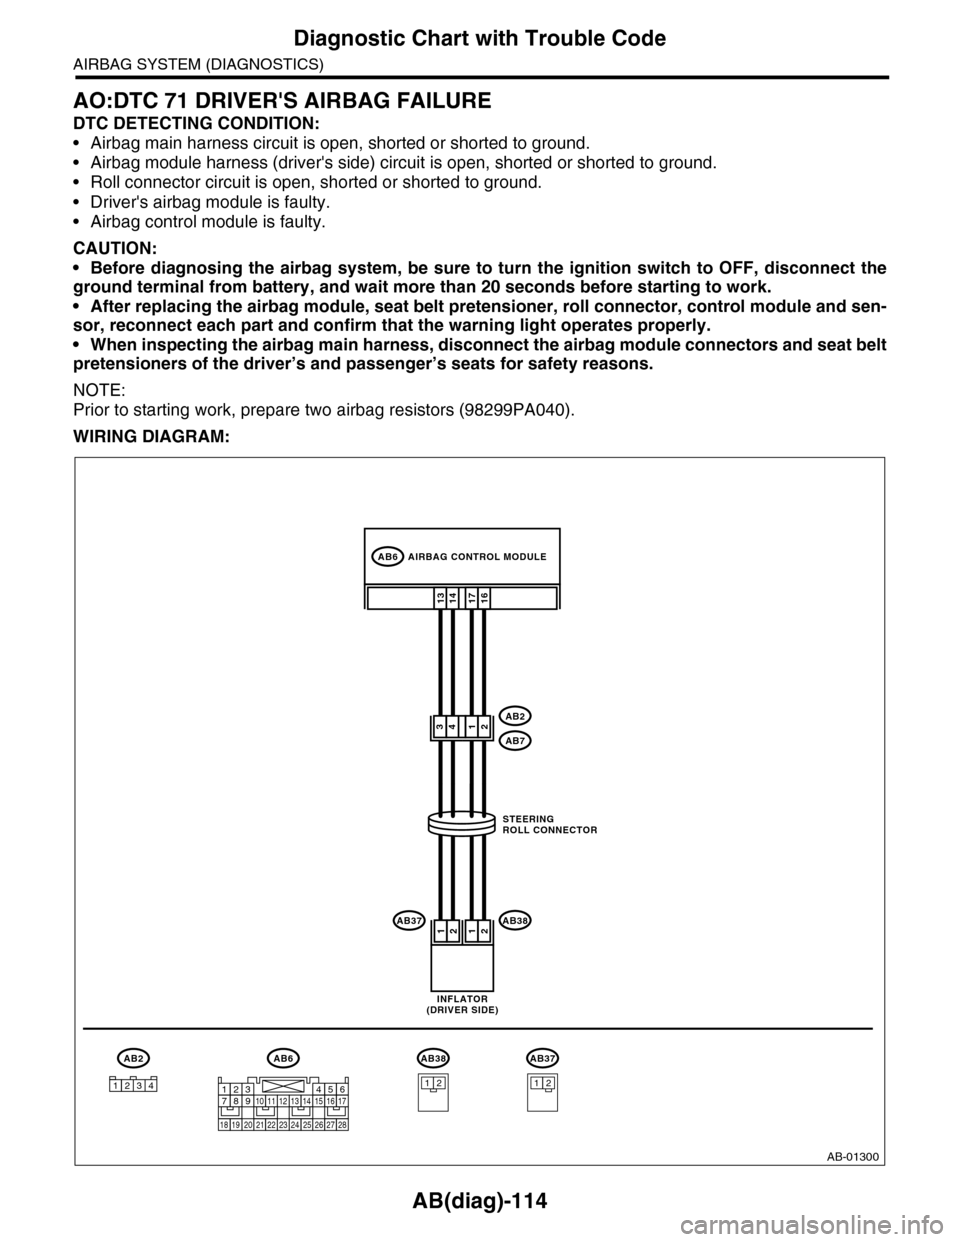
AO:DTC 71 DRIVER'S AIRBAG FAILURE
DTC DETECTING CONDITION:
•Airbag main harness circuit is open, shorted or shorted to ground.
•Airbag module harness (driver's side) circuit is open, shorted or shorted to ground.
•Roll connector circuit is open, shorted or shorted to ground.
•Driver's airbag module is faulty.
•Airbag control module is faulty.
CAUTION:
•Before diagnosing the airbag system, be sure to turn the ignition switch to OFF, disconnect the
ground terminal from battery, and wait more than 20 seconds before starting to work.
•After replacing the airbag module, seat belt pretensioner, roll connector, control module and sen-
sor, reconnect each part and confirm that the warning light operates properly.
•When inspecting the airbag main harness, disconnect the airbag module connectors and seat belt
pretensioners of the driver’s and passenger’s seats for safety reasons.
NOTE:
Prior to starting work, prepare two airbag resistors (98299PA040).
WIRING DIAGRAM:
AB-01300
16171314
AB6
AB2
AB2
AB71234
AB6
AB381212
21
AB38
AB37
123421
AB37
1234567891011121314151617
1819202122232425262728
AIRBAG CONTROL MODULE
STEERINGROLL CONNECTOR
INFLATOR(DRIVER SIDE)
Page 144 of 2453
AB(diag)-120
Diagnostic Chart with Trouble Code
AIRBAG SYSTEM (DIAGNOSTICS)
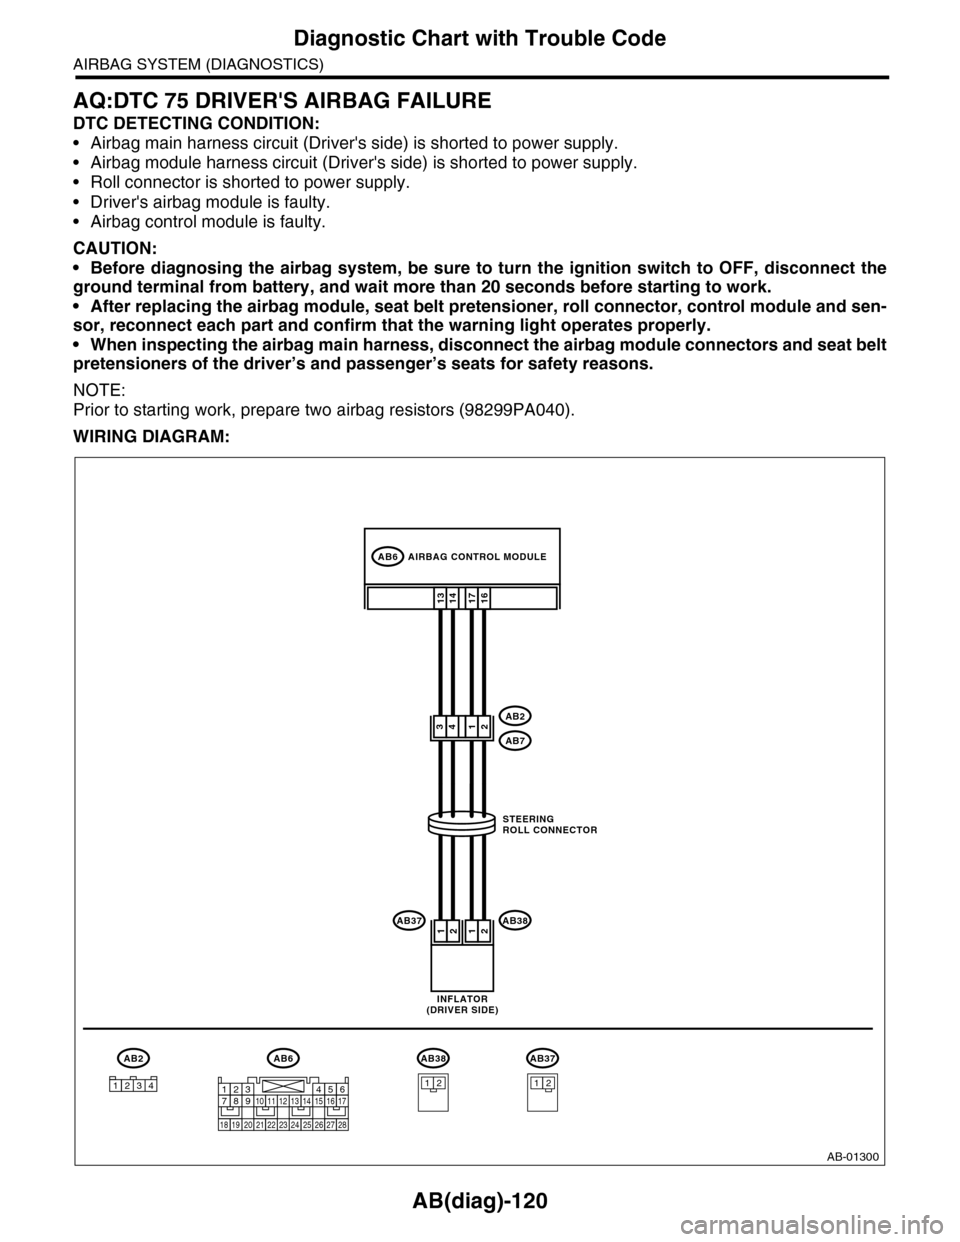
AQ:DTC 75 DRIVER'S AIRBAG FAILURE
DTC DETECTING CONDITION:
•Airbag main harness circuit (Driver's side) is shorted to power supply.
•Airbag module harness circuit (Driver's side) is shorted to power supply.
•Roll connector is shorted to power supply.
•Driver's airbag module is faulty.
•Airbag control module is faulty.
CAUTION:
•Before diagnosing the airbag system, be sure to turn the ignition switch to OFF, disconnect the
ground terminal from battery, and wait more than 20 seconds before starting to work.
•After replacing the airbag module, seat belt pretensioner, roll connector, control module and sen-
sor, reconnect each part and confirm that the warning light operates properly.
•When inspecting the airbag main harness, disconnect the airbag module connectors and seat belt
pretensioners of the driver’s and passenger’s seats for safety reasons.
NOTE:
Prior to starting work, prepare two airbag resistors (98299PA040).
WIRING DIAGRAM:
AB-01300
16171314
AB6
AB2
AB2
AB71234
AB6
AB381212
21
AB38
AB37
123421
AB37
1234567891011121314151617
1819202122232425262728
AIRBAG CONTROL MODULE
STEERINGROLL CONNECTOR
INFLATOR(DRIVER SIDE)
Page 167 of 2453
CC-5
Cruise Control Command Switch
CRUISE CONTROL SYSTEM
3. Cruise Control Command
Switch
A: REMOVAL
CAUTION:
Before servicing, be sure to read the notes in
the “AB” section for proper handling of the
driver’s airbag module.
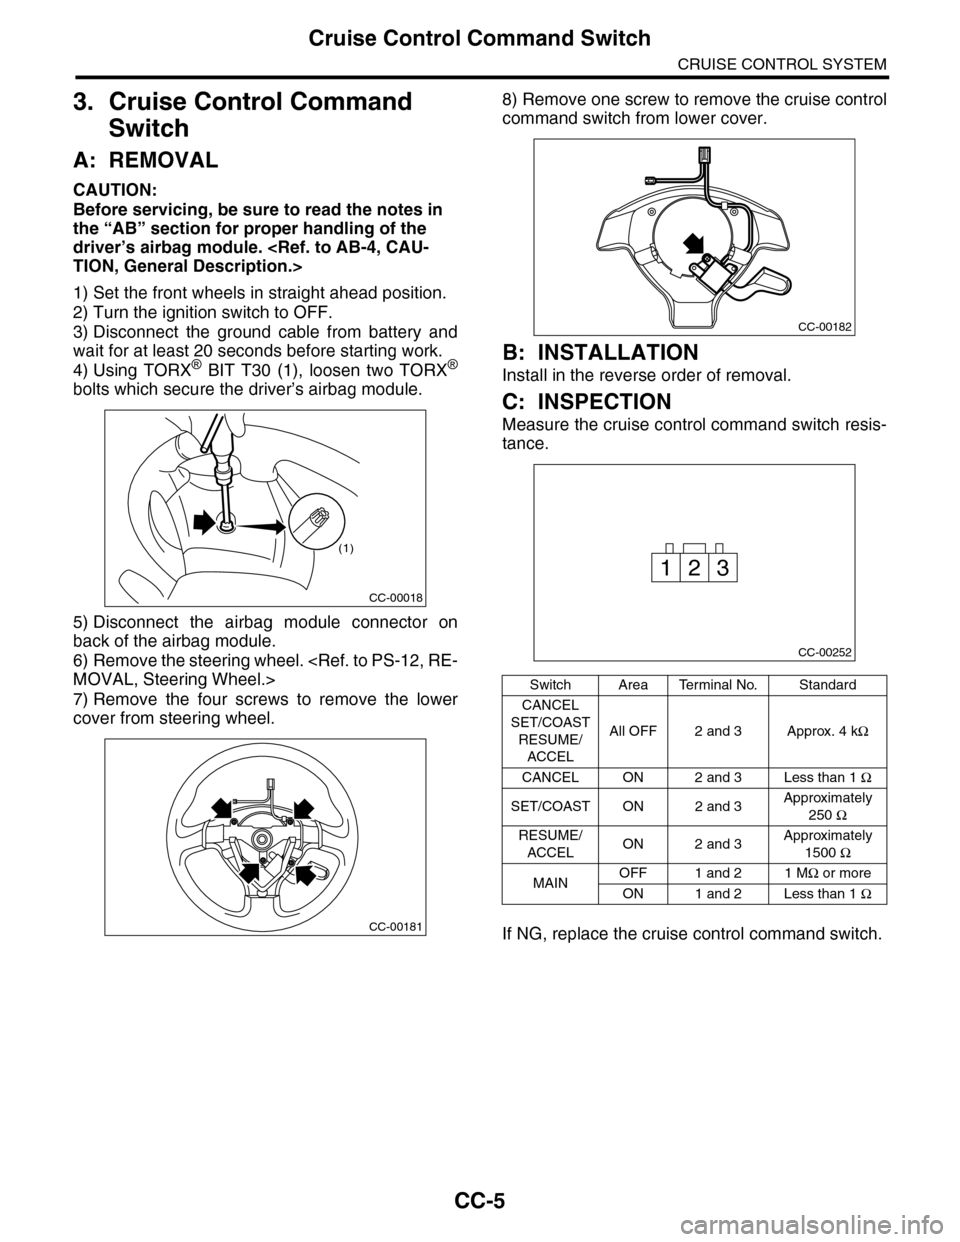
1) Set the front wheels in straight ahead position.
2) Turn the ignition switch to OFF.
3) Disconnect the ground cable from battery and
wait for at least 20 seconds before starting work.
4) Using TORX® BIT T30 (1), loosen two TORX®
bolts which secure the driver’s airbag module.
5) Disconnect the airbag module connector on
back of the airbag module.
6) Remove the steering wheel.
7) Remove the four screws to remove the lower
cover from steering wheel.
8) Remove one screw to remove the cruise control
command switch from lower cover.
B: INSTALLATION
Install in the reverse order of removal.
C: INSPECTION
Measure the cruise control command switch resis-
tance.
If NG, replace the cruise control command switch.
CC-00018
(1)
CC-00181
Switch Area Terminal No. Standard
CANCEL
SET/COAST
RESUME/
ACCEL
All OFF 2 and 3 Approx. 4 kΩ
CANCEL ON 2 and 3 Less than 1 Ω
SET/COAST ON 2 and 3Approximately
250 Ω
RESUME/
ACCELON 2 and 3Approximately
1500 Ω
MAINOFF 1 and 2 1 MΩ or more
ON 1 and 2 Less than 1 Ω
CC-00182
CC-00252
231
Page 180 of 2453
CC(ETC)(diag)-13
Diagnostic Procedure with Diagnostic Trouble Code (DTC)
CRUISE CONTROL SYSTEM (DIAGNOSTICS)
8. Diagnostic Procedure with Diagnostic Trouble Code (DTC)
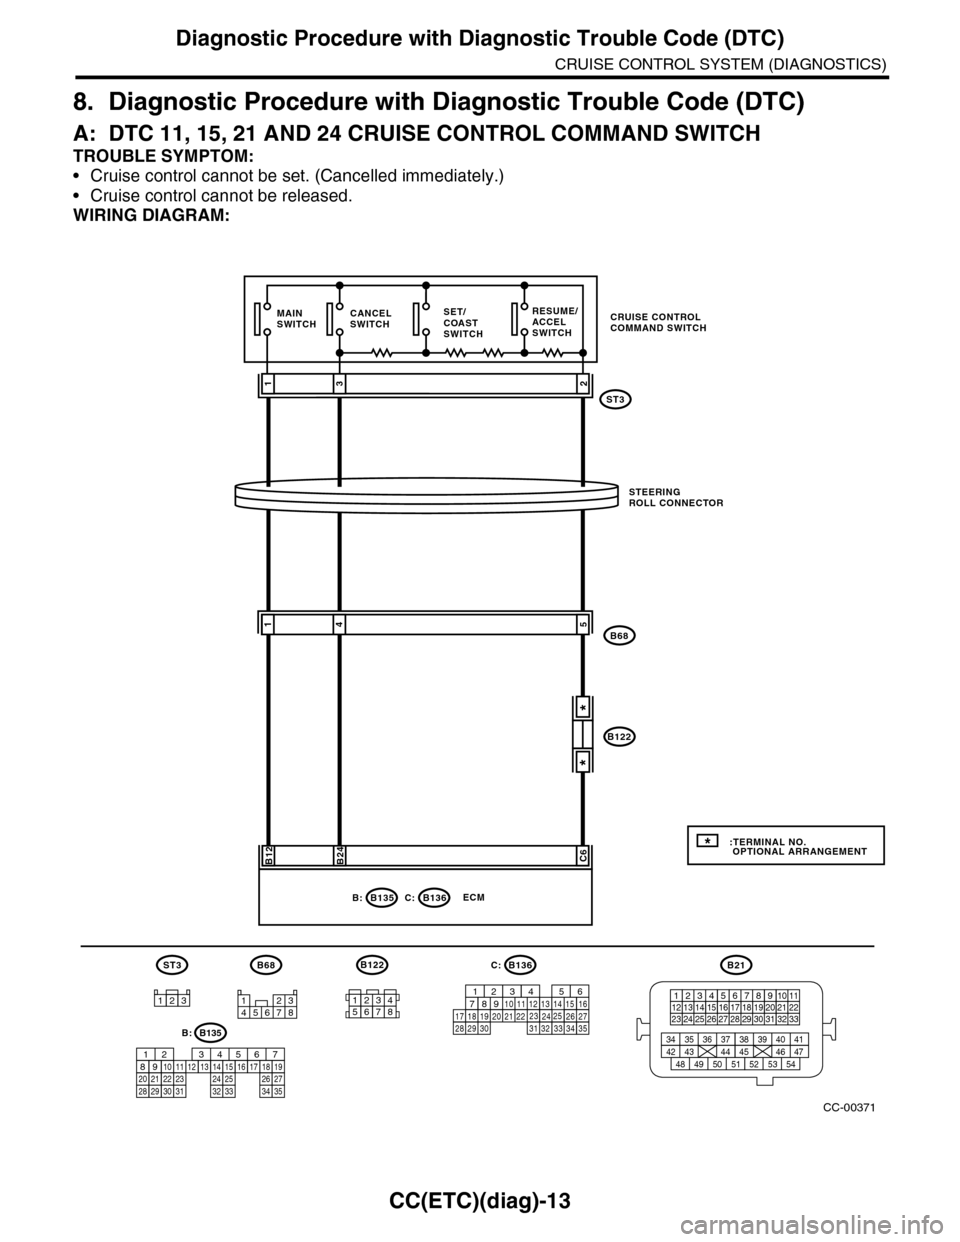
A: DTC 11, 15, 21 AND 24 CRUISE CONTROL COMMAND SWITCH
TROUBLE SYMPTOM:
•Cruise control cannot be set. (Cancelled immediately.)
•Cruise control cannot be released.
WIRING DIAGRAM:
CC-00371
ST3
SET/COASTSWITCH
RESUME/ACCELSWITCH
CANCELSWITCH
B136C:ECM
B24
2
B68
STEERINGROLL CONNECTOR
31
MAINSWITCH
541
B12C6
*
*
B21
123412131415567816171819910 1120212223 24 25 2627 28 29 3031 32 33
3534 37363938 41404342 4445 47464948 51505352 54
12345678
B68
123
ST3B136
9
302928 3231201918 22211012111424343327261612345613231525871735
C:
* :TERMINAL NO. OPTIONAL ARRANGEMENT
B122
CRUISE CONTROLCOMMAND SWITCH
B135B:
B122
12345678
B135
5672134
29
101112131415252416
30
98171819202821222332312627333435
B:
Page 181 of 2453
CC(ETC)(diag)-14
Diagnostic Procedure with Diagnostic Trouble Code (DTC)
CRUISE CONTROL SYSTEM (DIAGNOSTICS)
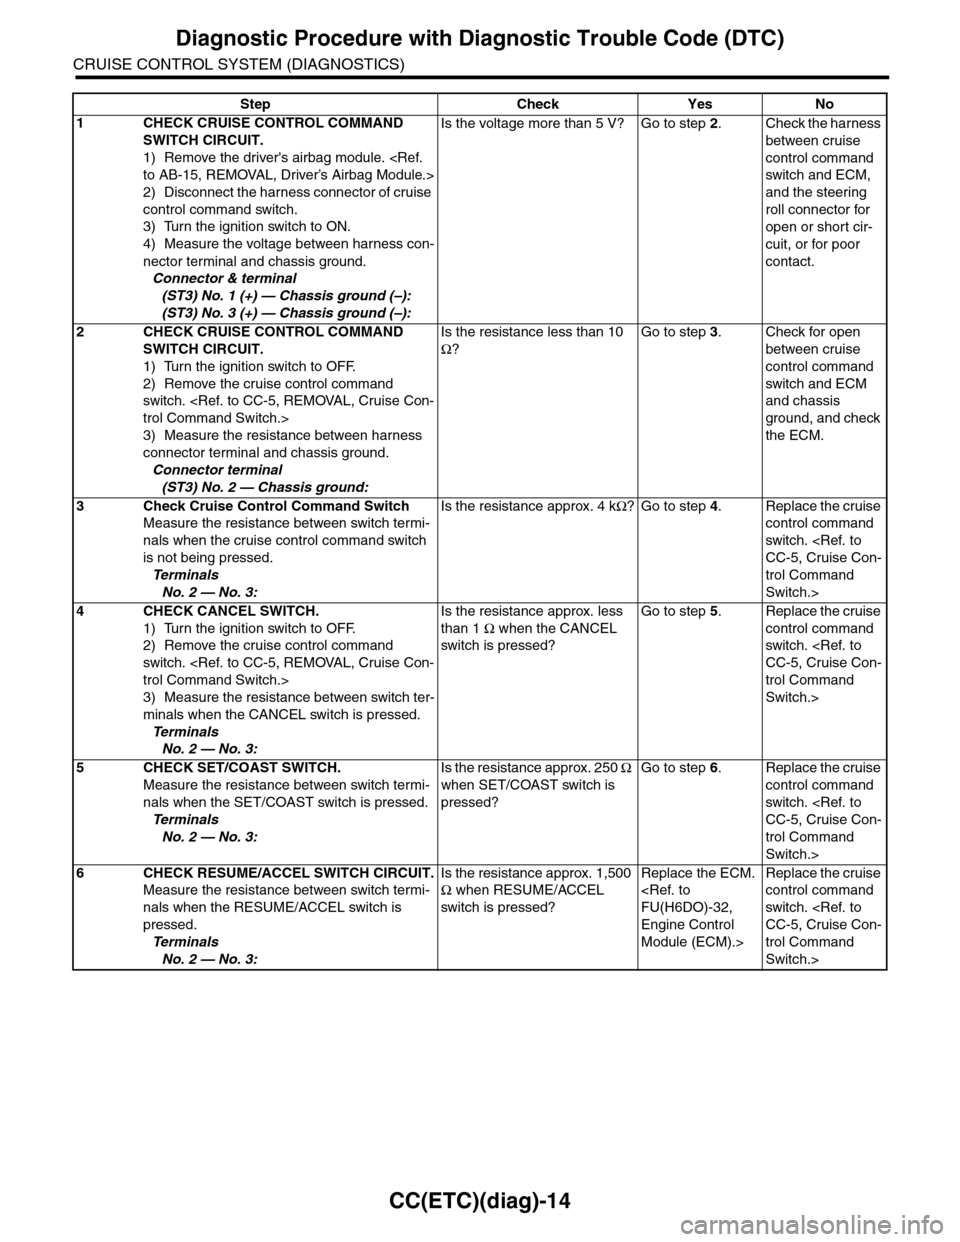
Step Check Yes No
1CHECK CRUISE CONTROL COMMAND
SWITCH CIRCUIT.
1) Remove the driver's airbag module.
2) Disconnect the harness connector of cruise
control command switch.
3) Turn the ignition switch to ON.
4) Measure the voltage between harness con-
nector terminal and chassis ground.
Connector & terminal
(ST3) No. 1 (+) — Chassis ground (–):
(ST3) No. 3 (+) — Chassis ground (–):
Is the voltage more than 5 V? Go to step 2.Check the harness
between cruise
control command
switch and ECM,
and the steering
roll connector for
open or short cir-
cuit, or for poor
contact.
2CHECK CRUISE CONTROL COMMAND
SWITCH CIRCUIT.
1) Turn the ignition switch to OFF.
2) Remove the cruise control command
switch.
3) Measure the resistance between harness
connector terminal and chassis ground.
Connector terminal
(ST3) No. 2 — Chassis ground:
Is the resistance less than 10
Ω?
Go to step 3.Check for open
between cruise
control command
switch and ECM
and chassis
ground, and check
the ECM.
3Check Cruise Control Command Switch
Measure the resistance between switch termi-
nals when the cruise control command switch
is not being pressed.
Te r m i n a l s
No. 2 — No. 3:
Is the resistance approx. 4 kΩ?Go to step 4.Replace the cruise
control command
switch.
trol Command
Switch.>
4CHECK CANCEL SWITCH.
1) Turn the ignition switch to OFF.
2) Remove the cruise control command
switch.
3) Measure the resistance between switch ter-
minals when the CANCEL switch is pressed.
Te r m i n a l s
No. 2 — No. 3:
Is the resistance approx. less
than 1 Ω when the CANCEL
switch is pressed?
Go to step 5.Replace the cruise
control command
switch.
trol Command
Switch.>
5CHECK SET/COAST SWITCH.
Measure the resistance between switch termi-
nals when the SET/COAST switch is pressed.
Te r m i n a l s
No. 2 — No. 3:
Is the resistance approx. 250 Ω
when SET/COAST switch is
pressed?
Go to step 6.Replace the cruise
control command
switch.
trol Command
Switch.>
6CHECK RESUME/ACCEL SWITCH CIRCUIT.
Measure the resistance between switch termi-
nals when the RESUME/ACCEL switch is
pressed.
Te r m i n a l s
No. 2 — No. 3:
Is the resistance approx. 1,500
Ω when RESUME/ACCEL
switch is pressed?
Replace the ECM.
Engine Control
Module (ECM).>
Replace the cruise
control command
switch.
trol Command
Switch.>
Page 218 of 2453
ET-33
Steering Satellite Switch
ENTERTAINMENT
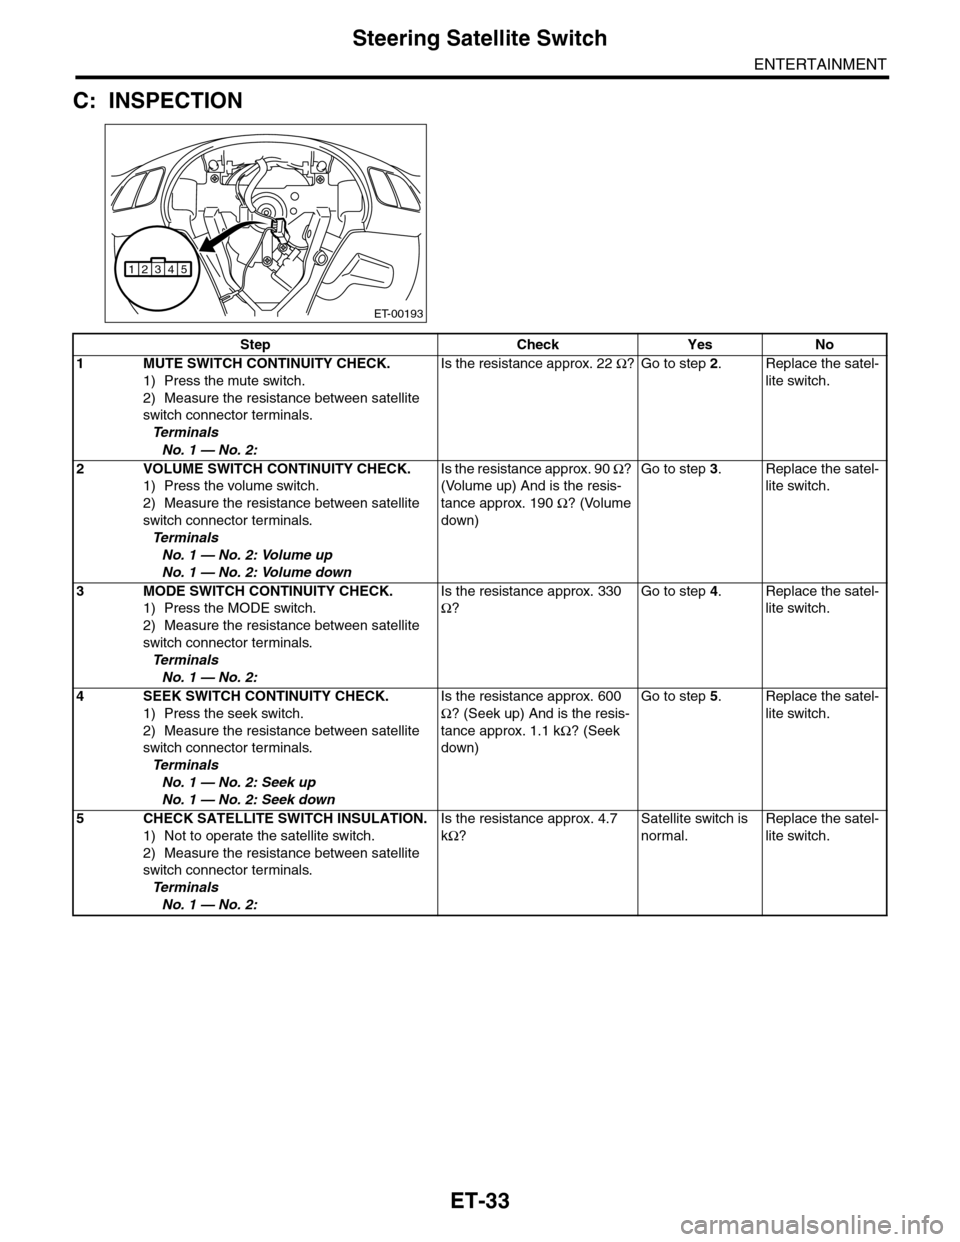
C: INSPECTION
ET-00193
12345
Step Check Yes No
1MUTE SWITCH CONTINUITY CHECK.
1) Press the mute switch.
2) Measure the resistance between satellite
switch connector terminals.
Te r m i n a l s
No. 1 — No. 2:
Is the resistance approx. 22 Ω?Go to step 2.Replace the satel-
lite switch.
2VOLUME SWITCH CONTINUITY CHECK.
1) Press the volume switch.
2) Measure the resistance between satellite
switch connector terminals.
Te r m i n a l s
No. 1 — No. 2: Volume up
No. 1 — No. 2: Volume down
Is the resistance approx. 90 Ω?
(Volume up) And is the resis-
tance approx. 190 Ω? (Volume
down)
Go to step 3.Replace the satel-
lite switch.
3MODE SWITCH CONTINUITY CHECK.
1) Press the MODE switch.
2) Measure the resistance between satellite
switch connector terminals.
Te r m i n a l s
No. 1 — No. 2:
Is the resistance approx. 330
Ω?
Go to step 4.Replace the satel-
lite switch.
4SEEK SWITCH CONTINUITY CHECK.
1) Press the seek switch.
2) Measure the resistance between satellite
switch connector terminals.
Te r m i n a l s
No. 1 — No. 2: Seek up
No. 1 — No. 2: Seek down
Is the resistance approx. 600
Ω? (Seek up) And is the resis-
tance approx. 1.1 kΩ? (Seek
down)
Go to step 5.Replace the satel-
lite switch.
5CHECK SATELLITE SWITCH INSULATION.
1) Not to operate the satellite switch.
2) Measure the resistance between satellite
switch connector terminals.
Te r m i n a l s
No. 1 — No. 2:
Is the resistance approx. 4.7
kΩ?
Satellite switch is
normal.
Replace the satel-
lite switch.
Page 502 of 2453
LAN(diag)-46
Diagnostic Procedure with Diagnostic Trouble Code (DTC)
LAN SYSTEM (DIAGNOSTICS)
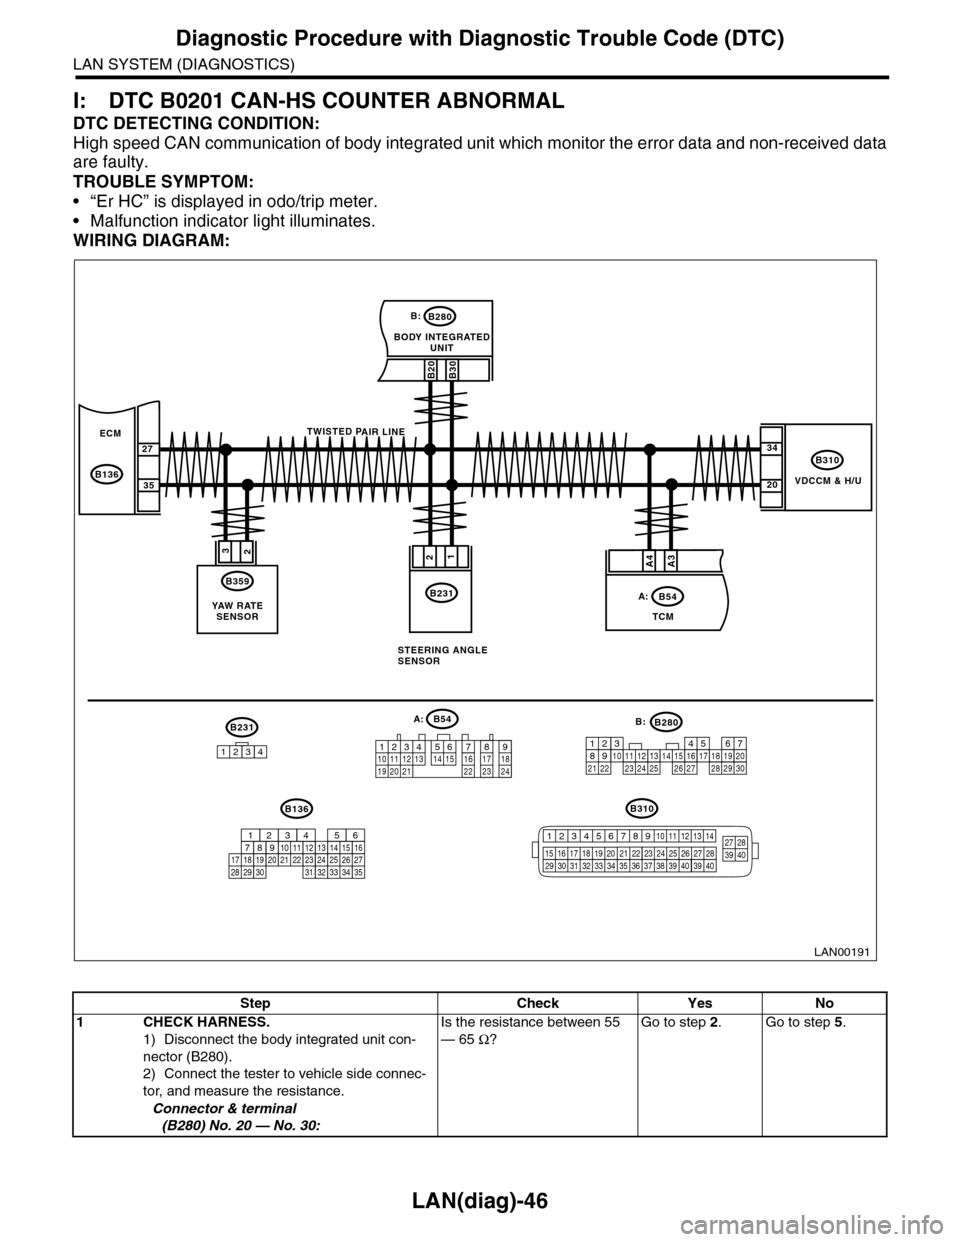
I: DTC B0201 CAN-HS COUNTER ABNORMAL
DTC DETECTING CONDITION:
High speed CAN communication of body integrated unit which monitor the error data and non-received data
are faulty.
TROUBLE SYMPTOM:
•“Er HC” is displayed in odo/trip meter.
•Malfunction indicator light illuminates.
WIRING DIAGRAM:
VDCCM & H/U
B310
B20B30
BODY INTEGRATEDUNIT
B280B:
TCM
B54A:
23
B359
YAW R AT ESENSOR
34
20
B231
21
STEERING ANGLESENSOR
B231
1234
B54A:
12 7 8 9563410 11 1219 20 2113 14 15 16 17 1822 23 24
B136B310
B280B:
5467821931022 23111213141524 25 26 2716171828 29192021 30
ECM
B136
27
35
A3A4
TWISTED PAIR LINE
12345678910 11 12 13 14
15 16 17 18 19 2021 22 23 24 25 26 27 2829 30 31 32 33 3435 36 37 38 39403940
27 28394016101112131415252430
9871718192028212223293231
123456
2726333435
LAN00191
Step Check Yes No
1CHECK HARNESS.
1) Disconnect the body integrated unit con-
nector (B280).
2) Connect the tester to vehicle side connec-
tor, and measure the resistance.
Connector & terminal
(B280) No. 20 — No. 30:
Is the resistance between 55
— 65 Ω?
Go to step 2.Go to step 5.
Page 503 of 2453
LAN(diag)-47
Diagnostic Procedure with Diagnostic Trouble Code (DTC)
LAN SYSTEM (DIAGNOSTICS)
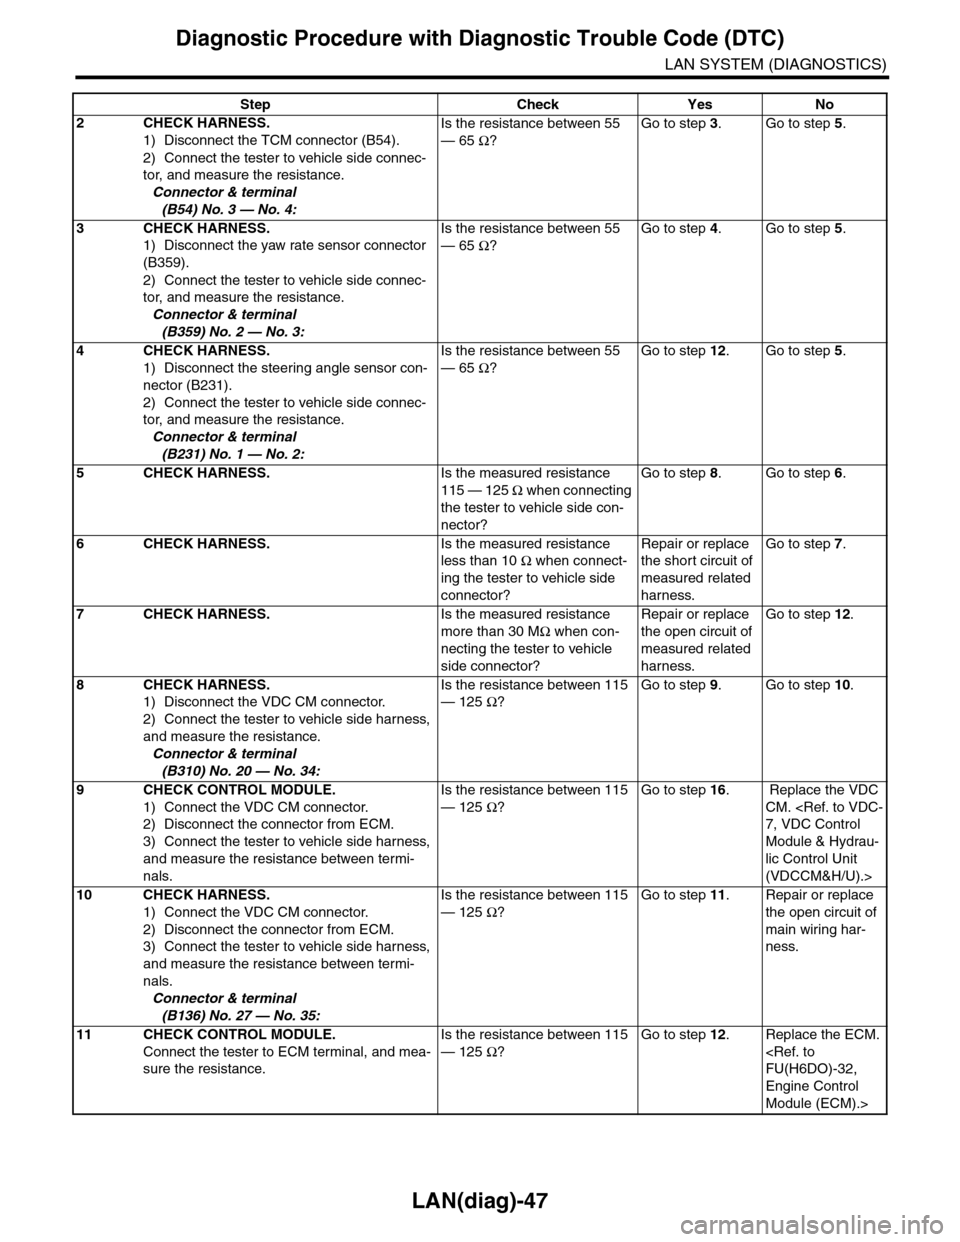
2CHECK HARNESS.
1) Disconnect the TCM connector (B54).
2) Connect the tester to vehicle side connec-
tor, and measure the resistance.
Connector & terminal
(B54) No. 3 — No. 4:
Is the resistance between 55
— 65 Ω?
Go to step 3.Go to step 5.
3CHECK HARNESS.
1) Disconnect the yaw rate sensor connector
(B359).
2) Connect the tester to vehicle side connec-
tor, and measure the resistance.
Connector & terminal
(B359) No. 2 — No. 3:
Is the resistance between 55
— 65 Ω?
Go to step 4.Go to step 5.
4CHECK HARNESS.
1) Disconnect the steering angle sensor con-
nector (B231).
2) Connect the tester to vehicle side connec-
tor, and measure the resistance.
Connector & terminal
(B231) No. 1 — No. 2:
Is the resistance between 55
— 65 Ω?
Go to step 12.Go to step 5.
5CHECK HARNESS.Is the measured resistance
115 — 125 Ω when connecting
the tester to vehicle side con-
nector?
Go to step 8.Go to step 6.
6CHECK HARNESS.Is the measured resistance
less than 10 Ω when connect-
ing the tester to vehicle side
connector?
Repair or replace
the short circuit of
measured related
harness.
Go to step 7.
7CHECK HARNESS.Is the measured resistance
more than 30 MΩ when con-
necting the tester to vehicle
side connector?
Repair or replace
the open circuit of
measured related
harness.
Go to step 12.
8CHECK HARNESS.
1) Disconnect the VDC CM connector.
2) Connect the tester to vehicle side harness,
and measure the resistance.
Connector & terminal
(B310) No. 20 — No. 34:
Is the resistance between 115
— 125 Ω?
Go to step 9.Go to step 10.
9CHECK CONTROL MODULE.
1) Connect the VDC CM connector.
2) Disconnect the connector from ECM.
3) Connect the tester to vehicle side harness,
and measure the resistance between termi-
nals.
Is the resistance between 115
— 125 Ω?
Go to step 16. Replace the VDC
CM.
Module & Hydrau-
lic Control Unit
(VDCCM&H/U).>
10 CHECK HARNESS.
1) Connect the VDC CM connector.
2) Disconnect the connector from ECM.
3) Connect the tester to vehicle side harness,
and measure the resistance between termi-
nals.
Connector & terminal
(B136) No. 27 — No. 35:
Is the resistance between 115
— 125 Ω?
Go to step 11.Repair or replace
the open circuit of
main wiring har-
ness.
11 CHECK CONTROL MODULE.
Connect the tester to ECM terminal, and mea-
sure the resistance.
Is the resistance between 115
— 125 Ω?
Go to step 12.Replace the ECM.
Engine Control
Module (ECM).>
Step Check Yes No