SUZUKI ERTIGA 2013 1.G Owners Manual
Manufacturer: SUZUKI, Model Year: 2013, Model line: ERTIGA, Model: SUZUKI ERTIGA 2013 1.GPages: 207, PDF Size: 5.14 MB
Page 121 of 207
Downloaded from www.Manualslib.com manuals search engine 5-26
OTHER CONTROLS AND EQUIPMENT
60MK0-14E
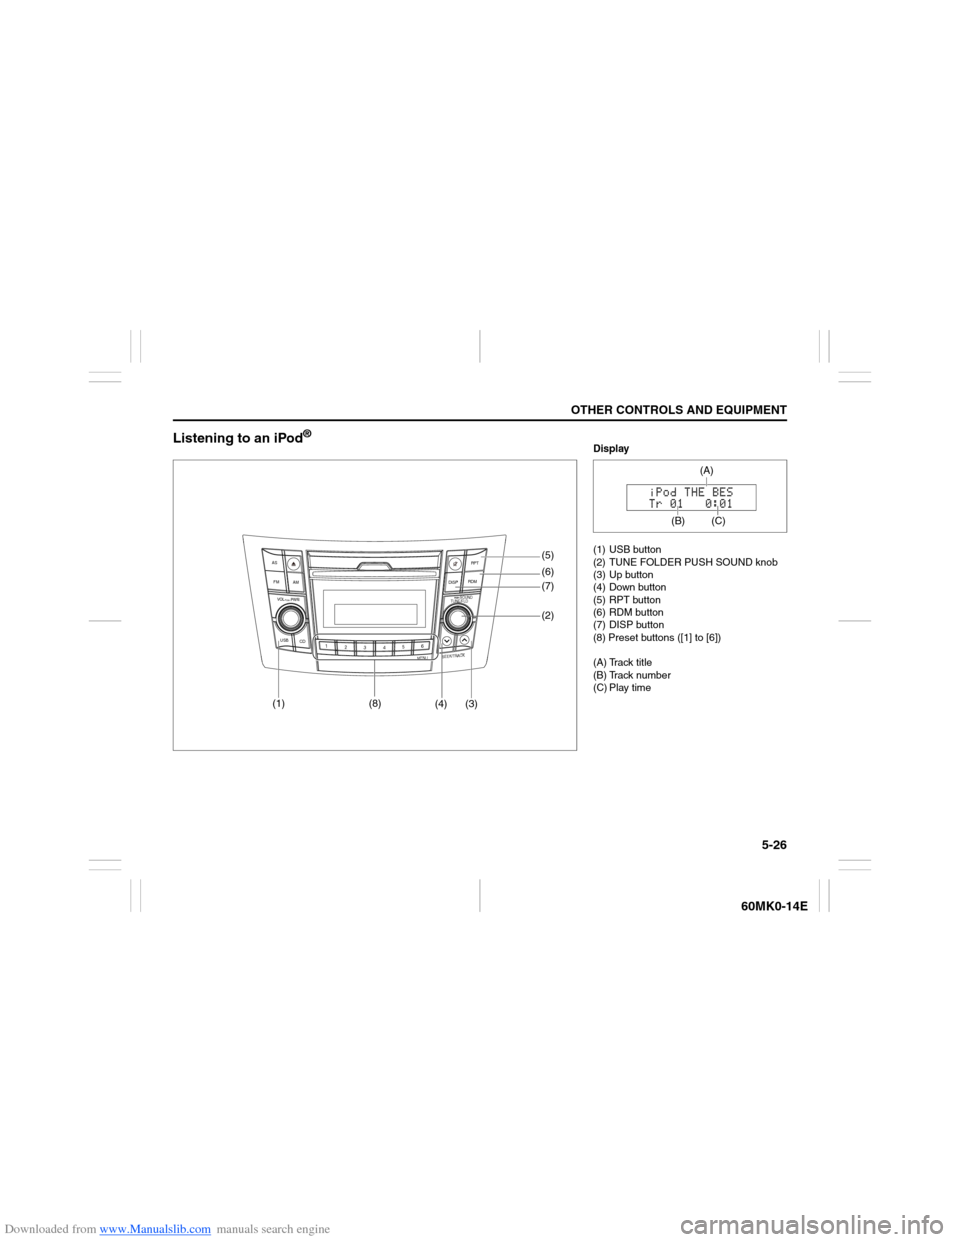
Listening to an iPod
®
USB
CD
1
2
3456
MENU
SEEK/TRACK
AS
AM FMRPT
RDM
DISP
PUSH SOUND
TUNE/FLD
VO L PUSH PWR
(4) (3)(7) (5)
(6)
(2)
(1)
(8)
Display
(1) USB button
(2) TUNE FOLDER PUSH SOUND knob
(3) Up button
(4) Down button
(5) RPT button
(6) RDM button
(7) DISP button
(8) Preset buttons ([1] to [6])
(A) Track title
(B) Track number
(C) Play time
(C)
(A)
(B)
Page 122 of 207
Downloaded from www.Manualslib.com manuals search engine 5-27OTHER CONTROLS AND EQUIPMENT
60MK0-14E
Selecting an iPod
® mode
Press the USB button (1).
Selecting a track
Press the Up button (3) to listen to the
next track.
Press the Down button (4) twice to lis-
ten to the previous track.
When the Down button (4) is pressed
once, the track currently being played
will start from the beginning again.
Fast forwarding/Rewinding a track
Hold down the Up button (3) to fast for-
ward the track.
Hold down the Down button (4) to fast
rewind the track.Random playback
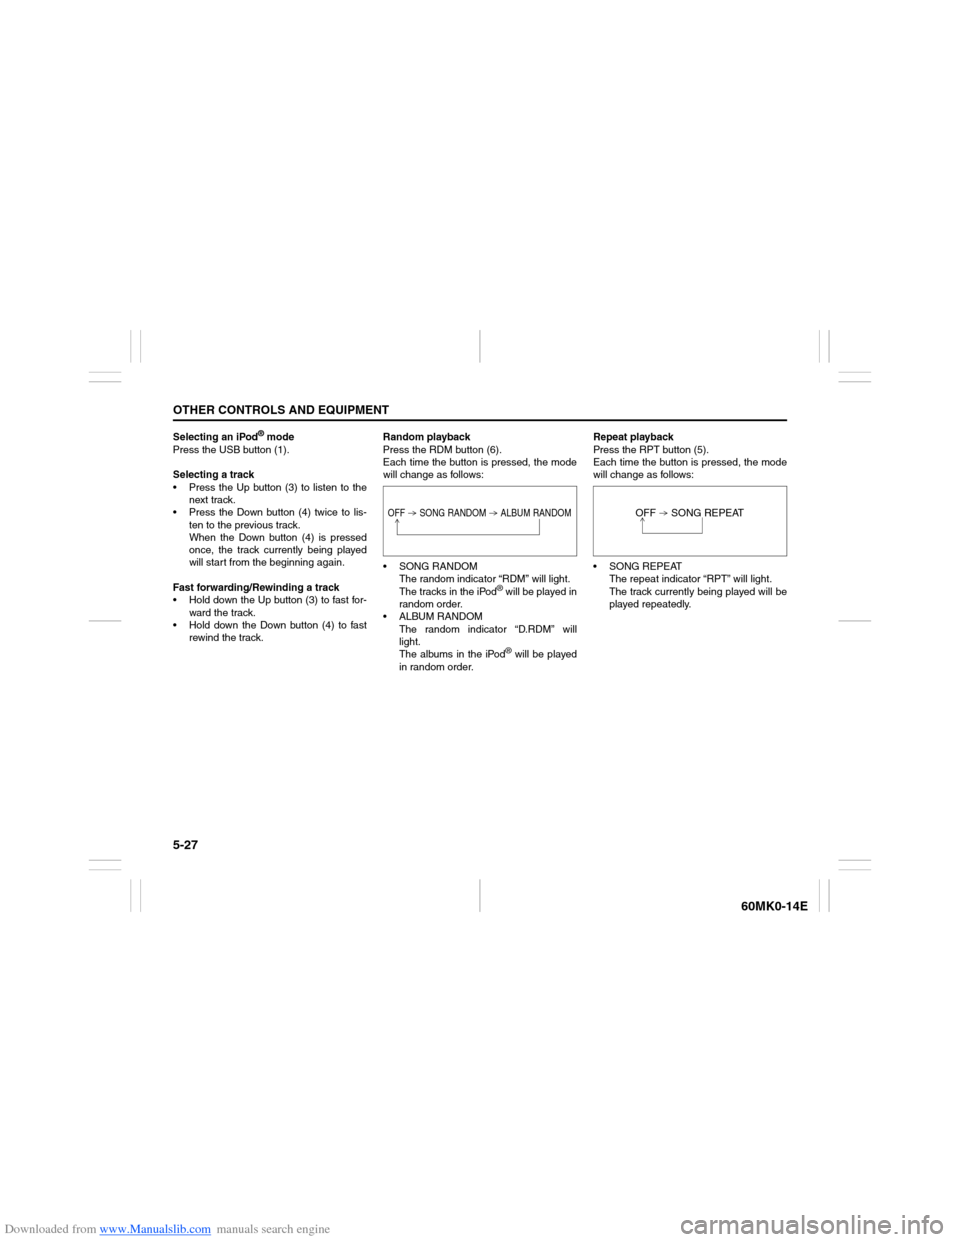
Press the RDM button (6).
Each time the button is pressed, the mode
will change as follows:
SONG RANDOM
The random indicator “RDM” will light.
The tracks in the iPod
® will be played in
random order.
ALBUM RANDOM
The random indicator “D.RDM” will
light.
The albums in the iPod® will be played
in random order.Repeat playback
Press the RPT button (5).
Each time the button is pressed, the mode
will change as follows:
SONG REPEAT
The repeat indicator “RPT” will light.
The track currently being played will be
played repeatedly.
OFF SONG RANDOM ALBUM RANDOM
OFF SONG REPEAT
Page 123 of 207
Downloaded from www.Manualslib.com manuals search engine 5-28
OTHER CONTROLS AND EQUIPMENT
60MK0-14E
Display change
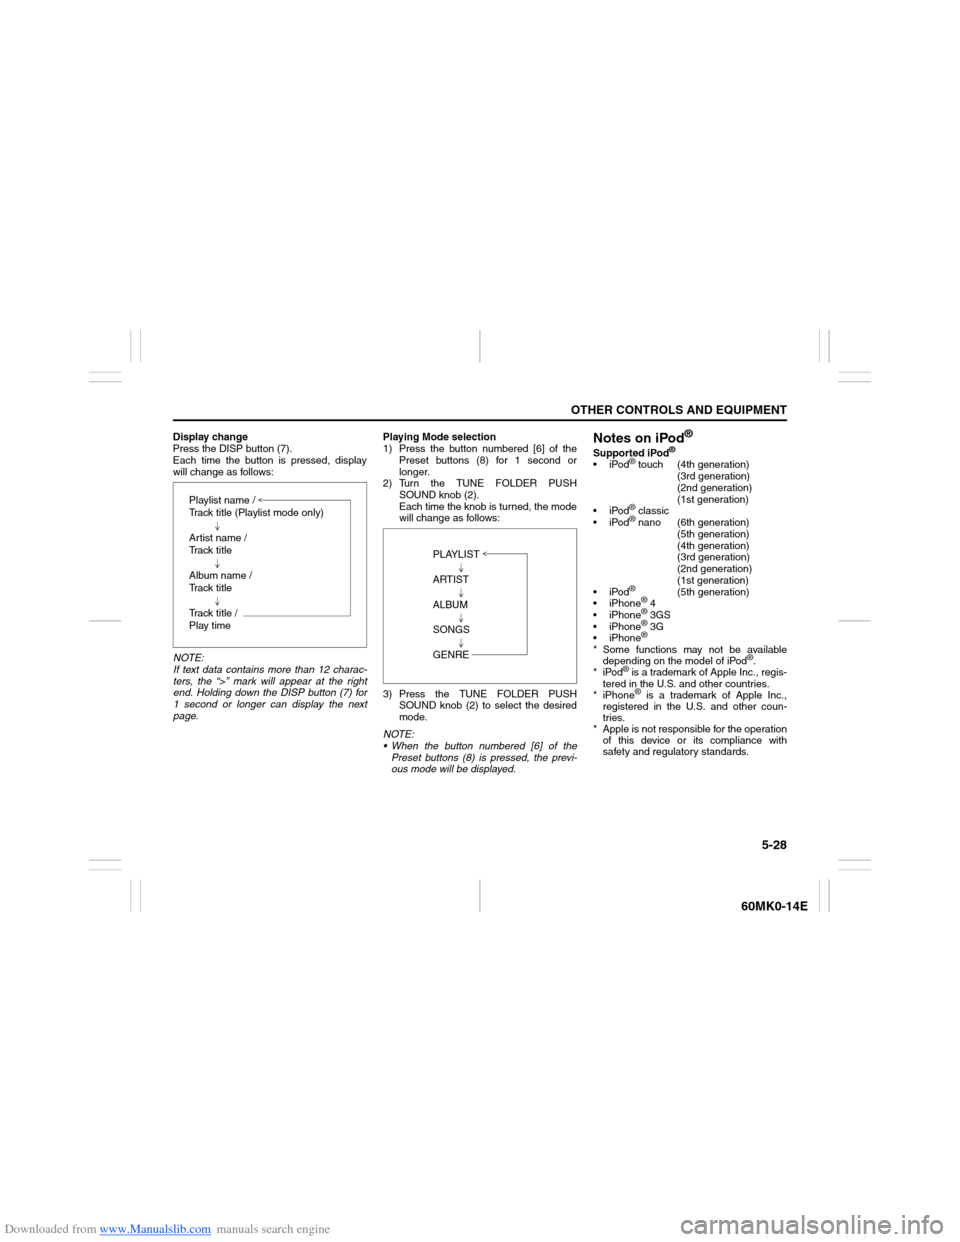
Press the DISP button (7).
Each time the button is pressed, display
will change as follows:
NOTE:
If text data contains more than 12 charac-
ters, the “>” mark will appear at the right
end. Holding down the DISP button (7) for
1 second or longer can display the next
page.Playing Mode selection
1) Press the button numbered [6] of the
Preset buttons (8) for 1 second or
longer.
2) Turn the TUNE FOLDER PUSH
SOUND knob (2).
Each time the knob is turned, the mode
will change as follows:
3) Press the TUNE FOLDER PUSH
SOUND knob (2) to select the desired
mode.
NOTE:
When the button numbered [6] of the
Preset buttons (8) is pressed, the previ-
ous mode will be displayed.
Notes on iPod
®
Supported iPod
®
iPod
® touch (4th generation)
(3rd generation)
(2nd generation)
(1st generation)
iPod® classic
iPod® nano (6th generation)
(5th generation)
(4th generation)
(3rd generation)
(2nd generation)
(1st generation)
iPod®
(5th generation)
iPhone
® 4
iPhone® 3GS
iPhone® 3G
iPhone®
* Some functions may not be available
depending on the model of iPod
®.
*iPod
® is a trademark of Apple Inc., regis-
tered in the U.S. and other countries.
* iPhone® is a trademark of Apple Inc.,
registered in the U.S. and other coun-
tries.
* Apple is not responsible for the operation
of this device or its compliance with
safety and regulatory standards. Playlist name /
Track title (Playlist mode only)
Artist name /
Track title
Album name /
Track title
Track title /
Play time
PLAYLIST
ARTIST
ALBUM
SONGS
GENRE
Page 124 of 207
Downloaded from www.Manualslib.com manuals search engine 5-29OTHER CONTROLS AND EQUIPMENT
60MK0-14E
iPod
® connection
Make sure to detach the iPod
® after
pressing the engine switch to change
the ignition mode to LOCK. The iPod
®
may not be shut down when it is being
connected and may result in battery
depletion.
Please do not connect iPod
® accesso-
ries such as an iPod
® remote control or
headphones while connecting the
iPod
® with the unit. The unit may not
operate correctly.
Page 125 of 207
Downloaded from www.Manualslib.com manuals search engine 5-30
OTHER CONTROLS AND EQUIPMENT
60MK0-14E
Remote Audio Controls
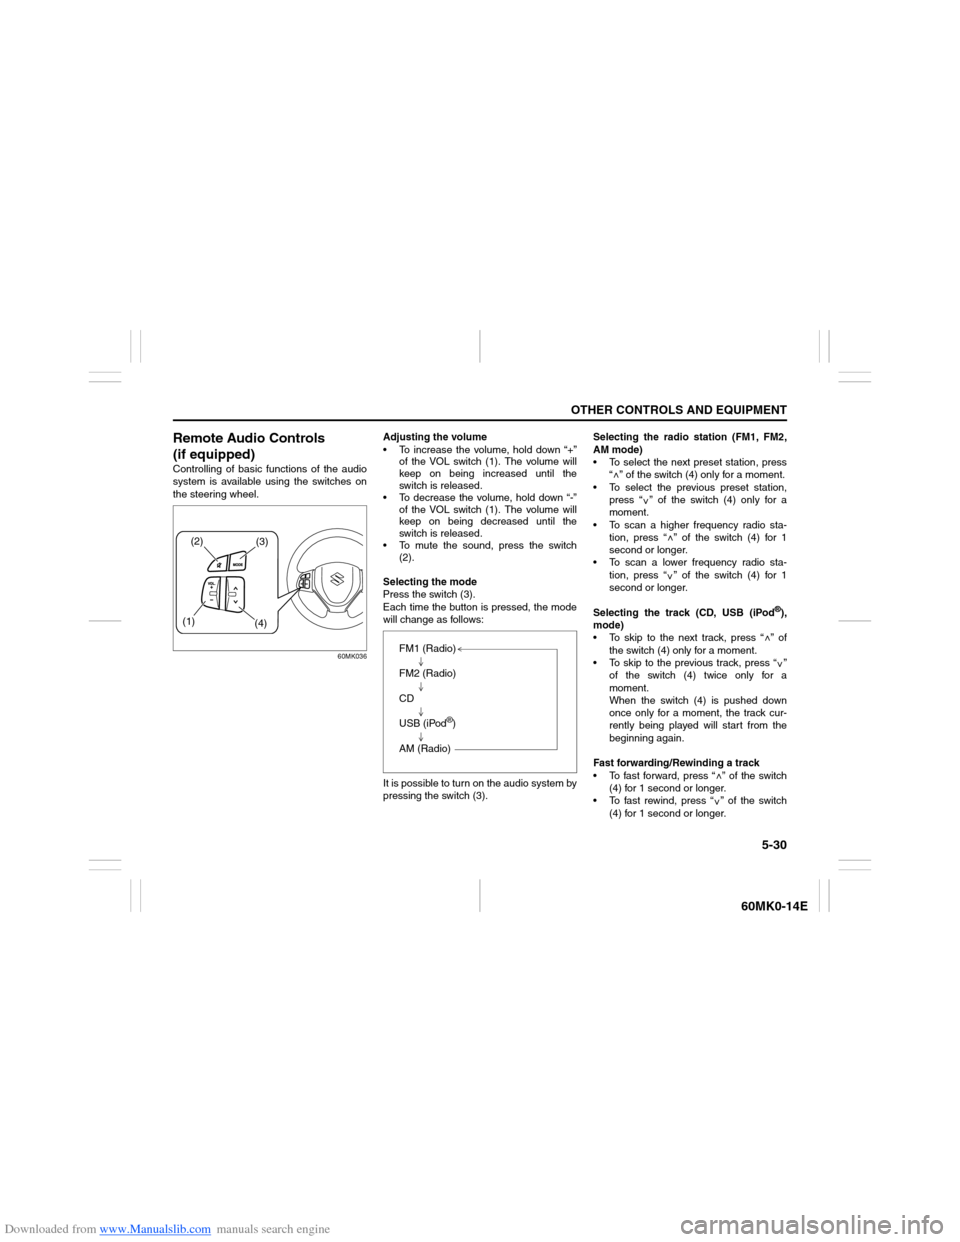
(if equipped)Controlling of basic functions of the audio
system is available using the switches on
the steering wheel.
60MK036
Adjusting the volume
To increase the volume, hold down “+”
of the VOL switch (1). The volume will
keep on being increased until the
switch is released.
To decrease the volume, hold down “-”
of the VOL switch (1). The volume will
keep on being decreased until the
switch is released.
To mute the sound, press the switch
(2).
Selecting the mode
Press the switch (3).
Each time the button is pressed, the mode
will change as follows:
It is possible to turn on the audio system by
pressing the switch (3).Selecting the radio station (FM1, FM2,
AM mode)
To select the next preset station, press
“ ” of the switch (4) only for a moment.
To select the previous preset station,
press “ ” of the switch (4) only for a
moment.
To scan a higher frequency radio sta-
tion, press “ ” of the switch (4) for 1
second or longer.
To scan a lower frequency radio sta-
tion, press “ ” of the switch (4) for 1
second or longer.
Selecting the track (CD, USB (iPod
®),
mode)
To skip to the next track, press “ ” of
the switch (4) only for a moment.
To skip to the previous track, press “ ”
of the switch (4) twice only for a
moment.
When the switch (4) is pushed down
once only for a moment, the track cur-
rently being played will start from the
beginning again.
Fast forwarding/Rewinding a track
To fast forward, press “ ” of the switch
(4) for 1 second or longer.
To fast rewind, press “ ” of the switch
(4) for 1 second or longer.
(2)
(3)
(1)
(4)
FM1 (Radio)
FM2 (Radio)
CD
USB (iPod
®)
AM (Radio)
<
<
<<
<
<
<<
Page 126 of 207
Downloaded from www.Manualslib.com manuals search engine 5-31OTHER CONTROLS AND EQUIPMENT
60MK0-14E
Anti-Theft Feature
USB
CD
1
2
3456
MENU
SEEK/TRACK
AS
AM FMRPT
RDM
DISP
PUSH SOUND
TUNE/FLD
VO L PUSH PWR
(4)
(3)
(2)
(1)
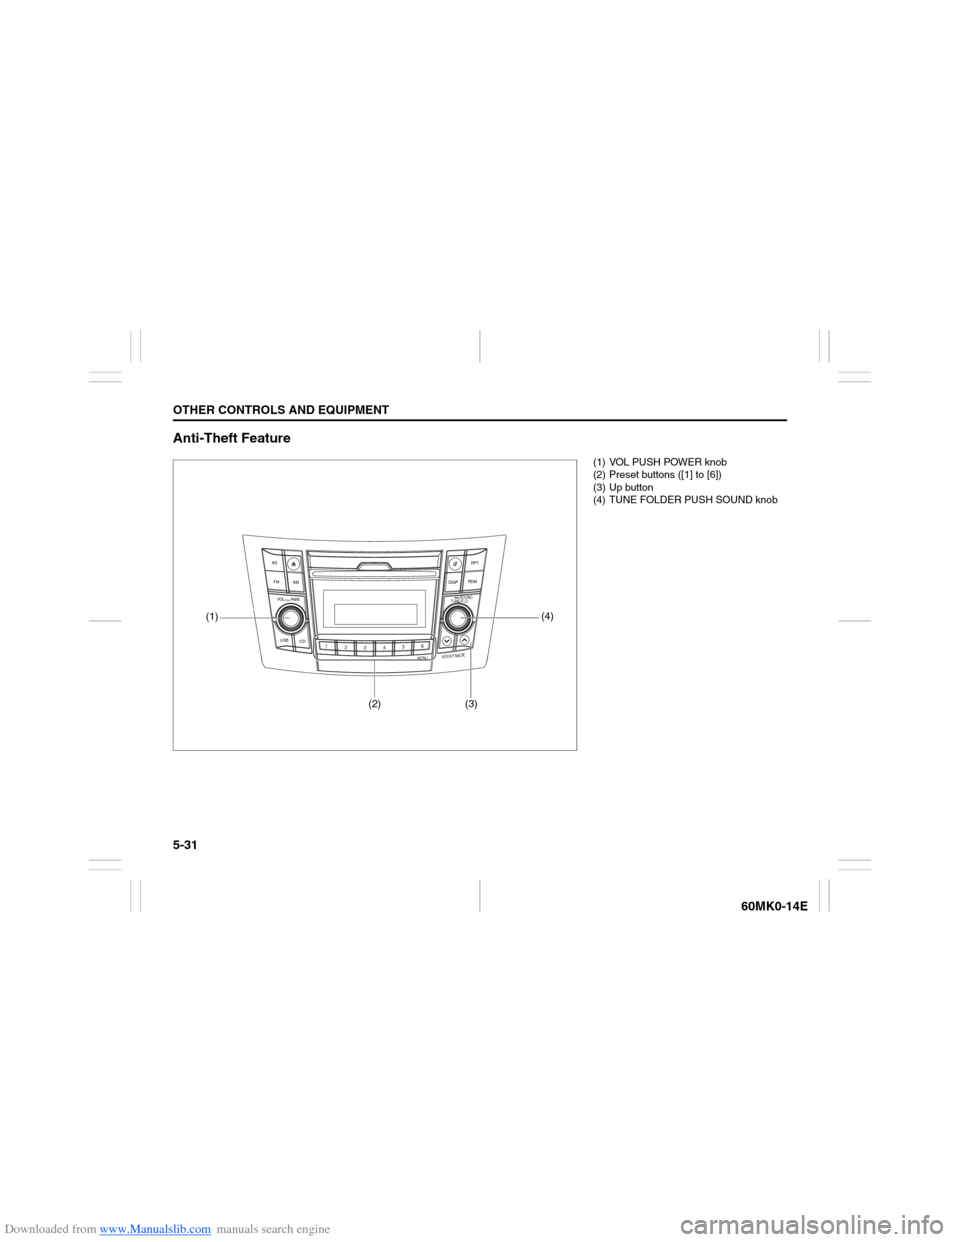
(1) VOL PUSH POWER knob
(2) Preset buttons ([1] to [6])
(3) Up button
(4) TUNE FOLDER PUSH SOUND knob
Page 127 of 207
Downloaded from www.Manualslib.com manuals search engine 5-32
OTHER CONTROLS AND EQUIPMENT
60MK0-14E
The anti-theft function is intended to dis-
courage thefts, such as that the audio sys-
tem becomes inoperable when it is
installed on other vehicles.
This function works by entering a Personal
Identification Number (PIN).
When the unit is disconnected from its
power source, such as when the audio
system is removed or the battery is discon-
nected, the unit will become inoperable
until the PIN is reentered.Setting the Anti-Theft Function
1) Press the VOL PUSH POWER knob (1)
to power off.
2) Hold down the buttons numbered [1]
and [6] of the Preset buttons (2) and
press the VOL PUSH POWER knob
(1).
“SECURITY” will be displayed.
3) Press the Up button (3) and the button
numbered [1] of the Preset buttons (2)
simultaneously.
4) Enter a 4-digit number to be registered
as PIN using the buttons numbered [1] -
[4] of the Preset buttons (2).
5) Hold down the TUNE FOLDER PUSH
SOUND knob (4) for 1 second or longer
to set the anti-theft function.
NOTE:
Take a note of the registered PIN and keep
it for the future use.Canceling the anti-theft feature
To cancel the anti-theft function, delete the
registered PIN.
1) Press the VOL PUSH POWER knob (1)
to power off.
2) Hold down the buttons numbered [1]
and [6] of the Preset buttons (2) and
press the VOL PUSH POWER knob
(1).
“PIN ENTRY” will be displayed.
3) Press the Up button (3) and the button
numbered [1] of the Preset buttons (2)
simultaneously.
4) Enter a 4-digit number to be registered
as PIN using the buttons numbered [1] -
[4] of the Preset buttons (2).
5) Hold down the TUNE FOLDER PUSH
SOUND knob (4) for 1 second or longer
to delete the registered PIN. The indi-
cation “----” will be displayed and the
anti-theft function will be canceled.
NOTE:
To change your PIN, first delete your cur-
rent PIN, then set a new one.
Page 128 of 207
Downloaded from www.Manualslib.com manuals search engine 5-33OTHER CONTROLS AND EQUIPMENT
60MK0-14E
Confirming the Personal Identification
Number (PIN)
When the main power source is discon-
nected such as when the battery is
replaced, etc, it is required to enter the PIN
to make the unit operable again.
1) Set the ignition switch to the “ACC”
position.
“SECURITY” will be displayed.
2) Press the Up button (3) and the button
numbered [1] of the Preset buttons (2)
simultaneously.
3) Enter a 4-digit number to be registered
as PIN using the buttons numbered [1] -
[4] of the Preset buttons (2).
4) Hold down TUNE FOLDER PUSH
SOUND knob (4) for 1 second or
longer.
When the PIN same as registered is
entered, the power of the audio system
will be turned off automatically and it
will become operable again.
NOTE:
If an incorrect PIN is entered, “ERROR”
and the total number of incorrect entry
attempts will be displayed.
If an incorrect PIN is entered 10 times or
more, “HELP” will be displayed and the
audio system will become inoperable.
Page 129 of 207
Downloaded from www.Manualslib.com manuals search engine 5-34
OTHER CONTROLS AND EQUIPMENT
60MK0-14E
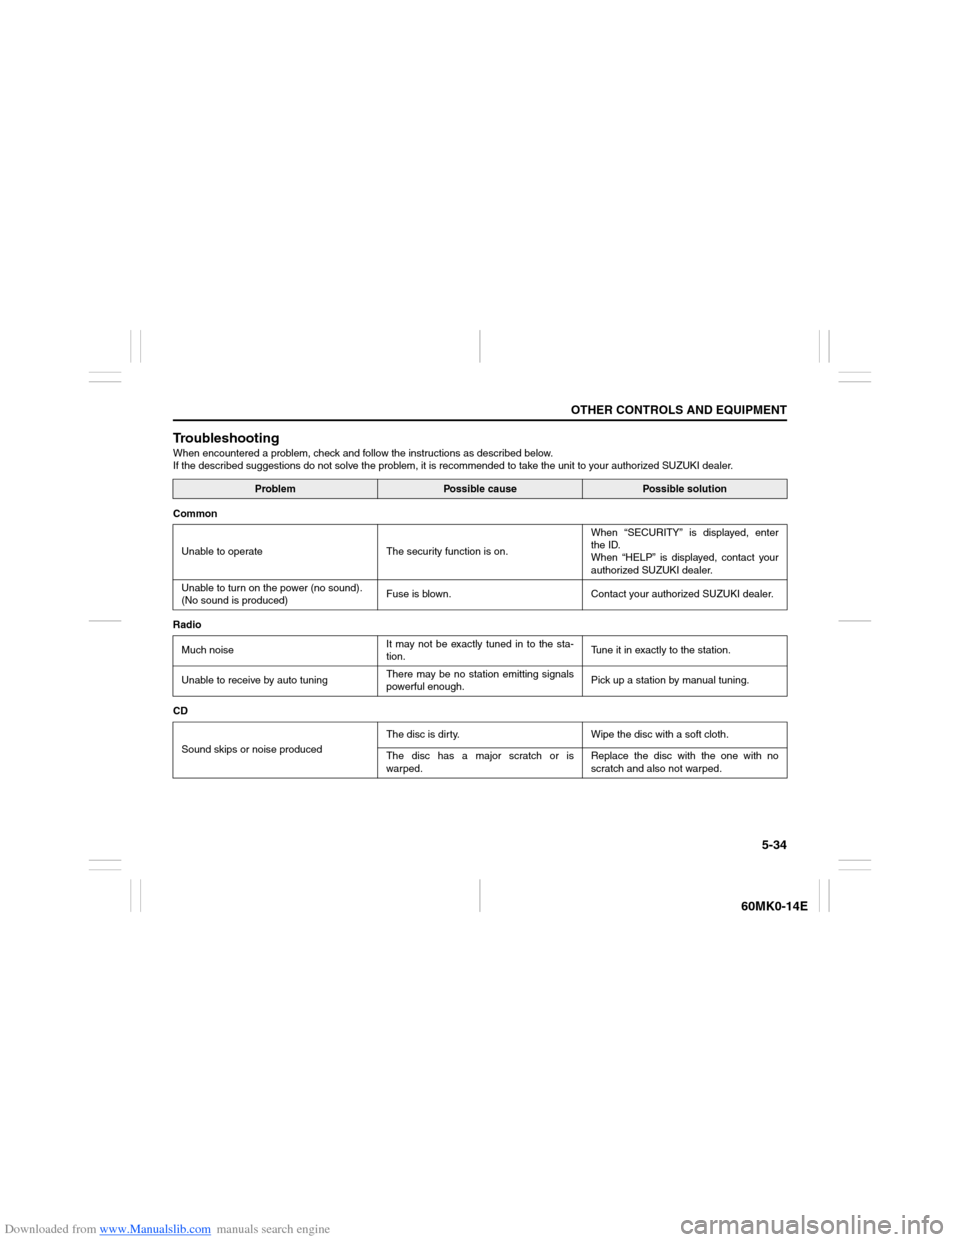
TroubleshootingWhen encountered a problem, check and follow the instructions as described below.
If the described suggestions do not solve the problem, it is recommended to take the unit to your authorized SUZUKI dealer.
Problem
Possible cause
Possible solution
Common
Unable to operate The security function is on.When “SECURITY” is displayed, enter
the ID.
When “HELP” is displayed, contact your
authorized SUZUKI dealer.
Unable to turn on the power (no sound).
(No sound is produced)Fuse is blown. Contact your authorized SUZUKI dealer.
Radio
Much noiseIt may not be exactly tuned in to the sta-
tion.Tune it in exactly to the station.
Unable to receive by auto tuningThere may be no station emitting signals
powerful enough.Pick up a station by manual tuning.
CD
Sound skips or noise producedThe disc is dirty. Wipe the disc with a soft cloth.
The disc has a major scratch or is
warped.Replace the disc with the one with no
scratch and also not warped.
Page 130 of 207
Downloaded from www.Manualslib.com manuals search engine 5-35OTHER CONTROLS AND EQUIPMENT
60MK0-14E
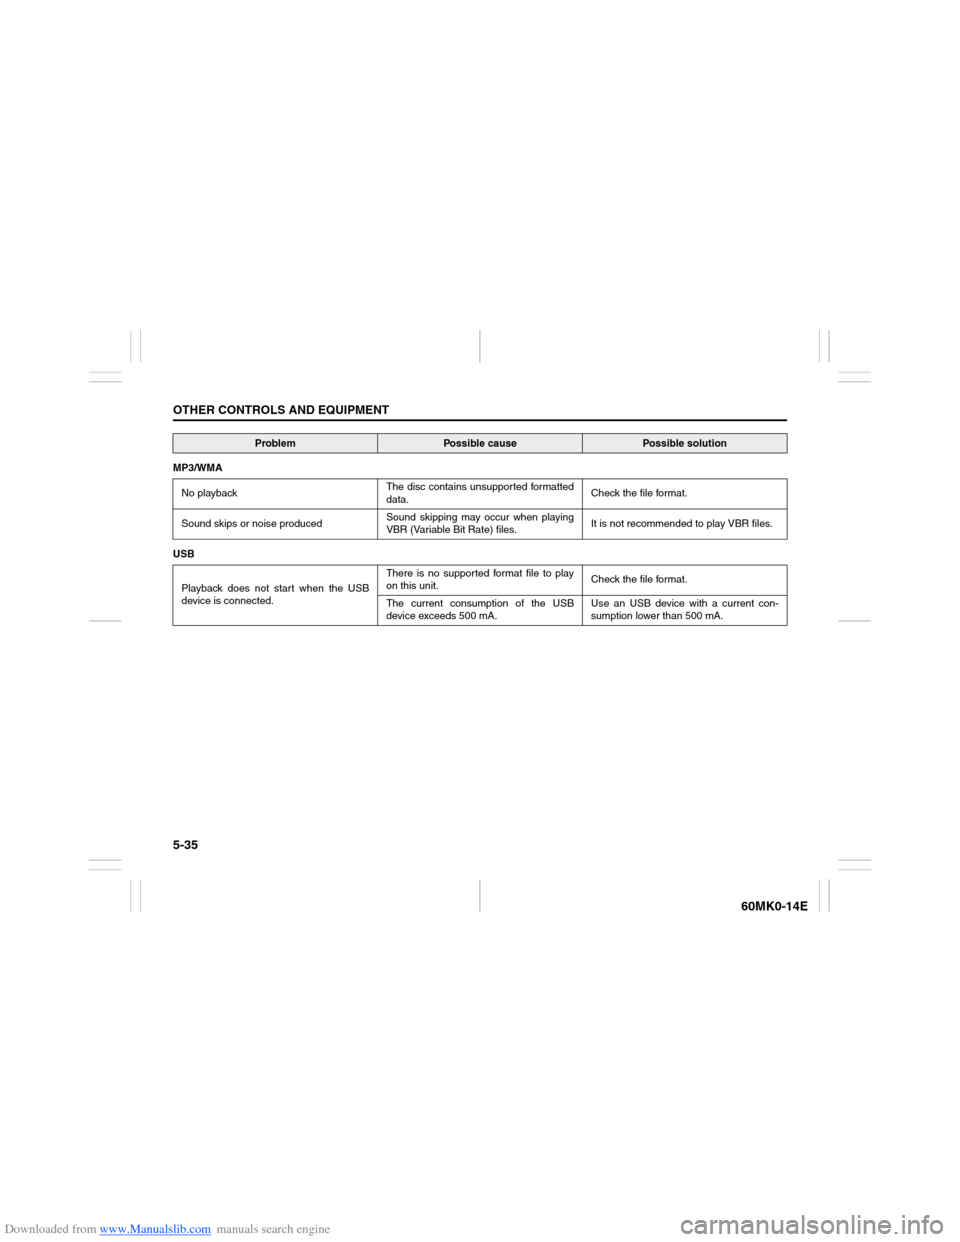
MP3/WMA
No playbackThe disc contains unsupported formatted
data.Check the file format.
Sound skips or noise producedSound skipping may occur when playing
VBR (Variable Bit Rate) files.It is not recommended to play VBR files.
USB
Playback does not start when the USB
device is connected.There is no supported format file to play
on this unit.Check the file format.
The current consumption of the USB
device exceeds 500 mA.Use an USB device with a current con-
sumption lower than 500 mA.
Problem
Possible cause
Possible solution