SUZUKI GRAND VITARA 2022 Owners Manual
Manufacturer: SUZUKI, Model Year: 2022, Model line: GRAND VITARA, Model: SUZUKI GRAND VITARA 2022Pages: 482, PDF Size: 21 MB
Page 401 of 482
8-1
EMERGENCY SERVICE
54P00-01E
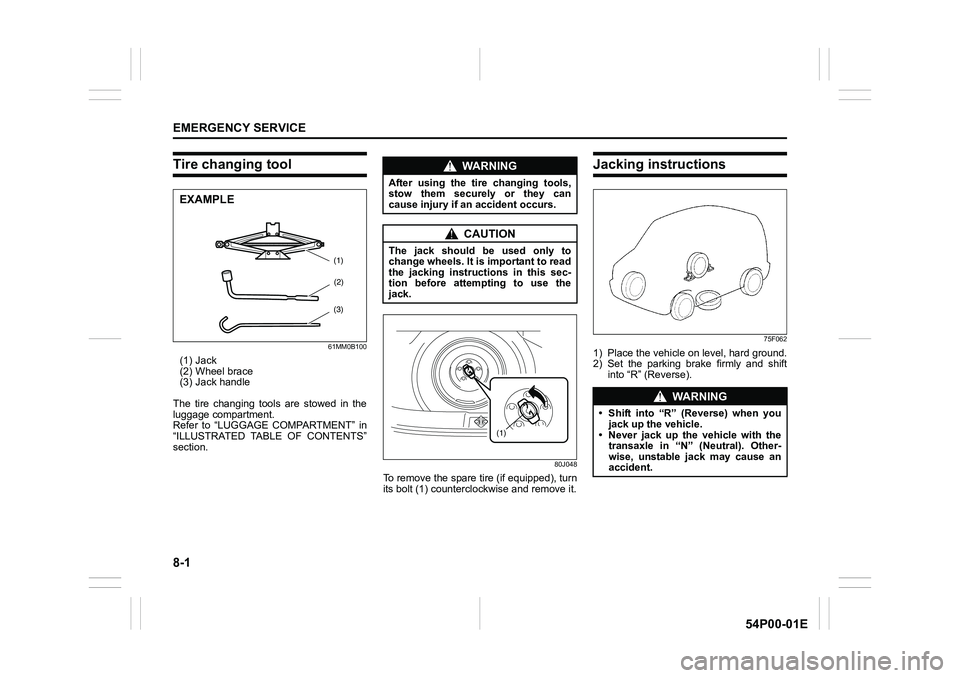
Tire changing tool
61MM0B100
(1) Jack
(2) Wheel brace
(3) Jack handle
The tire changing tools are stowed in the
luggage compartment.
Refer to “LUGGAGE COMPARTMENT” in
“ILLUSTRATED TABLE OF CONTENTS”
section.
80J048
To remove the spare tire (if equipped), turn
its bolt (1) counterclockwise and remove it.
Jacking instructions
75F062
1) Place the vehicle on level, hard ground.
2) Set the parking brake firmly and shift
into “R” (Reverse).
EXAMPLE
(3)
(2)
(1)
WA R N I N G
After using the tire changing tools,
stow them securely or they can
cause injury if an accident occurs.
CAUTION
The jack should be used only to
change wheels. It is important to read
the jacking instructions in this sec-
tion before attempting to use the
jack.
(1)
WA R N I N G
• Shift into “R” (Reverse) when you
jack up the vehicle.
• Never jack up the vehicle with the
transaxle in “N” (Neutral). Other-
wise, unstable jack may cause an
accident.
Page 402 of 482
8-2
EMERGENCY SERVICE
54P00-01E
3) Turn on the hazard warning flasher if
your vehicle is near traffic.
4) Block the front and rear of the wheel
diagonally opposite of the wheel being
lifted.
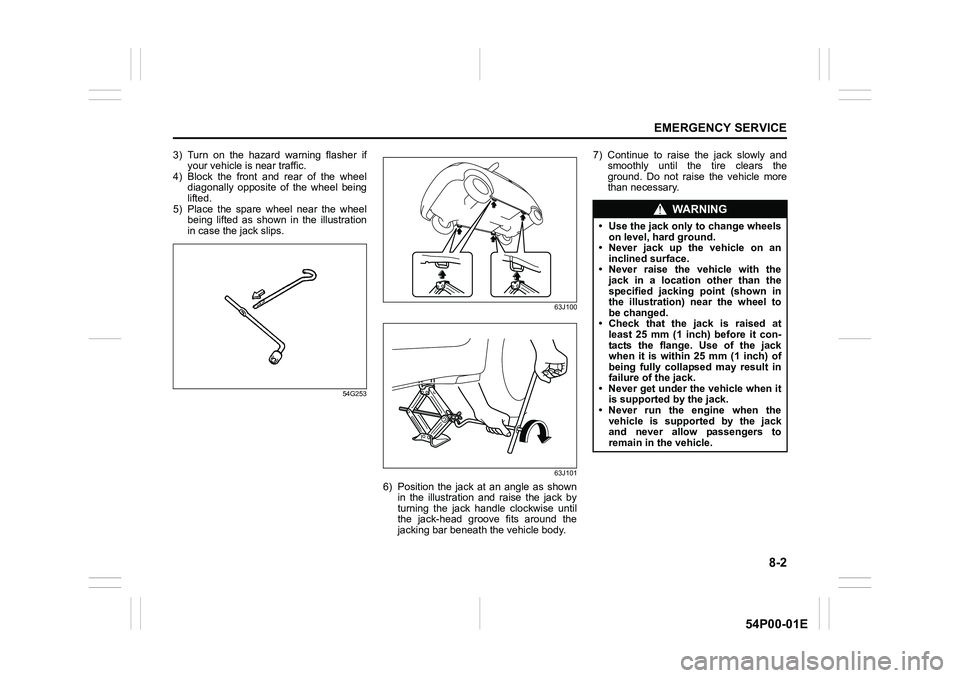
5) Place the spare wheel near the wheel
being lifted as shown in the illustration
in case the jack slips.
54G25363J100
63J101
6) Position the jack at an angle as shown
in the illustration and raise the jack by
turning the jack handle clockwise until
the jack-head groove fits around the
jacking bar beneath the vehicle body.7) Continue to raise the jack slowly and
smoothly until the tire clears the
ground. Do not raise the vehicle more
than necessary.
WA R N I N G
• Use the jack only to change wheels
on level, hard ground.
• Never jack up the vehicle on an
inclined surface.
• Never raise the vehicle with the
jack in a location other than the
specified jacking point (shown in
the illustration) near the wheel to
be changed.
• Check that the jack is raised at
least 25 mm (1 inch) before it con-
tacts the flange. Use of the jack
when it is within 25 mm (1 inch) of
being fully collapsed may result in
failure of the jack.
• Never get under the vehicle when it
is supported by the jack.
• Never run the engine when the
vehicle is supported by the jack
and never allow passengers to
remain in the vehicle.
Page 403 of 482
8-3
EMERGENCY SERVICE
54P00-01E
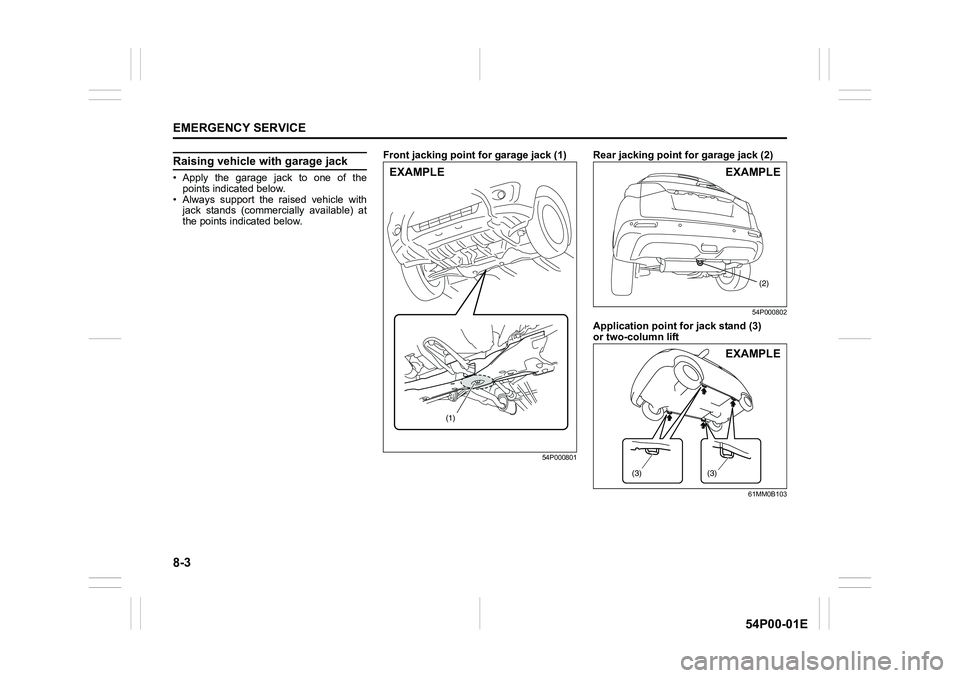
Raising vehicle with garage jack
• Apply the garage jack to one of the
points indicated below.
• Always support the raised vehicle with
jack stands (commercially available) at
the points indicated below.Front jacking point for garage jack (1)
54P000801
Rear jacking point for garage jack (2)
54P000802
Application point for jack stand (3)
or two-column lift
61MM0B103
(1)
EXAMPLE
(2)
EXAMPLE
(3)(3)
EXAMPLE
Page 404 of 482
8-4
EMERGENCY SERVICE
54P00-01E
NOTE:
For more details, contact an authorized
SUZUKI dealer.
Changing wheels
To change a wheel, use the following pro-
cedure:
1) Remove the jack, tools and spare
wheel from the vehicle.
2) Loosen, but do not remove the wheel
bolts.
3) Jack up the vehicle (follow the jacking
instructions in this section).4) Remove the wheel bolts and wheel.
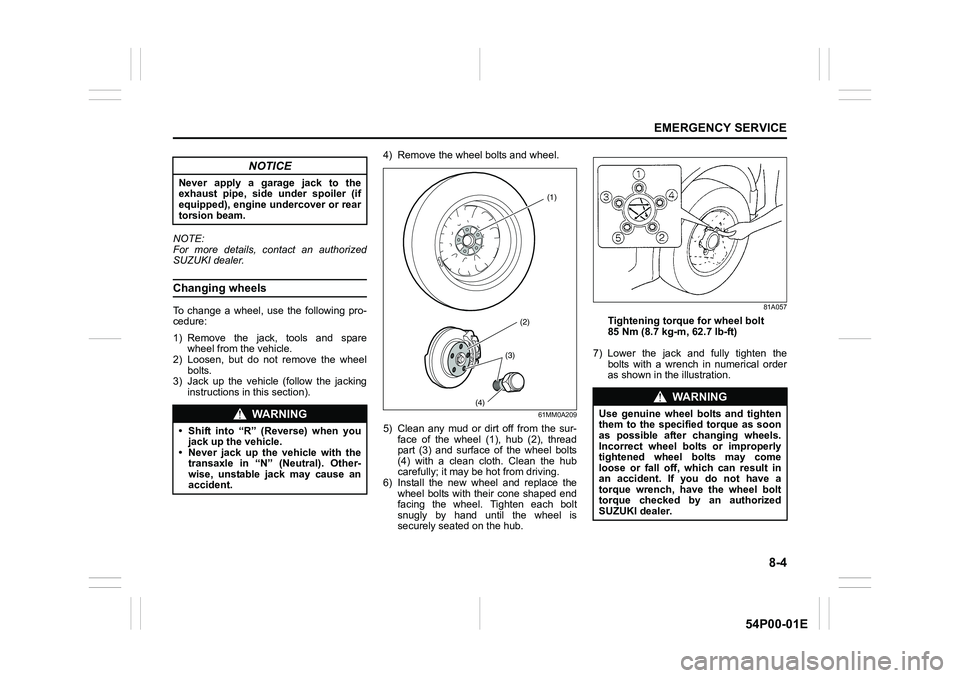
61MM0A209
5) Clean any mud or dirt off from the sur-
face of the wheel (1), hub (2), thread
part (3) and surface of the wheel bolts
(4) with a clean cloth. Clean the hub
carefully; it may be hot from driving.
6) Install the new wheel and replace the
wheel bolts with their cone shaped end
facing the wheel. Tighten each bolt
snugly by hand until the wheel is
securely seated on the hub.
81A057
Tightening torque for wheel bolt
85 Nm (8.7 kg-m, 62.7 lb-ft)
7) Lower the jack and fully tighten the
bolts with a wrench in numerical order
as shown in the illustration.
NOTICE
Never apply a garage jack to the
exhaust pipe, side under spoiler (if
equipped), engine undercover or rear
torsion beam.
WA R N I N G
• Shift into “R” (Reverse) when you
jack up the vehicle.
• Never jack up the vehicle with the
transaxle in “N” (Neutral). Other-
wise, unstable jack may cause an
accident.
(2)
(4)
(1)
(3)
WA R N I N G
Use genuine wheel bolts and tighten
them to the specified torque as soon
as possible after changing wheels.
Incorrect wheel bolts or improperly
tightened wheel bolts may come
loose or fall off, which can result in
an accident. If you do not have a
torque wrench, have the wheel bolt
torque checked by an authorized
SUZUKI dealer.
Page 405 of 482
8-5
EMERGENCY SERVICE
54P00-01E
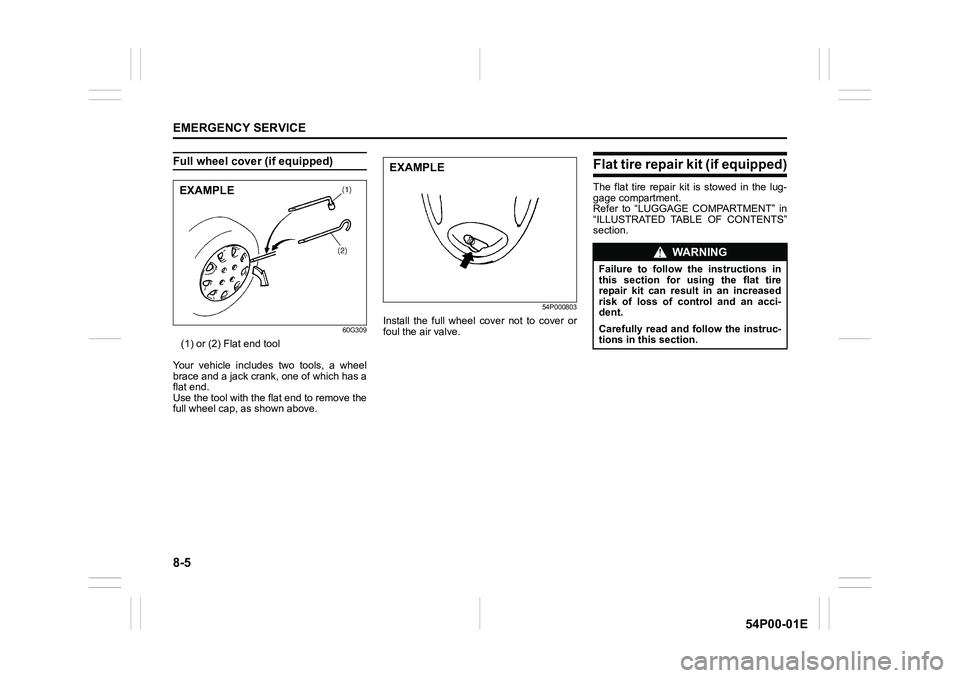
Full wheel cover (if equipped)
60G309
(1) or (2) Flat end tool
Your vehicle includes two tools, a wheel
brace and a jack crank, one of which has a
flat end.
Use the tool with the flat end to remove the
full wheel cap, as shown above.
54P000803
Install the full wheel cover not to cover or
foul the air valve.
Flat tire repair kit (if equipped)
The flat tire repair kit is stowed in the lug-
gage compartment.
Refer to “LUGGAGE COMPARTMENT” in
“ILLUSTRATED TABLE OF CONTENTS”
section.EXAMPLE
EXAMPLE
WA R N I N G
Failure to follow the instructions in
this section for using the flat tire
repair kit can result in an increased
risk of loss of control and an acci-
dent.
Carefully read and follow the instruc-
tions in this section.
Page 406 of 482
8-6
EMERGENCY SERVICE
54P00-01E
IMPORTANT
The flat tire repair kit cannot be used in
the following cases. Consult a SUZUKI
dealer or a roadside assistance service.
• Cuts or piercing in the tire tread
larger than approx. 4 mm.
• Cuts in the tire side wall.
• Tire damage caused by driving with
considerably reduced tire pressure or
even with deflated tire.
• The tire bead completely unseated
outside of the rim.
• The rim damaged.
Small punctures in the tire tread,
caused by a nail or a screw, can be
sealed with the flat tire repair kit.
Do not remove nails or screws from the
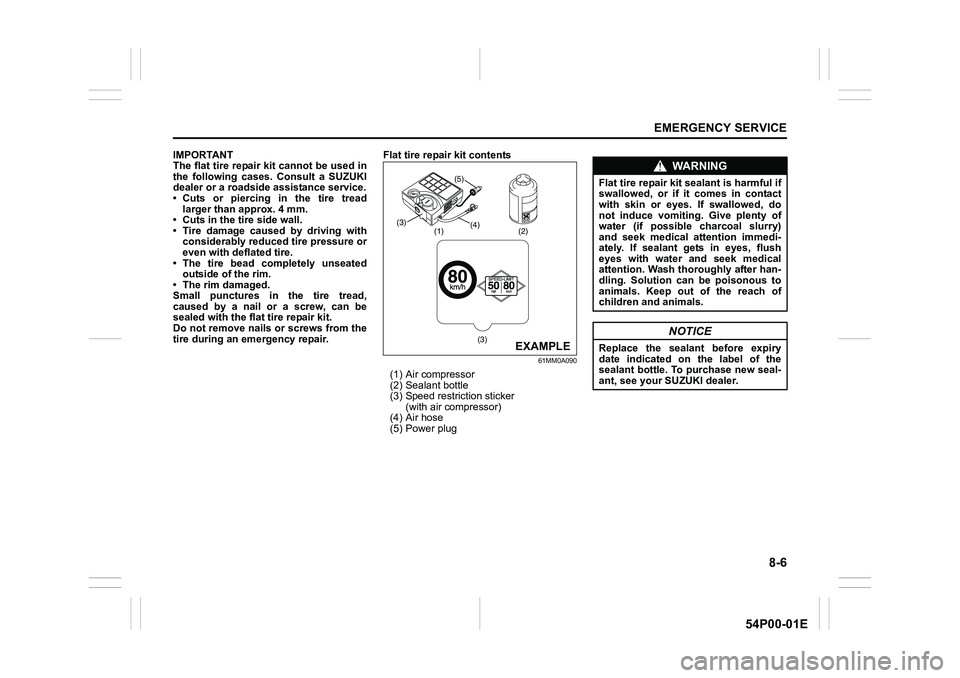
tire during an emergency repair.Flat tire repair kit contents
61MM0A090
(1) Air compressor
(2) Sealant bottle
(3) Speed restriction sticker
(with air compressor)
(4) Air hose
(5) Power plug
(1)(4) (5)
(3)(2)(3)
EXAMPLE
WA R N I N G
Flat tire repair kit sealant is harmful if
swallowed, or if it comes in contact
with skin or eyes. If swallowed, do
not induce vomiting. Give plenty of
water (if possible charcoal slurry)
and seek medical attention immedi-
ately. If sealant gets in eyes, flush
eyes with water and seek medical
attention. Wash thoroughly after han-
dling. Solution can be poisonous to
animals. Keep out of the reach of
children and animals.
NOTICE
Replace the sealant before expiry
date indicated on the label of the
sealant bottle. To purchase new seal-
ant, see your SUZUKI dealer.
Page 407 of 482
8-7
EMERGENCY SERVICE
54P00-01E
Emergency repair
1) Place the vehicle on level, hard ground.
Set the parking brake firmly and shift
into “R” (Reverse).
Turn on the hazard warning flasher if
your vehicle is near traffic.
Block the front and rear of the wheel
diagonally opposite of the wheel being
repaired.
2) Take out the sealant bottle and the
compressor.
3) At the top of the compressor, remove
the cap that covers the socket for the
sealant bottle, and then screw the bot-
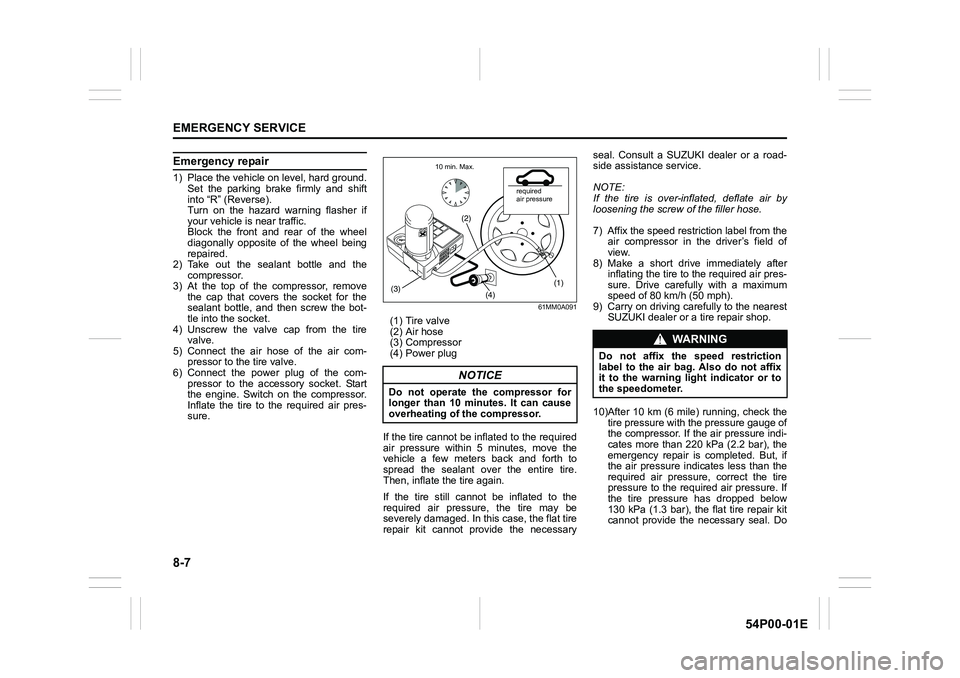
tle into the socket.
4) Unscrew the valve cap from the tire
valve.
5) Connect the air hose of the air com-
pressor to the tire valve.
6) Connect the power plug of the com-
pressor to the accessory socket. Start
the engine. Switch on the compressor.
Inflate the tire to the required air pres-
sure.
61MM0A091
(1) Tire valve
(2) Air hose
(3) Compressor
(4) Power plug
If the tire cannot be inflated to the required
air pressure within 5 minutes, move the
vehicle a few meters back and forth to
spread the sealant over the entire tire.
Then, inflate the tire again.
If the tire still cannot be inflated to the
required air pressure, the tire may be
severely damaged. In this case, the flat tire
repair kit cannot provide the necessaryseal. Consult a SUZUKI dealer or a road-
side assistance service.
NOTE:
If the tire is over-inflated, deflate air by
loosening the screw of the filler hose.
7) Affix the speed restriction label from the
air compressor in the driver’s field of
view.
8) Make a short drive immediately after
inflating the tire to the required air pres-
sure. Drive carefully with a maximum
speed of 80 km/h (50 mph).
9) Carry on driving carefully to the nearest
SUZUKI dealer or a tire repair shop.
10)After 10 km (6 mile) running, check the
tire pressure with the pressure gauge of
the compressor. If the air pressure indi-
cates more than 220 kPa (2.2 bar), the
emergency repair is completed. But, if
the air pressure indicates less than the
required air pressure, correct the tire
pressure to the required air pressure. If
the tire pressure has dropped below
130 kPa (1.3 bar), the flat tire repair kit
cannot provide the necessary seal. Do
NOTICE
Do not operate the compressor for
longer than 10 minutes. It can cause
overheating of the compressor.
(1)
(4)
(2)
(3)
required
air pressure 10 min. Max.
WA R N I N G
Do not affix the speed restriction
label to the air bag. Also do not affix
it to the warning light indicator or to
the speedometer.
Page 408 of 482
8-8
EMERGENCY SERVICE
54P00-01E
not use the tire and consult a SUZUKI
dealer or a roadside assistance service.Using compressor to inflate a tire
1) Place the vehicle on level, hard ground.
Set the parking brake firmly and shift
into “R” (Reverse).
2) Take out the compressor.
3) Unscrew the valve cap from the tire
valve.
4) Connect the air hose of the compressor
to the tire valve.
5) Connect the power plug of the com-
pressor to the accessory socket. Start
the engine. Switch on the compressor.
Inflate the tire to the required air pres-
sure.
Jump-starting instructions
WA R N I N G
Check the tire pressure and confirm
the completion of the emergency
repair after 10 km (6 mile) of running.
NOTICE
Have the tire renewed at the nearest
SUZUKI dealer. When reusing the
sealed tire, consult a tire repair shop.
The wheel can be reused after wiping
sealant off completely with cloth in
order to prevent rust, but the tire
valve and tire pressure monitoring
system (TPMS) sensor must be
renewed.
Dispose of the sealant bottle at a
SUZUKI dealer or in accordance with
your regional codes and practices.
After using the sealant bottle, replace
it with a new bottle from your SUZUKI
dealer.
NOTICE
Do not operate the compressor for
longer than 10 minutes. It can cause
overheating of the compressor.
WA R N I N G
• Never attempt to jump-start your
vehicle if the battery appears to be
frozen. Batteries in this condition
may explode.
• When making jump lead connec-
tions, check that your hands and
the jump leads remain clear from
pulleys, belts or fans.
• Batteries produce flammable
hydrogen gas. Keep flames and
sparks away from the battery or an
explosion may occur. Never smoke
when working near the battery.
• If the booster battery you use for
jump-starting is installed in another
vehicle, check that the two vehicles
are not touching each other.
• If your battery discharges repeat-
edly, for no apparent reason, have
your vehicle inspected by an
authorized SUZUKI dealer.
• To avoid harm to yourself or dam-
age to your vehicle or battery, fol-
low the jump-starting instructions
below.
If you are in doubt, call for qualified
road service.
Page 409 of 482
8-9
EMERGENCY SERVICE
54P00-01E
1) Use only a 12-volt battery to jump-start
your vehicle. Position the good 12-volt
battery close to your vehicle so that the
jump leads will reach both batteries.
When using a battery installed on
another vehicle, check that two vehicles
do not touch each other. Set the park-
ing brakes fully on both vehicles.
2) Turn off all vehicle accessories, except
those necessary for safety reasons (for
example, headlights or hazard lights).
54P000804
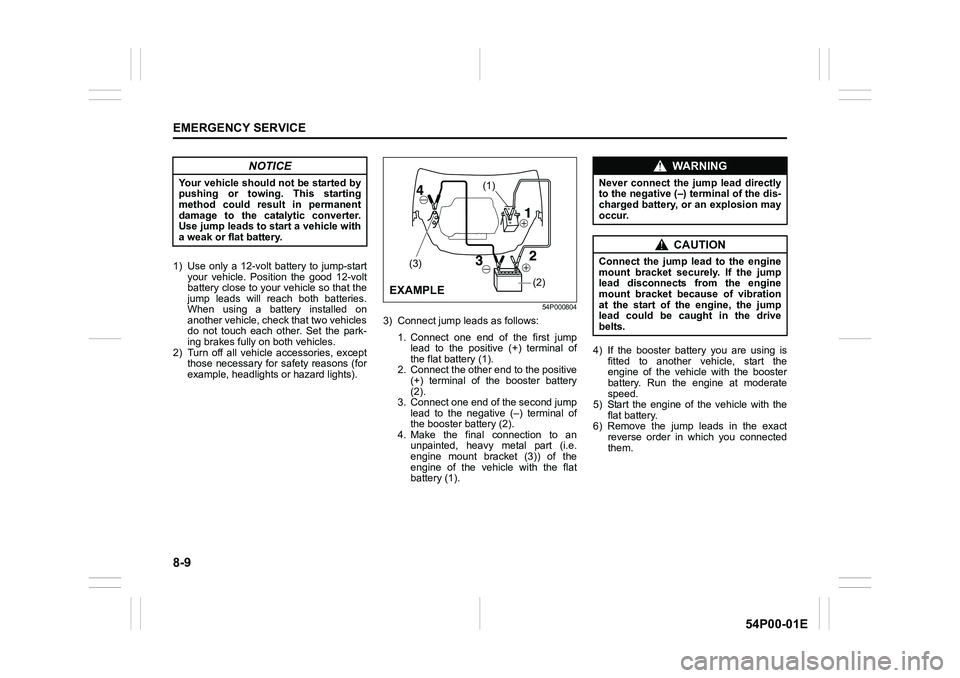
3) Connect jump leads as follows:
1. Connect one end of the first jump
lead to the positive (+) terminal of
the flat battery (1).
2. Connect the other end to the positive
(+) terminal of the booster battery
(2).
3. Connect one end of the second jump
lead to the negative (–) terminal of
the booster battery (2).
4. Make the final connection to an
unpainted, heavy metal part (i.e.
engine mount bracket (3)) of the
engine of the vehicle with the flat
battery (1).4) If the booster battery you are using is
fitted to another vehicle, start the
engine of the vehicle with the booster
battery. Run the engine at moderate
speed.
5) Start the engine of the vehicle with the
flat battery.
6) Remove the jump leads in the exact
reverse order in which you connected
them.
NOTICE
Your vehicle should not be started by
pushing or towing. This starting
method could result in permanent
damage to the catalytic converter.
Use jump leads to start a vehicle with
a weak or flat battery.
(2)
(1)
(3)
EXAMPLE
WA R N I N G
Never connect the jump lead directly
to the negative (–) terminal of the dis-
charged battery, or an explosion may
occur.
CAUTION
Connect the jump lead to the engine
mount bracket securely. If the jump
lead disconnects from the engine
mount bracket because of vibration
at the start of the engine, the jump
lead could be caught in the drive
belts.
Page 410 of 482
8-10
EMERGENCY SERVICE
54P00-01E
Towing
If you need to have your vehicle towed,
contact a professional service. Your dealer
can provide you with detailed towing
instructions.
2-wheel drive (2WD) manual tran-saxle
Manual transaxle vehicles may be towed
using either of the following methods.
1) From the front, with the front wheels
lifted and the rear wheels on the
ground. Before towing, check that the
parking brake is released.
2) From the rear, with the rear wheels
lifted and the front wheels on the
ground, provided the steering and
drivetrain are in operational condition.
Before towing, check that transaxle is in
neutral, the steering wheel is unlocked
(vehicle without keyless push start sys-
tem - the ignition key should be in
“ACC” position) (vehicle with keyless
push start system - the ignition mode is
“ACC”), and the steering wheel is
secured with a clamping device
designed for towing service.
4-wheel drive (4WD)
Your vehicle should be towed under one of
the following conditions:
1) With all four wheels on a flat-bed truck.
2) With the front or rear wheels lifted and a
dolly under the other wheels.
WA R N I N G
For vehicles equipped with the radar
brake support system, if your vehicle
is towed with the engine on, press
radar brake support OFF switch and
turn off the radar brake support sys-
tem. If not, unexpected accidents
related to the system being turned on
may occur.
NOTICE
Observe the following instructions
when towing your vehicle.
• To help avoid damage to your vehi-
cle during towing, proper equip-
ment and towing procedures must
be used.
• Using the frame hook, tow your
vehicle on paved roads for short
distances at low speed.
NOTICE
The steering column is not strong
enough to withstand shocks trans-
mitted from the front wheels during
towing. Always unlock the steering
wheel before towing.