body SUZUKI JIMNY 2005 3.G Service Repair Manual
[x] Cancel search | Manufacturer: SUZUKI, Model Year: 2005, Model line: JIMNY, Model: SUZUKI JIMNY 2005 3.GPages: 687, PDF Size: 13.38 MB
Page 319 of 687
Downloaded from www.Manualslib.com manuals search engine 5E-2 ANTILOCK BRAKE SYSTEM (ABS)
General Description
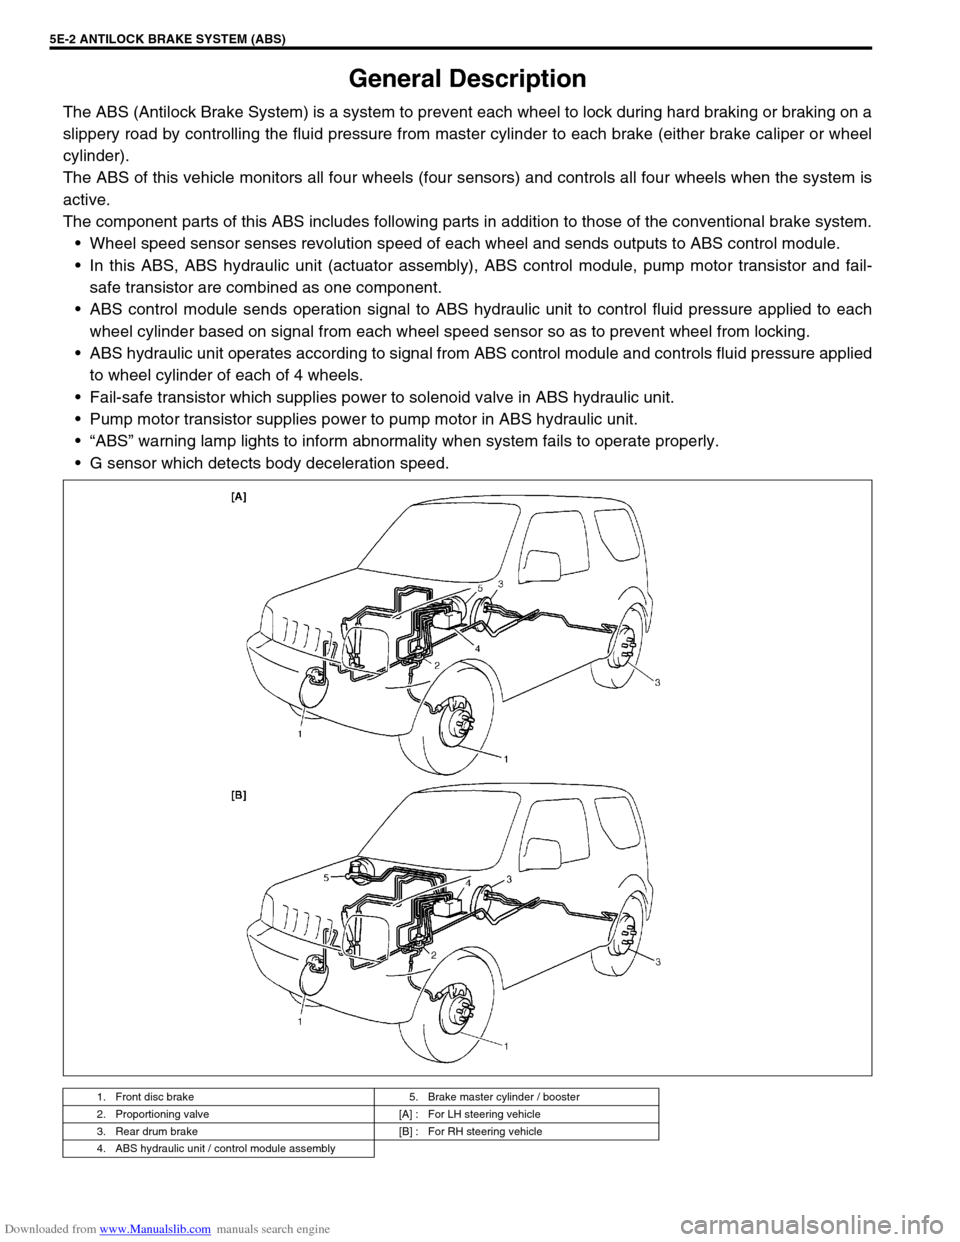
The ABS (Antilock Brake System) is a system to prevent each wheel to lock during hard braking or braking on a
slippery road by controlling the fluid pressure from master cylinder to each brake (either brake caliper or wheel
cylinder).
The ABS of this vehicle monitors all four wheels (four sensors) and controls all four wheels when the system is
active.
The component parts of this ABS includes following parts in addition to those of the conventional brake system.
Wheel speed sensor senses revolution speed of each wheel and sends outputs to ABS control module.
In this ABS, ABS hydraulic unit (actuator assembly), ABS control module, pump motor transistor and fail-
safe transistor are combined as one component.
ABS control module sends operation signal to ABS hydraulic unit to control fluid pressure applied to each
wheel cylinder based on signal from each wheel speed sensor so as to prevent wheel from locking.
ABS hydraulic unit operates according to signal from ABS control module and controls fluid pressure applied
to wheel cylinder of each of 4 wheels.
Fail-safe transistor which supplies power to solenoid valve in ABS hydraulic unit.
Pump motor transistor supplies power to pump motor in ABS hydraulic unit.
“ABS” warning lamp lights to inform abnormality when system fails to operate properly.
G sensor which detects body deceleration speed.
1. Front disc brake 5. Brake master cylinder / booster
2. Proportioning valve [A] : For LH steering vehicle
3. Rear drum brake [B] : For RH steering vehicle
4. ABS hydraulic unit / control module assembly
Page 332 of 687

Downloaded from www.Manualslib.com manuals search engine ANTILOCK BRAKE SYSTEM (ABS) 5E-15
Table – B “ABS” Warning Lamp Circuit Check – Lamp Comes “ON” Steady
Refer to TABLE – A for System Circuit Diagram and Circuit Description.
INSPECTION
3 1) Remove combination meter.
Is bulb of ABS warning lamp in good condition?“R/Bl” circuit shorted to ground.
If OK, replace ABS warning cir-
cuit (lamp driver module).Replace bulb.
4 Is IG fuse in good condition? Open in “B/W” wire to combina-
tion meter or poor connection.Repair and replace. Step Action Yes No
Step Action Yes No
1 Perform diagnostic trouble code check. Is there
any DTC (including code No.12, NO CODES on
SUZUKI scan tool) exists?Go to step 2. Go to step 3.
2 Is malfunction DTC (other than code No.12)
exists at step 1?Go to step 7 of ABS diag-
nostic flow table in this
section.Go to step 3.
3 1) Disconnect ABS hydraulic unit / control
module connector.
2) Check for proper connection to ABS hydrau-
lic unit / control module connector at termi-
nals “A14” and “A18”.
3) If OK, turn ignition switch “ON” and mea-
sure voltage at terminal “A18” of connector.
Is it 10 – 14 V?Go to step 4.“B/W” circuit open.
4 1) With ABS control module connector discon-
nected, turn ignition switch ON and light
ABS warning lamp.
2) Connect terminal “A14” of disconnected
connector to ground using service wire.
Does “ABS warning lamp” turn off?Go to step 5.“R/Bl” circuit open.
If wire and connection are
OK, replace ABS lamp
driver module.
5 1) Measure resistance from connector termi-
nal “A24” to body ground.
Is continuity indicated?Substitute a known-good
ABS hydraulic unit / con-
trol module assembly and
recheck.“B” circuit open.
Page 334 of 687

Downloaded from www.Manualslib.com manuals search engine ANTILOCK BRAKE SYSTEM (ABS) 5E-17
Table – D Code (DTC) is Not Outputted Even With Diag. Switch Terminal Con-
nected to Ground.
CIRCUIT DESCRIPTION
When the diag. switch terminal is connected to the ground with the ignition switch turned ON, the ABS control
module outputs a diagnostic trouble code by flashing “ABS” warning lamp.
INSPECTION
1.“ABS” warning lamp in combination meter 3-1. Diag. switch terminal 4-1. Lock position
2. ABS hydraulic unit / control module assembly 3-2. Diag. ground terminal 4-2. Unlock position
3. Monitor connector 4. ABS hydraulic unit / control module connector of harness
Step Action Yes No
1 Is it shorted diag. switch terminal and ground
terminal by service wire properly?Go to step 2. Connect service wire
securely.
2 1) Disconnect service wire.
2) Disconnect ABS hydraulic unit / control
module connector.
3) Measure resistance between diag. switch
terminal and connector terminal “A12”.
Is it infinite (∞)?“P/B” circuit open. Go to step 3.
3 1) Measure resistance between ground termi-
nal of monitor connector and body ground.
Is continuity indicated?Go to step 4.“B” circuit open or poor
connection.
4 1) Check for proper connection to ABS hydrau-
lic unit / control module at terminal “A12”
and “A24”.
2) If OK, then check “ABS” warning lamp cir-
cuit referring to TABLE A, B and C.
Is it in good condition?Substitute a known-good
ABS hydraulic unit / con-
trol module assembly and
recheck.Repair “ABS” warning
lamp circuit.
Page 336 of 687

Downloaded from www.Manualslib.com manuals search engine ANTILOCK BRAKE SYSTEM (ABS) 5E-19
INSPECTION
Step Action Yes No
1 Is G sensor installed floor securely? Go to step 2. Tighten sensor or bracket
screw securely. If not, use
new screw.
2 1) Ignition switch OFF.
2) Remove G sensor with bracket.
3) Check for proper connection to G sensor.
4) If OK, then check G sensor referring to “G
Sensor” in this section.
Is it in good condition?Go to step 3. Replace G sensor.
3 1) Disconnect connectors from ABS hydraulic
unit / control module assembly (See [A])
and G sensor.
2) Check for proper connection to ABS control
module at terminals “A11” and “A13”.
3) If OK, then turn ignition switch ON and mea-
sure voltage between “B/W” terminal of sen-
sor connector and body ground.
Is it 10 – 14 V?Go to step 4.“B/W” circuit open.
4 Measure voltage between “R/W” terminal of
sensor connector and body ground.
Is it 0 V?Go to step 5.“R/W” circuit shorted to
power circuit.
5 1) Ignition switch OFF.
2) Check that “R/W” circuit is free from open or
short to ground and “Or/B” circuit. (See [B])
Is it in good condition?“Or/B” circuit open.
If circuit is OK, substitute
a known-good ABS
hydraulic unit / control
module assembly.“R/W” circuit open or
shorted to ground or “Or/
B” circuit.
1. ABS hydraulic unit / control module connector
2. Lock position
3. Unlock position
Page 337 of 687
Downloaded from www.Manualslib.com manuals search engine 5E-20 ANTILOCK BRAKE SYSTEM (ABS)
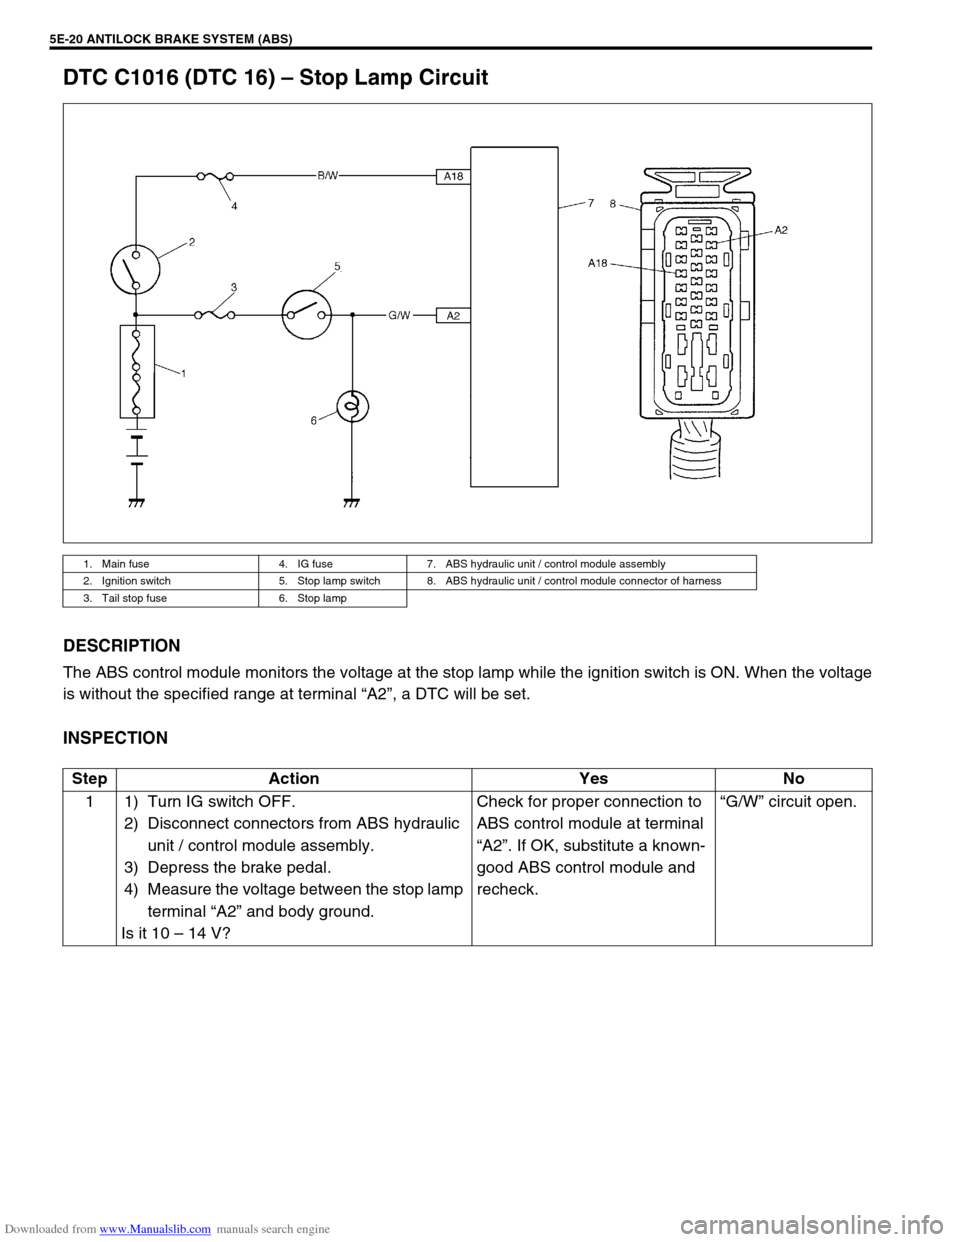
DTC C1016 (DTC 16) – Stop Lamp Circuit
DESCRIPTION
The ABS control module monitors the voltage at the stop lamp while the ignition switch is ON. When the voltage
is without the specified range at terminal “A2”, a DTC will be set.
INSPECTION
1. Main fuse 4. IG fuse 7. ABS hydraulic unit / control module assembly
2. Ignition switch 5. Stop lamp switch 8. ABS hydraulic unit / control module connector of harness
3. Tail stop fuse 6. Stop lamp
Step Action Yes No
1 1) Turn IG switch OFF.
2) Disconnect connectors from ABS hydraulic
unit / control module assembly.
3) Depress the brake pedal.
4) Measure the voltage between the stop lamp
terminal “A2” and body ground.
Is it 10 – 14 V?Check for proper connection to
ABS control module at terminal
“A2”. If OK, substitute a known-
good ABS control module and
recheck.“G/W” circuit open.
Page 339 of 687

Downloaded from www.Manualslib.com manuals search engine 5E-22 ANTILOCK BRAKE SYSTEM (ABS)
INSPECTION
Step Action Yes No
1 1) Disconnect the applicable sensor connector with ignition
switch OFF.
2) Measure resistance between sensor terminals.
Resistance of wheel speed sensor: 1.4 – 1.8 kΩ (at
20°C, 68°F)
3) Measure resistance between each terminal and body
ground.
Insulation resistance: 1MΩ or higher
Were measured resistance values in step 2) and 3) as spec-
ified? (See [A])Go to step 2. Replace sensor.
2 1) Ignition switch OFF.
2) Disconnect connector from ABS hydraulic unit / control
module assembly. (See [B])
3) Check for proper connection to ABS hydraulic unit / con-
trol module assembly at each sensor terminal.
4) If OK, then turn ignition switch ON and measure voltage
between sensor positive terminal of module connector
and body ground.
Is it 0V?Go to step 3. Sensor positive cir-
cuit shorted to
power.
3 1) Ignition switch OFF.
2) Connect connector to sensor.
3) Measure resistance between sensor terminals at mod-
ule connector.
4) Measure resistance between sensor positive terminal
and negative terminal of module connector, between
positive terminal and body ground.
Are measured resistance values within each specified range
described in above step 1?Go to step 4. Circuit open or
shorted to ground.
4 1) Remove wheel speed sensor.
2) Check sensor for damage or foreign material being
attached.
Is it in good condition? (See [C])Go to step 5. Clean or replace
sensor.
5 Check visually through wheel speed sensor installation hole
for following.
Ring serration (teeth) neither missing or damaged.
No foreign material being attached.
Ring not being eccentric.
Wheel bearing free from excessive play.
Are they in good condition? (See [D])Go to step 6. Clean, repair or
replace.
6 1) Install sensor to knuckle or axle housing.
2) Tighten sensor bolt to specified torque and check that
there is not any clearance between sensor and knuckle
or axle housing. (See [E])
Replace sensor if any.
Referring to “Front Wheel Speed Sensor” in this section,
check output voltage or waveform of sensor. Is proper out-
put voltage or waveform obtained?Substitute a known-
good ABS hydraulic
unit / control module
assembly and
recheck.Replace sensor and
recheck.
Page 341 of 687
Downloaded from www.Manualslib.com manuals search engine 5E-24 ANTILOCK BRAKE SYSTEM (ABS)
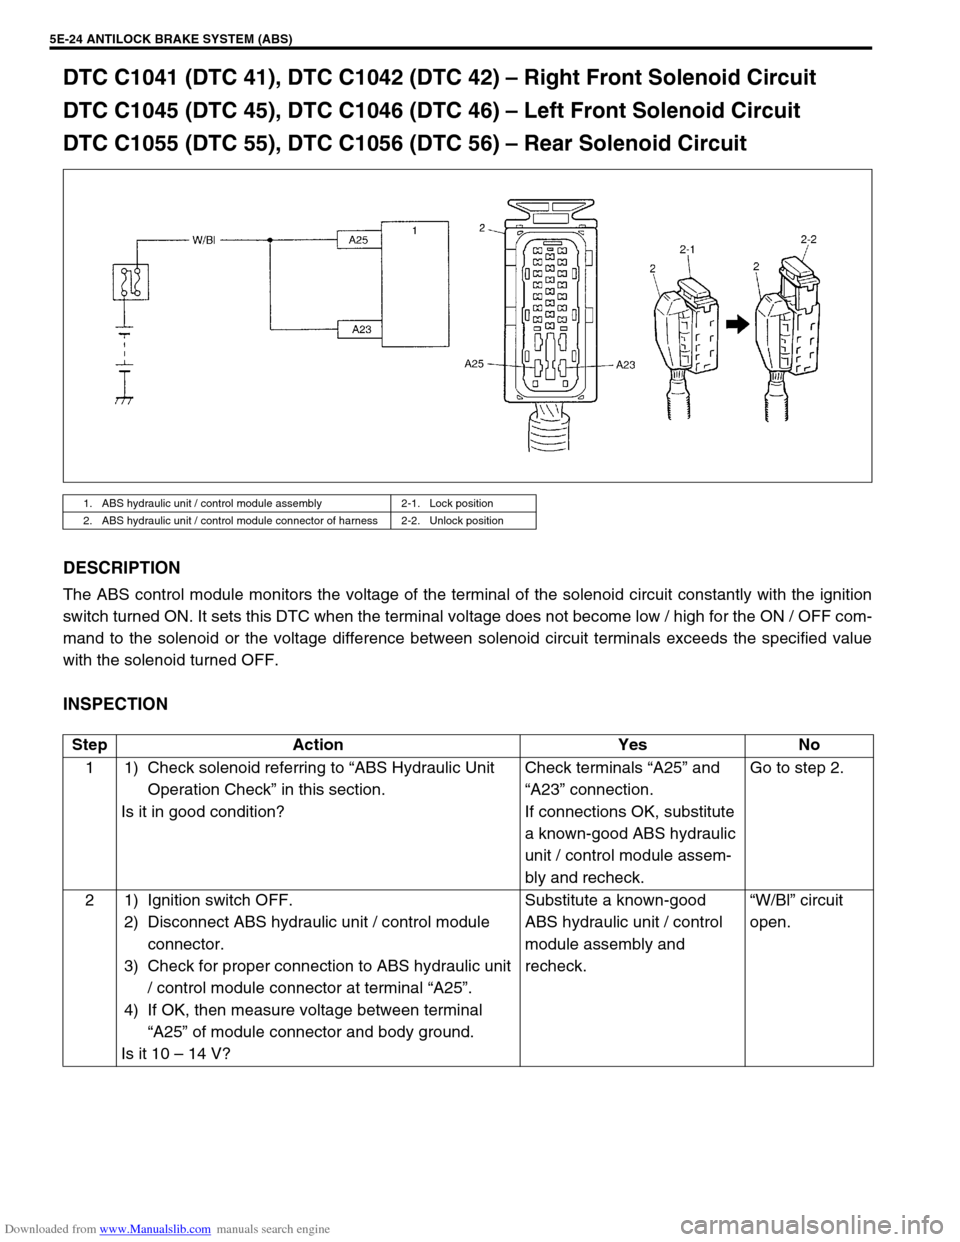
DTC C1041 (DTC 41), DTC C1042 (DTC 42) – Right Front Solenoid Circuit
DTC C1045 (DTC 45), DTC C1046 (DTC 46) – Left Front Solenoid Circuit
DTC C1055 (DTC 55), DTC C1056 (DTC 56) – Rear Solenoid Circuit
DESCRIPTION
The ABS control module monitors the voltage of the terminal of the solenoid circuit constantly with the ignition
switch turned ON. It sets this DTC when the terminal voltage does not become low / high for the ON / OFF com-
mand to the solenoid or the voltage difference between solenoid circuit terminals exceeds the specified value
with the solenoid turned OFF.
INSPECTION
1. ABS hydraulic unit / control module assembly 2-1. Lock position
2. ABS hydraulic unit / control module connector of harness 2-2. Unlock position
Step Action Yes No
1 1) Check solenoid referring to “ABS Hydraulic Unit
Operation Check” in this section.
Is it in good condition?Check terminals “A25” and
“A23” connection.
If connections OK, substitute
a known-good ABS hydraulic
unit / control module assem-
bly and recheck.Go to step 2.
2 1) Ignition switch OFF.
2) Disconnect ABS hydraulic unit / control module
connector.
3) Check for proper connection to ABS hydraulic unit
/ control module connector at terminal “A25”.
4) If OK, then measure voltage between terminal
“A25” of module connector and body ground.
Is it 10 – 14 V?Substitute a known-good
ABS hydraulic unit / control
module assembly and
recheck.“W/Bl” circuit
open.
Page 342 of 687
Downloaded from www.Manualslib.com manuals search engine ANTILOCK BRAKE SYSTEM (ABS) 5E-25
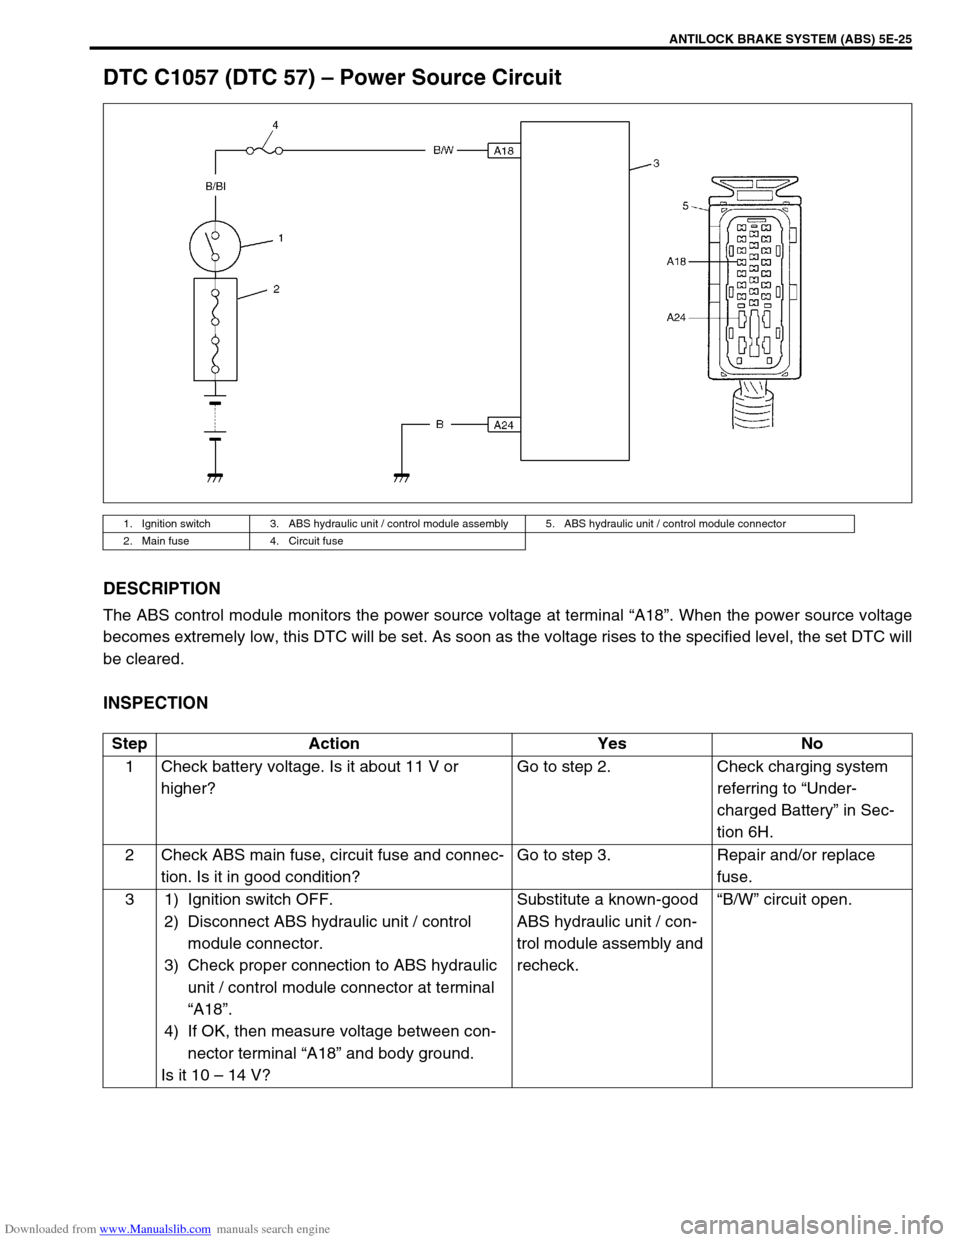
DTC C1057 (DTC 57) – Power Source Circuit
DESCRIPTION
The ABS control module monitors the power source voltage at terminal “A18”. When the power source voltage
becomes extremely low, this DTC will be set. As soon as the voltage rises to the specified level, the set DTC will
be cleared.
INSPECTION
1. Ignition switch 3. ABS hydraulic unit / control module assembly 5. ABS hydraulic unit / control module connector
2. Main fuse 4. Circuit fuse
Step Action Yes No
1 Check battery voltage. Is it about 11 V or
higher?Go to step 2. Check charging system
referring to “Under-
charged Battery” in Sec-
tion 6H.
2 Check ABS main fuse, circuit fuse and connec-
tion. Is it in good condition?Go to step 3. Repair and/or replace
fuse.
3 1) Ignition switch OFF.
2) Disconnect ABS hydraulic unit / control
module connector.
3) Check proper connection to ABS hydraulic
unit / control module connector at terminal
“A18”.
4) If OK, then measure voltage between con-
nector terminal “A18” and body ground.
Is it 10 – 14 V?Substitute a known-good
ABS hydraulic unit / con-
trol module assembly and
recheck.“B/W” circuit open.
Page 343 of 687
Downloaded from www.Manualslib.com manuals search engine 5E-26 ANTILOCK BRAKE SYSTEM (ABS)
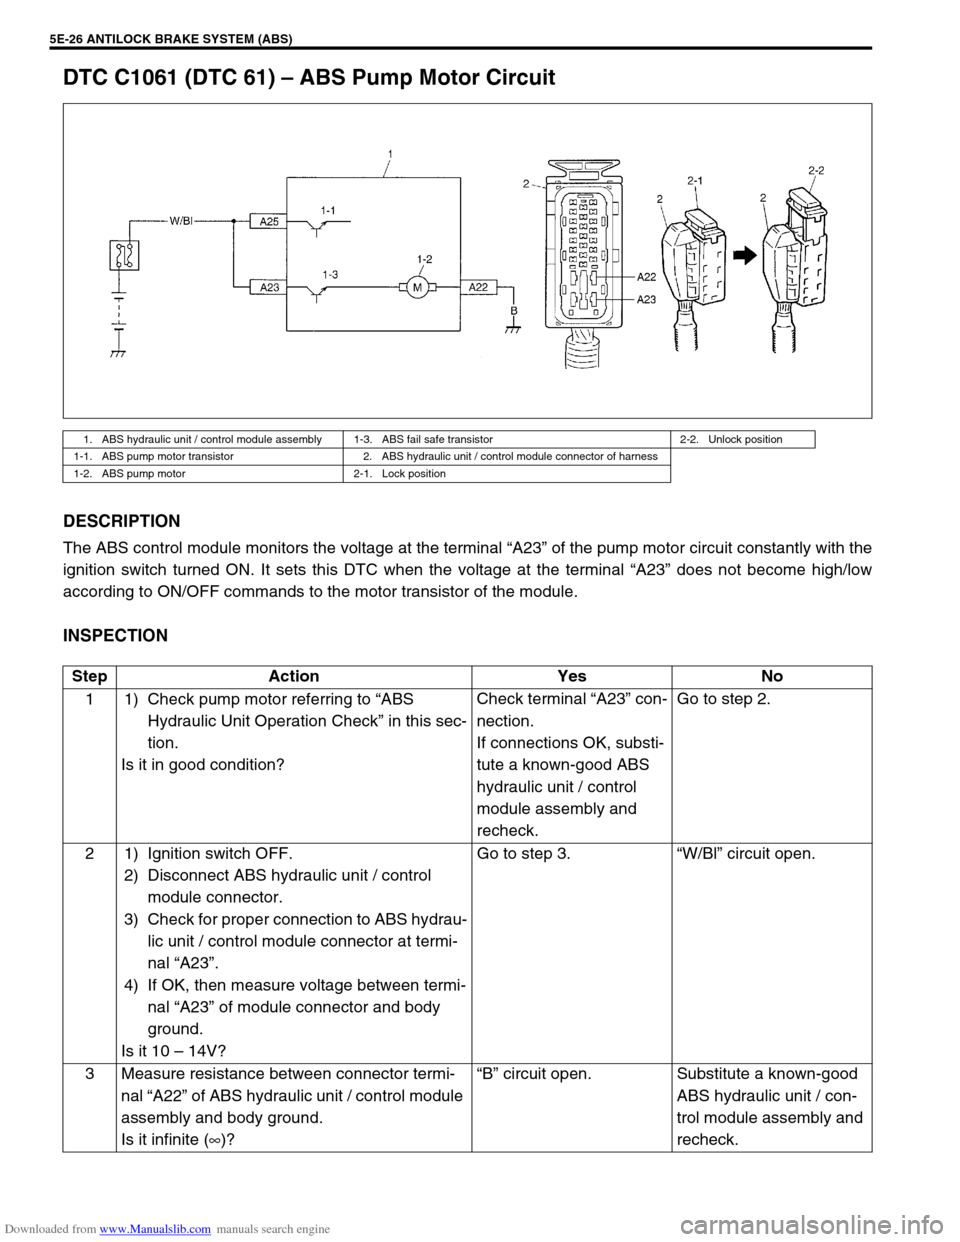
DTC C1061 (DTC 61) – ABS Pump Motor Circuit
DESCRIPTION
The ABS control module monitors the voltage at the terminal “A23” of the pump motor circuit constantly with the
ignition switch turned ON. It sets this DTC when the voltage at the terminal “A23” does not become high/low
according to ON/OFF commands to the motor transistor of the module.
INSPECTION
1. ABS hydraulic unit / control module assembly 1-3. ABS fail safe transistor 2-2. Unlock position
1-1. ABS pump motor transistor 2. ABS hydraulic unit / control module connector of harness
1-2. ABS pump motor 2-1. Lock position
Step Action Yes No
1 1) Check pump motor referring to “ABS
Hydraulic Unit Operation Check” in this sec-
tion.
Is it in good condition?Check terminal “A23” con-
nection.
If connections OK, substi-
tute a known-good ABS
hydraulic unit / control
module assembly and
recheck.Go to step 2.
2 1) Ignition switch OFF.
2) Disconnect ABS hydraulic unit / control
module connector.
3) Check for proper connection to ABS hydrau-
lic unit / control module connector at termi-
nal “A23”.
4) If OK, then measure voltage between termi-
nal “A23” of module connector and body
ground.
Is it 10 – 14V?Go to step 3.“W/Bl” circuit open.
3 Measure resistance between connector termi-
nal “A22” of ABS hydraulic unit / control module
assembly and body ground.
Is it infinite (∞)?“B” circuit open. Substitute a known-good
ABS hydraulic unit / con-
trol module assembly and
recheck.
Page 344 of 687
Downloaded from www.Manualslib.com manuals search engine ANTILOCK BRAKE SYSTEM (ABS) 5E-27
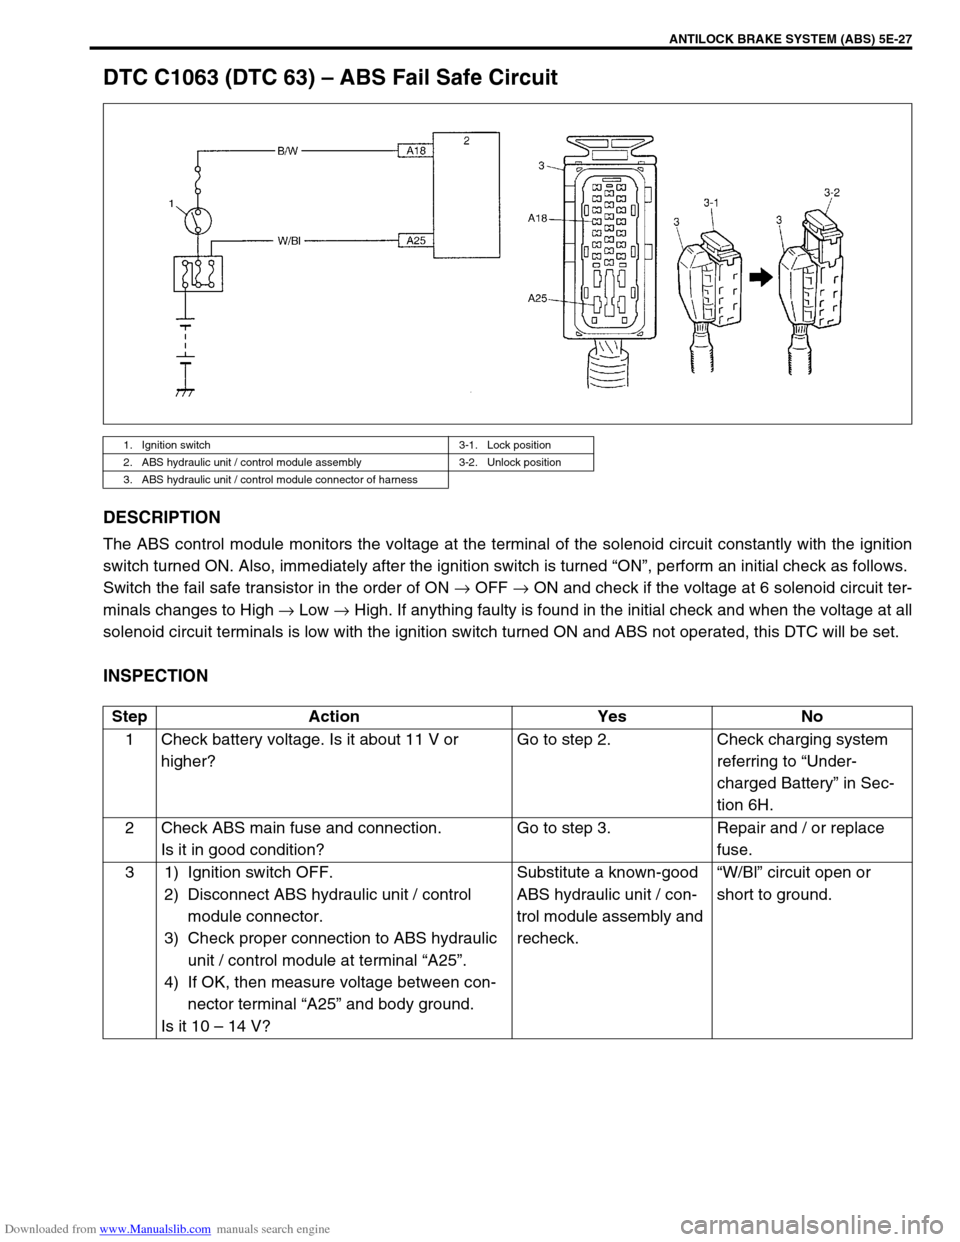
DTC C1063 (DTC 63) – ABS Fail Safe Circuit
DESCRIPTION
The ABS control module monitors the voltage at the terminal of the solenoid circuit constantly with the ignition
switch turned ON. Also, immediately after the ignition switch is turned “ON”, perform an initial check as follows.
Switch the fail safe transistor in the order of ON → OFF → ON and check if the voltage at 6 solenoid circuit ter-
minals changes to High → Low → High. If anything faulty is found in the initial check and when the voltage at all
solenoid circuit terminals is low with the ignition switch turned ON and ABS not operated, this DTC will be set.
INSPECTION
1. Ignition switch 3-1. Lock position
2. ABS hydraulic unit / control module assembly 3-2. Unlock position
3. ABS hydraulic unit / control module connector of harness
Step Action Yes No
1 Check battery voltage. Is it about 11 V or
higher?Go to step 2. Check charging system
referring to “Under-
charged Battery” in Sec-
tion 6H.
2 Check ABS main fuse and connection.
Is it in good condition?Go to step 3. Repair and / or replace
fuse.
3 1) Ignition switch OFF.
2) Disconnect ABS hydraulic unit / control
module connector.
3) Check proper connection to ABS hydraulic
unit / control module at terminal “A25”.
4) If OK, then measure voltage between con-
nector terminal “A25” and body ground.
Is it 10 – 14 V?Substitute a known-good
ABS hydraulic unit / con-
trol module assembly and
recheck.“W/Bl” circuit open or
short to ground.