body SUZUKI JIMNY 2005 3.G Service Repair Manual
[x] Cancel search | Manufacturer: SUZUKI, Model Year: 2005, Model line: JIMNY, Model: SUZUKI JIMNY 2005 3.GPages: 687, PDF Size: 13.38 MB
Page 350 of 687
Downloaded from www.Manualslib.com manuals search engine ANTILOCK BRAKE SYSTEM (ABS) 5E-33
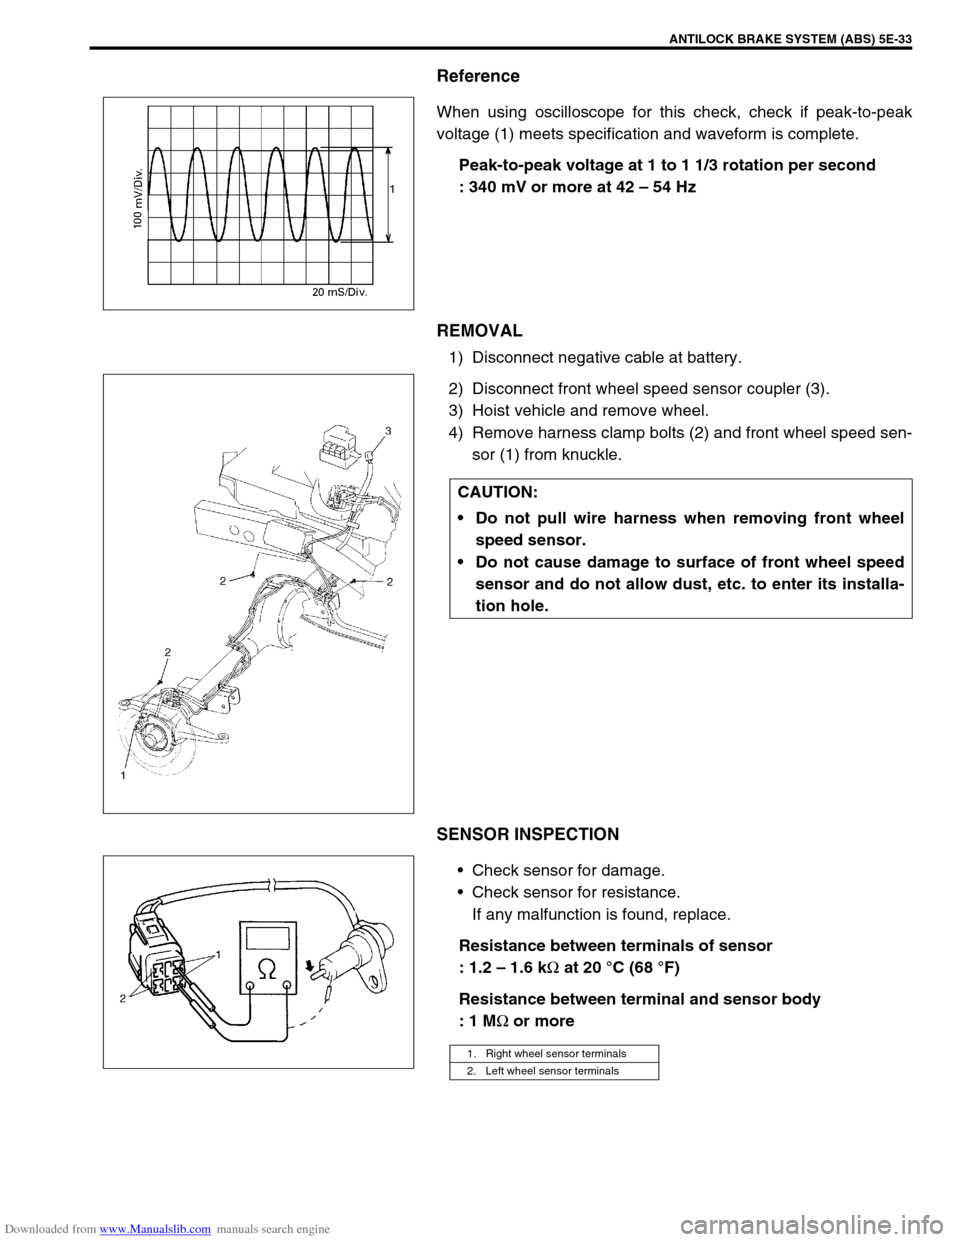
Reference
When using oscilloscope for this check, check if peak-to-peak
voltage (1) meets specification and waveform is complete.
Peak-to-peak voltage at 1 to 1 1/3 rotation per second
: 340 mV or more at 42 – 54 Hz
REMOVAL
1) Disconnect negative cable at battery.
2) Disconnect front wheel speed sensor coupler (3).
3) Hoist vehicle and remove wheel.
4) Remove harness clamp bolts (2) and front wheel speed sen-
sor (1) from knuckle.
SENSOR INSPECTION
Check sensor for damage.
Check sensor for resistance.
If any malfunction is found, replace.
Resistance between terminals of sensor
: 1.2 – 1.6 k
Ω at 20 °C (68 °F)
Resistance between terminal and sensor body
: 1 M
Ω or more
CAUTION:
Do not pull wire harness when removing front wheel
speed sensor.
Do not cause damage to surface of front wheel speed
sensor and do not allow dust, etc. to enter its installa-
tion hole.
1. Right wheel sensor terminals
2. Left wheel sensor terminals
Page 354 of 687
Downloaded from www.Manualslib.com manuals search engine ANTILOCK BRAKE SYSTEM (ABS) 5E-37
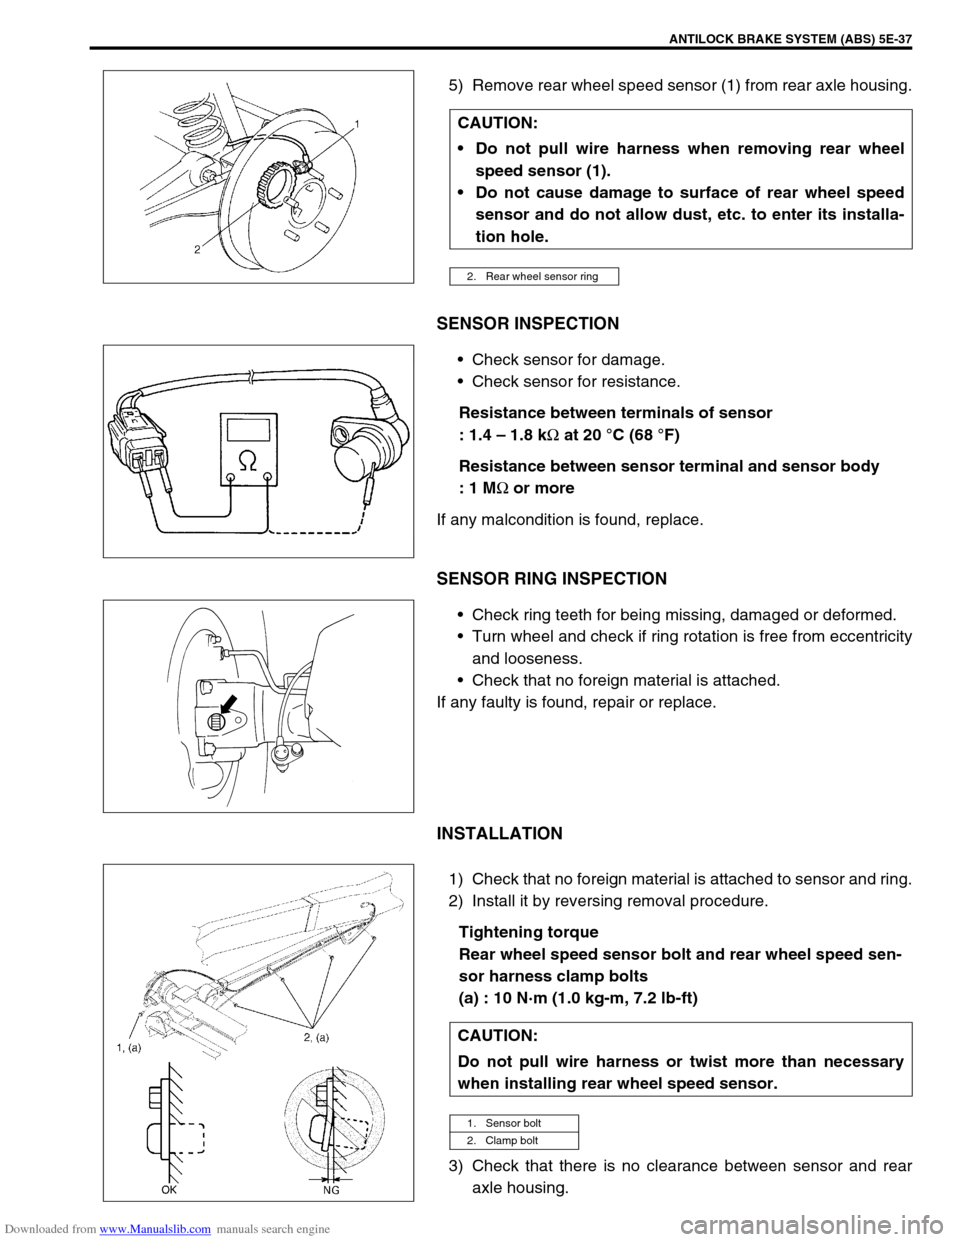
5) Remove rear wheel speed sensor (1) from rear axle housing.
SENSOR INSPECTION
Check sensor for damage.
Check sensor for resistance.
Resistance between terminals of sensor
: 1.4 – 1.8 k
Ω at 20 °C (68 °F)
Resistance between sensor terminal and sensor body
: 1 M
Ω or more
If any malcondition is found, replace.
SENSOR RING INSPECTION
Check ring teeth for being missing, damaged or deformed.
Turn wheel and check if ring rotation is free from eccentricity
and looseness.
Check that no foreign material is attached.
If any faulty is found, repair or replace.
INSTALLATION
1) Check that no foreign material is attached to sensor and ring.
2) Install it by reversing removal procedure.
Tightening torque
Rear wheel speed sensor bolt and rear wheel speed sen-
sor harness clamp bolts
(a) : 10 N·m (1.0 kg-m, 7.2 lb-ft)
3) Check that there is no clearance between sensor and rear
axle housing. CAUTION:
Do not pull wire harness when removing rear wheel
speed sensor (1).
Do not cause damage to surface of rear wheel speed
sensor and do not allow dust, etc. to enter its installa-
tion hole.
2. Rear wheel sensor ring
CAUTION:
Do not pull wire harness or twist more than necessary
when installing rear wheel speed sensor.
1. Sensor bolt
2. Clamp bolt
Page 360 of 687
Downloaded from www.Manualslib.com manuals search engine ENGINE GENERAL INFORMATION AND DIAGNOSIS 6-3
General Information
Statement on Cleanliness and Care
An automobile engine is a combination of many machined, honed, polished and lapped surfaces with tolerances
that are measured in the thousands of an millimeter (ten thousands of an inch).
Accordingly, when any internal engine parts are serviced, care and cleanliness are important.
Throughout this section, it should be understood that proper cleaning and protection of machined surfaces and
friction areas is part of the repair procedure. This is considered standard shop practice even if not specifically
stated.
A liberal coating of engine oil should be applied to friction areas during assembly to protect and lubricate the
surfaces on initial operation.
Whenever valve train components, pistons, piston rings, connecting rods, rod bearings, and crankshaft jour-
nal bearings are removed for service, they should be retained in order.
At the time of installation, they should be installed in the same locations and with the same mating surfaces
as when removed.
Battery cables should be disconnected before any major work is performed on the engine.
Failure to disconnect cables may result in damage to wire harness or other electrical parts.
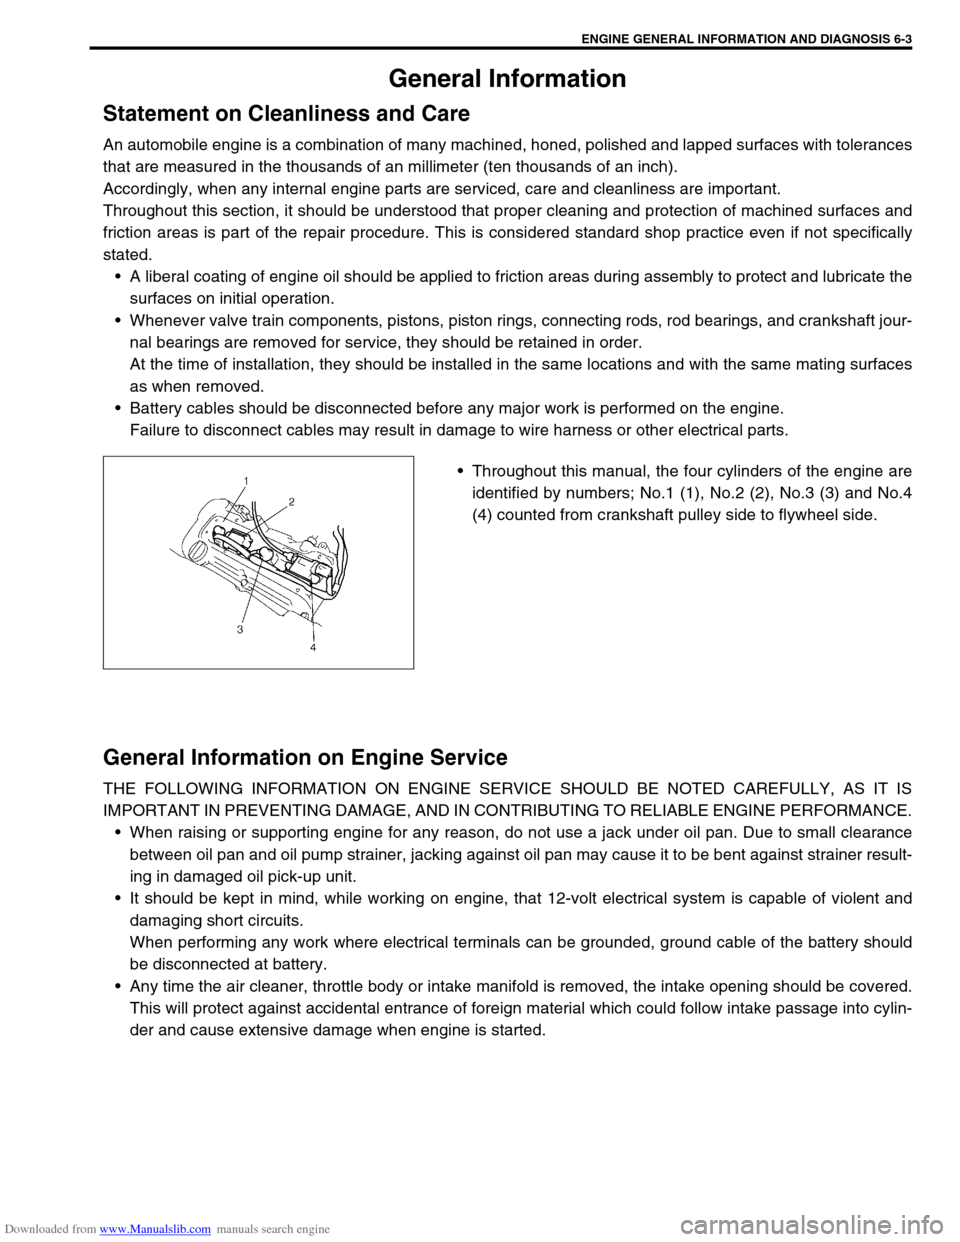
Throughout this manual, the four cylinders of the engine are
identified by numbers; No.1 (1), No.2 (2), No.3 (3) and No.4
(4) counted from crankshaft pulley side to flywheel side.
General Information on Engine Service
THE FOLLOWING INFORMATION ON ENGINE SERVICE SHOULD BE NOTED CAREFULLY, AS IT IS
IMPORTANT IN PREVENTING DAMAGE, AND IN CONTRIBUTING TO RELIABLE ENGINE PERFORMANCE.
When raising or supporting engine for any reason, do not use a jack under oil pan. Due to small clearance
between oil pan and oil pump strainer, jacking against oil pan may cause it to be bent against strainer result-
ing in damaged oil pick-up unit.
It should be kept in mind, while working on engine, that 12-volt electrical system is capable of violent and
damaging short circuits.
When performing any work where electrical terminals can be grounded, ground cable of the battery should
be disconnected at battery.
Any time the air cleaner, throttle body or intake manifold is removed, the intake opening should be covered.
This will protect against accidental entrance of foreign material which could follow intake passage into cylin-
der and cause extensive damage when engine is started.
Page 365 of 687
Downloaded from www.Manualslib.com manuals search engine 6-8 ENGINE GENERAL INFORMATION AND DIAGNOSIS
In the 2nd through the 4th frames, the freeze frame data of each
malfunction is stored in the order as the malfunction is detected.
These data are not updated.
Shown in the table below are examples of how freeze frame data
are stored when two or more malfunctions are detected.
Freeze Frame Data Clearance :
The freeze frame data is cleared at the same time as clearance of
diagnostic trouble code (DTC).
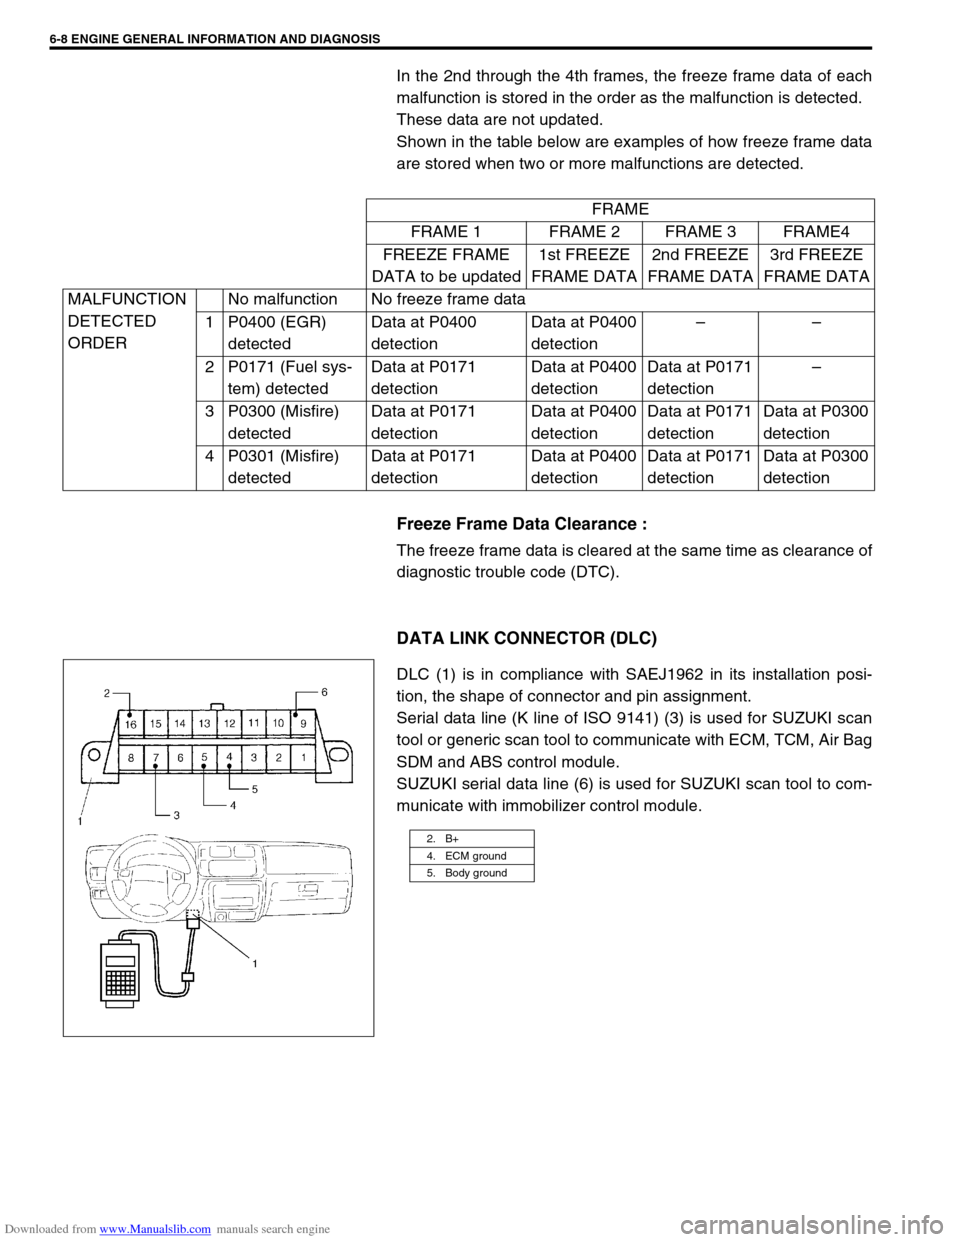
DATA LINK CONNECTOR (DLC)
DLC (1) is in compliance with SAEJ1962 in its installation posi-
tion, the shape of connector and pin assignment.
Serial data line (K line of ISO 9141) (3) is used for SUZUKI scan
tool or generic scan tool to communicate with ECM, TCM, Air Bag
SDM and ABS control module.
SUZUKI serial data line (6) is used for SUZUKI scan tool to com-
municate with immobilizer control module.FRAME
FRAME 1 FRAME 2 FRAME 3 FRAME4
FREEZE FRAME
DATA to be updated1st FREEZE
FRAME DATA2nd FREEZE
FRAME DATA3rd FREEZE
FRAME DATA
MALFUNCTION
DETECTED
ORDERNo malfunction No freeze frame data
1 P0400 (EGR)
detectedData at P0400
detectionData at P0400
detection––
2 P0171 (Fuel sys-
tem) detectedData at P0171
detectionData at P0400
detectionData at P0171
detection–
3 P0300 (Misfire)
detectedData at P0171
detectionData at P0400
detectionData at P0171
detectionData at P0300
detection
4 P0301 (Misfire)
detectedData at P0171
detectionData at P0400
detectionData at P0171
detectionData at P0300
detection
2. B+
4. ECM ground
5. Body ground
Page 390 of 687

Downloaded from www.Manualslib.com manuals search engine ENGINE GENERAL INFORMATION AND DIAGNOSIS 6-33
Inspection of ECM and Its Circuits
ECM and its circuits can be checked at ECM wiring connectors by
measuring voltage and resistance.
VOLTAGE CHECK
1) Remove ECM from body referring to Section 6E.
2) Check voltage at each terminal of connectors connected.CAUTION:
ECM cannot be checked by itself. It is strictly prohibited
to connect voltmeter or ohmmeter to ECM with connector
disconnected from it.
NOTE:
As each terminal voltage is affected by the battery volt-
age, confirm that it is 11 V or more when ignition switch
is ON.
1. ECM
2. ECM connectors (Viewed from harness side)
Page 398 of 687
Downloaded from www.Manualslib.com manuals search engine ENGINE GENERAL INFORMATION AND DIAGNOSIS 6-41
Resistance Check
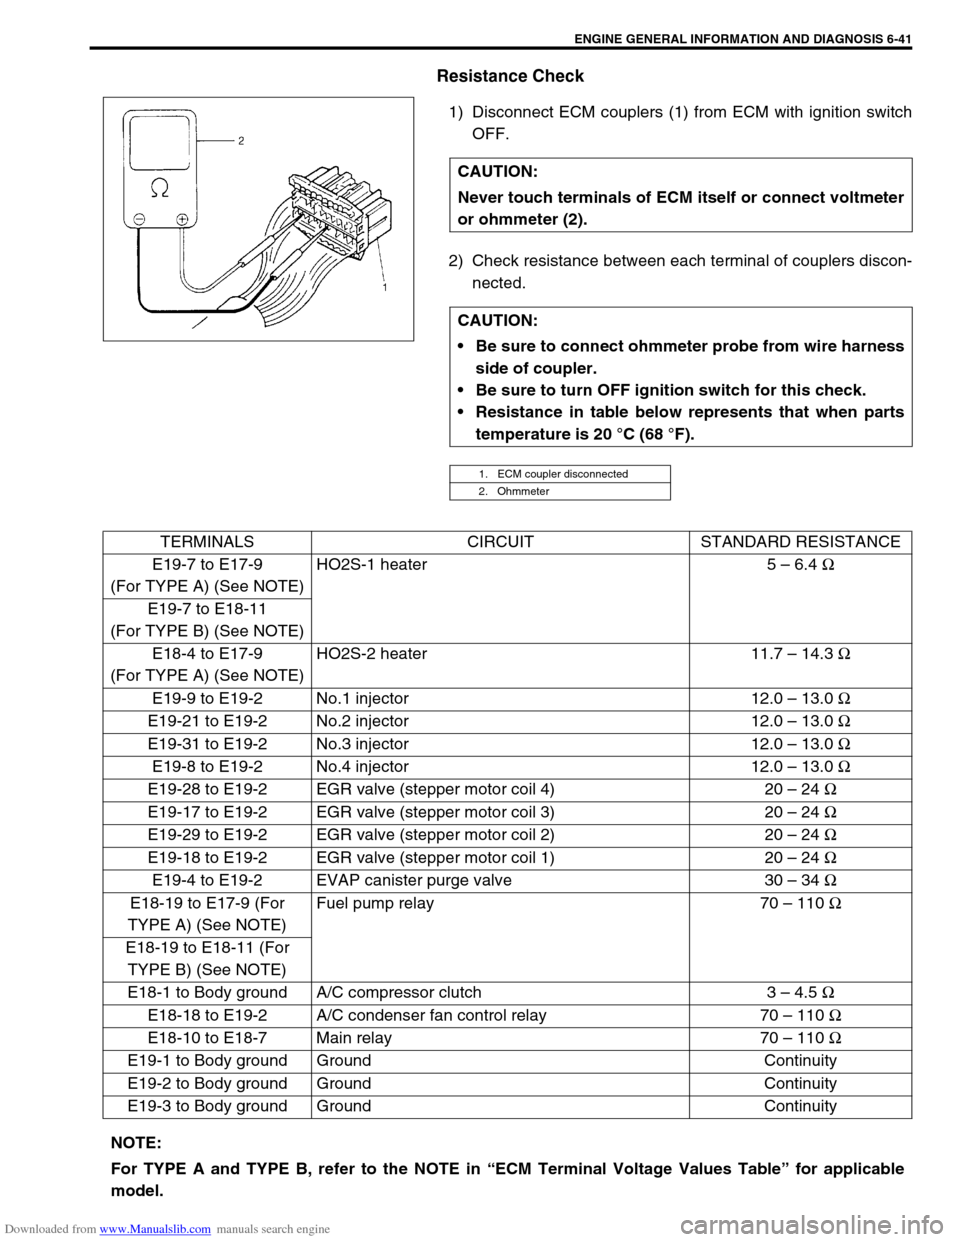
1) Disconnect ECM couplers (1) from ECM with ignition switch
OFF.
2) Check resistance between each terminal of couplers discon-
nected. CAUTION:
Never touch terminals of ECM itself or connect voltmeter
or ohmmeter (2).
CAUTION:
Be sure to connect ohmmeter probe from wire harness
side of coupler.
Be sure to turn OFF ignition switch for this check.
Resistance in table below represents that when parts
temperature is 20 °C (68 °F).
1. ECM coupler disconnected
2. Ohmmeter
TERMINALS CIRCUIT STANDARD RESISTANCE
E19-7 to E17-9
(For TYPE A) (See NOTE)HO2S-1 heater 5 – 6.4 Ω
E19-7 to E18-11
(For TYPE B) (See NOTE)
E18-4 to E17-9
(For TYPE A) (See NOTE)HO2S-2 heater 11.7 – 14.3 Ω
E19-9 to E19-2 No.1 injector 12.0 – 13.0 Ω
E19-21 to E19-2 No.2 injector 12.0 – 13.0 Ω
E19-31 to E19-2 No.3 injector 12.0 – 13.0 Ω
E19-8 to E19-2 No.4 injector 12.0 – 13.0 Ω
E19-28 to E19-2 EGR valve (stepper motor coil 4) 20 – 24 Ω
E19-17 to E19-2 EGR valve (stepper motor coil 3) 20 – 24 Ω
E19-29 to E19-2 EGR valve (stepper motor coil 2) 20 – 24 Ω
E19-18 to E19-2 EGR valve (stepper motor coil 1) 20 – 24 Ω
E19-4 to E19-2 EVAP canister purge valve 30 – 34 Ω
E18-19 to E17-9 (For
TYPE A) (See NOTE)Fuel pump relay 70 – 110 Ω
E18-19 to E18-11 (For
TYPE B) (See NOTE)
E18-1 to Body ground A/C compressor clutch 3 – 4.5 Ω
E18-18 to E19-2 A/C condenser fan control relay 70 – 110 Ω
E18-10 to E18-7 Main relay 70 – 110 Ω
E19-1 to Body ground Ground Continuity
E19-2 to Body ground Ground Continuity
E19-3 to Body ground Ground Continuity
NOTE:
For TYPE A and TYPE B, refer to the NOTE in “ECM Terminal Voltage Values Table” for applicable
model.
Page 406 of 687
![SUZUKI JIMNY 2005 3.G Service Repair Manual Downloaded from www.Manualslib.com manuals search engine ENGINE GENERAL INFORMATION AND DIAGNOSIS 6-49
[A] Fig. 1 for Step 2 / [B] Fig. 2 for Step 33 Check Wire Harness.
1) Disconnect MAP sensor conne SUZUKI JIMNY 2005 3.G Service Repair Manual Downloaded from www.Manualslib.com manuals search engine ENGINE GENERAL INFORMATION AND DIAGNOSIS 6-49
[A] Fig. 1 for Step 2 / [B] Fig. 2 for Step 33 Check Wire Harness.
1) Disconnect MAP sensor conne](/img/20/7588/w960_7588-405.png)
Downloaded from www.Manualslib.com manuals search engine ENGINE GENERAL INFORMATION AND DIAGNOSIS 6-49
[A] Fig. 1 for Step 2 / [B] Fig. 2 for Step 33 Check Wire Harness.
1) Disconnect MAP sensor connector with
ignition switch OFF.
2) Check for proper connection of MAP sensor
at “G” and “B/Bl” wire terminals.
3) If OK, then with ignition switch ON, check
voltage at each of “Lg/R” and “G” wire termi-
nals and body ground. See Fig. 2.
Is voltage about 4 – 6 V at each terminal?Go to Step 4.“Lg/R” wire open or
shorted to ground circuit
or shorted to power circuit
(See NOTE), “G” wire
open or shorted to
ground, poor E19-26 con-
nection or E19-22 con-
nection.
If wire and connection are
OK, confirm that MAP
sensor is normal and then
substitute a known-good
ECM and recheck.
4 Check MAP sensor according to “MAP Sensor
Individual Check” below.
Is it in good condition?“Lg/R” wire shorted to “G”
wire, “B/Bl” wire open,
poor E19-10 connection.
If wire and connection are
OK, substitute a known-
good ECM and recheck.Replace MAP sensor. Step Action Yes No
NOTE:
When battery voltage is applied to “Lg/R” wire, it is possible that MAP sensor is also faulty.
Page 413 of 687
![SUZUKI JIMNY 2005 3.G Service Repair Manual Downloaded from www.Manualslib.com manuals search engine 6-56 ENGINE GENERAL INFORMATION AND DIAGNOSIS
INSPECTION
[A] Fig. 1 for Step 2 / [B] Fig. 2 for Step 3 / [C] Fig. 3 for Step 4Step Action Yes N SUZUKI JIMNY 2005 3.G Service Repair Manual Downloaded from www.Manualslib.com manuals search engine 6-56 ENGINE GENERAL INFORMATION AND DIAGNOSIS
INSPECTION
[A] Fig. 1 for Step 2 / [B] Fig. 2 for Step 3 / [C] Fig. 3 for Step 4Step Action Yes N](/img/20/7588/w960_7588-412.png)
Downloaded from www.Manualslib.com manuals search engine 6-56 ENGINE GENERAL INFORMATION AND DIAGNOSIS
INSPECTION
[A] Fig. 1 for Step 2 / [B] Fig. 2 for Step 3 / [C] Fig. 3 for Step 4Step Action Yes No
1Was “Engine Diag. Flow Table” performed? Go to Step 2. Go to “Engine Diag. Flow
Table”.
2 Check TP Sensor and Its Circuit.
1) Connect scan tool to DLC with ignition
switch OFF and then turn ignition switch ON.
See Fig. 1.
2) Check throttle valve opening percentage dis-
played on scan tool.
Is it displayed 0% or 100%?Go to Step 3. Intermittent trouble.
Check for intermittent
referring to “Intermittent
and Poor Connection” in
Section 0A.
3 Check Wire Harness.
1) Disconnect connector from TP sensor with
ignition switch OFF.
2) Check for proper connection to TP sensor at
“Lg/R”, “Lg” and “B/Bl” wire terminal.
3) If OK, then with ignition switch ON, check
voltage at each of “Lg/R” and “Lg” wire ter-
minals and body ground. See Fig. 2.
Is voltage about 4 – 6 V at each terminal?Go to Step 4.“Lg/R” wire open, “Lg/R”
wire shorted to ground cir-
cuit or power circuit or
“B/Bl” wire, “Lg” wire open
or shorted to ground cir-
cuit or poor E19-22 or
E19-16 connection.
If wire and connection are
OK, substitute a known-
good ECM and recheck.
4 Check TP Sensor.
1) Check resistance between terminals of TP
sensor. See Fig. 3.
TP sensor resistance
Between 1 and 3 : 4.0 – 6.0 k
Ω
ΩΩ Ω
Between 2 and 3 : Varying according to
throttle valve opening (0.02 – 6.0 k
Ω
ΩΩ Ω)
Are measured values within specifications?“B/Bl” wire open or poor
E19-10 connection.
If wire and connection are
OK, substitute a known-
good ECM and recheck.Replace TP sensor.
Page 434 of 687
Downloaded from www.Manualslib.com manuals search engine ENGINE GENERAL INFORMATION AND DIAGNOSIS 6-77
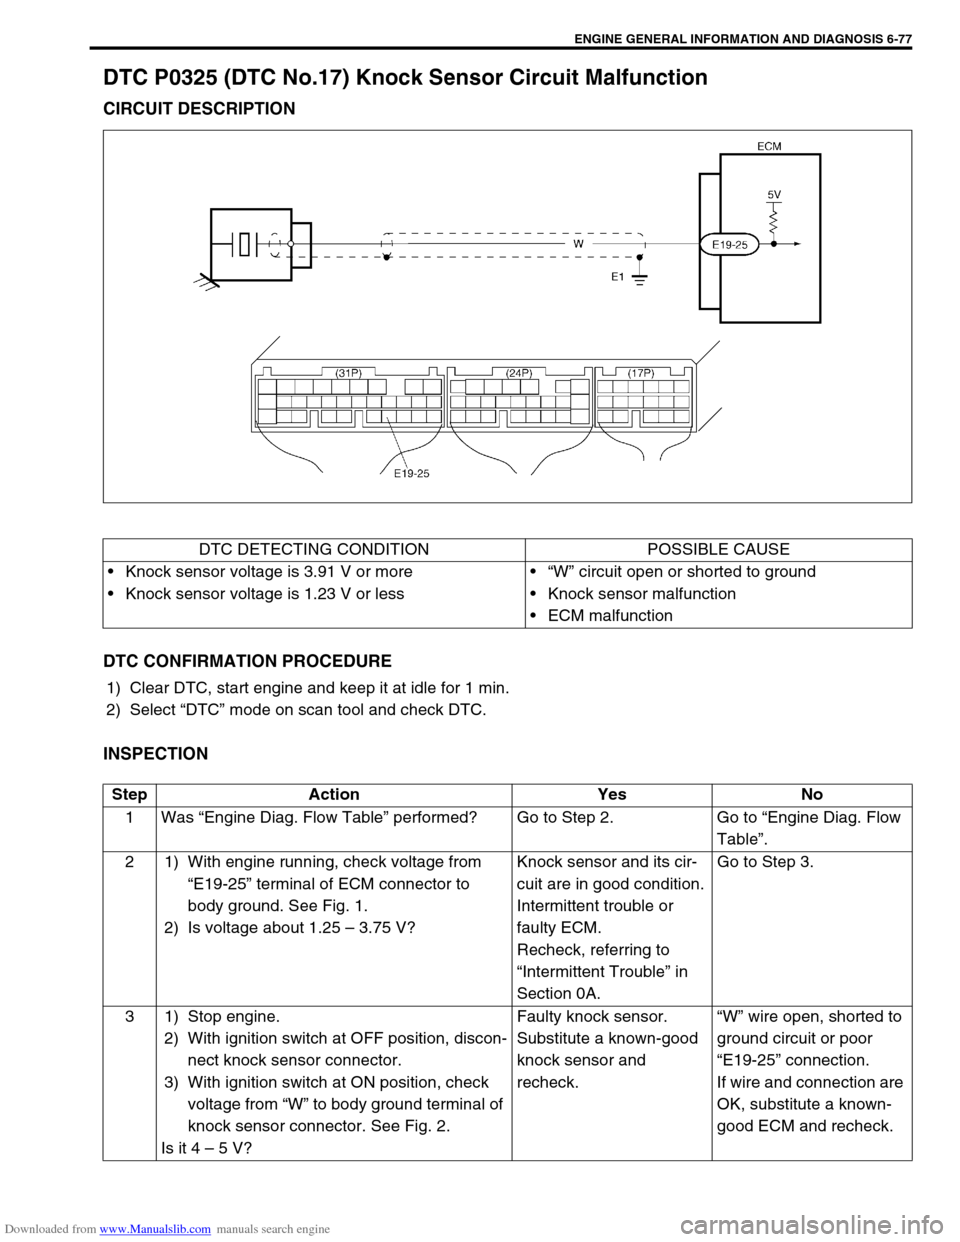
DTC P0325 (DTC No.17) Knock Sensor Circuit Malfunction
CIRCUIT DESCRIPTION
DTC CONFIRMATION PROCEDURE
1) Clear DTC, start engine and keep it at idle for 1 min.
2) Select “DTC” mode on scan tool and check DTC.
INSPECTION
DTC DETECTING CONDITION POSSIBLE CAUSE
Knock sensor voltage is 3.91 V or more
Knock sensor voltage is 1.23 V or less“W” circuit open or shorted to ground
Knock sensor malfunction
ECM malfunction
Step Action Yes No
1Was “Engine Diag. Flow Table” performed? Go to Step 2. Go to “Engine Diag. Flow
Table”.
2 1) With engine running, check voltage from
“E19-25” terminal of ECM connector to
body ground. See Fig. 1.
2) Is voltage about 1.25 – 3.75 V?Knock sensor and its cir-
cuit are in good condition.
Intermittent trouble or
faulty ECM.
Recheck, referring to
“Intermittent Trouble” in
Section 0A.Go to Step 3.
3 1) Stop engine.
2) With ignition switch at OFF position, discon-
nect knock sensor connector.
3) With ignition switch at ON position, check
voltage from “W” to body ground terminal of
knock sensor connector. See Fig. 2.
Is it 4 – 5 V?Faulty knock sensor.
Substitute a known-good
knock sensor and
recheck.“W” wire open, shorted to
ground circuit or poor
“E19-25” connection.
If wire and connection are
OK, substitute a known-
good ECM and recheck.
Page 436 of 687
Downloaded from www.Manualslib.com manuals search engine ENGINE GENERAL INFORMATION AND DIAGNOSIS 6-79
DTC P0335 (DTC No.23) Crankshaft Position (CKP) Sensor Circuit Malfunction
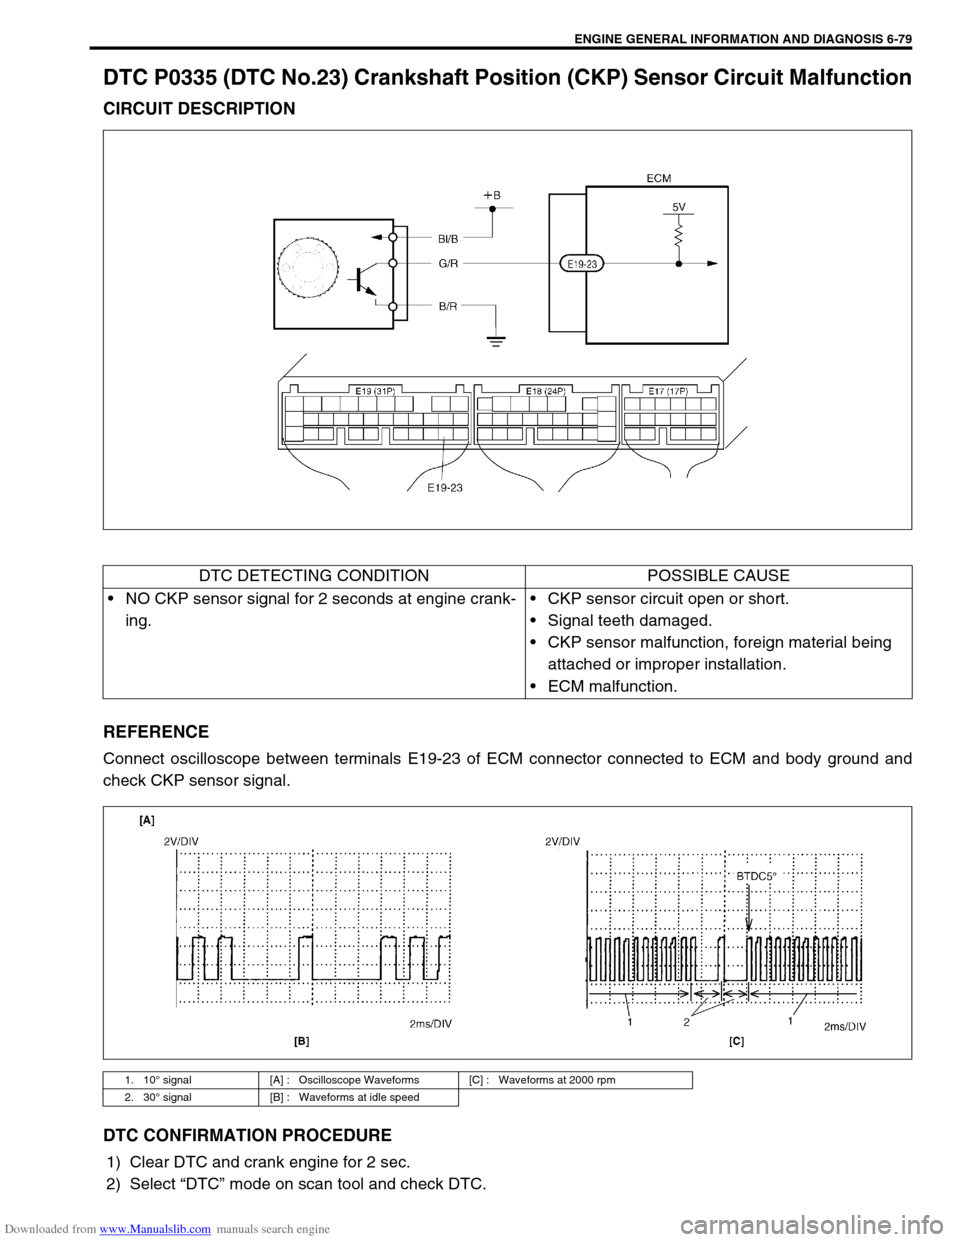
CIRCUIT DESCRIPTION
REFERENCE
Connect oscilloscope between terminals E19-23 of ECM connector connected to ECM and body ground and
check CKP sensor signal.
DTC CONFIRMATION PROCEDURE
1) Clear DTC and crank engine for 2 sec.
2) Select “DTC” mode on scan tool and check DTC.
DTC DETECTING CONDITION POSSIBLE CAUSE
NO CKP sensor signal for 2 seconds at engine crank-
ing.CKP sensor circuit open or short.
Signal teeth damaged.
CKP sensor malfunction, foreign material being
attached or improper installation.
ECM malfunction.
1. 10° signal [A] : Oscilloscope Waveforms [C] : Waveforms at 2000 rpm
2. 30° signal [B] : Waveforms at idle speed