SUZUKI MARUTI 2005 1.G Manual PDF
Manufacturer: SUZUKI, Model Year: 2005, Model line: MARUTI, Model: SUZUKI MARUTI 2005 1.GPages: 136, PDF Size: 2.93 MB
Page 71 of 136
Downloaded from www.Manualslib.com manuals search engine 7183K
Starting
1. Adjust the driver’s seat for the proper
driving posture.
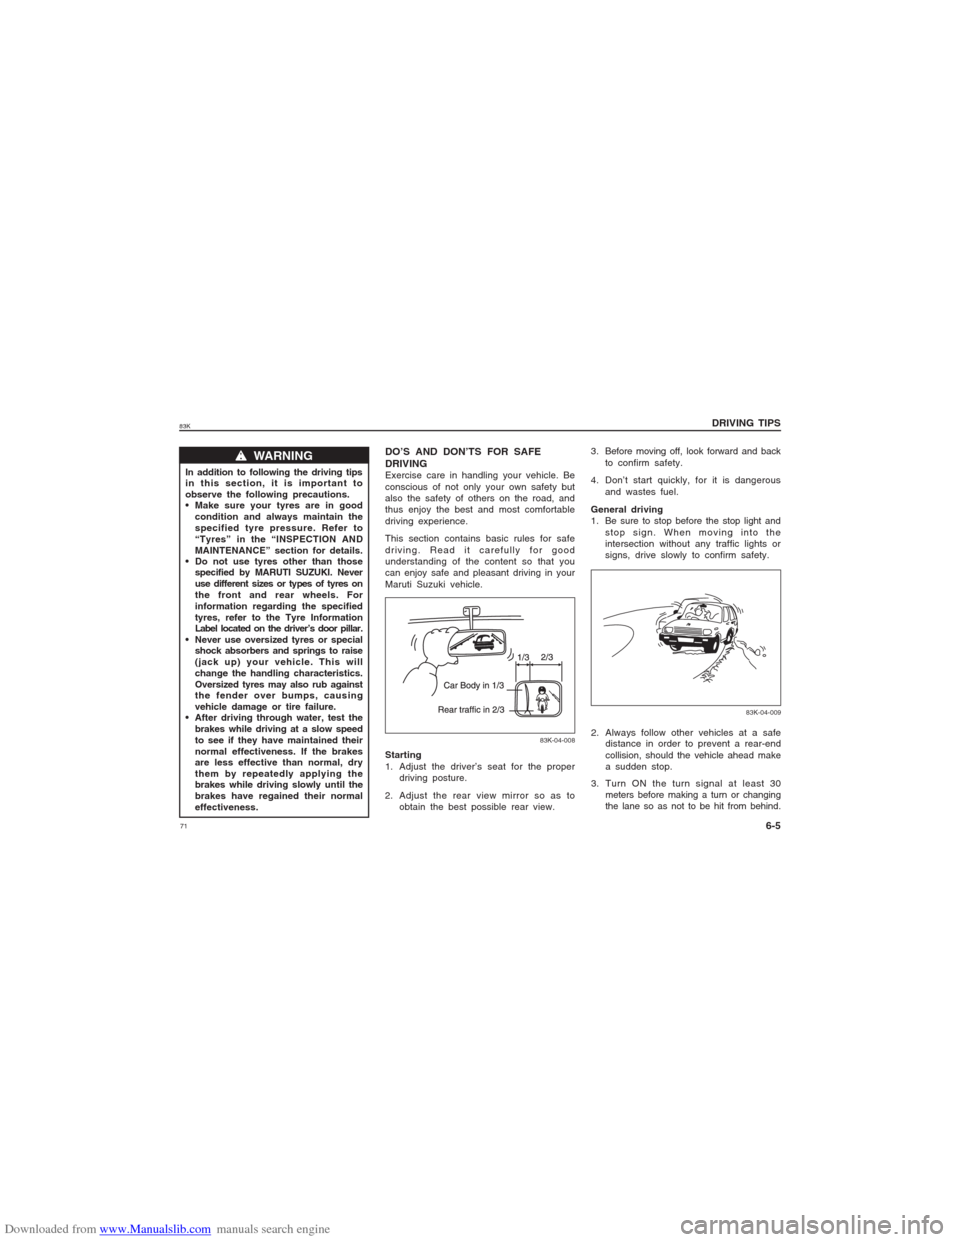
2. Adjust the rear view mirror so as to
obtain the best possible rear view.
83K-04-008
83K-04-009
2. Always follow other vehicles at a safe
distance in order to prevent a rear-end
collision, should the vehicle ahead make
a sudden stop.
3. Turn ON the turn signal at least 30
meters before making a turn or changing
the lane so as not to be hit from behind.
DRIVING TIPS
6-5
DO’S AND DON’TS FOR SAFE
DRIVINGExercise care in handling your vehicle. Be
conscious of not only your own safety but
also the safety of others on the road, and
thus enjoy the best and most comfortable
driving experience.
This section contains basic rules for safe
driving. Read it carefully for good
understanding of the content so that you
can enjoy safe and pleasant driving in your
Maruti Suzuki vehicle.3. Before moving off, look forward and back
to confirm safety.
4. Don’t start quickly, for it is dangerous
and wastes fuel.
General driving
1. Be sure to stop before the stop light and
stop sign. When moving into the
intersection without any traffic lights or
signs, drive slowly to confirm safety.
w ww w
w WARNING
In addition to following the driving tips
in this section, it is important to
observe the following precautions.
Make sure your tyres are in good
condition and always maintain the
specified tyre pressure. Refer to
“Tyres” in the “INSPECTION AND
MAINTENANCE” section for details.
Do not use tyres other than those
specified by MARUTI SUZUKI. Never
use different sizes or types of tyres on
the front and rear wheels. For
information regarding the specified
tyres, refer to the Tyre Information
Label located on the driver’s door pillar.
Never use oversized tyres or special
shock absorbers and springs to raise
(jack up) your vehicle. This will
change the handling characteristics.
Oversized tyres may also rub against
the fender over bumps, causing
vehicle damage or tire failure.
After driving through water, test the
brakes while driving at a slow speed
to see if they have maintained their
normal effectiveness. If the brakes
are less effective than normal, dry
them by repeatedly applying the
brakes while driving slowly until the
brakes have regained their normal
effectiveness.
Page 72 of 136
Downloaded from www.Manualslib.com manuals search engine 7283K
DRIVING TIPS
6-6
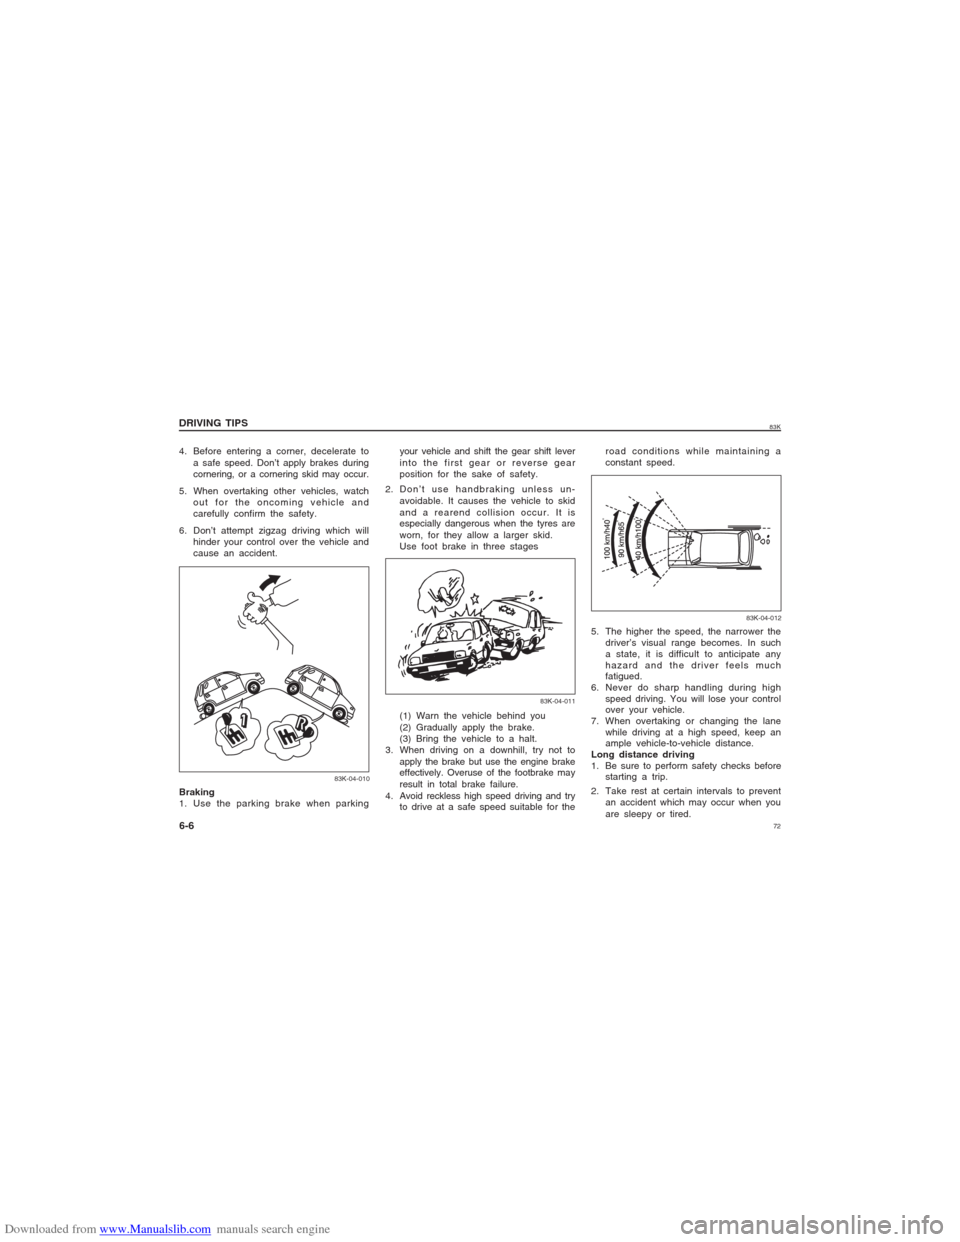
83K-04-010
4. Before entering a corner, decelerate to
a safe speed. Don’t apply brakes during
cornering, or a cornering skid may occur.
5. When overtaking other vehicles, watch
out for the oncoming vehicle and
carefully confirm the safety.
6. Don’t attempt zigzag driving which will
hinder your control over the vehicle and
cause an accident.
Braking
1. Use the parking brake when parking(1) Warn the vehicle behind you
(2) Gradually apply the brake.
(3) Bring the vehicle to a halt.
3. When driving on a downhill, try not to
apply the brake but use the engine brake
effectively. Overuse of the footbrake may
result in total brake failure.
4. Avoid reckless high speed driving and try
to drive at a safe speed suitable for theroad conditions while maintaining a
constant speed.
83K-04-012
83K-04-011
your vehicle and shift the gear shift lever
into the first gear or reverse gear
position for the sake of safety.
2. Don’t use handbraking unless un-
avoidable. It causes the vehicle to skid
and a rearend collision occur. It is
especially dangerous when the tyres are
worn, for they allow a larger skid.
Use foot brake in three stages
5. The higher the speed, the narrower the
driver’s visual range becomes. In such
a state, it is difficult to anticipate any
hazard and the driver feels much
fatigued.
6. Never do sharp handling during high
speed driving. You will lose your control
over your vehicle.
7. When overtaking or changing the lane
while driving at a high speed, keep an
ample vehicle-to-vehicle distance.
Long distance driving
1. Be sure to perform safety checks before
starting a trip.
2. Take rest at certain intervals to prevent
an accident which may occur when you
are sleepy or tired.
Page 73 of 136
Downloaded from www.Manualslib.com manuals search engine 7383K
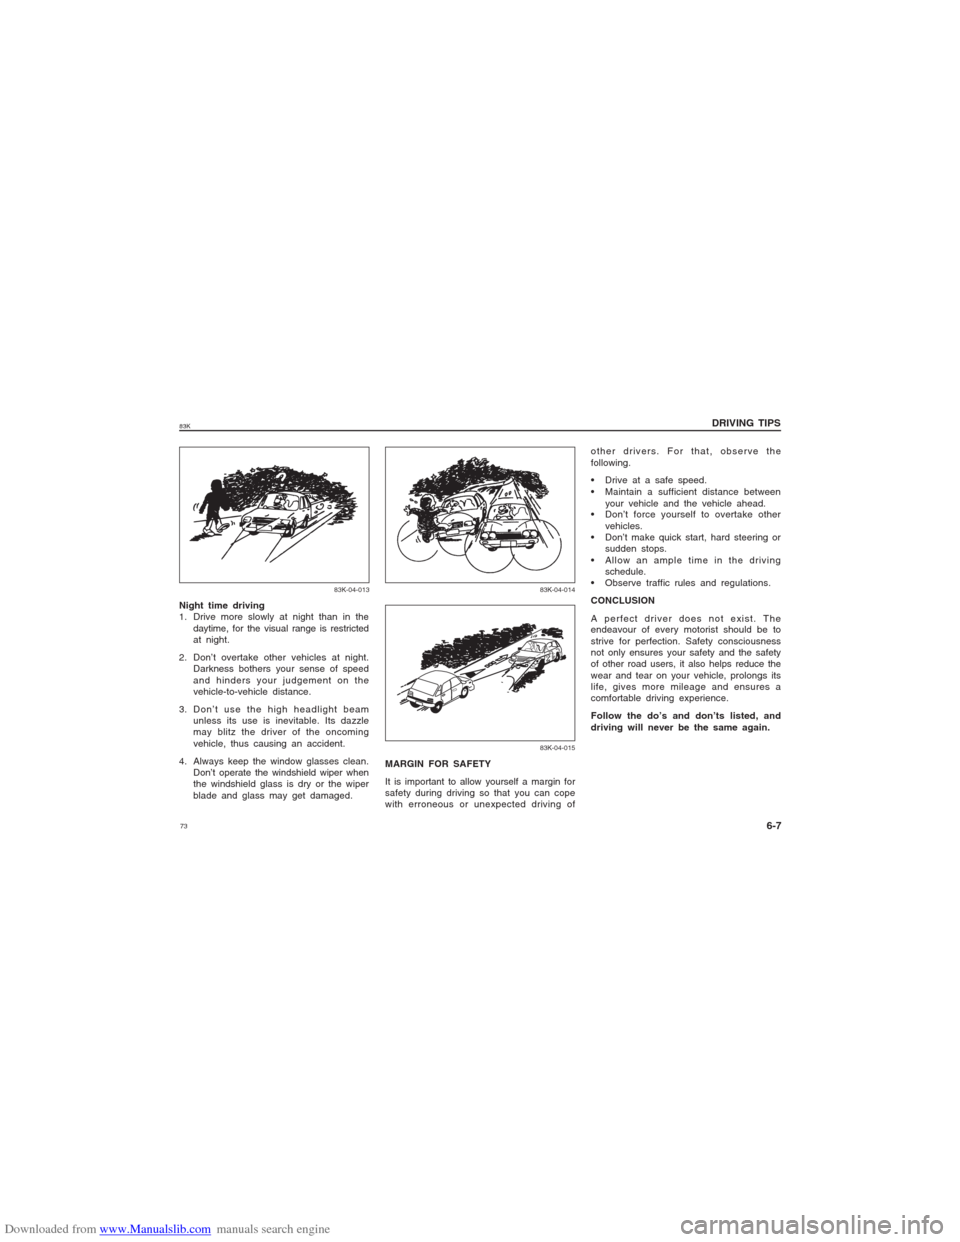
83K-04-01483K-04-015
other drivers. For that, observe the
following.
Drive at a safe speed.
Maintain a sufficient distance between
your vehicle and the vehicle ahead.
Don’t force yourself to overtake other
vehicles.
Don’t make quick start, hard steering or
sudden stops.
Allow an ample time in the driving
schedule.
Observe traffic rules and regulations.
CONCLUSION
A perfect driver does not exist. The
endeavour of every motorist should be to
strive for perfection. Safety consciousness
not only ensures your safety and the safety
of other road users, it also helps reduce the
wear and tear on your vehicle, prolongs its
life, gives more mileage and ensures a
comfortable driving experience.
Follow the do’s and don’ts listed, and
driving will never be the same again.
MARGIN FOR SAFETY
It is important to allow yourself a margin for
safety during driving so that you can cope
with erroneous or unexpected driving of
DRIVING TIPS
6-7
83K-04-013
Night time driving
1. Drive more slowly at night than in the
daytime, for the visual range is restricted
at night.
2. Don’t overtake other vehicles at night.
Darkness bothers your sense of speed
and hinders your judgement on the
vehicle-to-vehicle distance.
3. Don’t use the high headlight beam
unless its use is inevitable. Its dazzle
may blitz the driver of the oncoming
vehicle, thus causing an accident.
4. Always keep the window glasses clean.
Don’t operate the windshield wiper when
the windshield glass is dry or the wiper
blade and glass may get damaged.
Page 74 of 136
Downloaded from www.Manualslib.com manuals search engine 7483K
OTHER CONTROLS AND EQUIPMENT
Heating and Air Conditioning System........................................................................... 7-1
Manual Heating and Air Conditioning System............................................................. 7-1
Radio Antenna..................................................................................................................... 7-4
Remote Audio Controls (if equipped)............................................................................ 7-4
Fuel Filler Cap.................................................................................................................... 7-5
Engine Bonnet..................................................................................................................... 7-6
Sun Visor............................................................................................................................. 7-6
Interior Light Switch ..........................................................................................................7-7
Accessory Socket (if equipped)...................................................................................... 7-7
Assist Grips (if equipped)................................................................................................ 7-8
Glove Box............................................................................................................................ 7-8
Instrument Panel Upper Tray........................................................................................... 7-8
Cup Holder........................................................................................................................... 7-9
Front Seat Back Pocket (if equipped)........................................................................... 7-9
Underseat Tray (if equipped)........................................................................................... 7-9
Shopping Hook (if equipped).........................................................................................7-10
Luggage Area Cover (if equipped)...............................................................................7-10
Frame Hooks..................................................................................................................... 7-10
OTHER CONTROLS AND EQUIPMENT
Page 75 of 136
Downloaded from www.Manualslib.com manuals search engine 7583KHeating and Air Conditioning
SystemThe type of heating and air conditioning
system is:
Manual Heating and Air Conditioning
SystemAir OutletOTHER CONTROLS AND EQUIPMENT
7-1
83K-05-001
EXAMPLE
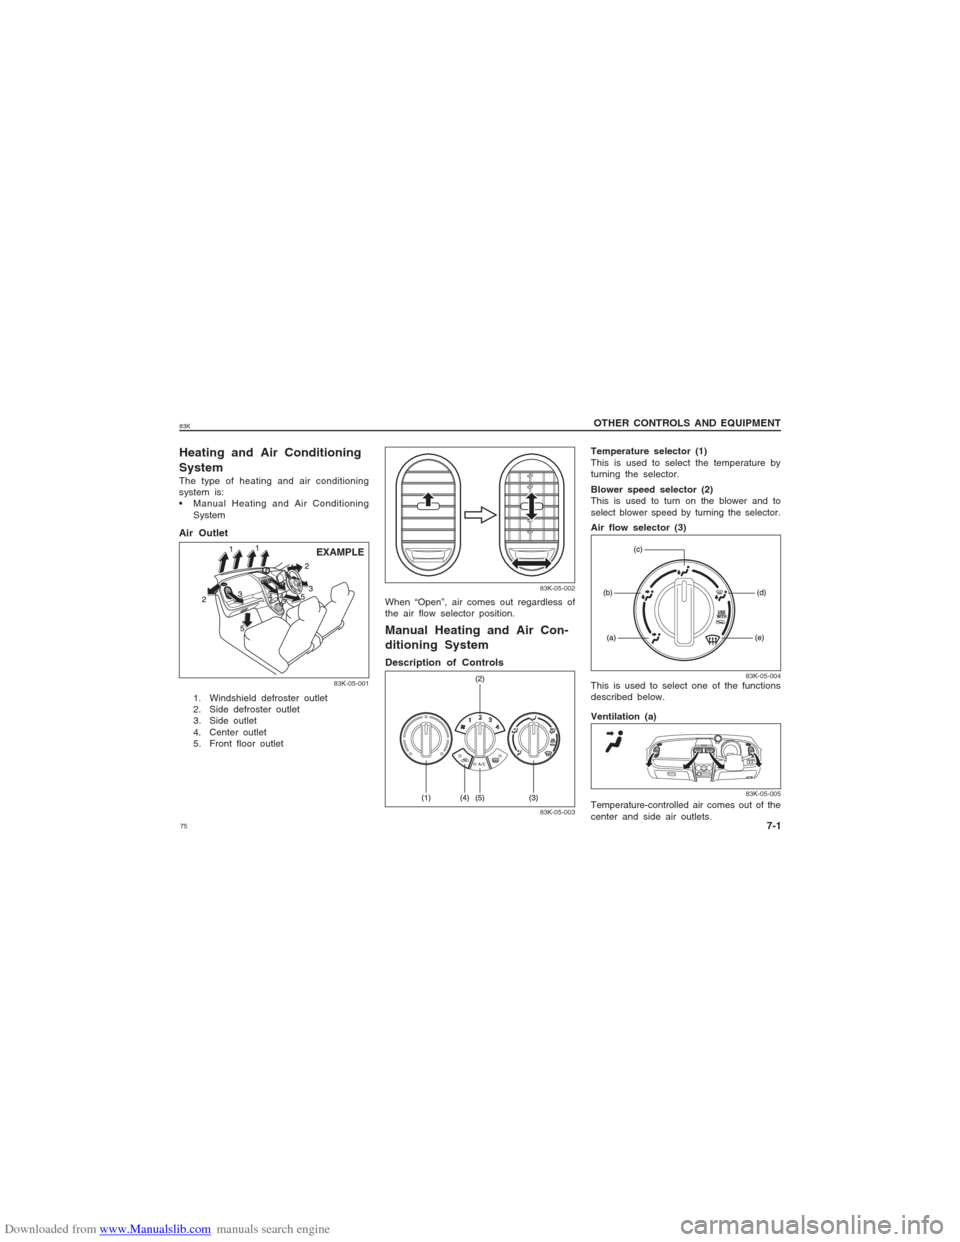
1. Windshield defroster outlet
2. Side defroster outlet
3. Side outlet
4. Center outlet
5. Front floor outlet
83K-05-002
When “Open”, air comes out regardless of
the air flow selector position.Manual Heating and Air Con-
ditioning SystemDescription of Controls
83K-05-003
Temperature selector (1)
This is used to select the temperature by
turning the selector.
Blower speed selector (2)
This is used to turn on the blower and to
select blower speed by turning the selector.
Air flow selector (3)
This is used to select one of the functions
described below.
Ventilation (a)
83K-05-005
Temperature-controlled air comes out of the
center and side air outlets.
83K-05-004
Page 76 of 136
Downloaded from www.Manualslib.com manuals search engine 7683K
OTHER CONTROLS AND EQUIPMENT
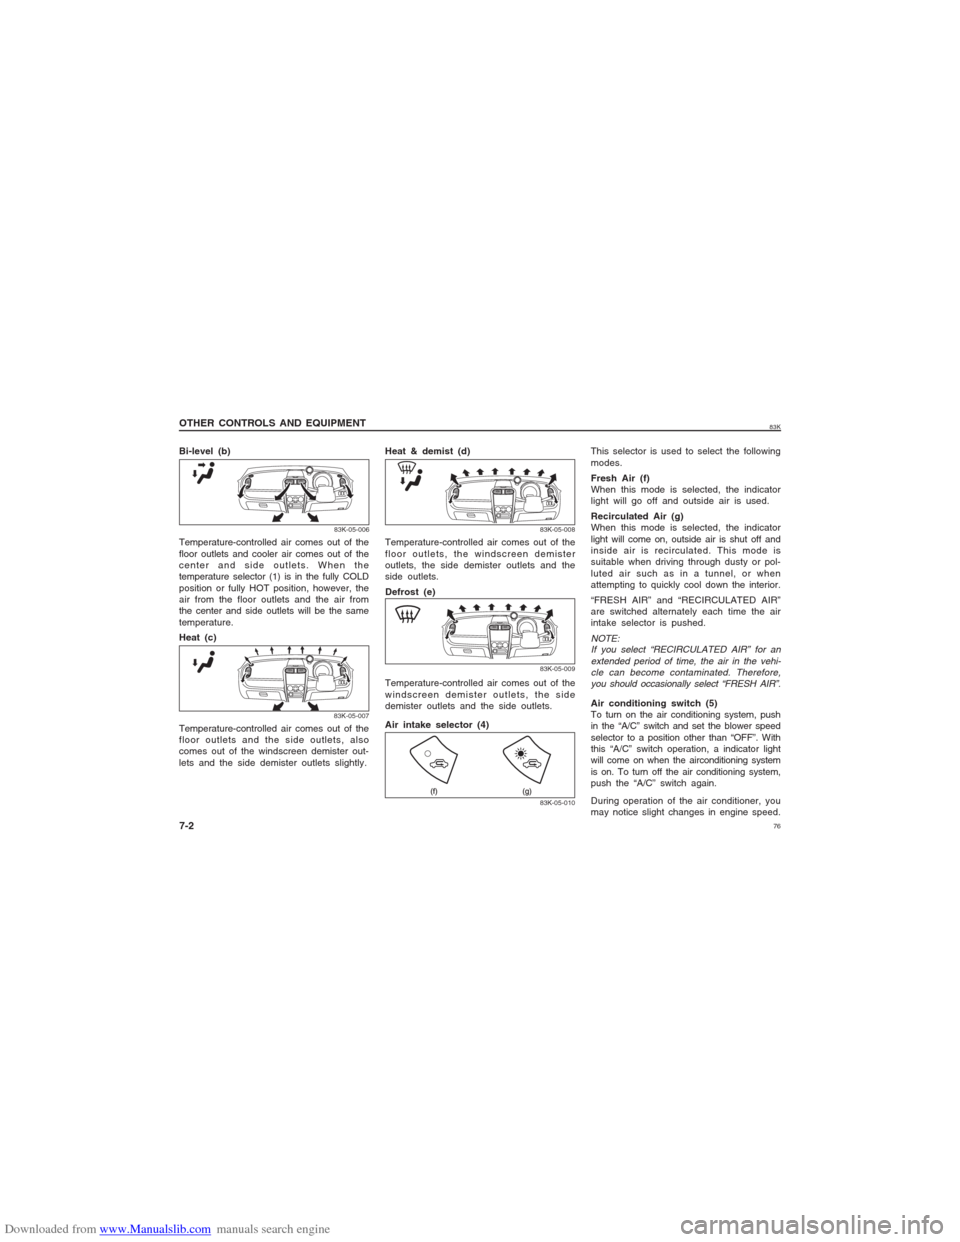
7-2Bi-level (b)
83K-05-007
Temperature-controlled air comes out of the
floor outlets and the side outlets, also
comes out of the windscreen demister out-
lets and the side demister outlets slightly.Heat & demist (d)
83K-05-006
Temperature-controlled air comes out of the
floor outlets and cooler air comes out of the
center and side outlets. When the
temperature selector (1) is in the fully COLD
position or fully HOT position, however, the
air from the floor outlets and the air from
the center and side outlets will be the same
temperature.
Heat (c)Temperature-controlled air comes out of the
floor outlets, the windscreen demister
outlets, the side demister outlets and the
side outlets.
Defrost (e)
Air intake selector (4)
83K-05-008
Temperature-controlled air comes out of the
windscreen demister outlets, the side
demister outlets and the side outlets.
83K-05-00983K-05-010
This selector is used to select the following
modes.
Fresh Air (f)
When this mode is selected, the indicator
light will go off and outside air is used.
Recirculated Air (g)
When this mode is selected, the indicator
light will come on, outside air is shut off and
inside air is recirculated. This mode is
suitable when driving through dusty or pol-
luted air such as in a tunnel, or when
attempting to quickly cool down the interior.
“FRESH AIR” and “RECIRCULATED AIR”
are switched alternately each time the air
intake selector is pushed.NOTE:
If you select “RECIRCULATED AIR” for an
extended period of time, the air in the vehi-
cle can become contaminated. Therefore,
you should occasionally select “FRESH AIR”.Air conditioning switch (5)
To turn on the air conditioning system, push
in the “A/C” switch and set the blower speed
selector to a position other than “OFF”. With
this “A/C” switch operation, a indicator light
will come on when the airconditioning system
is on. To turn off the air conditioning system,
push the “A/C” switch again.
During operation of the air conditioner, you
may notice slight changes in engine speed.
Page 77 of 136
Downloaded from www.Manualslib.com manuals search engine 7783K
OTHER CONTROLS AND EQUIPMENT
7-3
These changes are normal, the system is
designed so that the compressor turns on
or off to maintain the desired temperature.
Less operation of the compressor results in
better fuel economy.System Operating InstructionsNatural ventilation
Select “VENTILATION” and “FRESH AIR”,
the temperature selector to the desired
temperature position, and the blower speed
selector to “OFF”. Fresh air will flow through
the vehicle during driving.
Forced ventilation
The control settings are the same as for
natural ventilation except you set the blower
speed selector to a position other than “OFF”.
Normal heating (using outside air)
Select “HEAT” and “FRESH AIR”, the tem-
perature selector to the desired temperature
position and the blower speed selector to
the desired blower speed position. Setting
the blower speed selector to a higher blower
speed position increases heating efficiency.
Quick heating (using recirculated air)
The control settings are the same as for
normal heating except you select “RECIR-
CULATED AIR”. If you use this heating
method for an extended period of time, the
air in the vehicle can become contaminatedand the windows can become misty.
Therefore, use this method only for quick
heating and change to the normal heating
method as soon as possible.
Cool face / Warm feet
Select “BI-LEVEL” and “FRESH AIR”, the
temperature selector to the desired tem-
perature position, and the blower speed
selector to the desired blower speed posi-
tion. Unless the temperature selector is in
the fully COLD position or fully HOT posi-
tion, the air that comes out of the center
and side outlets will be cooler than the air
that comes out of the floor outlets.
Normal cooling
Turn on the “A/C” switch, set the air flow
selector to “VENTILATION”, the temperature
selector to the desired temperature position
and the blower speed selector to the
desired blower speed position. Setting the
blower speed selector to a higher blower
speed position increases cooling efficiency.
You can switch the air intake selector to
either “FRESH AIR” or “RECIRCULATED
AIR” as you desire. Choosing “RECIRCU-
LATED AIR” increases cooling efficiency.
Quick cooling (using recirculated air)
The control settings are the same as for
normal cooling except you select “RECIR-
CULATED AIR” and the highest blower speed.
NOTE:
If your vehicle has been left in the sun
with the windows closed, it will cool
faster if you open the windows briefly
while you operate the air conditioner with
the air intake selector at “FRESH AIR”
and the blower at high speed.Dehumidifying
Turn on the “A/C” switch, set the air flow
selector to the desired air flow selector
position, and select “FRESH AIR”, the tem-
perature selector to the desired temperature
position, and the blower speed selector to
the desired blower speed position.
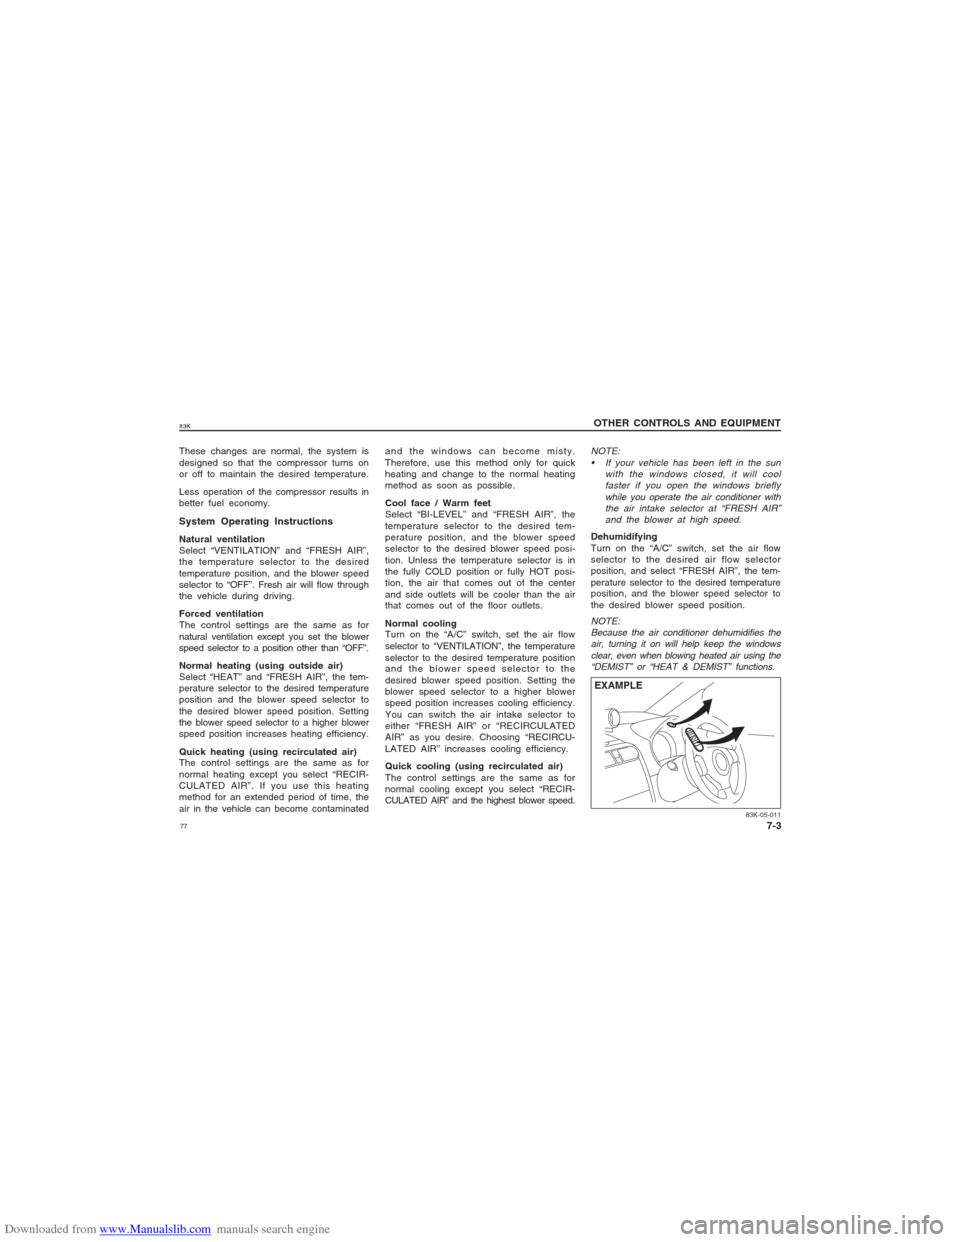
83K-05-011
NOTE:
Because the air conditioner dehumidifies the
air, turning it on will help keep the windows
clear, even when blowing heated air using the
“DEMIST” or “HEAT & DEMIST” functions.EXAMPLE
Page 78 of 136
Downloaded from www.Manualslib.com manuals search engine 7883K
OTHER CONTROLS AND EQUIPMENT
7-4Using the wrong refrigerant may
damage your air conditioning system.
Use R-134a only. Do not mix or replace
the R-134a with other refrigerants.
CAUTION
NOTE:
If you need maximum demisting:
set the air flow selector to “DEMIST”,
set the blower speed selector to HIGH,
adjust the temperature selector to the
HOT end,
turn on the “A/C” switch, and
adjust the side outlets so the air blows
on the side windows.MaintenanceIf you do not use the air conditioner for a
long period, such as during winter, it may
not give the best performance when you
start using it again. To help maintain opti-
mum performance and durability of your air
conditioner, it needs to be run periodically.
Operate the air conditioner at least once a
month for one minute with the engine idling.
This circulates the refrigerant and oil and
helps protect the internal components.NOTE:
Your vehicle uses the air conditioning
refrigerant HFC-134a, commonly called “R-
134a”. Only R-134a should be used in your
vehicle.
Audio System (if equipped)Refer supplementary manual for audio
system (if equipped), provided along with
the vehicle.Radio Antenna
83K-05-013
To avoid damage to the radio antenna:
Remove the antenna when using an
automatic car wash.
Remove the antenna when the
antenna hits anything such as a low
ceiling in a parking garage or
putting a car cover over your car.
CAUTION
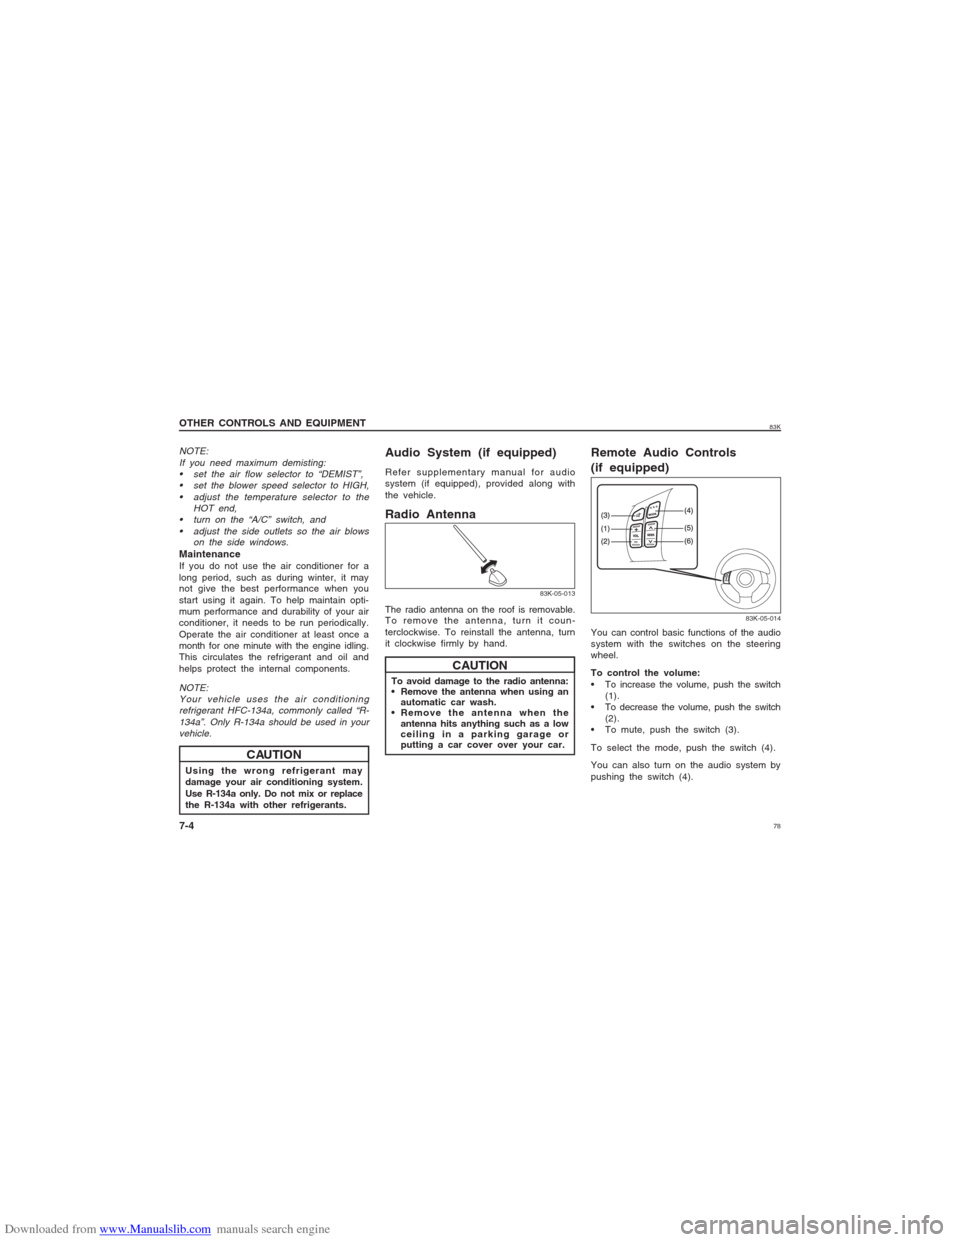
Remote Audio Controls
(if equipped)
83K-05-014
You can control basic functions of the audio
system with the switches on the steering
wheel.
To control the volume:
To increase the volume, push the switch
(1).
To decrease the volume, push the switch
(2).
To mute, push the switch (3).
To select the mode, push the switch (4).
You can also turn on the audio system by
pushing the switch (4). The radio antenna on the roof is removable.
To remove the antenna, turn it coun-
terclockwise. To reinstall the antenna, turn
it clockwise firmly by hand.
Page 79 of 136
Downloaded from www.Manualslib.com manuals search engine 7983K
OTHER CONTROLS AND EQUIPMENT
7-5
To change the radio station:
To advance to the next preset station,
push the switch (5) briefly.
To select the previous preset station,
push the switch (6) briefly.
To scan the higher frequency radio sta-
tion, push and hold the switch (5).
To scan the lower frequency radio sta-
tion, push and hold the switch (6).
To scan the selection on a CD:
To advance to the next track on a CD,
push the switch (5).
To select the previous track on a CD,
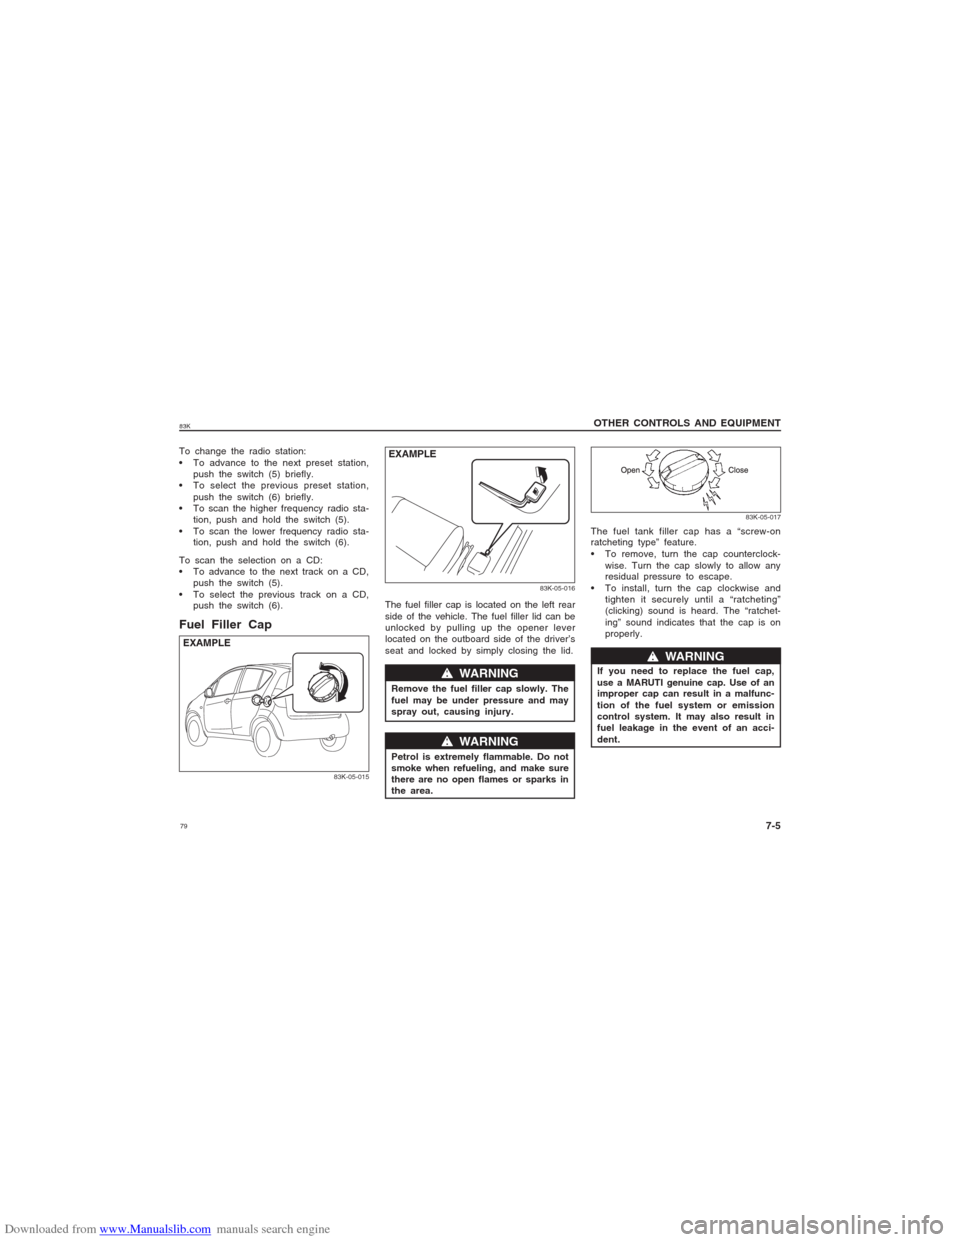
push the switch (6).Fuel Filler Cap
83K-05-015
EXAMPLE
83K-05-016
w ww w
w WARNING
Remove the fuel filler cap slowly. The
fuel may be under pressure and may
spray out, causing injury.
w ww w
w WARNING
Petrol is extremely flammable. Do not
smoke when refueling, and make sure
there are no open flames or sparks in
the area.
EXAMPLE
83K-05-017
The fuel tank filler cap has a “screw-on
ratcheting type” feature.
To remove, turn the cap counterclock-
wise. Turn the cap slowly to allow any
residual pressure to escape.
To install, turn the cap clockwise and
tighten it securely until a “ratcheting”
(clicking) sound is heard. The “ratchet-
ing” sound indicates that the cap is on
properly. The fuel filler cap is located on the left rear
side of the vehicle. The fuel filler lid can be
unlocked by pulling up the opener lever
located on the outboard side of the driver’s
seat and locked by simply closing the lid.
If you need to replace the fuel cap,
use a MARUTI genuine cap. Use of an
improper cap can result in a malfunc-
tion of the fuel system or emission
control system. It may also result in
fuel leakage in the event of an acci-
dent.
w ww w
w WARNING
Page 80 of 136
Downloaded from www.Manualslib.com manuals search engine 8083K
OTHER CONTROLS AND EQUIPMENT
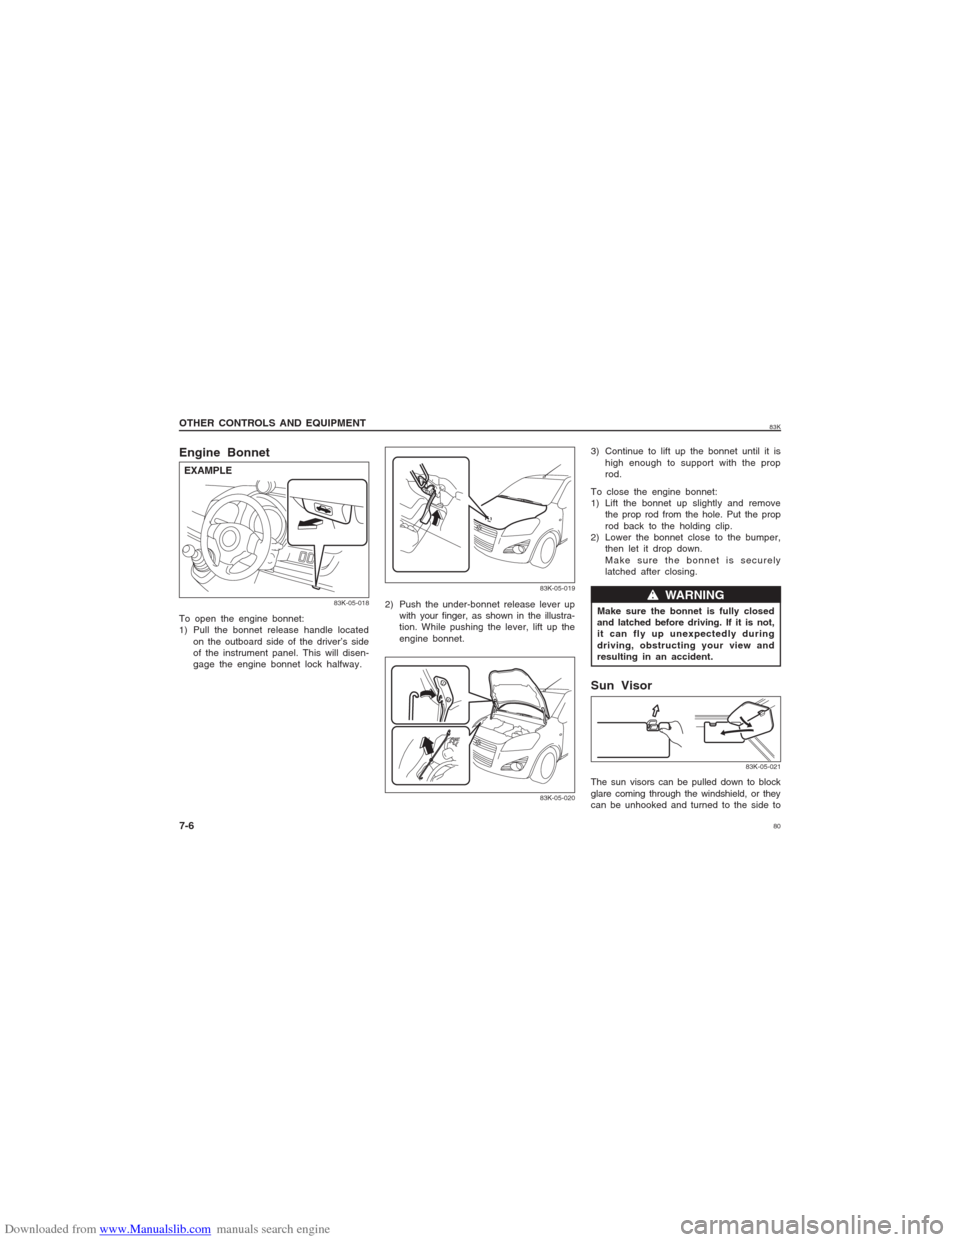
7-6Engine BonnetTo open the engine bonnet:
1) Pull the bonnet release handle located
on the outboard side of the driver’s side
of the instrument panel. This will disen-
gage the engine bonnet lock halfway.
83K-05-018
EXAMPLE
83K-05-01983K-05-020
2) Push the under-bonnet release lever up
with your finger, as shown in the illustra-
tion. While pushing the lever, lift up the
engine bonnet.3) Continue to lift up the bonnet until it is
high enough to support with the prop
rod.
To close the engine bonnet:
1) Lift the bonnet up slightly and remove
the prop rod from the hole. Put the prop
rod back to the holding clip.
2) Lower the bonnet close to the bumper,
then let it drop down.
Make sure the bonnet is securely
latched after closing.
Make sure the bonnet is fully closed
and latched before driving. If it is not,
it can fly up unexpectedly during
driving, obstructing your view and
resulting in an accident.
w ww w
w WARNING
83K-05-021
Sun VisorThe sun visors can be pulled down to block
glare coming through the windshield, or they
can be unhooked and turned to the side to