lock SUZUKI SWIFT 2000 1.G RG413 Service Service Manual
[x] Cancel search | Manufacturer: SUZUKI, Model Year: 2000, Model line: SWIFT, Model: SUZUKI SWIFT 2000 1.GPages: 698, PDF Size: 16.01 MB
Page 180 of 698
STEERING WHEEL AND COLUMN 3C-7
INSTALLATION
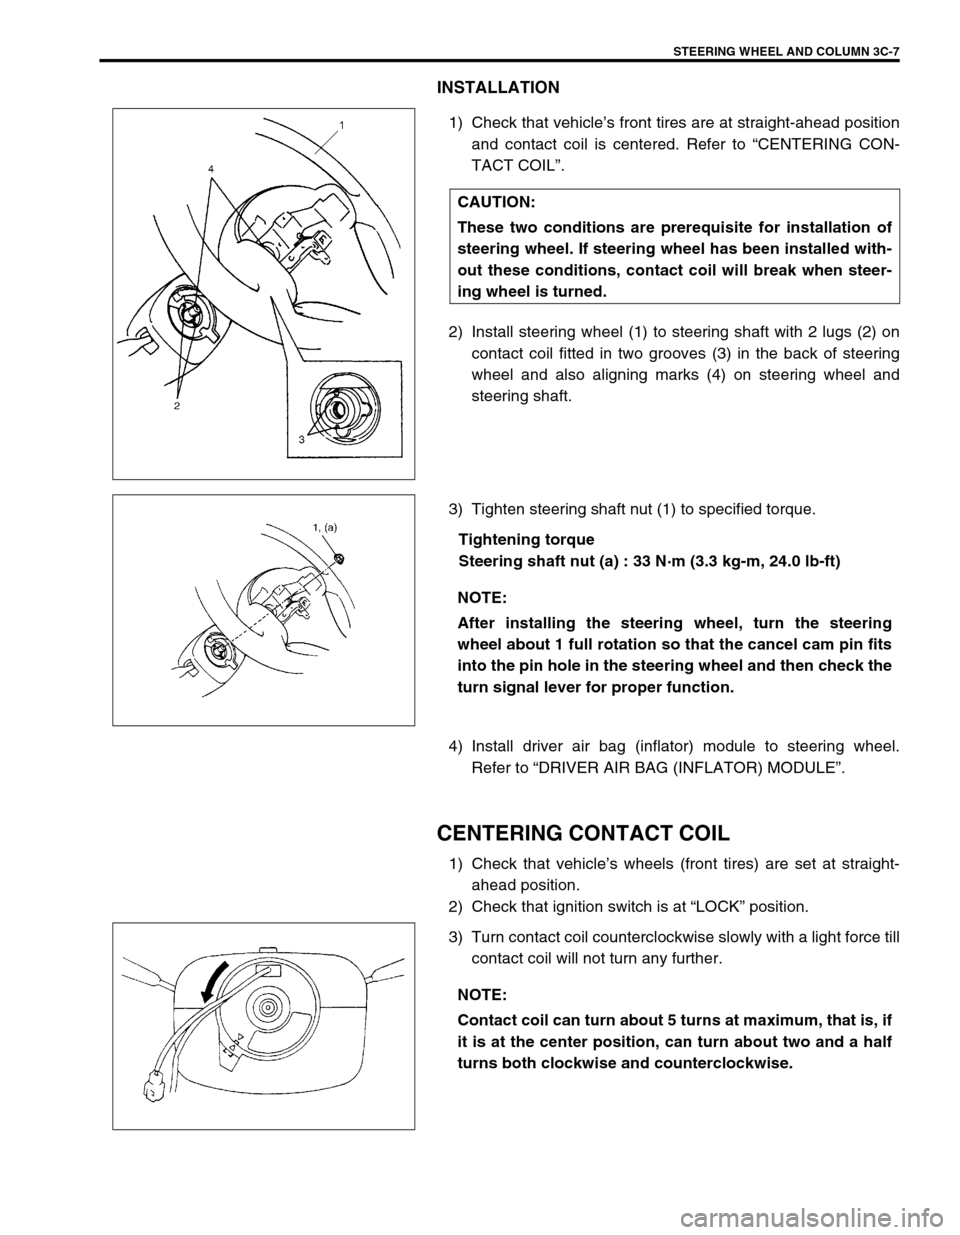
1) Check that vehicle’s front tires are at straight-ahead position
and contact coil is centered. Refer to “CENTERING CON-
TACT COIL”.
2) Install steering wheel (1) to steering shaft with 2 lugs (2) on
contact coil fitted in two grooves (3) in the back of steering
wheel and also aligning marks (4) on steering wheel and
steering shaft.
3) Tighten steering shaft nut (1) to specified torque.
Tightening torque
Steering shaft nut (a) : 33 N·m (3.3 kg-m, 24.0 lb-ft)
4) Install driver air bag (inflator) module to steering wheel.
Refer to “DRIVER AIR BAG (INFLATOR) MODULE”.
CENTERING CONTACT COIL
1) Check that vehicle’s wheels (front tires) are set at straight-
ahead position.
2) Check that ignition switch is at “LOCK” position.
3) Turn contact coil counterclockwise slowly with a light force till
contact coil will not turn any further. CAUTION:
These two conditions are prerequisite for installation of
steering wheel. If steering wheel has been installed with-
out these conditions, contact coil will break when steer-
ing wheel is turned.
NOTE:
After installing the steering wheel, turn the steering
wheel about 1 full rotation so that the cancel cam pin fits
into the pin hole in the steering wheel and then check the
turn signal lever for proper function.
NOTE:
Contact coil can turn about 5 turns at maximum, that is, if
it is at the center position, can turn about two and a half
turns both clockwise and counterclockwise.
Page 181 of 698
3C-8 STEERING WHEEL AND COLUMN
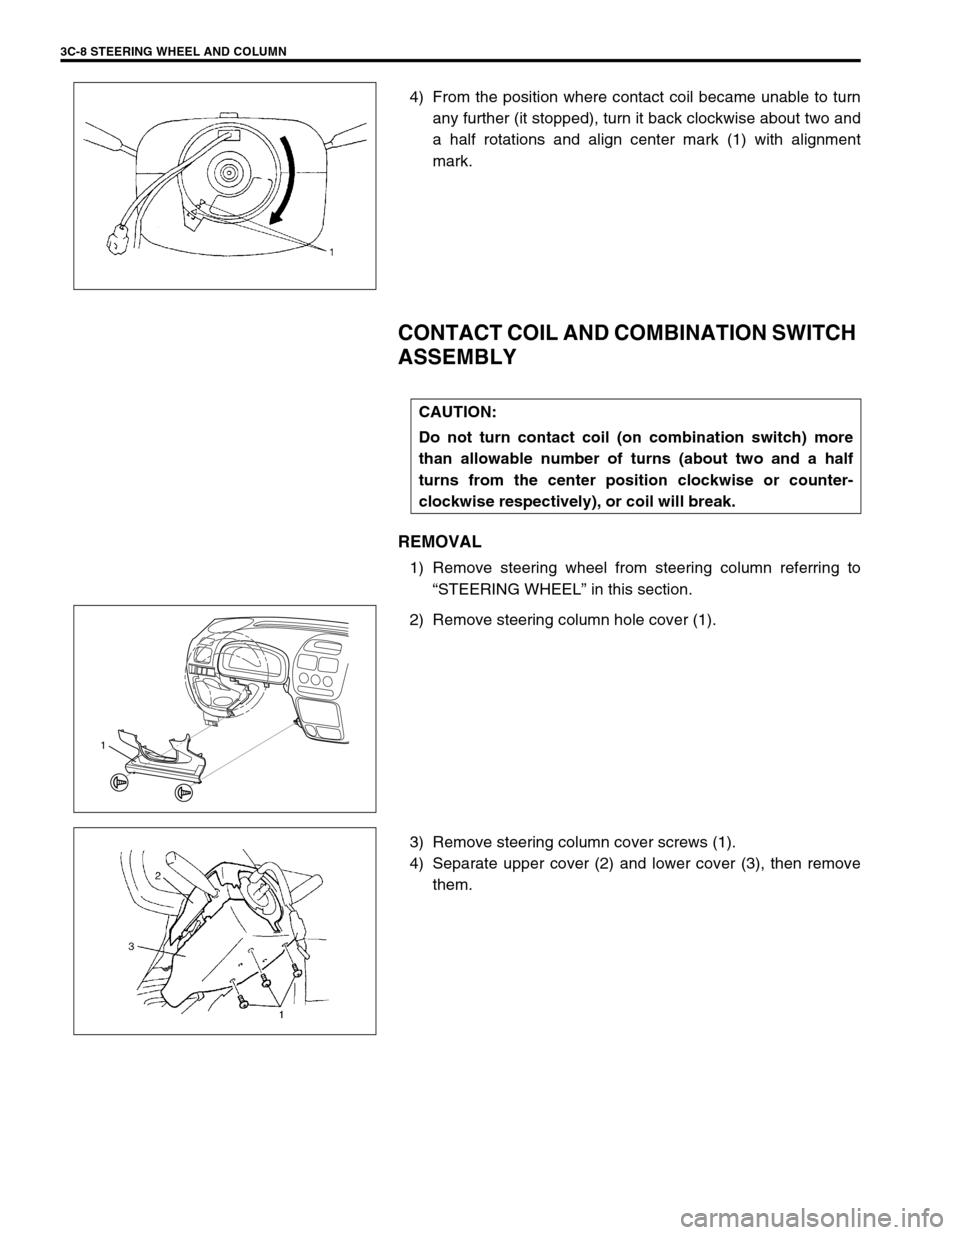
4) From the position where contact coil became unable to turn
any further (it stopped), turn it back clockwise about two and
a half rotations and align center mark (1) with alignment
mark.
CONTACT COIL AND COMBINATION SWITCH
ASSEMBLY
REMOVAL
1) Remove steering wheel from steering column referring to
“STEERING WHEEL” in this section.
2) Remove steering column hole cover (1).
3) Remove steering column cover screws (1).
4) Separate upper cover (2) and lower cover (3), then remove
them.
CAUTION:
Do not turn contact coil (on combination switch) more
than allowable number of turns (about two and a half
turns from the center position clockwise or counter-
clockwise respectively), or coil will break.
1
Page 182 of 698
STEERING WHEEL AND COLUMN 3C-9
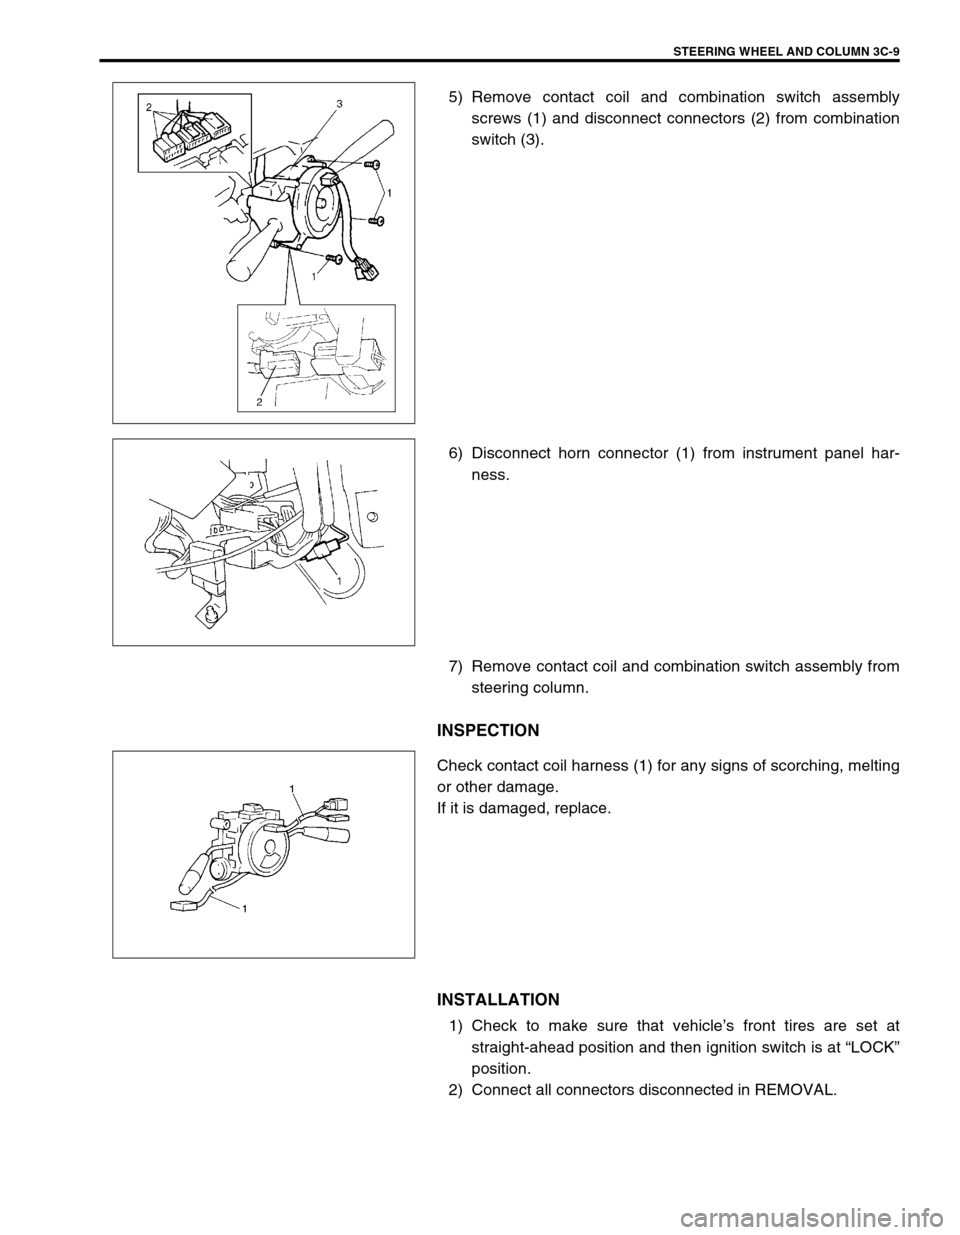
5) Remove contact coil and combination switch assembly
screws (1) and disconnect connectors (2) from combination
switch (3).
6) Disconnect horn connector (1) from instrument panel har-
ness.
7) Remove contact coil and combination switch assembly from
steering column.
INSPECTION
Check contact coil harness (1) for any signs of scorching, melting
or other damage.
If it is damaged, replace.
INSTALLATION
1) Check to make sure that vehicle’s front tires are set at
straight-ahead position and then ignition switch is at “LOCK”
position.
2) Connect all connectors disconnected in REMOVAL.
Page 183 of 698
3C-10 STEERING WHEEL AND COLUMN
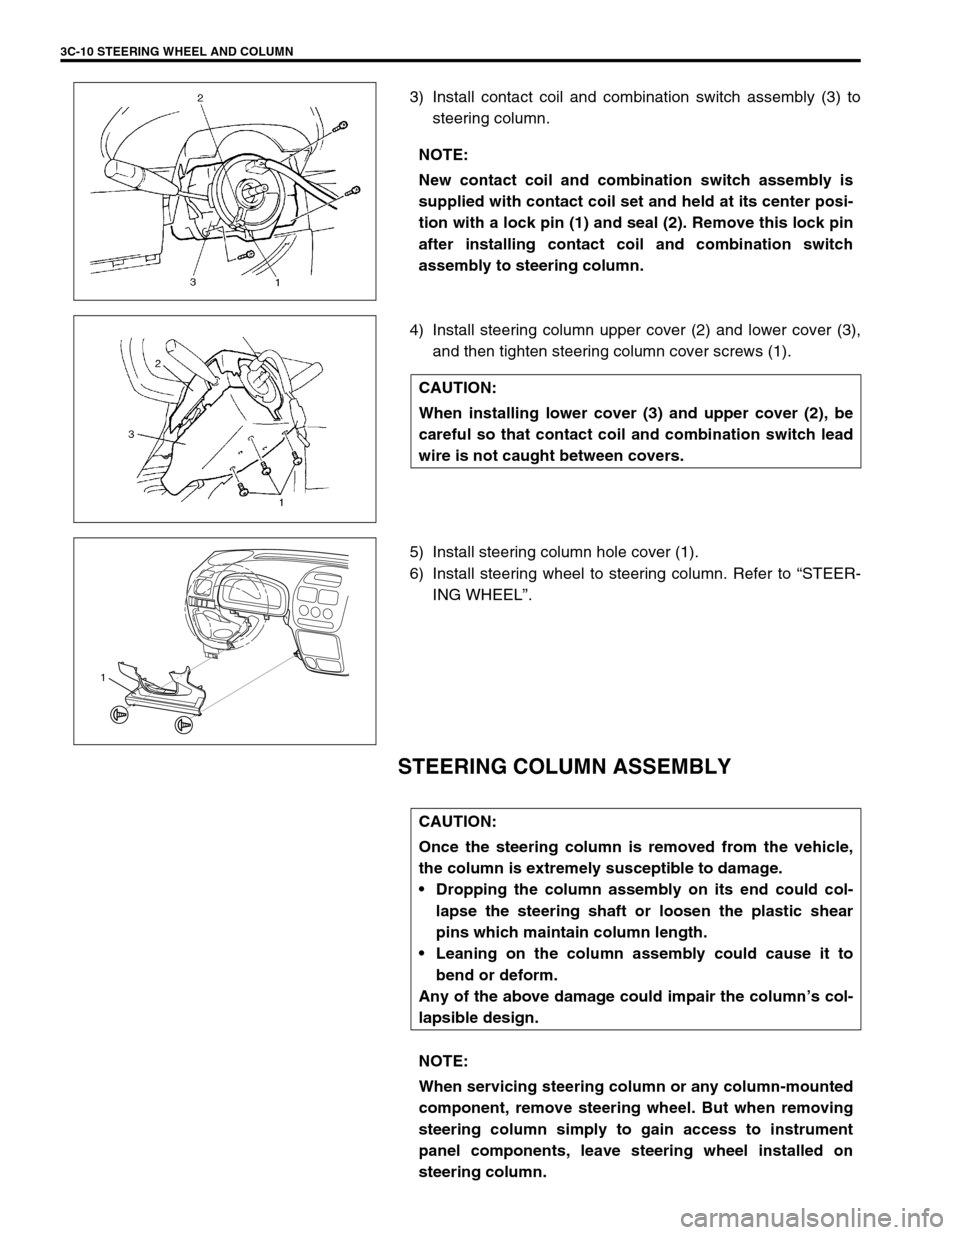
3) Install contact coil and combination switch assembly (3) to
steering column.
4) Install steering column upper cover (2) and lower cover (3),
and then tighten steering column cover screws (1).
5) Install steering column hole cover (1).
6) Install steering wheel to steering column. Refer to “STEER-
ING WHEEL”.
STEERING COLUMN ASSEMBLY
NOTE:
New contact coil and combination switch assembly is
supplied with contact coil set and held at its center posi-
tion with a lock pin (1) and seal (2). Remove this lock pin
after installing contact coil and combination switch
assembly to steering column.
CAUTION:
When installing lower cover (3) and upper cover (2), be
careful so that contact coil and combination switch lead
wire is not caught between covers.
1
CAUTION:
Once the steering column is removed from the vehicle,
the column is extremely susceptible to damage.
Dropping the column assembly on its end could col-
lapse the steering shaft or loosen the plastic shear
pins which maintain column length.
Leaning on the column assembly could cause it to
bend or deform.
Any of the above damage could impair the column’s col-
lapsible design.
NOTE:
When servicing steering column or any column-mounted
component, remove steering wheel. But when removing
steering column simply to gain access to instrument
panel components, leave steering wheel installed on
steering column.
Page 184 of 698
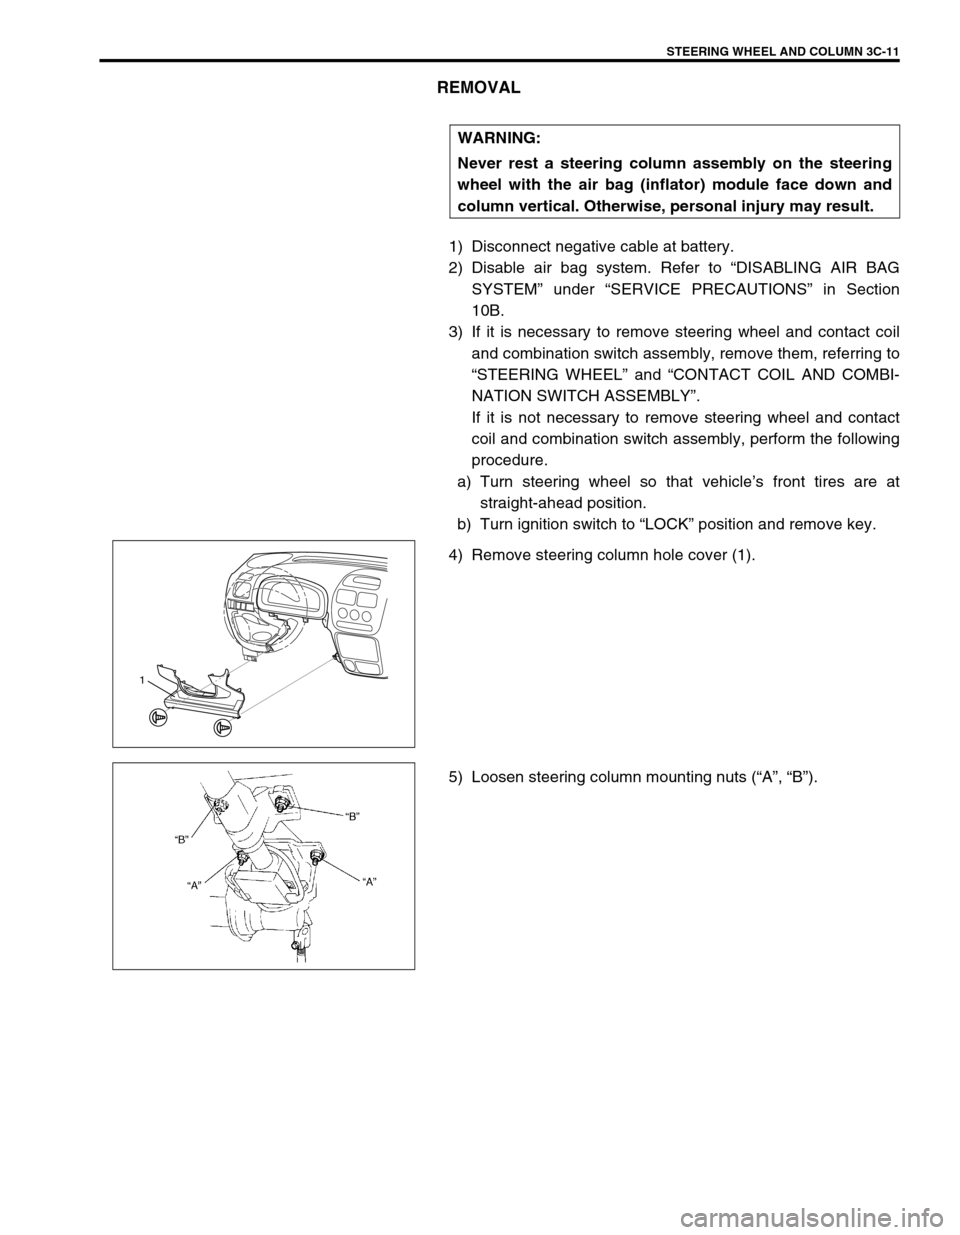
STEERING WHEEL AND COLUMN 3C-11
REMOVAL
1) Disconnect negative cable at battery.
2) Disable air bag system. Refer to “DISABLING AIR BAG
SYSTEM” under “SERVICE PRECAUTIONS” in Section
10B.
3) If it is necessary to remove steering wheel and contact coil
and combination switch assembly, remove them, referring to
“STEERING WHEEL” and “CONTACT COIL AND COMBI-
NATION SWITCH ASSEMBLY”.
If it is not necessary to remove steering wheel and contact
coil and combination switch assembly, perform the following
procedure.
a) Turn steering wheel so that vehicle’s front tires are at
straight-ahead position.
b) Turn ignition switch to “LOCK” position and remove key.
4) Remove steering column hole cover (1).
5) Loosen steering column mounting nuts (“A”, “B”). WARNING:
Never rest a steering column assembly on the steering
wheel with the air bag (inflator) module face down and
column vertical. Otherwise, personal injury may result.
1
Page 186 of 698
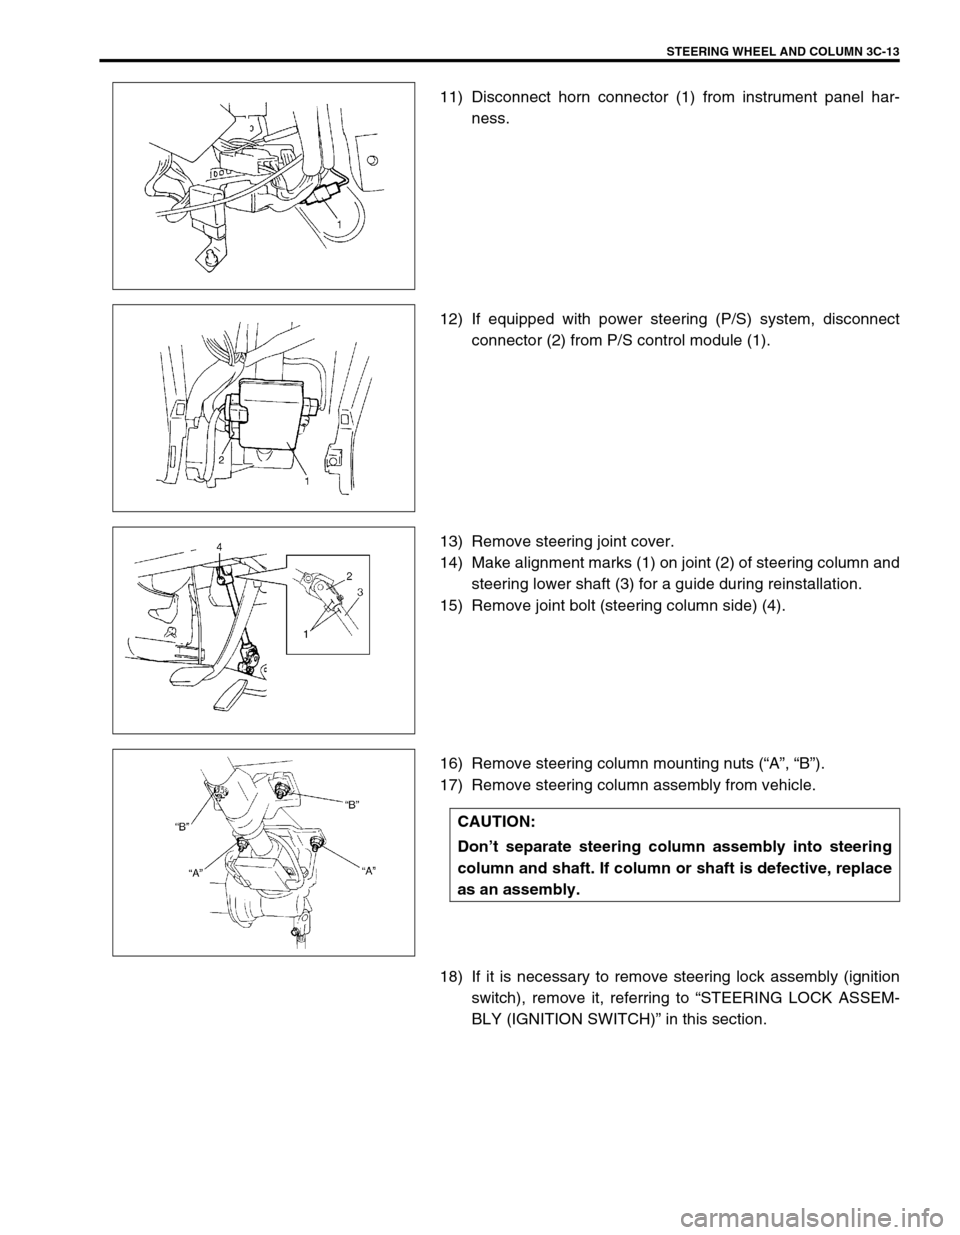
STEERING WHEEL AND COLUMN 3C-13
11) Disconnect horn connector (1) from instrument panel har-
ness.
12) If equipped with power steering (P/S) system, disconnect
connector (2) from P/S control module (1).
13) Remove steering joint cover.
14) Make alignment marks (1) on joint (2) of steering column and
steering lower shaft (3) for a guide during reinstallation.
15) Remove joint bolt (steering column side) (4).
16) Remove steering column mounting nuts (“A”, “B”).
17) Remove steering column assembly from vehicle.
18) If it is necessary to remove steering lock assembly (ignition
switch), remove it, referring to “STEERING LOCK ASSEM-
BLY (IGNITION SWITCH)” in this section.
CAUTION:
Don’t separate steering column assembly into steering
column and shaft. If column or shaft is defective, replace
as an assembly.
Page 187 of 698
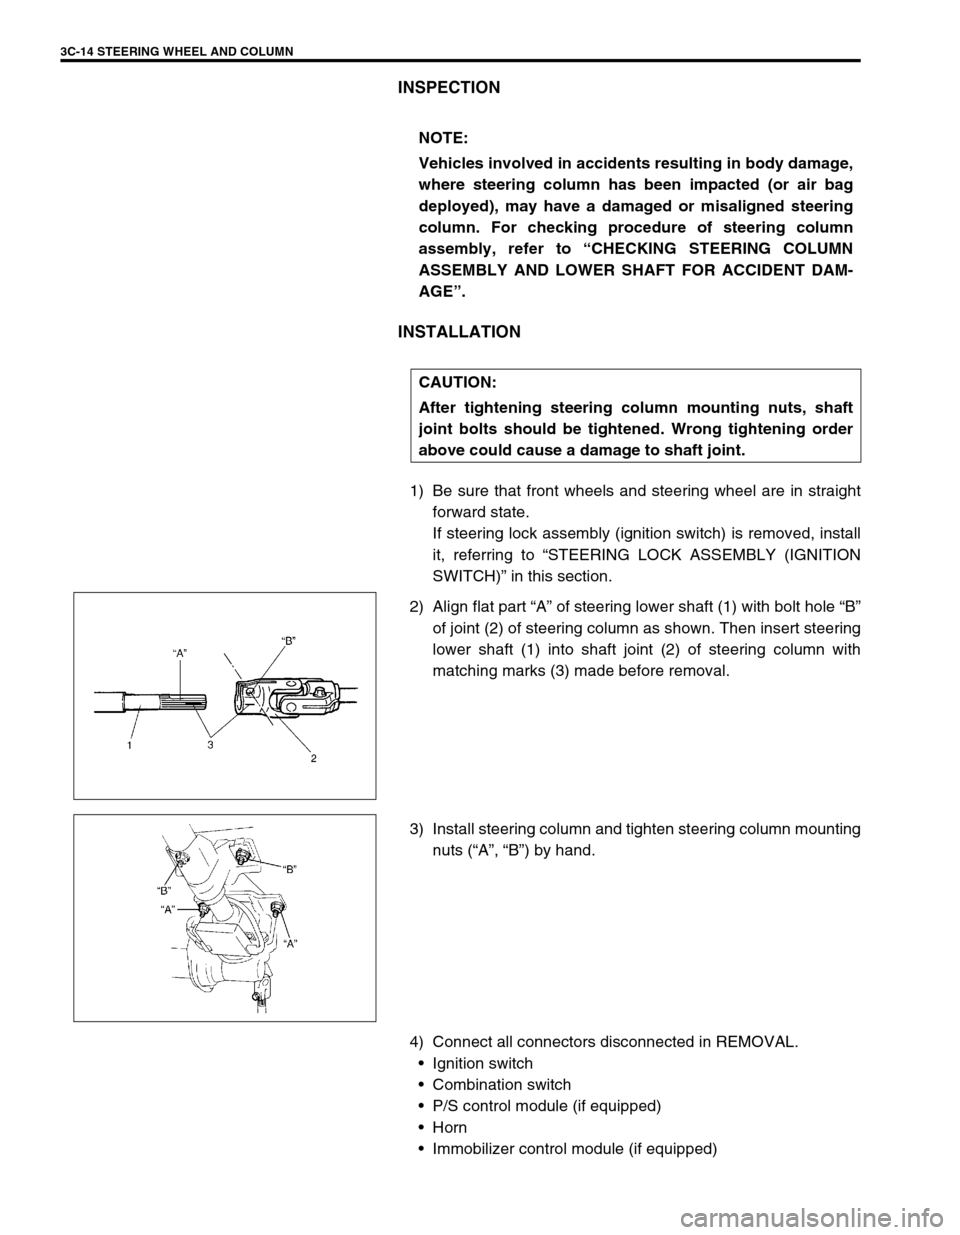
3C-14 STEERING WHEEL AND COLUMN
INSPECTION
INSTALLATION
1) Be sure that front wheels and steering wheel are in straight
forward state.
If steering lock assembly (ignition switch) is removed, install
it, referring to “STEERING LOCK ASSEMBLY (IGNITION
SWITCH)” in this section.
2) Align flat part “A” of steering lower shaft (1) with bolt hole “B”
of joint (2) of steering column as shown. Then insert steering
lower shaft (1) into shaft joint (2) of steering column with
matching marks (3) made before removal.
3) Install steering column and tighten steering column mounting
nuts (“A”, “B”) by hand.
4) Connect all connectors disconnected in REMOVAL.
Ignition switch
Combination switch
P/S control module (if equipped)
Horn
Immobilizer control module (if equipped) NOTE:
Vehicles involved in accidents resulting in body damage,
where steering column has been impacted (or air bag
deployed), may have a damaged or misaligned steering
column. For checking procedure of steering column
assembly, refer to “CHECKING STEERING COLUMN
ASSEMBLY AND LOWER SHAFT FOR ACCIDENT DAM-
AGE”.
CAUTION:
After tightening steering column mounting nuts, shaft
joint bolts should be tightened. Wrong tightening order
above could cause a damage to shaft joint.
Page 189 of 698
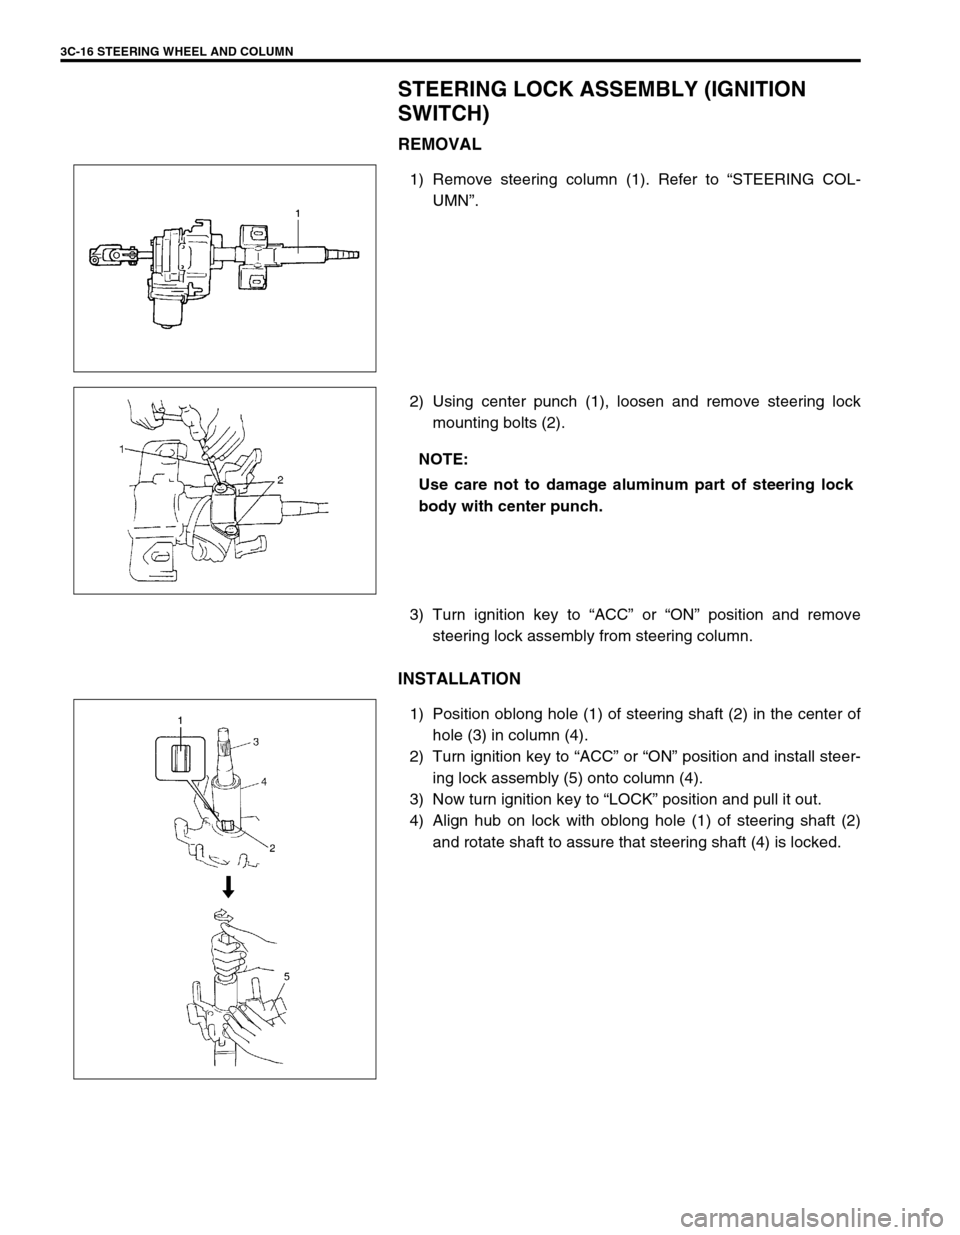
3C-16 STEERING WHEEL AND COLUMN
STEERING LOCK ASSEMBLY (IGNITION
SWITCH)
REMOVAL
1) Remove steering column (1). Refer to “STEERING COL-
UMN”.
2) Using center punch (1), loosen and remove steering lock
mounting bolts (2).
3) Turn ignition key to “ACC” or “ON” position and remove
steering lock assembly from steering column.
INSTALLATION
1) Position oblong hole (1) of steering shaft (2) in the center of
hole (3) in column (4).
2) Turn ignition key to “ACC” or “ON” position and install steer-
ing lock assembly (5) onto column (4).
3) Now turn ignition key to “LOCK” position and pull it out.
4) Align hub on lock with oblong hole (1) of steering shaft (2)
and rotate shaft to assure that steering shaft (4) is locked.
NOTE:
Use care not to damage aluminum part of steering lock
body with center punch.
Page 190 of 698
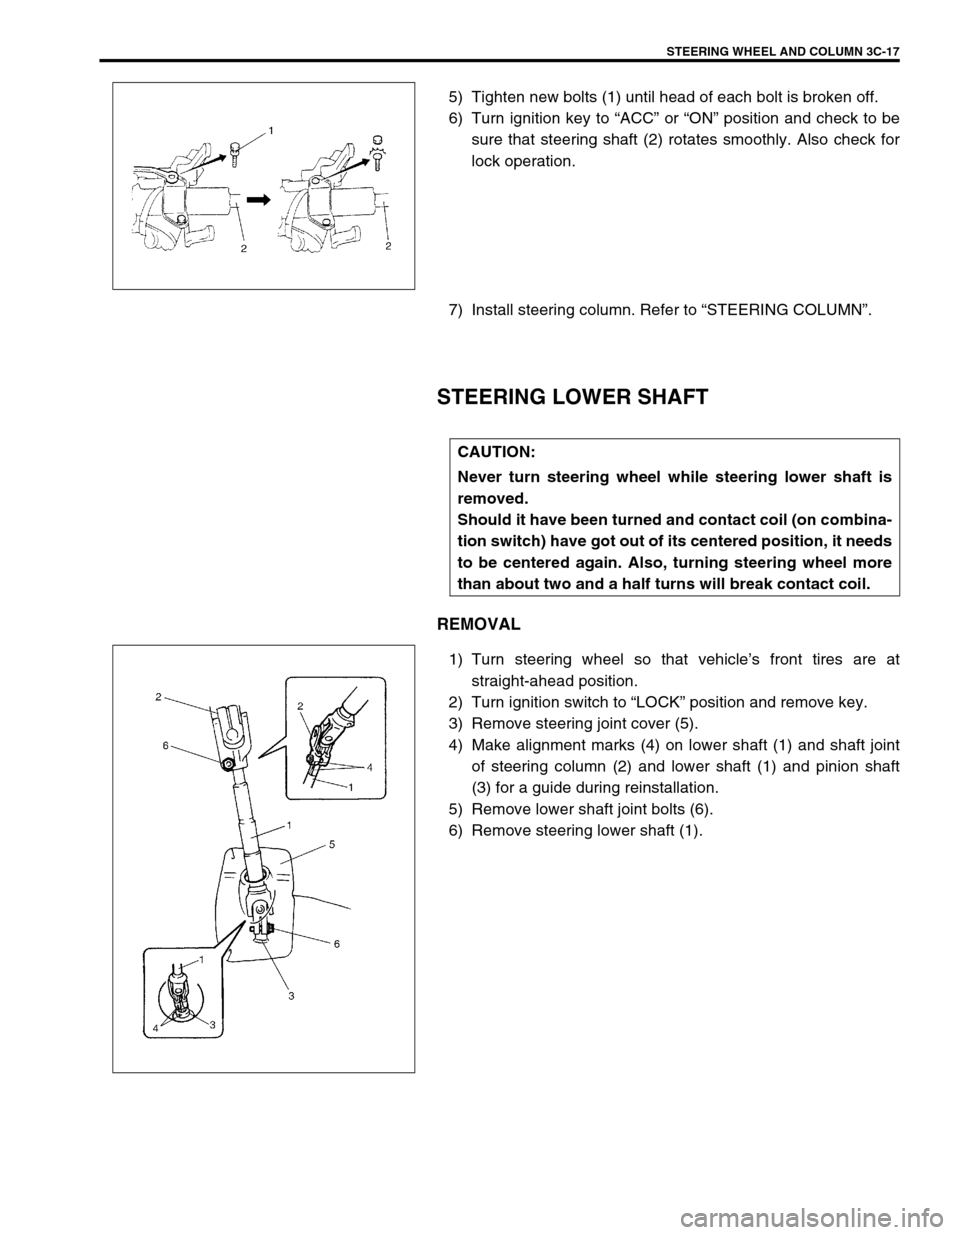
STEERING WHEEL AND COLUMN 3C-17
5) Tighten new bolts (1) until head of each bolt is broken off.
6) Turn ignition key to “ACC” or “ON” position and check to be
sure that steering shaft (2) rotates smoothly. Also check for
lock operation.
7) Install steering column. Refer to “STEERING COLUMN”.
STEERING LOWER SHAFT
REMOVAL
1) Turn steering wheel so that vehicle’s front tires are at
straight-ahead position.
2) Turn ignition switch to “LOCK” position and remove key.
3) Remove steering joint cover (5).
4) Make alignment marks (4) on lower shaft (1) and shaft joint
of steering column (2) and lower shaft (1) and pinion shaft
(3) for a guide during reinstallation.
5) Remove lower shaft joint bolts (6).
6) Remove steering lower shaft (1).
CAUTION:
Never turn steering wheel while steering lower shaft is
removed.
Should it have been turned and contact coil (on combina-
tion switch) have got out of its centered position, it needs
to be centered again. Also, turning steering wheel more
than about two and a half turns will break contact coil.
Page 250 of 698

WHEELS AND TIRES 3F-5
MAINTENANCE AND MINOR ADJUSTMENTS
WHEEL MAINTENANCE
Wheel repairs that use welding, heating, or peening are not approved. All damaged wheels should be replaced.
WHEEL ATTACHING STUDS
If a broken stud is found, see Section 3E (rear) or Section 3D (front) for Note and Replacement procedure.
MATCHED TIRES AND WHEELS
Tires and wheels are match mounted at the assembly plant.
This means that the radially stiffest part of the tire, or “high spot”,
is matched to the smallest radius or “low spot” of the wheel.
This is done to provide the smoothest possible ride.
The “high spot” of the tire is originally marked by paint dot (1) on
the outboard sidewall. This paint dot will eventually wash off the
tire.
The “ow spot” of the wheel is originally marked by paint dot (2) on
the wheel rim-flange. Properly assembled, the wheel rims’ paint
dot should be aligned with the tires’ paint dot as shown in left fig-
ure.
Whenever a tire is dismounted from its wheel, it should be
remounted so that the tire and wheel are matched. If the tire’s
paint dot cannot be located, a line should be scribed on the tire
and wheel before dismounting to assure that it is remounted in
the same position.
TIRE MAINTENANCE
TIRE PLACARD
The “Tire Placard” is located on the left door (right door for right-hand side steering vehicle) lock pillar and
should be referred to tire information.
The placard lists the maximum load, tire size and cold tire pressure where applicable.
NOTE:
Whether rim size and/or maximum load are listed or not depends on regulations of each country.