lock SUZUKI SWIFT 2000 1.G RG413 Service Owner's Manual
[x] Cancel search | Manufacturer: SUZUKI, Model Year: 2000, Model line: SWIFT, Model: SUZUKI SWIFT 2000 1.GPages: 698, PDF Size: 16.01 MB
Page 88 of 698
AIR CONDITIONING (OPTIONAL) 1B-23
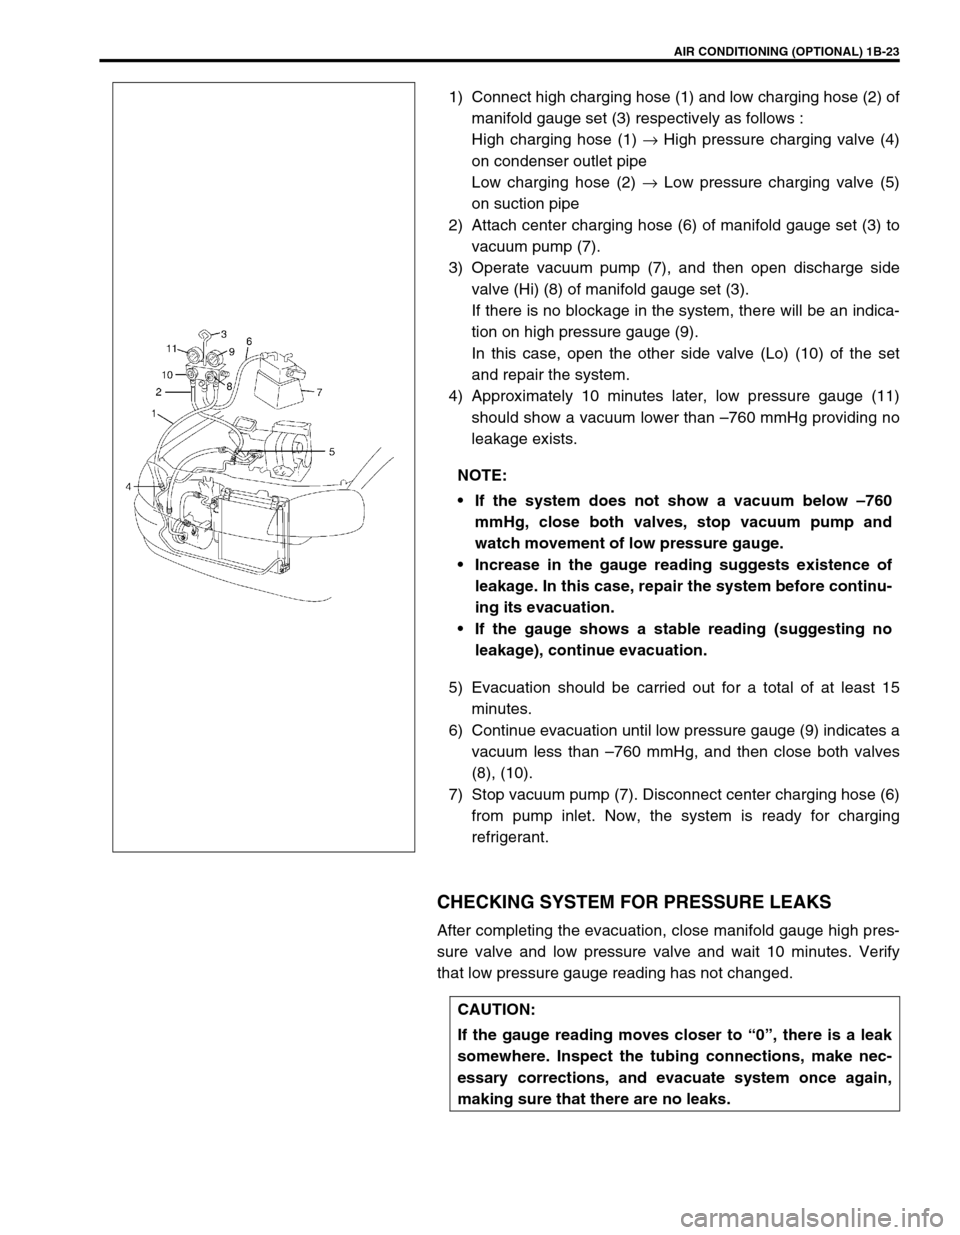
1) Connect high charging hose (1) and low charging hose (2) of
manifold gauge set (3) respectively as follows :
High charging hose (1) → High pressure charging valve (4)
on condenser outlet pipe
Low charging hose (2) → Low pressure charging valve (5)
on suction pipe
2) Attach center charging hose (6) of manifold gauge set (3) to
vacuum pump (7).
3) Operate vacuum pump (7), and then open discharge side
valve (Hi) (8) of manifold gauge set (3).
If there is no blockage in the system, there will be an indica-
tion on high pressure gauge (9).
In this case, open the other side valve (Lo) (10) of the set
and repair the system.
4) Approximately 10 minutes later, low pressure gauge (11)
should show a vacuum lower than –760 mmHg providing no
leakage exists.
5) Evacuation should be carried out for a total of at least 15
minutes.
6) Continue evacuation until low pressure gauge (9) indicates a
vacuum less than –760 mmHg, and then close both valves
(8), (10).
7) Stop vacuum pump (7). Disconnect center charging hose (6)
from pump inlet. Now, the system is ready for charging
refrigerant.
CHECKING SYSTEM FOR PRESSURE LEAKS
After completing the evacuation, close manifold gauge high pres-
sure valve and low pressure valve and wait 10 minutes. Verify
that low pressure gauge reading has not changed.NOTE:
If the system does not show a vacuum below –760
mmHg, close both valves, stop vacuum pump and
watch movement of low pressure gauge.
Increase in the gauge reading suggests existence of
leakage. In this case, repair the system before continu-
ing its evacuation.
If the gauge shows a stable reading (suggesting no
leakage), continue evacuation.
CAUTION:
If the gauge reading moves closer to “0”, there is a leak
somewhere. Inspect the tubing connections, make nec-
essary corrections, and evacuate system once again,
making sure that there are no leaks.
Page 90 of 698
AIR CONDITIONING (OPTIONAL) 1B-25
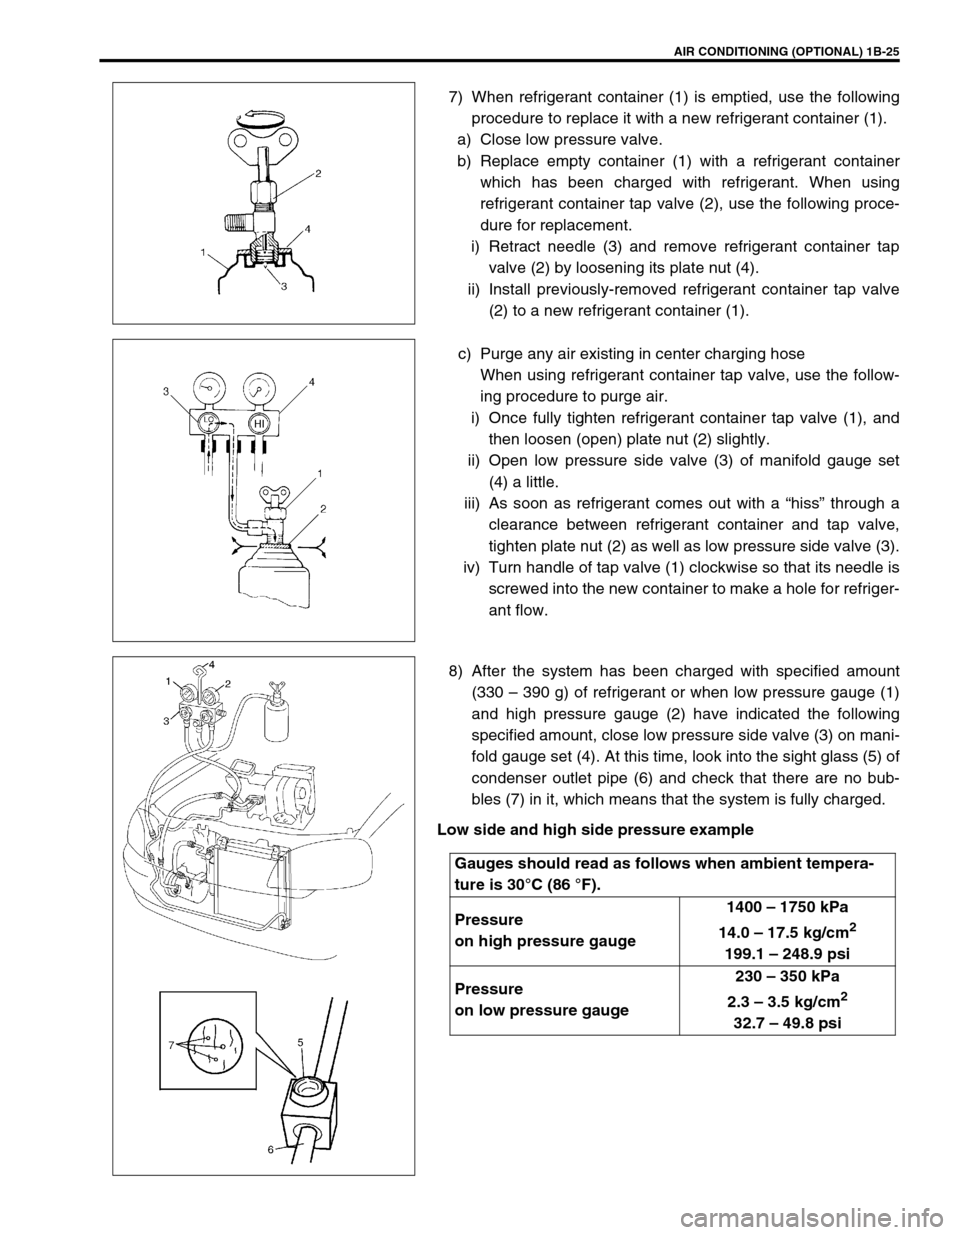
7) When refrigerant container (1) is emptied, use the following
procedure to replace it with a new refrigerant container (1).
a) Close low pressure valve.
b) Replace empty container (1) with a refrigerant container
which has been charged with refrigerant. When using
refrigerant container tap valve (2), use the following proce-
dure for replacement.
i) Retract needle (3) and remove refrigerant container tap
valve (2) by loosening its plate nut (4).
ii) Install previously-removed refrigerant container tap valve
(2) to a new refrigerant container (1).
c) Purge any air existing in center charging hose
When using refrigerant container tap valve, use the follow-
ing procedure to purge air.
i) Once fully tighten refrigerant container tap valve (1), and
then loosen (open) plate nut (2) slightly.
ii) Open low pressure side valve (3) of manifold gauge set
(4) a little.
iii) As soon as refrigerant comes out with a “hiss” through a
clearance between refrigerant container and tap valve,
tighten plate nut (2) as well as low pressure side valve (3).
iv) Turn handle of tap valve (1) clockwise so that its needle is
screwed into the new container to make a hole for refriger-
ant flow.
8) After the system has been charged with specified amount
(330 – 390 g) of refrigerant or when low pressure gauge (1)
and high pressure gauge (2) have indicated the following
specified amount, close low pressure side valve (3) on mani-
fold gauge set (4). At this time, look into the sight glass (5) of
condenser outlet pipe (6) and check that there are no bub-
bles (7) in it, which means that the system is fully charged.
Low side and high side pressure example
Gauges should read as follows when ambient tempera-
ture is 30°C (86 °F).
Pressure
on high pressure gauge1400 – 1750 kPa
14.0 – 17.5 kg/cm
2
199.1 – 248.9 psi
Pressure
on low pressure gauge230 – 350 kPa
2.3 – 3.5 kg/cm
2
32.7 – 49.8 psi
Page 114 of 698
STEERING, SUSPENSION, WHEELS AND TIRES 3-5
TIRE DIAGNOSIS
IRREGULAR AND/OR PREMATURE WEAR
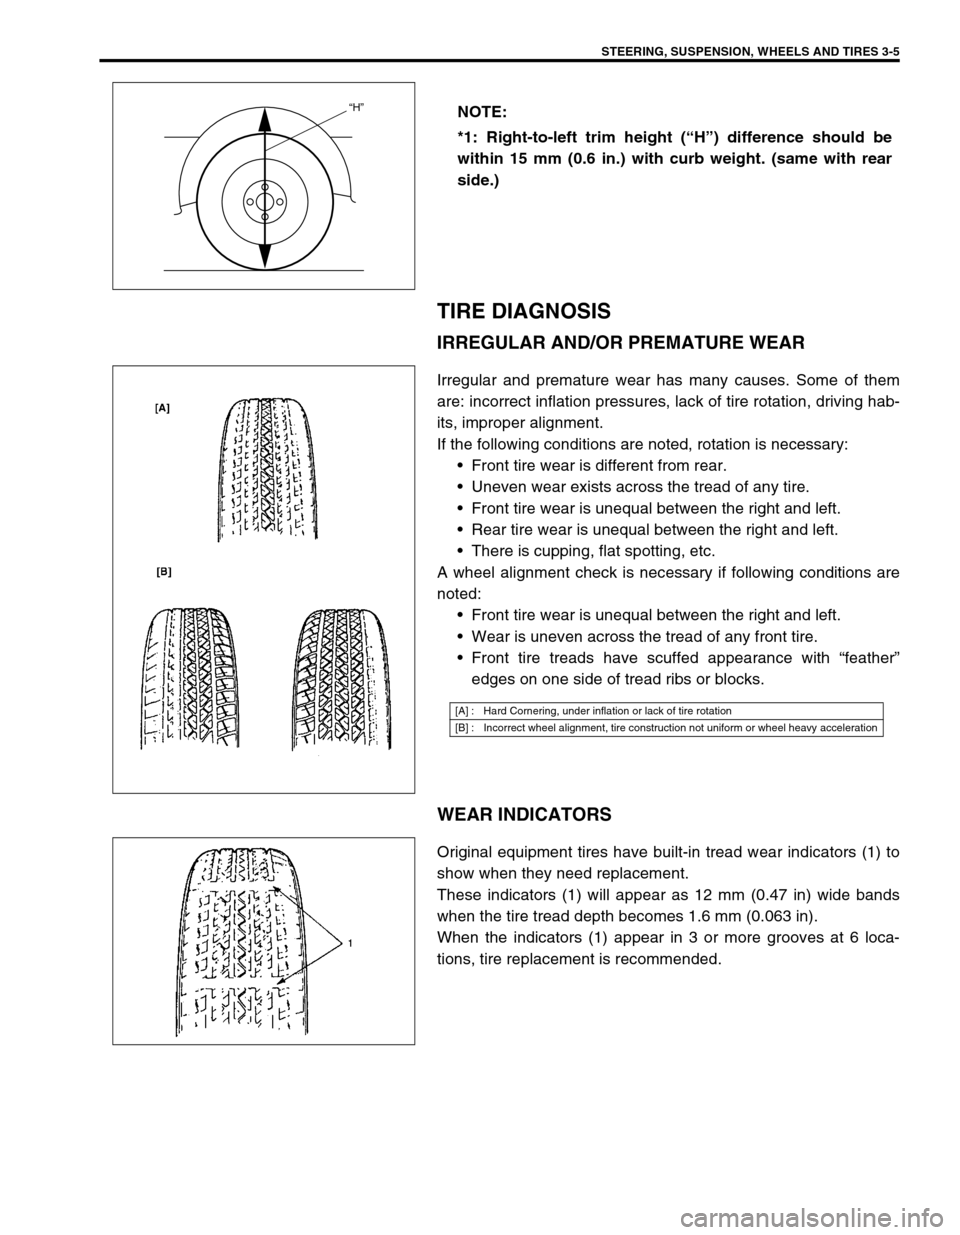
Irregular and premature wear has many causes. Some of them
are: incorrect inflation pressures, lack of tire rotation, driving hab-
its, improper alignment.
If the following conditions are noted, rotation is necessary:
Front tire wear is different from rear.
Uneven wear exists across the tread of any tire.
Front tire wear is unequal between the right and left.
Rear tire wear is unequal between the right and left.
There is cupping, flat spotting, etc.
A wheel alignment check is necessary if following conditions are
noted:
Front tire wear is unequal between the right and left.
Wear is uneven across the tread of any front tire.
Front tire treads have scuffed appearance with “feather”
edges on one side of tread ribs or blocks.
WEAR INDICATORS
Original equipment tires have built-in tread wear indicators (1) to
show when they need replacement.
These indicators (1) will appear as 12 mm (0.47 in) wide bands
when the tire tread depth becomes 1.6 mm (0.063 in).
When the indicators (1) appear in 3 or more grooves at 6 loca-
tions, tire replacement is recommended.NOTE:
*1: Right-to-left trim height (“H”) difference should be
within 15 mm (0.6 in.) with curb weight. (same with rear
side.)
“H”
[A] : Hard Cornering, under inflation or lack of tire rotation
[B] : Incorrect wheel alignment, tire construction not uniform or wheel heavy acceleration
Page 120 of 698
FRONT END ALIGNMENT 3A-3
DIAGNOSIS
DIAGNOSIS TABLE
For the details, refer to Section 3.
PRELIMINARY CHECKS PRIOR TO ADJUSTING FRONT ALIGNMENT
Steering and vibration complaints are not always the result of improper alignment. An additional item to be
checked is the possibility of tire lead due to worn or improperly manufactured tires. “Lead” is the deviation of the
vehicle from a straight path on a level road without hand pressure on the steering wheel. Procedure for deter-
mining the presence of a tire lead problem contains in SECTION 3. Before making any adjustment affecting toe
setting, the following checks and inspections should be made to ensure correctness of alignment readings and
alignment adjustments:
1) Check all tires for proper inflation pressures and approximately the same tread wear.
2) Check for loose of ball joints. Check tie rod ends; if excessive looseness is noted, it must be corrected
before adjusting.
3) Check for run-out of wheels and tires.
4) Check vehicle trim heights; if out of limits and a correction is to be made, it must be made before adjusting
toe.
5) Check for loose of suspension arms.
6) Check for loose or missing stabilizer bar attachments.
7) Consideration must be given to excess loads, such as tool boxes. If this excess load is normally carried in
vehicle, it should remain in vehicle during alignment checks.
8) Consider condition of equipment being used to check alignment and follow manufacturer's instructions.
9) Regardless of equipment used to check alignment, vehicle must be on a level surface both fore and aft and
transversely.
TOE ADJUSTMENT
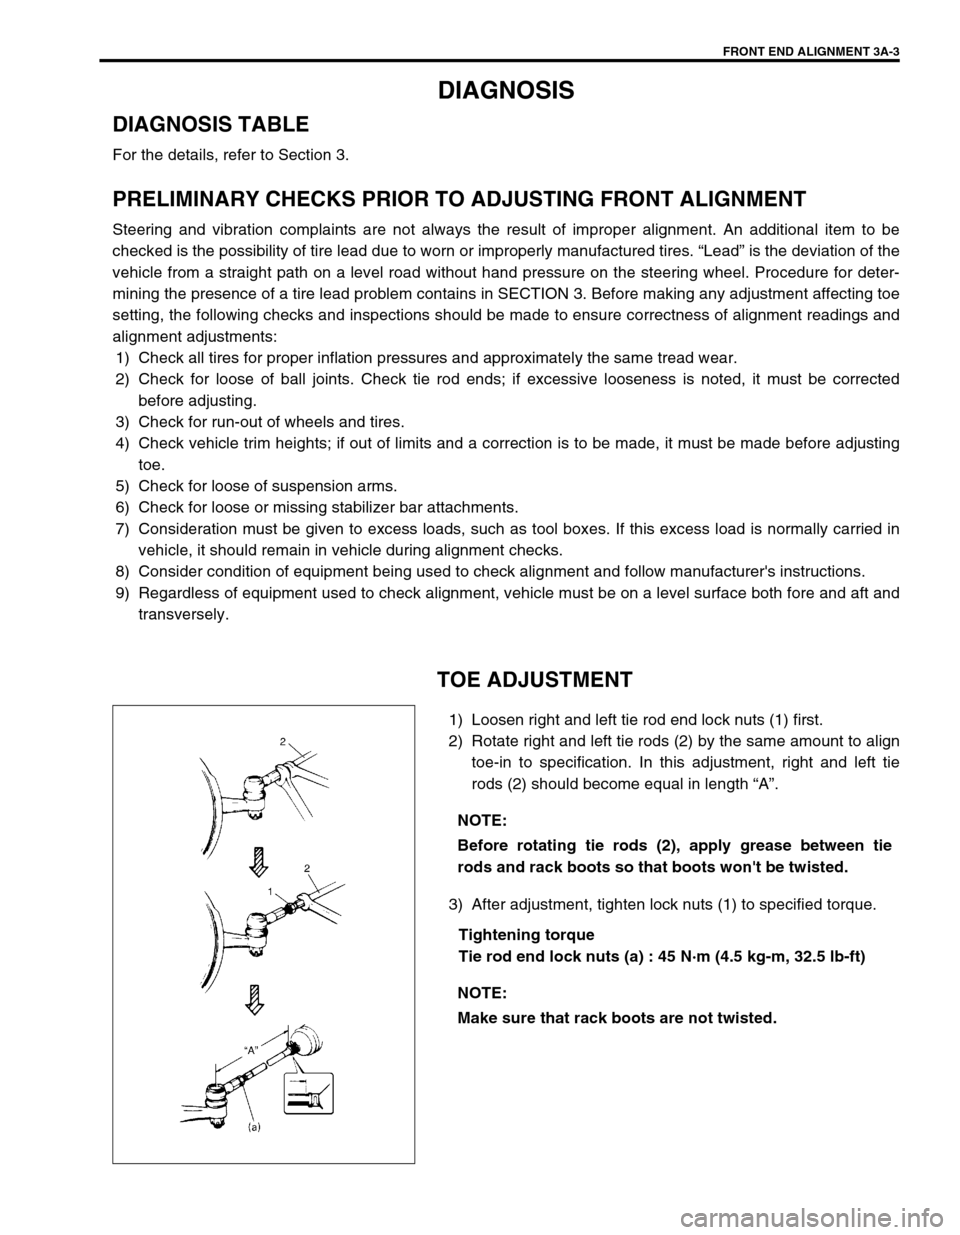
1) Loosen right and left tie rod end lock nuts (1) first.
2) Rotate right and left tie rods (2) by the same amount to align
toe-in to specification. In this adjustment, right and left tie
rods (2) should become equal in length “A”.
3) After adjustment, tighten lock nuts (1) to specified torque.
Tightening torque
Tie rod end lock nuts (a) : 45 N·m (4.5 kg-m, 32.5 lb-ft) NOTE:
Before rotating tie rods (2), apply grease between tie
rods and rack boots so that boots won't be twisted.
NOTE:
Make sure that rack boots are not twisted.
Page 122 of 698
MANUAL RACK AND PINION 3B-1
6F1
6F2
6G
6H
7A
3B
7C1
7D
7E
7F
8A
8B
8C
8D
8E
9
10
10A
10B
SECTION 3B
MANUAL RACK AND PINION
CONTENTS
GENERAL DESCRIPTION .............................. 3B-2
DIAGNOSIS ..................................................... 3B-3
ON-VEHICLE SERVICE .................................. 3B-4
LUBRICATION ............................................. 3B-4
TIE ROD END .............................................. 3B-6
MANUAL RACK AND PINION ASSEMBLY
(STEERING GEAR CASE) .......................... 3B-7
RACK BOOT/TIE ROD .............................. 3B-10STEERING RACK PLUNGER ................... 3B-12
STEERING PINION ................................... 3B-14
STEERING RACK...................................... 3B-15
PINION BEARING ..................................... 3B-17
RACK BUSHING ........................................ 3B-18
REQUIRED SERVICE MATERIAL................ 3B-19
SPECIAL TOOL ............................................ 3B-20
WARNING:
For vehicles equipped with a Air Bag System
Service on or around air bag system components or wiring must be performed only by an autho-
rized suzuki dealer. Please observe all WARNINGS and CAUTIONS in SECTION 10B and Precau-
tions, Air Bag System Components and Wiring Location view in Section 10B before performing
service on or around air bag system components or wiring. Failure to follow WARNINGS could
result in unintended activation of the system or could render the system inoperative. Either of these
two conditions may result in severe injury.
Technical service work must be started at least 90 seconds after the ignition switch is turned to the
“LOCK” position and the negative cable is disconnected from the battery. Otherwise, the system
may be deployed by reserve energy in the Sensing and Diagnostic Module (SDM).
NOTE:
All steering gear fasteners are important attaching parts in that they could affect the performance of
vital parts and systems, and/or could result in major repair expense. They must be replaced with one
of the same part number or with an equivalent part if replacement becomes necessary. Do not use a
replacement part of lesser quality or substitute design. Torque values must be used as specified dur-
ing reassembly to assure proper retention of these parts.
Page 127 of 698
3B-6 MANUAL RACK AND PINION
TIE ROD END
REMOVAL
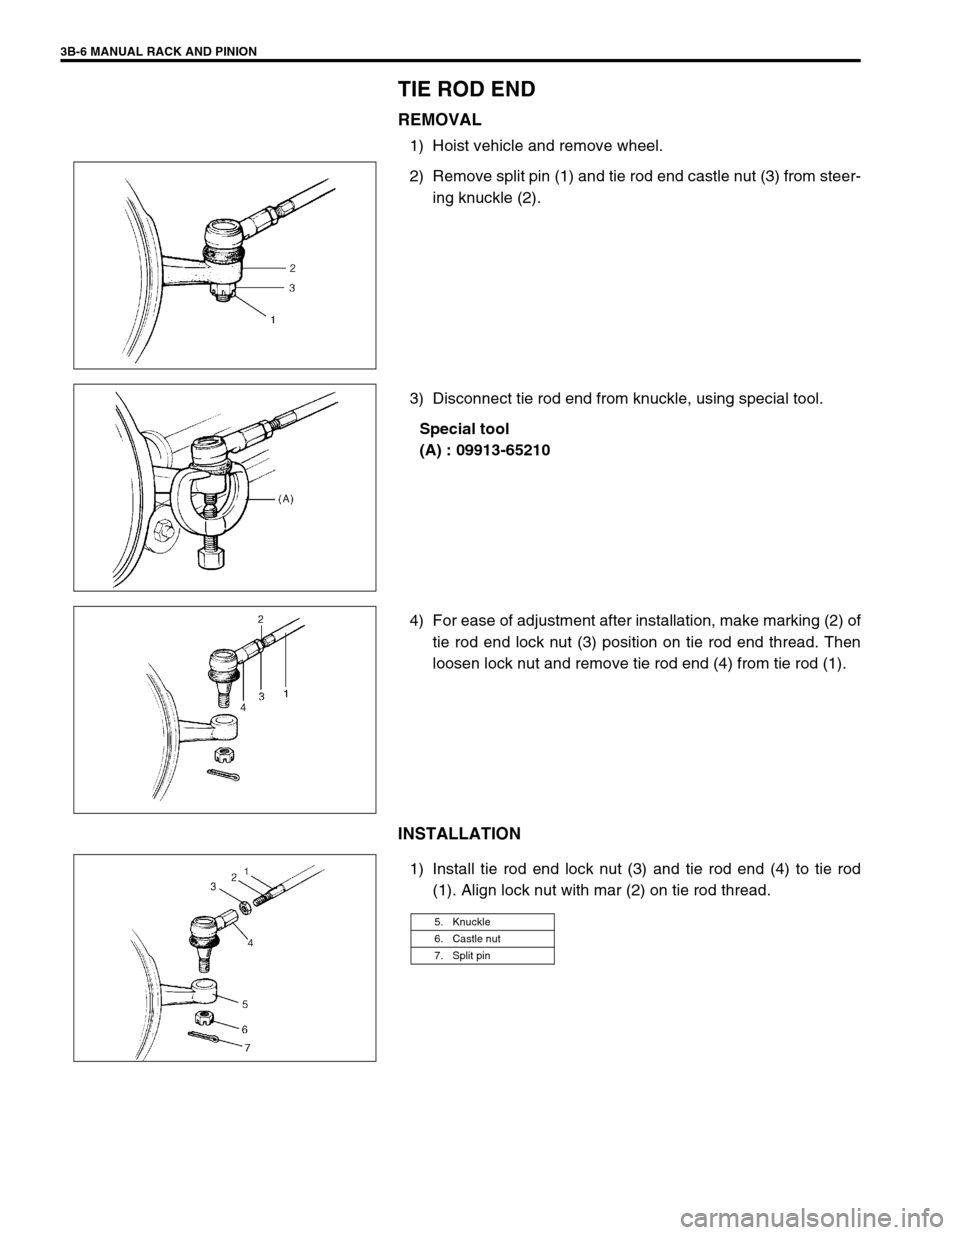
1) Hoist vehicle and remove wheel.
2) Remove split pin (1) and tie rod end castle nut (3) from steer-
ing knuckle (2).
3) Disconnect tie rod end from knuckle, using special tool.
Special tool
(A) : 09913-65210
4) For ease of adjustment after installation, make marking (2) of
tie rod end lock nut (3) position on tie rod end thread. Then
loosen lock nut and remove tie rod end (4) from tie rod (1).
INSTALLATION
1) Install tie rod end lock nut (3) and tie rod end (4) to tie rod
(1). Align lock nut with mar (2) on tie rod thread.
5. Knuckle
6. Castle nut
7. Split pin
Page 128 of 698
MANUAL RACK AND PINION 3B-7
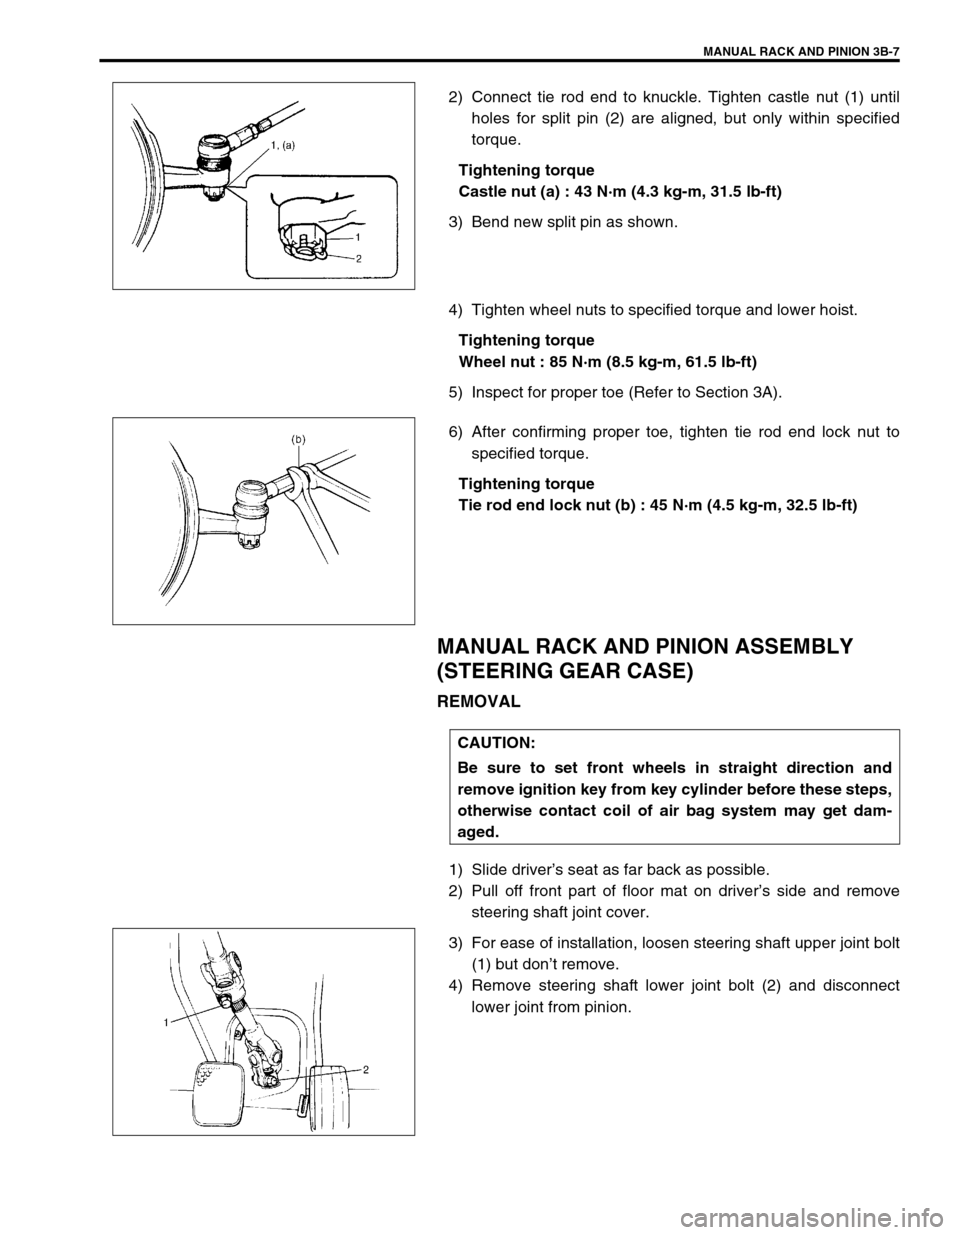
2) Connect tie rod end to knuckle. Tighten castle nut (1) until
holes for split pin (2) are aligned, but only within specified
torque.
Tightening torque
Castle nut (a) : 43 N·m (4.3 kg-m, 31.5 lb-ft)
3) Bend new split pin as shown.
4) Tighten wheel nuts to specified torque and lower hoist.
Tightening torque
Wheel nut : 85 N·m (8.5 kg-m, 61.5 lb-ft)
5) Inspect for proper toe (Refer to Section 3A).
6) After confirming proper toe, tighten tie rod end lock nut to
specified torque.
Tightening torque
Tie rod end lock nut (b) : 45 N·m (4.5 kg-m, 32.5 lb-ft)
MANUAL RACK AND PINION ASSEMBLY
(STEERING GEAR CASE)
REMOVAL
1) Slide driver’s seat as far back as possible.
2) Pull off front part of floor mat on driver’s side and remove
steering shaft joint cover.
3) For ease of installation, loosen steering shaft upper joint bolt
(1) but don’t remove.
4) Remove steering shaft lower joint bolt (2) and disconnect
lower joint from pinion.
CAUTION:
Be sure to set front wheels in straight direction and
remove ignition key from key cylinder before these steps,
otherwise contact coil of air bag system may get dam-
aged.
Page 129 of 698
3B-8 MANUAL RACK AND PINION
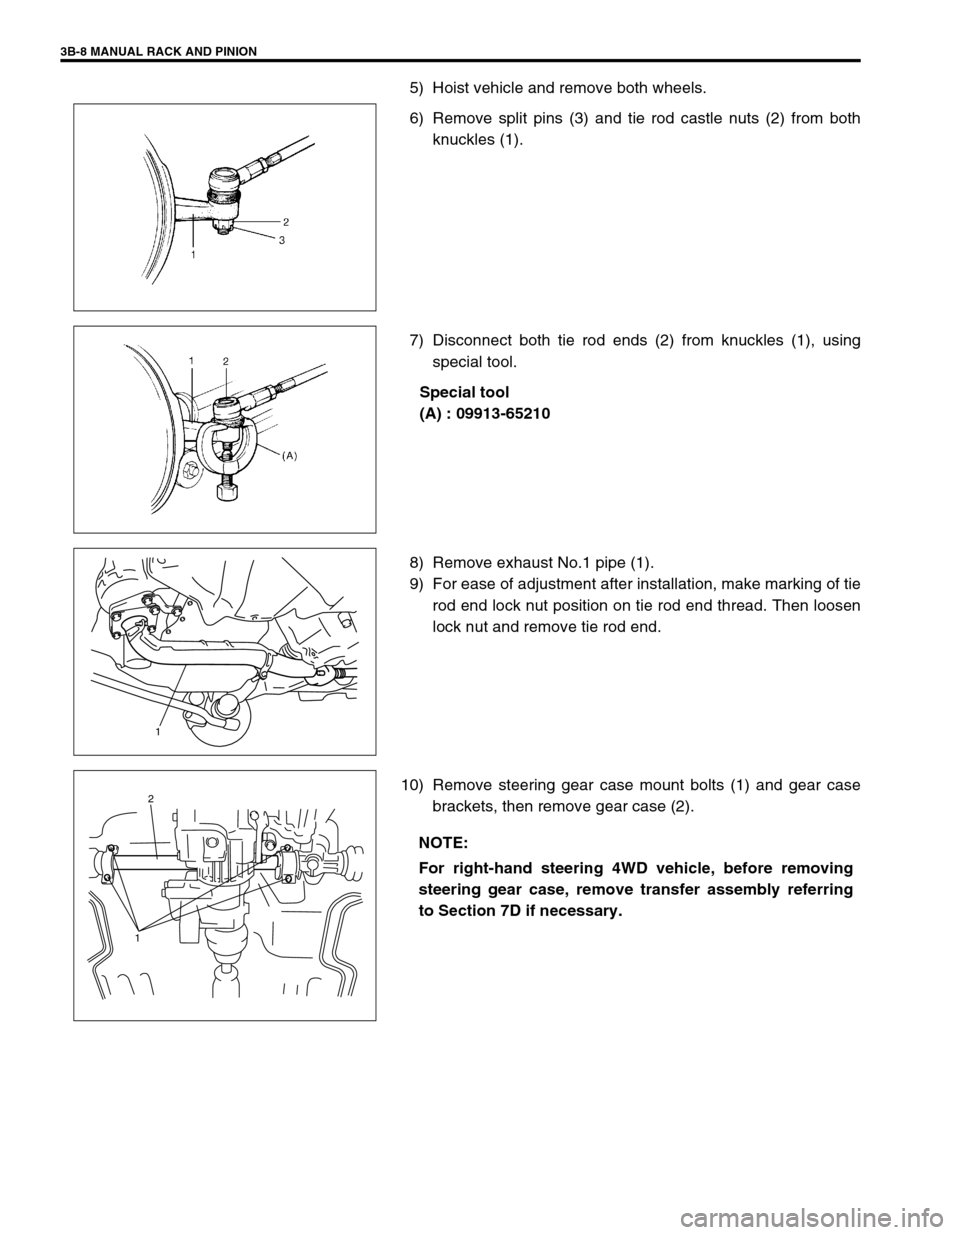
5) Hoist vehicle and remove both wheels.
6) Remove split pins (3) and tie rod castle nuts (2) from both
knuckles (1).
7) Disconnect both tie rod ends (2) from knuckles (1), using
special tool.
Special tool
(A) : 09913-65210
8) Remove exhaust No.1 pipe (1).
9) For ease of adjustment after installation, make marking of tie
rod end lock nut position on tie rod end thread. Then loosen
lock nut and remove tie rod end.
10) Remove steering gear case mount bolts (1) and gear case
brackets, then remove gear case (2).
1
NOTE:
For right-hand steering 4WD vehicle, before removing
steering gear case, remove transfer assembly referring
to Section 7D if necessary.
2
1
Page 131 of 698
3B-10 MANUAL RACK AND PINION
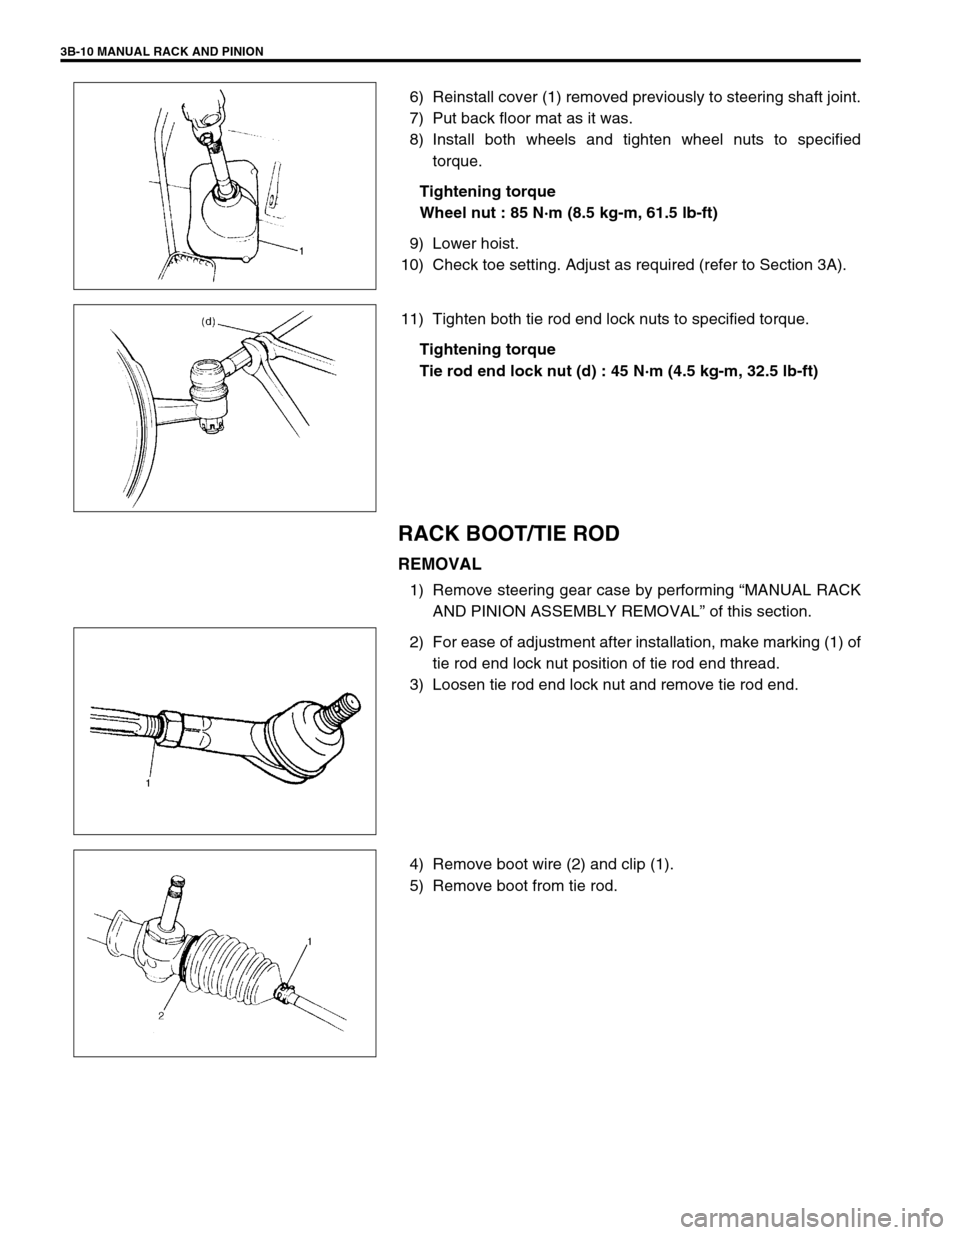
6) Reinstall cover (1) removed previously to steering shaft joint.
7) Put back floor mat as it was.
8) Install both wheels and tighten wheel nuts to specified
torque.
Tightening torque
Wheel nut : 85 N·m (8.5 kg-m, 61.5 lb-ft)
9) Lower hoist.
10) Check toe setting. Adjust as required (refer to Section 3A).
11) Tighten both tie rod end lock nuts to specified torque.
Tightening torque
Tie rod end lock nut (d) : 45 N·m (4.5 kg-m, 32.5 lb-ft)
RACK BOOT/TIE ROD
REMOVAL
1) Remove steering gear case by performing “MANUAL RACK
AND PINION ASSEMBLY REMOVAL” of this section.
2) For ease of adjustment after installation, make marking (1) of
tie rod end lock nut position of tie rod end thread.
3) Loosen tie rod end lock nut and remove tie rod end.
4) Remove boot wire (2) and clip (1).
5) Remove boot from tie rod.
Page 132 of 698
MANUAL RACK AND PINION 3B-11
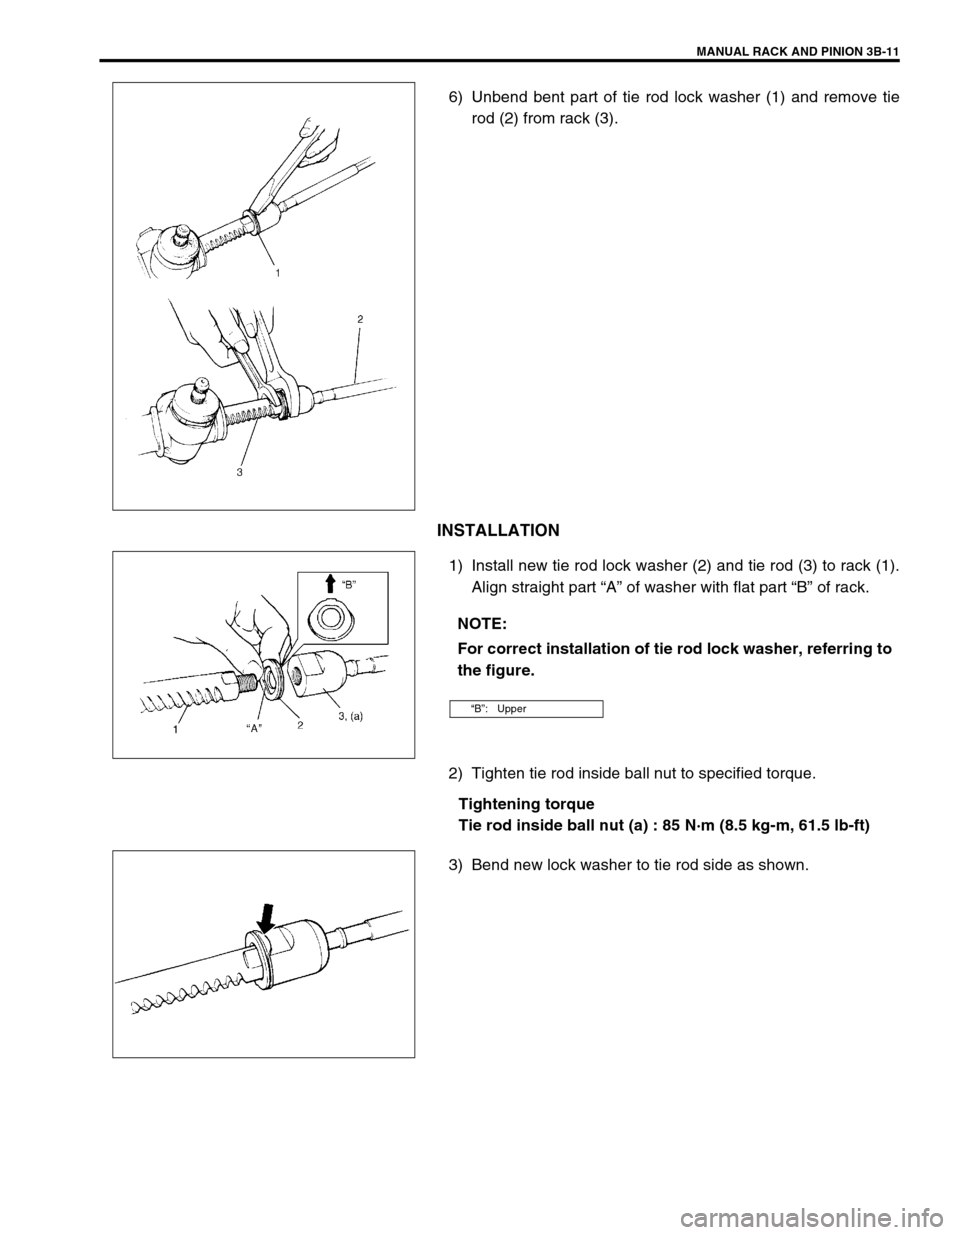
6) Unbend bent part of tie rod lock washer (1) and remove tie
rod (2) from rack (3).
INSTALLATION
1) Install new tie rod lock washer (2) and tie rod (3) to rack (1).
Align straight part “A” of washer with flat part “B” of rack.
2) Tighten tie rod inside ball nut to specified torque.
Tightening torque
Tie rod inside ball nut (a) : 85 N·m (8.5 kg-m, 61.5 lb-ft)
3) Bend new lock washer to tie rod side as shown.
NOTE:
For correct installation of tie rod lock washer, referring to
the figure.
“B”: Upper