ESP SUZUKI SWIFT 2000 1.G Transmission Service User Guide
[x] Cancel search | Manufacturer: SUZUKI, Model Year: 2000, Model line: SWIFT, Model: SUZUKI SWIFT 2000 1.GPages: 447, PDF Size: 10.54 MB
Page 321 of 447
BODY SERVICE 9-17
QUARTER WINDOW
REMOVAL AND INSTALLATION
Refer to “WINDSHIELD” in this section as removal and installa-
tion procedures are basically the same. However, note the follow-
ing.
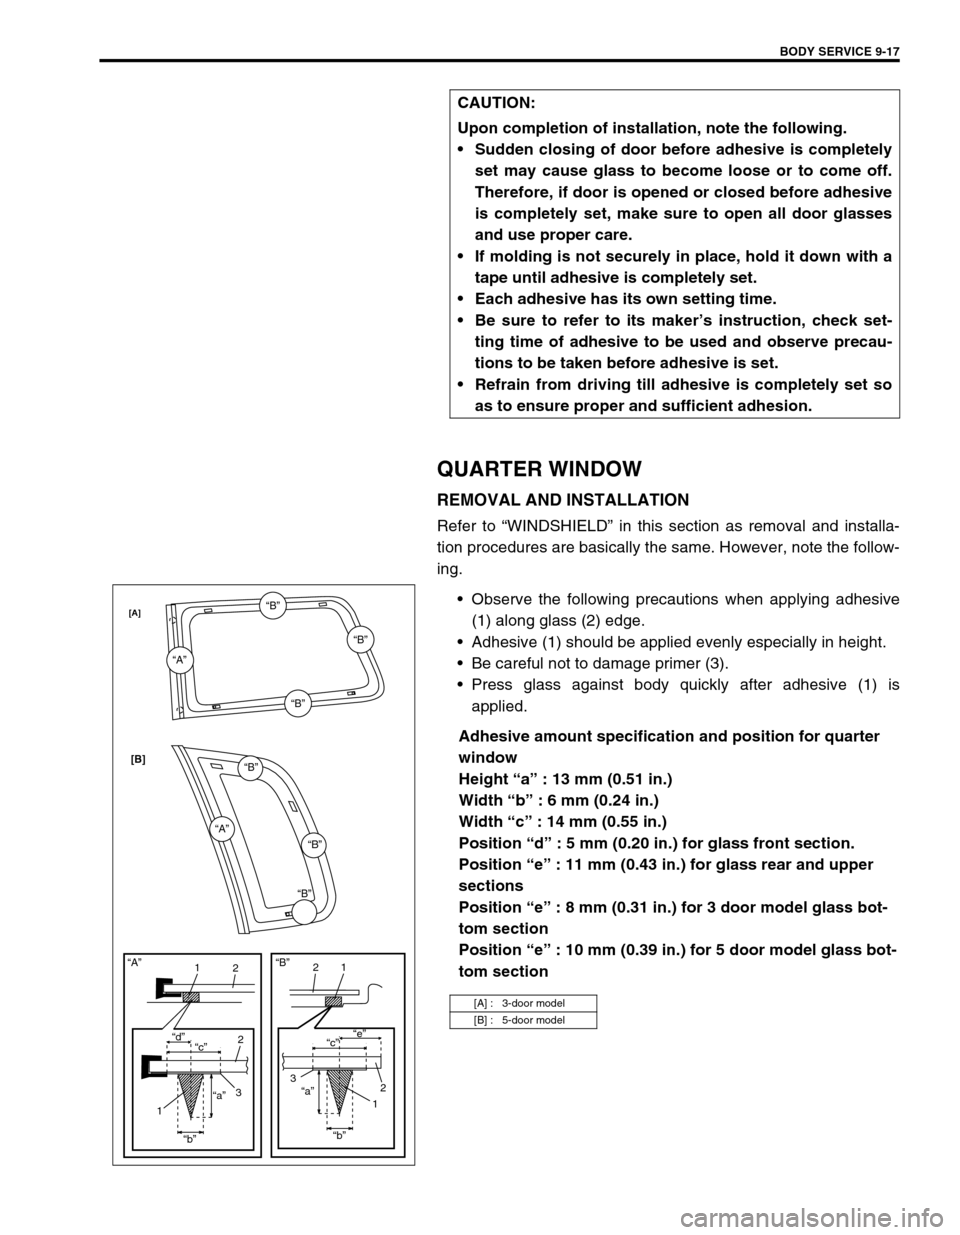
Observe the following precautions when applying adhesive
(1) along glass (2) edge.
Adhesive (1) should be applied evenly especially in height.
Be careful not to damage primer (3).
Press glass against body quickly after adhesive (1) is
applied.
Adhesive amount specification and position for quarter
window
Height “a” : 13 mm (0.51 in.)
Width “b” : 6 mm (0.24 in.)
Width “c” : 14 mm (0.55 in.)
Position “d” : 5 mm (0.20 in.) for glass front section.
Position “e” : 11 mm (0.43 in.) for glass rear and upper
sections
Position “e” : 8 mm (0.31 in.) for 3 door model glass bot-
tom section
Position “e” : 10 mm (0.39 in.) for 5 door model glass bot-
tom section CAUTION:
Upon completion of installation, note the following.
Sudden closing of door before adhesive is completely
set may cause glass to become loose or to come off.
Therefore, if door is opened or closed before adhesive
is completely set, make sure to open all door glasses
and use proper care.
If molding is not securely in place, hold it down with a
tape until adhesive is completely set.
Each adhesive has its own setting time.
Be sure to refer to its maker’s instruction, check set-
ting time of adhesive to be used and observe precau-
tions to be taken before adhesive is set.
Refrain from driving till adhesive is completely set so
as to ensure proper and sufficient adhesion.
[A] : 3-door model
[B] : 5-door model
“A”
“A”“B”
“B”
“B”
“B”
“B”“B”
11
22
2
33 “d”
“c”“c”“e”
“a”“a”
“b”“b”
11
2 “A”“B”
[A]
[B]
Page 322 of 447
9-18 BODY SERVICE
BACK DOOR GLASS
REMOVAL AND INSTALLATION
Refer to “WINDSHIELD” in this section as removal and installa-
tion procedures are basically the same. However, note the follow-
ing.
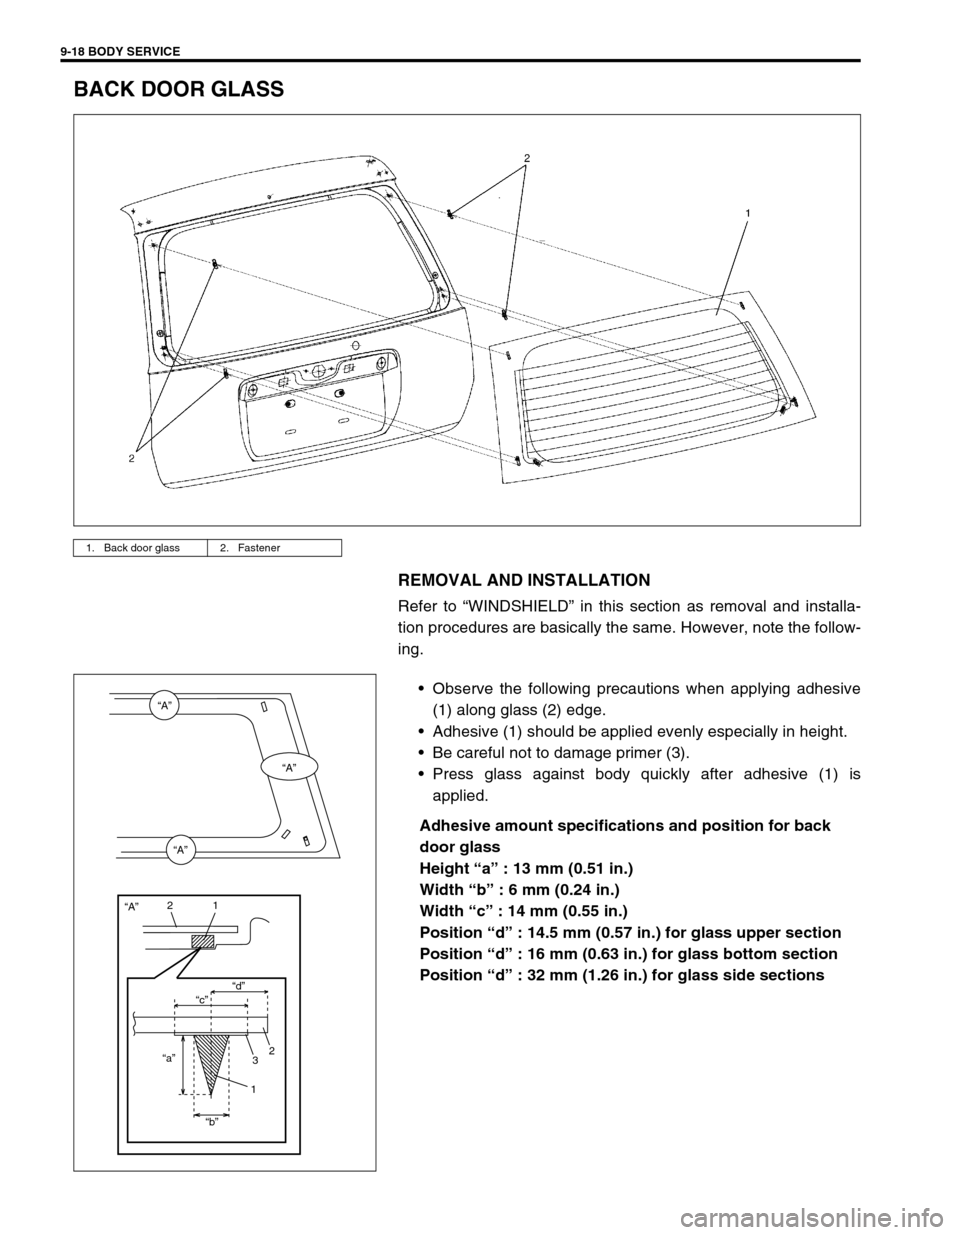
Observe the following precautions when applying adhesive
(1) along glass (2) edge.
Adhesive (1) should be applied evenly especially in height.
Be careful not to damage primer (3).
Press glass against body quickly after adhesive (1) is
applied.
Adhesive amount specifications and position for back
door glass
Height “a” : 13 mm (0.51 in.)
Width “b” : 6 mm (0.24 in.)
Width “c” : 14 mm (0.55 in.)
Position “d” : 14.5 mm (0.57 in.) for glass upper section
Position “d” : 16 mm (0.63 in.) for glass bottom section
Position “d” : 32 mm (1.26 in.) for glass side sections
1. Back door glass 2. Fastener
“A”
“A”
“A”
“A”
“c”“d”
“a”
“b”
21
2
3
1
Page 382 of 447
10B-8 AIR BAG SYSTEM
INTERMITTENTS AND POOR CONNECTIONS
Most intermittents are caused by faulty electrical connections or
wiring. When a check for proper connection is requested in a
diagnostic flow table, perform careful check of suspect circuits for:
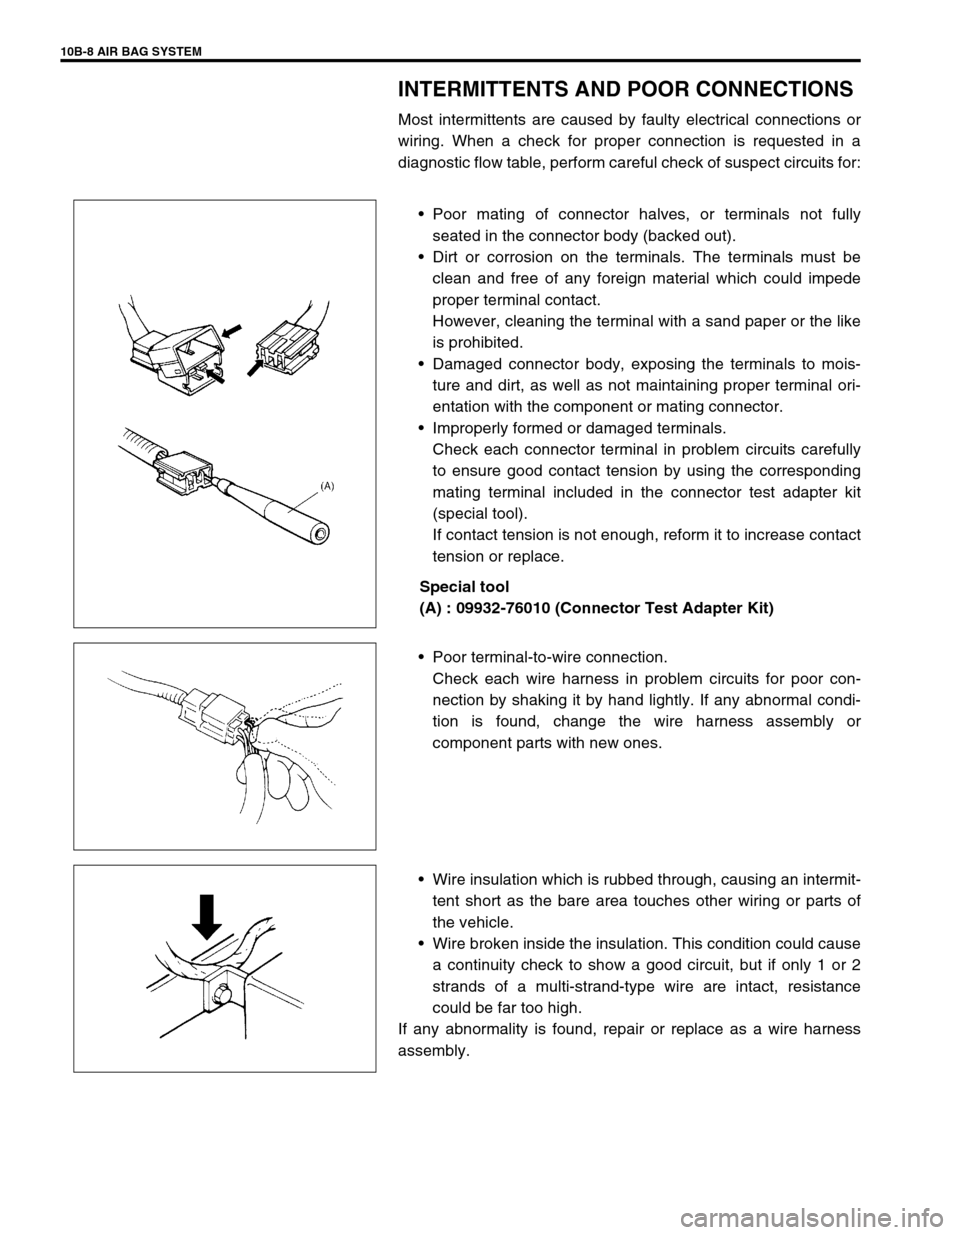
Poor mating of connector halves, or terminals not fully
seated in the connector body (backed out).
Dirt or corrosion on the terminals. The terminals must be
clean and free of any foreign material which could impede
proper terminal contact.
However, cleaning the terminal with a sand paper or the like
is prohibited.
Damaged connector body, exposing the terminals to mois-
ture and dirt, as well as not maintaining proper terminal ori-
entation with the component or mating connector.
Improperly formed or damaged terminals.
Check each connector terminal in problem circuits carefully
to ensure good contact tension by using the corresponding
mating terminal included in the connector test adapter kit
(special tool).
If contact tension is not enough, reform it to increase contact
tension or replace.
Special tool
(A) : 09932-76010 (Connector Test Adapter Kit)
Poor terminal-to-wire connection.
Check each wire harness in problem circuits for poor con-
nection by shaking it by hand lightly. If any abnormal condi-
tion is found, change the wire harness assembly or
component parts with new ones.
Wire insulation which is rubbed through, causing an intermit-
tent short as the bare area touches other wiring or parts of
the vehicle.
Wire broken inside the insulation. This condition could cause
a continuity check to show a good circuit, but if only 1 or 2
strands of a multi-strand-type wire are intact, resistance
could be far too high.
If any abnormality is found, repair or replace as a wire harness
assembly.
Page 384 of 447
10B-10 AIR BAG SYSTEM
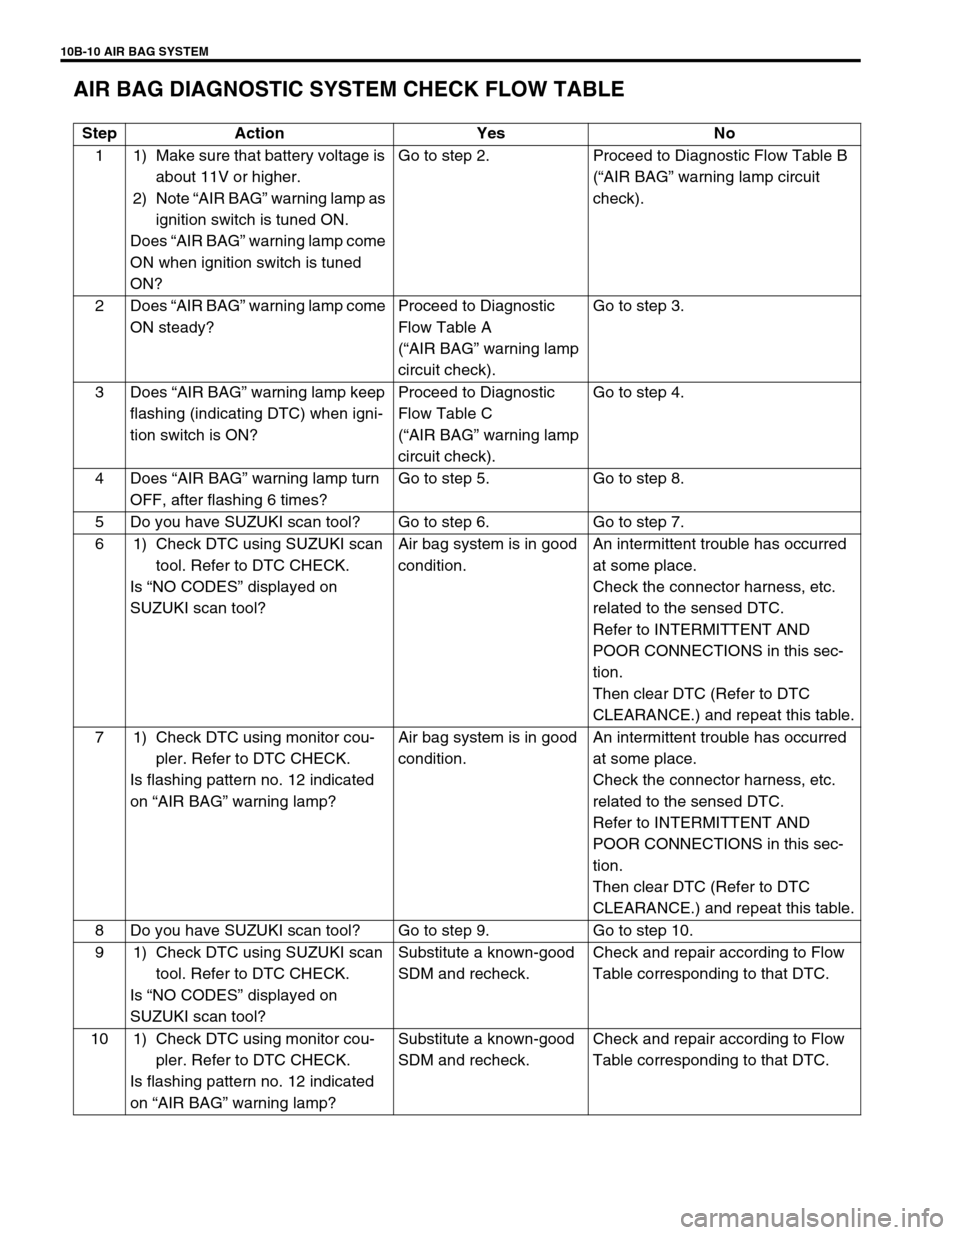
AIR BAG DIAGNOSTIC SYSTEM CHECK FLOW TABLE
Step Action Yes No
1 1) Make sure that battery voltage is
about 11V or higher.
2) Note “AIR BAG” warning lamp as
ignition switch is tuned ON.
Does “AIR BAG” warning lamp come
ON when ignition switch is tuned
ON?Go to step 2. Proceed to Diagnostic Flow Table B
(“AIR BAG” warning lamp circuit
check).
2Does “AIR BAG” warning lamp come
ON steady?Proceed to Diagnostic
Flow Table A
(“AIR BAG” warning lamp
circuit check).Go to step 3.
3Does “AIR BAG” warning lamp keep
flashing (indicating DTC) when igni-
tion switch is ON?Proceed to Diagnostic
Flow Table C
(“AIR BAG” warning lamp
circuit check).Go to step 4.
4Does “AIR BAG” warning lamp turn
OFF, after flashing 6 times?Go to step 5. Go to step 8.
5 Do you have SUZUKI scan tool? Go to step 6. Go to step 7.
6 1) Check DTC using SUZUKI scan
tool. Refer to DTC CHECK.
Is “NO CODES” displayed on
SUZUKI scan tool?Air bag system is in good
condition.An intermittent trouble has occurred
at some place.
Check the connector harness, etc.
related to the sensed DTC.
Refer to INTERMITTENT AND
POOR CONNECTIONS in this sec-
tion.
Then clear DTC (Refer to DTC
CLEARANCE.) and repeat this table.
7 1) Check DTC using monitor cou-
pler. Refer to DTC CHECK.
Is flashing pattern no. 12 indicated
on “AIR BAG” warning lamp?Air bag system is in good
condition.An intermittent trouble has occurred
at some place.
Check the connector harness, etc.
related to the sensed DTC.
Refer to INTERMITTENT AND
POOR CONNECTIONS in this sec-
tion.
Then clear DTC (Refer to DTC
CLEARANCE.) and repeat this table.
8 Do you have SUZUKI scan tool? Go to step 9. Go to step 10.
9 1) Check DTC using SUZUKI scan
tool. Refer to DTC CHECK.
Is “NO CODES” displayed on
SUZUKI scan tool?Substitute a known-good
SDM and recheck.Check and repair according to Flow
Table corresponding to that DTC.
10 1) Check DTC using monitor cou-
pler. Refer to DTC CHECK.
Is flashing pattern no. 12 indicated
on “AIR BAG” warning lamp?Substitute a known-good
SDM and recheck.Check and repair according to Flow
Table corresponding to that DTC.
Page 420 of 447
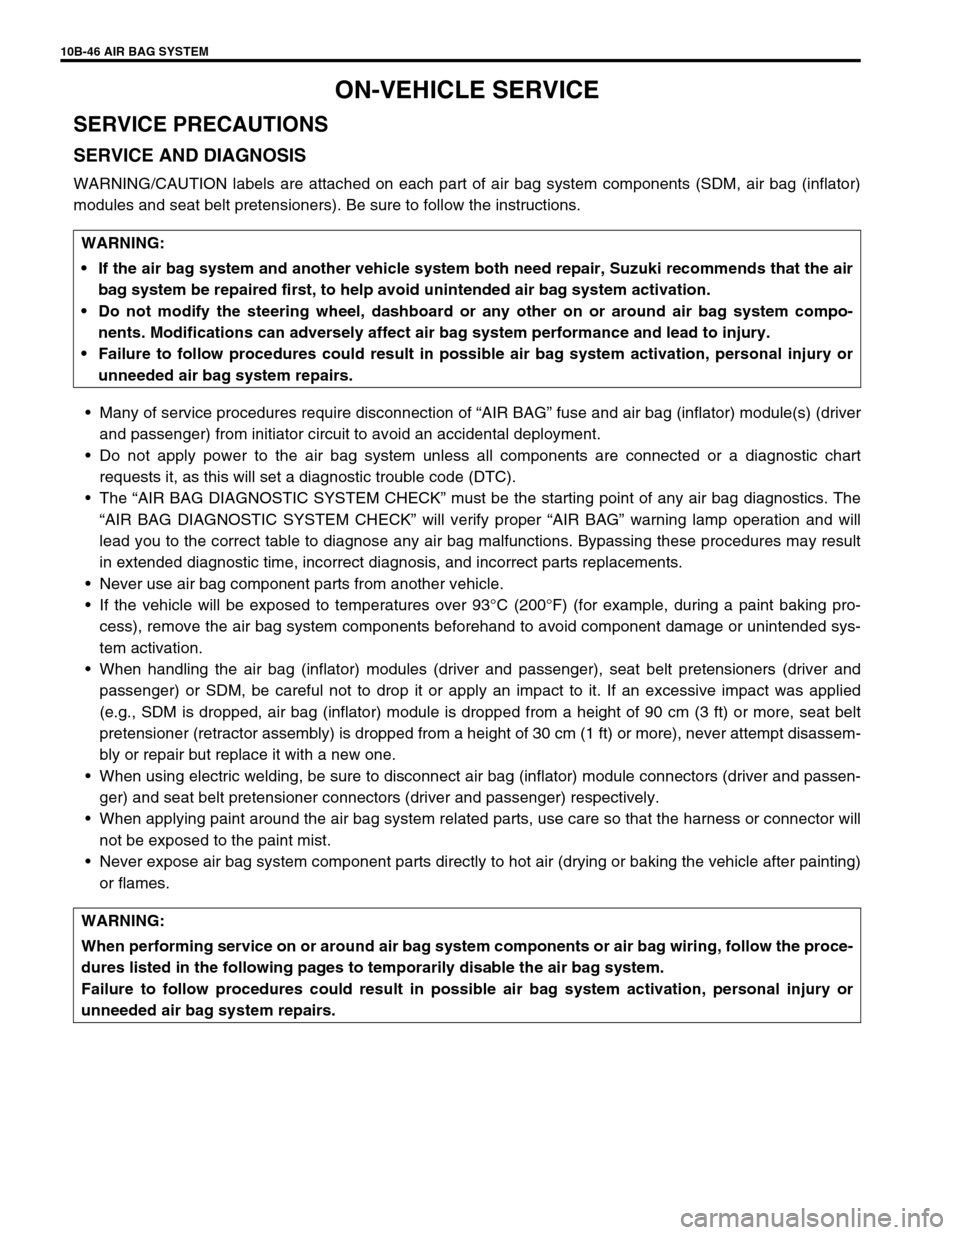
10B-46 AIR BAG SYSTEM
ON-VEHICLE SERVICE
SERVICE PRECAUTIONS
SERVICE AND DIAGNOSIS
WARNING/CAUTION labels are attached on each part of air bag system components (SDM, air bag (inflator)
modules and seat belt pretensioners). Be sure to follow the instructions.
Many of service procedures require disconnection of “AIR BAG” fuse and air bag (inflator) module(s) (driver
and passenger) from initiator circuit to avoid an accidental deployment.
Do not apply power to the air bag system unless all components are connected or a diagnostic chart
requests it, as this will set a diagnostic trouble code (DTC).
The “AIR BAG DIAGNOSTIC SYSTEM CHECK” must be the starting point of any air bag diagnostics. The
“AIR BAG DIAGNOSTIC SYSTEM CHECK” will verify proper “AIR BAG” warning lamp operation and will
lead you to the correct table to diagnose any air bag malfunctions. Bypassing these procedures may result
in extended diagnostic time, incorrect diagnosis, and incorrect parts replacements.
Never use air bag component parts from another vehicle.
If the vehicle will be exposed to temperatures over 93°C (200°F) (for example, during a paint baking pro-
cess), remove the air bag system components beforehand to avoid component damage or unintended sys-
tem activation.
When handling the air bag (inflator) modules (driver and passenger), seat belt pretensioners (driver and
passenger) or SDM, be careful not to drop it or apply an impact to it. If an excessive impact was applied
(e.g., SDM is dropped, air bag (inflator) module is dropped from a height of 90 cm (3 ft) or more, seat belt
pretensioner (retractor assembly) is dropped from a height of 30 cm (1 ft) or more), never attempt disassem-
bly or repair but replace it with a new one.
When using electric welding, be sure to disconnect air bag (inflator) module connectors (driver and passen-
ger) and seat belt pretensioner connectors (driver and passenger) respectively.
When applying paint around the air bag system related parts, use care so that the harness or connector will
not be exposed to the paint mist.
Never expose air bag system component parts directly to hot air (drying or baking the vehicle after painting)
or flames. WARNING:
If the air bag system and another vehicle system both need repair, Suzuki recommends that the air
bag system be repaired first, to help avoid unintended air bag system activation.
Do not modify the steering wheel, dashboard or any other on or around air bag system compo-
nents. Modifications can adversely affect air bag system performance and lead to injury.
Failure to follow procedures could result in possible air bag system activation, personal injury or
unneeded air bag system repairs.
WARNING:
When performing service on or around air bag system components or air bag wiring, follow the proce-
dures listed in the following pages to temporarily disable the air bag system.
Failure to follow procedures could result in possible air bag system activation, personal injury or
unneeded air bag system repairs.