clutch SUZUKI SWIFT 2000 1.G Transmission Service Workshop Manual
[x] Cancel search | Manufacturer: SUZUKI, Model Year: 2000, Model line: SWIFT, Model: SUZUKI SWIFT 2000 1.GPages: 447, PDF Size: 10.54 MB
Page 5 of 447
MANUAL TRANSMISSION 7A-5
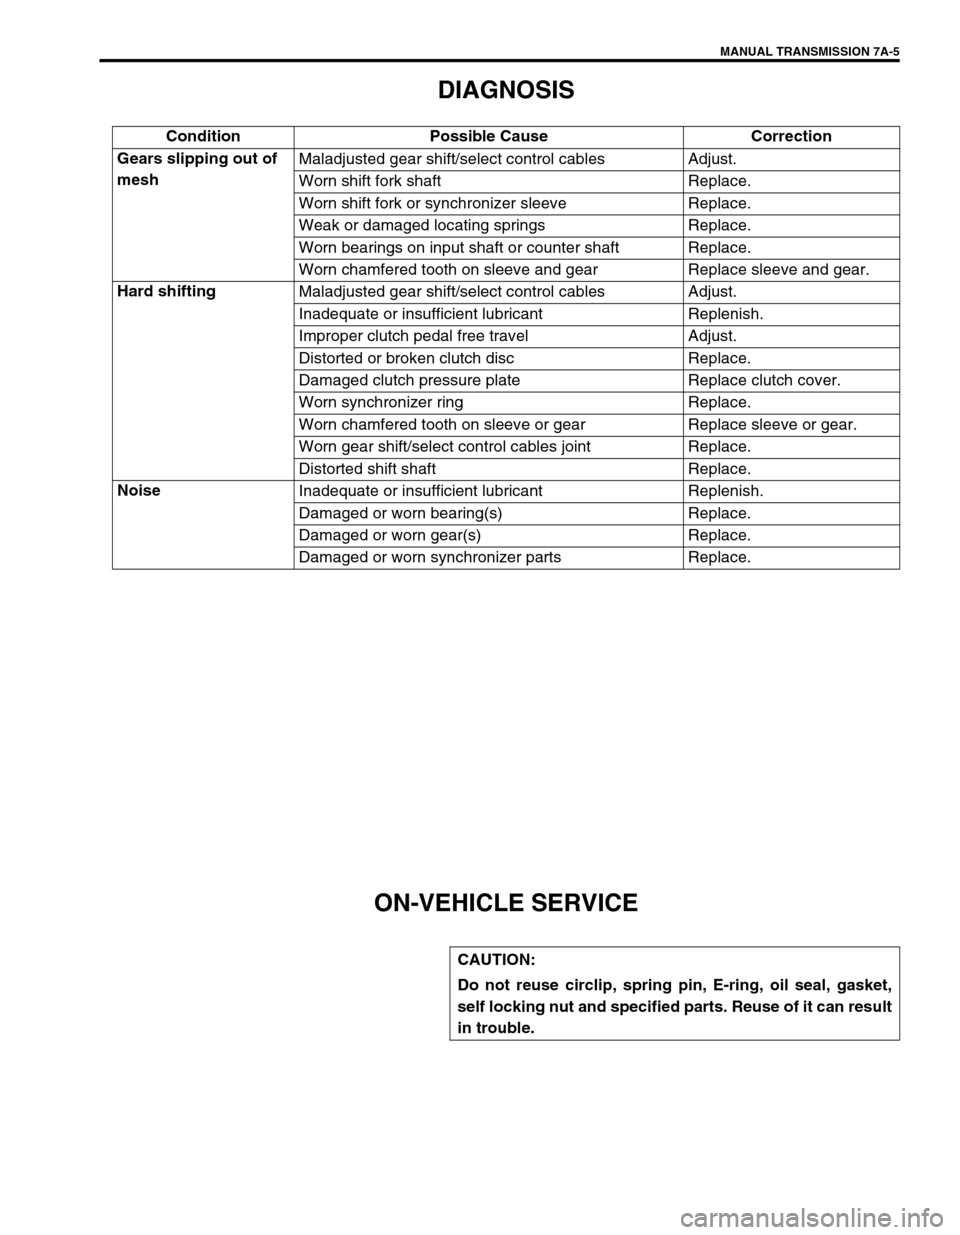
DIAGNOSIS
ON-VEHICLE SERVICE
Condition Possible Cause Correction
Gears slipping out of
meshMaladjusted gear shift/select control cables Adjust.
Worn shift fork shaft Replace.
Worn shift fork or synchronizer sleeve Replace.
Weak or damaged locating springs Replace.
Worn bearings on input shaft or counter shaft Replace.
Worn chamfered tooth on sleeve and gear Replace sleeve and gear.
Hard shifting
Maladjusted gear shift/select control cables Adjust.
Inadequate or insufficient lubricant Replenish.
Improper clutch pedal free travel Adjust.
Distorted or broken clutch disc Replace.
Damaged clutch pressure plate Replace clutch cover.
Worn synchronizer ring Replace.
Worn chamfered tooth on sleeve or gear Replace sleeve or gear.
Worn gear shift/select control cables joint Replace.
Distorted shift shaft Replace.
Noise
Inadequate or insufficient lubricant Replenish.
Damaged or worn bearing(s) Replace.
Damaged or worn gear(s) Replace.
Damaged or worn synchronizer parts Replace.
CAUTION:
Do not reuse circlip, spring pin, E-ring, oil seal, gasket,
self locking nut and specified parts. Reuse of it can result
in trouble.
Page 11 of 447
MANUAL TRANSMISSION 7A-11
UNIT REPAIR OVERHAUL
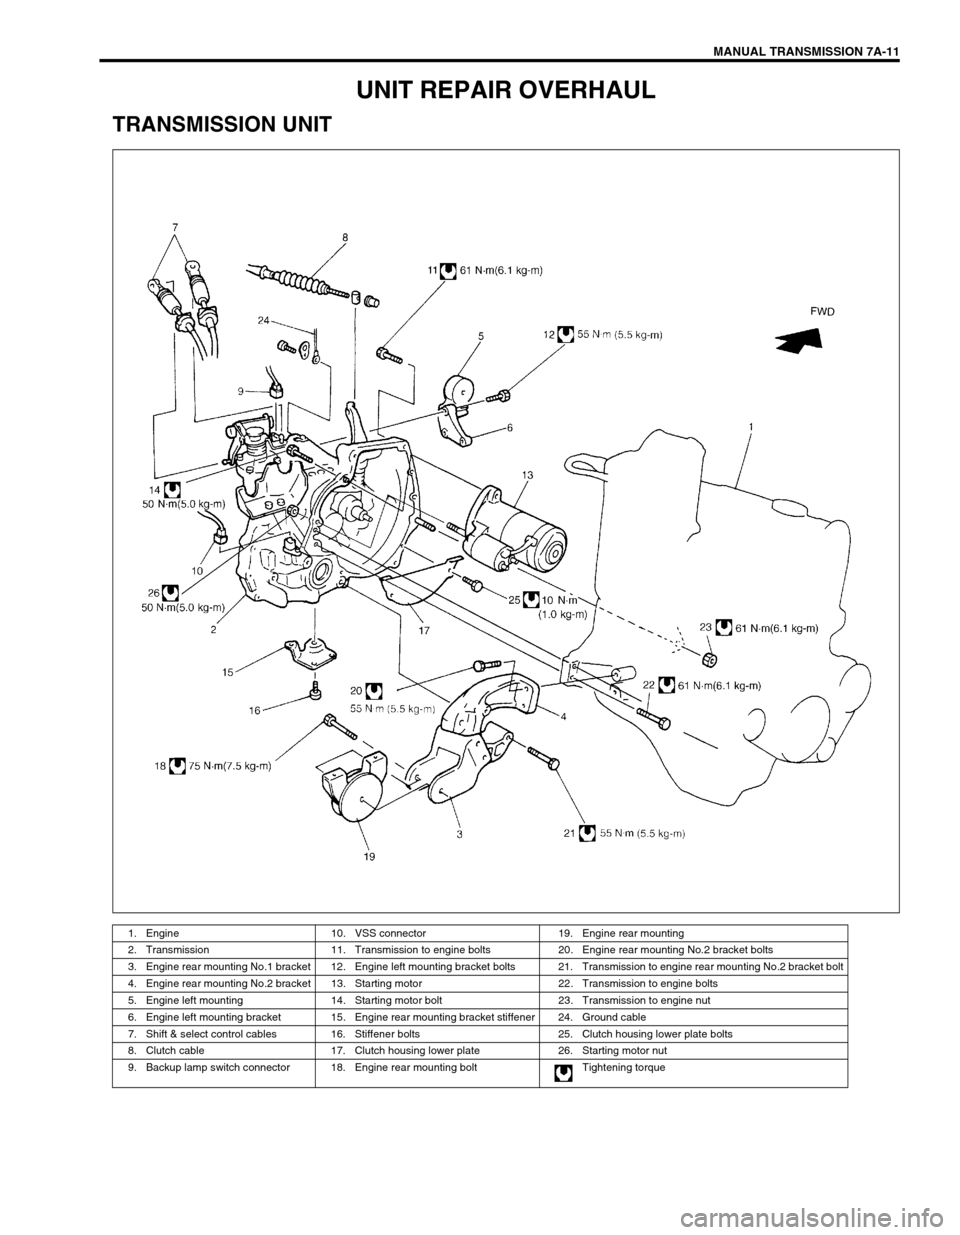
TRANSMISSION UNIT
1. Engine 10. VSS connector 19. Engine rear mounting
2. Transmission 11. Transmission to engine bolts 20. Engine rear mounting No.2 bracket bolts
3. Engine rear mounting No.1 bracket 12. Engine left mounting bracket bolts 21. Transmission to engine rear mounting No.2 bracket bolt
4. Engine rear mounting No.2 bracket 13. Starting motor 22. Transmission to engine bolts
5. Engine left mounting 14. Starting motor bolt 23. Transmission to engine nut
6. Engine left mounting bracket 15. Engine rear mounting bracket stiffener 24. Ground cable
7. Shift & select control cables 16. Stiffener bolts 25. Clutch housing lower plate bolts
8. Clutch cable 17. Clutch housing lower plate 26. Starting motor nut
9. Backup lamp switch connector 18. Engine rear mounting bolt Tightening torque
Page 16 of 447
7A-16 MANUAL TRANSMISSION
TRANSMISSION UNIT
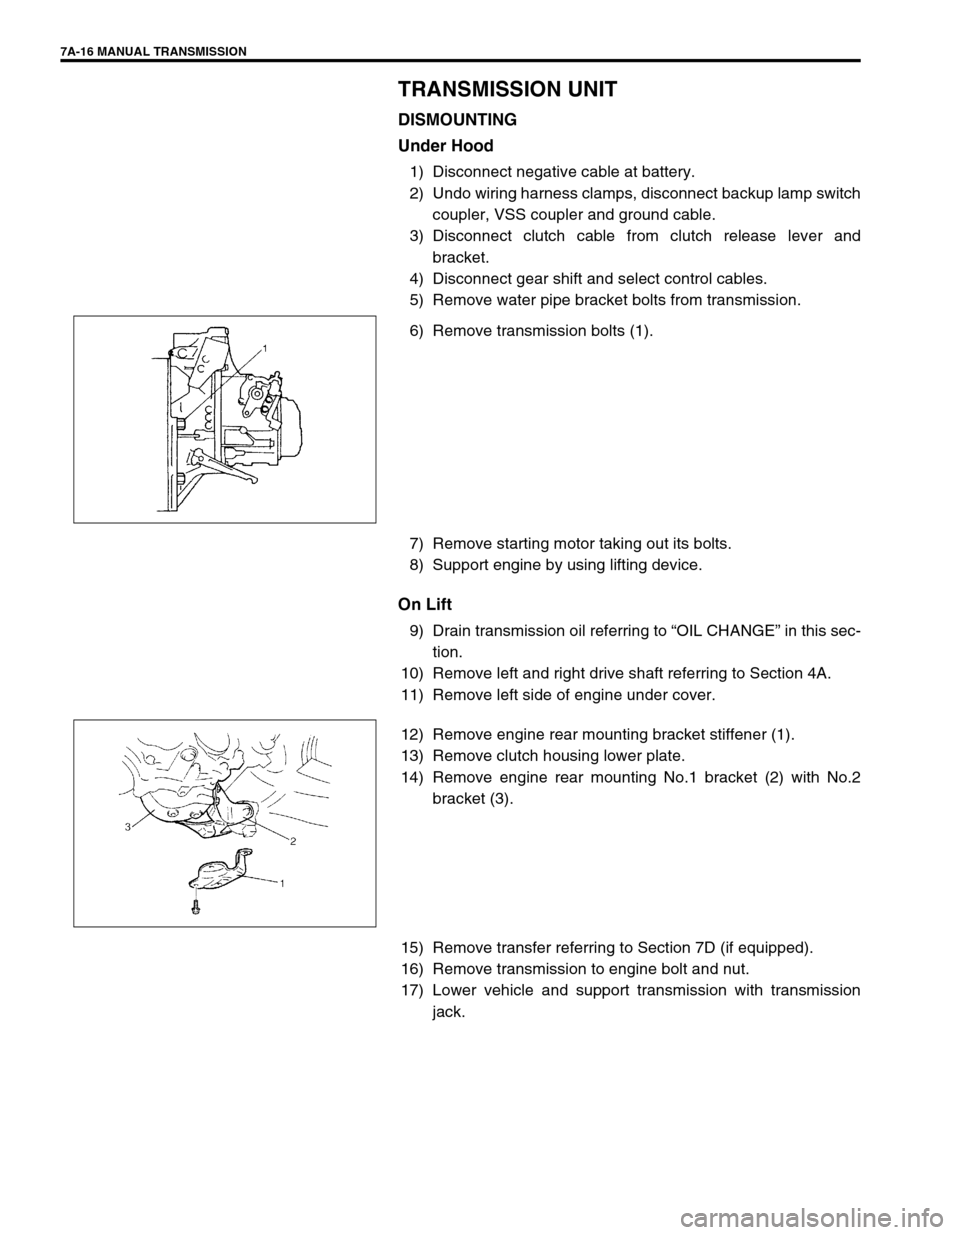
DISMOUNTING
Under Hood
1) Disconnect negative cable at battery.
2) Undo wiring harness clamps, disconnect backup lamp switch
coupler, VSS coupler and ground cable.
3) Disconnect clutch cable from clutch release lever and
bracket.
4) Disconnect gear shift and select control cables.
5) Remove water pipe bracket bolts from transmission.
6) Remove transmission bolts (1).
7) Remove starting motor taking out its bolts.
8) Support engine by using lifting device.
On Lift
9) Drain transmission oil referring to “OIL CHANGE” in this sec-
tion.
10) Remove left and right drive shaft referring to Section 4A.
11) Remove left side of engine under cover.
12) Remove engine rear mounting bracket stiffener (1).
13) Remove clutch housing lower plate.
14) Remove engine rear mounting No.1 bracket (2) with No.2
bracket (3).
15) Remove transfer referring to Section 7D (if equipped).
16) Remove transmission to engine bolt and nut.
17) Lower vehicle and support transmission with transmission
jack.
Page 17 of 447
MANUAL TRANSMISSION 7A-17
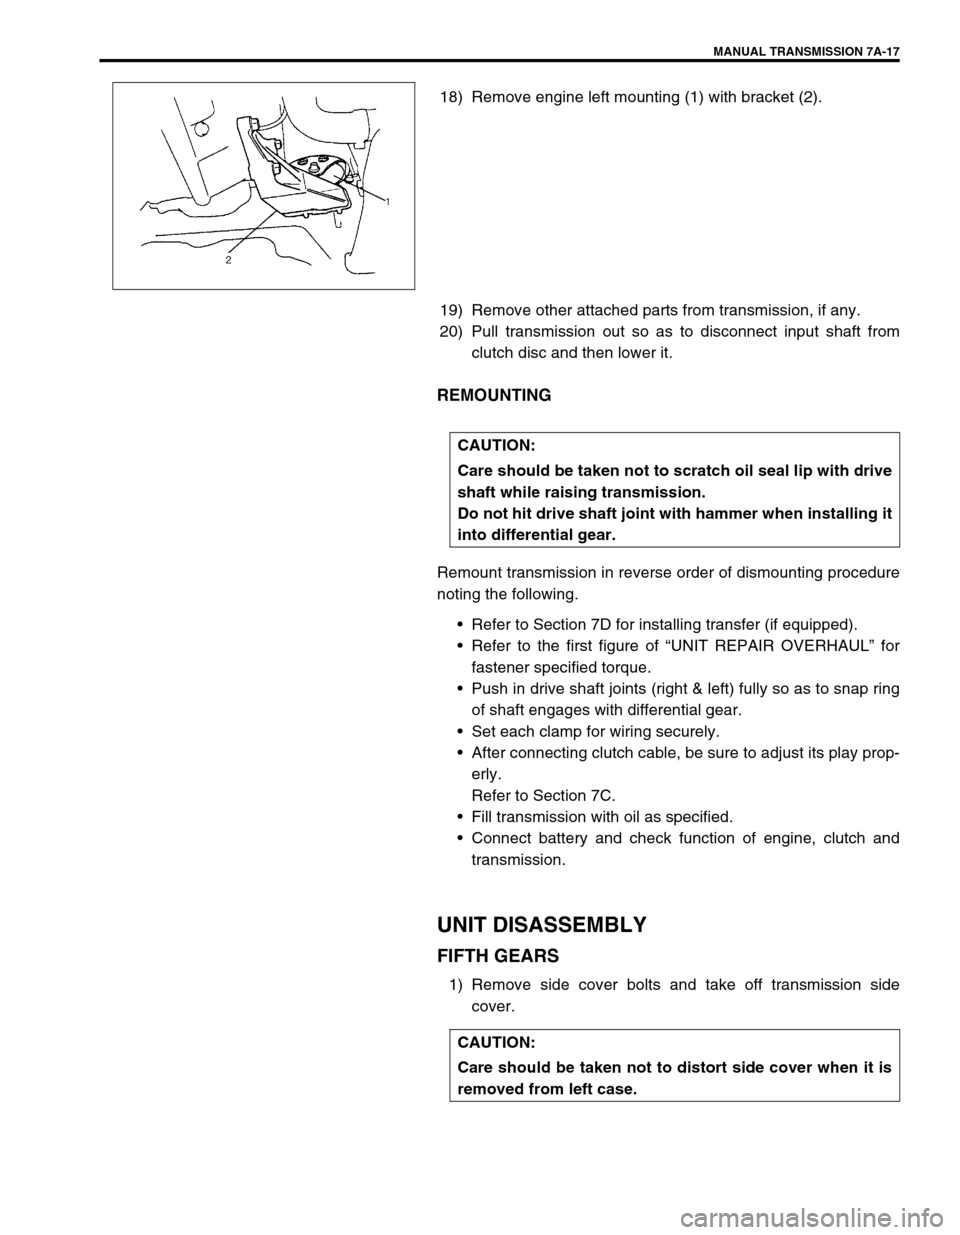
18) Remove engine left mounting (1) with bracket (2).
19) Remove other attached parts from transmission, if any.
20) Pull transmission out so as to disconnect input shaft from
clutch disc and then lower it.
REMOUNTING
Remount transmission in reverse order of dismounting procedure
noting the following.
Refer to Section 7D for installing transfer (if equipped).
Refer to the first figure of “UNIT REPAIR OVERHAUL” for
fastener specified torque.
Push in drive shaft joints (right & left) fully so as to snap ring
of shaft engages with differential gear.
Set each clamp for wiring securely.
After connecting clutch cable, be sure to adjust its play prop-
erly.
Refer to Section 7C.
Fill transmission with oil as specified.
Connect battery and check function of engine, clutch and
transmission.
UNIT DISASSEMBLY
FIFTH GEARS
1) Remove side cover bolts and take off transmission side
cover.
CAUTION:
Care should be taken not to scratch oil seal lip with drive
shaft while raising transmission.
Do not hit drive shaft joint with hammer when installing it
into differential gear.
CAUTION:
Care should be taken not to distort side cover when it is
removed from left case.
Page 19 of 447
MANUAL TRANSMISSION 7A-19
GEAR SHIFTER, INPUT SHAFT AND COUNTER
SHAFT
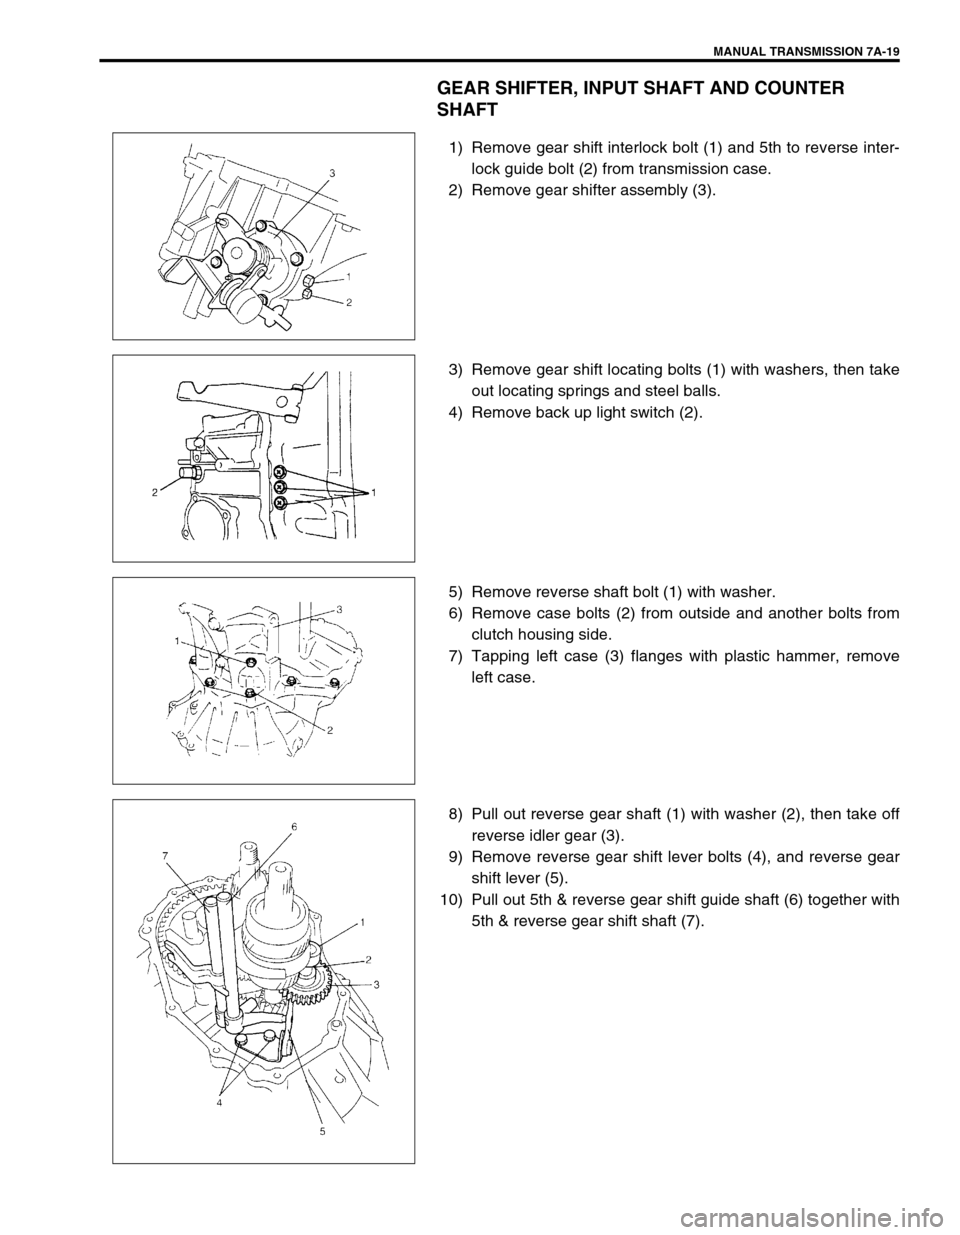
1) Remove gear shift interlock bolt (1) and 5th to reverse inter-
lock guide bolt (2) from transmission case.
2) Remove gear shifter assembly (3).
3) Remove gear shift locating bolts (1) with washers, then take
out locating springs and steel balls.
4) Remove back up light switch (2).
5) Remove reverse shaft bolt (1) with washer.
6) Remove case bolts (2) from outside and another bolts from
clutch housing side.
7) Tapping left case (3) flanges with plastic hammer, remove
left case.
8) Pull out reverse gear shaft (1) with washer (2), then take off
reverse idler gear (3).
9) Remove reverse gear shift lever bolts (4), and reverse gear
shift lever (5).
10) Pull out 5th & reverse gear shift guide shaft (6) together with
5th & reverse gear shift shaft (7).
Page 34 of 447
7A-34 MANUAL TRANSMISSION
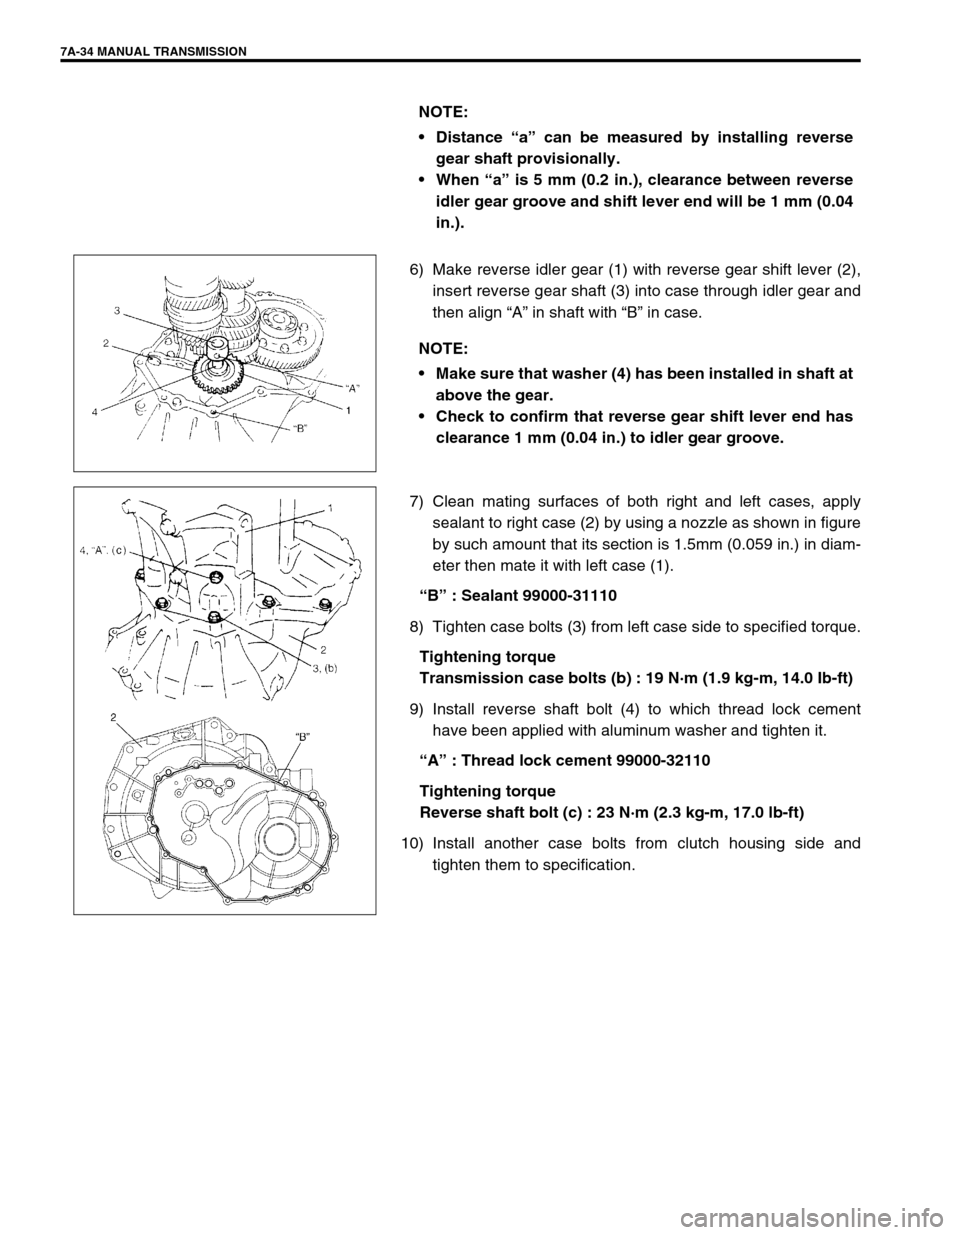
6) Make reverse idler gear (1) with reverse gear shift lever (2),
insert reverse gear shaft (3) into case through idler gear and
then align “A” in shaft with “B” in case.
7) Clean mating surfaces of both right and left cases, apply
sealant to right case (2) by using a nozzle as shown in figure
by such amount that its section is 1.5mm (0.059 in.) in diam-
eter then mate it with left case (1).
“B” : Sealant 99000-31110
8) Tighten case bolts (3) from left case side to specified torque.
Tightening torque
Transmission case bolts (b) : 19 N·m (1.9 kg-m, 14.0 Ib-ft)
9) Install reverse shaft bolt (4) to which thread lock cement
have been applied with aluminum washer and tighten it.
“A” : Thread lock cement 99000-32110
Tightening torque
Reverse shaft bolt (c) : 23 N·m (2.3 kg-m, 17.0 lb-ft)
10) Install another case bolts from clutch housing side and
tighten them to specification. NOTE:
Distance “a” can be measured by installing reverse
gear shaft provisionally.
When “a” is 5 mm (0.2 in.), clearance between reverse
idler gear groove and shift lever end will be 1 mm (0.04
in.).
NOTE:
Make sure that washer (4) has been installed in shaft at
above the gear.
Check to confirm that reverse gear shift lever end has
clearance 1 mm (0.04 in.) to idler gear groove.
Page 43 of 447
AUTOMATIC TRANSMISSION (4 A/T) 7B-1
6F1
6F2
6G
6H
6K
7A
7A1
7C1
7D
7B
7F
8A
8B
8C
8D
8E
9
10
10A
10B
SECTION 7B
AUTOMATIC TRANSMISSION (4 A/T)
CONTENTS
GENERAL DESCRIPTION ...............................7B-3
ELECTRONIC SHIFT CONTROL SYSTEM . 7B-6
TRANSMISSION CONTROL MODULE
(TCM) ........................................................ 7B-7
FAIL SAFE FUNCTION ............................. 7B-8
CHANGE MECHANISM .......................... 7B-10
AUTOMATIC GEAR SHIFT DIAGRAM ... 7B-11
DIAGNOSIS ....................................................7B-13
AUTOMATIC TRANSMISSION
DIAGNOSTIC FLOW TABLE ...................... 7B-13
TROUBLE DIAGNOSIS TABLE .................. 7B-18
STALL TEST ........................................... 7B-20
TIME LAG TEST ..................................... 7B-21
LINE PRESSURE TEST ......................... 7B-22
ENGINE BRAKE TEST ........................... 7B-23
“P” RANGE TEST.................................... 7B-23
ELECTRONIC CONTROL SYSTEM
DIAGNOSIS ................................................ 7B-24
PRECAUTIONS IN DIAGNOSING
TROUBLES ............................................. 7B-24
DTC CHECK ........................................... 7B-25
DTC CLEARANCE .................................. 7B-27
DTC TABLE............................................. 7B-28
TCM POWER AND GROUND CIRCUIT
CHECK .................................................... 7B-30
DTC P0715 (DTC NO.14) INPUT/
TURBINE SPEED SENSOR CIRCUIT
MALFUNCTION ...................................... 7B-31
DTC P0730 (DTC NO. 18) INCORRECT
GEAR RATIO .......................................... 7B-33
DTC P0753 (DTC NO.21/22) SHIFT
SOLENOID-A (NO.1) ELECTRICAL ....... 7B-35DTC P0758 (DTC NO.23/24) SHIFT
SOLENOID-B (NO.2) ELECTRICAL ....... 7B-35
DTC P0743 (DTC NO.25/26) TCC
(LOCK-UP CLUTCH) SYSTEM
ELECTRICAL .......................................... 7B-35
DTC P0741 (DTC NO.29) TCC
(LOCK-UP) SOLENOID
PERFORMANCE OR STUCK OFF ........ 7B-37
DTC P0720 (DTC NO. 31) OUTPUT
SHAFT SPEED SENSOR CIRCUIT
MALFUNCTION ...................................... 7B-38
DTC P1700 (DTC NO.32/33)
THROTTLE POSITION SIGNAL INPUT
MALFUNCTION ...................................... 7B-41
DTC P0705 (DTC NO.34)
TRANSMISSION RANGE SENSOR
(SWITCH) CIRCUIT MALFUNCTION ..... 7B-43
DTC P0725 (DTC NO.35) ENGINE
SPEED INPUT CIRCUIT
MALFUNCTION ...................................... 7B-45
DTC P0710 (DTC No.36/38)
TRANSMISSION TEMPERATURE
SENSOR CIRCUIT MALFUNCTION ...... 7B-47
DTC P0763 (DTC NO.43) SHIFT
SOLENOID-C (NO.3) ELECTRICAL ....... 7B-49
DTC P0768 (DTC NO.45) SHIFT
SOLENOID-B (NO.4) ELECTRICAL ....... 7B-49
DTC P0773 (DTC NO.48) SHIFT
SOLENOID-E (NO.5) ELECTRICAL ....... 7B-49
DTC P1709 (DTC NO.51) ENGINE
COOLANT TEMPERATURE/BAROMETRIC
PRESSURE SIGNAL CIRCUIT............... 7B-51 WARNING:
For vehicles equipped with Supplemental Restraint (Air Bag) System :
Service on and around the air bag system components or wiring must be performed only by an
authorized SUZUKI dealer. Refer to “Air Bag System Components and Wiring Location View” under
“General Description” in air bag system section in order to confirm whether you are performing ser-
vice on or near the air bag system components or wiring. Please observe all WARNINGS and “Ser-
vice Precautions” under “On-Vehicle Service” in air bag system section before performing service
on or around the air bag system components or wiring. Failure to follow WARNINGS could result in
unintentional activation of the system or could render the system inoperative. Either of these two
conditions may result in severe injury.
Technical service work must be started at least 90 seconds after the ignition switch is turned to the
“LOCK” position and the negative cable is disconnected from the battery. Otherwise, the system
may be activated by reserve energy in the Sensing and Diagnostic Module (SDM).
Page 44 of 447
7B-2 AUTOMATIC TRANSMISSION (4 A/T)
DTC P0702/P1702 (DTC No.52)
TRANSMISSION CONTROL SYSTEM
ELECTRICAL OR INTERNAL
MALFUNCTION OF TCM ....................... 7B-52
INSPECTION OF TCM AND ITS
CIRCUITS ............................................... 7B-53
ON-VEHICLE SERVICE ................................. 7B-55
MAINTENANCE SERVICE ......................... 7B-55
FLUID LEVEL AT NORMAL OPERATING
TEMPERATURE ..................................... 7B-55
FLUID LEVEL AT ROOM
TEMPERATURE ..................................... 7B-56
FLUID CHANGE ..................................... 7B-56
SELECTOR LEVER .................................... 7B-57
TRANSMISSION RANGE SENSOR
(SHIFT SWITCH) ........................................ 7B-58
SELECTOR CABLE .................................... 7B-60
OUTPUT SHAFT SPEED SENSOR
(A/T VSS) .................................................... 7B-62
INPUT SHAFT SPEED SENSOR ............... 7B-63
VEHICLE SPEED SENSOR (VSS)............. 7B-63
THROTTLE POSITION SENSOR............... 7B-63
ENGINE COOLANT TEMP. (ECT)
SENSOR ..................................................... 7B-64
DROPPING RESISTOR ............................. 7B-64
O/D OFF SWITCH ...................................... 7B-65
SHIFT SOLENOID VALVES AND
TRANSMISSION TEMPERATURE
SENSOR ..................................................... 7B-65
SHIFT SOLENOID VALVES ................... 7B-66
TRANSMISSION TEMPERATURE
SENSOR ................................................. 7B-66
DIFFERENTIAL SIDE OIL SEAL ................ 7B-68TRANSMISSION CONTROL MODULE
(TCM).......................................................... 7B-69
LEARNING CONTROL INITIALIZATION 7B-70
BRAKE INTERLOCK SYSTEM
(IF EQUIPPED)........................................... 7B-70
KEY INTERLOCK CABLE
(IF EQUIPPED)........................................... 7B-72
TRANSMISSION UNIT REPAIR
OVERHAUL ................................................... 7B-75
DISMOUNTING .......................................... 7B-76
REMOUNTING ........................................... 7B-77
UNIT DISASSEMBLY ................................. 7B-78
DISASSEMBLY/ASSEMBLY OF
SUBASSEMBLY ......................................... 7B-88
OIL PUMP ............................................... 7B-88
FRONT CLUTCH (C2 CLUTCH) ............ 7B-91
REAR CLUTCH (C1 CLUTCH) ............... 7B-95
DIRECT CLUTCH (C0 CLUTCH) ......... 7B-100
PLANETARY SET................................. 7B-104
VALVE BODY ....................................... 7B-106
DIFFERENTIAL ASSEMBLY ................ 7B-112
REAR COVER (O/D BRAKE PISTON
ASSEMBLY) ......................................... 7B-115
PLANETARY SUN GEAR NO.1
ASSEMBLY .......................................... 7B-115
TORQUE CONVERTER HOUSING ..... 7B-116
TRANSMISSION CASE ........................ 7B-117
UNIT ASSEMBLY ..................................... 7B-118
TIGHTENING TORQUE SPECIFICATION .. 7B-136
SPECIAL TOOL ........................................... 7B-137
REQUIRED SERVICE MATERIAL .............. 7B-139
Page 45 of 447
AUTOMATIC TRANSMISSION (4 A/T) 7B-3
GENERAL DESCRIPTION
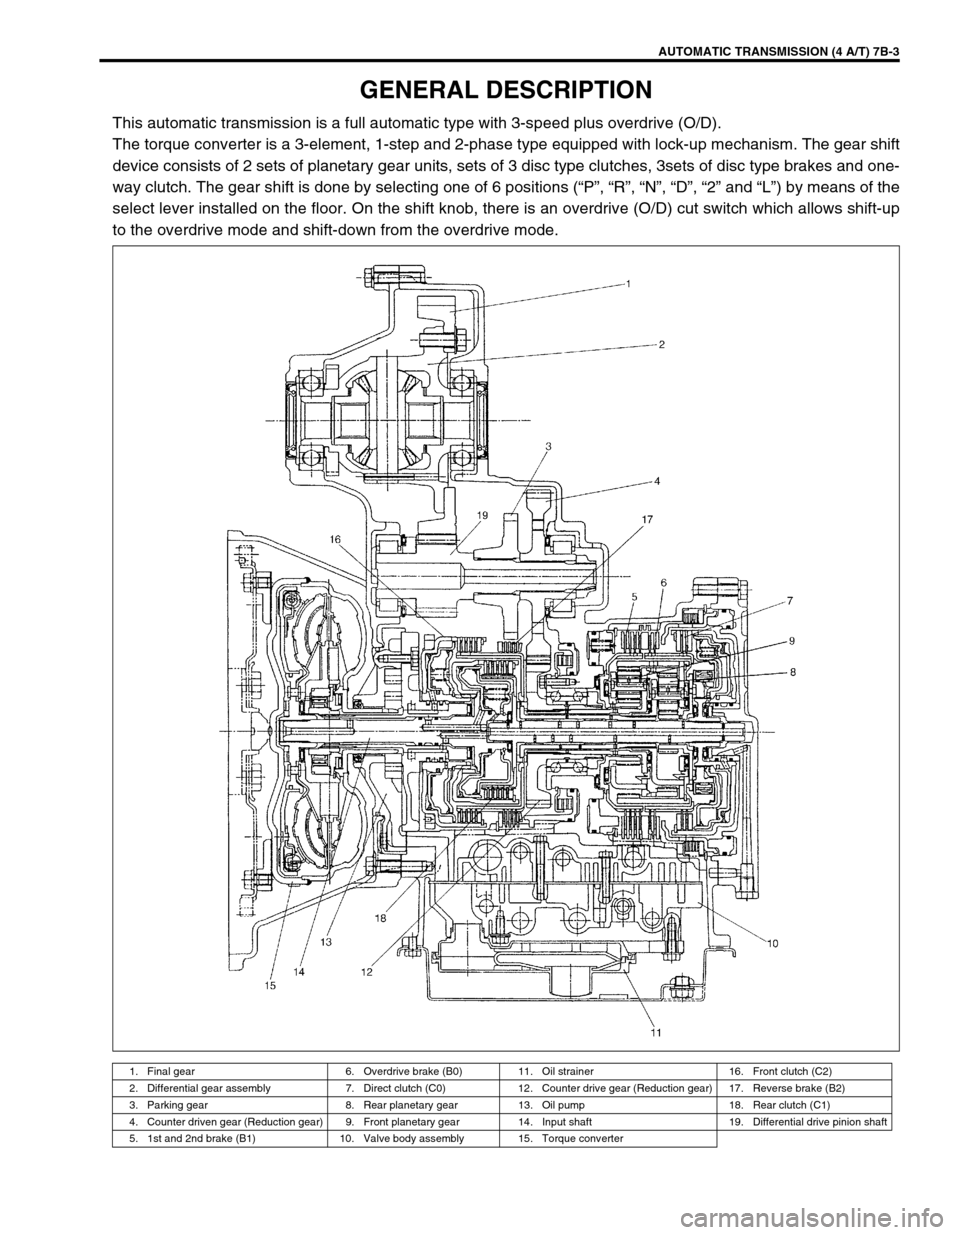
This automatic transmission is a full automatic type with 3-speed plus overdrive (O/D).
The torque converter is a 3-element, 1-step and 2-phase type equipped with lock-up mechanism. The gear shift
device consists of 2 sets of planetary gear units, sets of 3 disc type clutches, 3sets of disc type brakes and one-
way clutch. The gear shift is done by selecting one of 6 positions (“P”, “R”, “N”, “D”, “2” and “L”) by means of the
select lever installed on the floor. On the shift knob, there is an overdrive (O/D) cut switch which allows shift-up
to the overdrive mode and shift-down from the overdrive mode.
1. Final gear 6. Overdrive brake (B0) 11. Oil strainer 16. Front clutch (C2)
2. Differential gear assembly 7. Direct clutch (C0) 12. Counter drive gear (Reduction gear) 17. Reverse brake (B2)
3. Parking gear 8. Rear planetary gear 13. Oil pump 18. Rear clutch (C1)
4. Counter driven gear (Reduction gear) 9. Front planetary gear 14. Input shaft 19. Differential drive pinion shaft
5. 1st and 2nd brake (B1) 10. Valve body assembly 15. Torque converter
Page 46 of 447
7B-4 AUTOMATIC TRANSMISSION (4 A/T)
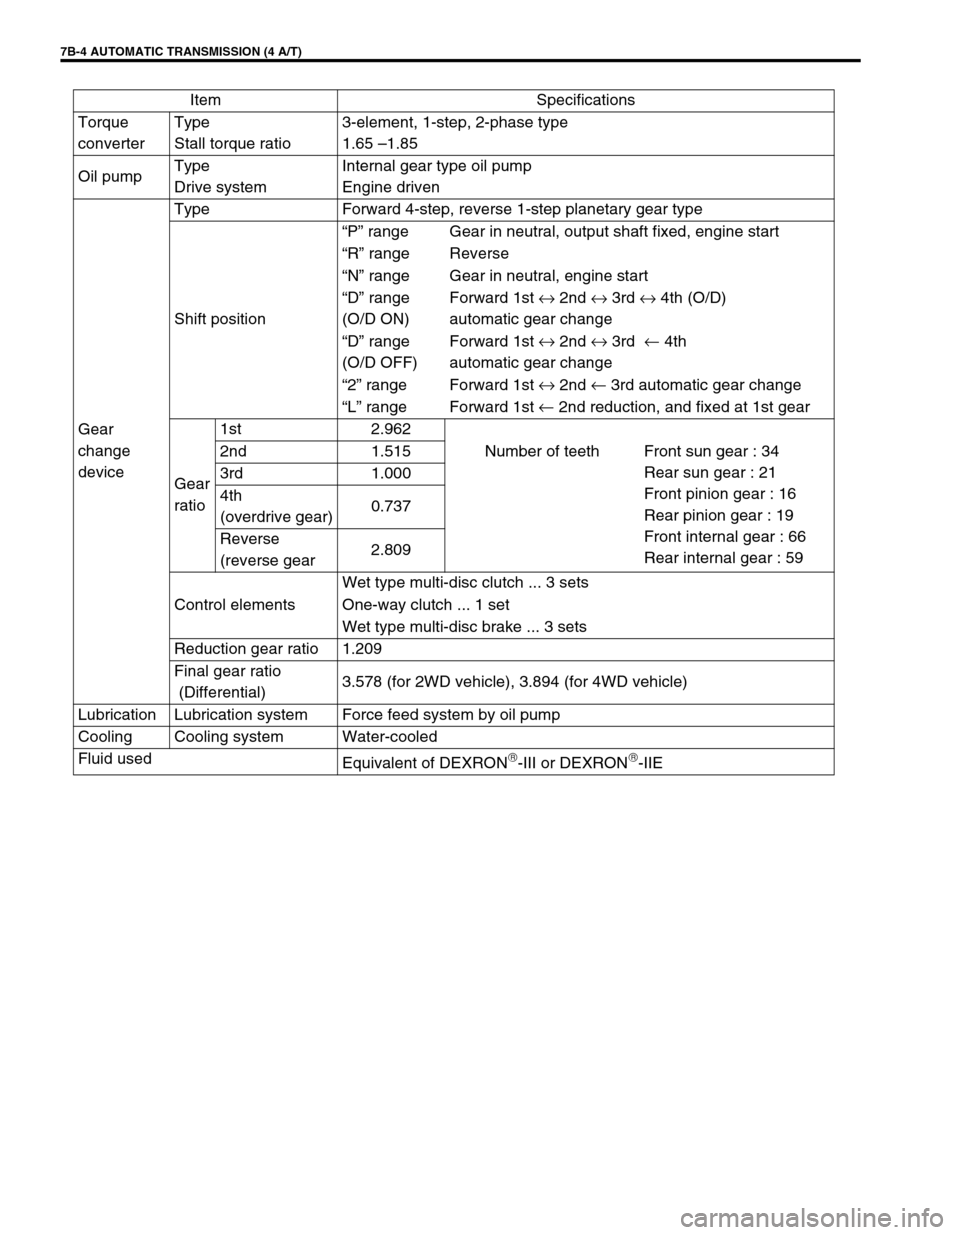
Item Specifications
Torque
converterType
Stall torque ratio3-element, 1-step, 2-phase type
1.65 –1.85
Oil pumpType
Drive systemInternal gear type oil pump
Engine driven
Gear
change
deviceType Forward 4-step, reverse 1-step planetary gear type
Shift position“P” range Gear in neutral, output shaft fixed, engine start
“R” range Reverse
“N” range Gear in neutral, engine start
“D” range
(O/D ON)Forward 1st ↔
2nd ↔
3rd ↔
4th (O/D)
automatic gear change
“D” range
(O/D OFF)Forward 1st ↔
2nd ↔
3rd ←
4th
automatic gear change
“2” range Forward 1st ↔
2nd ←
3rd automatic gear change
“L” range Forward 1st ←
2nd reduction, and fixed at 1st gear
Gear
ratio1st 2.962
2nd 1.515 Number of teeth Front sun gear : 34
Rear sun gear : 21
Front pinion gear : 16
Rear pinion gear : 19
Front internal gear : 66
Rear internal gear : 59 3rd 1.000
4th
(overdrive gear)0.737
Reverse
(reverse gear2.809
Control elementsWet type multi-disc clutch ... 3 sets
One-way clutch ... 1 set
Wet type multi-disc brake ... 3 sets
Reduction gear ratio 1.209
Final gear ratio
(Differential)3.578 (for 2WD vehicle), 3.894 (for 4WD vehicle)
Lubrication Lubrication system Force feed system by oil pump
Cooling Cooling system Water-cooled
Fluid used
Equivalent of DEXRON
-III or DEXRON-IIE