engine mount SUZUKI SX4 2006 1.G Service Workshop Manual
[x] Cancel search | Manufacturer: SUZUKI, Model Year: 2006, Model line: SX4, Model: SUZUKI SX4 2006 1.GPages: 1556, PDF Size: 37.31 MB
Page 808 of 1556
Downloaded from www.Manualslib.com manuals search engine 5A-160 Automatic Transmission/Transaxle:
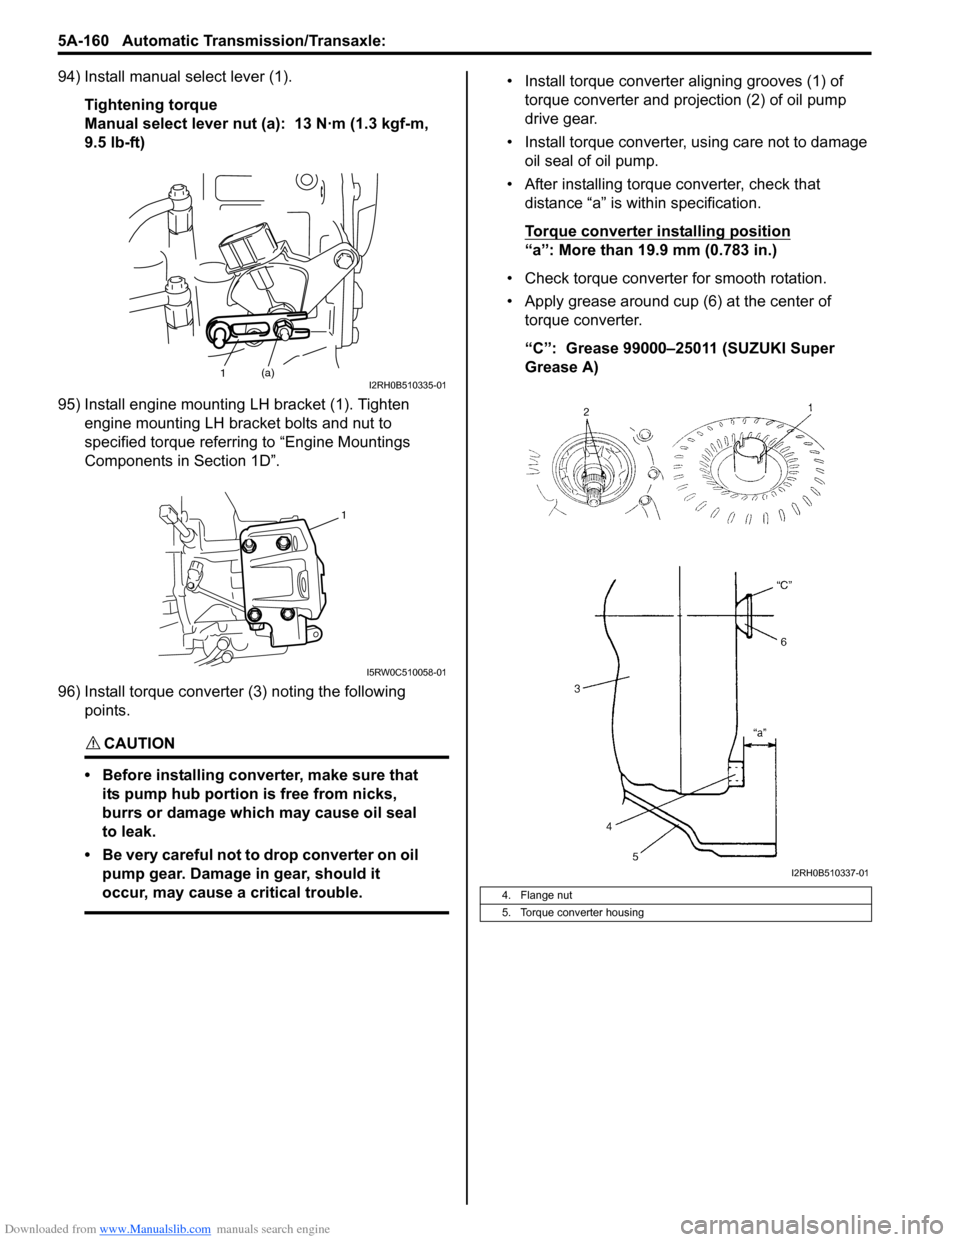
94) Install manual select lever (1).
Tightening torque
Manual select lever nut (a): 13 N·m (1.3 kgf-m,
9.5 lb-ft)
95) Install engine mounting LH bracket (1). Tighten
engine mounting LH bracket bolts and nut to
specified torque referring to “Engine Mountings
Components in Section 1D”.
96) Install torque converter (3) noting the following
points.
CAUTION!
• Before installing converter, make sure that
its pump hub portion is free from nicks,
burrs or damage which may cause oil seal
to leak.
• Be very careful not to drop converter on oil
pump gear. Damage in gear, should it
occur, may cause a critical trouble.
• Install torque converter aligning grooves (1) of
torque converter and projection (2) of oil pump
drive gear.
• Install torque converter, using care not to damage
oil seal of oil pump.
• After installing torque converter, check that
distance “a” is within specification.
Torque converter installing position
“a”: More than 19.9 mm (0.783 in.)
• Check torque converter for smooth rotation.
• Apply grease around cup (6) at the center of
torque converter.
“C”: Grease 99000–25011 (SUZUKI Super
Grease A)
1(a)I2RH0B510335-01
1
I5RW0C510058-01
4. Flange nut
5. Torque converter housing
I2RH0B510337-01
Page 813 of 1556
Downloaded from www.Manualslib.com manuals search engine Manual Transmission/Transaxle: 5B-1
Transmission / Transaxle
Manual Transmission/Transaxle
General Description
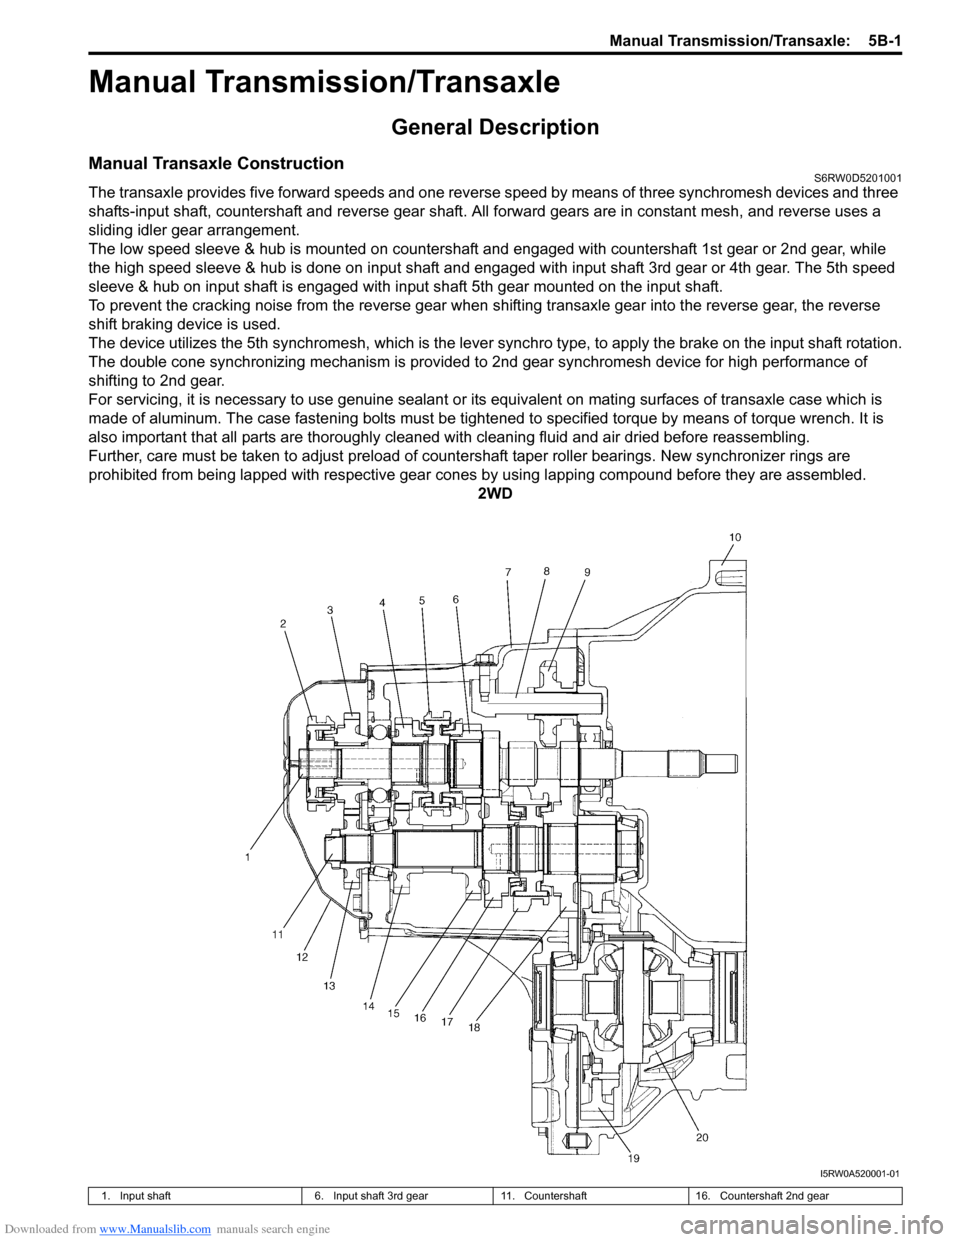
Manual Transaxle ConstructionS6RW0D5201001
The transaxle provides five forward speeds and one reverse speed by means of three synchromesh devices and three
shafts-input shaft, countershaft and reverse gear shaft. All forward gears are in constant mesh, and reverse uses a
sliding idler gear arrangement.
The low speed sleeve & hub is mounted on countershaft and engaged with countershaft 1st gear or 2nd gear, while
the high speed sleeve & hub is done on input shaft and engaged with input shaft 3rd gear or 4th gear. The 5th speed
sleeve & hub on input shaft is engaged with input shaft 5th gear mounted on the input shaft.
To prevent the cracking noise from the reverse gear when shifting transaxle gear into the reverse gear, the reverse
shift braking device is used.
The device utilizes the 5th synchromesh, which is the lever synchro type, to apply the brake on the input shaft rotation.
The double cone synchronizing mechanism is provided to 2nd gear synchromesh device for high performance of
shifting to 2nd gear.
For servicing, it is necessary to use genuine sealant or its equivalent on mating surfaces of transaxle case which is
made of aluminum. The case fastening bolts must be tightened to specified torque by means of torque wrench. It is
also important that all parts are thoroughly cleaned with cleaning fluid and air dried before reassembling.
Further, care must be taken to adjust preload of countershaft taper roller bearings. New synchronizer rings are
prohibited from being lapped with respective gear cones by using lapping compound before they are assembled.
2WD
I5RW0A520001-01
1. Input shaft 6. Input shaft 3rd gear 11. Countershaft 16. Countershaft 2nd gear
Page 820 of 1556
Downloaded from www.Manualslib.com manuals search engine 5B-8 Manual Transmission/Transaxle:
Gear Shift Control Lever and Cable ComponentsS6RW0D5206004
1
7
3
4
(a) 6
A
8(b)
2
(c)
5
9
A
I5RW0A520008-02
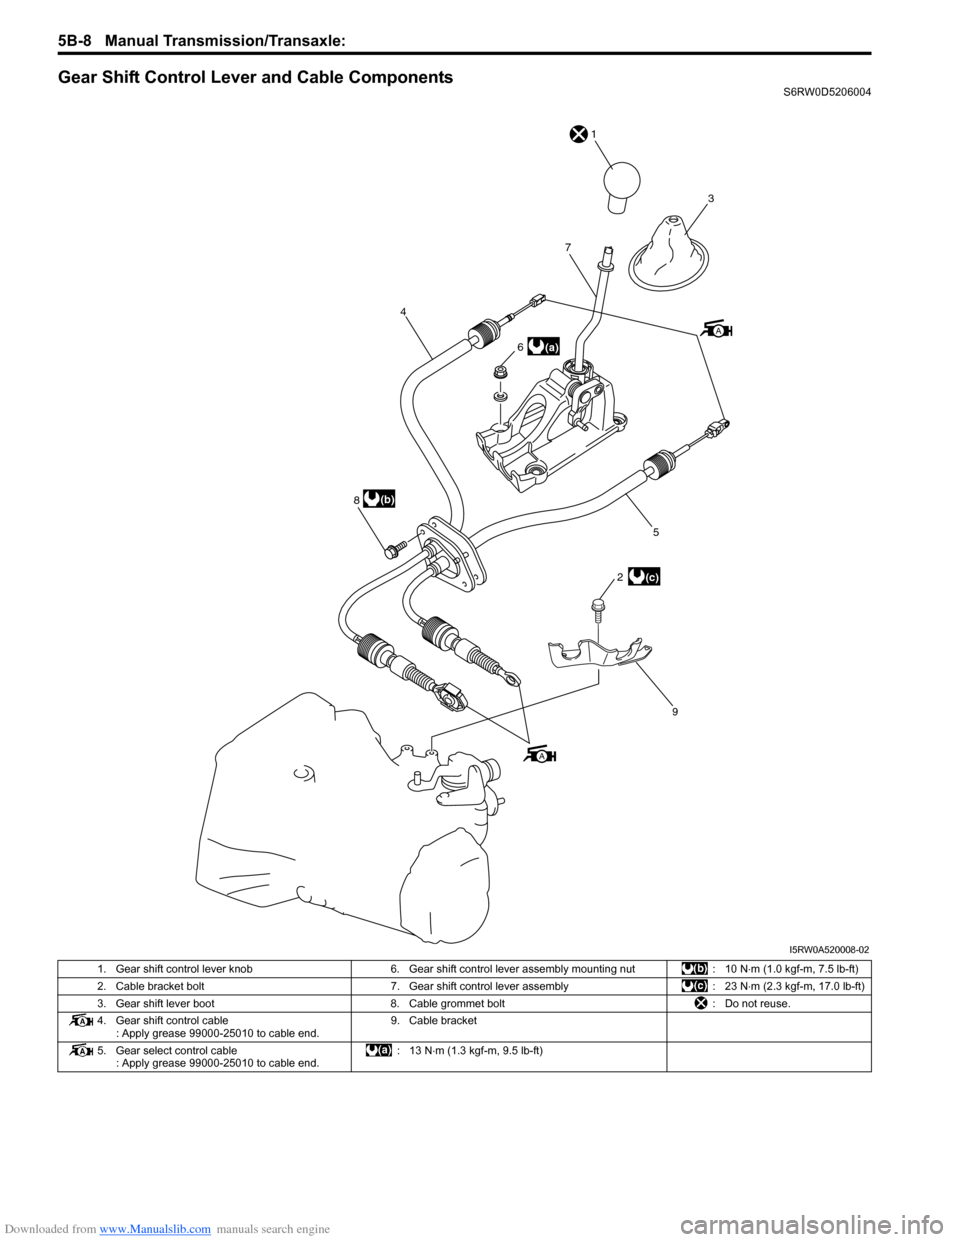
1. Gear shift control lever knob 6. Gear shift control lever assembly mounting nut : 10 N⋅m (1.0 kgf-m, 7.5 lb-ft)
2. Cable bracket bolt 7. Gear shift control lever assembly : 23 N⋅m (2.3 kgf-m, 17.0 lb-ft)
3. Gear shift lever boot 8. Cable grommet bolt : Do not reuse.
4. Gear shift control cable
: Apply grease 99000-25010 to cable end.9. Cable bracket
5. Gear select control cable
: Apply grease 99000-25010 to cable end.:13 N⋅m (1.3 kgf-m, 9.5 lb-ft)
Page 821 of 1556
Downloaded from www.Manualslib.com manuals search engine Manual Transmission/Transaxle: 5B-9
Gear Shift Control Lever and Cable Removal
and Installation
S6RW0D5206005
Removal
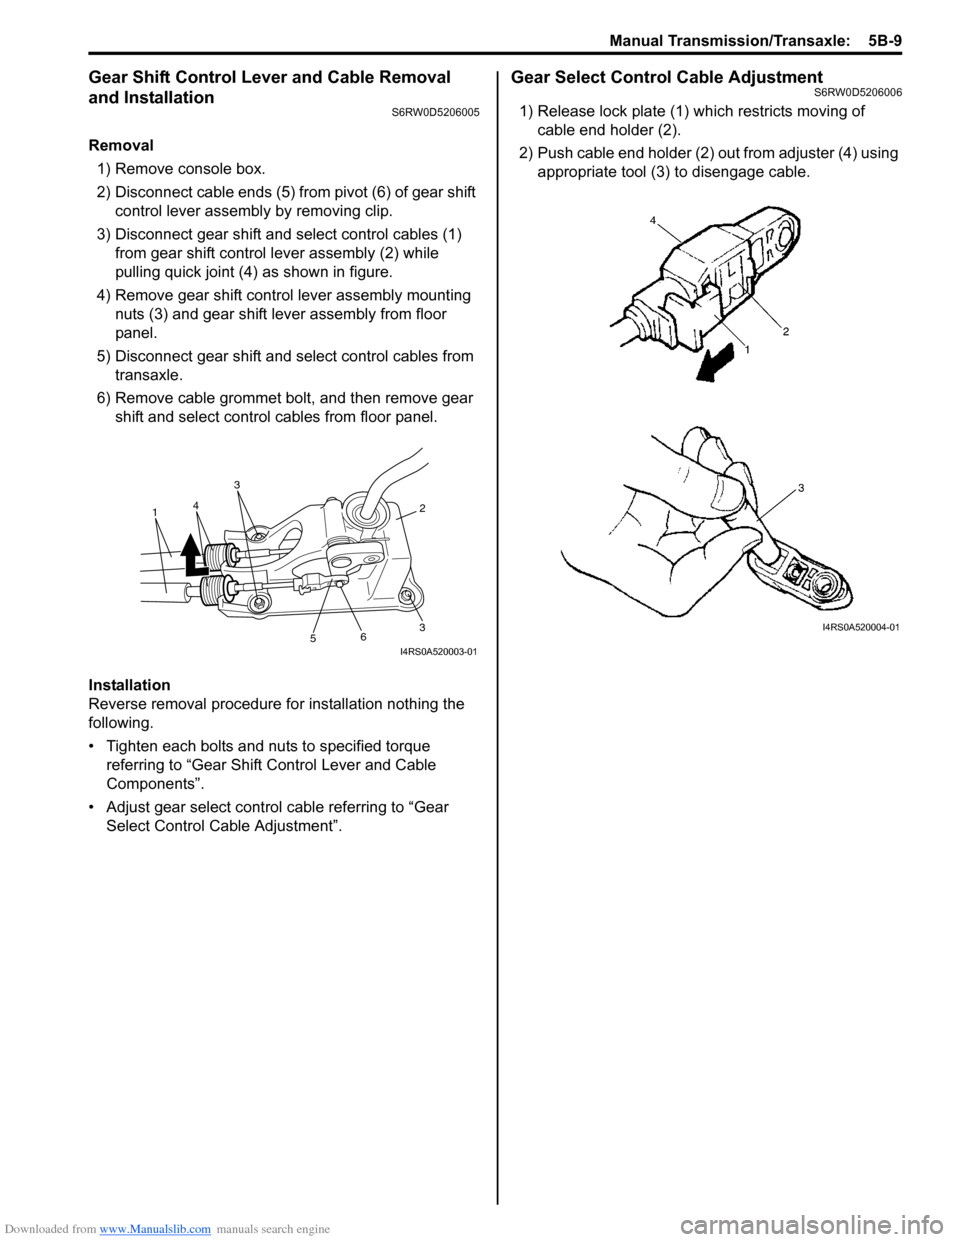
1) Remove console box.
2) Disconnect cable ends (5) from pivot (6) of gear shift
control lever assembly by removing clip.
3) Disconnect gear shift and select control cables (1)
from gear shift control lever assembly (2) while
pulling quick joint (4) as shown in figure.
4) Remove gear shift control lever assembly mounting
nuts (3) and gear shift lever assembly from floor
panel.
5) Disconnect gear shift and select control cables from
transaxle.
6) Remove cable grommet bolt, and then remove gear
shift and select control cables from floor panel.
Installation
Reverse removal procedure for installation nothing the
following.
• Tighten each bolts and nuts to specified torque
referring to “Gear Shift Control Lever and Cable
Components”.
• Adjust gear select control cable referring to “Gear
Select Control Cable Adjustment”.
Gear Select Control Cable AdjustmentS6RW0D5206006
1) Release lock plate (1) which restricts moving of
cable end holder (2).
2) Push cable end holder (2) out from adjuster (4) using
appropriate tool (3) to disengage cable.
36
5
2
3
41
I4RS0A520003-01
I4RS0A520004-01
Page 824 of 1556
Downloaded from www.Manualslib.com manuals search engine 5B-12 Manual Transmission/Transaxle:
Manual Transaxle Unit Dismounting and
Remounting
S6RW0D5206010
Dismounting
1) Drain coolant.
2) Remove battery and tray with ECM.
3) Remove air cleaner case and resonator.
4) Remove clutch fluid pipe referring to “Clutch Fluid
Pipe Removal and Installation in Section 5C”.
5) Disconnect back up light switch coupler and undo
wiring harness clamps.
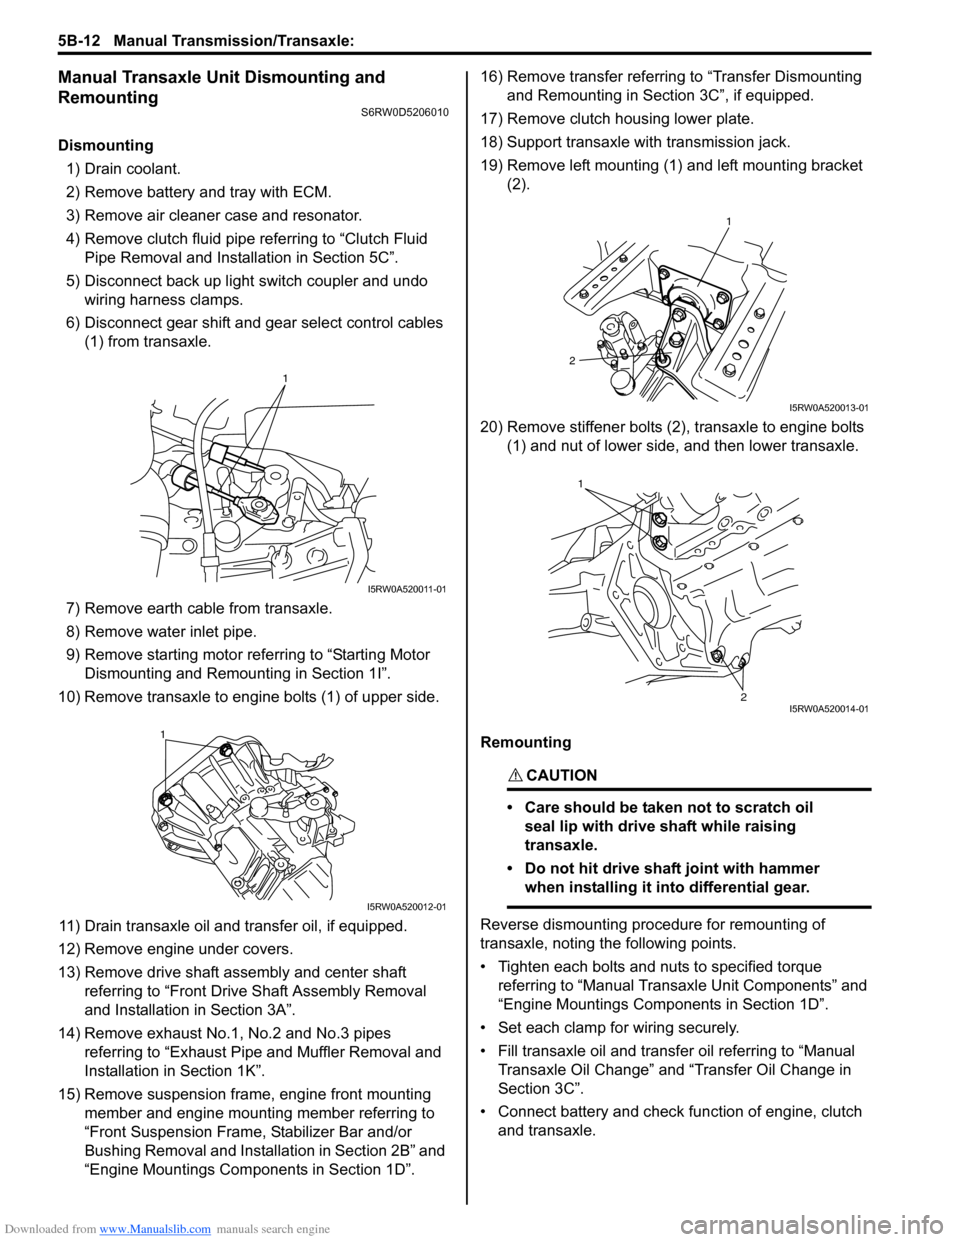
6) Disconnect gear shift and gear select control cables
(1) from transaxle.
7) Remove earth cable from transaxle.
8) Remove water inlet pipe.
9) Remove starting motor referring to “Starting Motor
Dismounting and Remounting in Section 1I”.
10) Remove transaxle to engine bolts (1) of upper side.
11) Drain transaxle oil and transfer oil, if equipped.
12) Remove engine under covers.
13) Remove drive shaft assembly and center shaft
referring to “Front Drive Shaft Assembly Removal
and Installation in Section 3A”.
14) Remove exhaust No.1, No.2 and No.3 pipes
referring to “Exhaust Pipe and Muffler Removal and
Installation in Section 1K”.
15) Remove suspension frame, engine front mounting
member and engine mounting member referring to
“Front Suspension Frame, Stabilizer Bar and/or
Bushing Removal and Installation in Section 2B” and
“Engine Mountings Components in Section 1D”.16) Remove transfer referring to “Transfer Dismounting
and Remounting in Section 3C”, if equipped.
17) Remove clutch housing lower plate.
18) Support transaxle with transmission jack.
19) Remove left mounting (1) and left mounting bracket
(2).
20) Remove stiffener bolts (2), transaxle to engine bolts
(1) and nut of lower side, and then lower transaxle.
Remounting
CAUTION!
• Care should be taken not to scratch oil
seal lip with drive shaft while raising
transaxle.
• Do not hit drive shaft joint with hammer
when installing it into differential gear.
Reverse dismounting procedure for remounting of
transaxle, noting the following points.
• Tighten each bolts and nuts to specified torque
referring to “Manual Transaxle Unit Components” and
“Engine Mountings Components in Section 1D”.
• Set each clamp for wiring securely.
• Fill transaxle oil and transfer oil referring to “Manual
Transaxle Oil Change” and “Transfer Oil Change in
Section 3C”.
• Connect battery and check function of engine, clutch
and transaxle.
1
I5RW0A520011-01
1
I5RW0A520012-01
1
2
I5RW0A520013-01
1
2I5RW0A520014-01
Page 826 of 1556

Downloaded from www.Manualslib.com manuals search engine 5B-14 Manual Transmission/Transaxle:
Gear Shift and Select Shaft Assembly Removal
and Installation
S6RW0D5206012
Removal
1) Remove battery and tray with ECM.
2) Disconnect gear shift and gear select control cables
from transaxle.
3) Remove gear shift interlock bolt (1) and 5th to
reverse interlock guide bolt (2) from transaxle case.
4) Remove gear shift & select shaft assembly (3).
Installation
1) Clean mating surface of guide case (1) and left case
(5), apply sealant to left case as shown in figure by
such amount that its section is 1.5 mm (0.059 in.) in
diameter, mate guide case with left case.
“B”: Sealant 99000–31260 (SUZUKI Bond
No.1217G)
2) Install guide case bolts No.1 to which sealant has
been applied and guide case bolts No.2 (2), and
tighten them to specified torque.
: Sealant 99000–31260 (SUZUKI Bond No.1217G)
Tightening torque
Guide case bolt No.1: 23 N·m (2.3 kgf-m, 17.0 lb-
ft)
Guide case bolt No.2 (a): 23 N·m (2.3 kgf-m, 17.0
lb-ft)3) Install washer and gear shift interlock bolt (3) to
which sealant has been applied and then tighten it to
specified torque.
“A”: Sealant 99000–31260 (SUZUKI Bond
No.1217G)
Tightening torque
Gear shift interlock bolt (b): 23 N·m (2.3 kgf-m,
17.0 lb-ft)
4) Install washer and 5th to reverse interlock guide bolt
(4) to which sealant has been applied and then
tighten it to specified torque.
“A”: Sealant 99000–31260 (SUZUKI Bond
No.1217G)
Tightening torque
5th to reverse interlock guide bolt (c): 23 N·m (
2.3 kgf-m, 17.0 lb-ft)
5) Connect gear shift and gear select control cables to
transaxle.
6) Install battery and tray with ECM.
7) Check input shaft for rotation in each gear position.
4. Transaxle side cover
3
1
2
4
I5RW0A520016-01
I5RW0A520017-02
Page 831 of 1556
Downloaded from www.Manualslib.com manuals search engine Manual Transmission/Transaxle: 5B-19
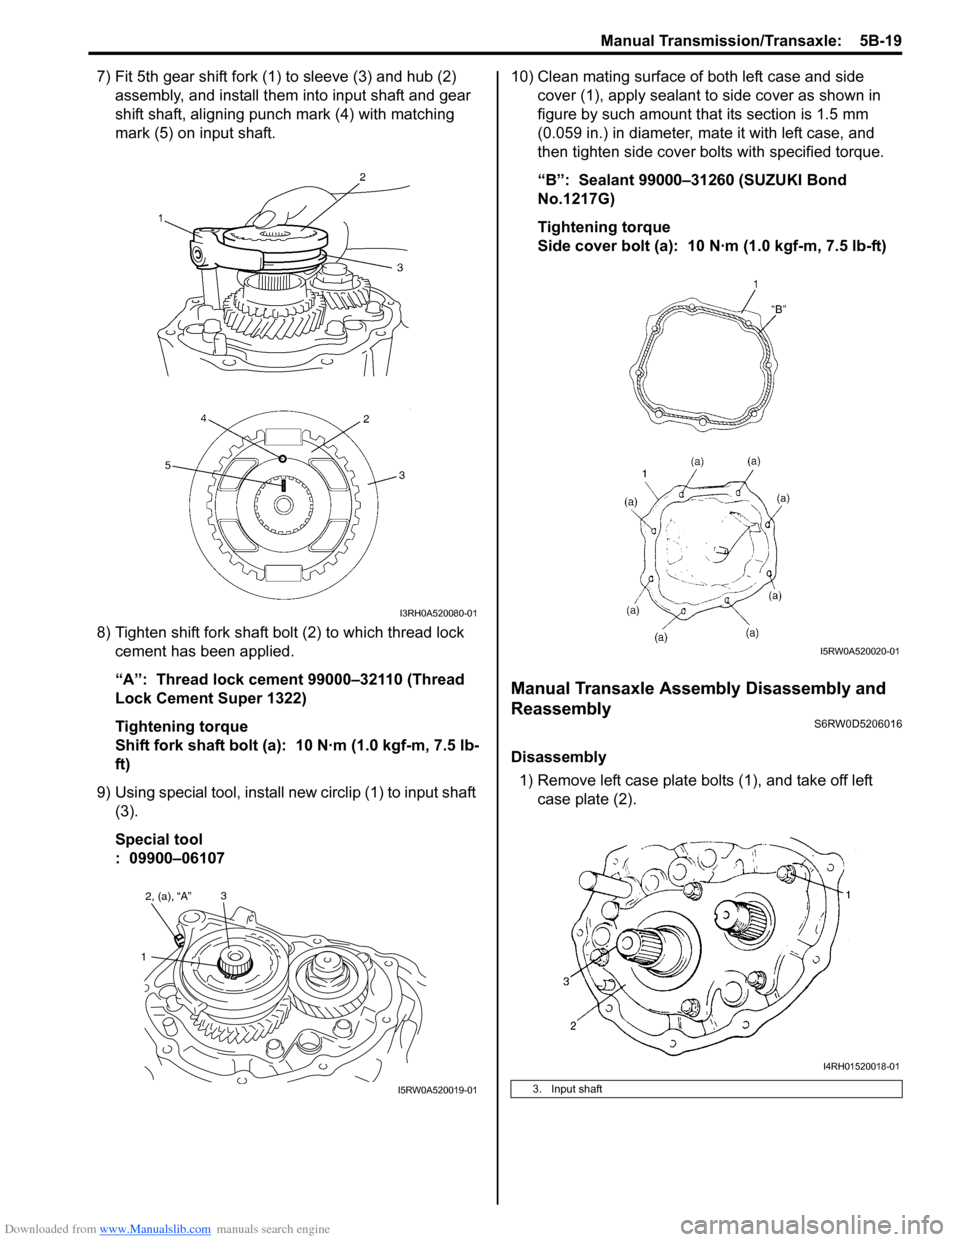
7) Fit 5th gear shift fork (1) to sleeve (3) and hub (2)
assembly, and install them into input shaft and gear
shift shaft, aligning punch mark (4) with matching
mark (5) on input shaft.
8) Tighten shift fork shaft bolt (2) to which thread lock
cement has been applied.
“A”: Thread lock cement 99000–32110 (Thread
Lock Cement Super 1322)
Tightening torque
Shift fork shaft bolt (a): 10 N·m (1.0 kgf-m, 7.5 lb-
ft)
9) Using special tool, install new circlip (1) to input shaft
(3).
Special tool
: 09900–0610710) Clean mating surface of both left case and side
cover (1), apply sealant to side cover as shown in
figure by such amount that its section is 1.5 mm
(0.059 in.) in diameter, mate it with left case, and
then tighten side cover bolts with specified torque.
“B”: Sealant 99000–31260 (SUZUKI Bond
No.1217G)
Tightening torque
Side cover bolt (a): 10 N·m (1.0 kgf-m, 7.5 lb-ft)
Manual Transaxle Assembly Disassembly and
Reassembly
S6RW0D5206016
Disassembly
1) Remove left case plate bolts (1), and take off left
case plate (2).
I3RH0A520080-01
2, (a), “A”
13
I5RW0A520019-013. Input shaft
I5RW0A520020-01
I4RH01520018-01
Page 834 of 1556

Downloaded from www.Manualslib.com manuals search engine 5B-22 Manual Transmission/Transaxle:
6) Clean mating surfaces of both right and left cases,
apply sealant to left case (2) as shown in the figure
by such amount that its section is 1.5 mm (0.059 in.)
in diameter then mate it with right case (1).
“A”: Sealant 99000–31260 (SUZUKI Bond
No.1217G)
7) Tighten case bolts (3) from outside and tighten
another case bolts from clutch housing side to
specified torque.
Tightening torque
Transaxle case bolt (a): 23 N·m (2.3 kgf-m, 17.0
lb-ft)
8) Install reverse shaft bolt (4) to which thread lock
cement has been applied, with aluminum washer
and tighten it to specified torque.
“B”: Sealant 99000–31260 (SUZUKI Bond
No.1217G)
Tightening torque
Reverse shaft bolt (b): 23 N·m (2.3 kgf-m, 17.0
lb-ft)9) Check locating springs (2, 4 and 5) for deterioration
and replace with new ones as necessary.
Locating spring
10) Install steel balls (3) and locating springs (2, 4 and 5)
for respective gear shift shaft and tighten bolts (1) to
which thread lock cement has been applied.
“A”: Thread lock cement 99000–32110 (Thread
Lock Cement Super 1322)
Tightening torque
Gear shift locating bolt (a): 13 N·m (1.3 kgf-m,
9.5 lb-ft)
11) Install new snap ring (1) using special tool.
Special tool
(A): 09900–06107
I5RW0A520023-01
Locating spring free length Standard Service limit
Low speed (2)53.1 mm
(2.091 in.)47.8 mm
(1.881 in.)
High speed (4)45.9 mm
(1.807 in.)41.4 mm
(1.629 in.)
5th & reverse (5)29.9 mm
(1.777 in.)27.0 mm
(1.062 in.)
2. Input shaft
3. Input shaft left bearing
1, (a), “A”
2
3
4
5
I5RW0A520024-02
1 (A)
2
3
I3RH0A520016-01
Page 855 of 1556
Downloaded from www.Manualslib.com manuals search engine Clutch: 5C-2
Diagnostic Information and Procedures
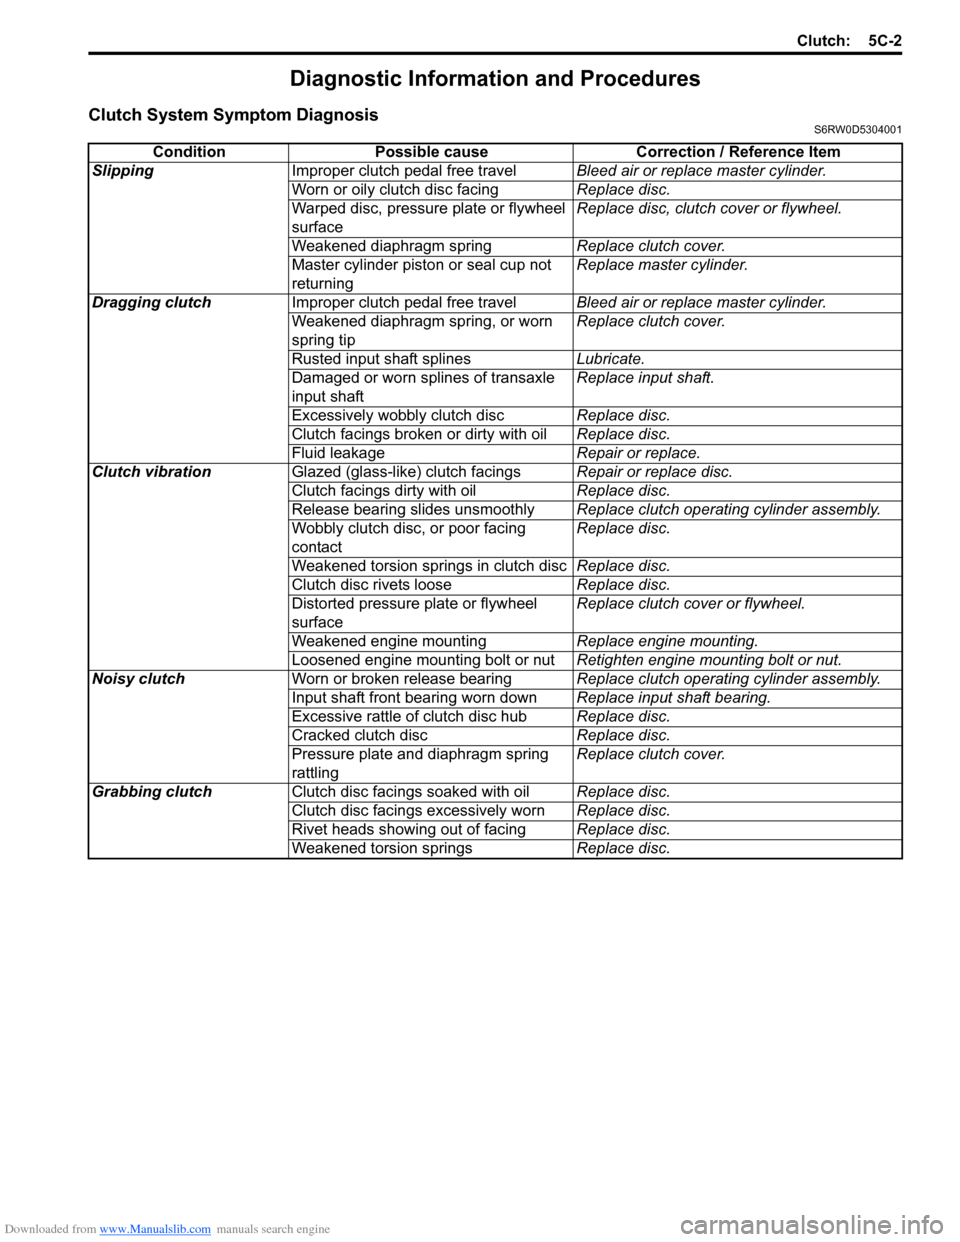
Clutch System Symptom DiagnosisS6RW0D5304001
Condition Possible cause Correction / Reference Item
SlippingImproper clutch pedal free travelBleed air or replace master cylinder.
Worn or oily clutch disc facingReplace disc.
Warped disc, pressure plate or flywheel
surfaceReplace disc, clutch cover or flywheel.
Weakened diaphragm springReplace clutch cover.
Master cylinder piston or seal cup not
returningReplace master cylinder.
Dragging clutchImproper clutch pedal free travelBleed air or replace master cylinder.
Weakened diaphragm spring, or worn
spring tipReplace clutch cover.
Rusted input shaft splinesLubricate.
Damaged or worn splines of transaxle
input shaftReplace input shaft.
Excessively wobbly clutch discReplace disc.
Clutch facings broken or dirty with oilReplace disc.
Fluid leakageRepair or replace.
Clutch vibrationGlazed (glass-like) clutch facingsRepair or replace disc.
Clutch facings dirty with oilReplace disc.
Release bearing slides unsmoothlyReplace clutch operating cylinder assembly.
Wobbly clutch disc, or poor facing
contactReplace disc.
Weakened torsion springs in clutch discReplace disc.
Clutch disc rivets looseReplace disc.
Distorted pressure plate or flywheel
surfaceReplace clutch cover or flywheel.
Weakened engine mountingReplace engine mounting.
Loosened engine mounting bolt or nutRetighten engine mounting bolt or nut.
Noisy clutchWorn or broken release bearingReplace clutch operating cylinder assembly.
Input shaft front bearing worn downReplace input shaft bearing.
Excessive rattle of clutch disc hubReplace disc.
Cracked clutch discReplace disc.
Pressure plate and diaphragm spring
rattlingReplace clutch cover.
Grabbing clutchClutch disc facings soaked with oilReplace disc.
Clutch disc facings excessively wornReplace disc.
Rivet heads showing out of facingReplace disc.
Weakened torsion springsReplace disc.
Page 858 of 1556
Downloaded from www.Manualslib.com manuals search engine 5C-5 Clutch:
Clutch Master Cylinder Removal and
Installation
S6RW0D5306007
Removal
1) Clean around brake master cylinder reservoir cap
and take out fluid with syringe or such from brake
master cylinder reservoir.
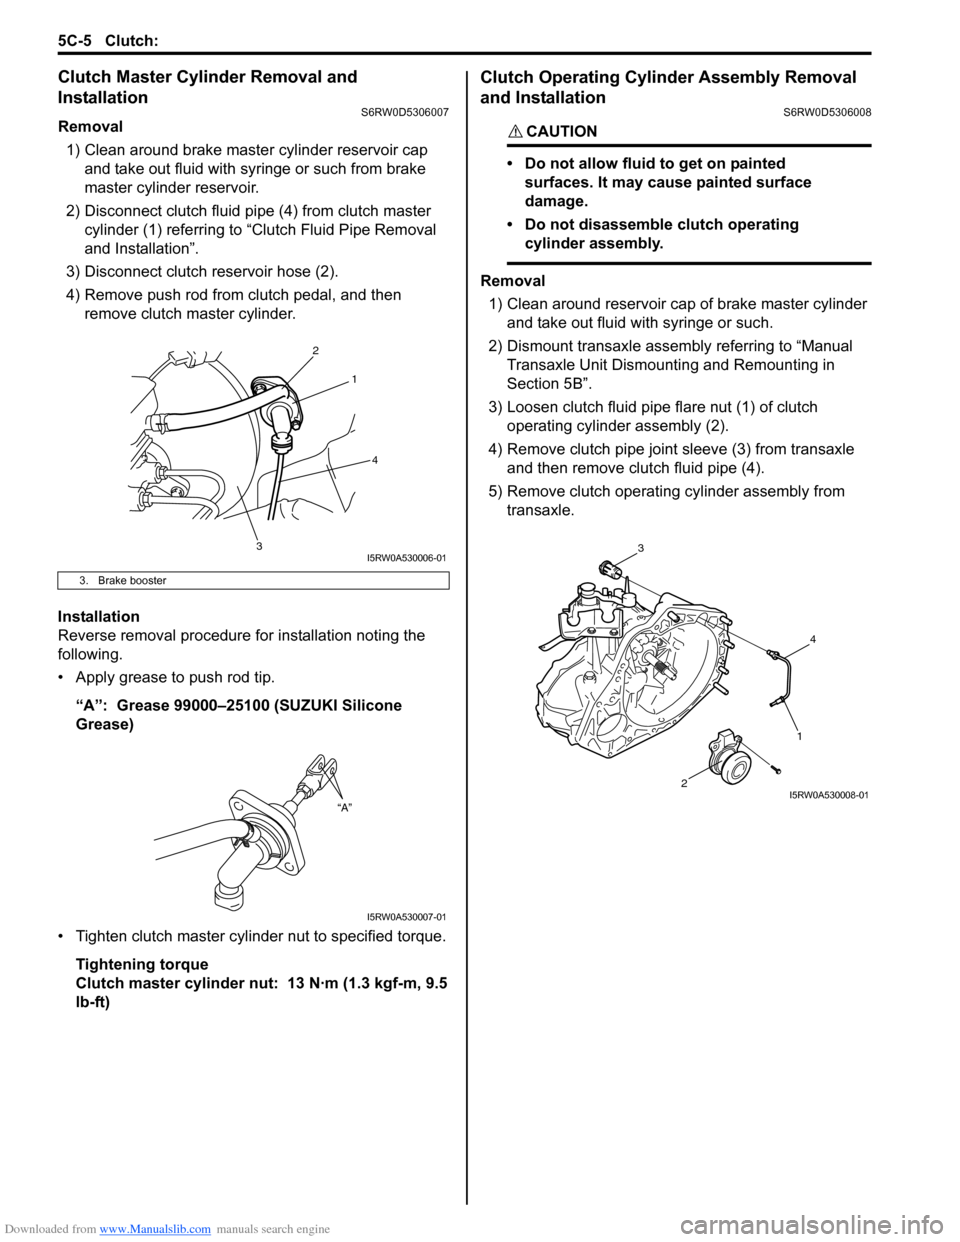
2) Disconnect clutch fluid pipe (4) from clutch master
cylinder (1) referring to “Clutch Fluid Pipe Removal
and Installation”.
3) Disconnect clutch reservoir hose (2).
4) Remove push rod from clutch pedal, and then
remove clutch master cylinder.
Installation
Reverse removal procedure for installation noting the
following.
• Apply grease to push rod tip.
“A”: Grease 99000–25100 (SUZUKI Silicone
Grease)
• Tighten clutch master cylinder nut to specified torque.
Tightening torque
Clutch master cylinder nut: 13 N·m (1.3 kgf-m, 9.5
lb-ft)
Clutch Operating Cylinder Assembly Removal
and Installation
S6RW0D5306008
CAUTION!
• Do not allow fluid to get on painted
surfaces. It may cause painted surface
damage.
• Do not disassemble clutch operating
cylinder assembly.
Removal
1) Clean around reservoir cap of brake master cylinder
and take out fluid with syringe or such.
2) Dismount transaxle assembly referring to “Manual
Transaxle Unit Dismounting and Remounting in
Section 5B”.
3) Loosen clutch fluid pipe flare nut (1) of clutch
operating cylinder assembly (2).
4) Remove clutch pipe joint sleeve (3) from transaxle
and then remove clutch fluid pipe (4).
5) Remove clutch operating cylinder assembly from
transaxle.
3. Brake booster
1
3
2
4
I5RW0A530006-01
“A”
I5RW0A530007-01
3
4
2
1
I5RW0A530008-01