300 SUZUKI SX4 2006 1.G Service Service Manual
[x] Cancel search | Manufacturer: SUZUKI, Model Year: 2006, Model line: SX4, Model: SUZUKI SX4 2006 1.GPages: 1556, PDF Size: 37.31 MB
Page 471 of 1556
Downloaded from www.Manualslib.com manuals search engine Wheels and Tires: 2D-2
Replacement Tires
When replacement is necessary, the original equipment
type tire should be used. Refer to the Tire Placard.
Replacement tires should be of the same size, load
range and construction as those originally on the vehicle.
Use of any other size or type tire may affect ride,
handling, speedometer / odometer calibration, vehicle
ground clearance and tire or snow chain clearance to the
body and chassis.
It is recommended that new tires be installed in pairs on
the same axle. If necessary to replace only one tire, it
should be paired with the tire having the most tread, to
equalize braking traction.
WARNING!
Do not mix different types of tires on the
same vehicle such as radial, bias and bias-
belted tires except in emergencies, because
handling may be seriously affected and may
result in loss of control.
The metric term for tire inflation pressure is the kilo
pascal (kPa). Tire pressures is usually printed in both
kPa and kgf/cm
2 on the “Tire Placard”.
Metric tire gauges are available from tool suppliers.
The chart, shown in the table, converts commonly used
inflation pressures from kPa to kgf/cm
2 and psi.
Wheels DescriptionS6RW0D2401002
Wheel Maintenance
Wheel repairs that use welding, heating, or peening are
not approved. All damaged wheels should be replaced.
Replacement Wheels
Wheels must be replaced if they are bent, dented, have
excessive lateral or radial runout, air leak through welds,
have elongated bolt holes, if lug wheel bolts won’t stay
tight, or if they are heavily rusted. Wheels with greater
runout than shown in the following may cause
objectional vibrations.
Replacement wheels must be equivalent to the original
equipment wheels in load capacity, diameter, rim with
offset and mounting configuration. A wheel of improper
size or type may affect wheel and bearing life, brake
cooling, speedometer / odometer calibration, vehicle
ground clearance and tire clearance to body and
chassis.How to Measure Wheel Runout
To measure the wheel runout, it is necessary to use an
accurate dial indicator. The tire may be on or off the
wheel. The wheel should be installed to the wheel
balancer of the like for proper measurement.
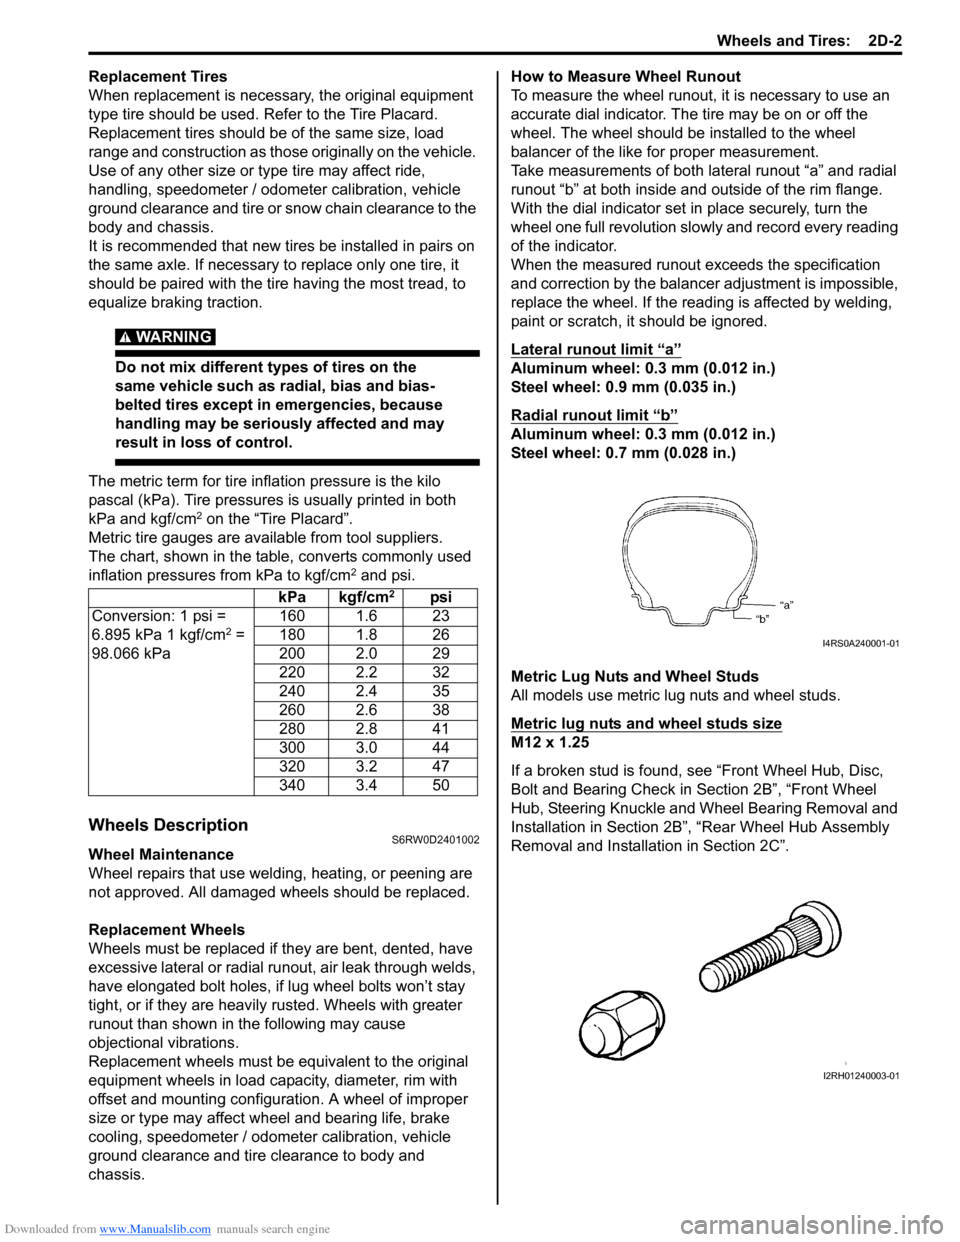
Take measurements of both lateral runout “a” and radial
runout “b” at both inside and outside of the rim flange.
With the dial indicator set in place securely, turn the
wheel one full revolution slowly and record every reading
of the indicator.
When the measured runout exceeds the specification
and correction by the balancer adjustment is impossible,
replace the wheel. If the reading is affected by welding,
paint or scratch, it should be ignored.
Lateral runout limit “a”
Aluminum wheel: 0.3 mm (0.012 in.)
Steel wheel: 0.9 mm (0.035 in.)
Radial runout limit “b”
Aluminum wheel: 0.3 mm (0.012 in.)
Steel wheel: 0.7 mm (0.028 in.)
Metric Lug Nuts and Wheel Studs
All models use metric lug nuts and wheel studs.
Metric lug nuts and wheel studs size
M12 x 1.25
If a broken stud is found, see “Front Wheel Hub, Disc,
Bolt and Bearing Check in Section 2B”, “Front Wheel
Hub, Steering Knuckle and Wheel Bearing Removal and
Installation in Section 2B”, “Rear Wheel Hub Assembly
Removal and Installation in Section 2C”. kPa kgf/cm
2psi
Conversion: 1 psi =
6.895 kPa 1 kgf/cm
2 =
98.066 kPa160 1.6 23
180 1.8 26
200 2.0 29
220 2.2 32
240 2.4 35
260 2.6 38
280 2.8 41
300 3.0 44
320 3.2 47
340 3.4 50I4RS0A240001-01
I2RH01240003-01
Page 479 of 1556
Downloaded from www.Manualslib.com manuals search engine Precautions: 3-1
Driveline / Axle
Precautions
Precautions
Precautions on Driveline / AxleS6RW0D3000001
Precaution for Rear Differential Oil Leakage
Refer to “Precaution for Rear Differential Oil Leakage in Section 3B”.
Precaution in Diagnosing Trouble
Refer to “Precautions in Diagnosing Trouble in Section 3B”.
Precaution on CAN Troubleshooting
Refer to “Precaution on CAN Troubleshooting in Section 1A”.
Page 480 of 1556
Downloaded from www.Manualslib.com manuals search engine 3A-1 Drive Shaft / Axle: Front
Driveline / Axle
Drive Shaft / Axle
Front
General Description
Front Drive Shaft ConstructionS6RW0D3111001
A constant velocity ball joint is used on the wheel side of both right and left side drive shaft assemblies. For A/T
vehicle, a tripod type constant velocity joint is used on the differential side and center shaft side. For M/T vehicle, a
double offset type constant velocity joint (DOJ) is used on the differential side and center shaft side. The drive shaft
can slide through the tripod joint or the double offset joint (DOJ) in the extension/contraction direction.
Component Location
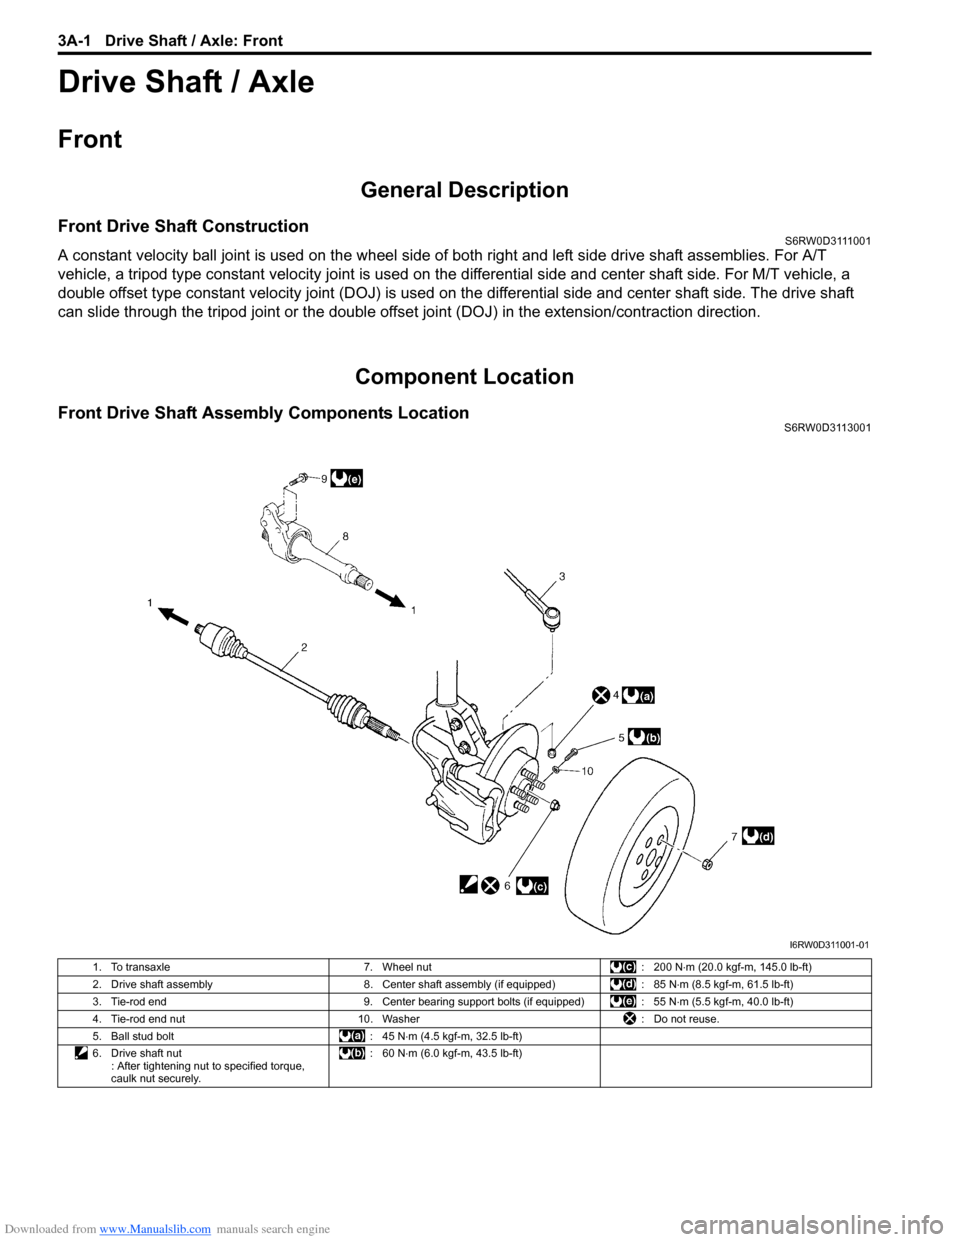
Front Drive Shaft Assembly Components LocationS6RW0D3113001
I6RW0D311001-01
1. To transaxle 7. Wheel nut : 200 N⋅m (20.0 kgf-m, 145.0 lb-ft)
2. Drive shaft assembly 8. Center shaft assembly (if equipped) : 85 N⋅m (8.5 kgf-m, 61.5 lb-ft)
3. Tie-rod end 9. Center bearing support bolts (if equipped) : 55 N⋅m (5.5 kgf-m, 40.0 lb-ft)
4. Tie-rod end nut 10. Washer : Do not reuse.
5. Ball stud bolt : 45 N⋅m (4.5 kgf-m, 32.5 lb-ft)
6. Drive shaft nut
: After tightening nut to specified torque,
caulk nut securely.:60 N⋅m (6.0 kgf-m, 43.5 lb-ft)
Page 495 of 1556
Downloaded from www.Manualslib.com manuals search engine Drive Shaft / Axle: Rear 3A-16
Rear Drive Shaft Assembly Removal and
Installation
S6RW0D3126002
Removal
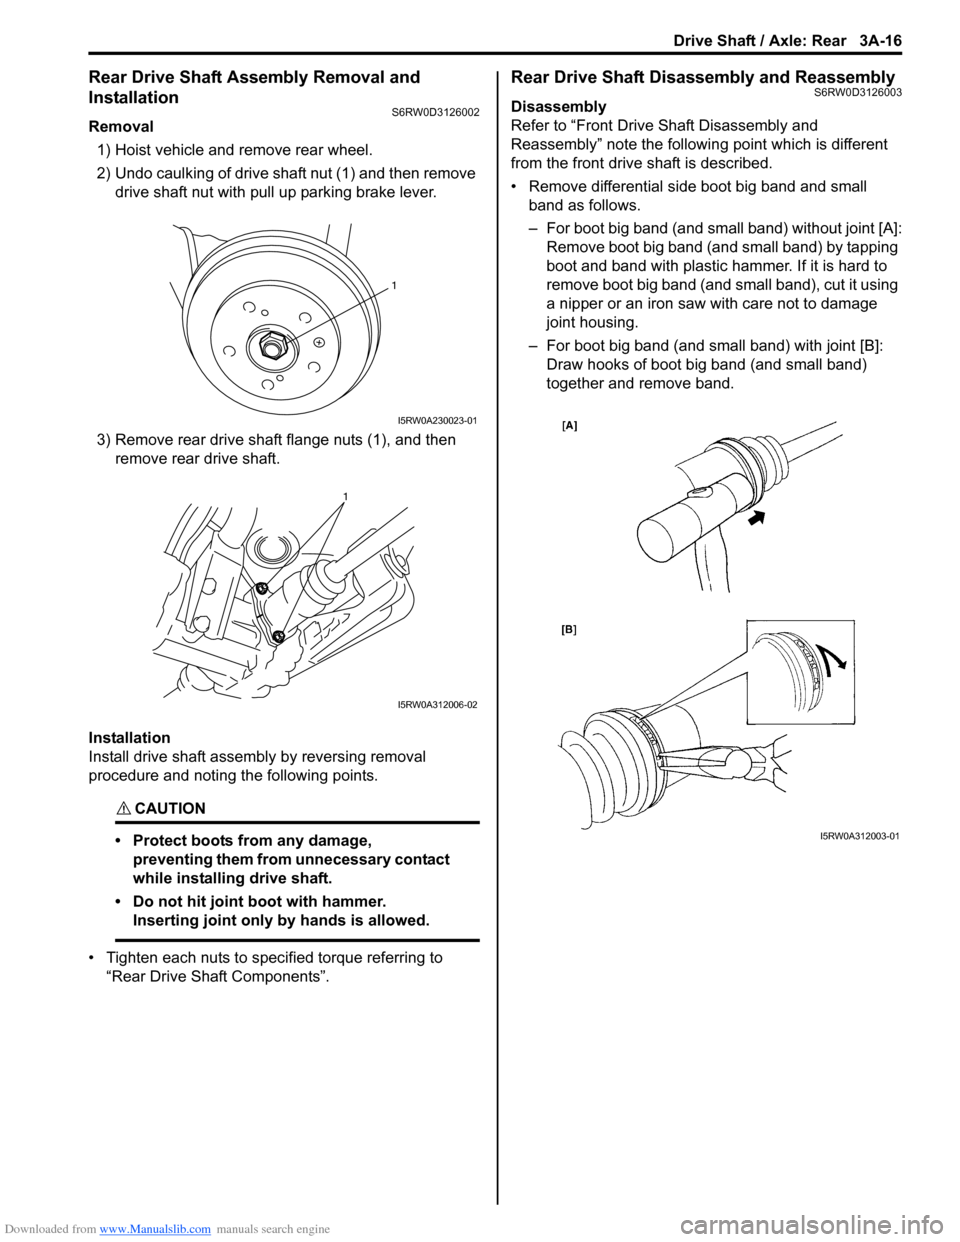
1) Hoist vehicle and remove rear wheel.
2) Undo caulking of drive shaft nut (1) and then remove
drive shaft nut with pull up parking brake lever.
3) Remove rear drive shaft flange nuts (1), and then
remove rear drive shaft.
Installation
Install drive shaft assembly by reversing removal
procedure and noting the following points.
CAUTION!
• Protect boots from any damage,
preventing them from unnecessary contact
while installing drive shaft.
• Do not hit joint boot with hammer.
Inserting joint only by hands is allowed.
• Tighten each nuts to specified torque referring to
“Rear Drive Shaft Components”.
Rear Drive Shaft Disassembly and ReassemblyS6RW0D3126003
Disassembly
Refer to “Front Drive Shaft Disassembly and
Reassembly” note the following point which is different
from the front drive shaft is described.
• Remove differential side boot big band and small
band as follows.
– For boot big band (and small band) without joint [A]:
Remove boot big band (and small band) by tapping
boot and band with plastic hammer. If it is hard to
remove boot big band (and small band), cut it using
a nipper or an iron saw with care not to damage
joint housing.
– For boot big band (and small band) with joint [B]:
Draw hooks of boot big band (and small band)
together and remove band.
1
I5RW0A230023-01
1
I5RW0A312006-02
I5RW0A312003-01
Page 548 of 1556
Downloaded from www.Manualslib.com manuals search engine 3C-1 Transfer:
Driveline / Axle
Transfer
General Description
Transfer DescriptionS6RW0D3301001
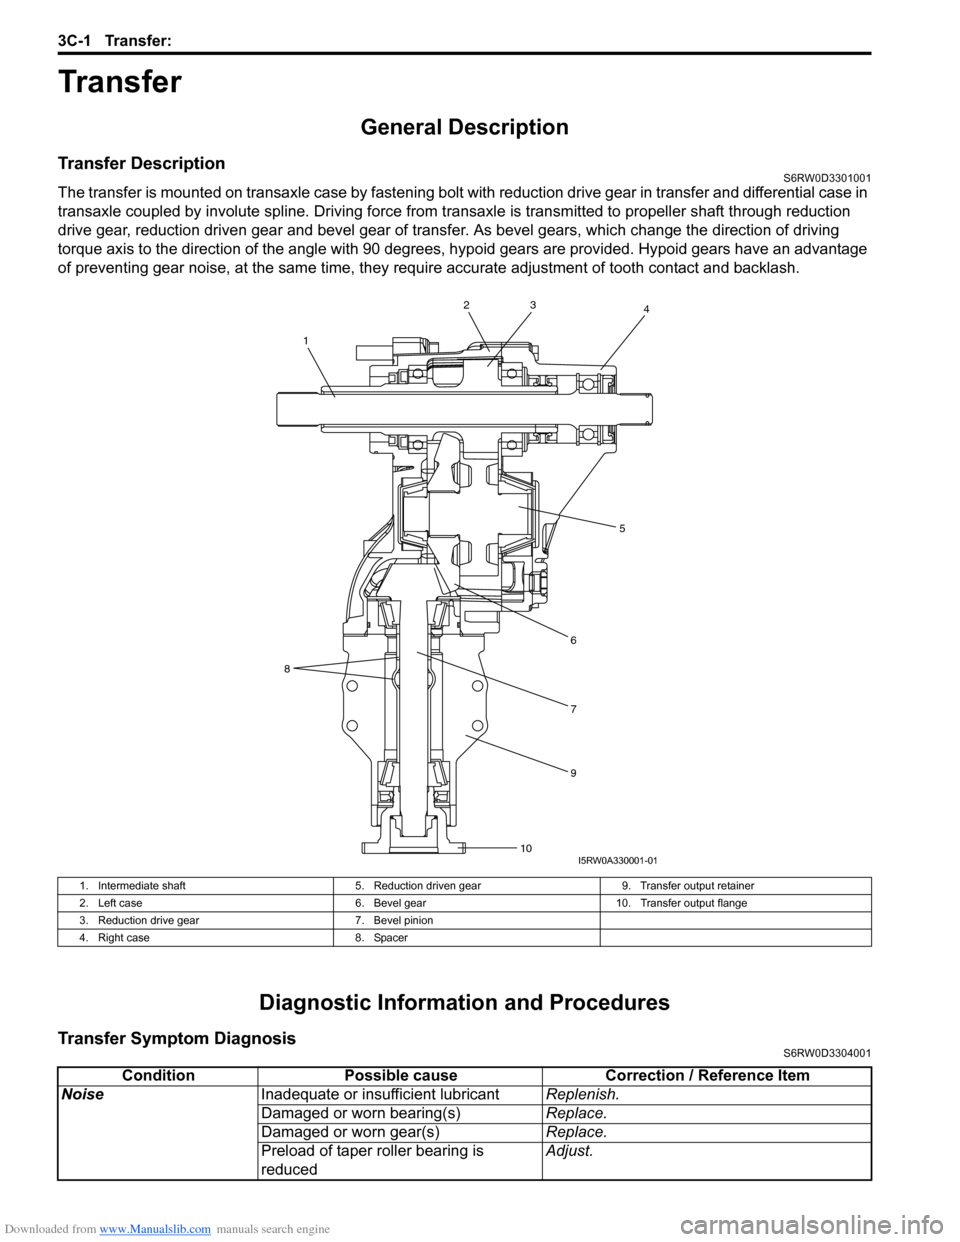
The transfer is mounted on transaxle case by fastening bolt with reduction drive gear in transfer and differential case in
transaxle coupled by involute spline. Driving force from transaxle is transmitted to propeller shaft through reduction
drive gear, reduction driven gear and bevel gear of transfer. As bevel gears, which change the direction of driving
torque axis to the direction of the angle with 90 degrees, hypoid gears are provided. Hypoid gears have an advantage
of preventing gear noise, at the same time, they require accurate adjustment of tooth contact and backlash.
Diagnostic Information and Procedures
Transfer Symptom DiagnosisS6RW0D3304001
2
1
8
34
5
6
7
9
10I5RW0A330001-01
1. Intermediate shaft 5. Reduction driven gear 9. Transfer output retainer
2. Left case 6. Bevel gear 10. Transfer output flange
3. Reduction drive gear 7. Bevel pinion
4. Right case 8. Spacer
Condition Possible cause Correction / Reference Item
NoiseInadequate or insufficient lubricantReplenish.
Damaged or worn bearing(s)Replace.
Damaged or worn gear(s)Replace.
Preload of taper roller bearing is
reducedAdjust.
Page 549 of 1556
Downloaded from www.Manualslib.com manuals search engine Transfer: 3C-2
Repair Instructions
Transfer Oil Level CheckS6RW0D3306001
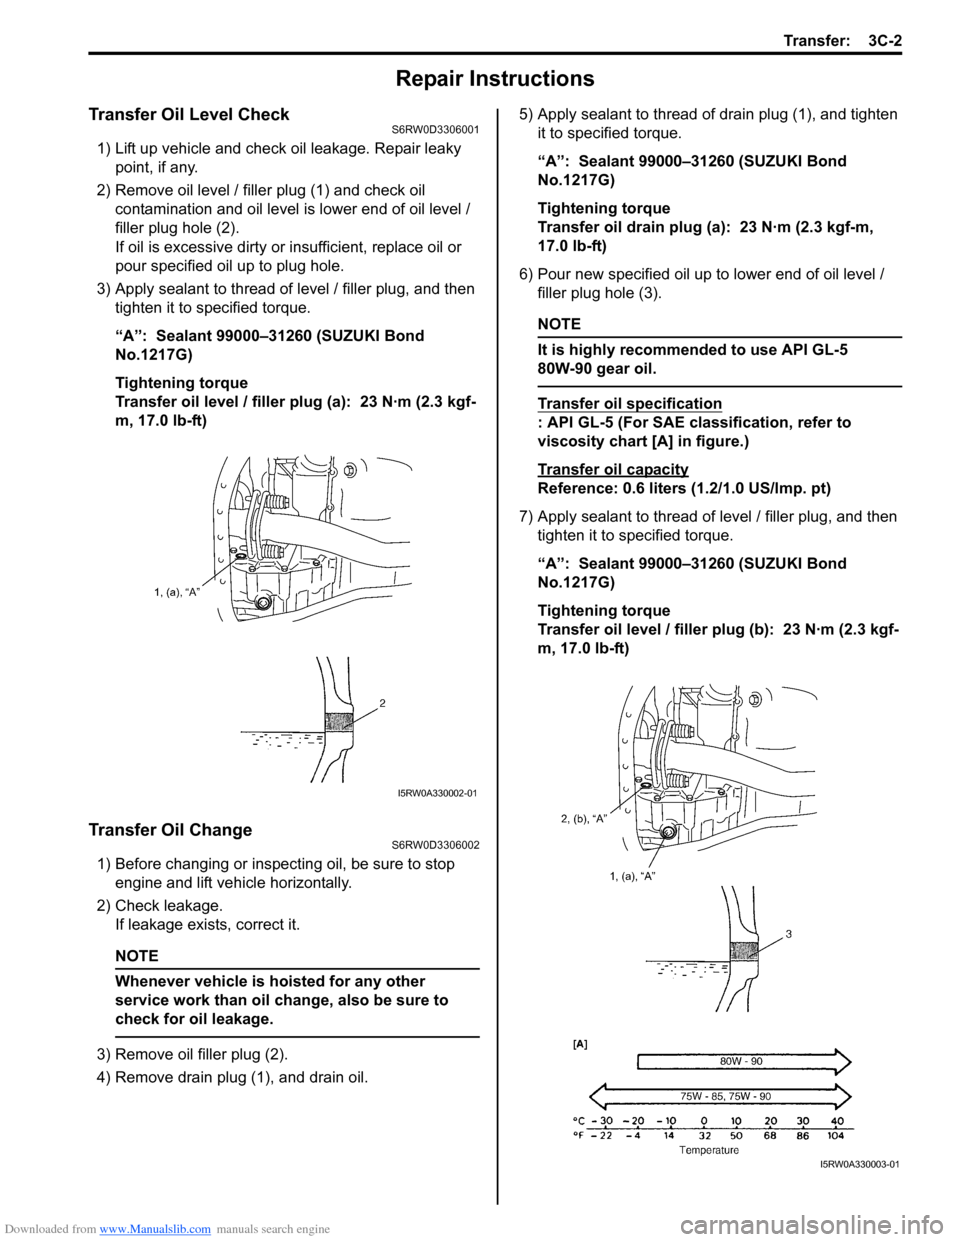
1) Lift up vehicle and check oil leakage. Repair leaky
point, if any.
2) Remove oil level / filler plug (1) and check oil
contamination and oil level is lower end of oil level /
filler plug hole (2).
If oil is excessive dirty or insufficient, replace oil or
pour specified oil up to plug hole.
3) Apply sealant to thread of level / filler plug, and then
tighten it to specified torque.
“A”: Sealant 99000–31260 (SUZUKI Bond
No.1217G)
Tightening torque
Transfer oil level / filler plug (a): 23 N·m (2.3 kgf-
m, 17.0 lb-ft)
Transfer Oil ChangeS6RW0D3306002
1) Before changing or inspecting oil, be sure to stop
engine and lift vehicle horizontally.
2) Check leakage.
If leakage exists, correct it.
NOTE
Whenever vehicle is hoisted for any other
service work than oil change, also be sure to
check for oil leakage.
3) Remove oil filler plug (2).
4) Remove drain plug (1), and drain oil.5) Apply sealant to thread of drain plug (1), and tighten
it to specified torque.
“A”: Sealant 99000–31260 (SUZUKI Bond
No.1217G)
Tightening torque
Transfer oil drain plug (a): 23 N·m (2.3 kgf-m,
17.0 lb-ft)
6) Pour new specified oil up to lower end of oil level /
filler plug hole (3).
NOTE
It is highly recommended to use API GL-5
80W-90 gear oil.
Transfer oil specification
: API GL-5 (For SAE classification, refer to
viscosity chart [A] in figure.)
Transfer oil capacity
Reference: 0.6 liters (1.2/1.0 US/lmp. pt)
7) Apply sealant to thread of level / filler plug, and then
tighten it to specified torque.
“A”: Sealant 99000–31260 (SUZUKI Bond
No.1217G)
Tightening torque
Transfer oil level / filler plug (b): 23 N·m (2.3 kgf-
m, 17.0 lb-ft)
I5RW0A330002-01
I5RW0A330003-01
Page 550 of 1556
Downloaded from www.Manualslib.com manuals search engine 3C-3 Transfer:
Transfer Dismounting and RemountingS6RW0D3306003
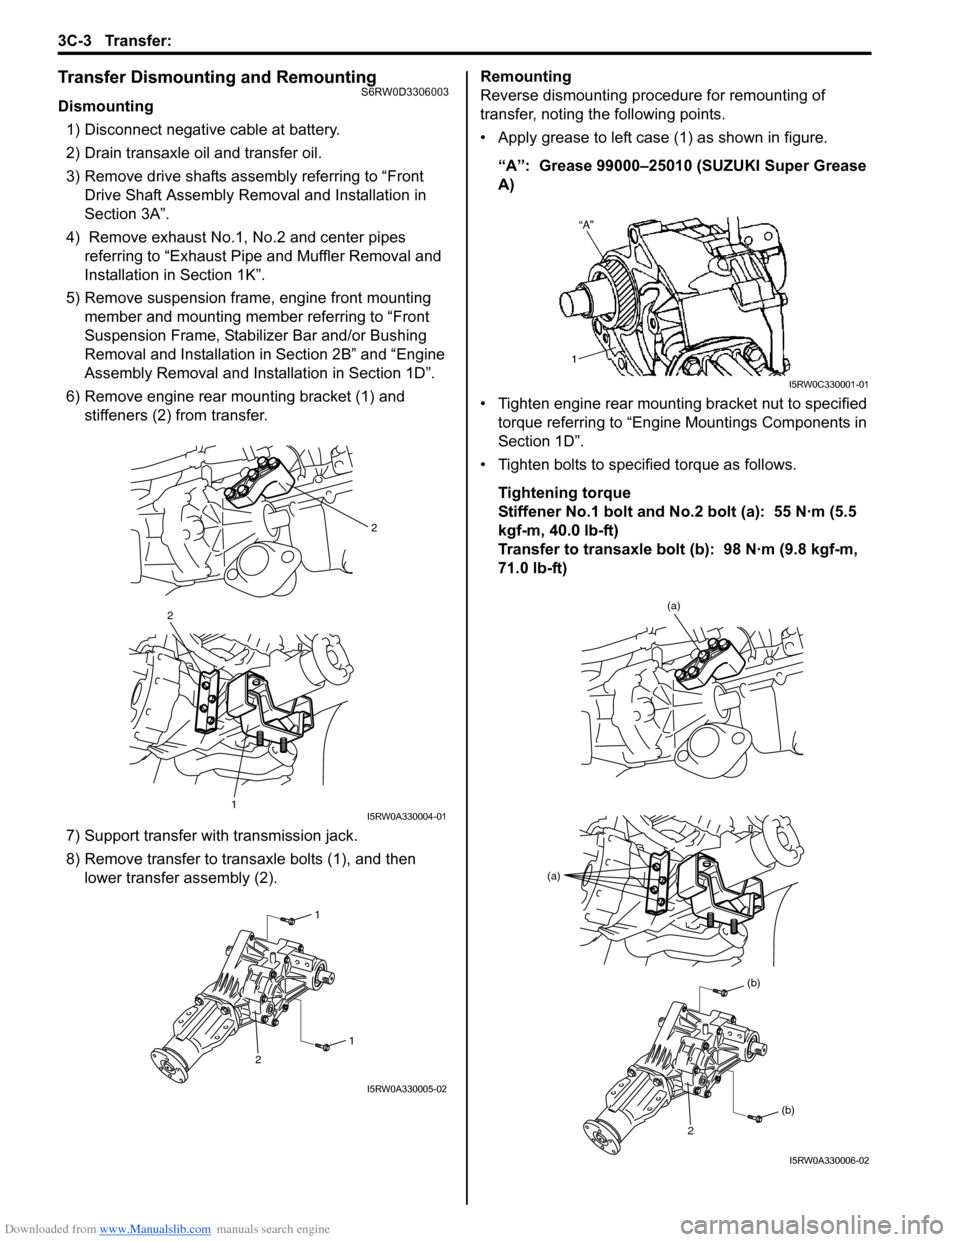
Dismounting
1) Disconnect negative cable at battery.
2) Drain transaxle oil and transfer oil.
3) Remove drive shafts assembly referring to “Front
Drive Shaft Assembly Removal and Installation in
Section 3A”.
4) Remove exhaust No.1, No.2 and center pipes
referring to “Exhaust Pipe and Muffler Removal and
Installation in Section 1K”.
5) Remove suspension frame, engine front mounting
member and mounting member referring to “Front
Suspension Frame, Stabilizer Bar and/or Bushing
Removal and Installation in Section 2B” and “Engine
Assembly Removal and Installation in Section 1D”.
6) Remove engine rear mounting bracket (1) and
stiffeners (2) from transfer.
7) Support transfer with transmission jack.
8) Remove transfer to transaxle bolts (1), and then
lower transfer assembly (2).Remounting
Reverse dismounting procedure for remounting of
transfer, noting the following points.
• Apply grease to left case (1) as shown in figure.
“A”: Grease 99000–25010 (SUZUKI Super Grease
A)
• Tighten engine rear mounting bracket nut to specified
torque referring to “Engine Mountings Components in
Section 1D”.
• Tighten bolts to specified torque as follows.
Tightening torque
Stiffener No.1 bolt and No.2 bolt (a): 55 N·m (5.5
kgf-m, 40.0 lb-ft)
Transfer to transaxle bolt (b): 98 N·m (9.8 kgf-m,
71.0 lb-ft)
2
2
1I5RW0A330004-01
1
1
2
I5RW0A330005-02
I5RW0C330001-01
(a)
(a)
(b)
(b)
2
I5RW0A330006-02
Page 551 of 1556
Downloaded from www.Manualslib.com manuals search engine Transfer: 3C-4
• Pour transaxle oil and transfer oil referring to “Manual
Transaxle Oil Change in Section 5B” and “Transfer Oil
Change”.
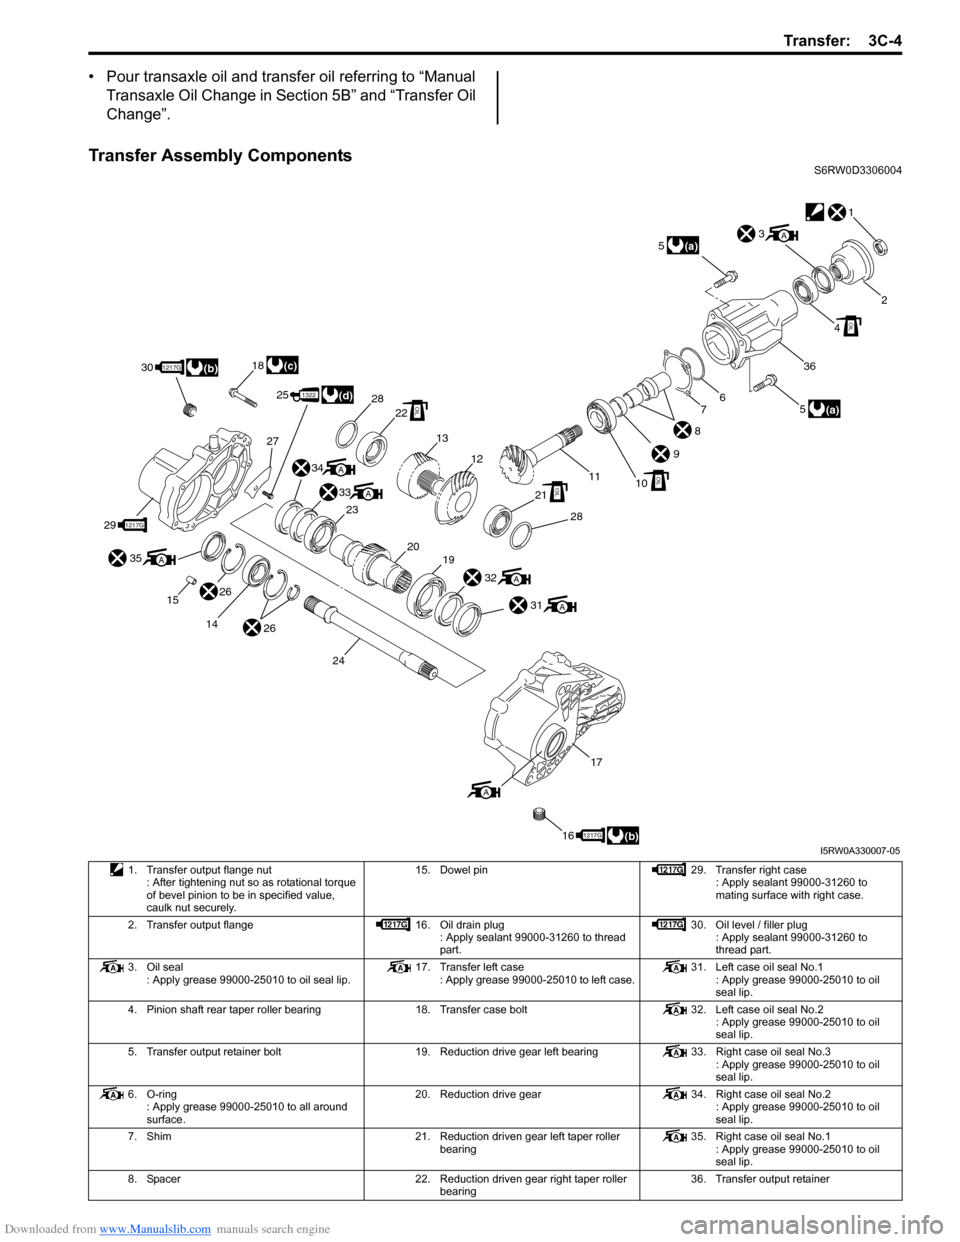
Transfer Assembly ComponentsS6RW0D3306004
1
2
6
9
1110
8
7
3A
4
5
36
OIL
(a) 5
(a)
OIL
28
18
30
27
25
21
28
13
12
22OIL
OIL
32A
31A
1322(d)
34A
33
23A
2019
(c)1217G
291217G
(b)
35
15A
26
26 14
24
17
161217G(b)
A
I5RW0A330007-05
1. Transfer output flange nut
: After tightening nut so as rotational torque
of bevel pinion to be in specified value,
caulk nut securely.15. Dowel pin 29. Transfer right case
: Apply sealant 99000-31260 to
mating surface with right case.
2. Transfer output flange 16. Oil drain plug
: Apply sealant 99000-31260 to thread
part.30. Oil level / filler plug
: Apply sealant 99000-31260 to
thread part.
3. Oil seal
: Apply grease 99000-25010 to oil seal lip.17. Transfer left case
: Apply grease 99000-25010 to left case.31. Left case oil seal No.1
: Apply grease 99000-25010 to oil
seal lip.
4. Pinion shaft rear taper roller bearing 18. Transfer case bolt 32. Left case oil seal No.2
: Apply grease 99000-25010 to oil
seal lip.
5. Transfer output retainer bolt 19. Reduction drive gear left bearing 33. Right case oil seal No.3
: Apply grease 99000-25010 to oil
seal lip.
6. O-ring
: Apply grease 99000-25010 to all around
surface.20. Reduction drive gear 34. Right case oil seal No.2
: Apply grease 99000-25010 to oil
seal lip.
7. Shim 21. Reduction driven gear left taper roller
bearing35. Right case oil seal No.1
: Apply grease 99000-25010 to oil
seal lip.
8. Spacer 22. Reduction driven gear right taper roller
bearing36. Transfer output retainer
Page 552 of 1556
Downloaded from www.Manualslib.com manuals search engine 3C-5 Transfer:
Transfer Assembly Disassembly and
Reassembly
S6RW0D3306005
Disassembly
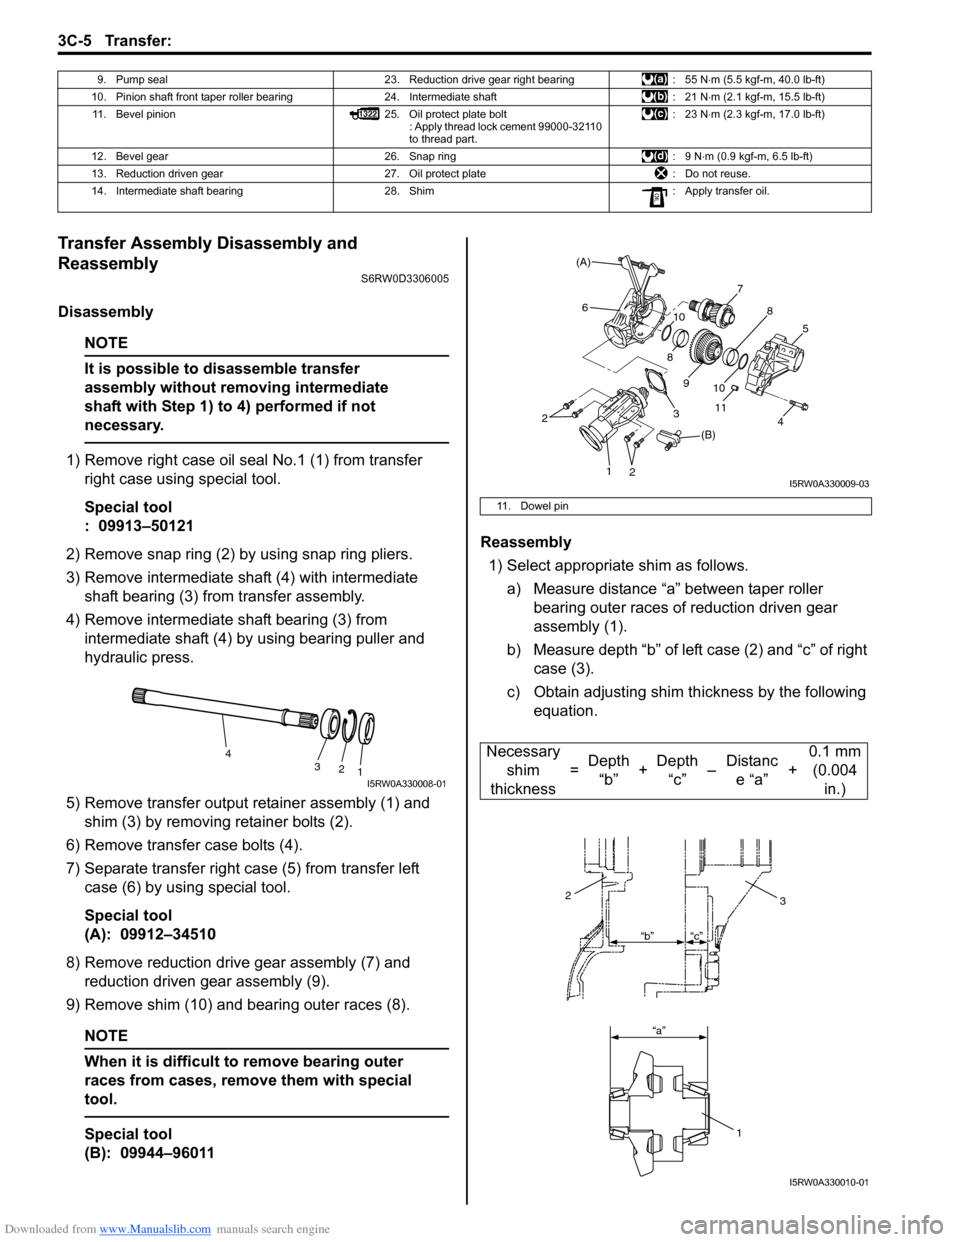
NOTE
It is possible to disassemble transfer
assembly without removing intermediate
shaft with Step 1) to 4) performed if not
necessary.
1) Remove right case oil seal No.1 (1) from transfer
right case using special tool.
Special tool
: 09913–50121
2) Remove snap ring (2) by using snap ring pliers.
3) Remove intermediate shaft (4) with intermediate
shaft bearing (3) from transfer assembly.
4) Remove intermediate shaft bearing (3) from
intermediate shaft (4) by using bearing puller and
hydraulic press.
5) Remove transfer output retainer assembly (1) and
shim (3) by removing retainer bolts (2).
6) Remove transfer case bolts (4).
7) Separate transfer right case (5) from transfer left
case (6) by using special tool.
Special tool
(A): 09912–34510
8) Remove reduction drive gear assembly (7) and
reduction driven gear assembly (9).
9) Remove shim (10) and bearing outer races (8).
NOTE
When it is difficult to remove bearing outer
races from cases, remove them with special
tool.
Special tool
(B): 09944–96011Reassembly
1) Select appropriate shim as follows.
a) Measure distance “a” between taper roller
bearing outer races of reduction driven gear
assembly (1).
b) Measure depth “b” of left case (2) and “c” of right
case (3).
c) Obtain adjusting shim thickness by the following
equation.
9. Pump seal 23. Reduction drive gear right bearing : 55 N⋅m (5.5 kgf-m, 40.0 lb-ft)
10. Pinion shaft front taper roller bearing 24. Intermediate shaft : 21 N⋅m (2.1 kgf-m, 15.5 lb-ft)
11. Bevel pinion 25. Oil protect plate bolt
: Apply thread lock cement 99000-32110
to thread part.: 23 N⋅m (2.3 kgf-m, 17.0 lb-ft)
12. Bevel gear 26. Snap ring : 9 N⋅m (0.9 kgf-m, 6.5 lb-ft)
13. Reduction driven gear 27. Oil protect plate : Do not reuse.
14. Intermediate shaft bearing 28. Shim : Apply transfer oil.
4
3
2
1
I5RW0A330008-01
11. Dowel pin
Necessary
shim
thickness=Depth
“b”+Depth
“c”–Distanc
e “a”+0.1 mm
(0.004
in.)
7
(B)
5
11
310 9 10
8 64
8
(A)
12
2
I5RW0A330009-03
23
1
“b”
“a”“c”
I5RW0A330010-01
Page 553 of 1556
Downloaded from www.Manualslib.com manuals search engine Transfer: 3C-6
d) Select a shim which is close to half thickness of
the calculated value (necessary shim thickness)
from among the available shims to install it
between bearing and case at each of right and
left sides.
For example:
Measure distance “a” is 110.75 mm (4.360 in.).
Measure depth “b” is 85.8 mm (3.378 in.).
Measure depth “c” is 26.55 mm (1.045 in.).
Necessary shim thickness = 85.8 mm (3.378 in.)
+ 26.55 mm (1.045 in.) – 110.75 mm (4.360 in.) +
0.1 mm (0.004 in.) = 1.7 mm (0.067 in.)
1.7 mm (0.067 in.) ÷ 2 = 0.85 mm (0.033 in.)
Calculated thickness of new shim = 0.85 mm
(0.033 in.)
Available reduction driven gear shim
thickness
0.60, 0.65, 0.70, 0.75, 0.80, 0.85, 0.90, 0.95,
1.00 and 1.05 mm (0.024, 0.026, 0.028, 0.030,
0.031, 0.033, 0.035, 0.037, 0.039 and 0.041 in.)
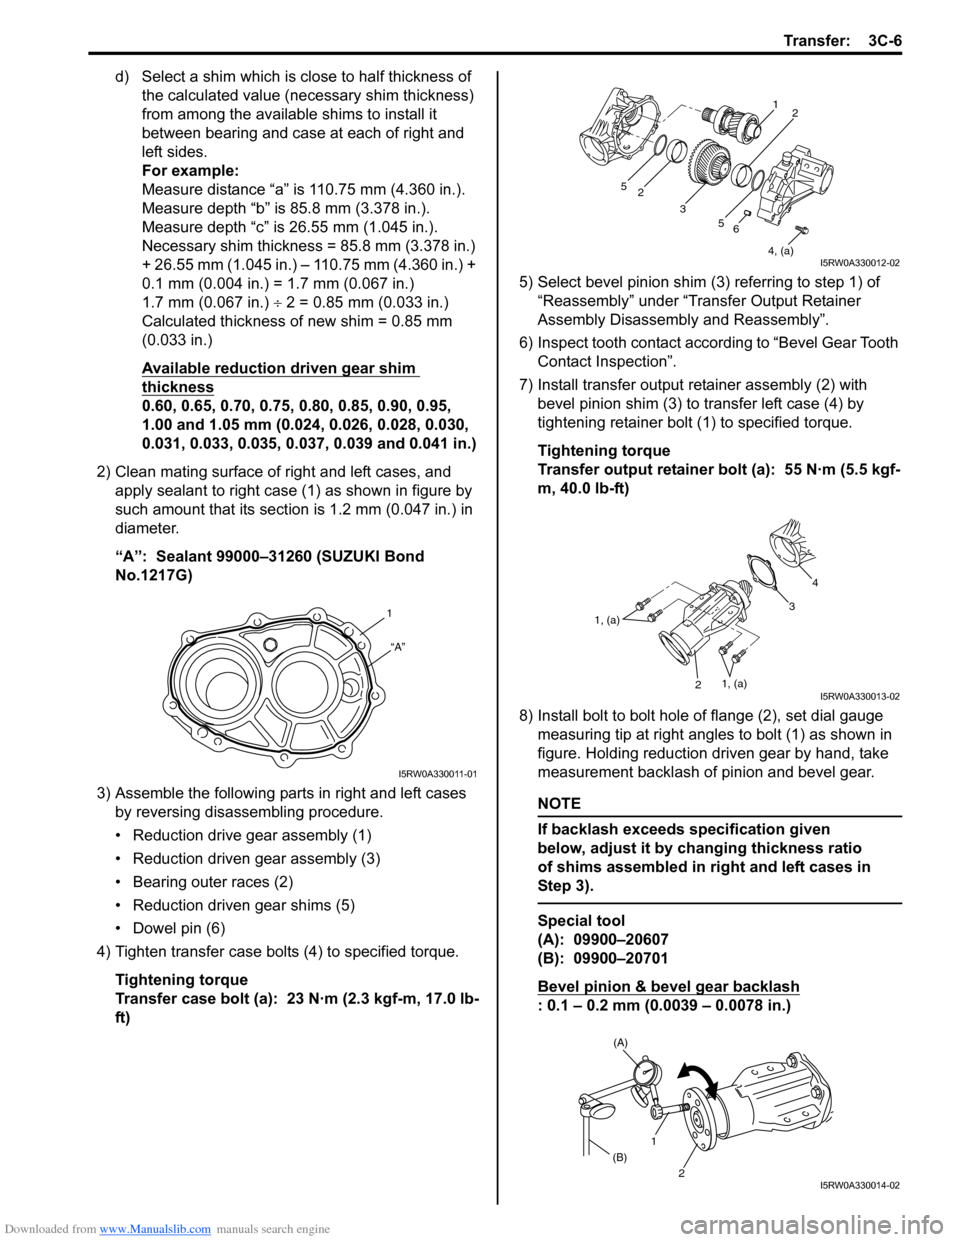
2) Clean mating surface of right and left cases, and
apply sealant to right case (1) as shown in figure by
such amount that its section is 1.2 mm (0.047 in.) in
diameter.
“A”: Sealant 99000–31260 (SUZUKI Bond
No.1217G)
3) Assemble the following parts in right and left cases
by reversing disassembling procedure.
• Reduction drive gear assembly (1)
• Reduction driven gear assembly (3)
• Bearing outer races (2)
• Reduction driven gear shims (5)
• Dowel pin (6)
4) Tighten transfer case bolts (4) to specified torque.
Tightening torque
Transfer case bolt (a): 23 N·m (2.3 kgf-m, 17.0 lb-
ft)5) Select bevel pinion shim (3) referring to step 1) of
“Reassembly” under “Transfer Output Retainer
Assembly Disassembly and Reassembly”.
6) Inspect tooth contact according to “Bevel Gear Tooth
Contact Inspection”.
7) Install transfer output retainer assembly (2) with
bevel pinion shim (3) to transfer left case (4) by
tightening retainer bolt (1) to specified torque.
Tightening torque
Transfer output retainer bolt (a): 55 N·m (5.5 kgf-
m, 40.0 lb-ft)
8) Install bolt to bolt hole of flange (2), set dial gauge
measuring tip at right angles to bolt (1) as shown in
figure. Holding reduction driven gear by hand, take
measurement backlash of pinion and bevel gear.
NOTE
If backlash exceeds specification given
below, adjust it by changing thickness ratio
of shims assembled in right and left cases in
Step 3).
Special tool
(A): 09900–20607
(B): 09900–20701
Bevel pinion & bevel gear backlash
: 0.1 – 0.2 mm (0.0039 – 0.0078 in.)
1
“A”
I5RW0A330011-01
6
4, (a) 5 2
31
2
5
I5RW0A330012-02
4
3
21, (a)
1, (a)
I5RW0A330013-02
(A)
1
(B)
2
I5RW0A330014-02