TOYOTA AYGO X 2022 Owners Manual (in English)
Manufacturer: TOYOTA, Model Year: 2022, Model line: AYGO X, Model: TOYOTA AYGO X 2022Pages: 494, PDF Size: 92.53 MB
Page 111 of 494
109
3
Owner's Manual_Europe_M99V08_en
3-3. Adjusting the seats
Before driving
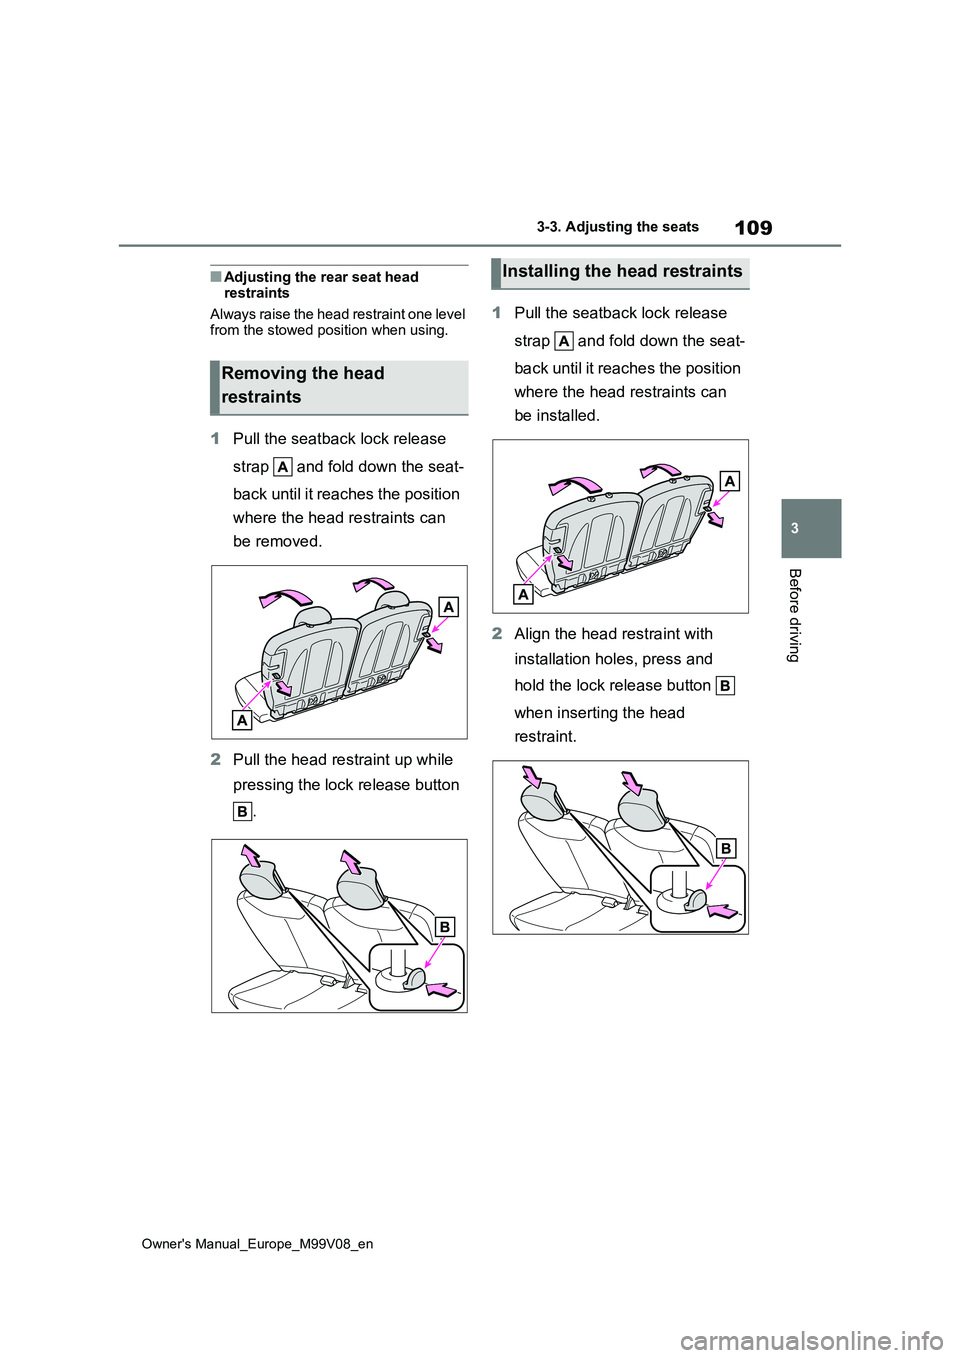
■Adjusting the rear seat head restraints
Always raise the head restraint one level from the stowed position when using.
1 Pull the seatback lock release
strap and fold down the seat-
back until it reaches the position
where the head restraints can
be removed.
2 Pull the head restraint up while
pressing the lock release button
.
1 Pull the seatback lock release
strap and fold down the seat-
back until it reaches the position
where the head restraints can
be installed.
2 Align the head restraint with
installation holes, press and
hold the lock release button
when inserting the head
restraint.
Removing the head
restraints
Installing the head restraints
Page 112 of 494
110
Owner's Manual_Europe_M99V08_en
3-4. Adjusting the steering wheel and mirrors
3-4.Adjusting the steering whe el an d mirrors
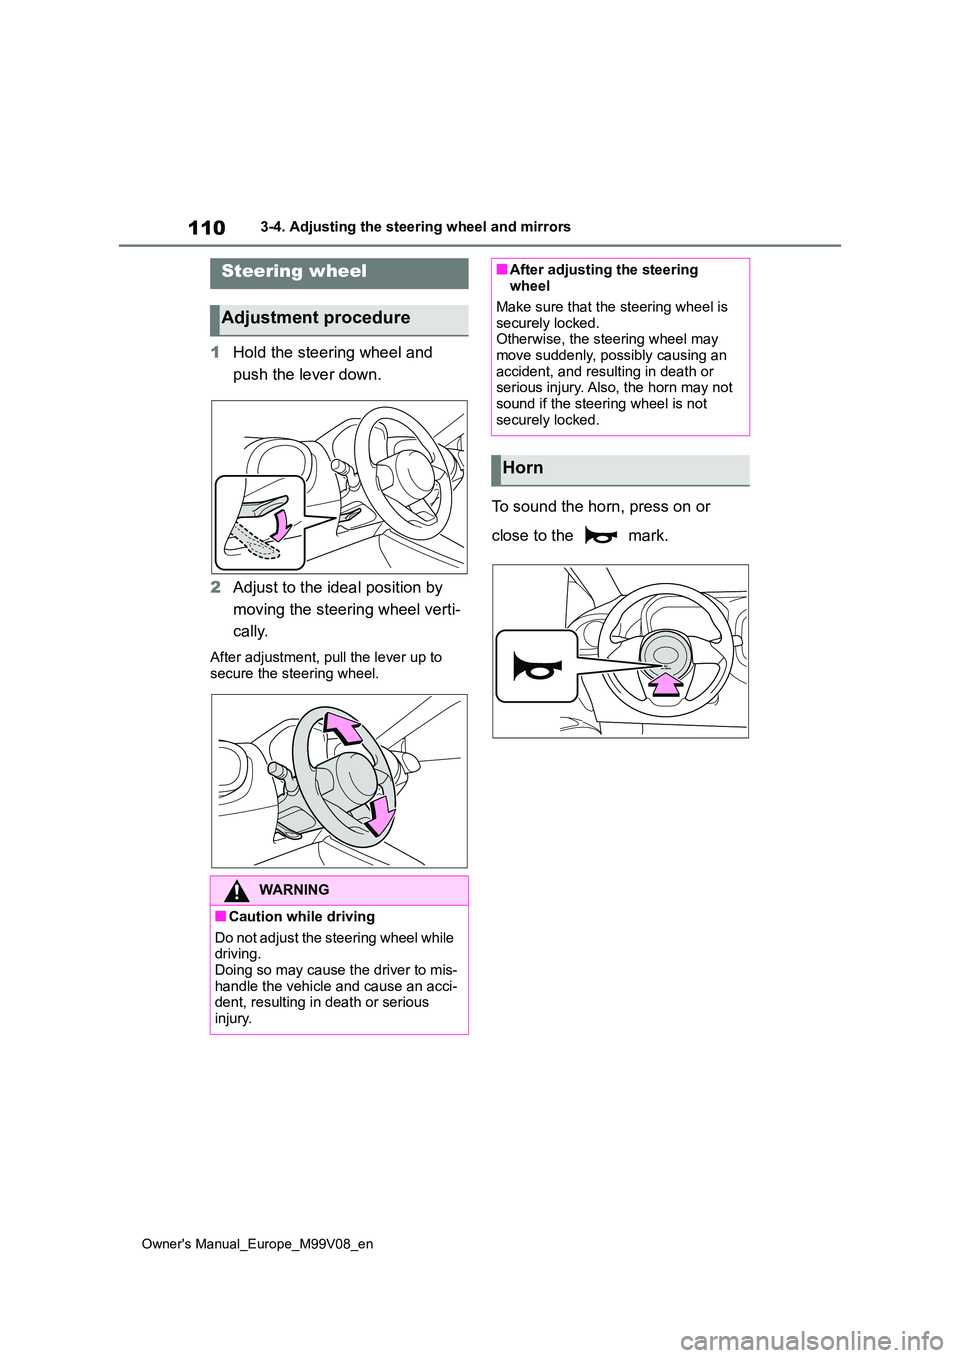
1Hold the steering wheel and
push the lever down.
2 Adjust to the ideal position by
moving the steering wheel verti-
cally.
After adjustment, pull the lever up to
secure the steering wheel.
To sound the horn, press on or
close to the mark.
Steering wheel
Adjustment procedure
WARNING
■Caution while driving
Do not adjust the steering wheel while driving.Doing so may cause the driver to mis-
handle the vehicle and cause an acci- dent, resulting in death or serious injury.
■After adjusting the steering wheel
Make sure that the steering wheel is
securely locked. Otherwise, the steering wheel may move suddenly, possibly causing an
accident, and resulting in death or serious injury. Also, the horn may not sound if the steering wheel is not
securely locked.
Horn
Page 113 of 494
111
3
Owner's Manual_Europe_M99V08_en
3-4. Adjusting the steering wheel and mirrors
Before driving
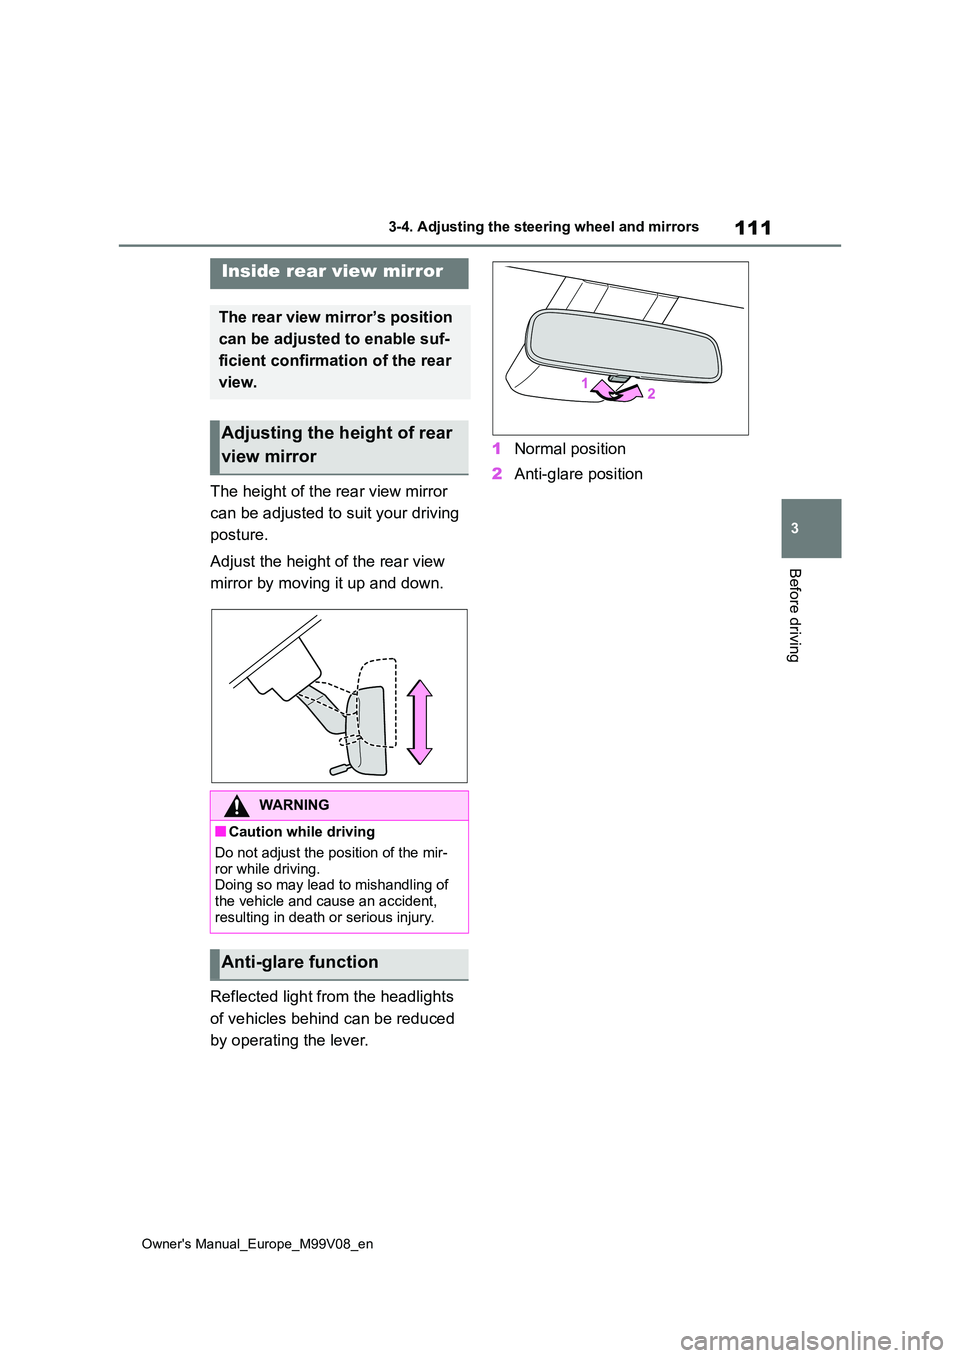
The height of the rear view mirror
can be adjusted to suit your driving
posture.
Adjust the height of the rear view
mirror by moving it up and down.
Reflected light from the headlights
of vehicles behind can be reduced
by operating the lever.
1 Normal position
2 Anti-glare position
Inside rear view mirror
The rear view mirror’s position
can be adjusted to enable suf-
ficient confirmation of the rear
view.
Adjusting the height of rear
view mirror
WARNING
■Caution while driving
Do not adjust the position of the mir-
ror while driving. Doing so may lead to mishandling of the vehicle and cause an accident,
resulting in death or serious injury.
Anti-glare function
Page 114 of 494
112
Owner's Manual_Europe_M99V08_en
3-4. Adjusting the steering wheel and mirrors
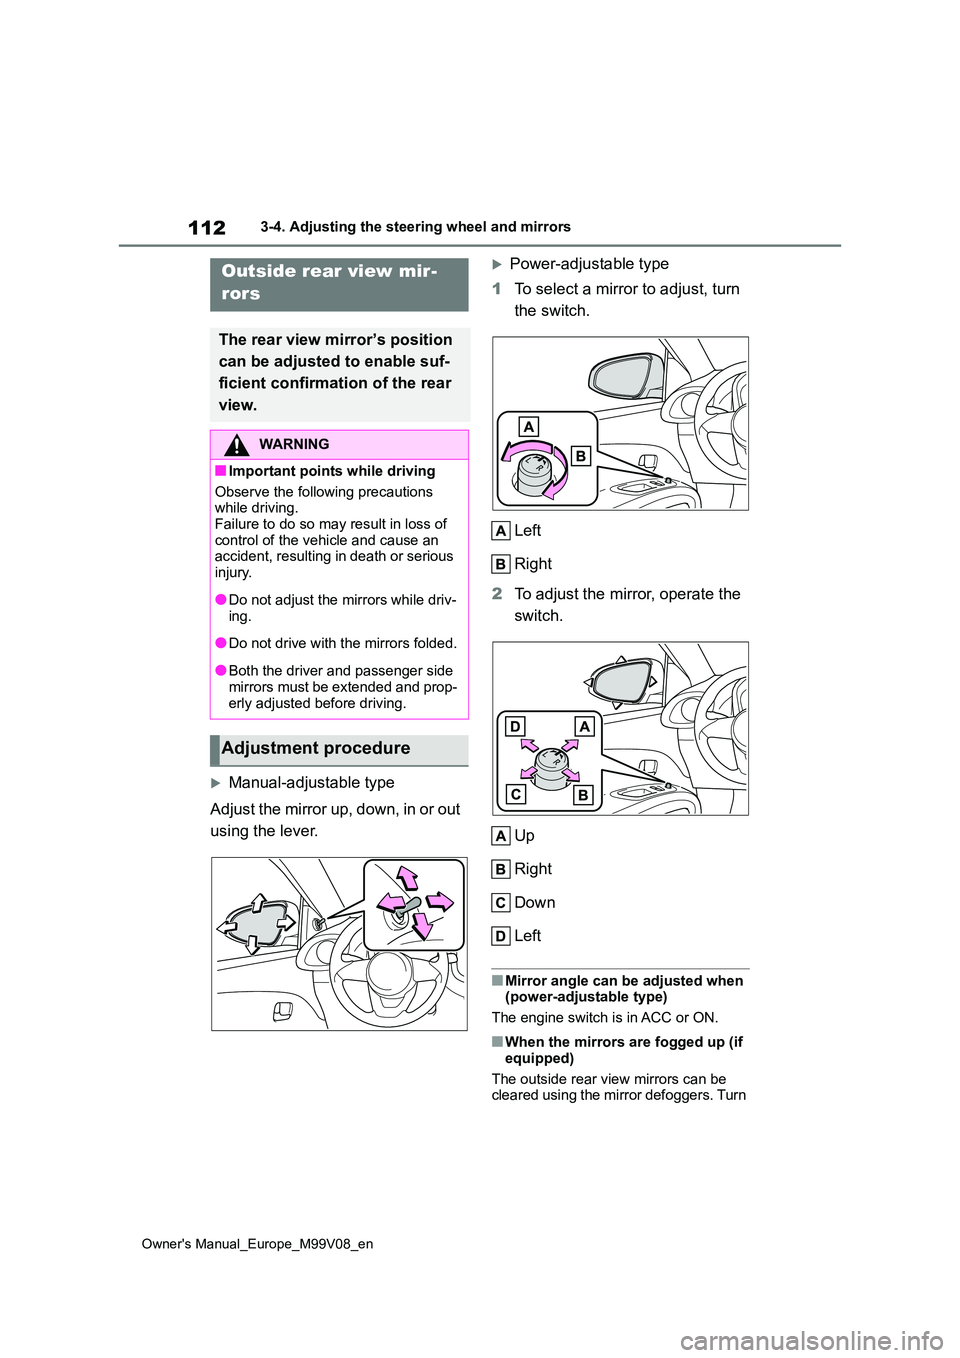
Manual-adjustable type
A dju st the mi rr or u p, d own, in or ou t
using the lever.
Power-adjustable type
1 To select a mirror to adjust, turn
the switch.
Left
Right
2 To adjust the mirror, operate the
switch.
Up
Right
Down
Left
■Mirror angle can be adjusted when (power-adjustable type)
The engine switch is in ACC or ON.
■When the mirrors are fogged up (if
equipped)
The outside rear view mirrors can be cleared using the mirror defoggers. Turn
Outside rear view mir-
rors
The rear view mirror’s position
can be adjusted to enable suf-
ficient confirmation of the rear
view.
WARNING
■Important points while driving
Observe the following precautions while driving.
Failure to do so may result in loss of control of the vehicle and cause an accident, resulting in death or serious
injury.
●Do not adjust the mirrors while driv-
ing.
●Do not drive with the mirrors folded.
●Both the driver and passenger side mirrors must be extended and prop-
erly adjusted before driving.
Adjustment procedure
Page 115 of 494
113
3
Owner's Manual_Europe_M99V08_en
3-4. Adjusting the steering wheel and mirrors
Before driving
on the rear window defogger to turn on
the outside rear view mirror defoggers. ( P.221, 225)
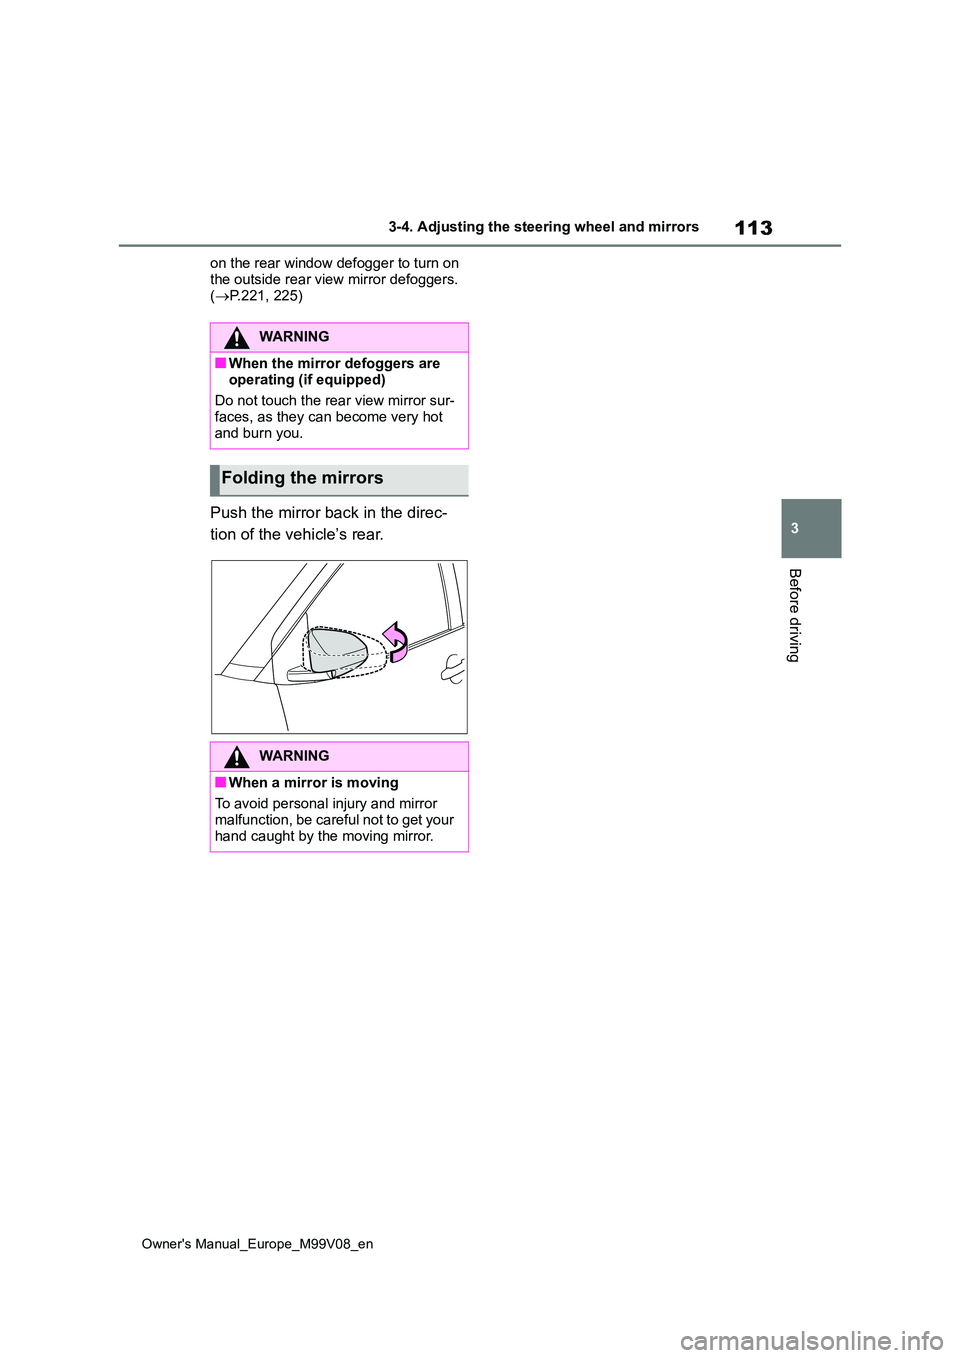
Push the mirror back in the direc-
tion of the vehicle’s rear.
WARNING
■When the mirror defoggers are
operating (if equipped)
Do not touch the rear view mirror sur- faces, as they can become very hot
and burn you.
Folding the mirrors
WARNING
■When a mirror is moving
To avoid personal injury and mirror
malfunction, be careful not to get your hand caught by the moving mirror.
Page 116 of 494
114
Owner's Manual_Europe_M99V08_en
3-5. Opening, closing the windows and canvas top
3-5.Opening, closing the windows an d c anva s top
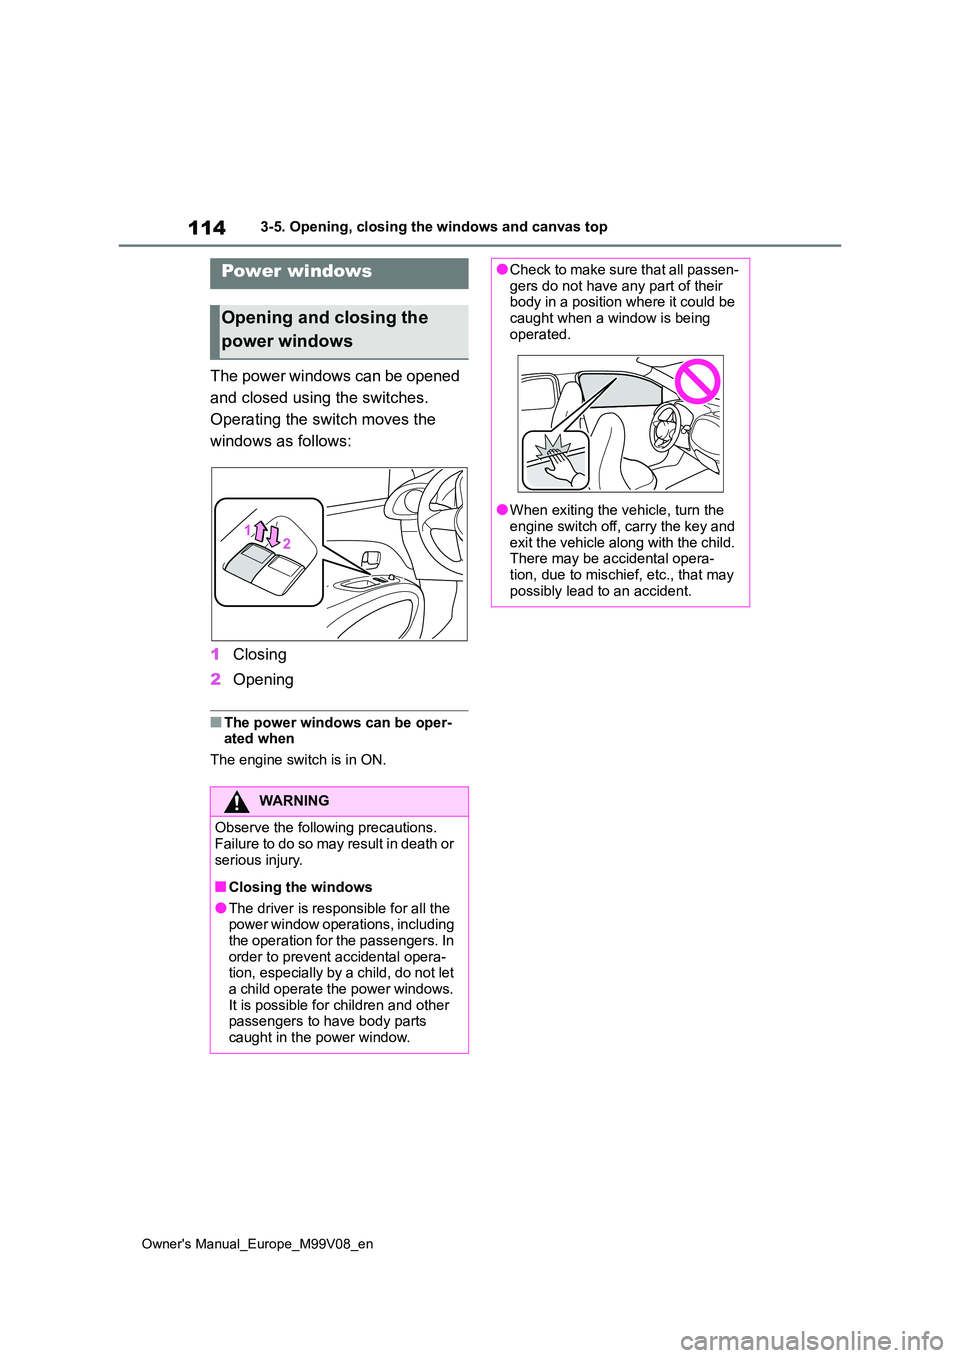
The power windows can be opened
and closed using the switches.
Operating the switch moves the
windows as follows:
1 Closing
2 Opening
■The power windows can be oper- ated when
The engine switch is in ON.
Power windows
Opening and closing the
power windows
WARNING
Observe the following precautions. Failure to do so may result in death or
serious injury.
■Closing the windows
●The driver is responsible for all the power window operations, including the operation for the passengers. In
order to prevent accidental opera- tion, especially by a child, do not let a child operate the power windows.
It is possible for children and other passengers to have body parts caught in the power window.
●Check to make sure that all passen-gers do not have any part of their body in a position where it could be
caught when a window is being operated.
●When exiting the vehicle, turn the
engine switch off, carry the key and exit the vehicle along with the child. There may be accidental opera-
tion, due to mischief, etc., that may possibly lead to an accident.
Page 117 of 494
115
3
Owner's Manual_Europe_M99V08_en
3-5. Opening, closing the windows and canvas top
Before driving
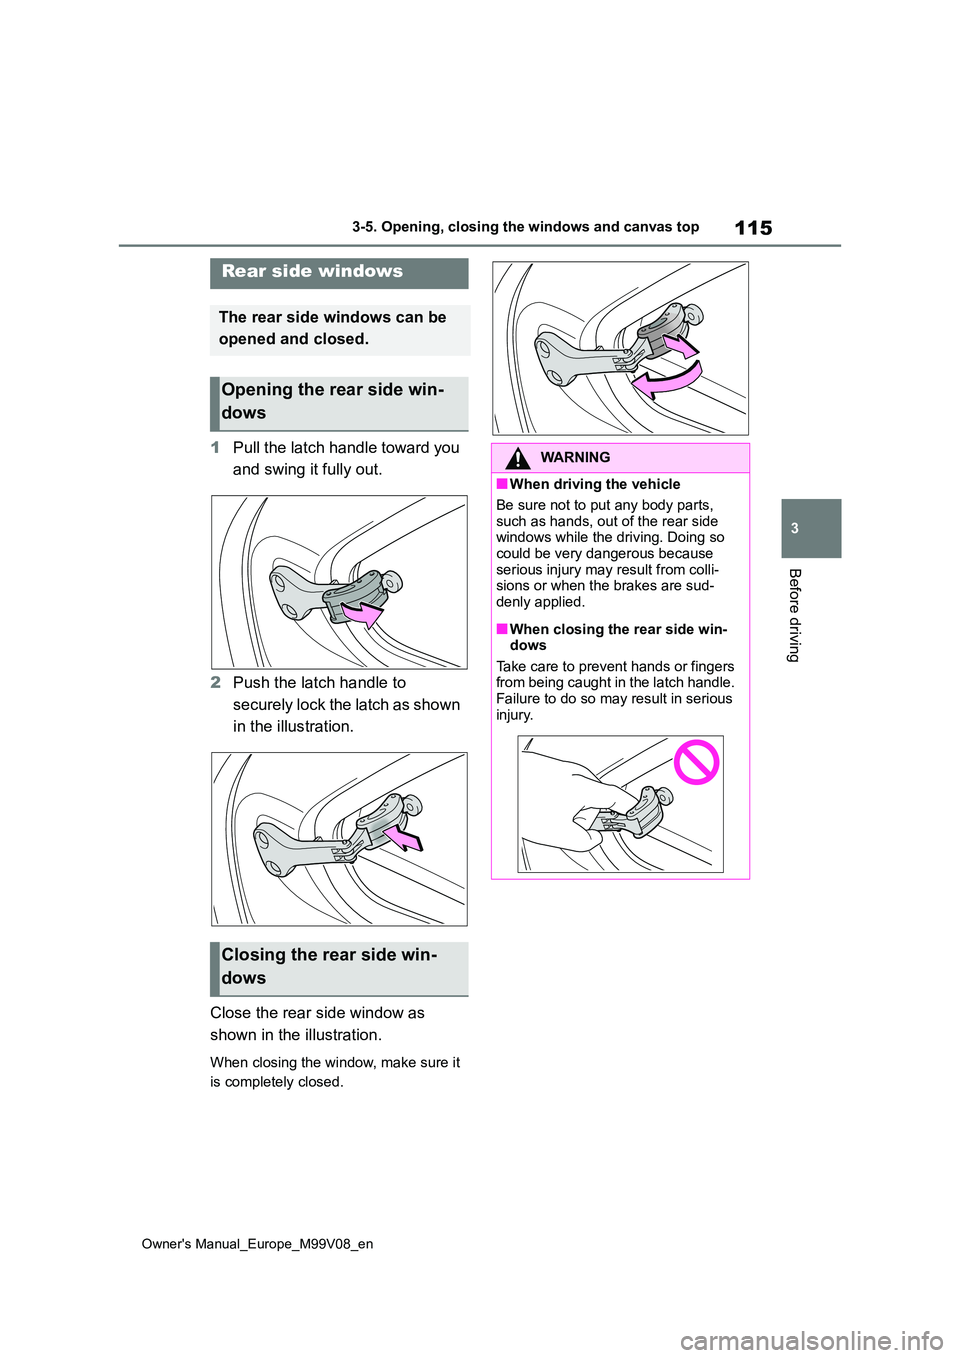
1Pull the latch handle toward you
and swing it fully out.
2 Push the latch handle to
securely lock the latch as shown
in the illustration.
Close the rear side window as
shown in the illustration.
When closing the window, make sure it
is completely closed.
Rear side windows
The rear side windows can be
opened and closed.
Opening the rear side win-
dows
Closing the rear side win-
dows
WARNING
■When driving the vehicle
Be sure not to put any body parts,
such as hands, out of the rear side windows while the driving. Doing so could be very dangerous because
serious injury may result from colli- sions or when the brakes are sud-denly applied.
■When closing the rear side win-dows
Take care to prevent hands or fingers from being caught in the latch handle. Failure to do so may result in serious
injury.
Page 118 of 494
116
Owner's Manual_Europe_M99V08_en
3-5. Opening, closing the windows and canvas top
*: If equipped
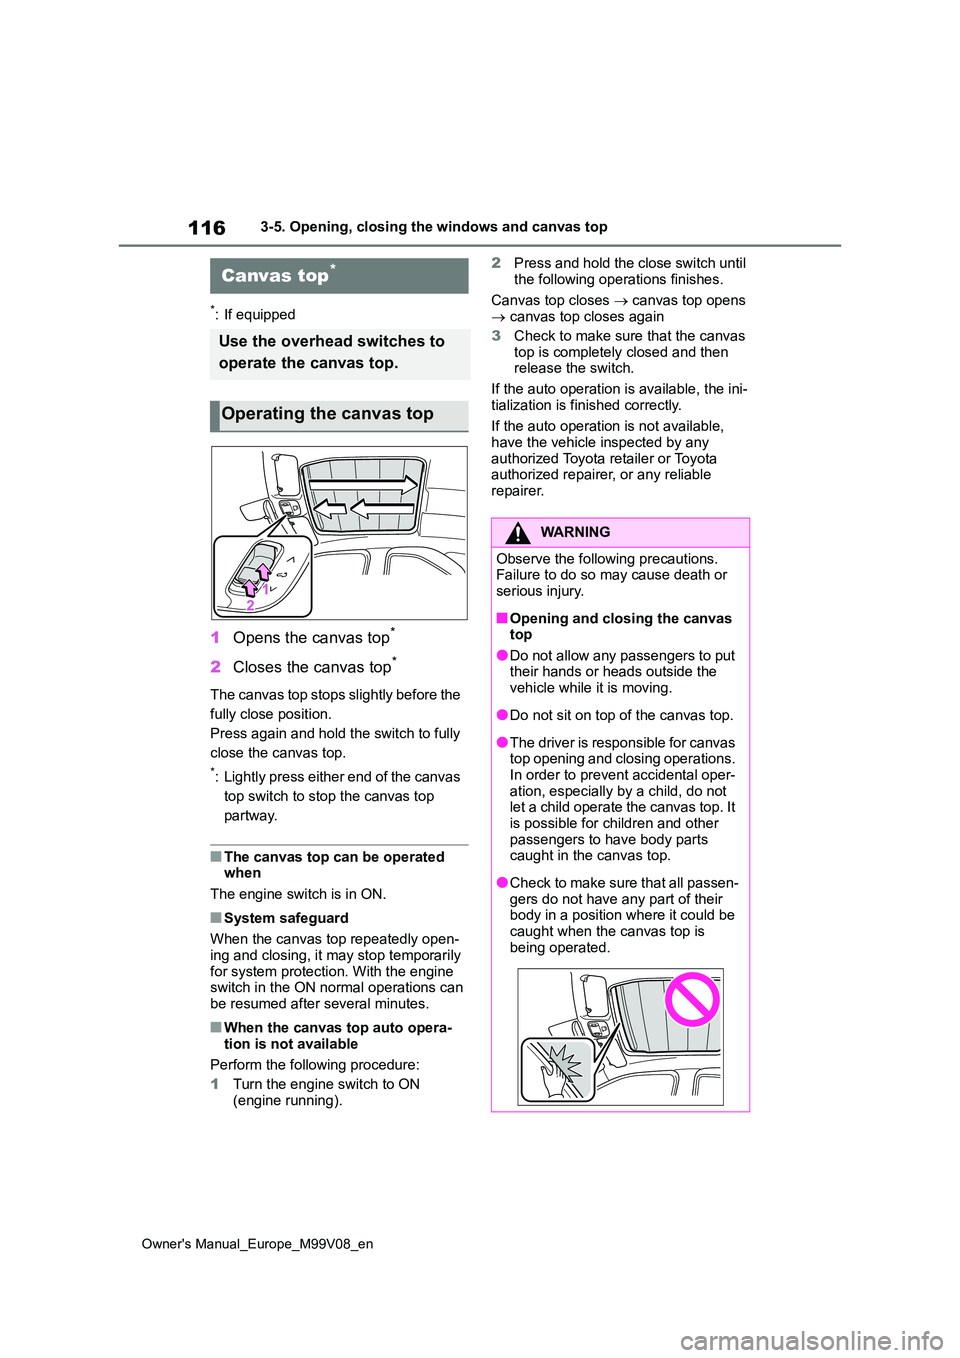
1Opens the canvas top*
2Closes the canvas top*
The canvas top stops slightly before the
fully close position.
Press again and hold the switch to fully
close the canvas top.
*: Lightly press either end of the canvas
top switch to stop the canvas top
partway.
■The canvas top can be operated when
The engine switch is in ON.
■System safeguard
When the canvas top repeatedly open- ing and closing, it may stop temporarily
for system protection. With the engine switch in the ON normal operations can be resumed after several minutes.
■When the canvas top auto opera-
tion is not available
Perform the following procedure:
1 Turn the engine switch to ON (engine running).
2 Press and hold the close switch until
the following operations finishes.
Canvas top closes canvas top opens canvas top closes again
3 Check to make sure that the canvas
top is completely closed and then release the switch.
If the auto operation is available, the ini-
tialization is finished correctly.
If the auto operation is not available, have the vehicle inspected by any
authorized Toyota retailer or Toyota authorized repairer, or any reliable repairer.
Canvas top*
Use the overhead switches to
operate the canvas top.
Operating the canvas top
WARNING
Observe the following precautions. Failure to do so may cause death or serious injury.
■Opening and closing the canvas top
●Do not allow any passengers to put their hands or heads outside the vehicle while it is moving.
●Do not sit on top of the canvas top.
●The driver is responsible for canvas top opening and closing operations. In order to prevent accidental oper-
ation, especially by a child, do not let a child operate the canvas top. It is possible for children and other
passengers to have body parts caught in the canvas top.
●Check to make sure that all passen-gers do not have any part of their body in a position where it could be
caught when the canvas top is being operated.
Page 119 of 494
117
3
Owner's Manual_Europe_M99V08_en
3-5. Opening, closing the windows and canvas top
Before driving
WARNING
●When exiting the vehicle, turn the engine switch to OFF, carry the key
and exit the vehicle along with the child. There may be accidental operation, due to mischief, etc., that
may possibly lead to an accident.
NOTICE
■To prevent damage to the canvas top
●Do not sit or place excessive weight on the canvas top. It may cause of damage of canvas top operation.
●Remove any standing water from the outer canvas and dry the sur-
face before opening roof. The water can potentially enter into the vehicle and may cause interior water dam-
age.
●Do not leave the canvas top open
for long term, such as longer than one day. Doing so may lead to dis-coloration in the folds of the outer
canvas fabric and possibility of irreparable creasing of the outer
canvas fabric.
●To prevent from damaging the can-
vas top material, do not operate the canvas top when the temperature is below 0°C (32°F) or the outer can-
vas fabric is frozen. If necessary to do so, warm the vehicle in a heated garage prior to operation the can-
vas top mechanism.
●Remove ice and snow before open-
ing the canvas top. Also, do not use sharp-edged objects or anything that may cause a scratch to the
outer canvas fabric.
●Do not put any objects on the guide
rail and surround area. It may cause of jamming for sliding canvas top.
Page 120 of 494
118
Owner's Manual_Europe_M99V08_en
3-5. Opening, closing the windows and canvas top