start TOYOTA AYGO X 2022 (in English) User Guide
[x] Cancel search | Manufacturer: TOYOTA, Model Year: 2022, Model line: AYGO X, Model: TOYOTA AYGO X 2022Pages: 494, PDF Size: 92.53 MB
Page 24 of 494
22
Owner's Manual_Europe_M99V08_en
Pictorial index
Multi-information display ...................................... ..........................P.83
Display ........................................................ .......................................P.83
When a warning message is displayed............................ ................ P.311
Parking brake .................................................. ...............................P.141
Applying/releasing............................................. ...............................P.141
Precautions against winter season .............................. ....................P.217
Warning buzzer/message ......................................... ............... P.141, 311
Windshield wiper and washer switch ............................. .............P.149
Rear window wiper and washer switch ............................ ...........P.152
Usage.......................................................... .............................P.149, 152
Adding washer fluid............................................ ..............................P.264
Turn signal lever .............................................. ..............................P.140
Headlight switch ............................................... .............................P.142
Headlights/front position lights/tail lights/daytime running li ghts ......P.142
Front fog lights*4/rear fog light ................................................ .........P.148
Emergency flasher switch....................................... ......................P.296
Hood lock release lever ........................................ .........................P.255
Tilt steering lock release lever............................... ....................... P.110
Multimedia system (7-inch/8-inch display model)*4, 5
Multimedia system (9-inch display model)*4, 6
Air conditioning system ........................................ ................P.220, 224
Usage.......................................................... .............................P.220, 224
Rear window defogger ........................................... ..................P.221, 225
Fuel filler door opener ........................................ ...........................P.155
*1: Vehicles without smart entry & start system
*2: Vehicles with smart entry & start system
*3: Vehicles with Multidrive
*4: If equipped
Page 26 of 494
24
Owner's Manual_Europe_M99V08_en
Pictorial index
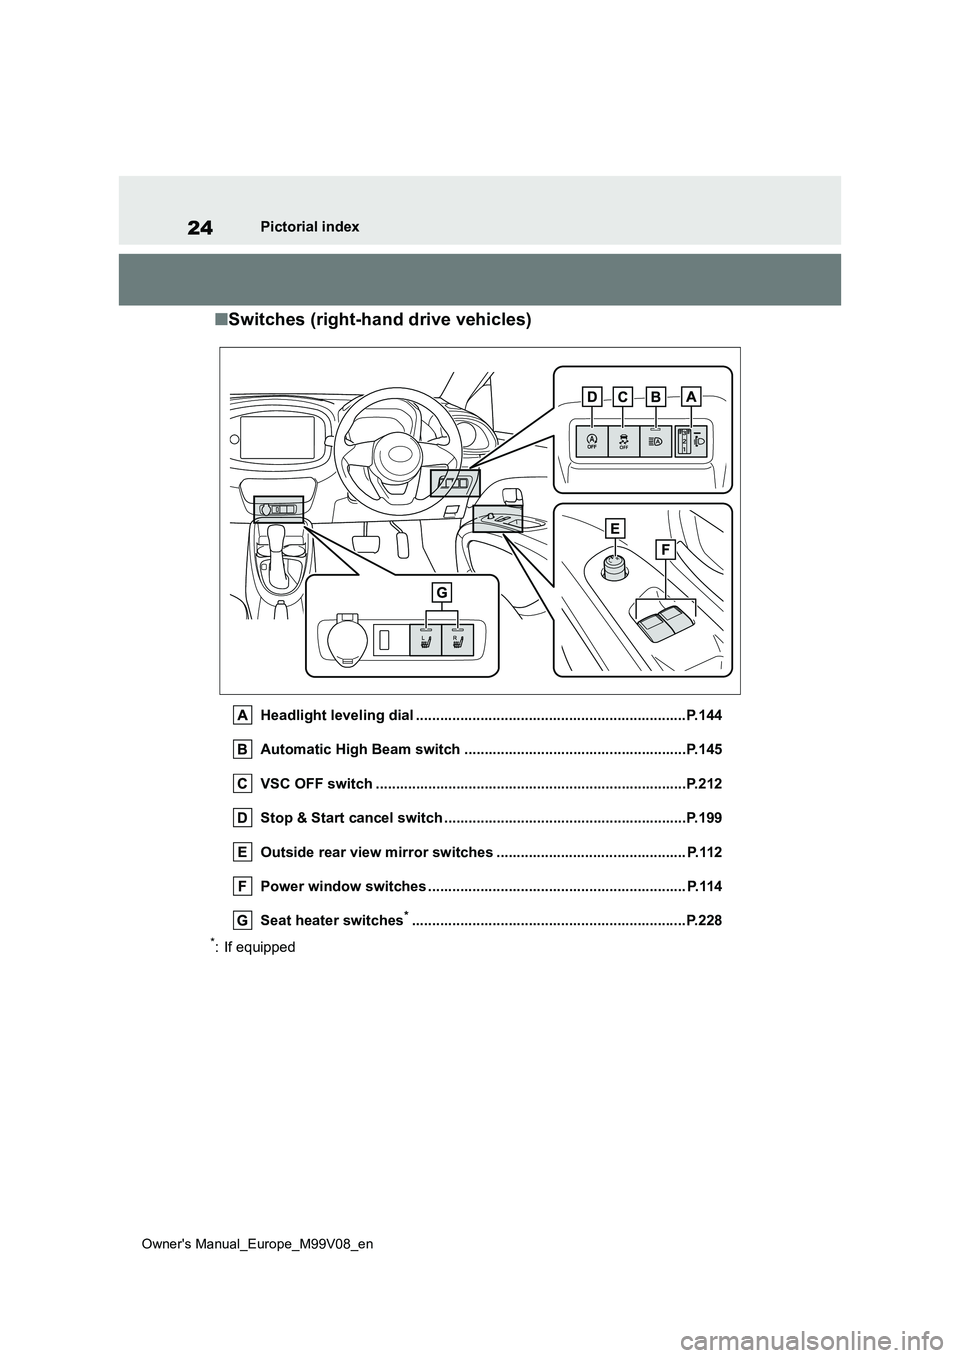
■Switches (right-hand drive vehicles)
Headlight leveling dial ...................................................................P.144
Automatic High Beam switch ..................................... ..................P.145
VSC OFF switch ................................................. ............................P.212
Stop & Start cancel switch ..................................... .......................P.199
Outside rear view mirror switches .............................. ................. P.112
Power window switches .......................................... ...................... P.114
Seat heater switches*............................................................... .....P.228
*: If equipped
Page 32 of 494
30
Owner's Manual_Europe_M99V08_en
1-1. For safe use
1-1.For s afe us e
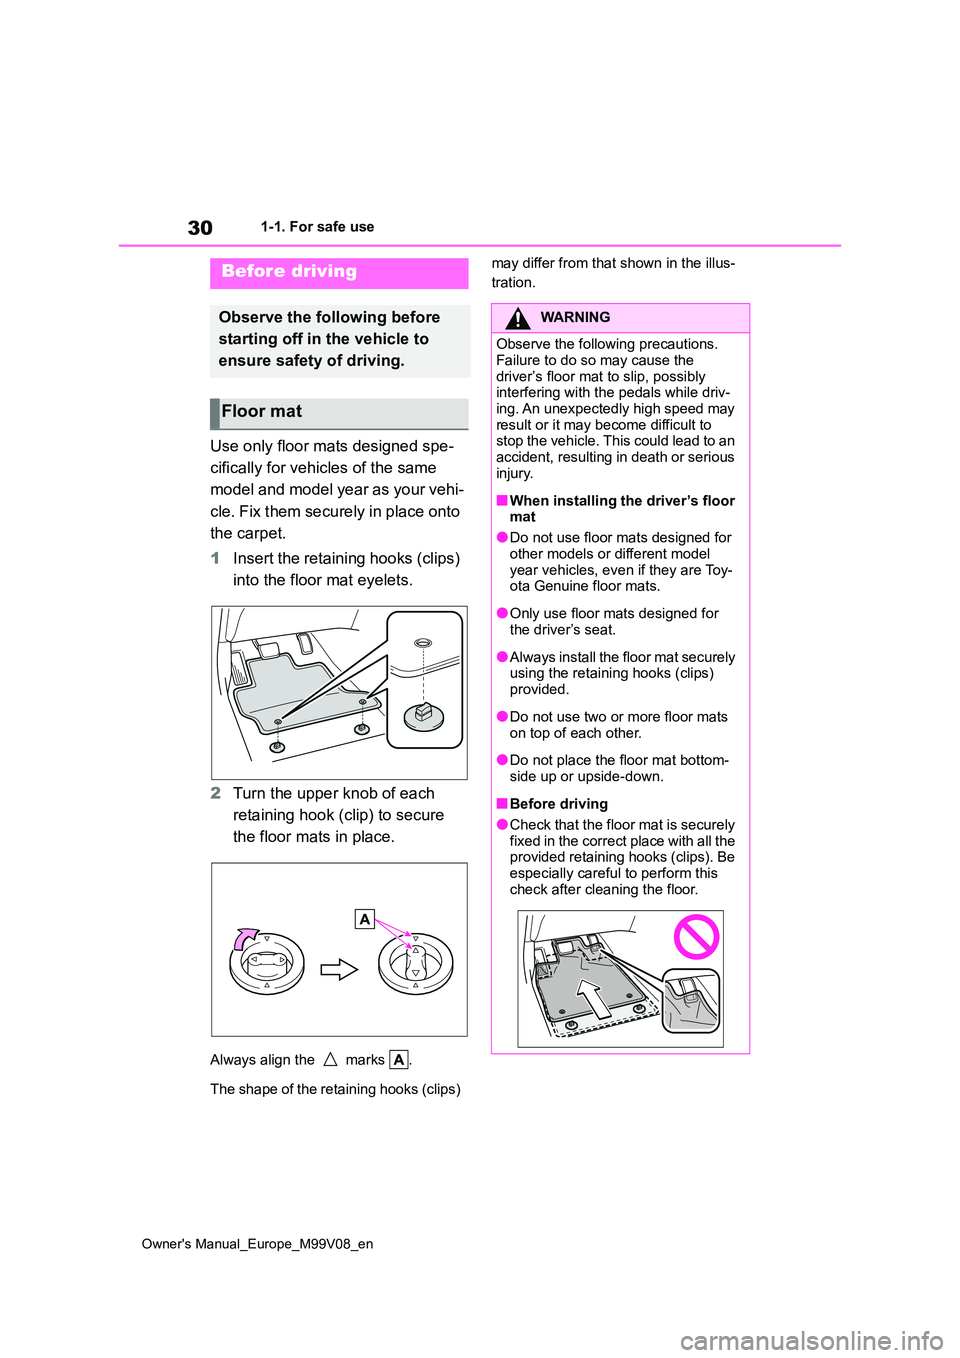
Use only floor mats designed spe-
cifically for vehicles of the same
model and model year as your vehi-
cle. Fix them securely in place onto
the carpet.
1 Insert the retaining hooks (clips)
into the floor mat eyelets.
2 Turn the upper knob of each
retaining hook (clip) to secure
the floor mats in place.
Always align the marks .
The shape of the retaining hooks (clips)
may differ from that shown in the illus-
tration.Before driving
Observe the following before
starting off in t he vehicle to
ensure safety of driving.
Floor mat
WARNING
Observe the following precautions.
Failure to do so may cause the driver’s floor mat to slip, possibly interfering with the pedals while driv-
ing. An unexpectedly high speed may result or it may become difficult to stop the vehicle. This could lead to an
accident, resulting in death or serious injury.
■When installing the driver’s floor mat
●Do not use floor mats designed for
other models or different model year vehicles, even if they are Toy-ota Genuine floor mats.
●Only use floor mats designed for the driver’s seat.
●Always install the floor mat securely using the retaining hooks (clips)
provided.
●Do not use two or more floor mats
on top of each other.
●Do not place the floor mat bottom-
side up or upside-down.
■Before driving
●Check that the floor mat is securely fixed in the correct place with all the provided retaining hooks (clips). Be
especially careful to perform this check after cleaning the floor.
Page 34 of 494
32
Owner's Manual_Europe_M99V08_en
1-1. For safe use
Make sure that all occupants are
wearing their seat belts before driv-
ing the vehicle. ( P.32)
Use a child restraint system appro-
priate for the child until the child
becomes large enough to properly
wear the vehicle’s seat belt.
( P. 4 8 )
Make sure that you can see rear of
the vehicle clearly by adjusting the
inside and outside rear view mirrors
properly. ( P. 111 , 11 2 )
WARNING
●Do n ot p la ce a cu s hi on b et we en t he driver or passenger and the seat-
back. A cushion may prevent correct pos-ture from being achieved, and
reduce the effectiveness of the seat belt and head restraint.
●Do not place anything under the front seats.Objects placed under the front
seats may become jammed in the seat tracks and stop the seat from locking in place. This may lead to
an accident and the adjustment mechanism may also be damaged.
●Always observe the legal speed limit when driving on public roads.
●When driving over long distances, take regular breaks before you start to feel tired.
Also, if you feel tired or sleepy while driving, do not force yourself to con-tinue driving and take a break
immediately.
Correct use of the seat belts
Adjusting the mirrors
Seat belts
Make sure that all occupants
are wearing their seat belts
before driving the vehicle.
WARNING
Observe the following precautions to
re d uc e t he r i sk of i n ju r y in t he e ve n t of sudden braking, sudden swerving or an accident.
Failure to do so may cause death or serious injury.
■Wearing a seat belt
●Ensure that all passengers wear a seat belt.
●Always wear a seat belt properly.
●Each seat belt should be used by one person only. Do not use a seat belt for more than one person at
once, including children.
●Toyota recommends that children
be seated in the rear seat and always use a seat belt and/or an appropriate child restraint system.
●To achieve a proper seating posi-tion, do not recline the seat more
than necessary. The seat belt is most effective when the occupants are sitting up straight and well back
in the seats.
●Do not wear the shoulder belt under
your arm.
●Always wear your seat belt low and
snug across your hips.
Page 47 of 494
45
1
Owner's Manual_Europe_M99V08_en
1-2. Child safety
For safety and security
1-2.Child sa fety
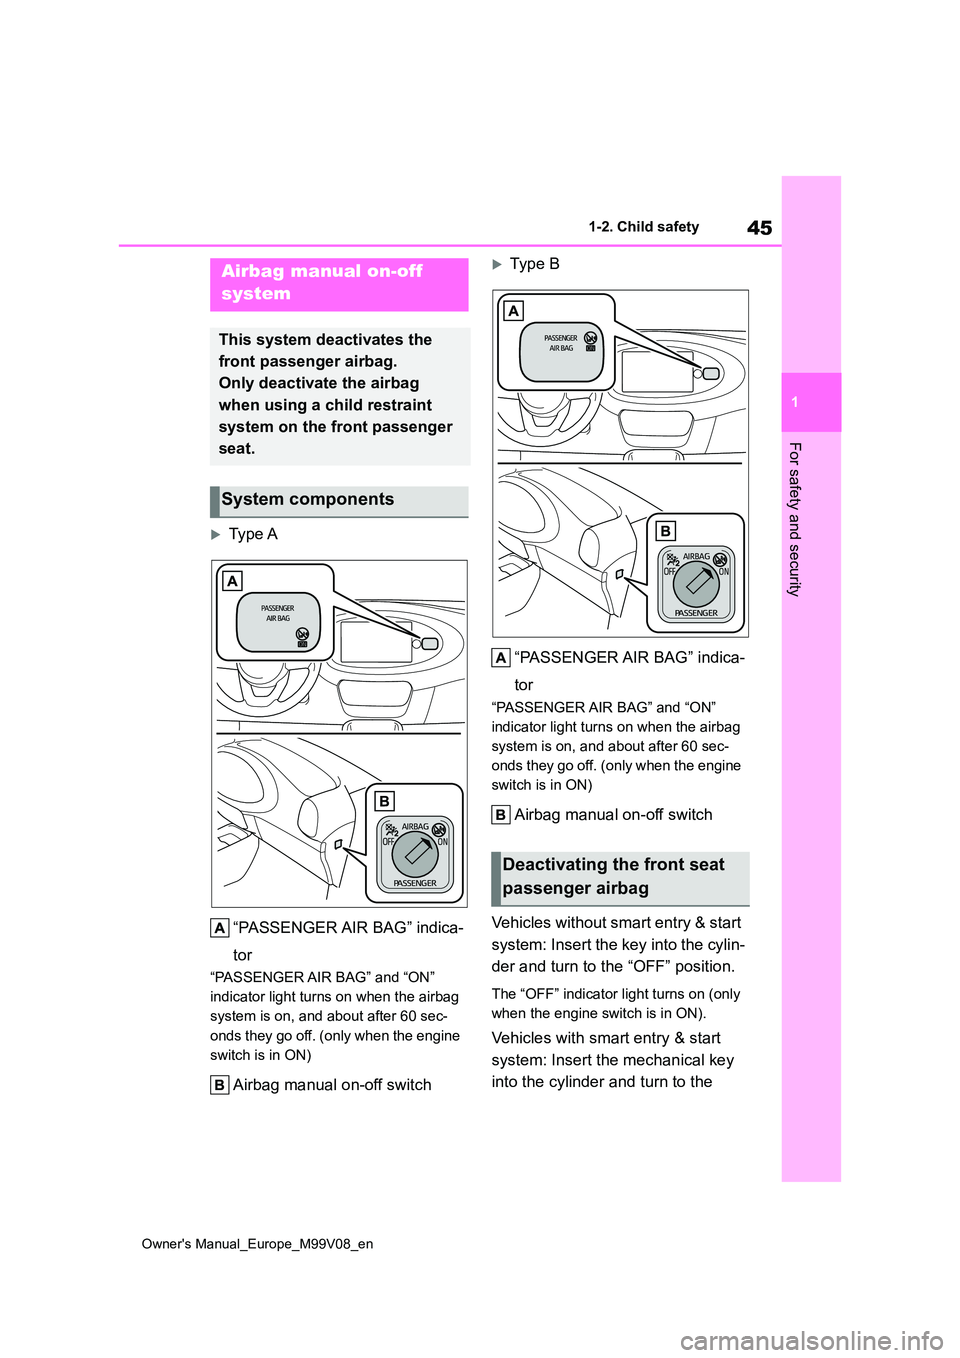
Type A
“PASSENGER AIR BAG” indica-
tor
“PASSENGER AIR BAG” and “ON”
indicator light turns on when the airbag
system is on, and about after 60 sec-
onds they go off. (only when the engine
switch is in ON)
Airbag manual on-off switch
Typ e B
“PASSENGER AIR BAG” indica-
tor
“PASSENGER AIR BAG” and “ON”
indicator light turns on when the airbag
system is on, and about after 60 sec-
onds they go off. (only when the engine
switch is in ON)
Airbag manual on-off switch
Vehicles without smart entry & start
system: Insert the key into the cylin-
der and turn to the “OFF” position.
The “OFF” indicator light turns on (only
when the engine switch is in ON).
Vehicles with smart entry & start
system: Insert the mechanical key
into the cylinder and turn to the
Airbag manual on-off
system
This system deactivates the
front passenger airbag.
Only deactivate the airbag
when using a child restraint
system on the front passenger
seat.
System components
Deactivating the front seat
passenger airbag
Page 49 of 494
47
1
Owner's Manual_Europe_M99V08_en
1-2. Child safety
For safety and security
Riding with children
Observe the following precau-
tions when children are in the
vehicle.
Use a child restraint system
appropriate for t he child, until
the child becomes large
enough to properly wear the
vehicle’s seat belt.
It is recommended that chil-
dren sit in the rear seats to
avoid accidental contact with
the shift lever, wiper switch,
etc.
Use the rear door child-protec-
tor lock or the window lock
switch to avoid children open-
ing the door while driving or
operating the power window
accidentally. ( P.99, 114)
Do not let small children oper-
ate equipment which may
catch or pinch body parts,
such as the power window,
hood, back door, seats, etc.
WARNING
■When children are in the vehicle
Never leave children unattended in
the vehicle, and never allow children to have or use the key.
Children may be able to start the vehi-
cle or shift the vehicle into neutral. There is also a danger that children may injure themselves by playing with
the windows, the canvas top, or other features of the vehicle. In addition, heat build-up or extremely cold tem-
peratures inside the vehicle can be fatal to children.
Page 76 of 494
74
Owner's Manual_Europe_M99V08_en
1-4. Theft deterrent system
1-4.Theft de terre nt sys te m
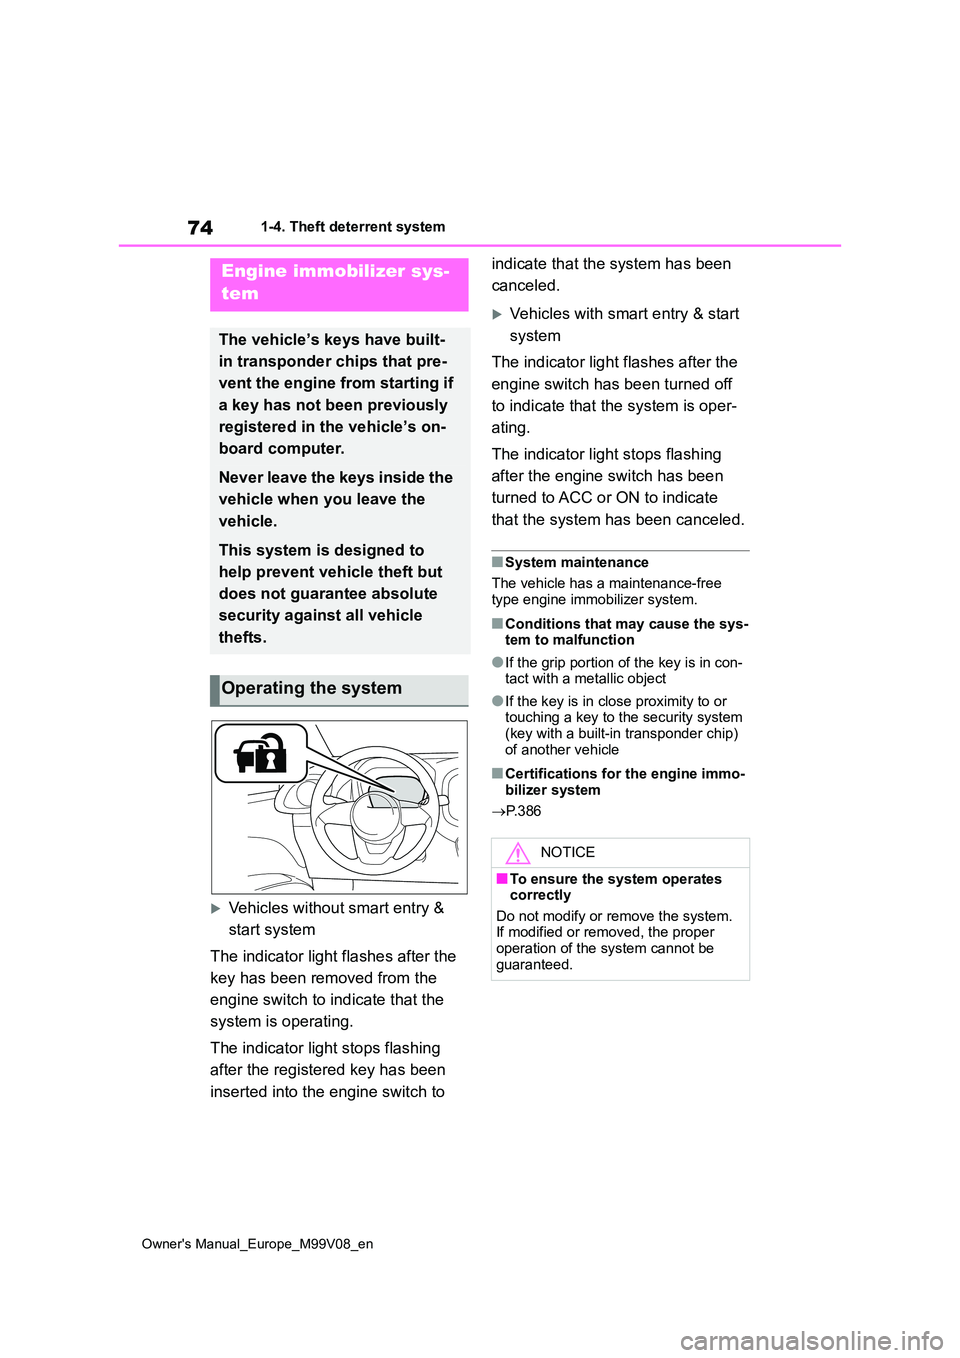
Vehicles without smart entry &
start system
The indicator light flashes after the
key has been removed from the
engine switch to indicate that the
system is operating.
The indicator light stops flashing
after the registered key has been
inserted into the engine switch to
indicate that the system has been
canceled.
Vehicles with smart entry & start
system
The indicator light flashes after the
engine switch has been turned off
to indicate that the system is oper-
ating.
The indicator light stops flashing
after the engine switch has been
turned to ACC or ON to indicate
that the system has been canceled.
■System maintenance
The vehicle has a maintenance-free
type engine immobilizer system.
■Conditions that may cause the sys- tem to malfunction
●If the grip portion of the key is in con-tact with a metallic object
●If the key is in close proximity to or touching a key to the security system (key with a built-in transponder chip)
of another vehicle
■Certifications for the engine immo- bilizer system
P. 3 8 6
Engine immobilizer sys-
tem
The vehicle’s keys have built-
in transponder chips that pre-
vent the engine from starting if
a key has not been previously
registered in the vehicle’s on-
board computer.
Never leave the keys inside the
vehicle when you leave the
vehicle.
This system is designed to
help prevent vehicle theft but
does not guarantee absolute
security against all vehicle
thefts.
Operating the system
NOTICE
■To ensure the system operates correctly
Do not modify or remove the system. If modified or removed, the proper operation of the system cannot be
guaranteed.
Page 79 of 494
77
2
Owner's Manual_Europe_M99V08_en
2-1. Instrument cluster
Vehicle status information and indicators
*1: These lights come on when the
engine switch is turned to ON to indi-
cate that a system check is being
performed. They will turn off after the
engine is started, or after a few sec-
onds. There may be a malfunction in
a system if the lights do not come
on, or turn off. Have the vehicle
inspected by any authorized Toyota
retailer or Toyota authorized repairer,
or any reliable repairer.
*2: This light illuminates on the multi-
information display.
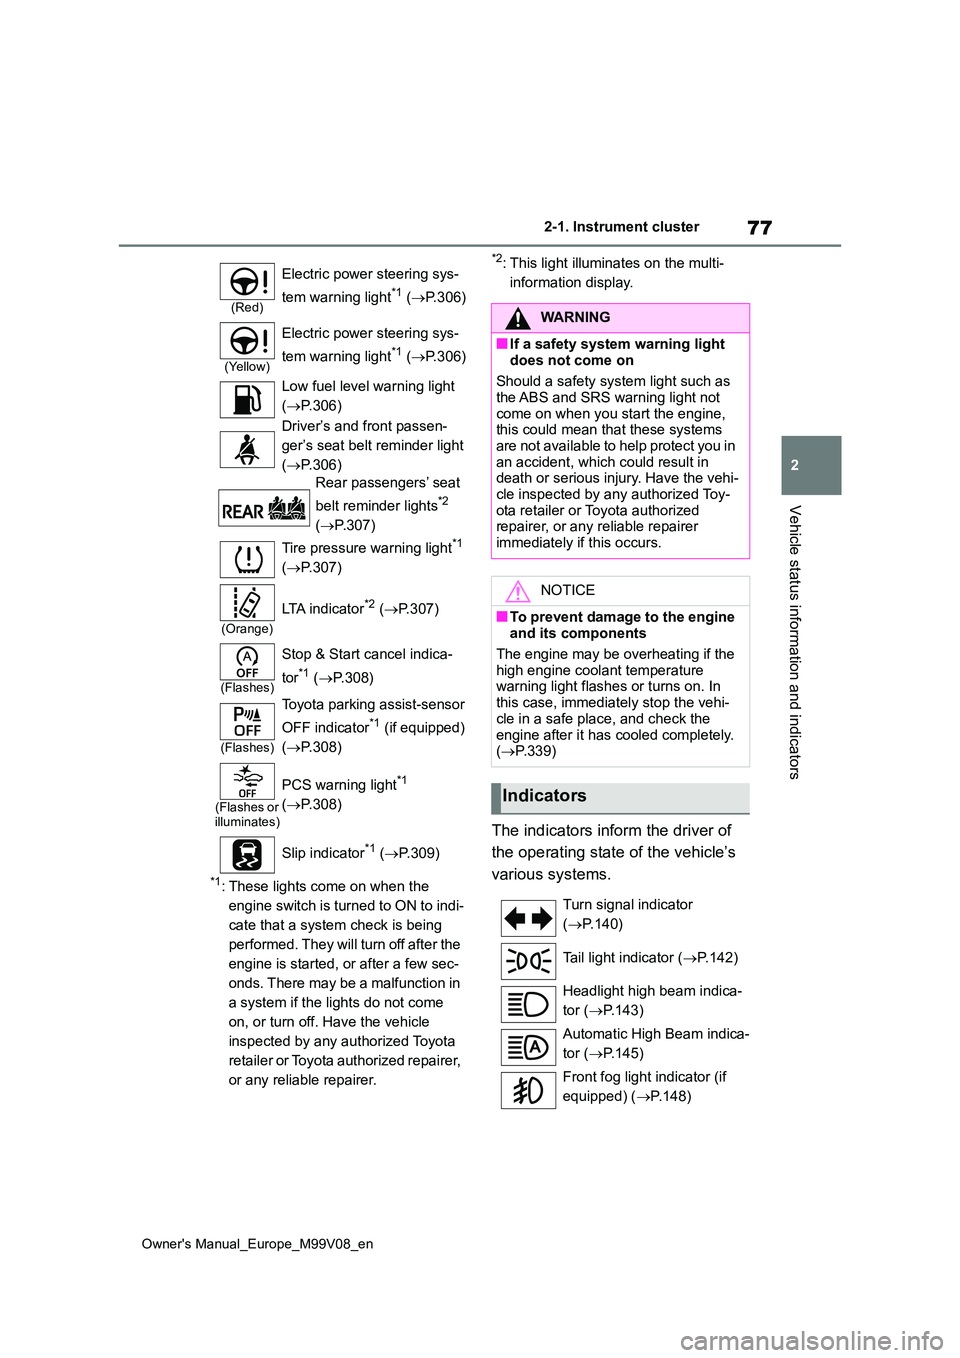
The indicators inform the driver of
the operating state of the vehicle’s
various systems.
(Red)
Electric power steering sys-
tem warning light*1 ( P.306)
(Yellow)
Electric power steering sys-
tem warning light*1 ( P.306)
Low fuel level warning light
( P.306)
Driver’s and front passen-
ger’s seat belt reminder light
( P.306)
Rear passengers’ seat
belt reminder lights*2
( P.307)
Tire pressure warning light*1
( P.307)
(Orange)
LTA indicator*2 (P.307)
(Flashes)
Stop & Start cancel indica-
tor*1 ( P.308)
(Flashes)
Toyota parking assist-sensor
OFF indicator*1 (if equipped)
( P.308)
(Flashes or illuminates)
PCS warning light*1
( P.308)
Slip indicator*1 ( P.309)
WARNING
■If a safety system warning light
does not come on
Should a safety system light such as the ABS and SRS warning light not
come on when you start the engine, this could mean that these systems are not available to help protect you in
an accident, which could result in death or serious injury. Have the vehi-cle inspected by any authorized Toy-
ota retailer or Toyota authorized repairer, or any reliable repairer immediately if this occurs.
NOTICE
■To prevent damage to the engine and its components
The engine may be overheating if the high engine coolant temperature warning light flashes or turns on. In
this case, immediately stop the vehi- cle in a safe place, and check the
engine after it has cooled completely. ( P.339)
Indicators
Turn signal indicator
( P.140)
Tail light indicator ( P.142)
Headlight high beam indica-
tor ( P.143)
Automatic High Beam indica-
tor ( P.145)
Front fog light indicator (if
equipped) ( P.148)
Page 80 of 494
78
Owner's Manual_Europe_M99V08_en
2-1. Instrument cluster
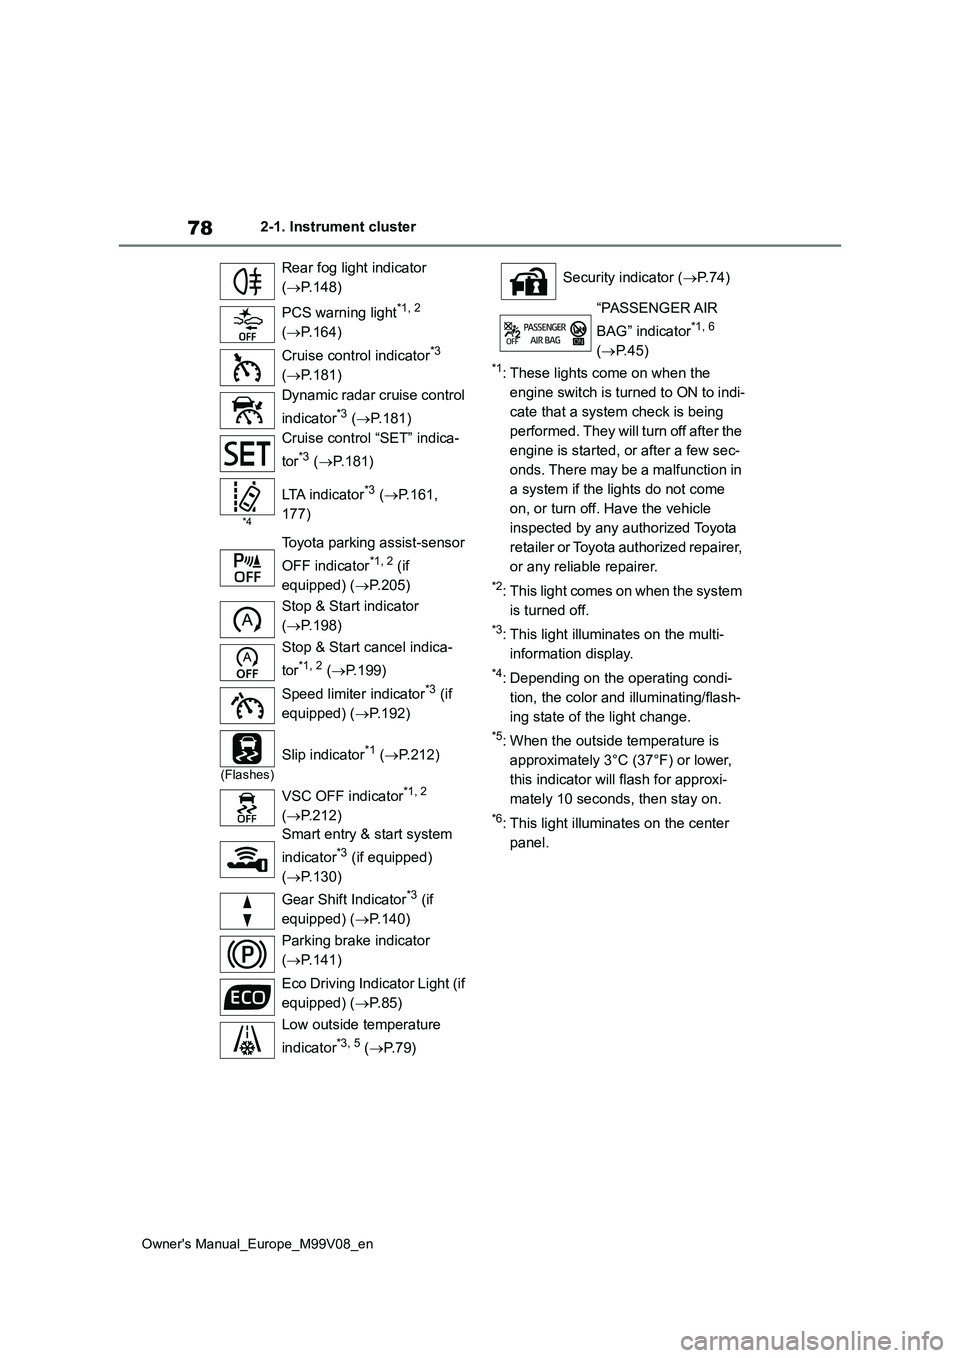
*1: These lights come on when the
engine switch is turned to ON to indi-
cate that a system check is being
performed. They will turn off after the
engine is started, or after a few sec-
onds. There may be a malfunction in
a system if the lights do not come
on, or turn off. Have the vehicle
inspected by any authorized Toyota
retailer or Toyota authorized repairer,
or any reliable repairer.
*2: This light comes on when the system
is turned off.
*3: This light illuminates on the multi-
information display.
*4: Depending on the operating condi-
tion, the color and illuminating/flash-
ing state of the light change.
*5: When the outside temperature is
approximately 3°C (37°F) or lower,
this indicator will flash for approxi-
mately 10 seconds, then stay on.
*6: This light illuminates on the center
panel.
Rear fog light indicator
( P.148)
PCS warning light*1, 2
( P.164)
Cruise control indicator*3
( P.181)
Dynamic radar cruise control
indicator*3 ( P.181)
Cruise control “SET” indica-
tor*3 ( P.181)
*4
LTA indicator*3 (P.161,
177)
Toyota parking assist-sensor
OFF indicator*1, 2 (if
equipped) ( P.205)
Stop & Start indicator
( P.198)
Stop & Start cancel indica-
tor*1, 2 ( P.199)
Speed limiter indicator*3 (if
equipped) ( P.192)
(Flashes)
Slip indicator*1 (P.212)
VSC OFF indicator*1, 2
( P.212)
Smart entry & start system
indicator*3 (if equipped)
( P.130)
Gear Shift Indicator*3 (if
equipped) ( P.140)
Parking brake indicator
( P.141)
Eco Driving Indicator Light (if
equipped) ( P. 8 5 )
Low outside temperature
indicator*3, 5 ( P. 7 9 )
Security indicator (P. 7 4 )
“PASSENGER AIR
BAG” indicator*1, 6
( P.45)
Page 87 of 494
85
2
Owner's Manual_Europe_M99V08_en
2-1. Instrument cluster
Vehicle status information and indicators
Displays driving range with remaining
fuel.
This distance is computed based on
your average fuel consumption. As a
result, the actual distance that can be
driven may differ from that displayed.
When only a small amount of fuel is
added to the tank, the display may not
be updated.
When refueling, turn the engine switch
off. If the vehicle is refueled without
turning the engine switch off, the dis-
play may not be updated.
The average fuel economy display
can be changed in . ( P. 8 6 )
Average fuel economy (after
start)
Displays the average fuel consumption
since engine start.
Average fuel economy (after
refuel)
Displays the average fuel consumption
since the vehicle was refueled.
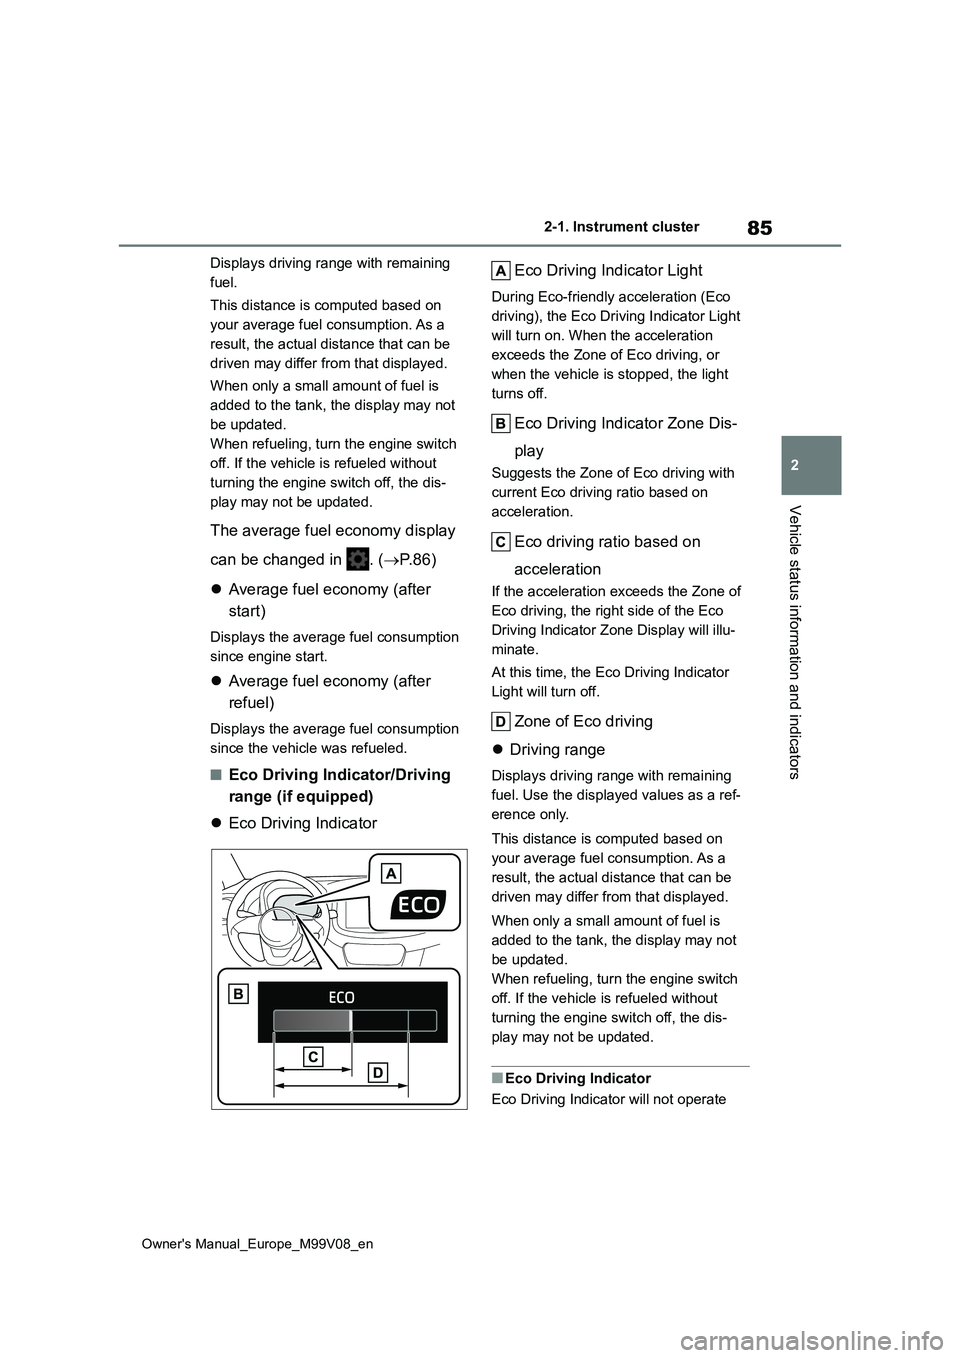
■Eco Driving Indicator/Driving
range (if equipped)
Eco Driving Indicator
Eco Driving Indicator Light
During Eco-friendly acceleration (Eco
driving), the Eco Driving Indicator Light
will turn on. When the acceleration
exceeds the Zone of Eco driving, or
when the vehicle is stopped, the light
turns off.
Eco Driving Indicator Zone Dis-
play
Suggests the Zone of Eco driving with
current Eco driving ratio based on
acceleration.
Eco driving ratio based on
acceleration
If the acceleration exceeds the Zone of
Eco driving, the right side of the Eco
Driving Indicator Zone Display will illu-
minate.
At this time, the Eco Driving Indicator
Light will turn off.
Zone of Eco driving
Driving range
Displays driving range with remaining
fuel. Use the displayed values as a ref-
erence only.
This distance is computed based on
your average fuel consumption. As a
result, the actual distance that can be
driven may differ from that displayed.
When only a small amount of fuel is
added to the tank, the display may not
be updated.
When refueling, turn the engine switch
off. If the vehicle is refueled without
turning the engine switch off, the dis-
play may not be updated.
■Eco Driving Indicator
Eco Driving Indicator will not operate