TOYOTA AYGO X 2022 Owners Manual (in English)
Manufacturer: TOYOTA, Model Year: 2022, Model line: AYGO X, Model: TOYOTA AYGO X 2022Pages: 494, PDF Size: 92.53 MB
Page 281 of 494
279
6
Owner's Manual_Europe_M99V08_en
6-3. Do-it-yourself maintenance
Maintenance and care
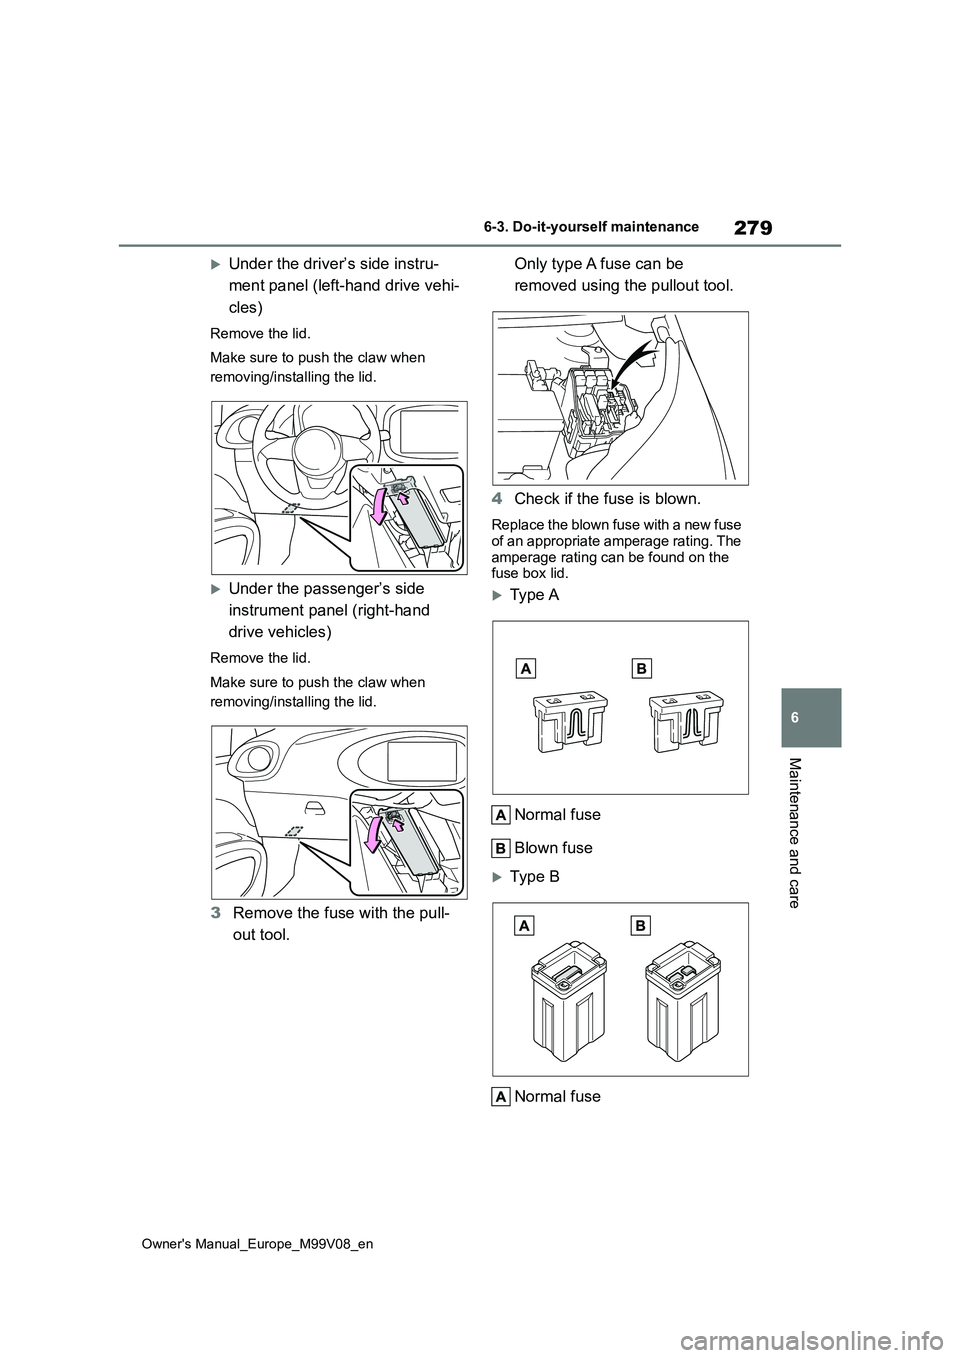
Under the driver’s side instru-
ment panel (left-hand drive vehi-
cles)
Remove the lid.
Make sure to push the claw when
removing/installing the lid.
Under the passenger’s side
instrument panel (right-hand
drive vehicles)
Remove the lid.
Make sure to push the claw when
removing/installing the lid.
3 Remove the fuse with the pull-
out tool.
Only type A fuse can be
removed using the pullout tool.
4 Check if the fuse is blown.
Replace the blown fuse with a new fuse of an appropriate amperage rating. The
amperage rating can be found on the fuse box lid.
Typ e A
Normal fuse
Blown fuse
Typ e B
Normal fuse
Page 282 of 494
280
Owner's Manual_Europe_M99V08_en
6-3. Do-it-yourself maintenance
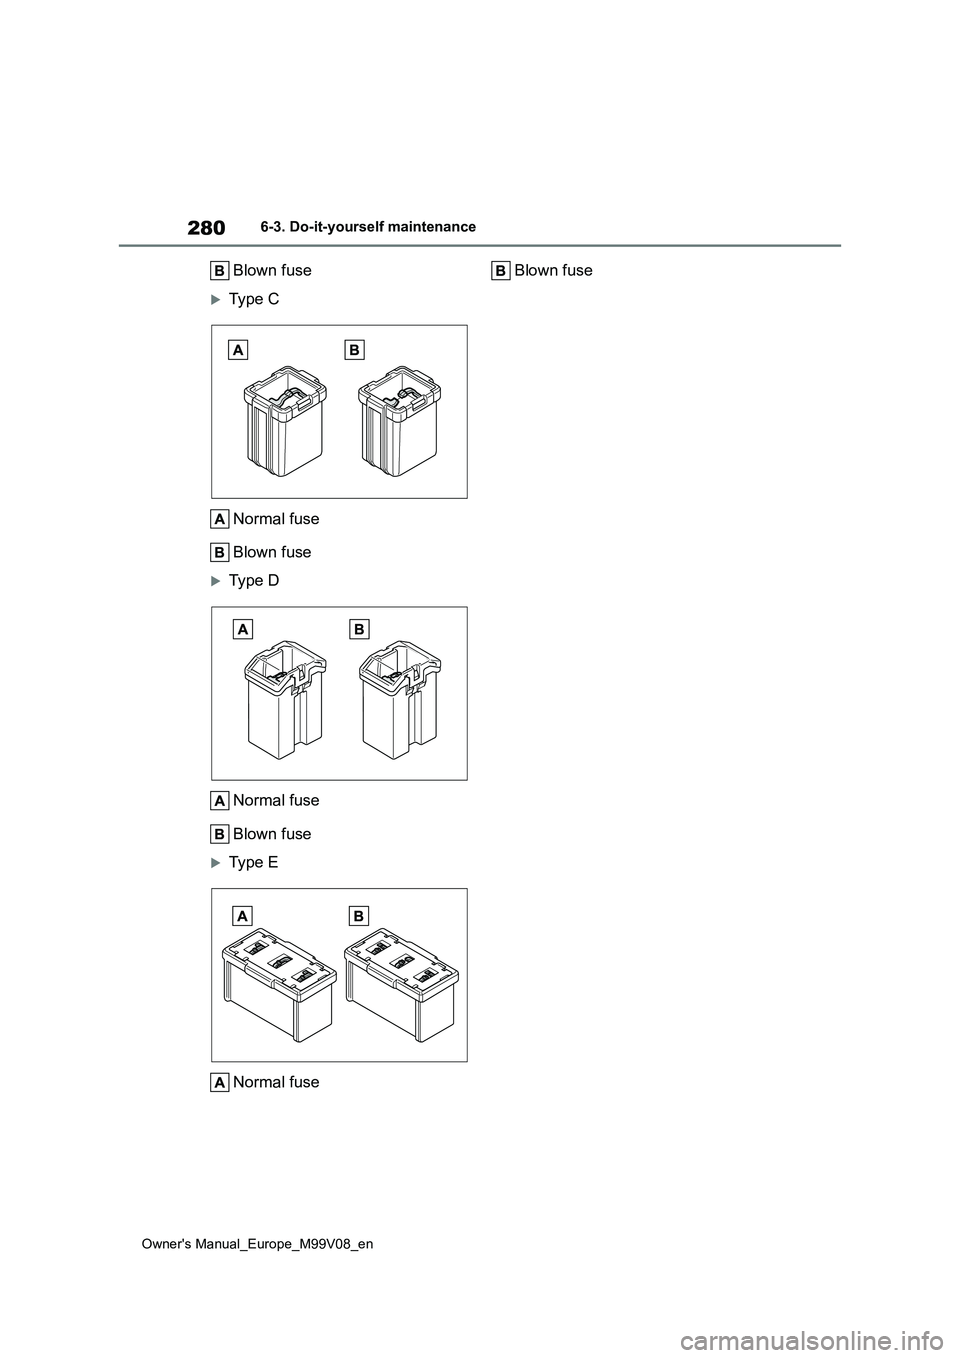
Blown fuse
Type C
Normal fuse
Blown fuse
Type D
Normal fuse
Blown fuse
Type E
Normal fuse
Blown fuse
Page 283 of 494
281
6
Owner's Manual_Europe_M99V08_en
6-3. Do-it-yourself maintenance
Maintenance and care
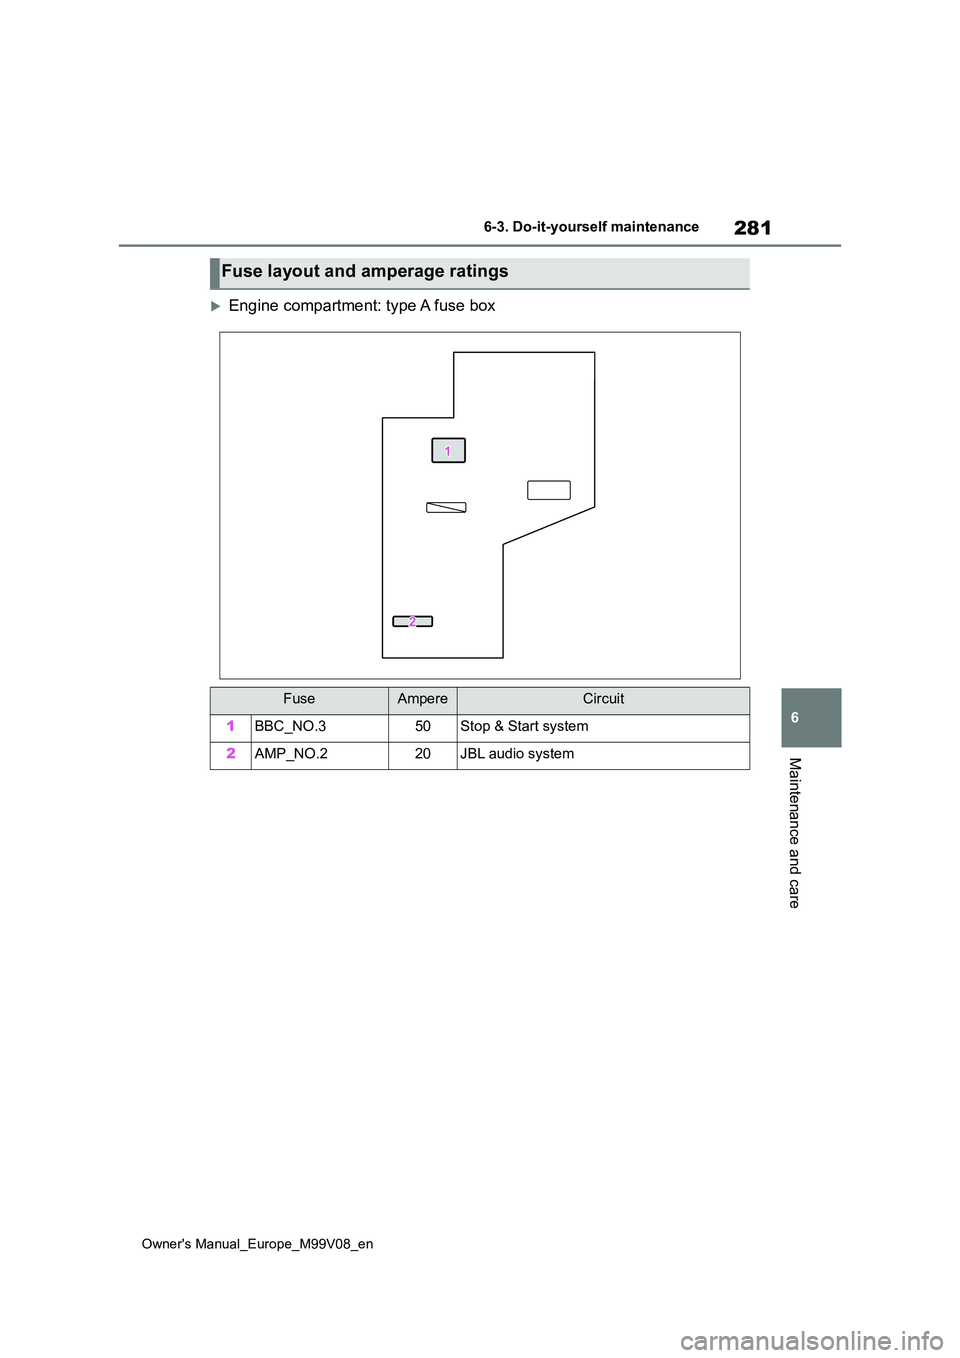
Engine compartment: type A fuse box
Fuse layout and amperage ratings
FuseAmpereCircuit
1BBC_NO.350Stop & Start system
2AMP_NO.220JBL audio system
Page 284 of 494
282
Owner's Manual_Europe_M99V08_en
6-3. Do-it-yourself maintenance
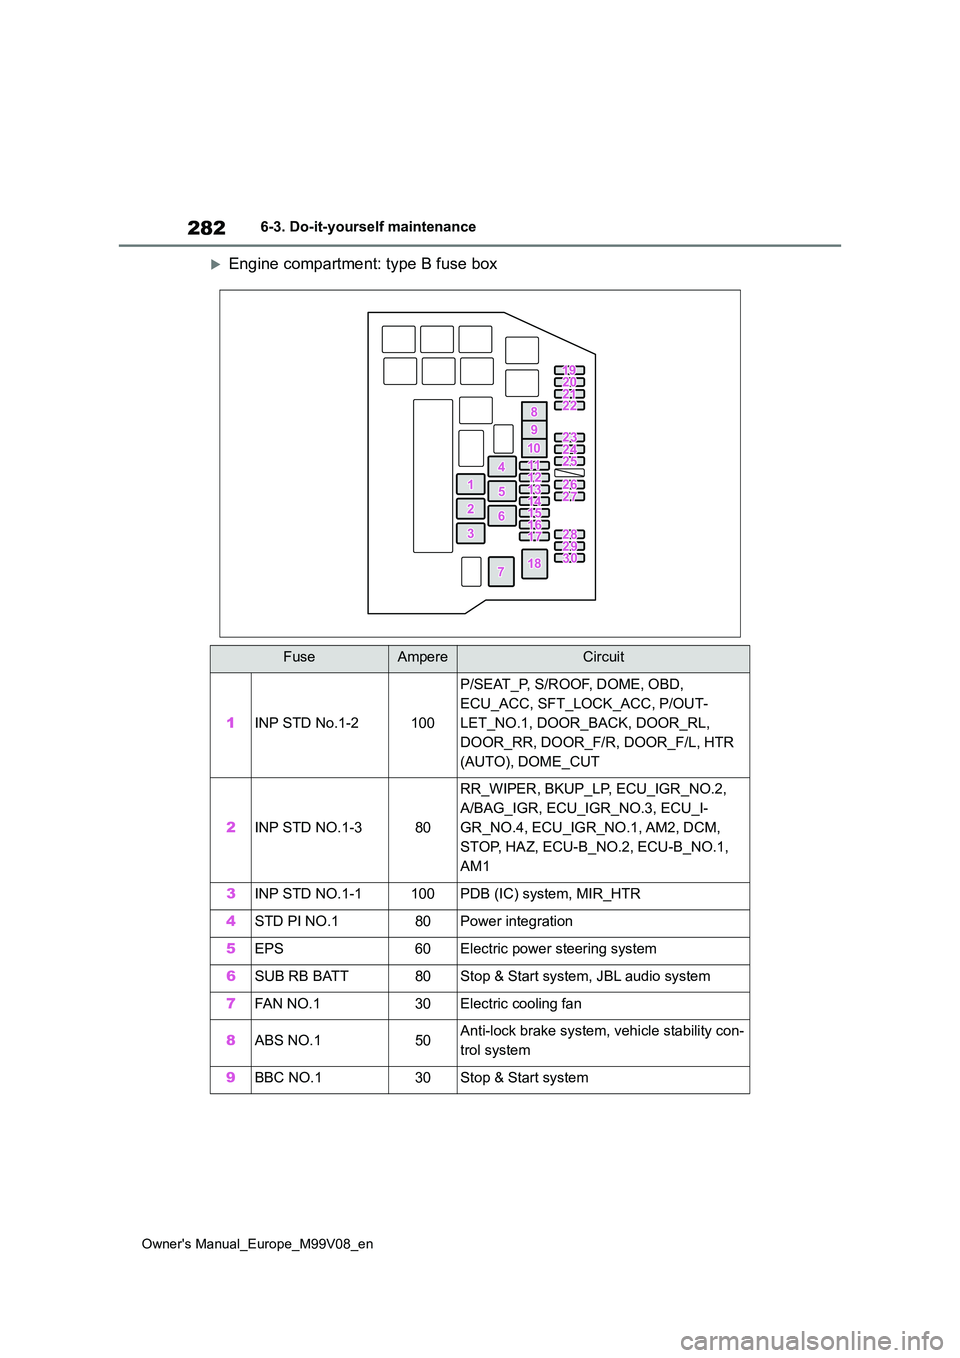
Engine compartment: type B fuse box
FuseAmpereCircuit
1INP STD No.1-2100
P/SEAT_P, S/ROOF, DOME, OBD,
ECU_ACC, SFT_LOCK_ACC, P/OUT-
LET_NO.1, DOOR_BACK, DOOR_RL,
DOOR_RR, DOOR_F/R, DOOR_F/L, HTR
(AUTO), DOME_CUT
2INP STD NO.1-380
RR_WIPER, BKUP_LP, ECU_IGR_NO.2,
A/BAG_IGR, ECU_IGR_NO.3, ECU_I-
GR_NO.4, ECU_IGR_NO.1, AM2, DCM,
STOP, HAZ, ECU-B_NO.2, ECU-B_NO.1,
AM1
3INP STD NO.1-1100PDB (IC) system, MIR_HTR
4STD PI NO.180Power integration
5EPS60Electric power steering system
6SUB RB BATT80Stop & Start system, JBL audio system
7FA N N O. 130Electric cooling fan
8ABS NO.150Anti-lock brake system, vehicle stability con-
trol system
9BBC NO.130Stop & Start system
Page 285 of 494
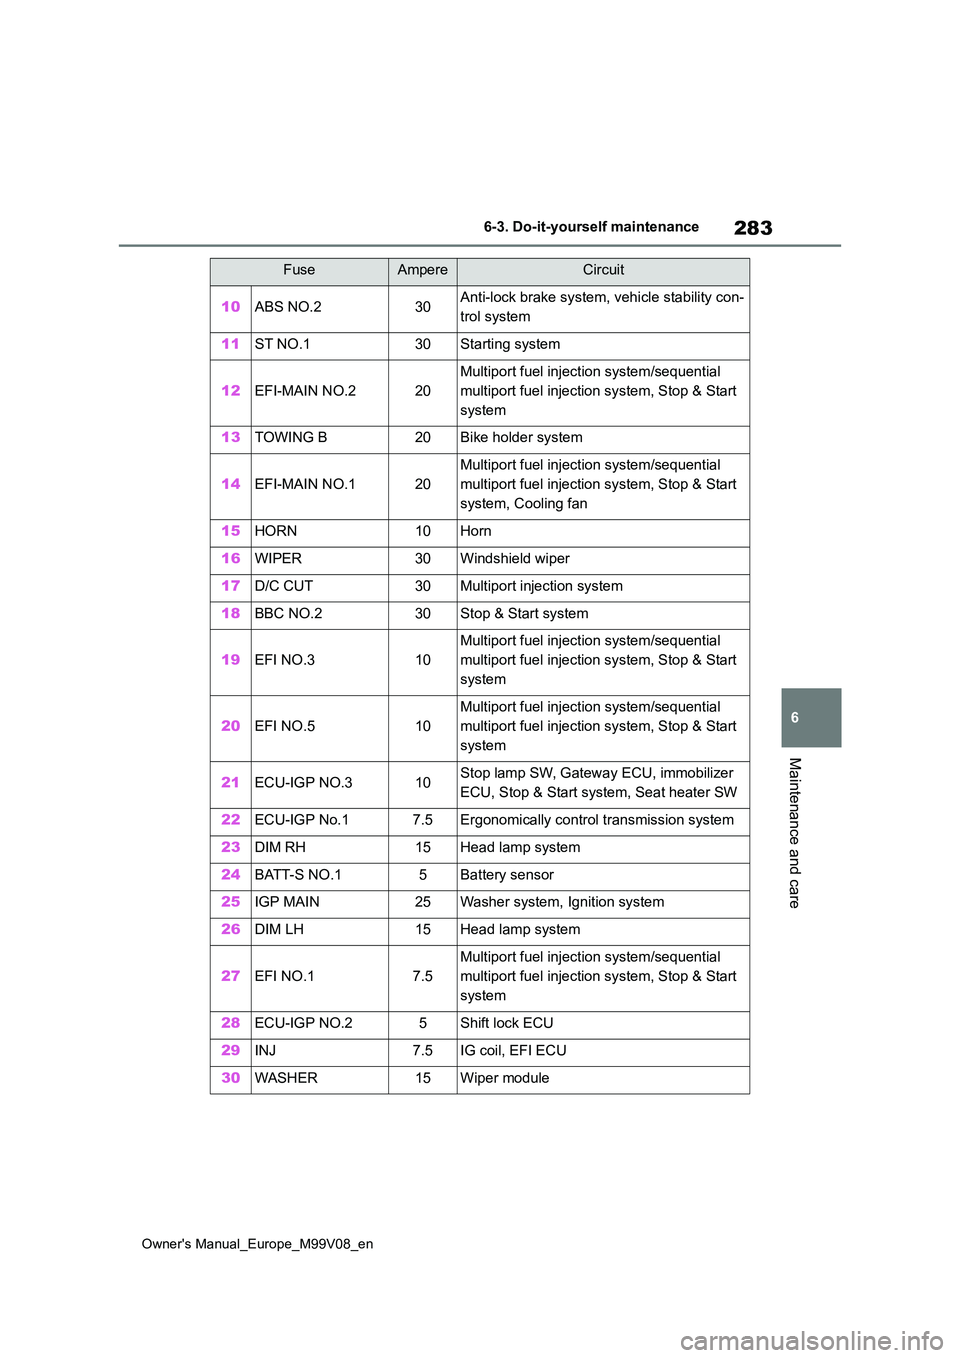
283
6
Owner's Manual_Europe_M99V08_en
6-3. Do-it-yourself maintenance
Maintenance and care
10ABS NO.230Anti-lock brake system, vehicle stability con-
trol system
11ST NO.130Starting system
12EFI-MAIN NO.220
Multiport fuel injection system/sequential
multiport fuel injection system, Stop & Start
system
13TOWING B20Bike holder system
14EFI-MAIN NO.120
Multiport fuel injection system/sequential
multiport fuel injection system, Stop & Start
system, Cooling fan
15HORN10Horn
16WIPER30Windshield wiper
17D/C CUT30Multiport injection system
18BBC NO.230Stop & Start system
19EFI NO.310
Multiport fuel injection system/sequential
multiport fuel injection system, Stop & Start
system
20EFI NO.510
Multiport fuel injection system/sequential
multiport fuel injection system, Stop & Start
system
21ECU-IGP NO.310Stop lamp SW, Gateway ECU, immobilizer
ECU, Stop & Start system, Seat heater SW
22ECU-IGP No.17.5Ergonomically control transmission system
23DIM RH15Head lamp system
24BATT-S NO.15Battery sensor
25IGP MAIN25Washer system, Ignition system
26DIM LH15Head lamp system
27EFI NO.17.5
Multiport fuel injection system/sequential
multiport fuel injection system, Stop & Start
system
28ECU-IGP NO.25Shift lock ECU
29INJ7.5IG coil, EFI ECU
30WASHER15Wiper module
FuseAmpereCircuit
Page 286 of 494
284
Owner's Manual_Europe_M99V08_en
6-3. Do-it-yourself maintenance
■After a fuse is replaced
●When installing the lid, make sure that the tab is installed securely.
●If the lights do not turn on even after the fuse has been replaced, a bulb may need replacement. ( P.285)
●If the replaced fuse blows again, have the vehicle inspected by any autho-
rized Toyota retailer or Toyota autho- rized repairer, or any reliable repairer.
■If there is an overload in a circuit
The fuses are designed to blow, protect-
ing the wiring harness from damage.
■When replacing light bulbs
Toyota recommends that you use genu- ine Toyota products designed for this
vehicle. Because certain bulbs are connected to circuits designed to prevent overload,
non-genuine parts of parts not designed for this vehicle may be unusable.
WARNING
■To prevent system breakdowns and vehicle fire
Observe the following precautions.
Failure to do so may cause damage to the vehicle, and possibly a fire or injury.
●Never use a fuse of a higher amperage rating than that indi-
cated, or use any other object in place of a fuse.
●Always use a genuine Toyota fuse or equivalent.Never replace a fuse with a wire,
even as a temporary fix.
●Do not modify the fuses or fuse
boxes.
NOTICE
■Before replacing fuses
Have the cause of electrical overload
determined and repaired by any authorized Toyota retailer or Toyota authorized repairer, or any reliable
repairer as soon as possible.
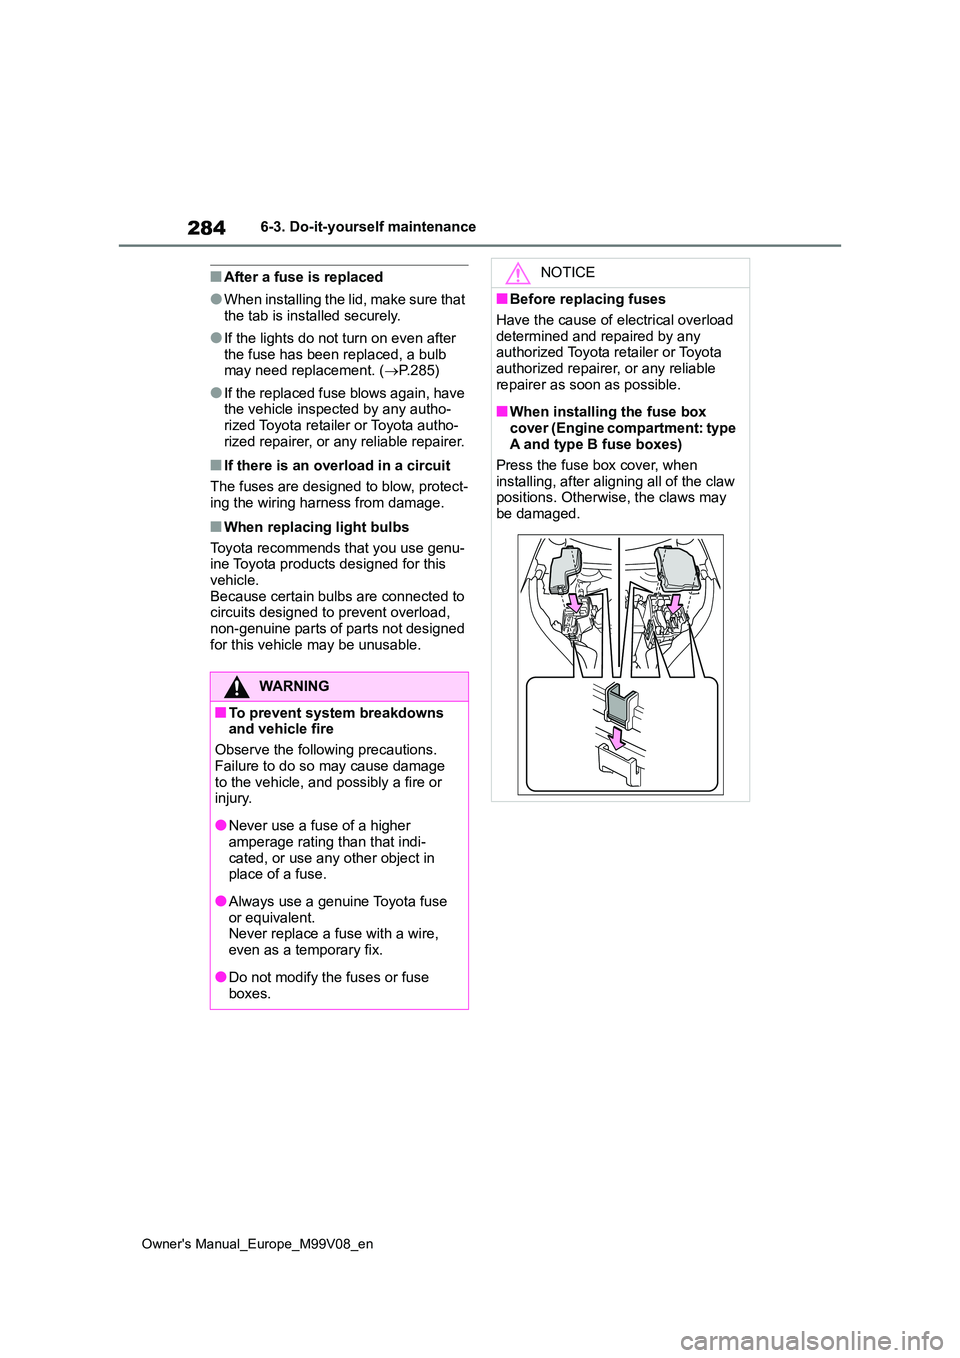
■When installing the fuse box
cover (Engine compartment: type A and type B fuse boxes)
Press the fuse box cover, when
installing, after aligning all of the claw positions. Otherwise, the claws may be damaged.
Page 287 of 494
285
6
Owner's Manual_Europe_M99V08_en
6-3. Do-it-yourself maintenance
Maintenance and care
Check the wattage of the light bulb
to be replaced. ( P.350)
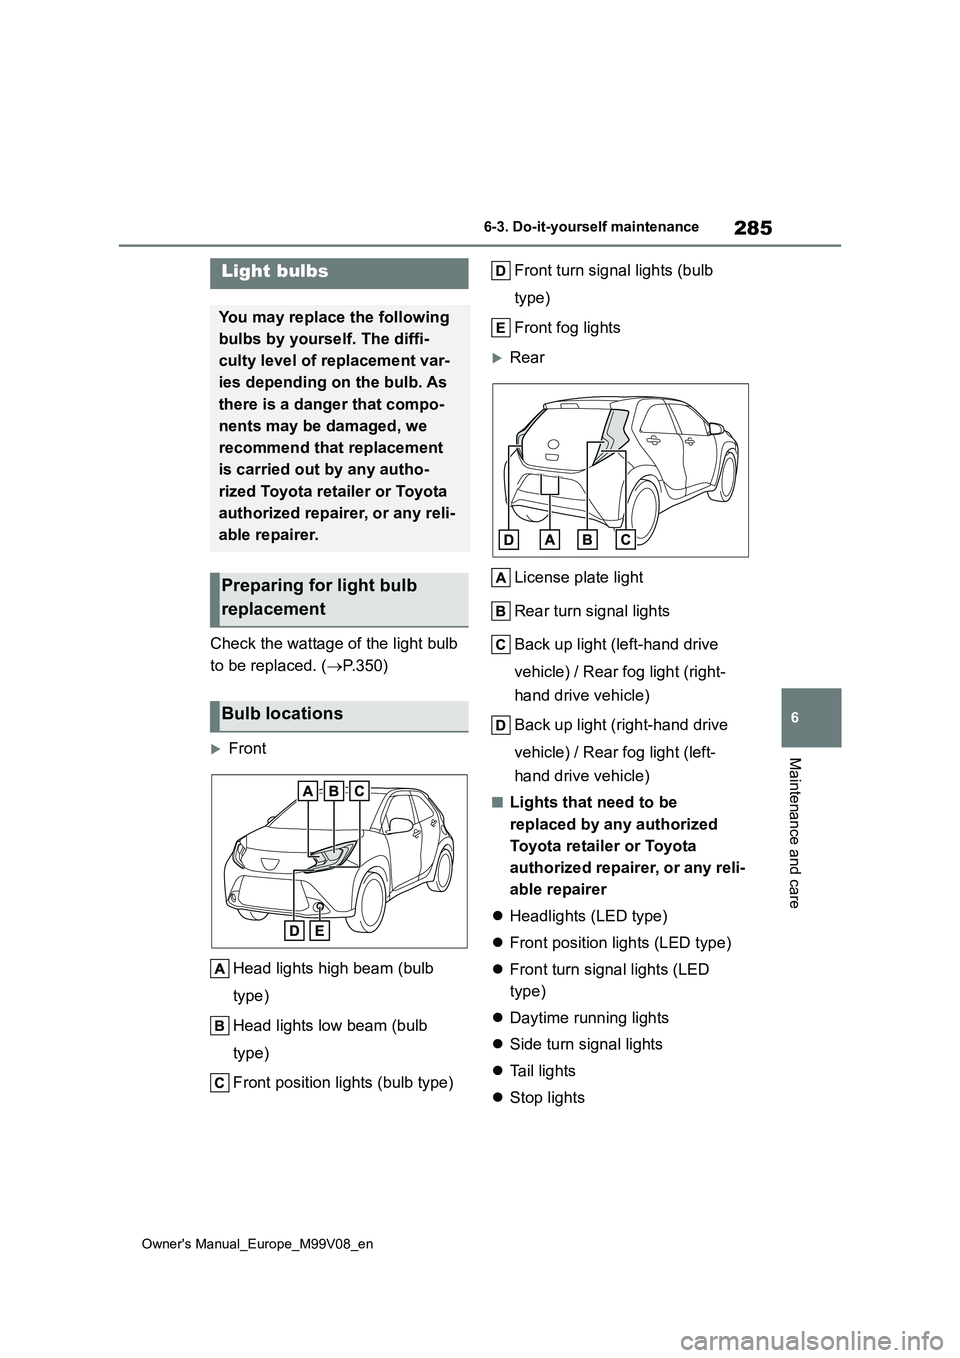
Front
Head lights high beam (bulb
type)
Head lights low beam (bulb
type)
Front position lights (bulb type)
Front turn signal lights (bulb
type)
Front fog lights
Rear
License plate light
Rear turn signal lights
Back up light (left-hand drive
vehicle) / Rear fog light (right-
hand drive vehicle)
Back up light (right-hand drive
vehicle) / Rear fog light (left-
hand drive vehicle)
■Lights that need to be
replaced by any authorized
Toyota retailer or Toyota
authorized repairer, or any reli-
able repairer
Headlights (LED type)
Front position lights (LED type)
Front turn signal lights (LED
type)
Daytime running lights
Side turn signal lights
Ta i l l i g h t s
Stop lights
Light bulbs
You may replace the following
bulbs by yourself. The diffi-
culty level of replacement var-
ies depending on the bulb. As
there is a danger that compo-
nents may be damaged, we
recommend that replacement
is carried out by any autho-
rized Toyota retailer or Toyota
authorized repairer, or any reli-
able repairer.
Preparing for light bulb
replacement
Bulb locations
Page 288 of 494
286
Owner's Manual_Europe_M99V08_en
6-3. Do-it-yourself maintenance
High mounted stoplight
■LED light bulbs
The lights other than the following lights each consist of a number of LEDs. If any of the LEDs burn out, take your vehicle
to any authorized Toyota retailer or Toy- ota authorized repairer, or any reliable repairer to have the light replaced.
●Headlights low beam (bulb type)
●Headlights high beam (bulb type)
●Front position lights (bulb type)
●Front turn signal lights (bulb type)
●Front fog lights
●Side turn signal lights
●Rear turn signal lights
●Back up light
●Rear fog light
●License plate light
■Condensation build-up on the inside of the lens
Temporary condensation build-up on the inside of the headlight lens does not indicate a malfunction. Contact any
authorized Toyota retailer or Toyota authorized repairer, or any reliable repairer for more information in the fol-
lowing situations:
●Large drops of water have built up on
the inside of the lens.
●Water has built up inside the head-
light.
■When replacing light bulbs
P. 2 8 4
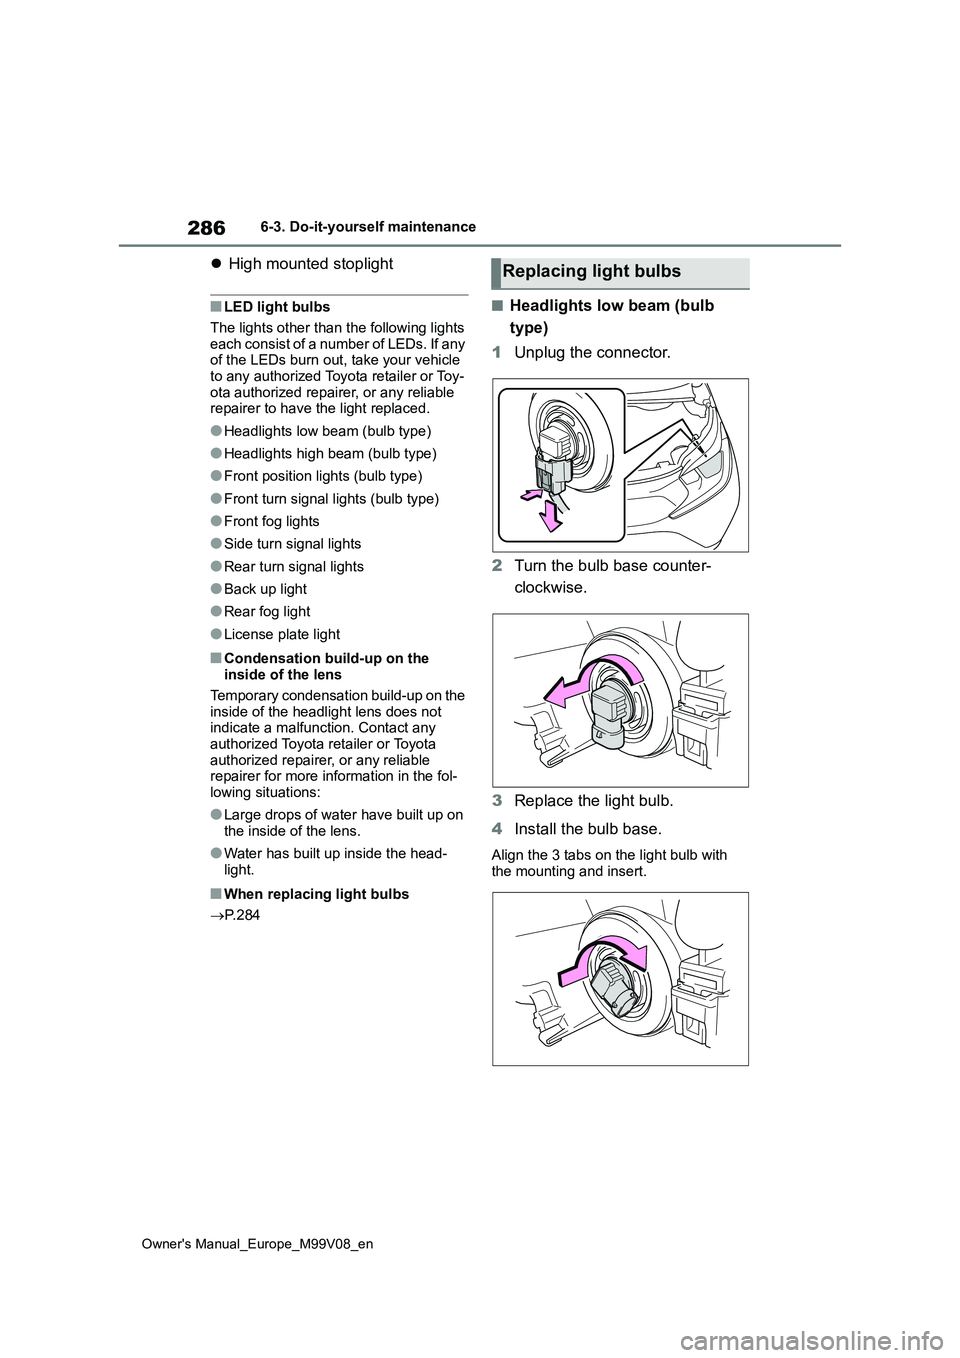
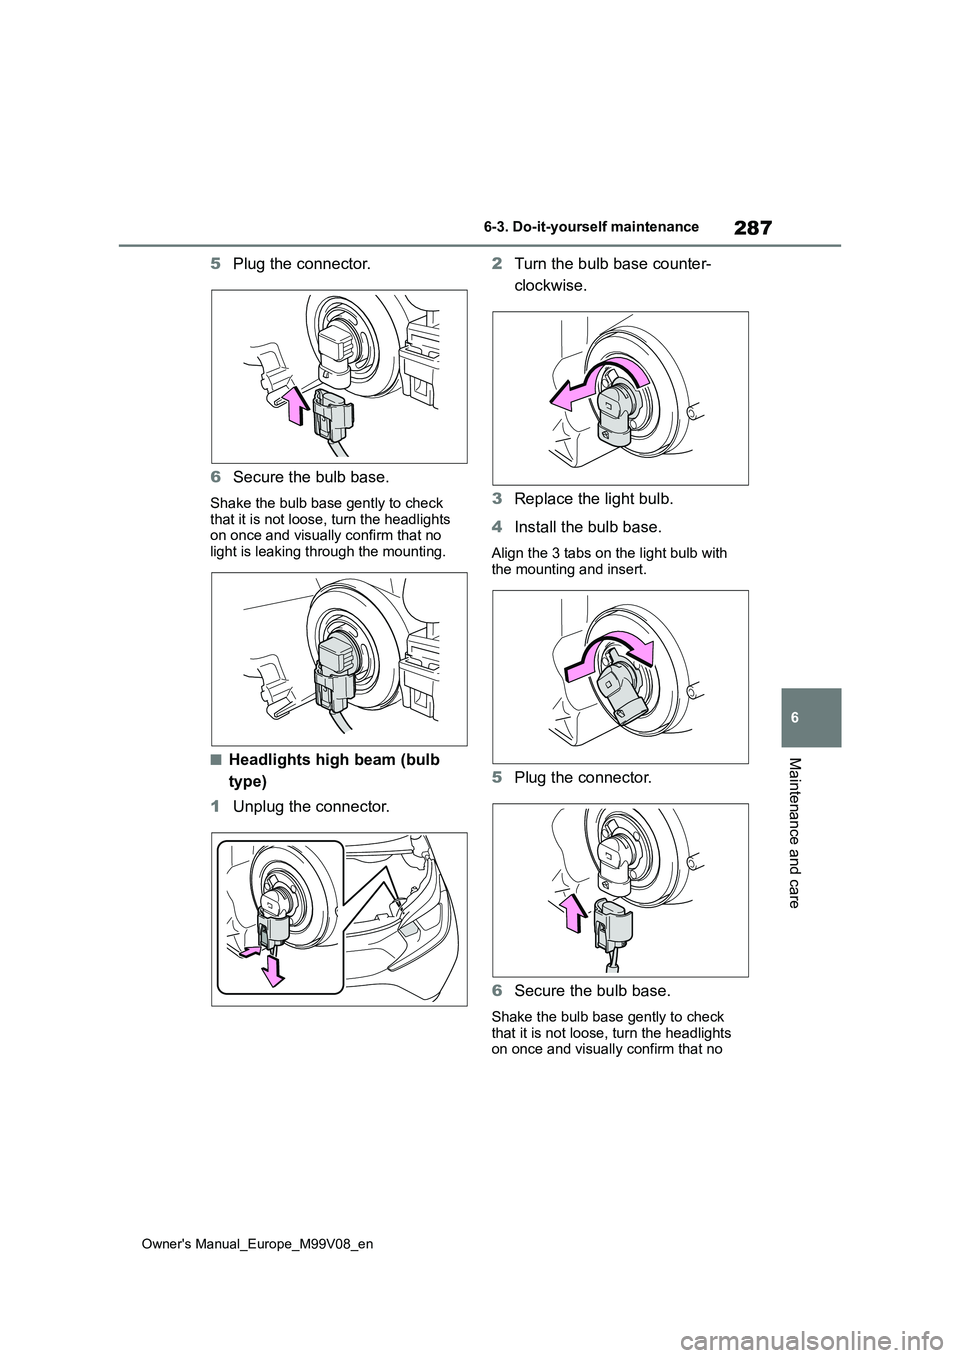
■Headlights low beam (bulb
type)
1 Unplug the connector.
2 Turn the bulb base counter-
clockwise.
3 Replace the light bulb.
4 Install the bulb base.
Align the 3 tabs on the light bulb with the mounting and insert.
Replacing light bulbs
Page 289 of 494
287
6
Owner's Manual_Europe_M99V08_en
6-3. Do-it-yourself maintenance
Maintenance and care
5Plug the connector.
6 Secure the bulb base.
Shake the bulb base gently to check that it is not loose, turn the headlights on once and visually confirm that no
light is leaking through the mounting.
■Headlights high beam (bulb
type)
1 Unplug the connector.
2 Turn the bulb base counter-
clockwise.
3 Replace the light bulb.
4 Install the bulb base.
Align the 3 tabs on the light bulb with the mounting and insert.
5 Plug the connector.
6 Secure the bulb base.
Shake the bulb base gently to check
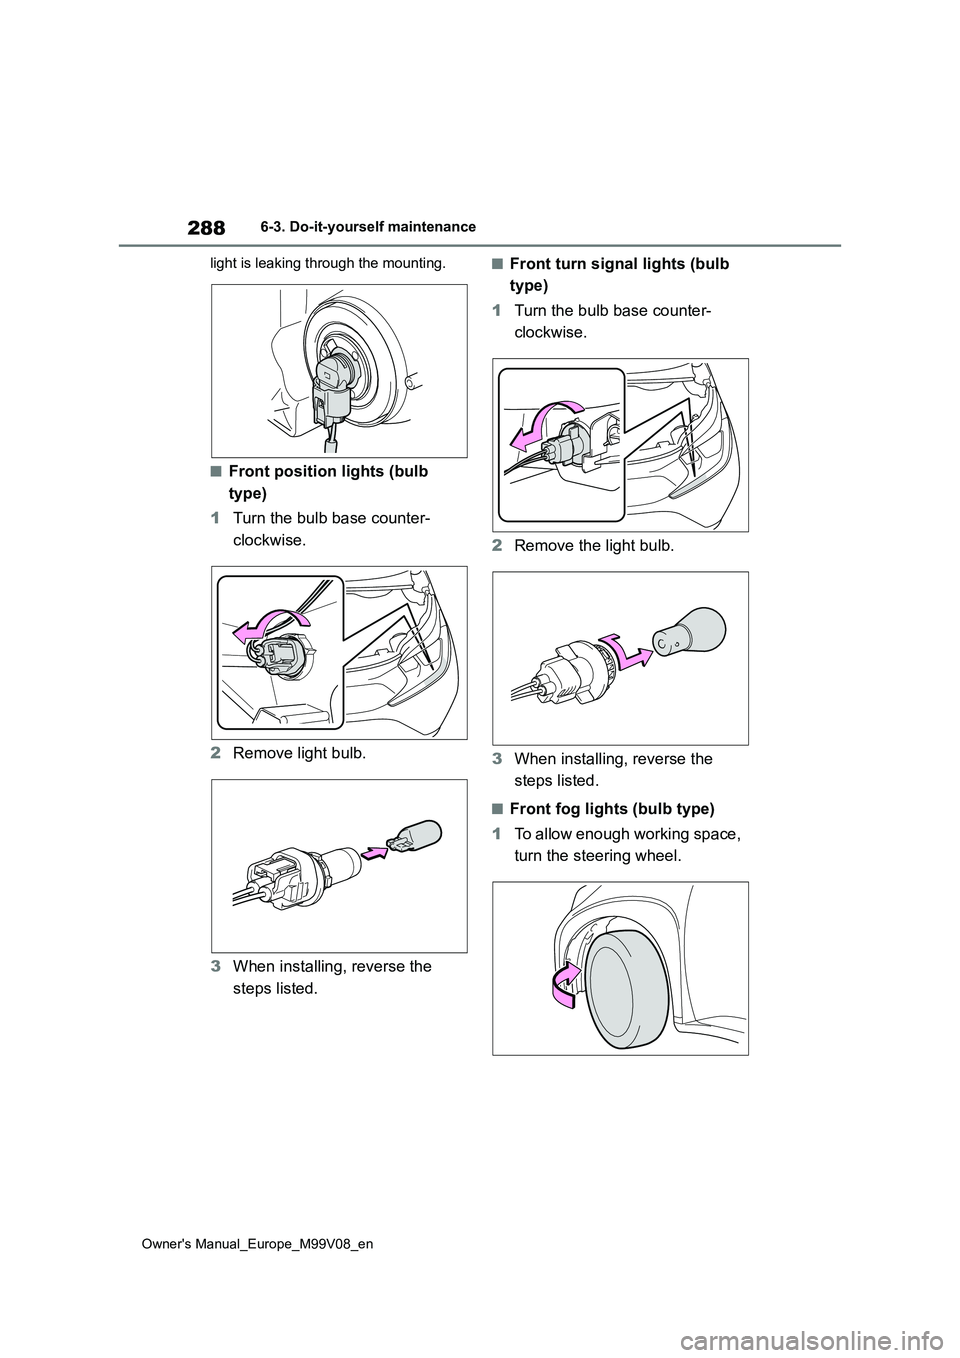
that it is not loose, turn the headlights on once and visually confirm that no
Page 290 of 494
288
Owner's Manual_Europe_M99V08_en
6-3. Do-it-yourself maintenance
light is leaking through the mounting.
■Front position lights (bulb
type)
1 Turn the bulb base counter-
clockwise.
2 Remove light bulb.
3 When installing, reverse the
steps listed.
■Front turn signal lights (bulb
type)
1 Turn the bulb base counter-
clockwise.
2 Remove the light bulb.
3 When installing, reverse the
steps listed.
■Front fog lights (bulb type)
1 To allow enough working space,
turn the steering wheel.