TOYOTA AYGO X 2022 Owners Manual (in English)
Manufacturer: TOYOTA, Model Year: 2022, Model line: AYGO X, Model: TOYOTA AYGO X 2022Pages: 494, PDF Size: 92.53 MB
Page 311 of 494
309
7
Owner's Manual_Europe_M99V08_en
7-2. Steps to take in an emergency
When trouble arises
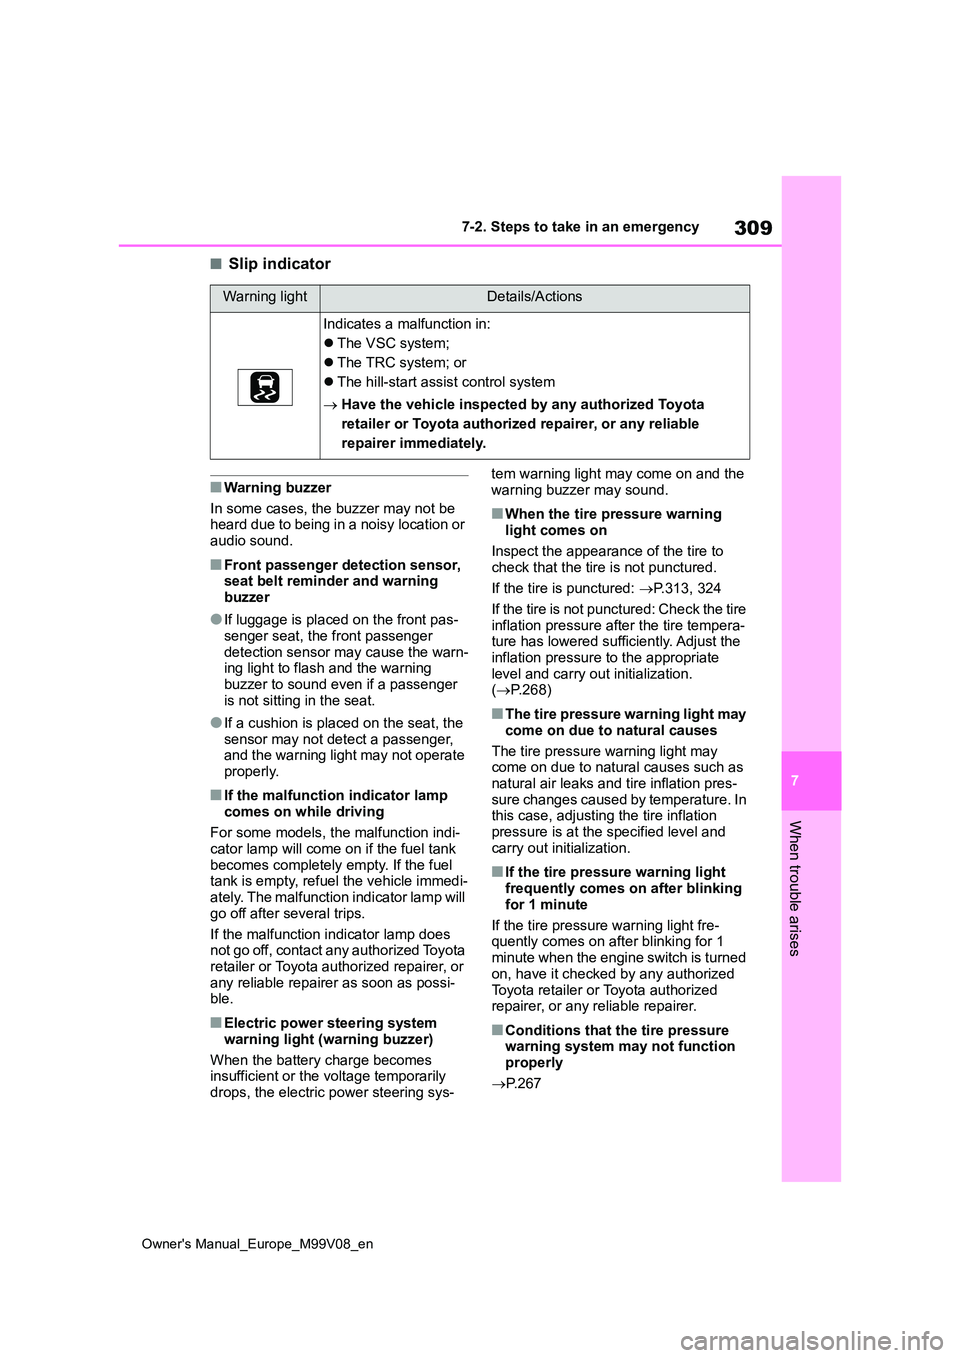
■Slip indicator
■Warning buzzer
In some cases, the buzzer may not be heard due to being in a noisy location or
audio sound.
■Front passenger detection sensor, seat belt reminder and warning buzzer
●If luggage is placed on the front pas-senger seat, the front passenger
detection sensor may cause the warn- ing light to flash and the warning buzzer to sound even if a passenger
is not sitting in the seat.
●If a cushion is placed on the seat, the
sensor may not detect a passenger, and the warning light may not operate properly.
■If the malfunction indicator lamp
comes on while driving
For some models, the malfunction indi- cator lamp will come on if the fuel tank
becomes completely empty. If the fuel tank is empty, refuel the vehicle immedi-ately. The malfunction indicator lamp will
go off after several trips.
If the malfunction indicator lamp does not go off, contact any authorized Toyota
retailer or Toyota authorized repairer, or any reliable repairer as soon as possi-ble.
■Electric power steering system
warning light (warning buzzer)
When the battery charge becomes insufficient or the voltage temporarily
drops, the electric power steering sys-
tem warning light may come on and the warning buzzer may sound.
■When the tire pressure warning light comes on
Inspect the appearance of the tire to check that the tire is not punctured.
If the tire is punctured: P.313, 324
If the tire is not punctured: Check the tire inflation pressure after the tire tempera-ture has lowered sufficiently. Adjust the
inflation pressure to the appropriate level and carry out initialization. ( P.268)
■The tire pressure warning light may
come on due to natural causes
The tire pressure warning light may come on due to natural causes such as
natural air leaks and tire inflation pres- sure changes caused by temperature. In this case, adjusting the tire inflation
pressure is at the specified level and carry out initialization.
■If the tire pressure warning light frequently comes on after blinking
for 1 minute
If the tire pressure warning light fre- quently comes on after blinking for 1
minute when the engine switch is turned on, have it checked by any authorized
Toyota retailer or Toyota authorized repairer, or any reliable repairer.
■Conditions that the tire pressure warning system may not function
properly
P. 2 6 7
Warning lightDetails/Actions
Indicates a malfunction in:
The VSC system;
The TRC system; or
The hill-start assist control system
Have the vehicle inspected by any authorized Toyota
retailer or Toyota authorized repairer, or any reliable
repairer immediately.
Page 312 of 494
310
Owner's Manual_Europe_M99V08_en
7-2. Steps to take in an emergency
WARNING
■If both the ABS and the brake system warning lights remain on
Stop your vehicle in a safe place immediately and contact any autho-rized Toyota retailer or Toyota autho-
rized repairer, or any reliable repairer. The vehicle will become extremely unstable during braking, and the ABS
system may fail, which could cause an accident resulting in death or seri-ous injury.
■When the electric power steer-ing system warning light comes
on
When the light comes on yellow, the assist to the power steering is
restricted. When the light comes on red, the assist to the power steering is lost and handling operations of the
steering wheel become extremely heavy.When steering wheel operations are
heavier than usual, grip the steering wheel firmly and operate it using more force than usual.
■If the tire pressure warning light comes on
Be sure to observe the following pre- cautions.Failure to do so could cause a loss of
vehicle control and result in death or serious injury.
●Stop your vehicle in a safe place as soon as possible. Adjust the tire inflation pressure immediately.
●Vehicles with a compact spare tire and full-size spare tire: If the tire
pressure warning light comes on even after tire inflation pressure adjustment, it is probable that you
have a flat tire. Check the tires. If a tire is flat, change it with the spare tire and have the flat tire repaired
by the nearest any authorized Toy- ota retailer or Toyota authorized repairer, or any reliable repairer.
●Vehicles with emergency tire punc-ture repair kit: If the tire pressure warning light comes on even after
tire inflation pressure adjustment, it is probable that you have a flat tire.Check the tires. If a tire is flat, repair
the flat tire by using emergency tire puncture repair kit.
●Avoid abrupt maneuvering and braking.If the vehicle tires deteriorate, you
could lose control of the steering wheel or the brakes.
■If a blowout or sudden air leak-age should occur
The tire pressure warning system
may not activate immediately.
NOTICE
■To ensure the tire pressure warn- ing system operates properly
Do not install tires with different speci- fications or makers, as the tire pres-sure warning system may not operate
properly.
Page 313 of 494
311
7
Owner's Manual_Europe_M99V08_en
7-2. Steps to take in an emergency
When trouble arises
■Warning messages
The warning messages explained below
may differ from the actual messages according to operation conditions and vehicle specifications.
■Warning buzzer
A buzzer may sound when a message is displayed.The buzzer may not be audible if the
vehicle is in a noisy location or if the audio system volume is high.
■If “Engine Stopped Steering Power Low” is displayed
This message is displayed if the engine
is stopped while driving.
When steering wheel operations are heavier than usual, grip the steering wheel firmly and operate it using more
force than usual.
■If “Auto Power OFF to Conserve Battery” is displayed
Power was cut off due to the automatic
power off function. Next time when start- ing the engine, increase the engine speed slightly and maintain that level for
approximately 5 minutes to recharge the battery.
■If “Headlight System Malfunction Visit Your Dealer” is displayed
The following systems may be malfunc- tioning. Have the vehicle inspected by any authorized Toyota retailer or Toyota
authorized repairer, or any reliable repairer immediately.
●The LED headlight system (if equipped)
●AHB (Automatic High Beam)
■If a message that indicates the mal-function of front camera is dis-played
The following systems may be sus- pended until the problem shown in the message is resolved. ( P.159, 304)
●PCS (Pre-Collision System)
●LTA (Lane Tracing Assist)
●AHB (Automatic High Beam)
●RSA (Road Sign Assist) (if equipped)
●Dynamic radar cruise control
■If a message that indicates the mal- function of radar sensor is dis-played
The following systems may be sus- pended until the problem shown in the message is resolved. ( P.159, 304)
●PCS (Pre-Collision system)
●LTA (Lane Tracing Assist)
●Dynamic radar cruise control
If a warning message is
displayed
The multi-information display
shows warnings for system
malfunctions and incorrectly
performed operations, and
messages that indicate a need
for maintenance. When a mes-
sage is displayed, perform the
appropriate corrective action
for the message.
If a warning message is dis-
played again after the appro-
priate actions have been
performed, contact any autho-
rized Toyota retailer or Toyota
authorized repairer, or any reli-
able repairer.
Additionally, if a warning light
comes on or flashes at the
same time that a warning mes-
sage is displayed, take the
appropriate corrective action
for the warning light. ( P.304)
Page 314 of 494
312
Owner's Manual_Europe_M99V08_en
7-2. Steps to take in an emergency
■If “Oil Maintenance Required Soon”
is displayed
Indicates that the engine oil should be scheduled to be changed.
Check the engine oil and change it if necessary.
After changing the engine oil, make sure
to reset the message. ( P.260)
■If “Oil Maintenance Required Visit Your Dealer” is displayed
Indicates that the engine oil should be
changed.
Check and change the engine oil, and oil filter by any authorized Toyota retailer
or Toyota authorized repairer, or any reli- able repairer. After changing the engine oil, make sure to reset the message.
( P.260)
■If “Radar Cruise Control Unavail- able See Owner’s Manual” is dis-played
The dynamic radar cruise control sys- tem is suspended temporarily or until the problem shown in the message is
resolved. (causes and coping methods: P.159)
■If “Radar Cruise Control Unavail- able” is displayed
The dynamic radar cruise control sys- tem cannot be used temporarily. Use the system when it becomes available
again.
■If a message that indicates the need for visiting your Toyota dealer is displayed
The system or part shown on the multi- information display is malfunctioning. Have the vehicle inspected by any
authorized Toyota retailer or Toyota authorized repairer, or any reliable repairer immediately.
■If a message that indicates the
need for referring to Owner’s Man- ual is displayed
●If “Engine Coolant Temp High” is dis-played, follow the instructions accord-ingly. ( P.339)
●If “Transmission Oil Temp. High” is
displayed, follow the instructions accordingly. ( P.135)
●If “Exhaust Filter Full” is displayed, fol- low the instructions accordingly. ( P.210)
●If any of the following messages are displayed on the multi-information dis-
play, it may indicate a malfunction. Have the vehicle inspected by any authorized Toyota retailer or Toyota
authorized repairer, or any reliable repairer immediately.• “Smart Entry & Start System Malfunc-
tion”
●If any of the following messages are
displayed on the multi-information dis- play, it may indicate a malfunction. Immediately stop the vehicle and con-
tact any authorized Toyota retailer or Toyota authorized repairer, or any reli-able repairer.
• “Braking Power Low” • “12-Volt Battery Charging System Malfunction”
• “Oil Pressure Low”
Page 315 of 494
313
7
Owner's Manual_Europe_M99V08_en
7-2. Steps to take in an emergency
When trouble arises
Stop the vehicle in a safe place
on a hard, flat surface.
Set the parking brake.
Shift the shift lever to P (Multid-
rive) or N (manual transmission).
Stop the engine.
Turn on the emergency flashers.
( P.296)
Check the degree of the tire
damage.
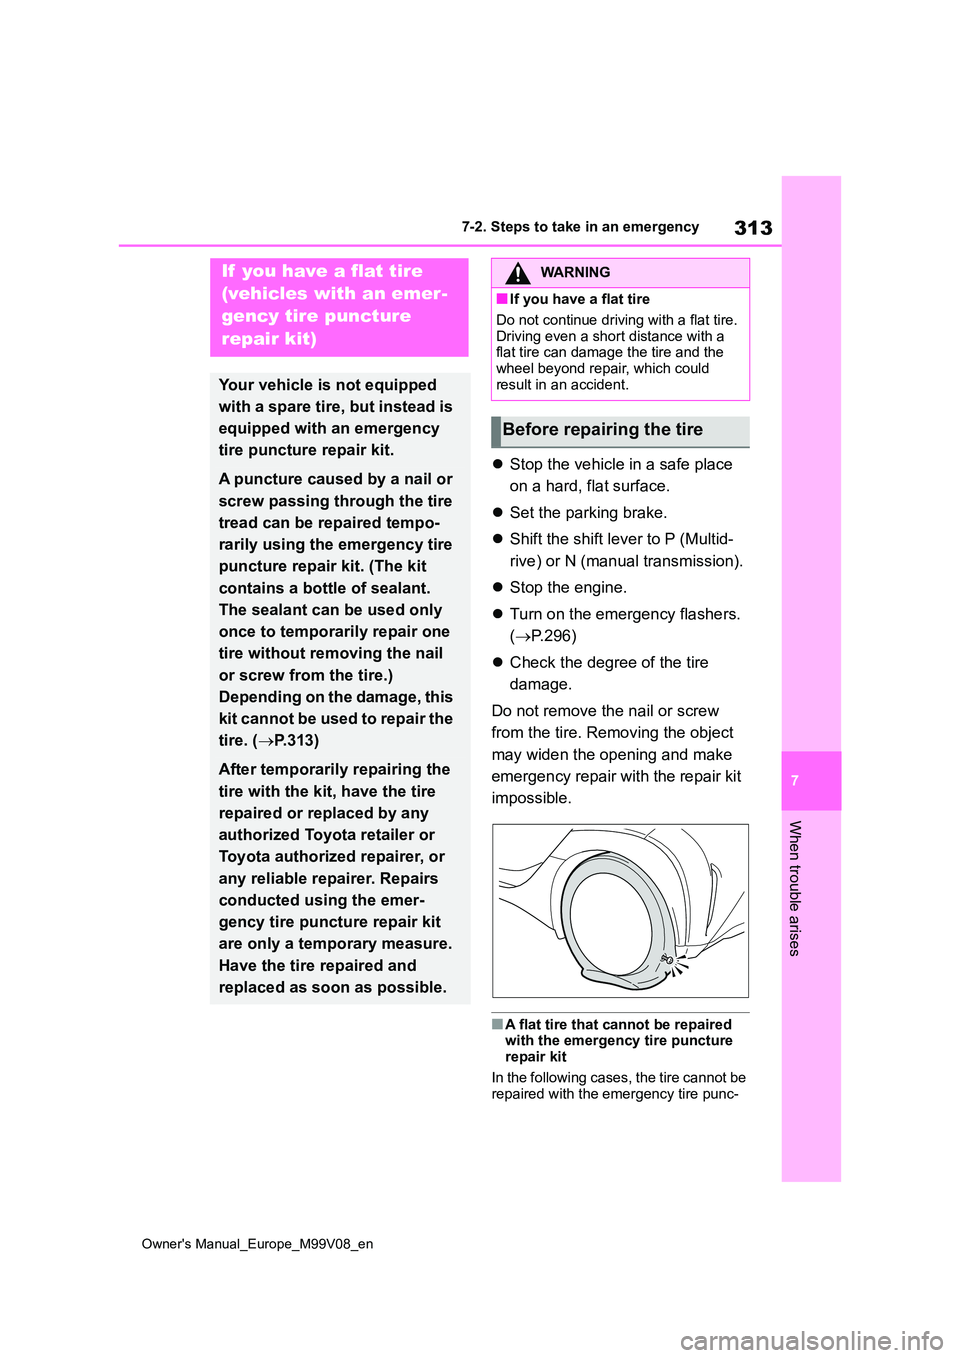
Do not remove the nail or screw
from the tire. Removing the object
may widen the opening and make
emergency repair with the repair kit
impossible.
■A flat tire that cannot be repaired with the emergency tire puncture repair kit
In the following cases, the tire cannot be repaired with the emergency tire punc-
If you have a flat tire
(vehicles with an emer-
gency tire puncture
repair kit)
Your vehicle is not equipped
with a spare tire, but instead is
equipped with an emergency
tire puncture repair kit.
A puncture caused by a nail or
screw passing through the tire
tread can be repaired tempo-
rarily using the emergency tire
puncture repair kit. (The kit
contains a bottle of sealant.
The sealant can be used only
once to temporarily repair one
tire without removing the nail
or screw from the tire.)
Depending on the damage, this
kit cannot be used to repair the
tire. ( P.313)
After temporarily repairing the
tire with the kit, have the tire
repaired or replaced by any
authorized Toyota retailer or
Toyota authorized repairer, or
any reliable repairer. Repairs
conducted using the emer-
gency tire puncture repair kit
are only a temporary measure.
Have the tire repaired and
replaced as soon as possible.
WARNING
■If you have a flat tire
Do not continue driving with a flat tire.
Driving even a short distance with a flat tire can damage the tire and the wheel beyond repair, which could
result in an accident.
Before repairing the tire
Page 316 of 494
314
Owner's Manual_Europe_M99V08_en
7-2. Steps to take in an emergency
ture repair kit. Contact any authorized
Toyota retailer or Toyota authorized repairer, or any reliable repairer.
●When the tire is damaged due to driv-ing without sufficient air pressure
●When there are any cracks or damage at any location on the tire, such as on the side wall, except the tread
●When the tire is visibly separated from the wheel
●When the cut or damage to the tread
is 4 mm (0.16 in.) long or more
●When the wheel is damaged
●When two or more tires have been punctured
●When more than 2 sharp objects such as nails or screws have passed
through the tread on a single tire
●When the sealant has expired
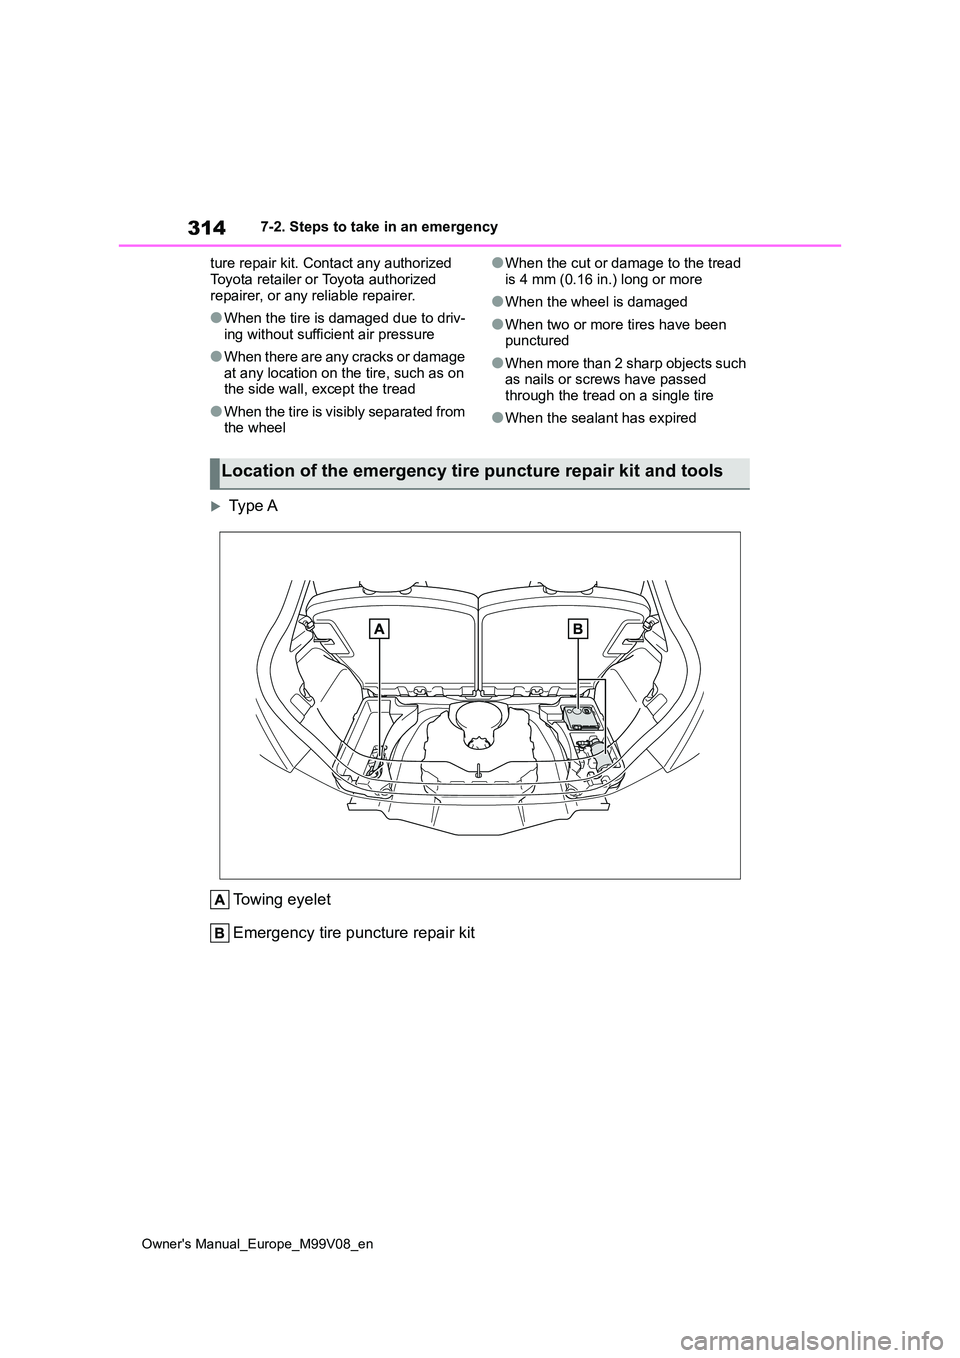
Type A
Towing eyelet
Emergency tire puncture repair kit
Location of the emergency tire puncture repair kit and tools
Page 317 of 494
315
7
Owner's Manual_Europe_M99V08_en
7-2. Steps to take in an emergency
When trouble arises
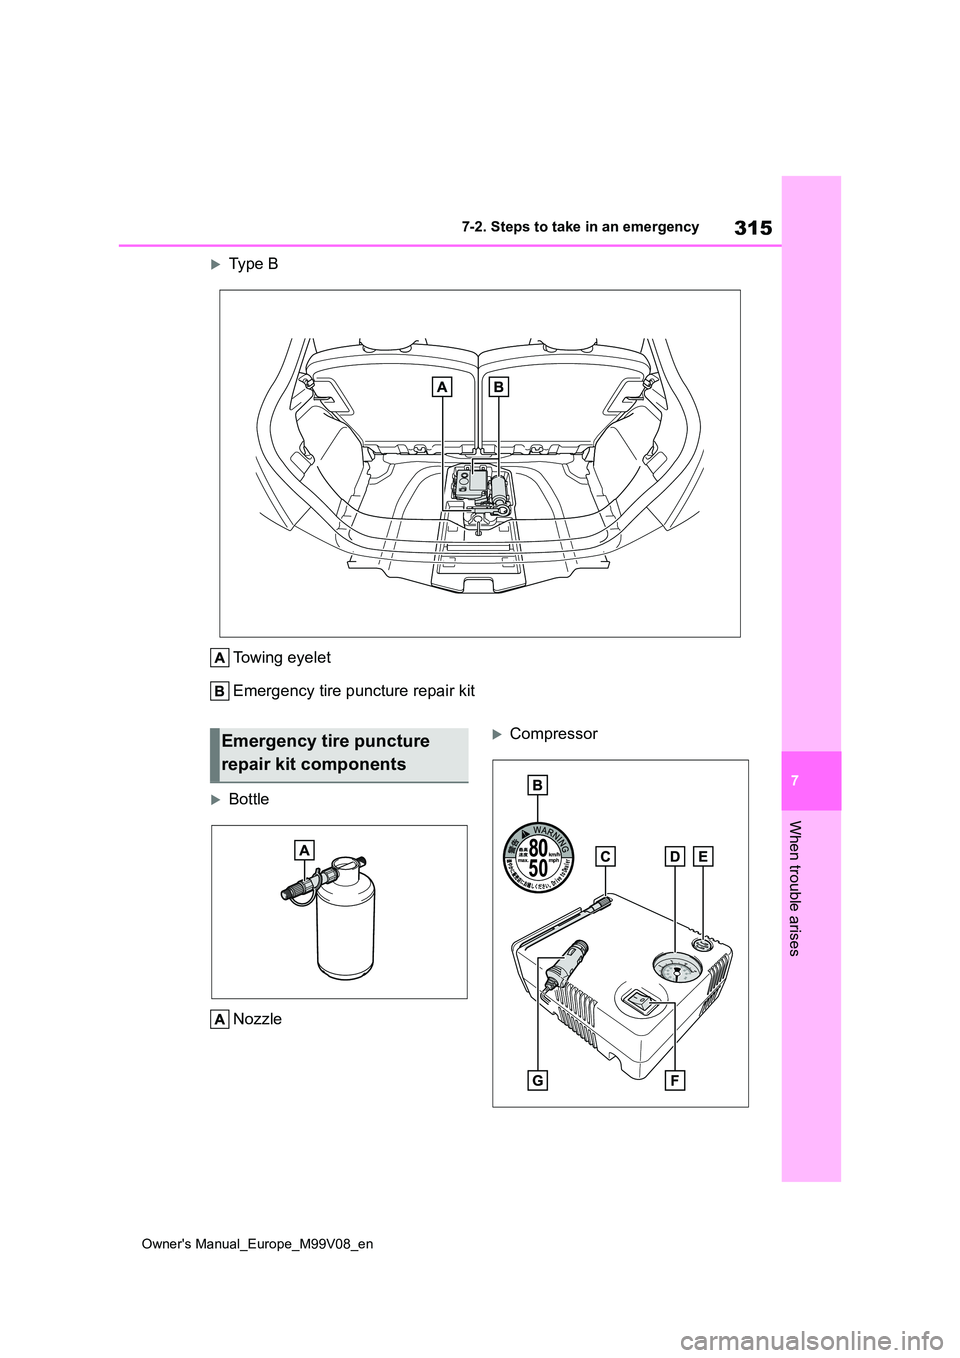
Type B
Towing eyelet
Emergency tire puncture repair kit
Bottle
Nozzle
CompressorEmergency tire puncture
repair kit components
Page 318 of 494
316
Owner's Manual_Europe_M99V08_en
7-2. Steps to take in an emergency
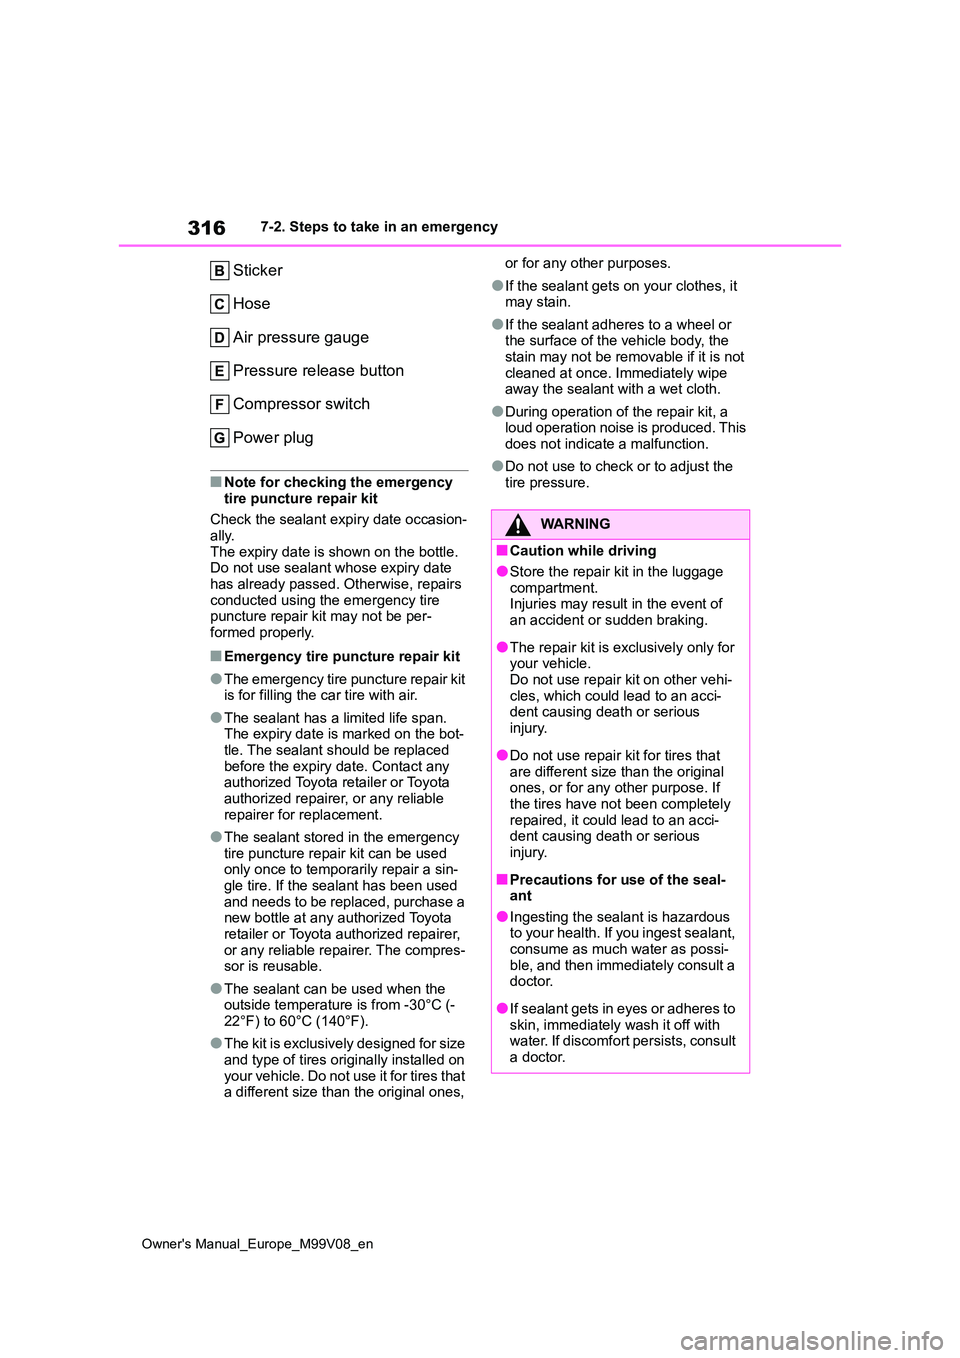
Sticker
Hose
Air pressure gauge
Pressure release button
Compressor switch
Power plug
■Note for checking the emergency
tire puncture repair kit
Check the sealant expiry date occasion- ally.
The expiry date is shown on the bottle. Do not use sealant whose expiry date has already passed. Otherwise, repairs
conducted using the emergency tire puncture repair kit may not be per-formed properly.
■Emergency tire puncture repair kit
●The emergency tire puncture repair kit is for filling the car tire with air.
●The sealant has a limited life span. The expiry date is marked on the bot-
tle. The sealant should be replaced before the expiry date. Contact any authorized Toyota retailer or Toyota
authorized repairer, or any reliable repairer for replacement.
●The sealant stored in the emergency tire puncture repair kit can be used only once to temporarily repair a sin-
gle tire. If the sealant has been used and needs to be replaced, purchase a new bottle at any authorized Toyota
retailer or Toyota authorized repairer, or any reliable repairer. The compres-sor is reusable.
●The sealant can be used when the outside temperature is from -30°C (-
22°F) to 60°C (140°F).
●The kit is exclusively designed for size
and type of tires originally installed on yo u r ve hi cl e . Do n ot u se it f o r ti r e s t ha t a different size than the original ones,
or for any other purposes.
●If the sealant gets on your clothes, it may stain.
●If the sealant adheres to a wheel or the surface of the vehicle body, the
stain may not be removable if it is not cleaned at once. Immediately wipe away the sealant with a wet cloth.
●During operation of the repair kit, a loud operation noise is produced. This
does not indicate a malfunction.
●Do not use to check or to adjust the
tire pressure.
WARNING
■Caution while driving
●Store the repair kit in the luggage
compartment. Injuries may result in the event of an accident or sudden braking.
●The repair kit is exclusively only for your vehicle.
Do not use repair kit on other vehi- cles, which could lead to an acci-dent causing death or serious
injury.
●Do not use repair kit for tires that
are different size than the original ones, or for any other purpose. If the tires have not been completely
repaired, it could lead to an acci- dent causing death or serious injury.
■Precautions for use of the seal-ant
●Ingesting the sealant is hazardous to your health. If you ingest sealant, consume as much water as possi-
ble, and then immediately consult a doctor.
●If sealant gets in eyes or adheres to skin, immediately wash it off with water. If discomfort persists, consult
a doctor.
Page 319 of 494
317
7
Owner's Manual_Europe_M99V08_en
7-2. Steps to take in an emergency
When trouble arises
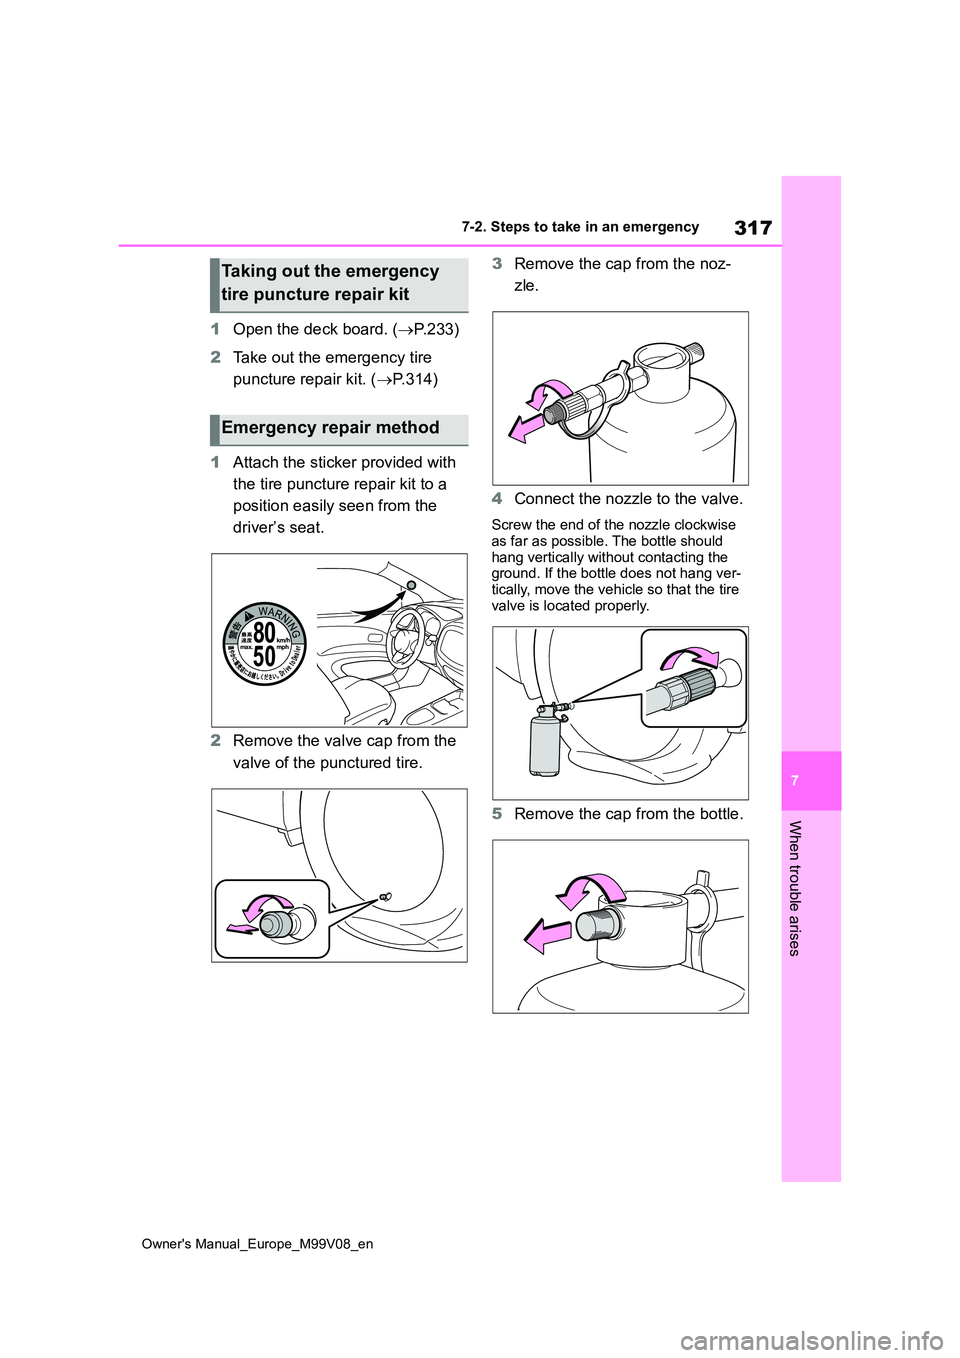
1Open the deck board. (P.233)
2 Take out the emergency tire
puncture repair kit. ( P.314)
1 Attach the sticker provided with
the tire puncture repair kit to a
position easily seen from the
driver’s seat.
2 Remove the valve cap from the
valve of the punctured tire.
3 Remove the cap from the noz-
zle.
4 Connect the nozzle to the valve.
Screw the end of the nozzle clockwise as far as possible. The bottle should
hang vertically without contacting the ground. If the bottle does not hang ver-tically, move the vehicle so that the tire
valve is located properly.
5 Remove the cap from the bottle.
Taking out the emergency
tire puncture repair kit
Emergency repair method
Page 320 of 494
318
Owner's Manual_Europe_M99V08_en
7-2. Steps to take in an emergency
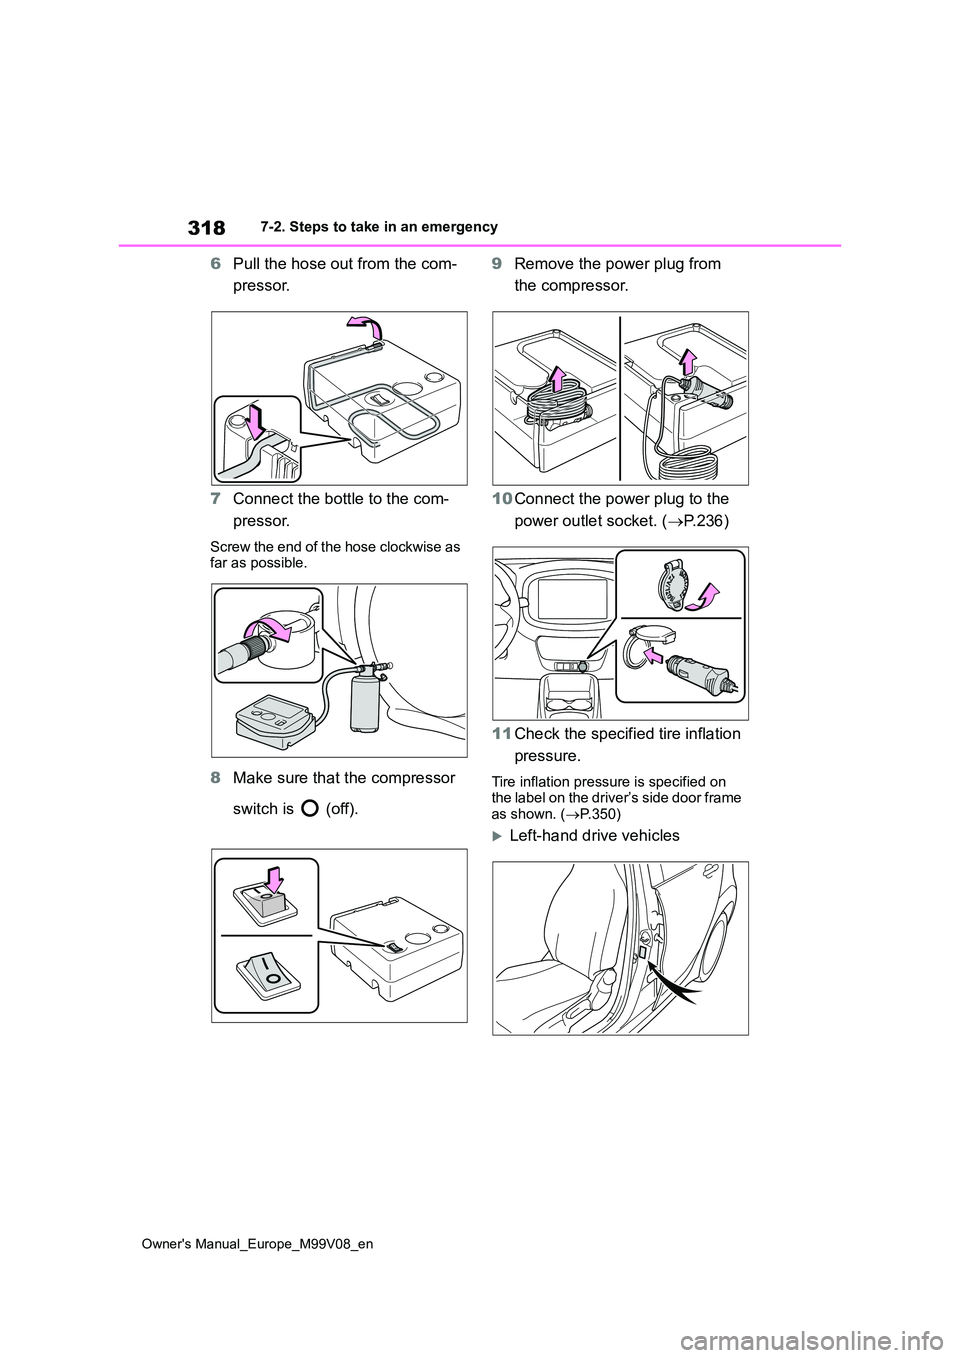
6Pull the hose out from the com-
pressor.
7 Connect the bottle to the com-
pressor.
Screw the end of the hose clockwise as far as possible.
8 Make sure that the compressor
switch is (off).
9 Remove the power plug from
the compressor.
10 Connect the power plug to the
power outlet socket. ( P.236)
11 Check the specified tire inflation
pressure.
Tire inflation pressure is specified on the label on the driver’s side door frame
as shown. ( P.350)
Left-hand drive vehicles