ECO mode TOYOTA BZ4X 2022 (in English) User Guide
[x] Cancel search | Manufacturer: TOYOTA, Model Year: 2022, Model line: BZ4X, Model: TOYOTA BZ4X 2022Pages: 674, PDF Size: 120.02 MB
Page 137 of 674
135
2
Owners Manual_Europe_M42D76_en
2-2. Charging
Electric Vehicle system
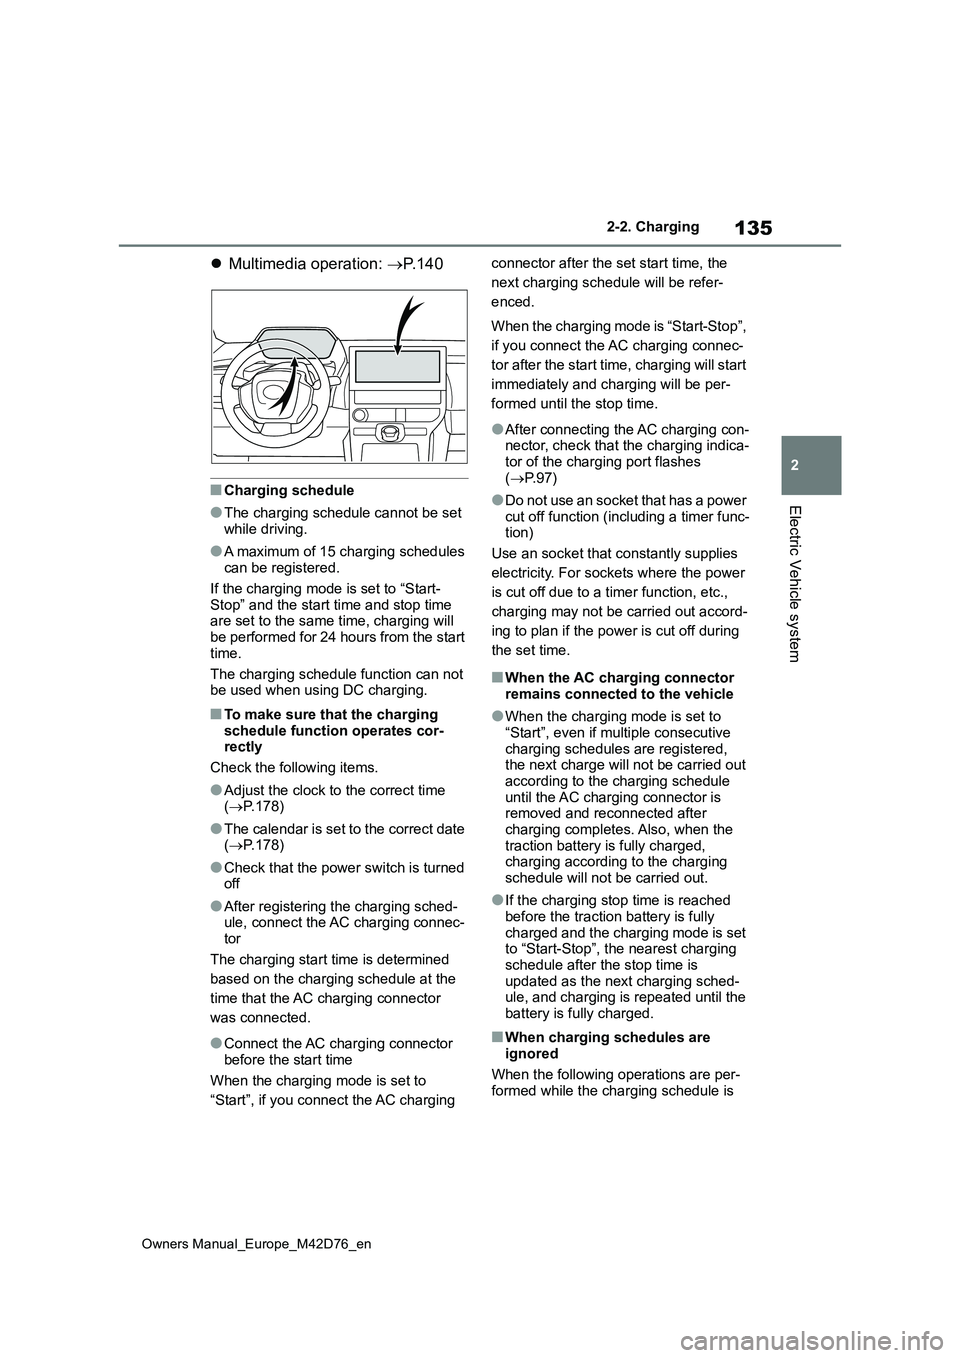
Multimedia operation: P. 1 4 0
■Charging schedule
●The charging schedule cannot be set while driving.
●A maximum of 15 charging schedules can be registered.
If the charging mode is set to “Start-
Stop” and the start time and stop time are set to the same time, charging will be performed for 24 hours from the start
time.
The charging schedule function can not be used when using DC charging.
■To make sure that the charging
schedule function operates cor- rectly
Check the following items.
●Adjust the clock to the correct time ( P.178)
●The calendar is set to the correct date ( P.178)
●Check that the power switch is turned off
●After registering the charging sched-ule, connect the AC charging connec-
tor
The charging start time is determined
based on the charging schedule at the
time that the AC charging connector
was connected.
●Connect the AC charging connector
before the start time
When the charging mode is set to
“Start”, if you connect the AC charging
connector after the set start time, the
next charging schedule will be refer-
enced.
When the charging mode is “Start-Stop”,
if you connect the AC charging connec-
tor after the start time, charging will start
immediately and charging will be per-
formed until the stop time.
●After connecting the AC charging con- nector, check that the charging indica-tor of the charging port flashes
( P. 9 7 )
●Do not use an socket that has a power
cut off function (including a timer func- tion)
Use an socket that constantly supplies
electricity. For sockets where the power
is cut off due to a timer function, etc.,
charging may not be carried out accord-
ing to plan if the power is cut off during
the set time.
■When the AC charging connector remains connected to the vehicle
●When the charging mode is set to “Start”, even if multiple consecutive
charging schedules are registered, the next charge will not be carried out according to the charging schedule
until the AC charging connector is removed and reconnected after charging completes. Also, when the
traction battery is fully charged, charging according to the charging schedule will not be carried out.
●If the charging stop time is reached before the traction battery is fully
charged and the charging mode is set to “Start-Stop”, the nearest charging schedule after the stop time is
updated as the next charging sched- ule, and charging is repeated until the battery is fully charged.
■When charging schedules are
ignored
When the following operations are per- formed while the charging schedule is
Page 147 of 674
145
2
Owners Manual_Europe_M42D76_en
2-2. Charging
Electric Vehicle system
1Connect the charge cable to the
vehicle to start charging.
AC Charging: P.121
DC Charging: P. 1 2 9
2Turn the power switch to ON
while charging.
My Room Mode settings is automati- cally displayed on the multi-information
display.
3 Operate the meter control
switches to select “Yes”, and
then press “OK”.
My Room Mode is started and it is pos- sible to use the air conditioning system, audio system, etc.
Select “No” and press “OK” when My Room Mode is not being used.
To disable My Room Mode, turn the
power switch off.
My Room Mode will automatically be off when DC charging is completed.
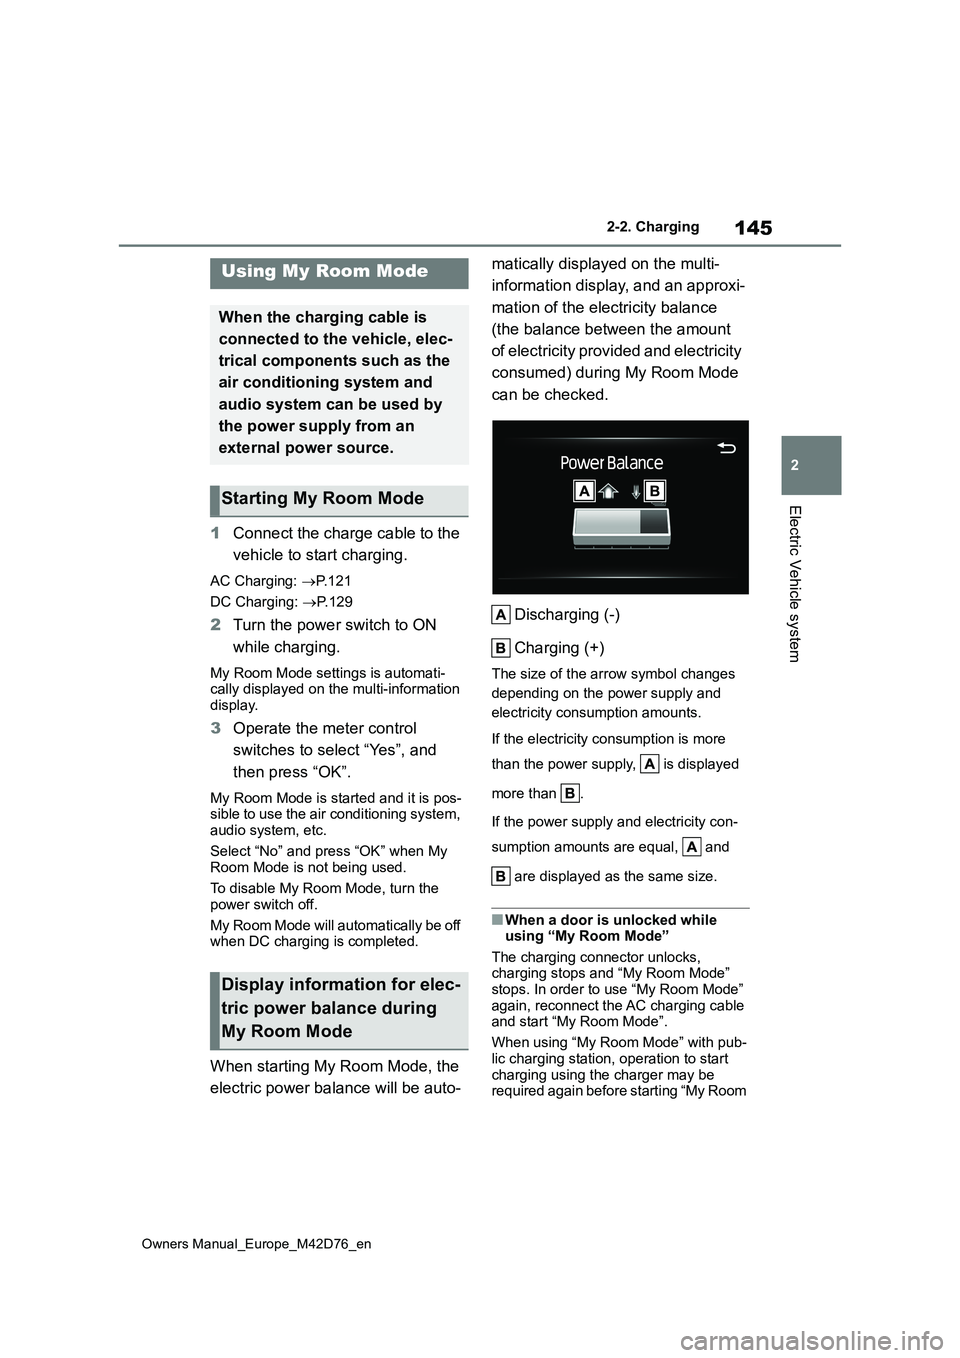
When starting My Room Mode, the
electric power balance will be auto-
matically displayed on the multi-
information display, and an approxi-
mation of the electricity balance
(the balance between the amount
of electricity provided and electricity
consumed) during My Room Mode
can be checked.
Discharging (-)
Charging (+)
The size of the arrow symbol changes
depending on the power supply and
electricity consumption amounts.
If the electricity consumption is more
than the power supply, is displayed
more than .
If the power supply and electricity con-
sumption amounts are equal, and
are displayed as the same size.
■When a door is unlocked while using “My Room Mode”
The charging connector unlocks, charging stops and “My Room Mode” stops. In order to use “My Room Mode”
again, reconnect the AC charging cable and start “My Room Mode”.
When using “My Room Mode” with pub-
lic charging station, operation to start charging using the charger may be required again before starting “My Room
Using My Room Mode
When the charging cable is
connected to the vehicle, elec-
trical components such as the
air conditioning system and
audio system can be used by
the power supply from an
external power source.
Starting My Room Mode
Display information for elec-
tric power balance during
My Room Mode
Page 148 of 674
146
Owners Manual_Europe_M42D76_en
2-2. Charging
Mode”.
■Meter display while charging
After turning the power switch to ON while charging, the power switch auto-matically turns off if My Room Mode is
not selected within approximately 100 seconds.
■When using My Room Mode the fol-lowing may occur
●When the remaining charge of the traction battery drops to the lower
limit, the air conditioning system auto- matically stops. In that case, the air conditioning system can not operate
until the remaining charge of the trac- tion battery increases. Turn off the power switch once, then use My
Room Mode after the remaining charge of the traction battery increases.
●If the doors are unlocked while using My Room mode, the AC charging con-
nector will be unlocked and My Room mode will be stopped. To use My Room mode again, perform the opera-
tion to start it. ( P.145) In addition, when using AC charger at the public charging station, it is necessary to
perform the operation to start the charger before using My Room mode.
●The charging time of the traction bat-tery gets longer.
●Noise may be heard from the radio depending on conditions of the radio
wave.
●The surrounding area of the onboard traction battery charger in the motor
compartment may become hot.
●The electric power steering system
warning light (yellow) may turn on, but this is not a malfunction.
■Using My Room Mode during DC charging
When using My Room mode during DC charging, the state of charge completion will be lower than when not using My
Room Mode.
■When “My Room Mode” is used while the traction battery is fully charged
When the power switch is turned on
while the traction battery is fully charged
and the charging connector that sup-
plies power is connected, “Charging
Port Lid is Open” is displayed on the
multi-information display. In this case,
press on the meter control switches
to display the setting screen of “My
Room Mode”, and then select “My
Room Mode”.
When “My Room Mode” is used while
the traction battery is fully charged, the electric power of the traction battery may be consumed. In this case,
charging may be performed again.
■Warning message display
When trying to start My Room Mode or My Room Mode is being used , if a message
is displayed on the multi-information display, refer to the cor responding table and perform the appropriate correction procedures.
MessageCorrection procedure
“Traction Battery is too Low
for “My Room Mode””
There is no remaining charge of the traction battery to
start My Room Mode. Wait until the remaining charge
of the traction battery increases, start My Room Mode.
Page 149 of 674
147
2
Owners Manual_Europe_M42D76_en
2-2. Charging
Electric Vehicle system
*: During My Room Mode, the information for electric power balance can be checked
on the multi-information display.
““My Room Mode” has
stopped due to low traction
battery level”
The remaining charge of the traction battery is insuffi-
cient. Stop using My Room Mode and charge the trac-
tion battery.
““My Room Mode” will stop
when traction battery level
is too low Reduce power
usage to continue using “My
Room Mode””
When My Room mode electricity consumption
exceeds the charge amount, the traction battery
charge level becomes too low.*
• If the electricity consumption of the vehicle can not
be improved, My Room Mode will be off.
• When My Room Mode continuation is desired, turn
off the air conditioning system, audio system, etc.,
to increase the remaining charge of the traction bat-
tery.
MessageCorrection procedure
WARNING
■Warnings for using My Room
Mode
Observe the following precautions.
Failure to do so may result in death or
a serious health hazard.
●Do not leave children, people who need care, or pets inside the vehi-
cle. The temperature inside the vehicle may become high or low due to features such as the auto-
matic shut-off. The children, people who need care, or pets left inside the vehicle may suffer heatstroke
dehydration or hypothermia. Also, since the wipers, etc., can be oper-ated, there may be accidental oper-
ation, possibly leading to an accident.
●Use the mode after sufficiently checking the vicinity of the vehicle for safety hazards.
Page 161 of 674
159
2
Owners Manual_Europe_M42D76_en
2-2. Charging
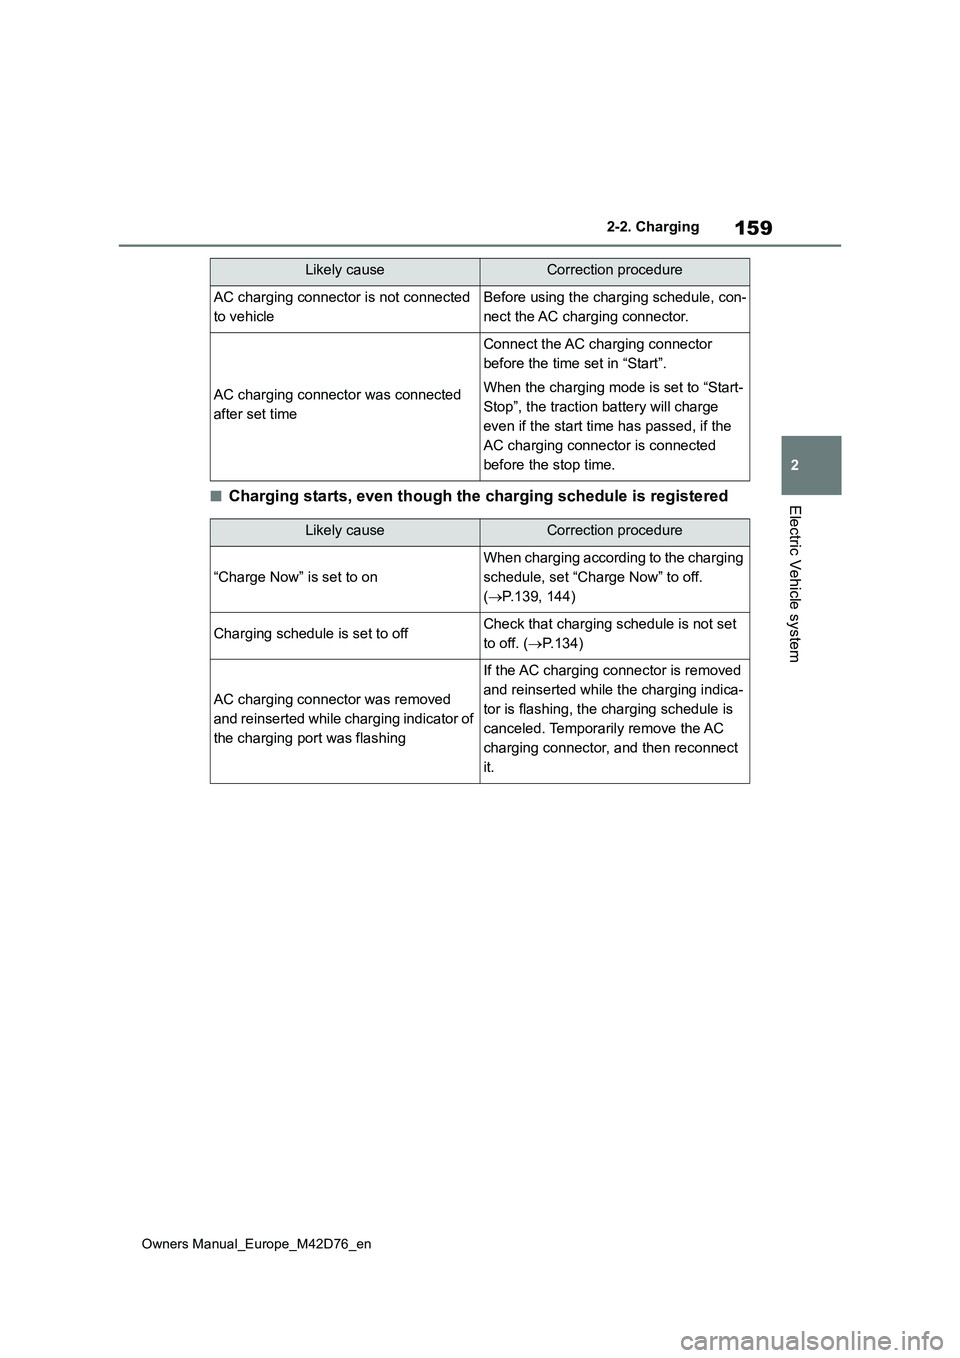
Electric Vehicle system■Charging starts, even though the charging schedule is registered
AC charging connector is not connected
to vehicle
Before using the charging schedule, con-
nect the AC charging connector.
AC charging connector was connected
after set time
Connect the AC charging connector
before the time set in “Start”.
When the charging mode is set to “Start-
Stop”, the traction battery will charge
even if the start time has passed, if the
AC charging connector is connected
before the stop time.
Likely causeCorrection procedure
Likely causeCorrection procedure
“Charge Now” is set to on
When charging according to the charging
schedule, set “Charge Now” to off.
( P.139, 144)
Charging schedule is set to offCheck that charging schedule is not set
to off. ( P.134)
AC charging connector was removed
and reinserted while charging indicator of
the charging port was flashing
If the AC charging connector is removed
and reinserted while the charging indica-
tor is flashing, the charging schedule is
canceled. Temporarily remove the AC
charging connector, and then reconnect
it.
Page 172 of 674
170
Owners Manual_Europe_M42D76_en
3-1. Instrument cluster
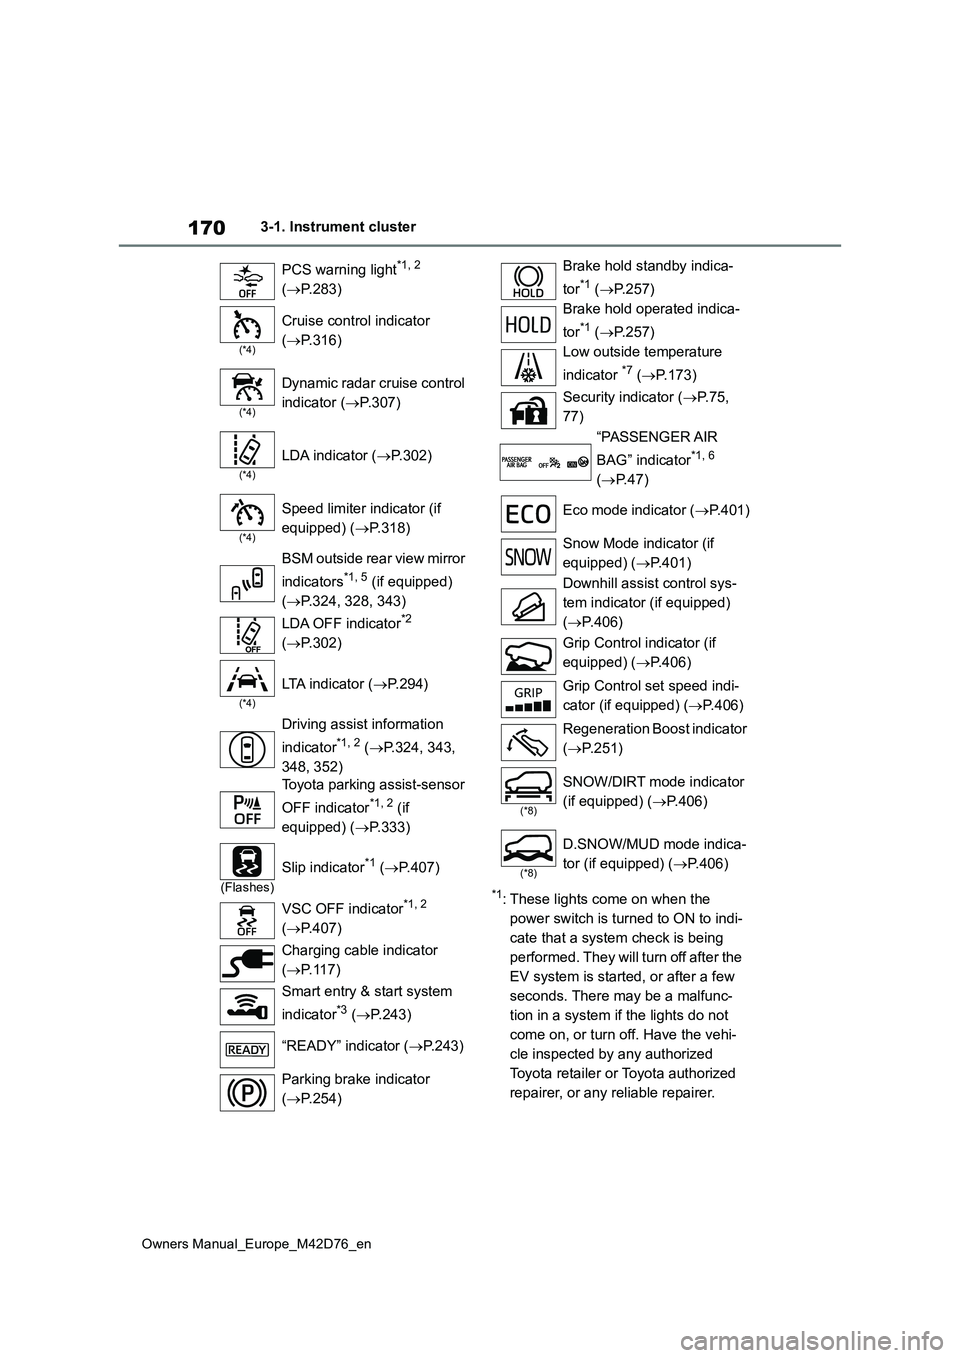
*1: These lights come on when the
power switch is turned to ON to indi-
cate that a system check is being
performed. They will turn off after the
EV system is started, or after a few
seconds. There may be a malfunc-
tion in a system if the lights do not
come on, or turn off. Have the vehi-
cle inspected by any authorized
Toyota retailer or Toyota authorized
repairer, or any reliable repairer.
PCS warning light*1, 2
( P.283)
(*4)
Cruise control indicator
( P.316)
(*4)
Dynamic radar cruise control
indicator ( P.307)
(*4)
LDA indicator (P.302)
(*4)
Speed limiter indicator (if
equipped) ( P.318)
BSM outside rear view mirror
indicators*1, 5 (if equipped)
( P.324, 328, 343)
LDA OFF indicator*2
( P.302)
(*4)
LTA indicator (P.294)
Driving assist information
indicator*1, 2 ( P.324, 343,
348, 352)
Toyota parking assist-sensor
OFF indicator*1, 2 (if
equipped) ( P.333)
(Flashes)
Slip indicator*1 (P.407)
VSC OFF indicator*1, 2
( P.407)
Charging cable indicator
( P. 1 1 7 )
Smart entry & start system
indicator*3 ( P.243)
“READY” indicator ( P.243)
Parking brake indicator
( P.254)
Brake hold standby indica-
tor*1 ( P.257)
Brake hold operated indica-
tor*1 ( P.257)
Low outside temperature
indicator *7 ( P.173)
Security indicator ( P. 7 5 ,
77)
“PASSENGER AIR
BAG” indicator*1, 6
( P.47)
Eco mode indicator ( P. 4 0 1 )
Snow Mode indicator (if
equipped) ( P.401)
Downhill assist control sys-
tem indicator (if equipped)
( P.406)
Grip Control indicator (if
equipped) ( P.406)
Grip Control set speed indi-
cator (if equipped) ( P.406)
Regeneration Boost indicator
( P.251)
(*8)
SNOW/DIRT mode indicator
(if equipped) ( P.406)
(*8)
D.SNOW/MUD mode indica-
tor (if equipped) ( P.406)
Page 181 of 674
179
3
Owners Manual_Europe_M42D76_en
3-1. Instrument cluster
Vehicle status information and indicators
• Display contents (AWD models only)
Select to display/not display the torque
distribution display.
• Drive information type
Select to change the drive information
type display between after start/after
reset.
• Drive information items
Select to set the first and second items
of the drive information display to any of
the following: average vehicle
speed/distance/elapsed time.
Closing Display
Select to set the items displayed when
the power switch is turned off.
Pop-up display
Select to enable/disable pop-up dis-
plays for each relevant system.
Calendar
The year, month, and day can be set.
Default setting
Select to reset the meter display set-
tings to the default setting.
■Vehicle functions and settings
that can be changed
P. 5 6 1
■Suspension of the settings display
●Some settings cannot be changed
while driving. When changing set- tings, park the vehicle in a safe place.
●If a warning message is displayed, operation of the settings display will be suspended.
Displays suggestions to the driver
in the following situations. To select
a response to a displayed sugges-
tion, use the meter control
switches.
■Suggestion to turn on the
headlights
If the headlight switch is in other
than or , and the vehicle
speed is 5 km/h (3 mph) or higher
for a certain amount of time when
the surroundings are dark, a sug-
gestion message will be displayed.
■Suggestion to turn off the
headlights
If the headlights are left on for a
certain amount of time after the
power switch has been turned off, a
suggestion message will be dis-
played.
When the headlight switch is in the
AUTO position: The message ask-
ing if you wish to turn the headlights
off is displayed. To turn the head-
lights off, select “Yes”.
If the driver’s door is opened after the
power switch is turned off, this sugges-
tion message will not be displayed.
NOTICE
■During setting up the display
To prevent 12-volt battery discharge,
ensure that the EV system is operat- ing while setting up the display fea-tures.
Suggestion function
Page 184 of 674
182
Owners Manual_Europe_M42D76_en
4-1. Key information
4-1.Key info rmation
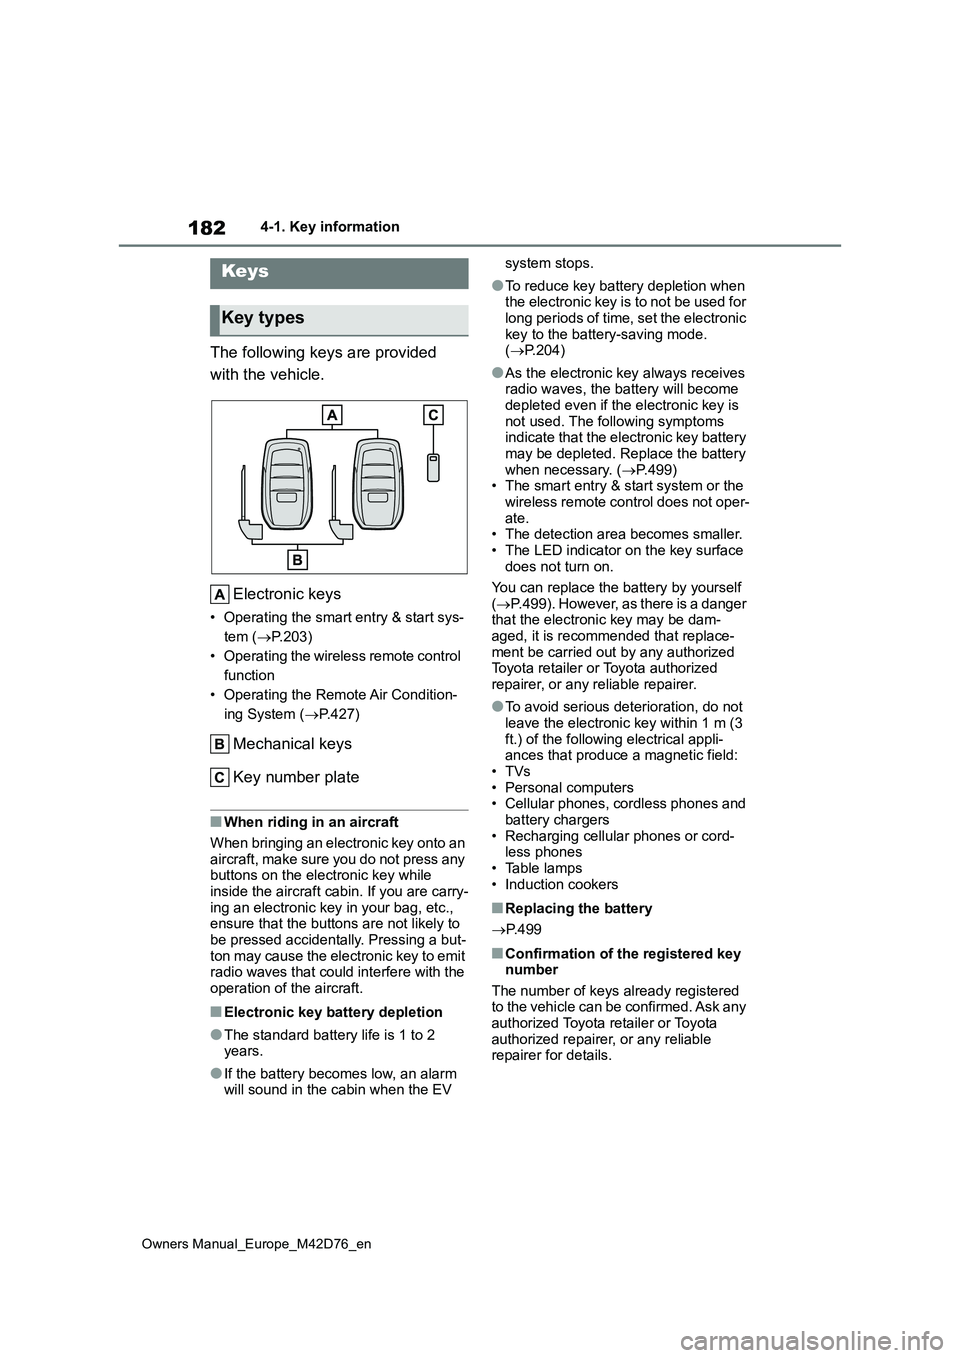
The following keys are provided
with the vehicle.
Electronic keys
• Operating the smart entry & start sys-
tem ( P.203)
• Operating the wireless remote control
function
• Operating the Remote Air Condition-
ing System ( P.427)
Mechanical keys
Key number plate
■When riding in an aircraft
When bringing an electronic key onto an
aircraft, make sure you do not press any buttons on the electronic key while inside the aircraft cabin. If you are carry-
ing an electronic key in your bag, etc., ensure that the buttons are not likely to be pressed accidentally. Pressing a but-
ton may cause the electronic key to emit radio waves that could interfere with the operation of the aircraft.
■Electronic key battery depletion
●The standard battery life is 1 to 2 years.
●If the battery becomes low, an alarm will sound in the cabin when the EV
system stops.
●To reduce key battery depletion when the electronic key is to not be used for
long periods of time, set the electronic key to the battery-saving mode. ( P.204)
●As the electronic key always receives radio waves, the battery will become
depleted even if the electronic key is not used. The following symptoms indicate that the electronic key battery
may be depleted. Replace the battery when necessary. ( P.499) • The smart entry & start system or the
wireless remote control does not oper- ate.• The detection area becomes smaller.
• The LED indicator on the key surface does not turn on.
You can replace the battery by yourself
( P.499). However, as there is a danger that the electronic key may be dam-aged, it is recommended that replace-
ment be carried out by any authorized Toyota retailer or Toyota authorized repairer, or any reliable repairer.
●To avoid serious deterioration, do not leave the electronic key within 1 m (3
ft.) of the following electrical appli- ances that produce a magnetic field:•TVs
• Personal computers • Cellular phones, cordless phones and battery chargers
• Recharging cellular phones or cord- less phones• Table lamps
• Induction cookers
■Replacing the battery
P. 4 9 9
■Confirmation of the registered key number
The number of keys already registered to the vehicle can be confirmed. Ask any authorized Toyota retailer or Toyota
authorized repairer, or any reliable repairer for details.
Keys
Key types
Page 187 of 674

185
4
Owners Manual_Europe_M42D76_en
4-2. Opening, closing and locking the doors
Before driving
4-2.Opening, closing and lo cking th e d oors
■Smart entry & start system
Carry the electronic key to enable
this function.
1 Grip the front door handle or
rear door handle (some models)
to unlock the doors.*
Make sure to touch the sensor on the
back of the handle.
The doors cannot be unlocked for 3
seconds after the doors are locked.
2 Touch the lock sensor (the
indentation on the side of the
door handle) to lock all the
doors.
Check that the door is securely locked.
*: The door unlock settings can be
changed.
■Wireless remote control
1 Locks all the doors
Check that the door is securely locked.
Press and hold to close the windows.*
2 Unlocks all the doors
Press and hold to open the windows.*
*: These settings must be customized
at any authorized Toyota retailer or
Toyota authorized repairer, or any
reliable repairer.
■Switching the door unlock function
It is possible to set which doors the entry function unlocks using the wireless remote control.
1 Turn the power switch off.
2 Cancel the intrusion sensor and tilt
sensor of the alarm system to pre- vent unintended triggering of the alarm while changing the settings. (if
equipped) ( P. 7 8 )
3 When the indicator light on the key
surface is not on, press and hold
or for approximately 5 sec-
onds while pressing and holding .
The setting changes each time an oper-
ation is performed, as shown below.
(When changing the setting continu-
ously, release the buttons, wait for at
least 5 seconds, and repeat step 3.)
Side doors
Unlocking and locking the
doors from the outside
Page 206 of 674
204
Owners Manual_Europe_M42D76_en
4-2. Opening, closing and locking the doors
●When an exterior alarm sounds once
for 5 seconds
●When an interior alarm pings repeat- edly
■If “Key Detected In Vehicle” is shown on the multi-information display
An attempt was made to lock the doors using the smart entry & start system while the electronic key was still inside
the vehicle. Retrieve the electronic key from the vehicle and lock the doors again.
■Battery-saving function
The battery-saving function will be acti- vated in order to prevent the electronic key battery and the 12-volt battery from
being discharged while the vehicle is not in operation for a long time.
●In the following situations, the smart entry & start system may take some time to unlock the doors.
• The electronic key has been left in an
area of approximately 2 m (6 ft.) of the
outside of the vehicle for 10 minutes or longer.• The smart entry & start system has
not been used for 5 days or longer.
●If the smart entry & start system has
not been used for 14 days or longer, the doors cannot be unlocked at any doors except the driver’s door. In this
case, take hold of the driver’s door handle, or use the wireless remote control or the mechanical key, to
unlock the doors.
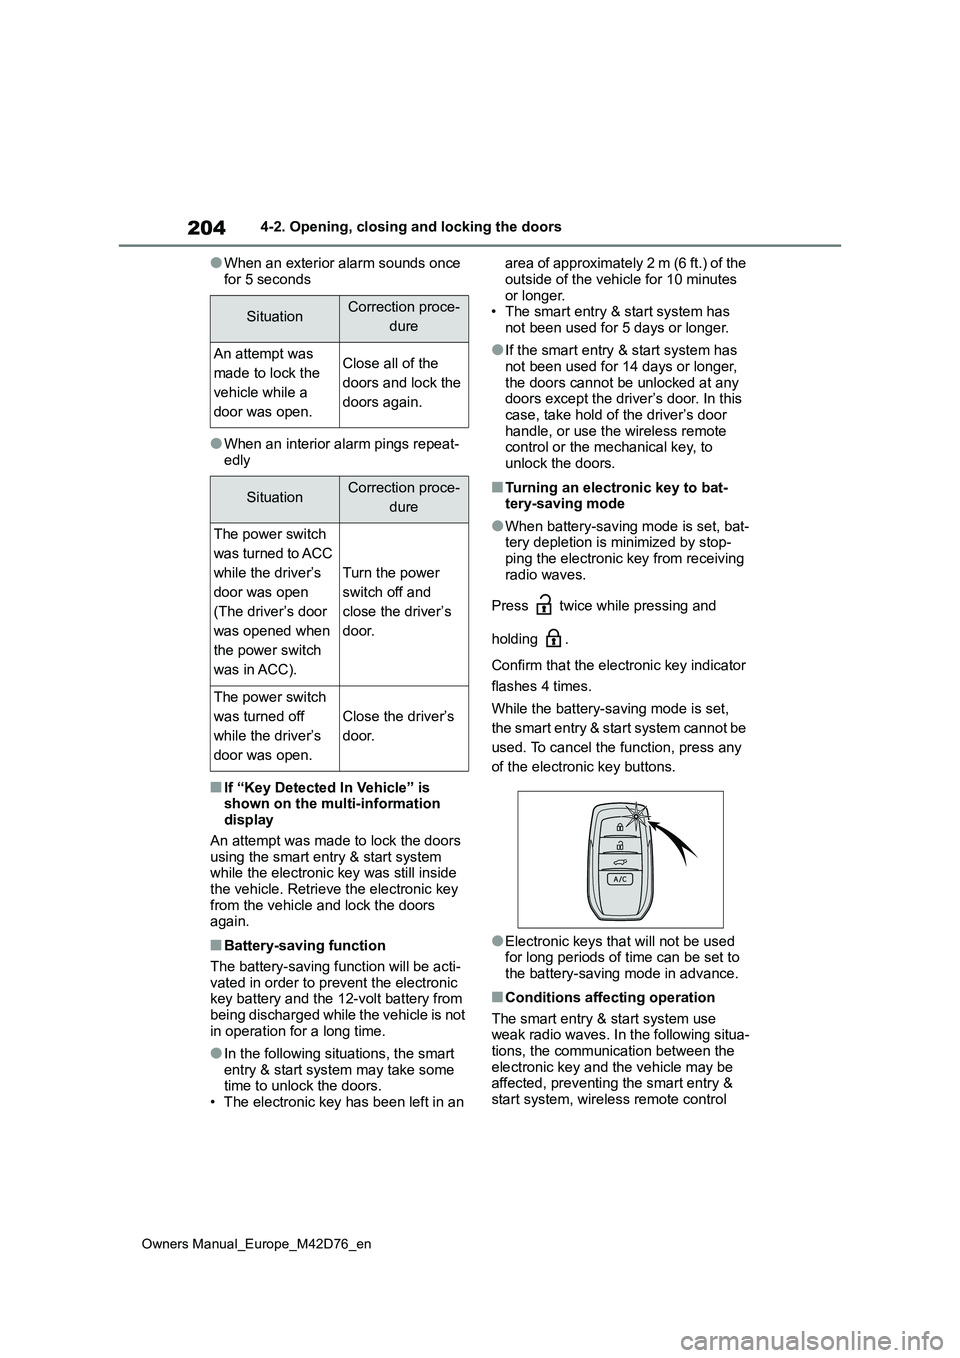
■Turning an electronic key to bat- tery-saving mode
●When battery-saving mode is set, bat-tery depletion is minimized by stop-ping the electronic key from receiving
radio waves.
Press twice while pressing and
holding .
Confirm that the electronic key indicator
flashes 4 times.
While the battery-saving mode is set,
the smart entry & start system cannot be
used. To cancel the function, press any
of the electronic key buttons.
●Electronic keys that will not be used for long periods of time can be set to the battery-saving mode in advance.
■Conditions affecting operation
The smart entry & start system use weak radio waves. In the following situa-tions, the communication between the
electronic key and the vehicle may be affected, preventing the smart entry & start system, wireless remote control
SituationCorrection proce-
dure
An attempt was
made to lock the
vehicle while a
door was open.
Close all of the
doors and lock the
doors again.
SituationCorrection proce-
dure
The power switch
was turned to ACC
while the driver’s
door was open
(The driver’s door
was opened when
the power switch
was in ACC).
Turn the power
switch off and
close the driver’s
door.
The power switch
was turned off
while the driver’s
door was open.
Close the driver’s
door.