warning light TOYOTA BZ4X 2022 (in English) Owner's Manual
[x] Cancel search | Manufacturer: TOYOTA, Model Year: 2022, Model line: BZ4X, Model: TOYOTA BZ4X 2022Pages: 674, PDF Size: 120.02 MB
Page 134 of 674
132
Owners Manual_Europe_M42D76_en
2-2. Charging
WARNING
■Warnings for DC charging
Be sure to observe the following when
using DC charging.
Failure to do so may cause an acci- dent that could lead to death or seri-
ous injury.
●Check that the DC charger and DC charging inlet are not damaged. If
there is any damage to the DC charging inlet, do not perform a DC charge and have it inspected imme-
diately at any authorized Toyota retailer or Toyota authorized repairer, or any reliable repairer.
●Do not touch the terminals of the DC charging connector or inlet with
metallic sharp tips (wires and nee- dles), or allow a short circuit to occur with foreign objects.
●Do not insert anything other than the DC charging connector into the
DC charging inlet.
●Check that the DC charging cable is
not coiled up or pinned underneath heavy objects.
●Be sure the DC charging inlet makes direct contact with the DC charging connector.
Do not connect conversion adapt- ers, extension cords, etc., between the DC charging connector and DC
charging inlet.
●When DC charging is interrupted,
follow the handling procedures of the DC charger. Immediately stop the DC charging when there is an
outbreak of heat, smoke, strange noises or smells, etc., during charging.
●Check that the DC charging con-nector and DC charging inlet do not have foreign objects or snow or ice
attached to it. If anything is attached to the inlet, be sure to completely remove the material
before connecting the DC charging connector.
●Do not charge the vehicle when there is a possibility of lightning. If you notice lightning while charging
the vehicle, do not touch the vehicle and the DC charging cable.
●Do not get the DC charging inlet terminals wet.
●Close the hood when using DC charging. The cooling fan may sud-denly start to run. Keep hands and
clothing (especially a tie, a scarf or a muffler) away from the fan. Fail-ure to do so may cause the hands
or clothing to be caught, resulting in serious injury.
■When connecting the DC charging connector
●Follow the handling procedures of
the DC charger to connect the DC charging connector. If the connector is not connected properly, the sys-
tem cannot recognize the connec- tion, and it may be possible to start the EV system.
After charging is completed, make sure to remove the DC charging con-
nector from the DC charging inlet before starting the EV system.
If the vehicle is started off with the
connector still connected, it could lead to an accident, possibly resulting in death or serious injury.
●Do not remove the DC charging connector from the DC charging
inlet during DC charging. After operating the DC charger to stop charging, remove the DC charging
connector from the DC charging inlet.
Page 148 of 674
146
Owners Manual_Europe_M42D76_en
2-2. Charging
Mode”.
■Meter display while charging
After turning the power switch to ON while charging, the power switch auto-matically turns off if My Room Mode is
not selected within approximately 100 seconds.
■When using My Room Mode the fol-lowing may occur
●When the remaining charge of the traction battery drops to the lower
limit, the air conditioning system auto- matically stops. In that case, the air conditioning system can not operate
until the remaining charge of the trac- tion battery increases. Turn off the power switch once, then use My
Room Mode after the remaining charge of the traction battery increases.
●If the doors are unlocked while using My Room mode, the AC charging con-
nector will be unlocked and My Room mode will be stopped. To use My Room mode again, perform the opera-
tion to start it. ( P.145) In addition, when using AC charger at the public charging station, it is necessary to
perform the operation to start the charger before using My Room mode.
●The charging time of the traction bat-tery gets longer.
●Noise may be heard from the radio depending on conditions of the radio
wave.
●The surrounding area of the onboard traction battery charger in the motor
compartment may become hot.
●The electric power steering system
warning light (yellow) may turn on, but this is not a malfunction.
■Using My Room Mode during DC charging
When using My Room mode during DC charging, the state of charge completion will be lower than when not using My
Room Mode.
■When “My Room Mode” is used while the traction battery is fully charged
When the power switch is turned on
while the traction battery is fully charged
and the charging connector that sup-
plies power is connected, “Charging
Port Lid is Open” is displayed on the
multi-information display. In this case,
press on the meter control switches
to display the setting screen of “My
Room Mode”, and then select “My
Room Mode”.
When “My Room Mode” is used while
the traction battery is fully charged, the electric power of the traction battery may be consumed. In this case,
charging may be performed again.
■Warning message display
When trying to start My Room Mode or My Room Mode is being used , if a message
is displayed on the multi-information display, refer to the cor responding table and perform the appropriate correction procedures.
MessageCorrection procedure
“Traction Battery is too Low
for “My Room Mode””
There is no remaining charge of the traction battery to
start My Room Mode. Wait until the remaining charge
of the traction battery increases, start My Room Mode.
Page 169 of 674

3
167
Owners Manual_Europe_M42D76_en
3
Vehicle status information and indicators
Vehicle status informa-
tion and indicators
3-1. Instrument cluster
Warning lights and indicators
....................................... 168
Gauges and meters .......... 172
Multi-information display ... 175
Page 170 of 674
168
Owners Manual_Europe_M42D76_en
3-1. Instrument cluster
3-1.In strument clu ste r
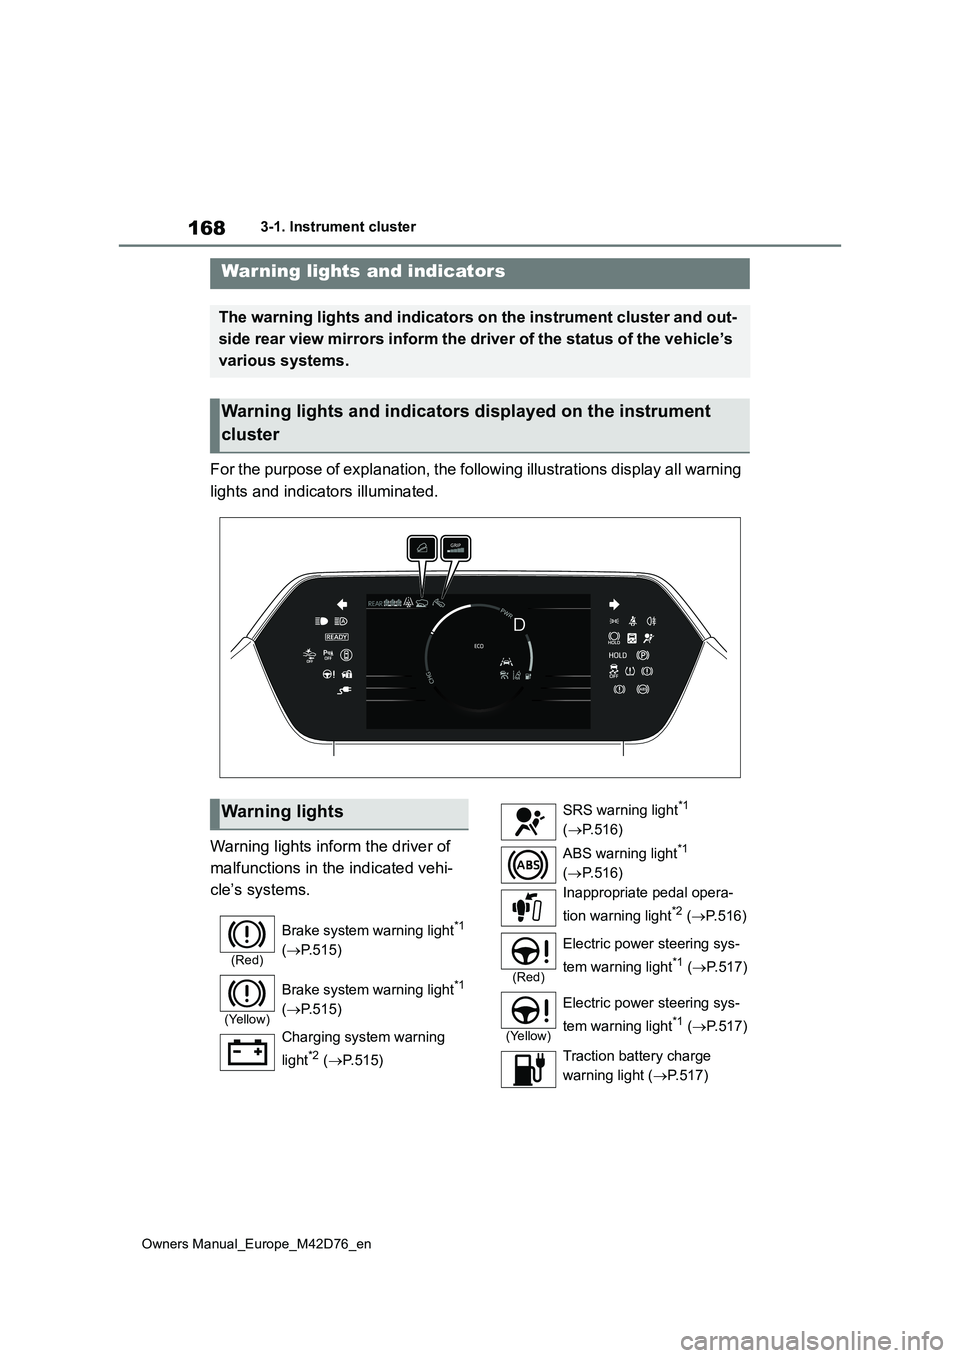
For the purpose of explanation, the following illustrations display all warning
lights and indicators illuminated.
Warning lights inform the driver of
malfunctions in the indicated vehi-
cle’s systems.
Warning lights and indicators
The warning lights and indicators on the instrument cluster and out-
side rear view mirrors inform the driver of the status of the v ehicle’s
various systems.
Warning lights and indicators displayed on the instrument
cluster
Warning lights
(Red)
Brake system warning light*1
( P.515)
(Yellow)
Brake system warning light*1
( P.515)
Charging system warning
light*2 ( P.515)
SRS warning light*1
( P.516)
ABS warning light*1
( P.516)
Inappropriate pedal opera-
tion warning light*2 ( P. 5 1 6 )
(Red)
Electric power steering sys-
tem warning light*1 ( P.517)
(Yellow)
Electric power steering sys-
tem warning light*1 ( P.517)
Traction battery charge
warning light ( P.517)
Page 171 of 674
169
3
Owners Manual_Europe_M42D76_en
3-1. Instrument cluster
Vehicle status information and indicators
*1: These lights come on when the
power switch is turned to ON to indi-
cate that a system check is being
performed. They will turn off after the
EV system is started, or after a few
seconds. There may be a malfunc-
tion in a system if the lights do not
come on, or turn off. Have the vehi-
cle inspected by any authorized
Toyota retailer or Toyota authorized
repairer, or any reliable repairer.
*2: This light illuminates on the multi-
information display with a message.
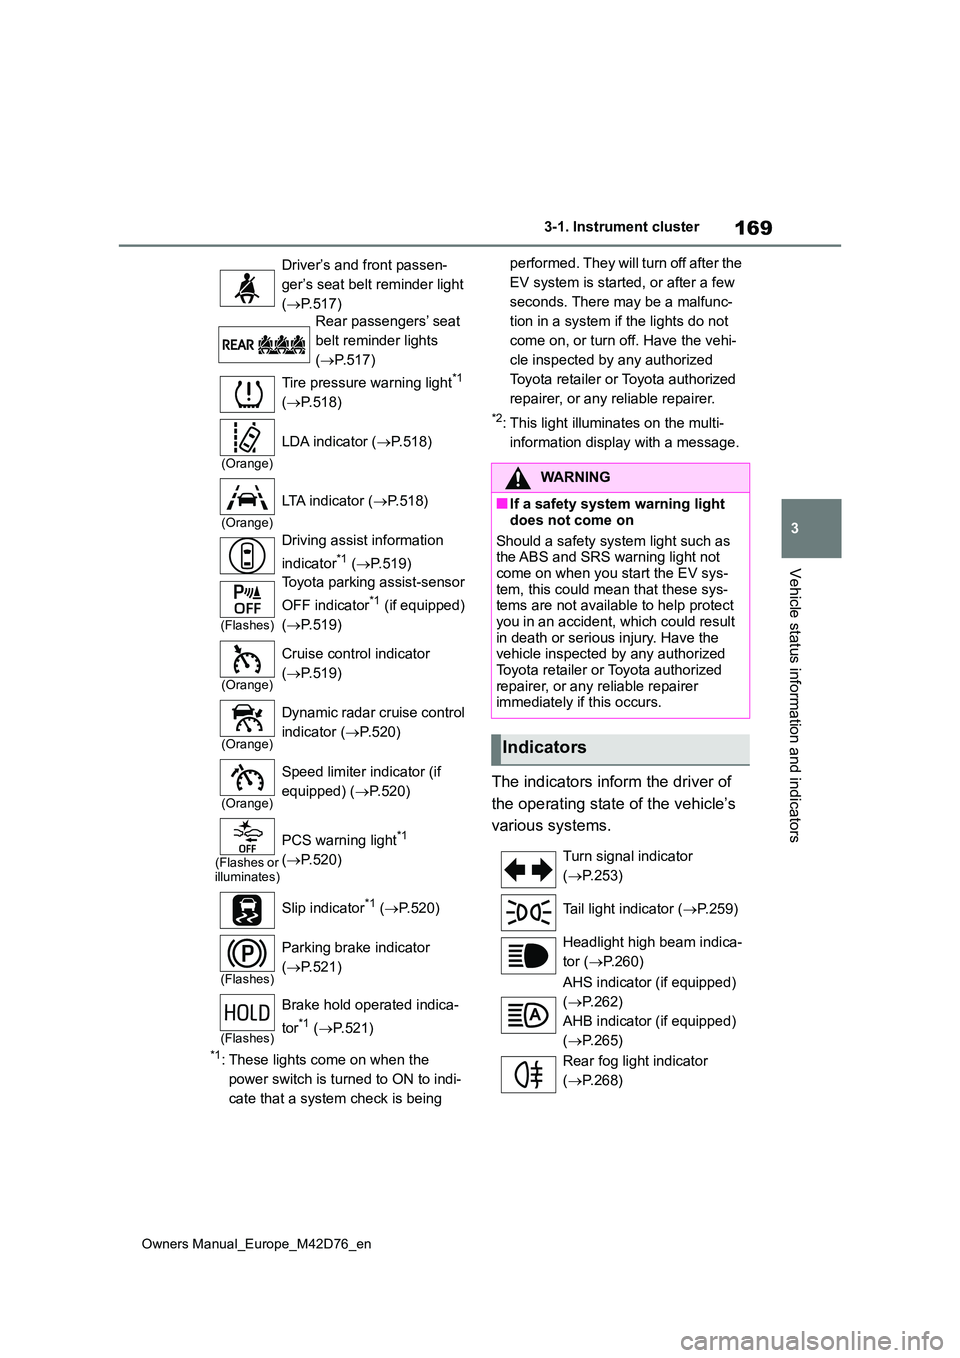
The indicators inform the driver of
the operating state of the vehicle’s
various systems.
Driver’s and front passen-
ger’s seat belt reminder light
( P.517)
Rear passengers’ seat
belt reminder lights
( P.517)
Tire pressure warning light*1
( P.518)
(Orange)
LDA indicator (P.518)
(Orange)
LTA indicator (P.518)
Driving assist information
indicator*1 ( P.519)
(Flashes)
Toyota parking assist-sensor
OFF indicator*1 (if equipped)
( P.519)
(Orange)
Cruise control indicator
( P.519)
(Orange)
Dynamic radar cruise control
indicator ( P.520)
(Orange)
Speed limiter indicator (if
equipped) ( P.520)
(Flashes or illuminates)
PCS warning light*1
( P.520)
Slip indicator*1 ( P.520)
(Flashes)
Parking brake indicator
( P.521)
(Flashes)
Brake hold operated indica-
tor*1 ( P.521)
WARNING
■If a safety system warning light
does not come on
Should a safety system light such as the ABS and SRS warning light not
come on when you start the EV sys- tem, this could mean that these sys-tems are not available to help protect
you in an accident, which could result in death or serious injury. Have the vehicle inspected by any authorized
Toyota retailer or Toyota authorized repairer, or any reliable repairer immediately if this occurs.
Indicators
Turn signal indicator
( P.253)
Tail light indicator ( P.259)
Headlight high beam indica-
tor ( P.260)
AHS indicator (if equipped)
( P.262)
AHB indicator (if equipped)
( P.265)
Rear fog light indicator
( P.268)
Page 172 of 674
170
Owners Manual_Europe_M42D76_en
3-1. Instrument cluster
*1: These lights come on when the
power switch is turned to ON to indi-
cate that a system check is being
performed. They will turn off after the
EV system is started, or after a few
seconds. There may be a malfunc-
tion in a system if the lights do not
come on, or turn off. Have the vehi-
cle inspected by any authorized
Toyota retailer or Toyota authorized
repairer, or any reliable repairer.
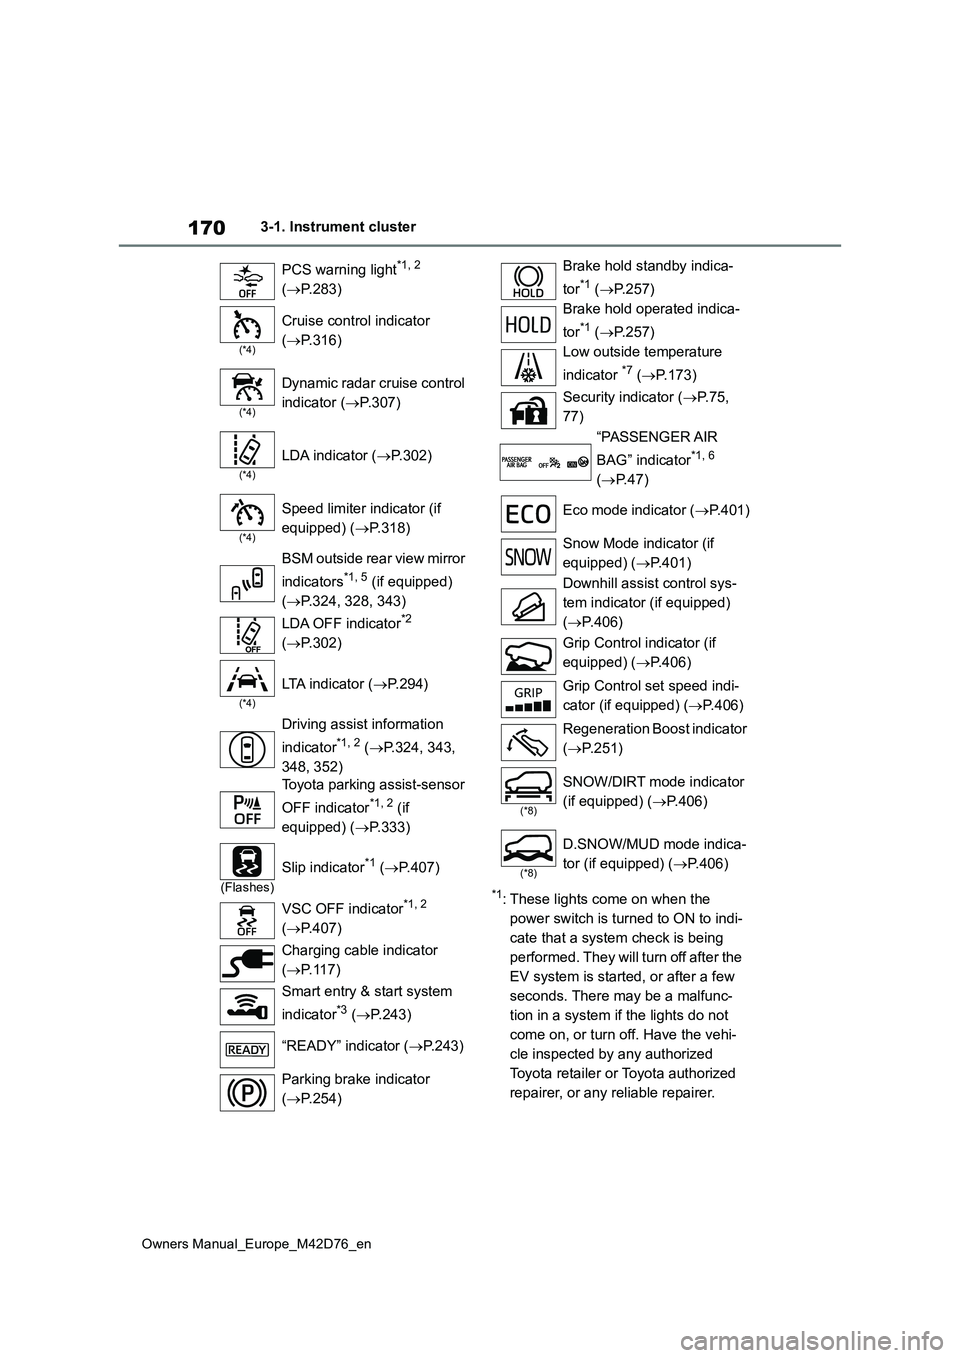
PCS warning light*1, 2
( P.283)
(*4)
Cruise control indicator
( P.316)
(*4)
Dynamic radar cruise control
indicator ( P.307)
(*4)
LDA indicator (P.302)
(*4)
Speed limiter indicator (if
equipped) ( P.318)
BSM outside rear view mirror
indicators*1, 5 (if equipped)
( P.324, 328, 343)
LDA OFF indicator*2
( P.302)
(*4)
LTA indicator (P.294)
Driving assist information
indicator*1, 2 ( P.324, 343,
348, 352)
Toyota parking assist-sensor
OFF indicator*1, 2 (if
equipped) ( P.333)
(Flashes)
Slip indicator*1 (P.407)
VSC OFF indicator*1, 2
( P.407)
Charging cable indicator
( P. 1 1 7 )
Smart entry & start system
indicator*3 ( P.243)
“READY” indicator ( P.243)
Parking brake indicator
( P.254)
Brake hold standby indica-
tor*1 ( P.257)
Brake hold operated indica-
tor*1 ( P.257)
Low outside temperature
indicator *7 ( P.173)
Security indicator ( P. 7 5 ,
77)
“PASSENGER AIR
BAG” indicator*1, 6
( P.47)
Eco mode indicator ( P. 4 0 1 )
Snow Mode indicator (if
equipped) ( P.401)
Downhill assist control sys-
tem indicator (if equipped)
( P.406)
Grip Control indicator (if
equipped) ( P.406)
Grip Control set speed indi-
cator (if equipped) ( P.406)
Regeneration Boost indicator
( P.251)
(*8)
SNOW/DIRT mode indicator
(if equipped) ( P.406)
(*8)
D.SNOW/MUD mode indica-
tor (if equipped) ( P.406)
Page 177 of 674
175
3
Owners Manual_Europe_M42D76_en
3-1. Instrument cluster
Vehicle status information and indicators
If is displayed when is
selected on the multi-information dis-
play, the system may be malfunctioning.
Have the vehicle inspected by any
authorized Toyota retailer or Toyota authorized repairer, or any reliable repairer.
The brightness of the instrument
panel lights can be adjusted.
1 Darker
2 Brighter
■Instrument panel illumination adjustment
The brightness level can be adjusted when the surroundings are bright (day-time, etc.) or dark (nighttime, etc.).
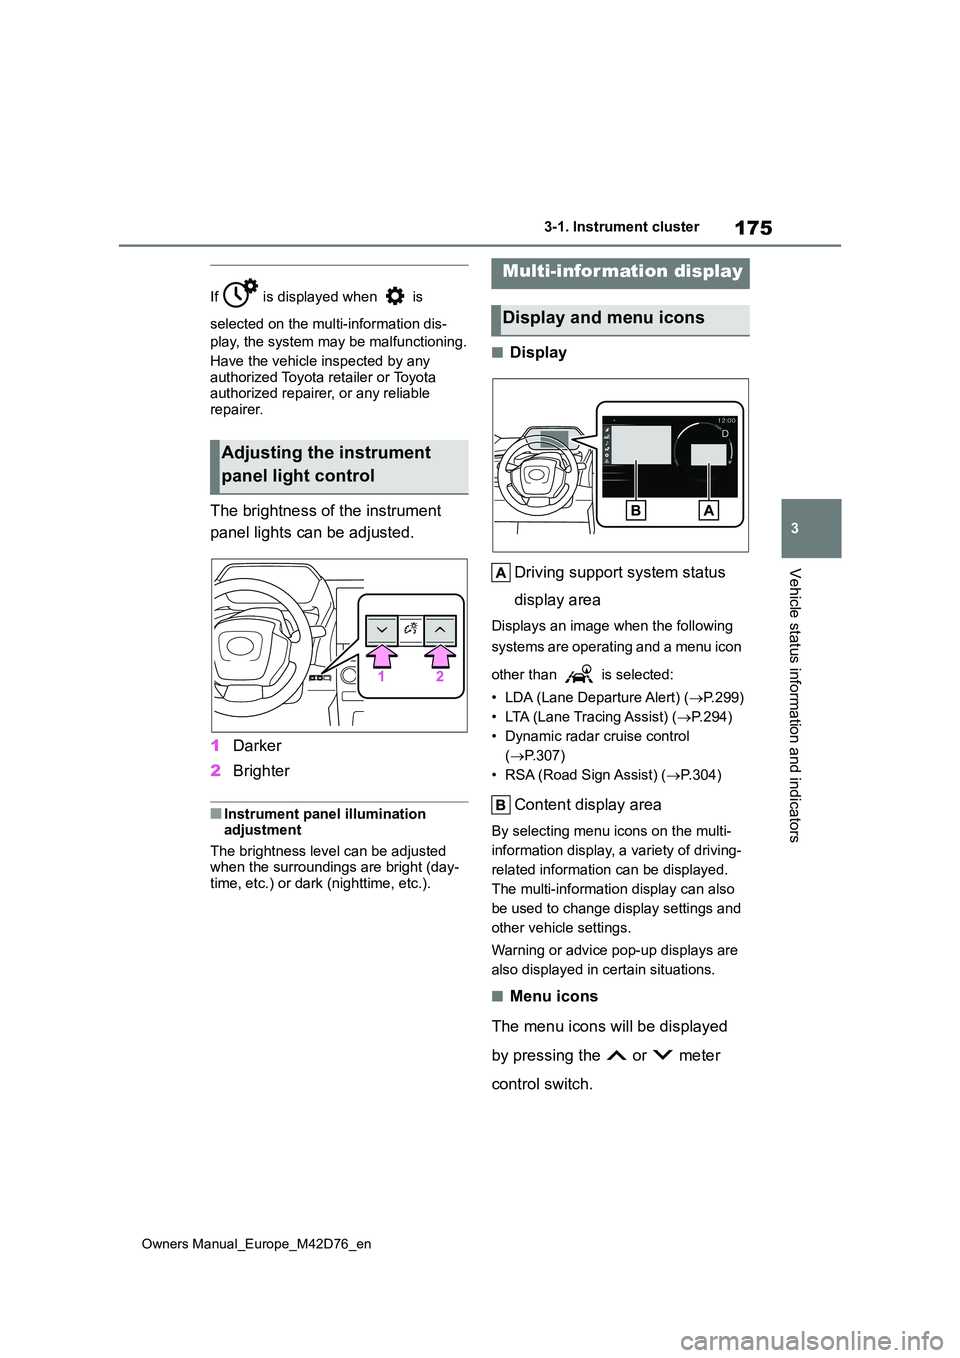
■Display
Driving support system status
display area
Displays an image when the following
systems are operating and a menu icon
other than is selected:
• LDA (Lane Departure Alert) ( P.299)
• LTA (Lane Tracing Assist) ( P. 2 9 4 )
• Dynamic radar cruise control
( P.307)
• RSA (Road Sign Assist) ( P.304)
Content display area
By selecting menu icons on the multi-
information display, a variety of driving-
related information can be displayed.
The multi-information display can also
be used to change display settings and
other vehicle settings.
Warning or advice pop-up displays are
also displayed in certain situations.
■Menu icons
The menu icons will be displayed
by pressing the or meter
control switch.
Adjusting the instrument
panel light control
Multi-information display
Display and menu icons
Page 178 of 674
176
Owners Manual_Europe_M42D76_en
3-1. Instrument cluster
■Liquid crystal display
Small spots or light spots may appear
on the display. This phenomenon is characteristic of liquid crystal displays, and there is no problem continuing to
use the display.
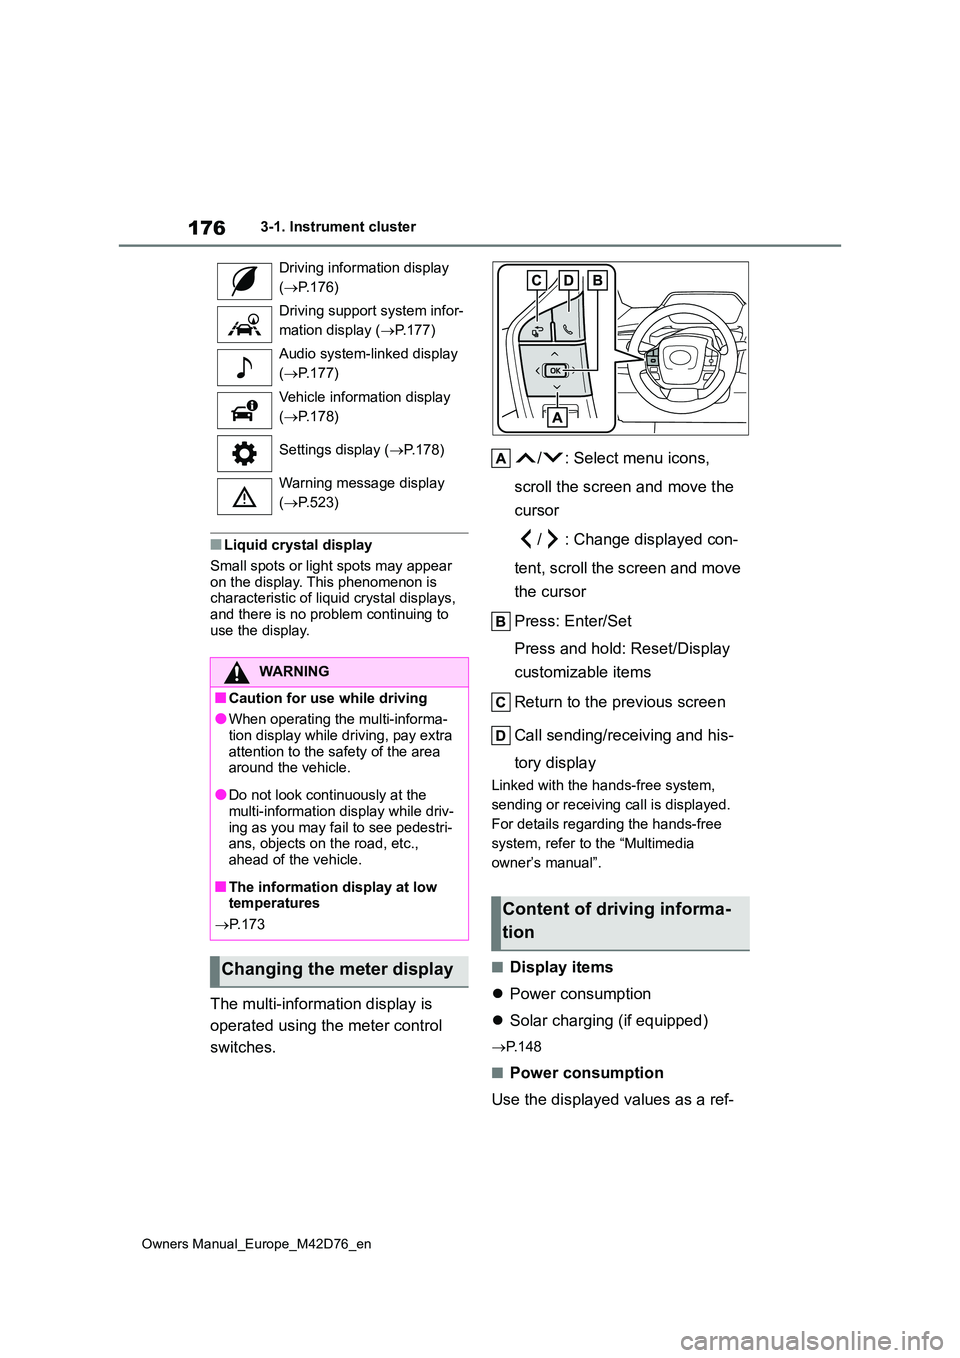
The multi-information display is
operated using the meter control
switches.
/ : Select menu icons,
scroll the screen and move the
cursor
/ : Change displayed con-
tent, scroll the screen and move
the cursor
Press: Enter/Set
Press and hold: Reset/Display
customizable items
Return to the previous screen
Call sending/receiving and his-
tory display
Linked with the hands-free system,
sending or receiving call is displayed.
For details regarding the hands-free
system, refer to the “Multimedia
owner’s manual”.
■Display items
Power consumption
Solar charging (if equipped)
P. 1 4 8
■Power consumption
Use the displayed values as a ref-
Driving information display
( P.176)
Driving support system infor-
mation display ( P.177)
Audio system-linked display
( P.177)
Vehicle information display
( P.178)
Settings display ( P.178)
Warning message display
( P.523)
WARNING
■Caution for use while driving
●When operating the multi-informa-
tion display while driving, pay extra attention to the safety of the area around the vehicle.
●Do not look continuously at the multi-information display while driv-
ing as you may fail to see pedestri- ans, objects on the road, etc., ahead of the vehicle.
■The information display at low temperatures
P. 1 7 3
Changing the meter display
Content of driving informa-
tion
Page 181 of 674
179
3
Owners Manual_Europe_M42D76_en
3-1. Instrument cluster
Vehicle status information and indicators
• Display contents (AWD models only)
Select to display/not display the torque
distribution display.
• Drive information type
Select to change the drive information
type display between after start/after
reset.
• Drive information items
Select to set the first and second items
of the drive information display to any of
the following: average vehicle
speed/distance/elapsed time.
Closing Display
Select to set the items displayed when
the power switch is turned off.
Pop-up display
Select to enable/disable pop-up dis-
plays for each relevant system.
Calendar
The year, month, and day can be set.
Default setting
Select to reset the meter display set-
tings to the default setting.
■Vehicle functions and settings
that can be changed
P. 5 6 1
■Suspension of the settings display
●Some settings cannot be changed
while driving. When changing set- tings, park the vehicle in a safe place.
●If a warning message is displayed, operation of the settings display will be suspended.
Displays suggestions to the driver
in the following situations. To select
a response to a displayed sugges-
tion, use the meter control
switches.
■Suggestion to turn on the
headlights
If the headlight switch is in other
than or , and the vehicle
speed is 5 km/h (3 mph) or higher
for a certain amount of time when
the surroundings are dark, a sug-
gestion message will be displayed.
■Suggestion to turn off the
headlights
If the headlights are left on for a
certain amount of time after the
power switch has been turned off, a
suggestion message will be dis-
played.
When the headlight switch is in the
AUTO position: The message ask-
ing if you wish to turn the headlights
off is displayed. To turn the head-
lights off, select “Yes”.
If the driver’s door is opened after the
power switch is turned off, this sugges-
tion message will not be displayed.
NOTICE
■During setting up the display
To prevent 12-volt battery discharge,
ensure that the EV system is operat- ing while setting up the display fea-tures.
Suggestion function
Page 192 of 674
190
Owners Manual_Europe_M42D76_en
4-2. Opening, closing and locking the doors
WARNING
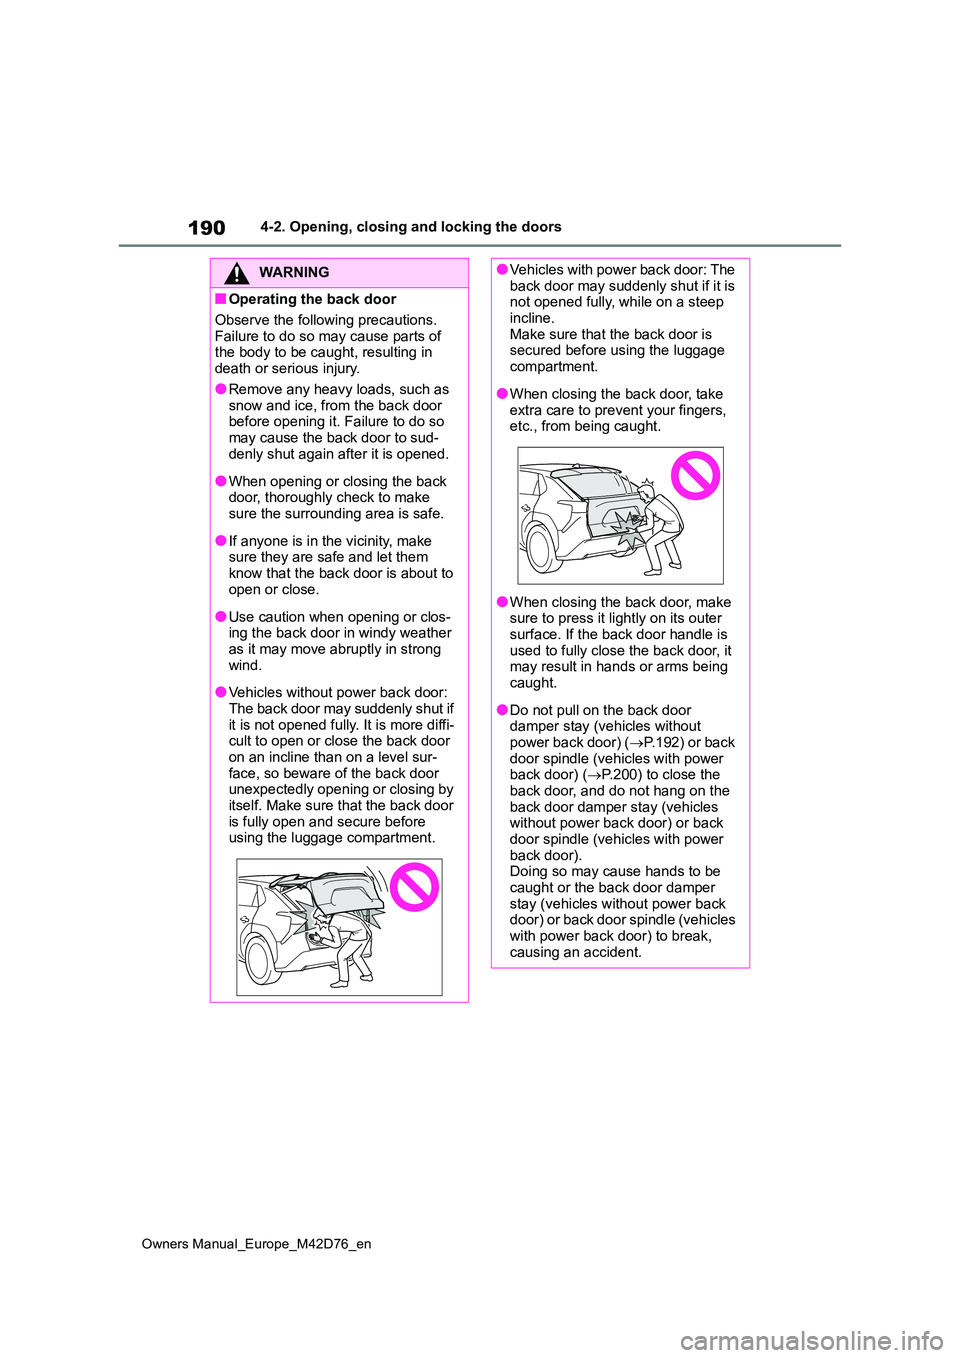
■Operating the back door
Observe the following precautions.
Failure to do so may cause parts of the body to be caught, resulting in death or serious injury.
●Remove any heavy loads, such as snow and ice, from the back door before opening it. Failure to do so
may cause the back door to sud- denly shut again after it is opened.
●When opening or closing the back door, thoroughly check to make sure the surrounding area is safe.
●If anyone is in the vicinity, make sure they are safe and let them
know that the back door is about to open or close.
●Use caution when opening or clos-ing the back door in windy weather as it may move abruptly in strong
wind.
●Vehicles without power back door:
The back door may suddenly shut if it is not opened fully. It is more diffi-cult to open or close the back door
on an incline than on a level sur- face, so beware of the back door unexpectedly opening or closing by
itself. Make sure that the back door is fully open and secure before using the luggage compartment.
●Vehicles with power back door: The back door may suddenly shut if it is not opened fully, while on a steep
incline. Make sure that the back door is secured before using the luggage
compartment.
●When closing the back door, take
extra care to prevent your fingers, etc., from being caught.
●When closing the back door, make sure to press it lightly on its outer surface. If the back door handle is
used to fully close the back door, it may result in hands or arms being caught.
●Do not pull on the back door damper stay (vehicles without
power back door) ( P.192) or back door spindle (vehicles with power back door) ( P.200) to close the
back door, and do not hang on the back door damper stay (vehicles without power back door) or back
door spindle (vehicles with power back door).Doing so may cause hands to be
caught or the back door damper stay (vehicles without power back door) or back door spindle (vehicles
with power back door) to break, causing an accident.