Setting TOYOTA BZ4X 2022 (in English) Service Manual
[x] Cancel search | Manufacturer: TOYOTA, Model Year: 2022, Model line: BZ4X, Model: TOYOTA BZ4X 2022Pages: 674, PDF Size: 120.02 MB
Page 225 of 674
223
4
Owners Manual_Europe_M42D76_en
4-6. Favorite settings
Before driving
■Customization
The seat movement amount settings of the power easy access system can be customized. (Customizable features:
P.566)
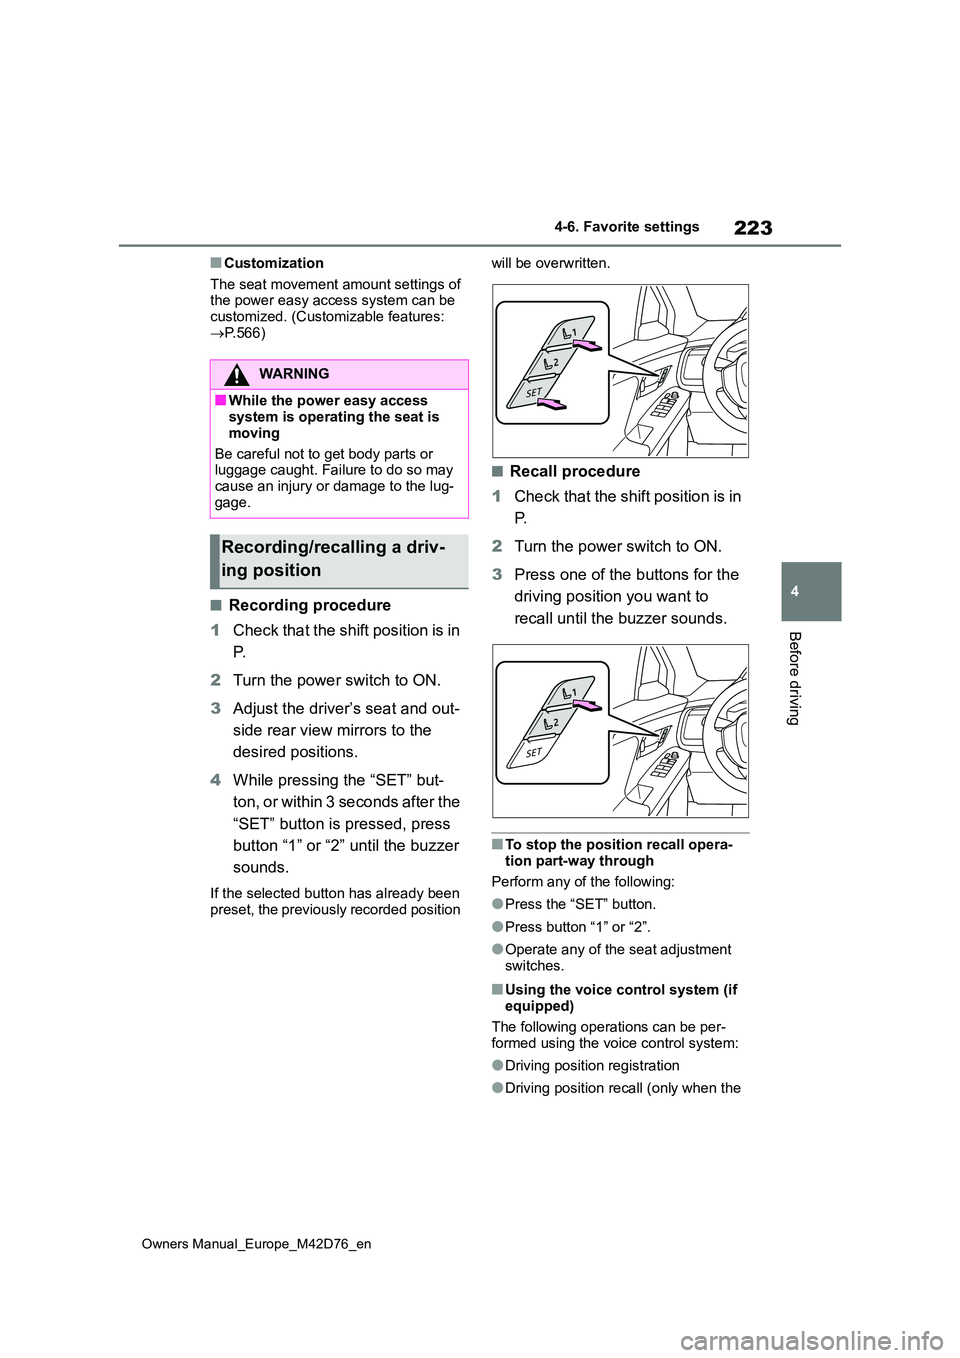
■Recording procedure
1 Check that the shift position is in
P.
2 Turn the power switch to ON.
3 Adjust the driver’s seat and out-
side rear view mirrors to the
desired positions.
4 While pressing the “SET” but-
t o n , o r w i t h i n 3 s e c o n d s a f t e r t h e
“SET” button is pressed, press
button “1” or “2” until the buzzer
sounds.
If the selected button has already been preset, the previously recorded position
will be overwritten.
■Recall procedure
1 Check that the shift position is in
P.
2 Turn the power switch to ON.
3 Press one of the buttons for the
driving position you want to
recall until the buzzer sounds.
■To stop the position recall opera- tion part-way through
Perform any of the following:
●Press the “SET” button.
●Press button “1” or “2”.
●Operate any of the seat adjustment switches.
■Using the voice control system (if equipped)
The following operations can be per- formed using the voice control system:
●Driving position registration
●Driving position recall (only when the
WARNING
■While the power easy access system is operating the seat is
moving
Be careful not to get body parts or luggage caught. Failure to do so may
cause an injury or damage to the lug- gage.
Recording/recalling a driv-
ing position
Page 226 of 674
224
Owners Manual_Europe_M42D76_en
4-6. Favorite settings
shift position is in P)
For details, refer to the “Multimedia owner’s manual”.
■Seat positions that can be memo-rized ( P.208)
The adjusted positions other than the position adjusted by lumbar support switch can be recorded.
■Operating the driving position
memory after turning the power switch to OFF
Recorded seat positions can be acti-
vated up to 180 seconds after the driver’s door is opened and another 60 seconds after it is closed again.
■In order to correctly use the driving
position memory function
If a seat position is already in the fur- thest possible position and the seat is
operated in the same direction, the recorded position may be slightly differ-ent when it is recalled.
■When recalling the driving position
Take care so that a head restraint does not contact the ceiling or a sun visor.
■If the 12-volt battery is discon-nected
The memorized positions are erased.
■When the recorded seat position cannot be recalled
The seat position may not be recalled in
some situations when the seat position is recorded in a certain range. For details, contact any authorized Toyota
retailer or Toyota authorized repairer, or any reliable repairer.
■Jam protection function
While the driving position is recalled or
the power easy access system is oper- ating, if an object is stuck behind the front seat, the front seat will stop and
then slightly move forward. When the jam protection function operates, the seat stops at a position other than the
set seat position. Check the seat posi- tion.
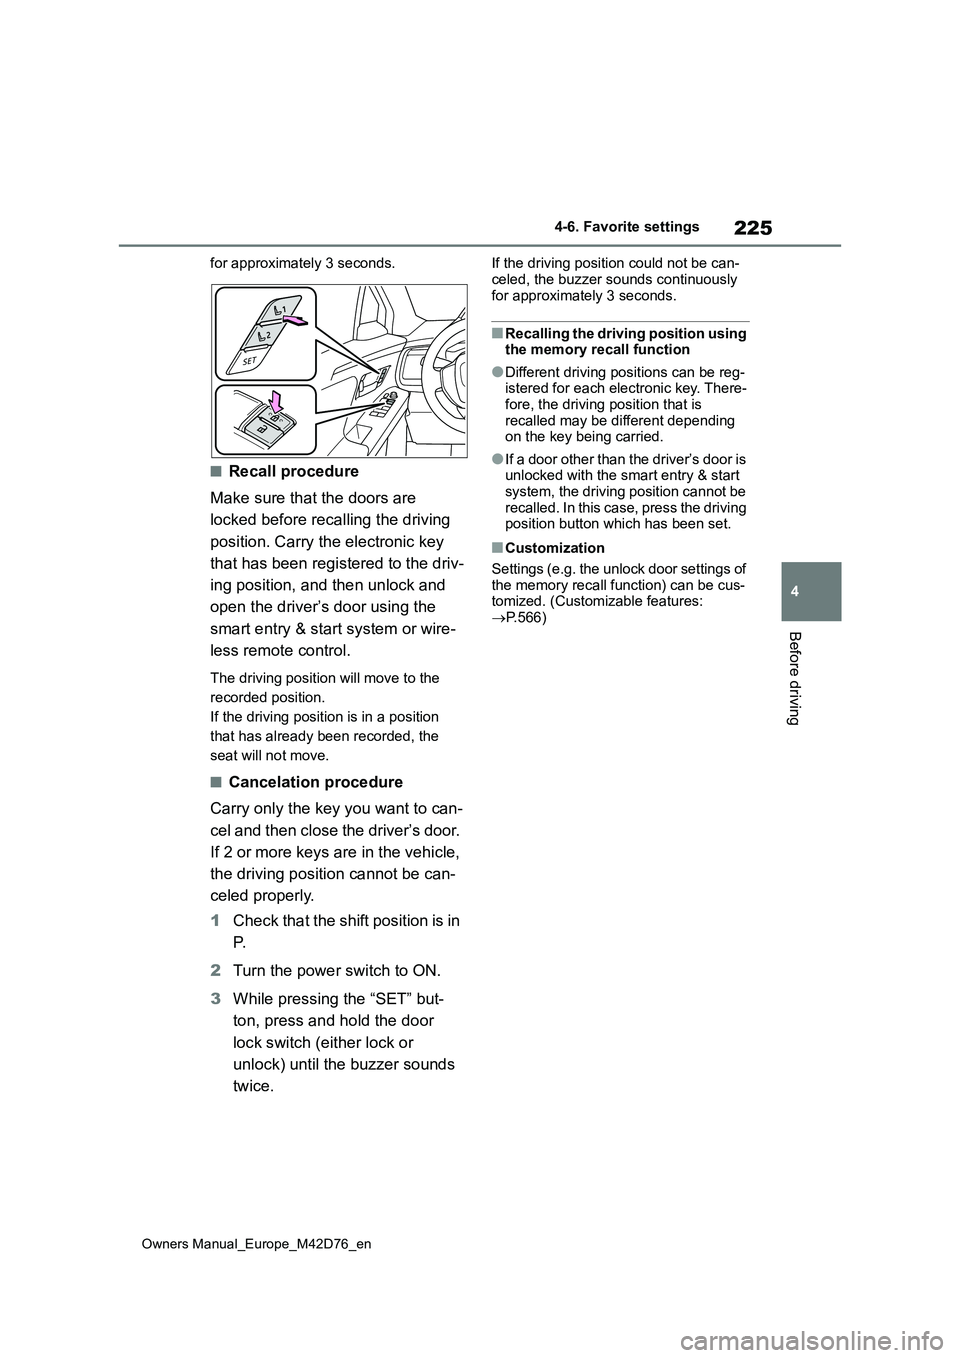
■Registering procedure
Record your driving position to but-
ton “1” or “2” before performing the
following:
Carry only the key you want to reg-
ister, and then close the driver’s
door.
If 2 or more keys are in the vehicle,
the driving position cannot be
recorded properly.
1 Check that the shift position is in
P.
2 Turn the power switch to ON.
3 Recall the driving position that
you want to record.
4 While pressing the recalled but-
ton, press and hold the door
lock switch (either lock or
unlock) until the buzzer sounds.
If the driving position could not be regis-
tered, the buzzer sounds continuously
WARNING
■Seat adjustment caution
Take care during seat adjustment so
that the seat does not strike the rear passenger or squeeze your body against the steering wheel.
Registering/recall/canceling
an electronic key to driving
position (memory recall
function)
Page 227 of 674
225
4
Owners Manual_Europe_M42D76_en
4-6. Favorite settings
Before driving
for approximately 3 seconds.
■Recall procedure
Make sure that the doors are
locked before recalling the driving
position. Carry the electronic key
that has been registered to the driv-
ing position, and then unlock and
open the driver’s door using the
smart entry & start system or wire-
less remote control.
The driving position will move to the
recorded position.
If the driving position is in a position
that has already been recorded, the
seat will not move.
■Cancelation procedure
Carry only the key you want to can-
cel and then close the driver’s door.
If 2 or more keys are in the vehicle,
the driving position cannot be can-
celed properly.
1 Check that the shift position is in
P.
2 Turn the power switch to ON.
3 While pressing the “SET” but-
ton, press and hold the door
lock switch (either lock or
unlock) until the buzzer sounds
twice.
If the driving position could not be can-
celed, the buzzer sounds continuously for approximately 3 seconds.
■Recalling the driving position using the memory recall function
●Different driving positions can be reg-istered for each electronic key. There-fore, the driving position that is
recalled may be different depending on the key being carried.
●If a door other than the driver’s door is unlocked with the smart entry & start system, the driving position cannot be
recalled. In this case, press the driving position button which has been set.
■Customization
Settings (e.g. the unlock door settings of
the memory recall function) can be cus- tomized. (Customizable features: P.566)
Page 228 of 674
226
Owners Manual_Europe_M42D76_en
4-6. Favorite settings
An individual can be identified
using the following authentication
devices.
Electronic key
An individual is identified when the
smart entry & start system detects their
electronic key.
Face identification
Individuals are identified by detecting
the face from the driver monitor.
Bluetooth devices
An individual can be detected if the
same Bluetooth device that was used
as a handsfree phone the last time the
vehicle was entered is connected to the
audio system.
When an individual is identified
from an authentication device, set-
tings for the following functions are
recalled.
Driving position (memory recall
function)*1
After an individual is identified, the driv-
ing position that was set when driving
was last completed is recalled when the
following operation is performed.
The door is unlocked and opened using
the smart entry & start system or wire-
less remote control.
Meter display and multimedia
information*2
When an individual is identified, the
vehicle settings used when the power
switch was last turned off are recalled.
Vehicle settings that can be set
using the multimedia display*2
When an individual is identified, the
vehicle settings used when the power
switch was last turned off are recalled.
Safe driving support function*2
When an individual is identified, the
vehicle settings used when the power
switch was last turned off are recalled.
*1: If equipped
*2: Some settings are excluded
My Settings
By recognizing an individual
through a device, such as an
electronic key, the driving
position and vehicle settings
recorded for that driver can be
recalled when the vehicle is
entered. By assigning an
authentication device to a
driver in advance, the driver
can enter the vehicle with their
preferred settings. Settings for
u p t o 3 d riv ers c an be r ec or d ed
by My Settings. For details on
how to assign/delete electronic
keys, set driver names, per-
form initialization, change driv-
ers manually, or delete a driver,
refer to the “Multimedia
owner’s manual”.
Types of assigned authenti-
cation devices
Recalled functions
Page 248 of 674
246
Owners Manual_Europe_M42D76_en
5-2. Driving procedures
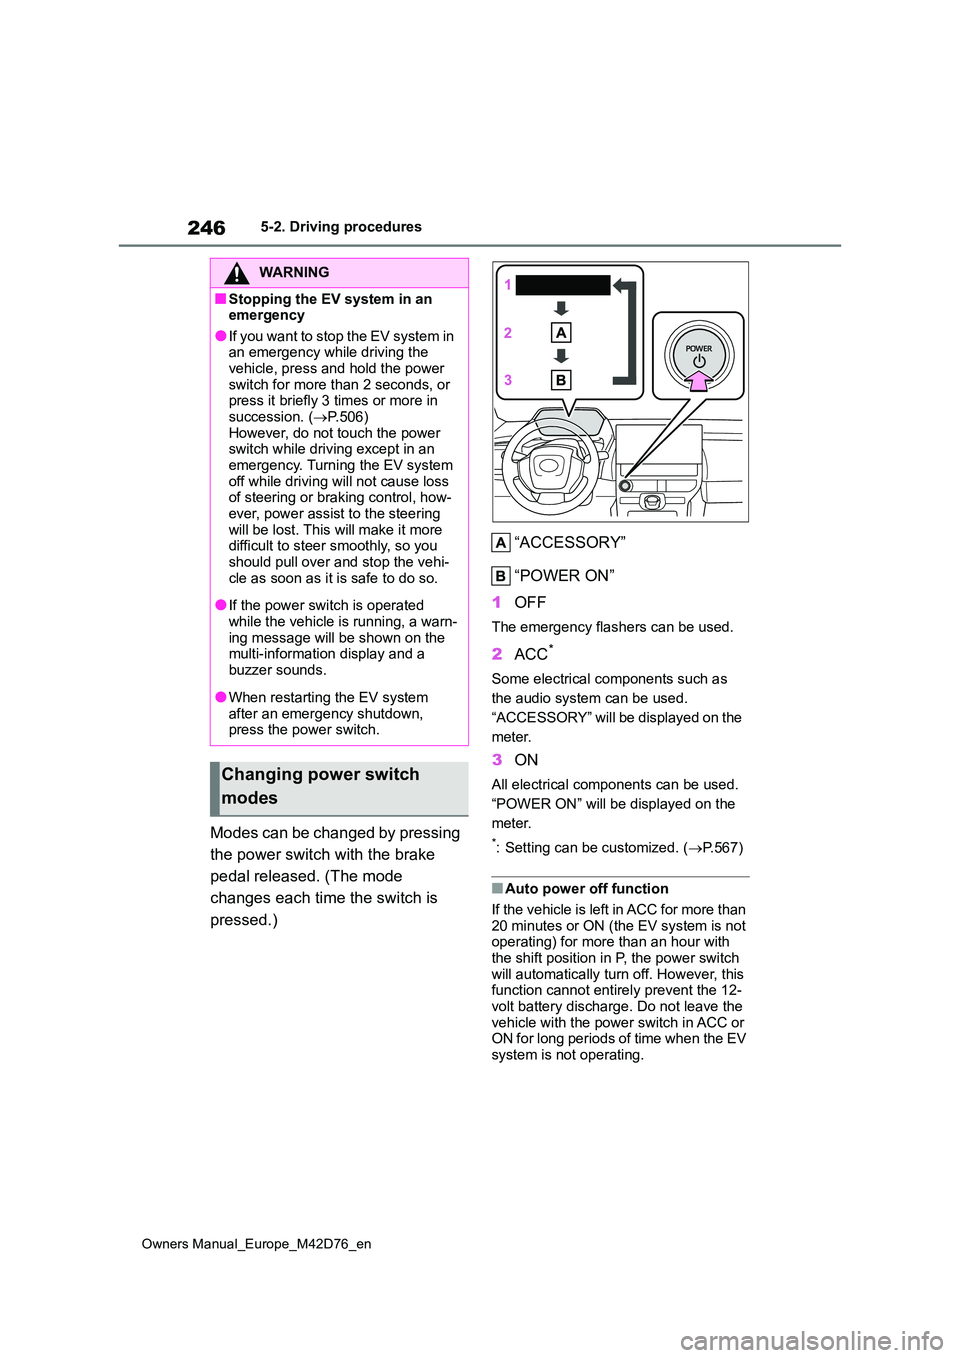
Modes can be changed by pressing
the power switch with the brake
pedal released. (The mode
changes each time the switch is
pressed.)
“ACCESSORY”
“POWER ON”
1 OFF
The emergency flashers can be used.
2ACC*
Some electrical components such as
the audio system can be used.
“ACCESSORY” will be displayed on the
meter.
3 ON
All electrical components can be used.
“POWER ON” will be displayed on the
meter.
*: Setting can be customized. ( P.567)
■Auto power off function
If the vehicle is left in ACC for more than
20 minutes or ON (the EV system is not operating) for more than an hour with the shift position in P, the power switch
will automatically turn off. However, this function cannot entirely prevent the 12-volt battery discharge. Do not leave the
vehicle with the power switch in ACC or ON for long periods of time when the EV system is not operating.
WARNING
■Stopping the EV system in an emergency
●If you want to stop the EV system in an emergency while driving the vehicle, press and hold the power
switch for more than 2 seconds, or press it briefly 3 times or more in succession. ( P.506)
However, do not touch the power switch while driving except in an emergency. Turning the EV system
off while driving will not cause loss of steering or braking control, how-ever, power assist to the steering
will be lost. This will make it more difficult to steer smoothly, so you should pull over and stop the vehi-
cle as soon as it is safe to do so.
●If the power switch is operated
while the vehicle is running, a warn- ing message will be shown on the multi-information display and a
buzzer sounds.
●When restarting the EV system
after an emergency shutdown, press the power switch.
Changing power switch
modes
Page 262 of 674
260
Owners Manual_Europe_M42D76_en
5-3. Operating the lights and wipers
■Light reminder buzzer
A buzzer sounds when the power switch is turned off or turned to ACC and the driver’s door is opened while the lights
are turned on.
■Automatic headlight leveling sys- tem (if equipped)
The level of the headlights is automati-
cally adjusted according to the number of passengers and the loading condition of the vehicle to ensure that the head-
lights do not interfere with other road users.
■12-volt battery-saving function
In order to prevent 12-volt the battery of
the vehicle from discharging, if the light
switch is in the or position
when the power switch is turned off, the
12-volt battery saving function will oper-
ate and automatically turn off all the
lights after approximately 20 minutes.
When the power switch is turned to ON, the 12-volt battery-saving function will be disabled.
When any of the following are per- formed, the 12-volt battery-saving func-tion is canceled once and then
reactivated. All the lights will turn off automatically 20 minutes after the 12-volt battery- saving function has been
reactivated:
●When the headlight switch is operated
●When a door is opened or closed
■Customization
Settings (e.g. light sensor sensitivity)
can be changed. (Customizable features: P.567)
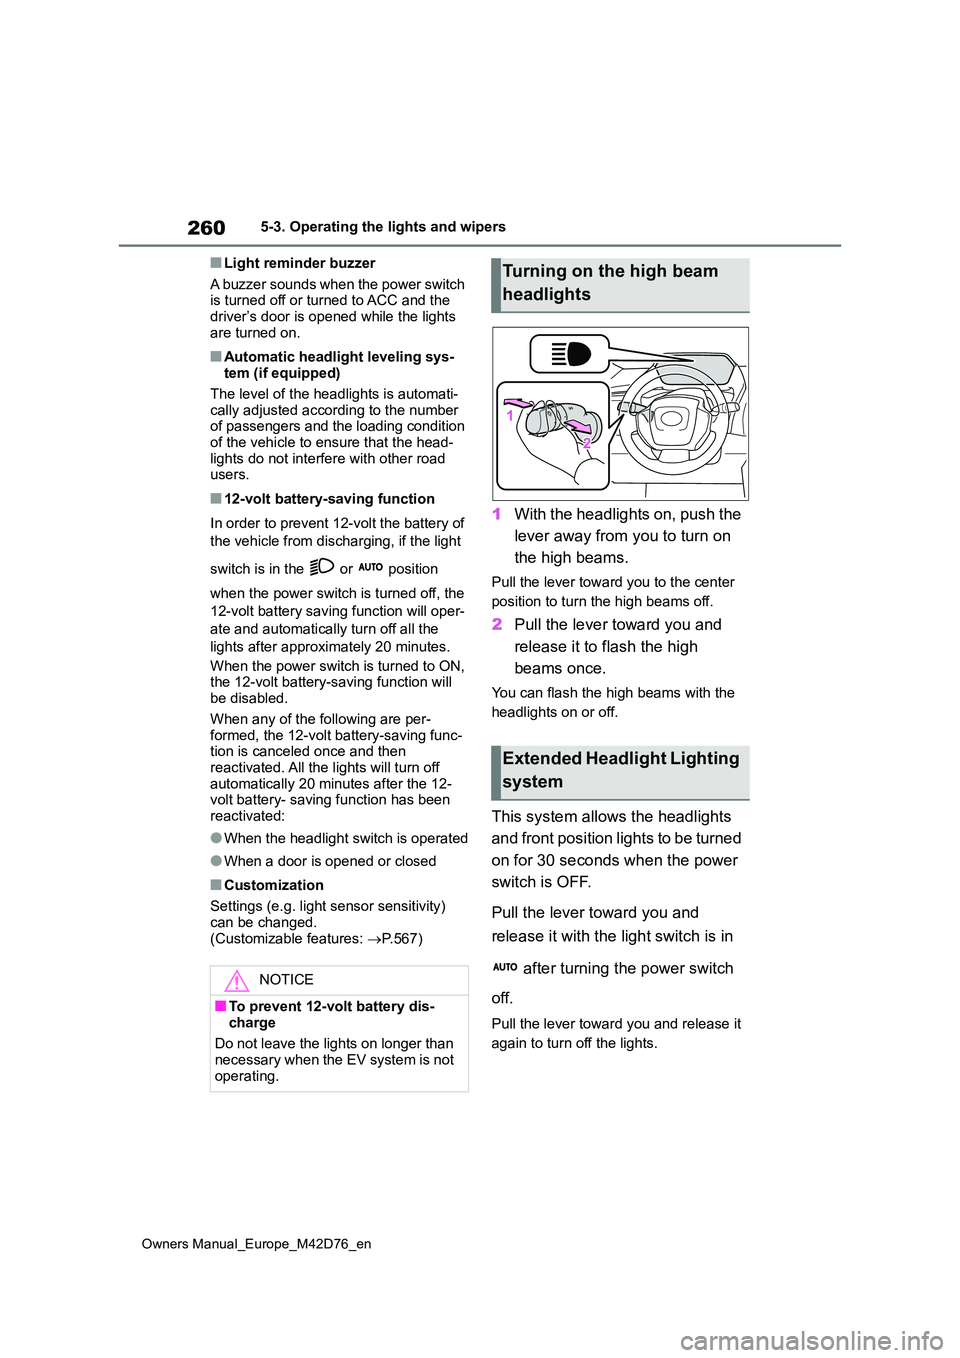
1With the headlights on, push the
lever away from you to turn on
the high beams.
Pull the lever toward you to the center
position to turn the high beams off.
2 Pull the lever toward you and
release it to flash the high
beams once.
You can flash the high beams with the
headlights on or off.
This system allows the headlights
and front position lights to be turned
on for 30 seconds when the power
switch is OFF.
Pull the lever toward you and
release it with the light switch is in
after turning the power switch
off.
Pull the lever toward you and release it
again to turn off the lights.
NOTICE
■To prevent 12-volt battery dis-
charge
Do not leave the lights on longer than necessary when the EV system is not
operating.
Turning on the high beam
headlights
Extended Headlight Lighting
system
Page 263 of 674
261
5
Owners Manual_Europe_M42D76_en
5-3. Operating the lights and wipers
Driving
*: If equipped
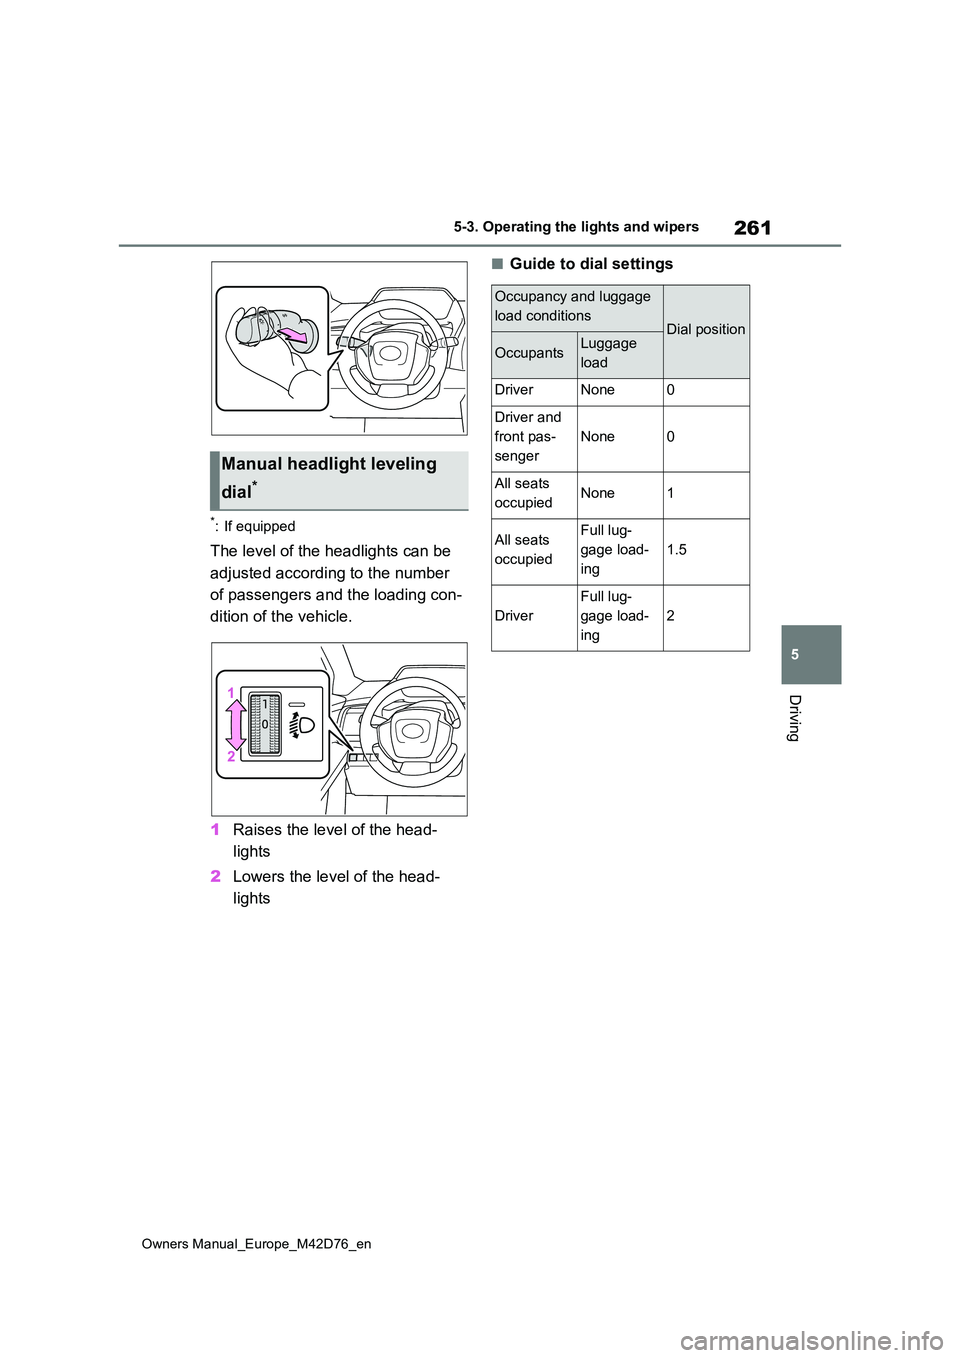
The level of the headlights can be
adjusted according to the number
of passengers and the loading con-
dition of the vehicle.
1 Raises the level of the head-
lights
2 Lowers the level of the head-
lights
■Guide to dial settings
Manual headlight leveling
dial*
Occupancy and luggage
load conditionsDial position
OccupantsLuggage
load
DriverNone0
Driver and
front pas-
senger
None0
All seats
occupiedNone1
All seats
occupied
Full lug-
gage load-
ing
1.5
Driver
Full lug-
gage load-
ing
2
Page 266 of 674
264
Owners Manual_Europe_M42D76_en
5-3. Operating the lights and wipers
• When a vehicle ahead is a two-
wheeled vehicle • The condition of the road (gradient, curve, condition of the road surface,
etc.) • The number of passengers and amount of luggage
●The light distribution control of the headlights may not match the driver’s
expectations
●Bicycles and other small vehicles may
not be detected.
●In the following situations, the system
may not be able to correctly detect the brightness of the surroundings. This may cause the low beams to remain
on or the high beams to flash or daz- zle pedestrians or vehicles ahead. In such a case, it is necessary to manu-
ally change between the high beams and low beams.• When there are lights similar to head-
lights or tail lights in the surrounding area• When headlights or tail lights of vehi-
cles ahead are turned off, dirty, chang- ing color, or not aimed properly• When the headlights are repeatedly
changing between the high beams and low beams.• When use of the high beams is inap-
propriate or when the high beams may be flashing or dazzling pedestri-ans or other drivers.
• When the vehicle is used in an area in which vehicles travel on the opposite side of the road of the country for
which the vehicle was designed, for example using a vehicle designed for right-hand traffic in a left-hand traffic
area, or vice versa • When it is necessary to disable the system: P. 2 7 5
• Situations in which the sensors may not operate properly: P. 2 7 9
■Customization
The settings of some functions can be
changed. ( P.567)
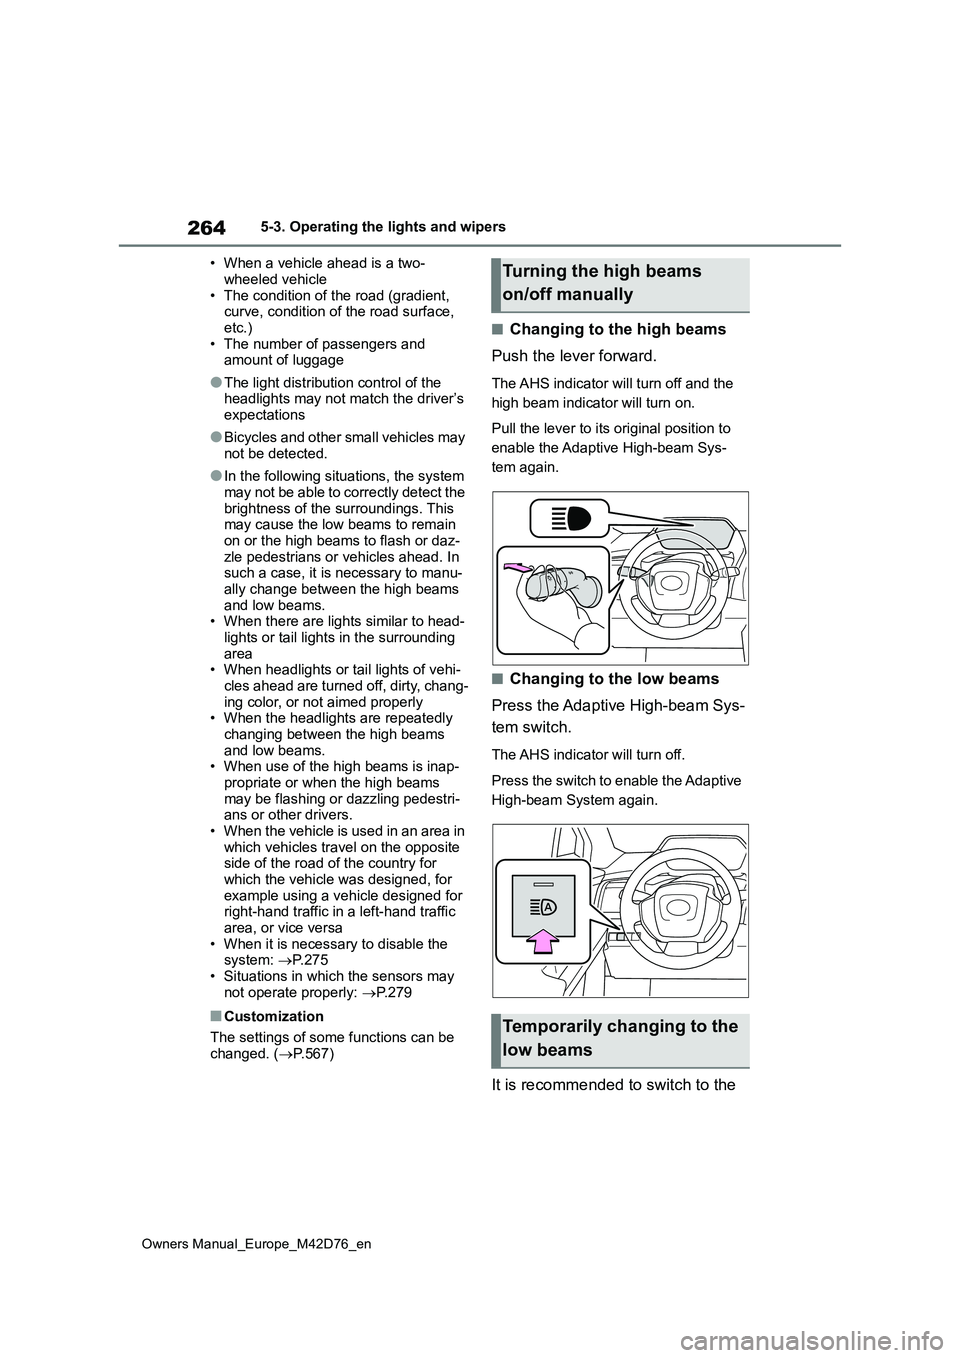
■Changing to the high beams
Push the lever forward.
The AHS indicator will turn off and the
high beam indicator will turn on.
Pull the lever to its original position to
enable the Adaptive High-beam Sys-
tem again.
■Changing to the low beams
Press the Adaptive High-beam Sys-
tem switch.
The AHS indicator will turn off.
Press the switch to enable the Adaptive
High-beam System again.
It is recommended to switch to the
Turning the high beams
on/off manually
Temporarily changing to the
low beams
Page 273 of 674
271
5
Owners Manual_Europe_M42D76_en
5-3. Operating the lights and wipers
Driving
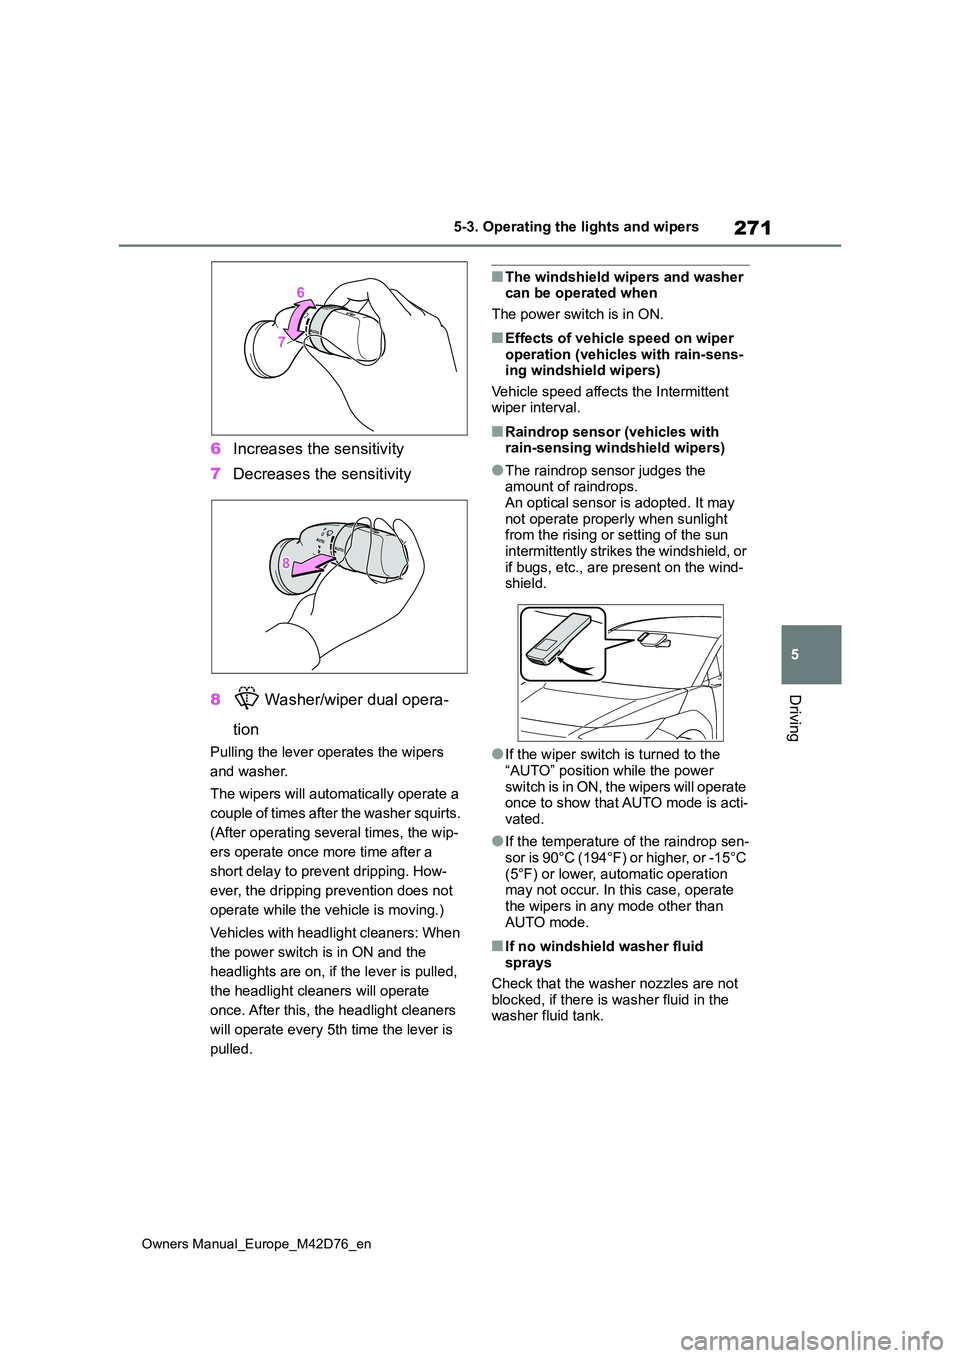
6Increases the sensitivity
7 Decreases the sensitivity
8 Washer/wiper dual opera-
tion
Pulling the lever operates the wipers
and washer.
The wipers will automatically operate a
couple of times after the washer squirts.
(After operating several times, the wip-
ers operate once more time after a
short delay to prevent dripping. How-
ever, the dripping prevention does not
operate while the vehicle is moving.)
Vehicles with headlight cleaners: When
the power switch is in ON and the
headlights are on, if the lever is pulled,
the headlight cleaners will operate
once. After this, the headlight cleaners
will operate every 5th time the lever is
pulled.
■The windshield wipers and washer can be operated when
The power switch is in ON.
■Effects of vehicle speed on wiper operation (vehicles with rain-sens-ing windshield wipers)
Vehicle speed affects the Intermittent wiper interval.
■Raindrop sensor (vehicles with rain-sensing windshield wipers)
●The raindrop sensor judges the amount of raindrops.
An optical sensor is adopted. It may not operate properly when sunlight from the rising or setting of the sun
intermittently strikes the windshield, or if bugs, etc., are present on the wind-shield.
●If the wiper switch is turned to the “AUTO” position while the power
switch is in ON, the wipers will operate once to show that AUTO mode is acti-vated.
●If the temperature of the raindrop sen-
sor is 90°C (194°F) or higher, or -15°C (5°F) or lower, automatic operation may not occur. In this case, operate
the wipers in any mode other than AUTO mode.
■If no windshield washer fluid sprays
Check that the washer nozzles are not blocked, if there is washer fluid in the washer fluid tank.
Page 285 of 674
283
5
Owners Manual_Europe_M42D76_en
5-4. Using the driving support systems
Driving
tion.
See “My Settings” regarding how to
use face authentication function,
priority with other personal identifi-
cation, and related customized set-
tings.
■Warning function
These functions may not operate when the vehicle speed is low.
■Situations in which the driver moni-
tor may not operate properly
P. 2 8 1
The settings of Driver monitor can
be changed through customize set-
tings. ( P.570)
WARNING
■For safe use
●The driver monitor is not designed to prevent the driver from driving carelessly or having a poor driving
posture. Pay careful attention to the sur-rounding conditions in order to
ensure safe driving.
●The driver monitor cannot reduce
drowsiness. If you feel unable to concentrate or drowsy, take a break and sleep as necessary in order to
ensure safe driving.
Changing Driver monitor
settings
PCS (Pre-Collision Sys-
tem)
The pre-collision system uses
sensors to detect objects
( P.284) in the path of the
vehicle. When the system
determines that the possibility
of a frontal collision with a
detectable obj ect is high, a
warning operates to urge the
driver to take evasive action
and the potential brake pres-
sure is increased to help the
driver avoid the collision. If the
system determines that the
possibility of a collision is
extremely high, the brakes are
automatically applied to help
avoid the collision or help
reduce the impact of the colli-
sion.
The pre-collision system can be
disabled/enabled and the warn-
ing timing can be changed.
( P.293)
WARNING
■For safe use
●Driving safely is solely the responsi-
bility of the driver. Pay careful atten- tion to the surrounding conditions in order to ensure safe driving. Never
use the pre-collision system in place of normal braking operations. This system cannot help avoid or
reduce the impact of a collision in every situation. Over-reliance on this system to drive the vehicle
safely may lead to an accident resulting in death or serious injury.