Time setting TOYOTA BZ4X 2022 (in English) Service Manual
[x] Cancel search | Manufacturer: TOYOTA, Model Year: 2022, Model line: BZ4X, Model: TOYOTA BZ4X 2022Pages: 674, PDF Size: 120.02 MB
Page 402 of 674
400
Owners Manual_Europe_M42D76_en
5-4. Using the driving support systems
deleted. Parking space information
cannot be deleted when assis-
tance is being performed or when
registering parking space informa-
tion to the memory function.
■Toyota parking assist-sensor
warning sound ON/OFF
(Smartphone setting)
The warning sounds of the Toyota
parking assist-sensor from smart-
phone application can be turned
on/off using the Remote Park app.
■Toyota parking assist-sensor
warning sound volume adjust-
ment (Smartphone setting)
The volume of the warning sounds
of the Toyota parking assist-sensor
from smartphone application can
be adjusted using the Remote Park
app.
The operating state, assistance
operation, etc. of the Advanced
Park is displayed on the multimedia
display. If a message is displayed,
respond according to the content
displayed.
■If “No available parking space” is
displayed
Move the vehicle to a location where a parking space or parking lines can be
detected.
■If “Unavailable in current condi-
tion” is displayed
Move the vehicle to another location and use the system.
■If “Not enough space to exit” is dis-
played
The parallel parking exit function cannot be used due to a situation such as the
distance between your vehicle and vehi- cles parked in front of and behind your vehicle being short, the existence of an
object in the exit direction, etc.
Check the conditions of the area around your vehicle and exit from the parking
space manually.
■If “Cannot control speed” is dis- played
The system judged that it cannot adjust
the speed of the vehicle when using the system in an area with a slope or step and assistance was canceled.
Use the system in a level location.
■If “Obstacle detected” is displayed
The emergency support brake operated and assistance was suspended.
Check the condition of the surrounding area. To resume assistance, select the “Start” button on the multimedia display.
■If “No available parking space to
register” is displayed
This message is displayed when is
selected at a parking space that cannot
be detected.
Operate the system at a parking space where differences in the road surface can be recognized. ( P.386)
Changing the Remote Park
app settings
Advanced Park Displayed
messages
Page 424 of 674
422
Owners Manual_Europe_M42D76_en
6-1. Using the air conditioning system and defogger
■Defogging the windshield
Defoggers are used to defog the
windshield and front side windows.
Press the windshield defogger
switch.
Set the outside/recirculated air mode
switch to outside air mode if the recircu-
lated air mode is used. (It may switch
automatically.)
To defog the windshield and the side
windows early, turn the air flow and
temperature up.
To return to the previous mode, press
the windshield defogger switch again
when the windshield is defogged.
When the windshield defogger switch is
on, the indicator illuminates on the
windshield defogger switch.
■Defogging the rear window
and outside rear view mirrors
Defoggers are used to defog the
rear window and to remove rain-
drops, dew and frost from the out-
side rear view mirrors.
Press the rear window and outside
rear view mirror defogger switch.
The defoggers will automatically turn off
after a period of time.
■Windshield wiper de-icer (if
equipped)
This feature is used to prevent ice
from building up on the windshield
and wiper blades.
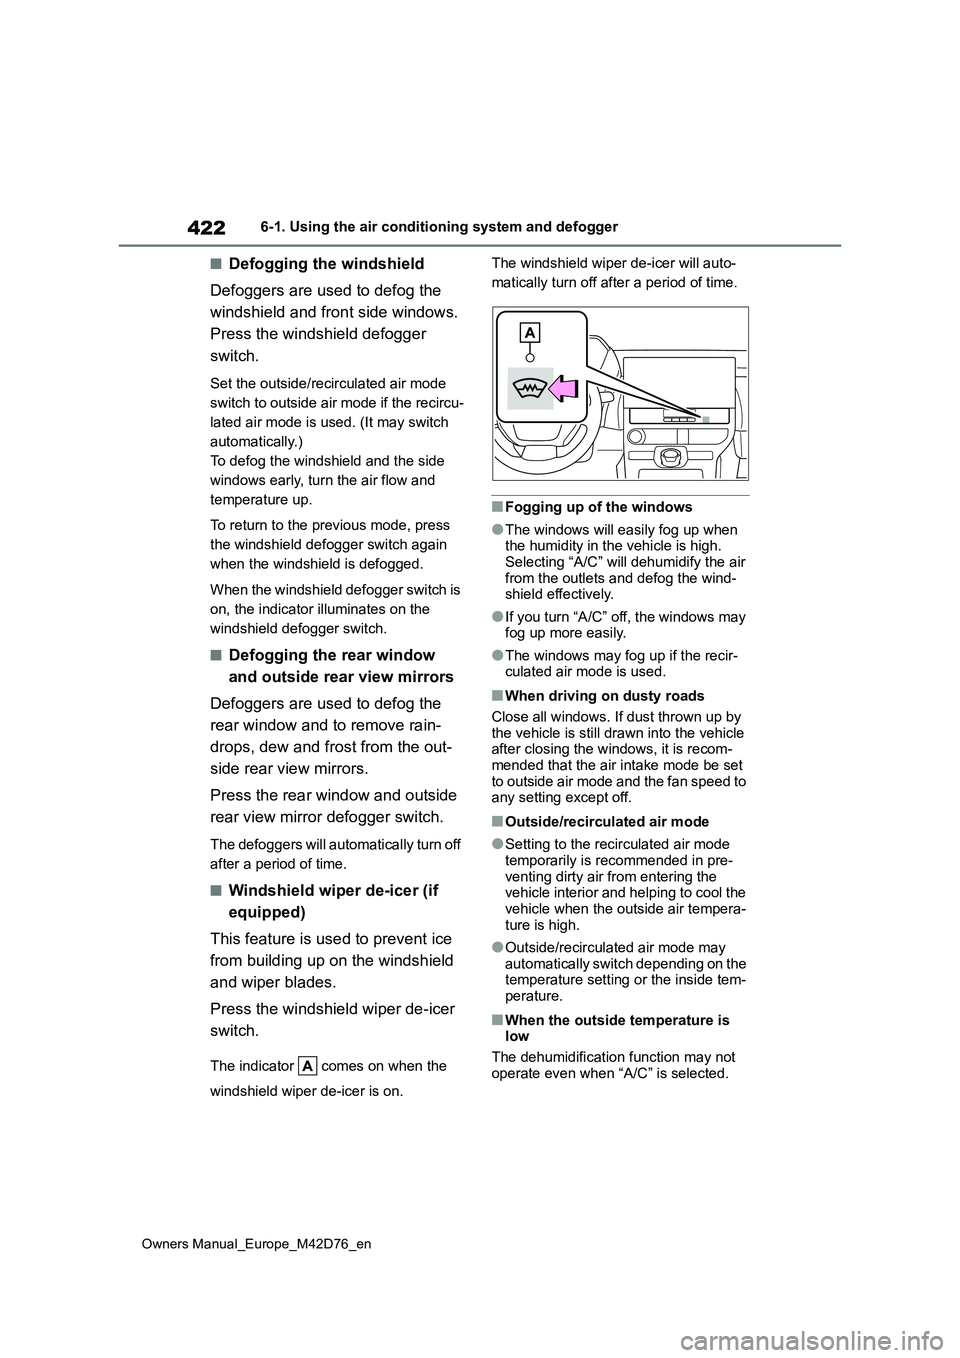
Press the windshield wiper de-icer
switch.
The indicator comes on when the
windshield wiper de-icer is on.
The windshield wiper de-icer will auto-
matically turn off after a period of time.
■Fogging up of the windows
●The windows will easily fog up when the humidity in the vehicle is high.
Selecting “A/C” will dehumidify the air from the outlets and defog the wind-shield effectively.
●If you turn “A/C” off, the windows may fog up more easily.
●The windows may fog up if the recir-culated air mode is used.
■When driving on dusty roads
Close all windows. If dust thrown up by the vehicle is still drawn into the vehicle after closing the windows, it is recom-
mended that the air intake mode be set to outside air mode and the fan speed to any setting except off.
■Outside/recirculated air mode
●Setting to the recirculated air mode temporarily is recommended in pre-
venting dirty air from entering the vehicle interior and helping to cool the vehicle when the outside air tempera-
ture is high.
●Outside/recirculated air mode may automatically switch depending on the temperature setting or the inside tem-
perature.
■When the outside temperature is low
The dehumidification function may not
operate even when “A/C” is selected.
Page 425 of 674
423
6
Owners Manual_Europe_M42D76_en
6-1. Using the air conditioning system and defogger
Interior features
■Ventilation and air conditioning
odors
●To let fresh air in, set the air condition-
ing system to the outside air mode.
●During use, various odors from inside
and outside the vehicle may enter into and accumulate in the air conditioning system. This may then cause odor to
be emitted from the vents.
●To reduce potential odors from occur-
ring: • It is recommended that the air condi-tioning system be set to outside air
mode prior to turning the vehicle off. • The start timing of the blower may be delayed for a short period of time
immediately after the air conditioning system is started in automatic mode.
■Air conditioning filter
P. 4 9 6
■Customization
Settings (e.g. A/C automatic mode switch operation) can be changed.(Customizable features: P.571)
1Press the automatic mode
switch.
2 Adjust the temperature setting.
3 To stop the operation, press the
“OFF” switch.
If the fan speed setting or air flow
modes are operated, the automatic
mode indicator goes off. However,
automatic mode for functions other
than that operated is maintained.
■Using automatic mode
Fan speed is adjusted automatically according to the temperature setting and the ambient conditions.
Therefore, the fan may stop for a while until warm or cool air is ready to flow immediately after the automatic mode
switch is pressed.
Cool air may blow around the upper body even when the heater is on due to
sunlight.
To turn on the “SYNC” mode, per-
form any of the following proce-
dures:
Press the “SYNC” mode switch.
WARNING
■To prevent the windshield from fogging up
Do not use the windshield defogger
switch during cool air operation in extremely humid weather. The differ-ence between the temperature of the
outside air and that of the windshield can cause the outer surface of the windshield to fog up, blocking your
vision.
■To prevent burns
●Do not touch the outside rear view mirror surfaces, as they can become very hot and burn you.
●Vehicles with windshield wiper de-icer: Do not touch the glass at lower
part of the windshield or to the side of the front pillars when the wind-shield wiper de-icer is on.
NOTICE
■To prevent 12-volt battery dis-charge
Do not leave the air conditioning sys- tem on longer than necessary when the EV system is off.
Using automatic mode
Adjusting the temperature
for driver and front passen-
ger seats separately
(“SYNC” mode)
Page 429 of 674
427
6
Owners Manual_Europe_M42D76_en
6-1. Using the air conditioning system and defogger
Interior features
Check the temperature setting of
the air conditioning system.
( P.421)
The Remote Air Conditioning System
will operate in accordance with the tem-
perature settings of the air conditioning
system.
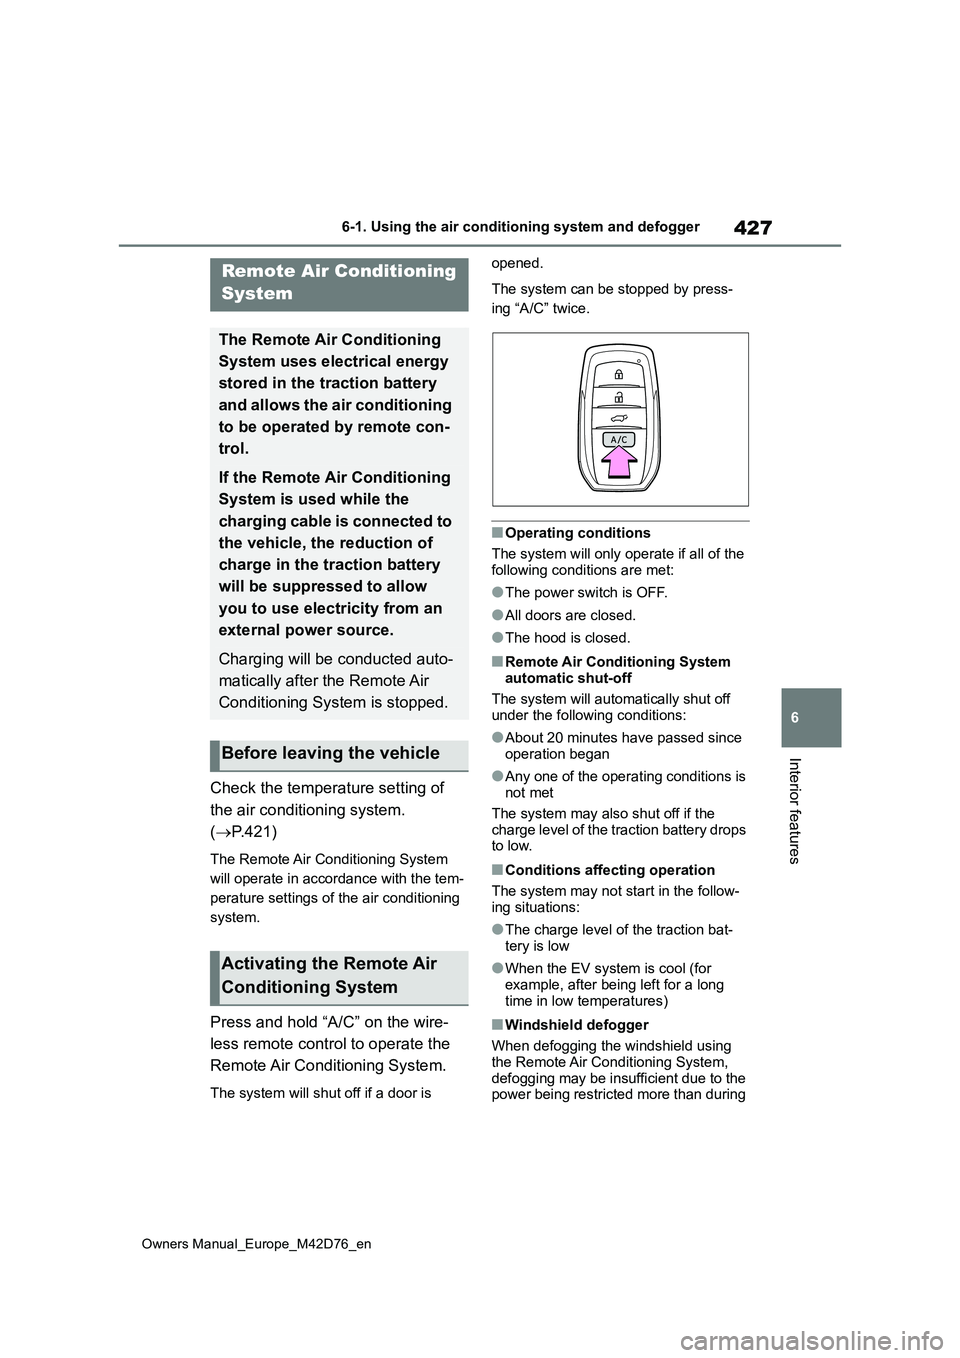
Press and hold “A/C” on the wire-
less remote control to operate the
Remote Air Conditioning System.
The system will shut off if a door is
opened.
The system can be stopped by press-
ing “A/C” twice.
■Operating conditions
The system will only operate if all of the following conditions are met:
●The power switch is OFF.
●All doors are closed.
●The hood is closed.
■Remote Air Conditioning System
automatic shut-off
The system will automatically shut off under the following conditions:
●About 20 minutes have passed since operation began
●Any one of the operating conditions is not met
The system may also shut off if the charge level of the traction battery drops to low.
■Conditions affecting operation
The system may not start in the follow- ing situations:
●The charge level of the traction bat-tery is low
●When the EV system is cool (for example, after being left for a long
time in low temperatures)
■Windshield defogger
When defogging the windshield using the Remote Air Conditioning System,
defogging may be insufficient due to the power being restricted more than during
Remote Air Conditioning
System
The Remote Air Conditioning
System uses electrical energy
stored in the traction battery
and allows the air conditioning
to be operated by remote con-
trol.
If the Remote Air Conditioning
System is used while the
charging cable is connected to
the vehicle, the reduction of
charge in the traction battery
will be suppressed to allow
you to use electricity from an
external power source.
Charging will be conducted auto-
matically after the Remote Air
Conditioning System is stopped.
Before leaving the vehicle
Activating the Remote Air
Conditioning System
Page 434 of 674
432
Owners Manual_Europe_M42D76_en
6-2. Using the interior lights
doors are opened/closed.
●If the interior lights remain on when the power switch is turned off, the
lights will go off automatically after 20 minutes.
■The interior lights will turn on auto-matically when
If any of the SRS airbags deploy (inflate) or in the event of a strong rear impact, the interior lights will turn on automati-
cally. The interior lights will turn off auto- matically after approximately 20 minutes.
The interior lights can be turned off man- ually. However, in order to help prevent further collisions, it is recommended that
they be left on until safety can be ensured.
(The interior lights may not turn on auto-
matically depending on the force of the impact and conditions of the collision.)
■Customization
Setting (e.g. the time elapsed before the
lights turn off) can be changed. (Customizable features: P.572)
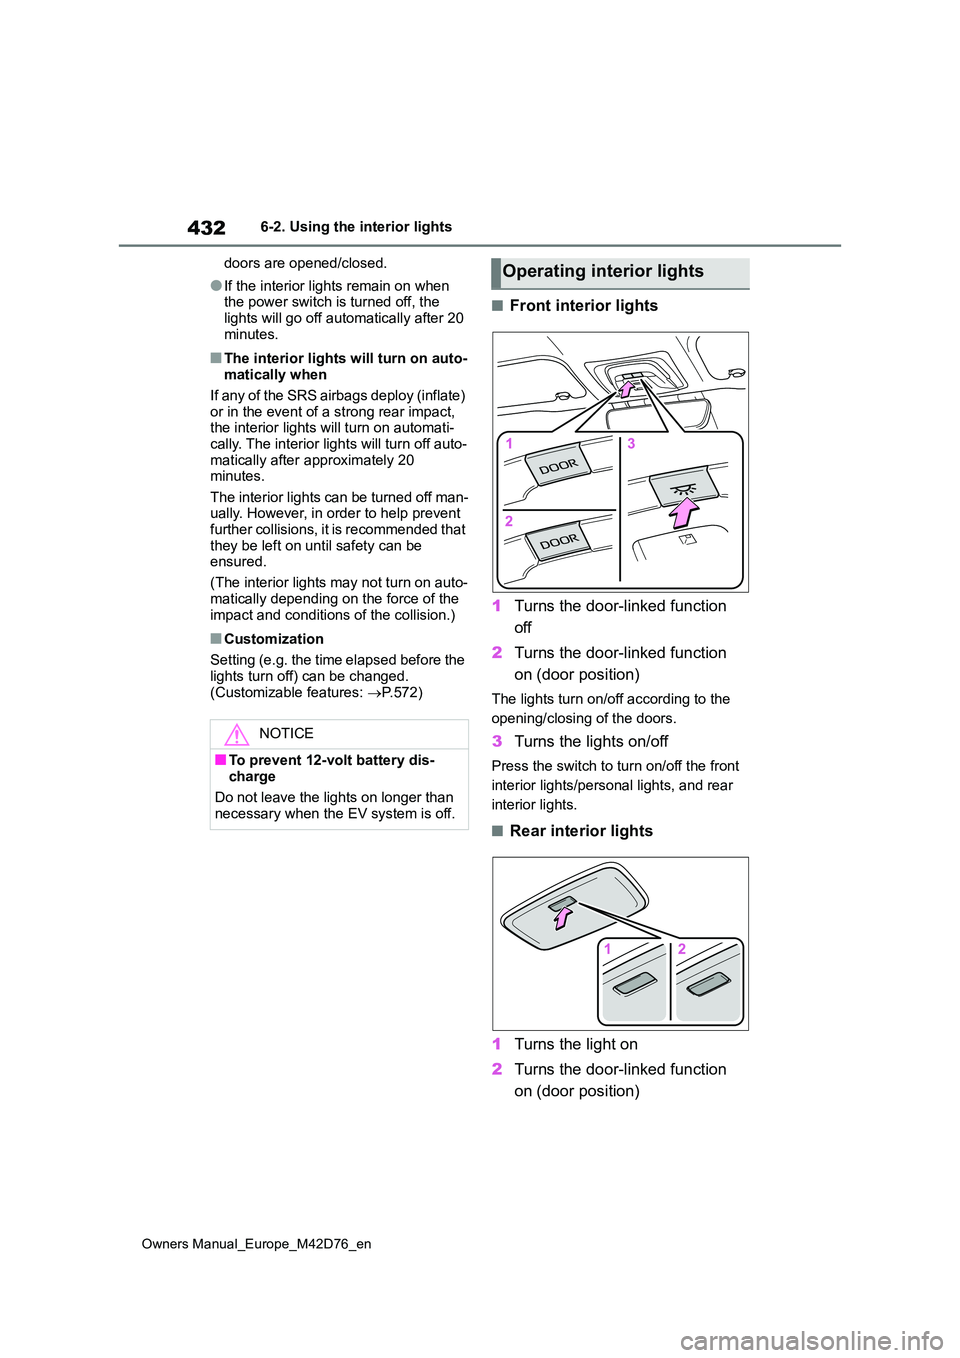
■Front interior lights
1 Turns the door-linked function
off
2 Turns the door-linked function
on (door position)
The lights turn on/off according to the
opening/closing of the doors.
3 Turns the lights on/off
Press the switch to turn on/off the front
interior lights/personal lights, and rear
interior lights.
■Rear interior lights
1 Turns the light on
2 Turns the door-linked function
on (door position)
NOTICE
■To prevent 12-volt battery dis-
charge
Do not leave the lights on longer than necessary when the EV system is off.
Operating interior lights
Page 482 of 674
480
Owners Manual_Europe_M42D76_en
7-3. Do-it-yourself maintenance
■When rotating the tires
It is necessary to register the posi-
tion of each wheel after performing
a tire rotation.
Wheel position registration can be
performed by oneself. Wheel posi-
tion registration is performed by
driving forward with moderate left
and right turns. However, depend-
ing on the driving conditions and
driving environment, registration
may take some time to complete.
■Registration of the tire posi-
tion
1 Park the vehicle in a safe place
and stop the EV system for 15
minutes or more.
2 Start the EV system (P.243)
Registration cannot be performed while the vehicle is moving.
3 Press or of the meter
control switches and select .
4 Press or of the meter
control switches and select
“Vehicle Settings”, and then
press and hold the “OK”.
5 Press or of the meter
control switches and select
“TPWS Setting”, and then press
“OK”.
6 Press or of the meter
control switches and select
“Tyre Rotation”, and then press
“OK”.
NOTICE
■Repairing or replacing tires, wheels, tire pressure warning
valves, transmitters and tire valve caps
●When removing or fitting the
wheels, tires or the tire pressure warning valves and transmitters, contact any authorized Toyota
retailer or Toyota authorized repairer, or any reliable repairer as the tire pressure warning valves
and transmitters may be damaged if not handled correctly.
●Make sure to install the tire valve caps. If the tire valve caps are not installed, water could enter the tire
pressure warning valves and the tire pressure warning valves could be bound.
●When replacing tire valve caps, do not use tire valve caps other than
those specified. The cap may become stuck.
■To avoid damage to the tire pres-sure warning valves and trans-mitters
When a tire is repaired with liquid sealants, the tire pressure warning valve and transmitter may not operate
properly. If a liquid sealant is used, contact any authorized Toyota retailer or Toyota authorized repairer, or any
reliable repairer or other qualified ser- vice shop as soon as possible. After use of liquid sealant, make sure to
replace the tire pressure warning valve and transmitter when repairing or replacing the tire.
Registration of the position
of each wheel after perform-
ing a tire rotation
Page 483 of 674
481
7
Owners Manual_Europe_M42D76_en
7-3. Do-it-yourself maintenance
Maintenance and care
7Press or of the meter
control switches and select
“OK”, and then press “OK”.
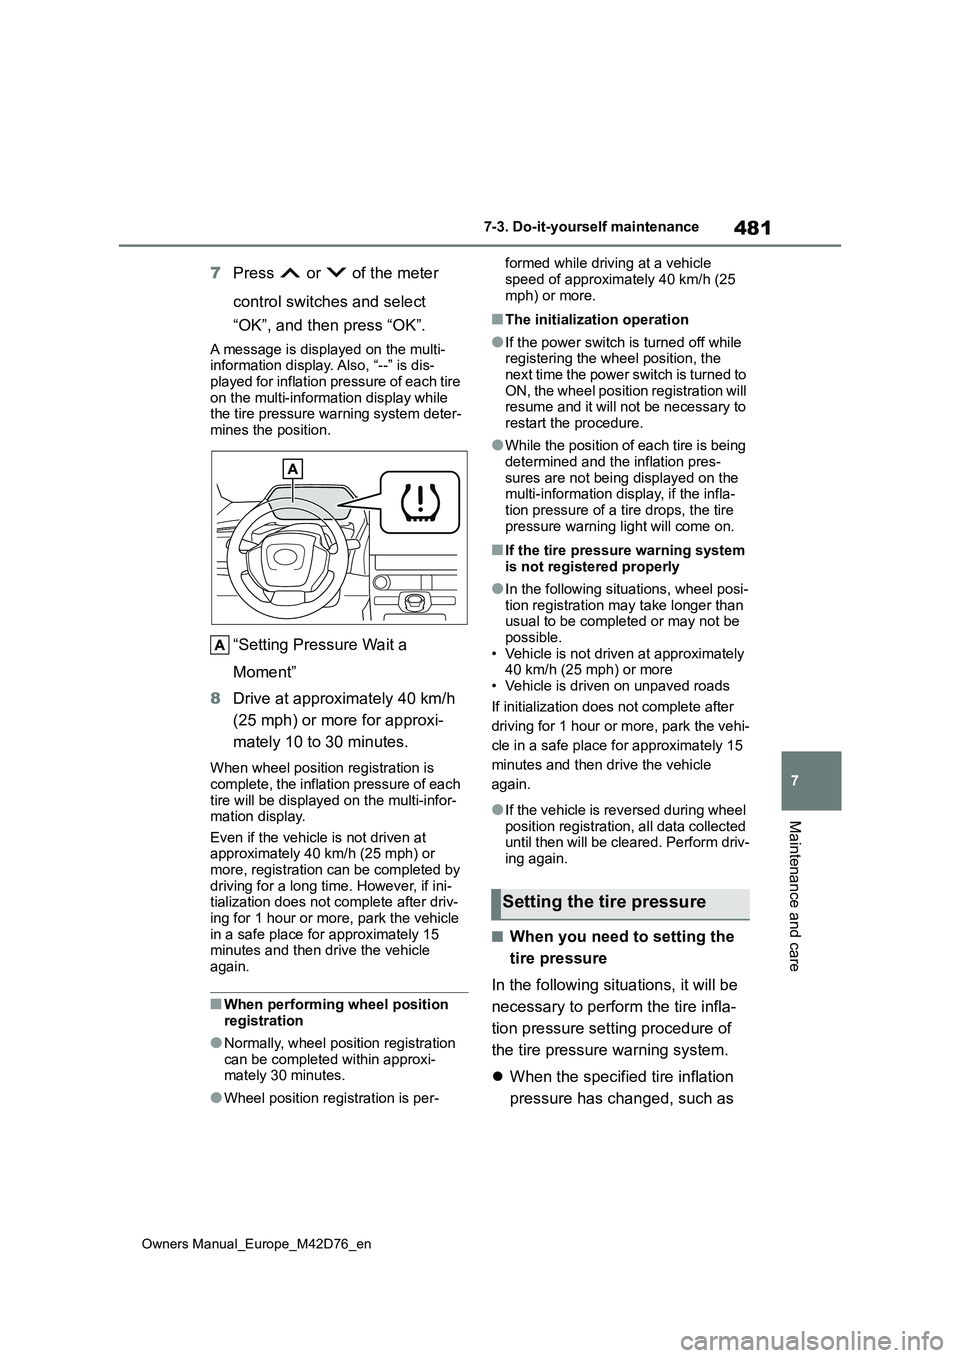
A message is displayed on the multi- information display. Also, “--” is dis-
played for inflation pressure of each tire on the multi-information display while the tire pressure warning system deter-
mines the position.
“Setting Pressure Wait a
Moment”
8 Drive at approximately 40 km/h
(25 mph) or more for approxi-
mately 10 to 30 minutes.
When wheel position registration is
complete, the inflation pressure of each tire will be displayed on the multi-infor-mation display.
Even if the vehicle is not driven at approximately 40 km/h (25 mph) or more, registration can be completed by
driving for a long time. However, if ini- tialization does not complete after driv-ing for 1 hour or more, park the vehicle
in a safe place for approximately 15 minutes and then drive the vehicle again.
■When performing wheel position
registration
●Normally, wheel position registration
can be completed within approxi- mately 30 minutes.
●Wheel position registration is per-
formed while driving at a vehicle
speed of approximately 40 km/h (25 mph) or more.
■The initialization operation
●If the power switch is turned off while registering the wheel position, the next time the power switch is turned to
ON, the wheel position registration will resume and it will not be necessary to restart the procedure.
●While the position of each tire is being determined and the inflation pres-
sures are not being displayed on the multi-information display, if the infla-tion pressure of a tire drops, the tire
pressure warning light will come on.
■If the tire pressure warning system is not registered properly
●In the following situations, wheel posi-tion registration may take longer than usual to be completed or may not be
possible. • Vehicle is not driven at approximately 40 km/h (25 mph) or more
• Vehicle is driven on unpaved roads
If initialization does not complete after
driving for 1 hour or more, park the vehi-
cle in a safe place for approximately 15
minutes and then drive the vehicle
again.
●If the vehicle is reversed during wheel
position registration, all data collected until then will be cleared. Perform driv-ing again.
■When you need to setting the
tire pressure
In the following situations, it will be
necessary to perform the tire infla-
tion pressure setting procedure of
the tire pressure warning system.
When the specified tire inflation
pressure has changed, such as
Setting the tire pressure
Page 484 of 674
482
Owners Manual_Europe_M42D76_en
7-3. Do-it-yourself maintenance
due to carried load, etc.
When the tire inflation pressure
is changed such as when the tire
size is changed.
If the tire inflation pressure has
been adjusted to the specified
level, perform the tire inflation set-
ting procedure by selecting speci-
fied inflation pressure on the multi-
information display.
When the tire inflation pressure is
to be other than specified, such as
when tires other than the specified
size are used, etc., set the tire infla-
tion pressure using the current
pressure. Make sure to adjust the
tire inflation pressure of each tire to
the appropriate level before per-
forming tire pressure setting. The
tire pressure warning system oper-
ates based on this tire inflation
pressure.
■Setting by selecting a speci-
fied tire inflation pressure
1 Start the EV system (P.243)
The tire inflation pressure cannot be set while the vehicle is moving.
2 Press or of the meter
control switches and select .
3 Press or of the meter
control switches and select
“Vehicle Settings”, and then
press and hold the “OK”.
4 Press or of the meter
control switches and select
“TPWS Setting”, and then press
“OK”.
5 Press or of the meter
control switches and select
“Tyre Pressure Setting”, and
then press “OK”.
6 Press or of the meter
control switches and select “Set-
ting by Specified Pressure”, and
then press “OK”.
Select the desired front and rear tire
pressures.
7 Press or of the meter
control switches and select
“OK”, and then press “OK”.
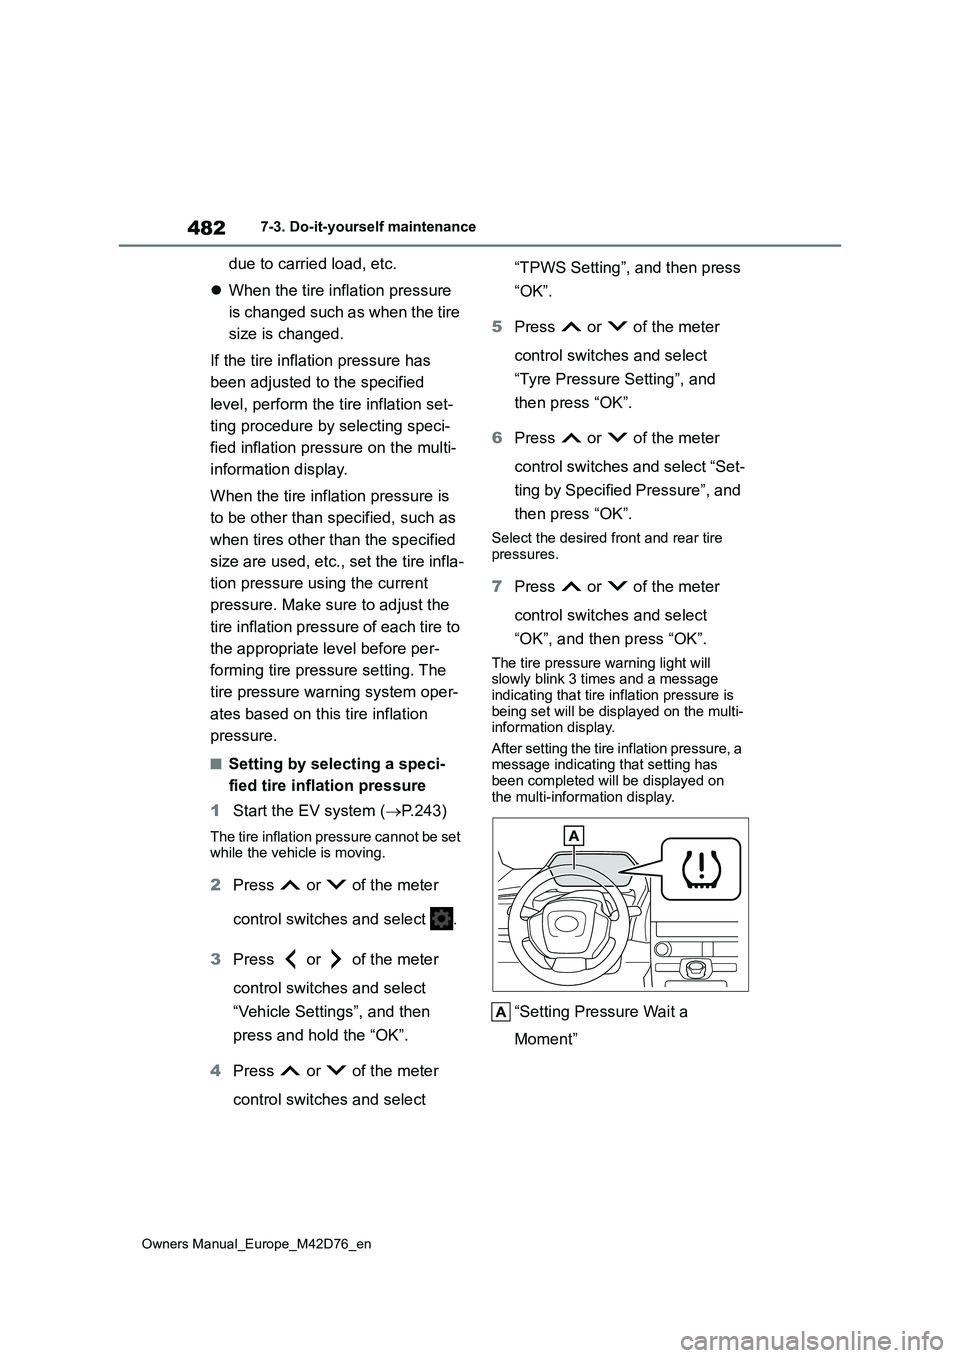
The tire pressure warning light will slowly blink 3 times and a message
indicating that tire inflation pressure is being set will be displayed on the multi-information display.
After setting the tire inflation pressure, a message indicating that setting has been completed will be displayed on
the multi-information display.
“Setting Pressure Wait a
Moment”
Page 485 of 674
483
7
Owners Manual_Europe_M42D76_en
7-3. Do-it-yourself maintenance
Maintenance and care
■Setting using the current tire
inflation pressure
1 Adjust the tire inflation pressure
to the specified cold tire inflation
pressure level.
Make sure to adjust the tire pressure to
the specified cold tire inflation pressure level. The tire pressure warning system will operate based on this pressure
level.
2 Start the EV system (P.243)
The tire inflation pressure cannot be set while the vehicle is moving.
3 Press or of the meter
control switches and select .
4 Press or of the meter
control switches and select
“Vehicle Settings”, and then
press and hold the “OK”.
5 Press or of the meter
control switches and select
“TPWS Setting”, and then press
“OK”.
6 Press or of the meter
control switches and select
“Tyre Pressure Setting”, and
then press “OK”.
7 Press or of the meter
control switches and select “Set-
ting by Current Pressure” and
then press “OK”.
8 Press or of the meter
control switches and select
“OK”, and then press “OK”.
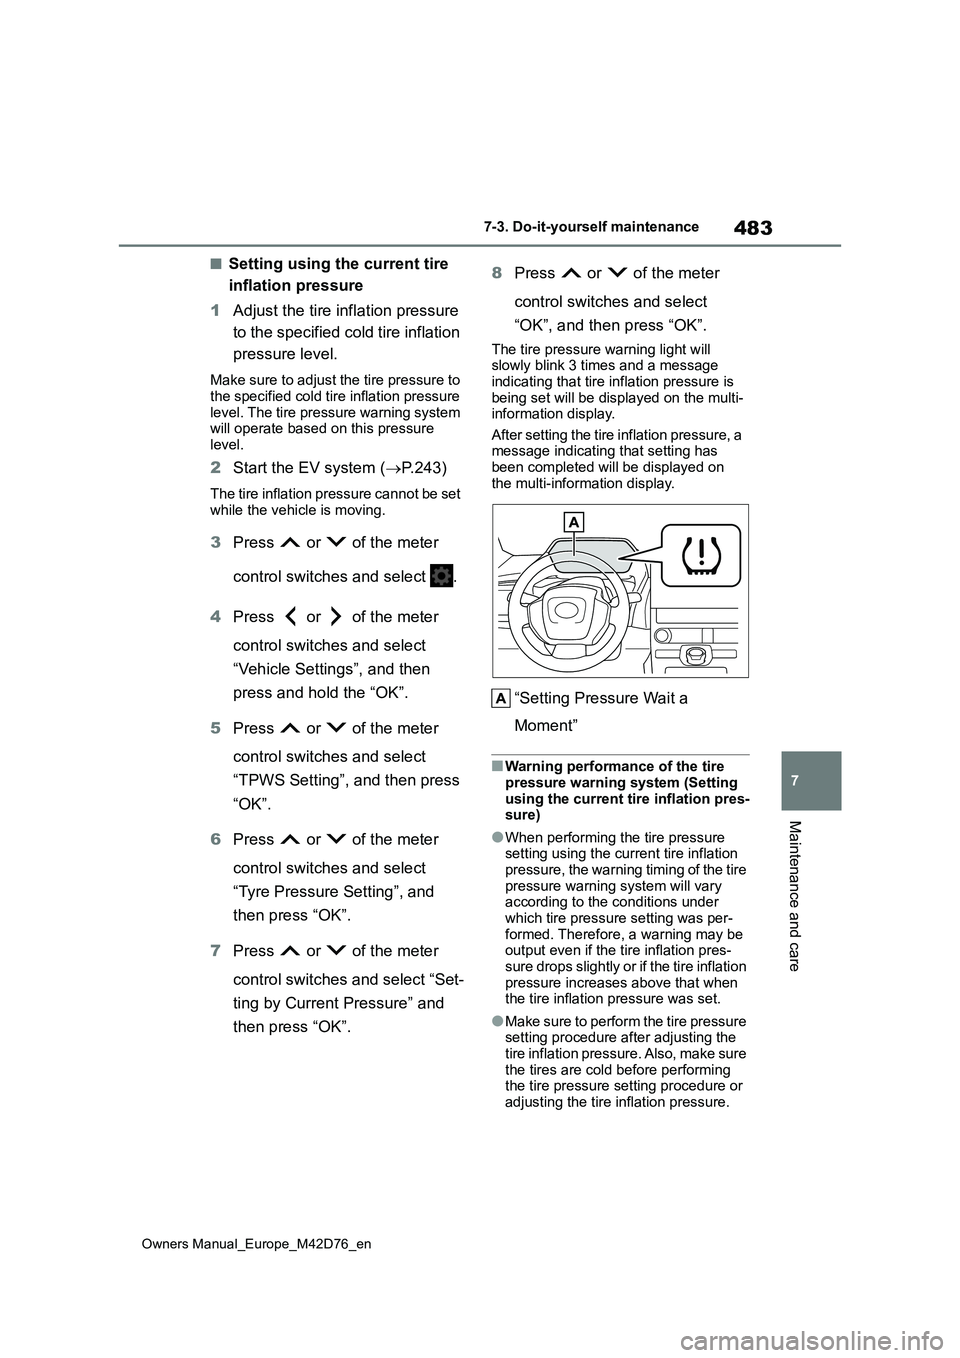
The tire pressure warning light will slowly blink 3 times and a message
indicating that tire inflation pressure is being set will be displayed on the multi-information display.
After setting the tire inflation pressure, a message indicating that setting has been completed will be displayed on
the multi-information display.
“Setting Pressure Wait a
Moment”
■Warning performance of the tire pressure warning system (Setting
using the current tire inflation pres- sure)
●When performing the tire pressure setting using the current tire inflation pressure, the warning timing of the tire
pressure warning system will vary according to the conditions under which tire pressure setting was per-
formed. Therefore, a warning may be output even if the tire inflation pres-
sure drops slightly or if the tire inflation pressure increases above that when the tire inflation pressure was set.
●Make sure to perform the tire pressure setting procedure after adjusting the
tire inflation pressure. Also, make sure the tires are cold before performing the tire pressure setting procedure or
adjusting the tire inflation pressure.
Page 486 of 674
484
Owners Manual_Europe_M42D76_en
7-3. Do-it-yourself maintenance
■Tire inflation pressure setting pro-
cedure (Setting using the current tire inflation pressure)
●If the power switch is turned off while setting the tire inflation pressure, the next time the power switch is turned to
ON, the setting procedure will resume and it will not be necessary to restart the procedure.
●If the tire inflation pressure setting procedure is started unnecessarily,
adjust the tire inflation pressure to the specified level with the tires cold and then perform setting by selecting a
specified tire inflation pressure, or per- form the tire inflation pressure setting procedure with the current tire inflation
pressure.
■If the tire inflation pressure cannot be set properly
●Normally, the tire inflation pressure setting procedure can be completed in 2 or 3 minutes.
●If the tire pressure warning light does not blink 3 times when starting the tire
inflation pressure setting procedure, the procedure may not have started. Perform the procedure again from the
beginning.
●If tire inflation pressure setting proce-
dure cannot be completed after per- forming the above procedure, contact by any authorized Toyota retailer or
Toyota authorized repairer, or any reli- able repairer.
■When the registering ID codes
The tire pressure warning valve
and transmitter is equipped with a
unique ID code.
When new tire pressure warning
valves and transmitters are
installed, new ID codes must be
registered in the tire pressure warn-
ing computer.
■How to registration ID code
1 Park the vehicle in a safe place,
wait for approximately 15 min-
utes.
2 Start the EV system. (P.243)
The ID code registration procedure
cannot be performed while the vehicle is moving.
3 Press or of the meter
control switches and select .
4 Press or of the meter
control switches and select
“Vehicle Settings”, and then
press and hold the “OK”.
5 Press or of the meter
control switches and select
“TPWS Setting”, and then press
“OK”.
6 Press or of the meter
control switches and select
“Tyre Set Switching”, and then
press “OK”.
WARNING
■When setting using the current
tire inflation pressure
Make sure to adjust the tire inflation pressure of each tire to the appropri-
ate level before performing tire pres- sure setting. Otherwise, the tire pressure warning light may not illumi-
nate even if the tire inflation pressure drops or may illuminate even though the tire inflation pressure is normal.
Registering ID codes