Time setting TOYOTA BZ4X 2022 (in English) User Guide
[x] Cancel search | Manufacturer: TOYOTA, Model Year: 2022, Model line: BZ4X, Model: TOYOTA BZ4X 2022Pages: 674, PDF Size: 120.02 MB
Page 141 of 674
139
2
Owners Manual_Europe_M42D76_en
2-2. Charging
Electric Vehicle system
Change the desired settings as
described starting from step 7 of the
“Registering the charging schedule”
procedure. ( P.136)
Press to return to the previous
screen.
“Delete”
A deletion confirmation screen will be
displayed.
Press or of the meter control
switches to select “Yes”, and then press
to delete the selected charging
schedule.
To cancel deletion, select “No” and then
press .
Press to return to the previous
screen.
■Setting “Charge Now” to on
The “Charge Now” setting can be
changed by performing one of the
two following procedures.
Operation on “Charging Sched-
ule” screen
1 Perform step 1 to 4 of the “Reg-
istering the charging schedule”
procedure ( P.136) and display
“Charging Schedule” screen.
2 Press or of the meter
control switches to select
“Charge Now”, and then press
.
Each time is pressed, “Charge
Now” switches between on and off.
Operation on “Closing Display”
screen*
*: If “Closing Display” is not set to
“Charging Schedule” on the
screen of the multi-information dis-
play, the “Closing Display” is not dis-
played. In this case, check the
settings on the multi-information dis-
play.
1 Turn the power switch off. The
“Closing Display” screen is dis-
played on the multi-information
display.
(If the door is opened while wait-
ing for charging schedule, the
same screen will be displayed.)
2 Press to set “Charge Now”
to on.
After setting operations are com-
plete, charging starts when the AC
charging connector is connected.
■Displaying “Next Event”
1 Perform step 1 to 4 of the “Reg-
istering the charging schedule”
procedure ( P.136) and display
“Charging Schedule” screen.
2 Press or of the meter
control switches to select “Next
Event”, and then press .
The “Next Event” screen will be dis- played.
Page 142 of 674
140
Owners Manual_Europe_M42D76_en
2-2. Charging
■When charging schedule setting operations are canceled
When the vehicle is in the following con- ditions, charging schedule setting oper-ations are canceled.
●The power switch is operated before the settings are confirmed
●The vehicle starts off
●A display with a higher priority than that of the charging schedule setting is shown
For details on how to operate the
audio system screen, refer to “Mul-
timedia owner’s manual”.
Setting operations related to the
charging schedule are performed
on the “Charging schedule” screen.
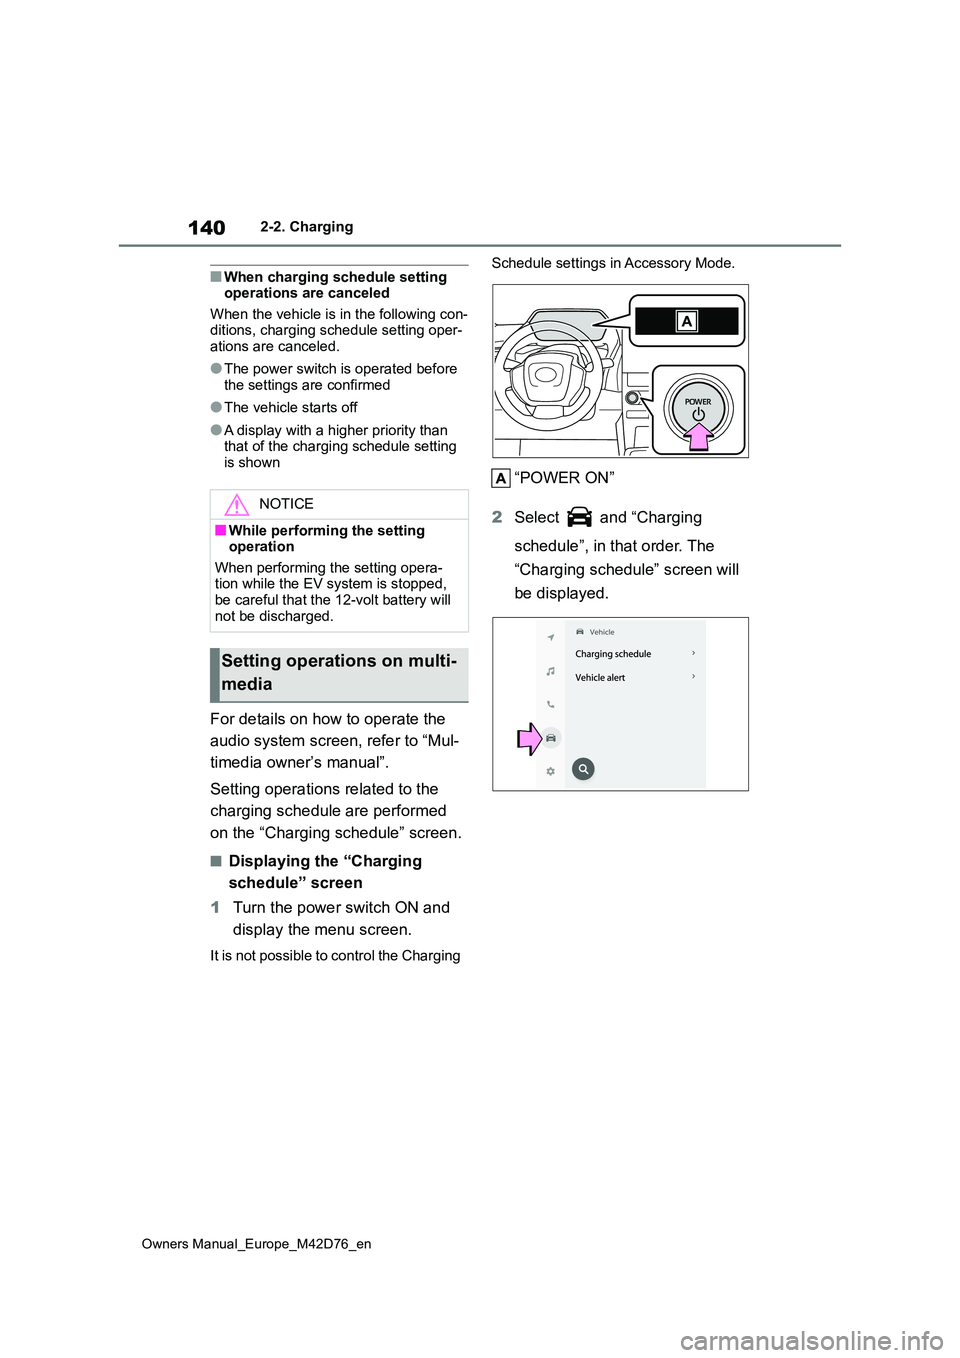
■Displaying the “Charging
schedule” screen
1 Turn the power switch ON and
display the menu screen.
It is not possible to control the Charging
Schedule settings in Accessory Mode.
“POWER ON”
2 Select and “Charging
schedule”, in that order. The
“Charging schedule” screen will
be displayed.
NOTICE
■While performing the setting operation
When performing the setting opera- tion while the EV system is stopped, be careful that the 12-volt battery will
not be discharged.
Setting operations on multi-
media
Page 144 of 674
142
Owners Manual_Europe_M42D76_en
2-2. Charging
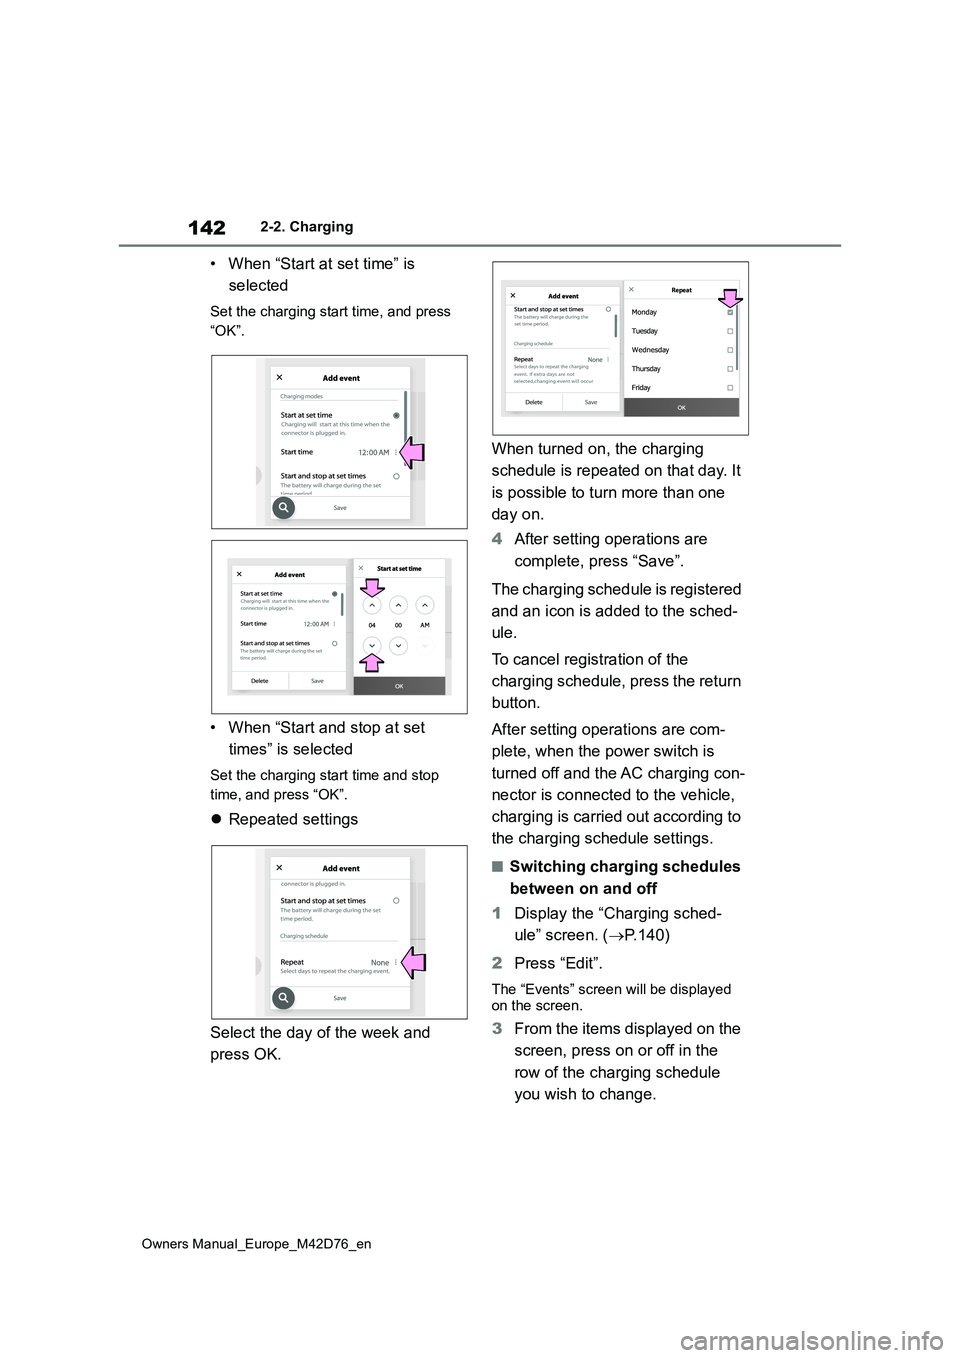
• When “Start at set time” is
selected
Set the charging start time, and press
“OK”.
• When “Start and stop at set
times” is selected
Set the charging start time and stop
time, and press “OK”.
Repeated settings
Select the day of the week and
press OK.
When turned on, the charging
schedule is repeated on that day. It
is possible to turn more than one
day on.
4 After setting operations are
complete, press “Save”.
The charging schedule is registered
and an icon is added to the sched-
ule.
To cancel registration of the
charging schedule, press the return
button.
After setting operations are com-
plete, when the power switch is
turned off and the AC charging con-
nector is connected to the vehicle,
charging is carried out according to
the charging schedule settings.
■Switching charging schedules
between on and off
1 Display the “Charging sched-
ule” screen. ( P.140)
2 Press “Edit”.
The “Events” screen will be displayed on the screen.
3 From the items displayed on the
screen, press on or off in the
row of the charging schedule
you wish to change.
Repeat
Page 145 of 674
143
2
Owners Manual_Europe_M42D76_en
2-2. Charging
Electric Vehicle system
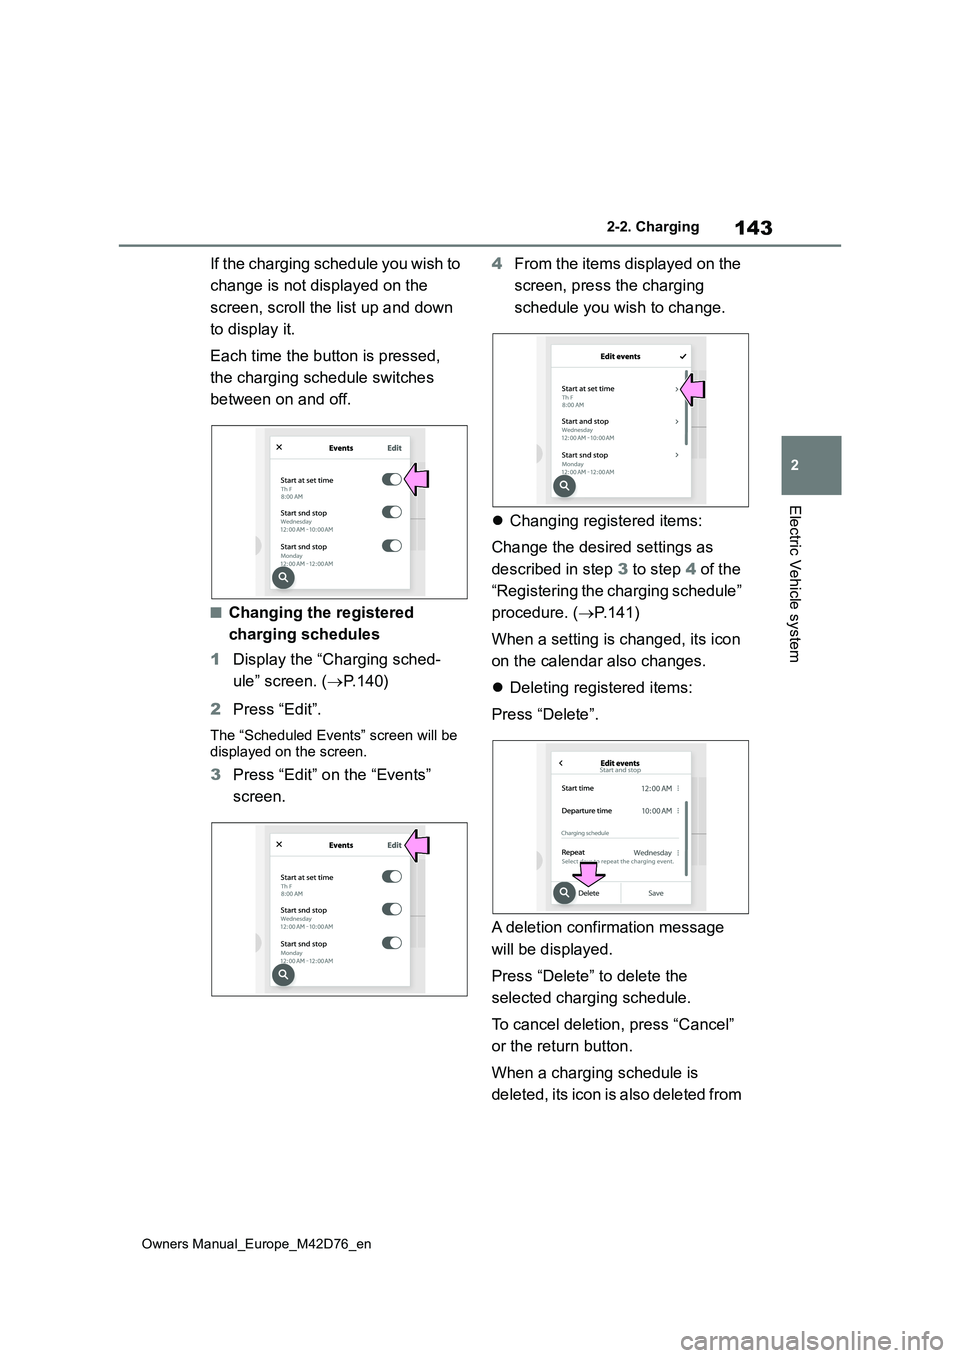
If the charging schedule you wish to
change is not displayed on the
screen, scroll the list up and down
to display it.
Each time the button is pressed,
the charging schedule switches
between on and off.
■Changing the registered
charging schedules
1 Display the “Charging sched-
ule” screen. ( P. 1 4 0 )
2 Press “Edit”.
The “Scheduled Events” screen will be displayed on the screen.
3 Press “Edit” on the “Events”
screen.
4 From the items displayed on the
screen, press the charging
schedule you wish to change.
Changing registered items:
Change the desired settings as
described in step 3 to step 4 of the
“Registering the charging schedule”
procedure. ( P.141)
When a setting is changed, its icon
on the calendar also changes.
Deleting registered items:
Press “Delete”.
A deletion confirmation message
will be displayed.
Press “Delete” to delete the
selected charging schedule.
To cancel deletion, press “Cancel”
or the return button.
When a charging schedule is
deleted, its icon is also deleted from
Page 146 of 674
144
Owners Manual_Europe_M42D76_en
2-2. Charging
the calendar.
■Turning “Charge now” on
1 Display the “Charging sched-
ule” screen. ( P. 1 4 0 )
2 Press “Charge now”.
Each time the button is pressed,
“Charge now” switches between on
and off.
After setting operations are com-
plete, charging starts when the AC
charging connector is connected.
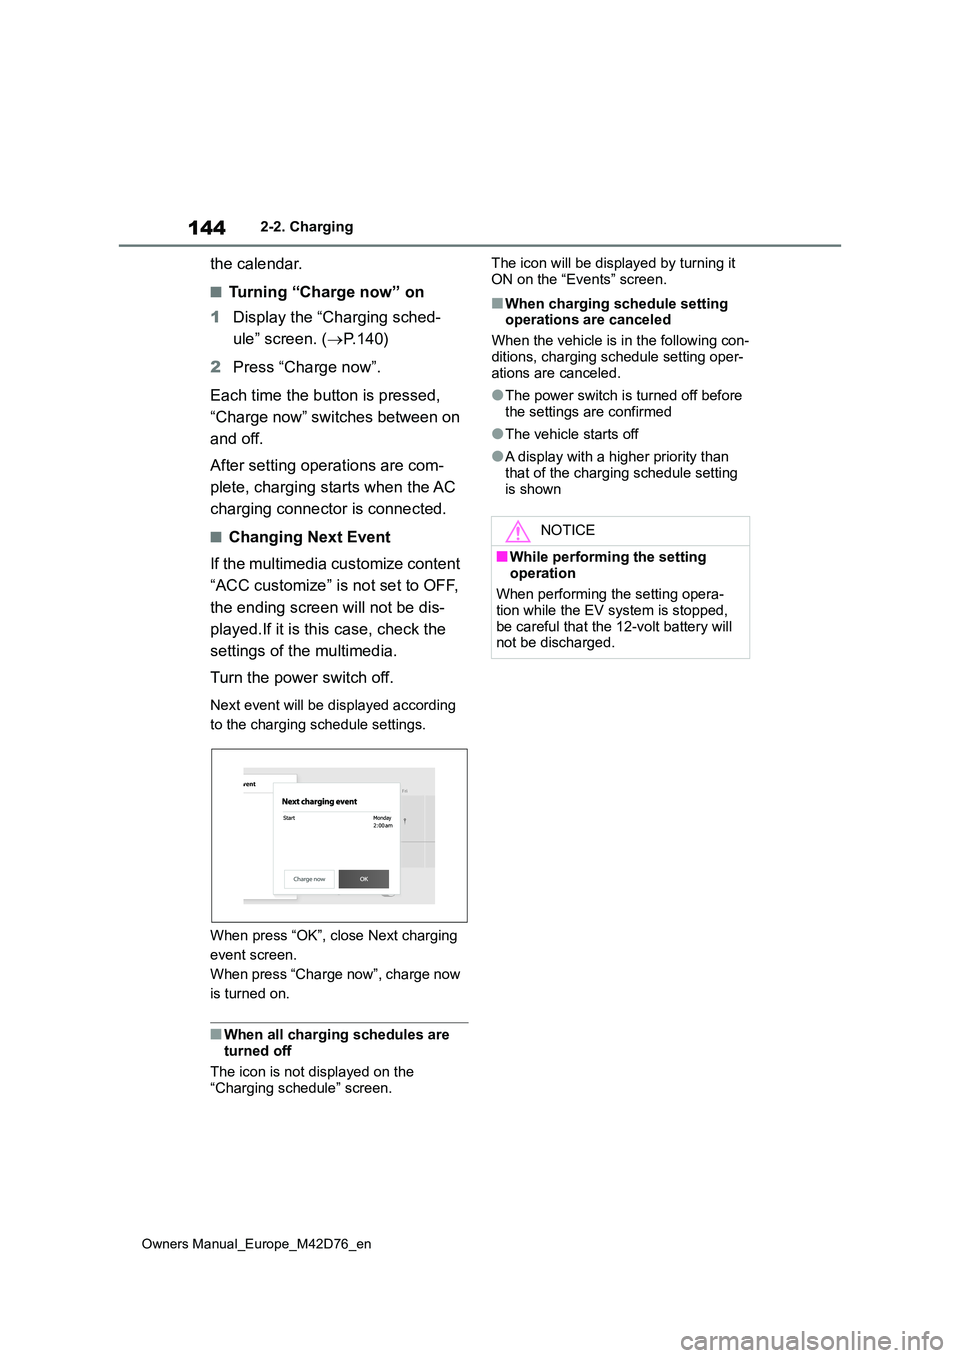
■Changing Next Event
If the multimedia customize content
“ACC customize” is not set to OFF,
the ending screen will not be dis-
played.If it is this case, check the
settings of the multimedia.
Turn the power switch off.
Next event will be displayed according
to the charging schedule settings.
When press “OK”, close Next charging
event screen.
When press “Charge now”, charge now
is turned on.
■When all charging schedules are turned off
The icon is not displayed on the
“Charging schedule” screen.
The icon will be displayed by turning it
ON on the “Events” screen.
■When charging schedule setting operations are canceled
When the vehicle is in the following con-
ditions, charging schedule setting oper- ations are canceled.
●The power switch is turned off before the settings are confirmed
●The vehicle starts off
●A display with a higher priority than
that of the charging schedule setting is shown
NOTICE
■While performing the setting
operation
When performing the setting opera- tion while the EV system is stopped,
be careful that the 12-volt battery will not be discharged.
Page 148 of 674
146
Owners Manual_Europe_M42D76_en
2-2. Charging
Mode”.
■Meter display while charging
After turning the power switch to ON while charging, the power switch auto-matically turns off if My Room Mode is
not selected within approximately 100 seconds.
■When using My Room Mode the fol-lowing may occur
●When the remaining charge of the traction battery drops to the lower
limit, the air conditioning system auto- matically stops. In that case, the air conditioning system can not operate
until the remaining charge of the trac- tion battery increases. Turn off the power switch once, then use My
Room Mode after the remaining charge of the traction battery increases.
●If the doors are unlocked while using My Room mode, the AC charging con-
nector will be unlocked and My Room mode will be stopped. To use My Room mode again, perform the opera-
tion to start it. ( P.145) In addition, when using AC charger at the public charging station, it is necessary to
perform the operation to start the charger before using My Room mode.
●The charging time of the traction bat-tery gets longer.
●Noise may be heard from the radio depending on conditions of the radio
wave.
●The surrounding area of the onboard traction battery charger in the motor
compartment may become hot.
●The electric power steering system
warning light (yellow) may turn on, but this is not a malfunction.
■Using My Room Mode during DC charging
When using My Room mode during DC charging, the state of charge completion will be lower than when not using My
Room Mode.
■When “My Room Mode” is used while the traction battery is fully charged
When the power switch is turned on
while the traction battery is fully charged
and the charging connector that sup-
plies power is connected, “Charging
Port Lid is Open” is displayed on the
multi-information display. In this case,
press on the meter control switches
to display the setting screen of “My
Room Mode”, and then select “My
Room Mode”.
When “My Room Mode” is used while
the traction battery is fully charged, the electric power of the traction battery may be consumed. In this case,
charging may be performed again.
■Warning message display
When trying to start My Room Mode or My Room Mode is being used , if a message
is displayed on the multi-information display, refer to the cor responding table and perform the appropriate correction procedures.
MessageCorrection procedure
“Traction Battery is too Low
for “My Room Mode””
There is no remaining charge of the traction battery to
start My Room Mode. Wait until the remaining charge
of the traction battery increases, start My Room Mode.
Page 160 of 674
158
Owners Manual_Europe_M42D76_en
2-2. Charging
■EV system does not start after DC charging
Refer to the following tables and carry out the appropriate cor rection proce-
dures.
■Cannot charge at desired time
Likely causeCorrection procedure
System check is not completed properly
after charging.
Do a system check following the proce-
dures on P.131. If the system check can
not be completed properly even after
these procedures are performed, con-
tact any authorized Toyota retailer or
Toyota authorized repairer, or any reli-
able repairer.
The DC charging connector is still con-
nected.
For safety, the EV system can not be
started when the DC charging connector
is connected. ( P.118)
Remove the DC charging connector
immediately after the charging is com-
pleted.
The DC charging system is malfunction-
ing
• Depending on the type of malfunction,
the EV system can be started after
closing the charging port lid.
• If the EV system can not be started,
contact any authorized Toyota retailer
or Toyota authorized repairer, or any
reliable repairer.
When charging schedule function does not operate normally
Likely causeCorrection procedure
The vehicle calendar and clock is not set
correctly.
Check the calendar setting and set it to
the correct date. ( P.178)
Page 177 of 674
175
3
Owners Manual_Europe_M42D76_en
3-1. Instrument cluster
Vehicle status information and indicators
If is displayed when is
selected on the multi-information dis-
play, the system may be malfunctioning.
Have the vehicle inspected by any
authorized Toyota retailer or Toyota authorized repairer, or any reliable repairer.
The brightness of the instrument
panel lights can be adjusted.
1 Darker
2 Brighter
■Instrument panel illumination adjustment
The brightness level can be adjusted when the surroundings are bright (day-time, etc.) or dark (nighttime, etc.).
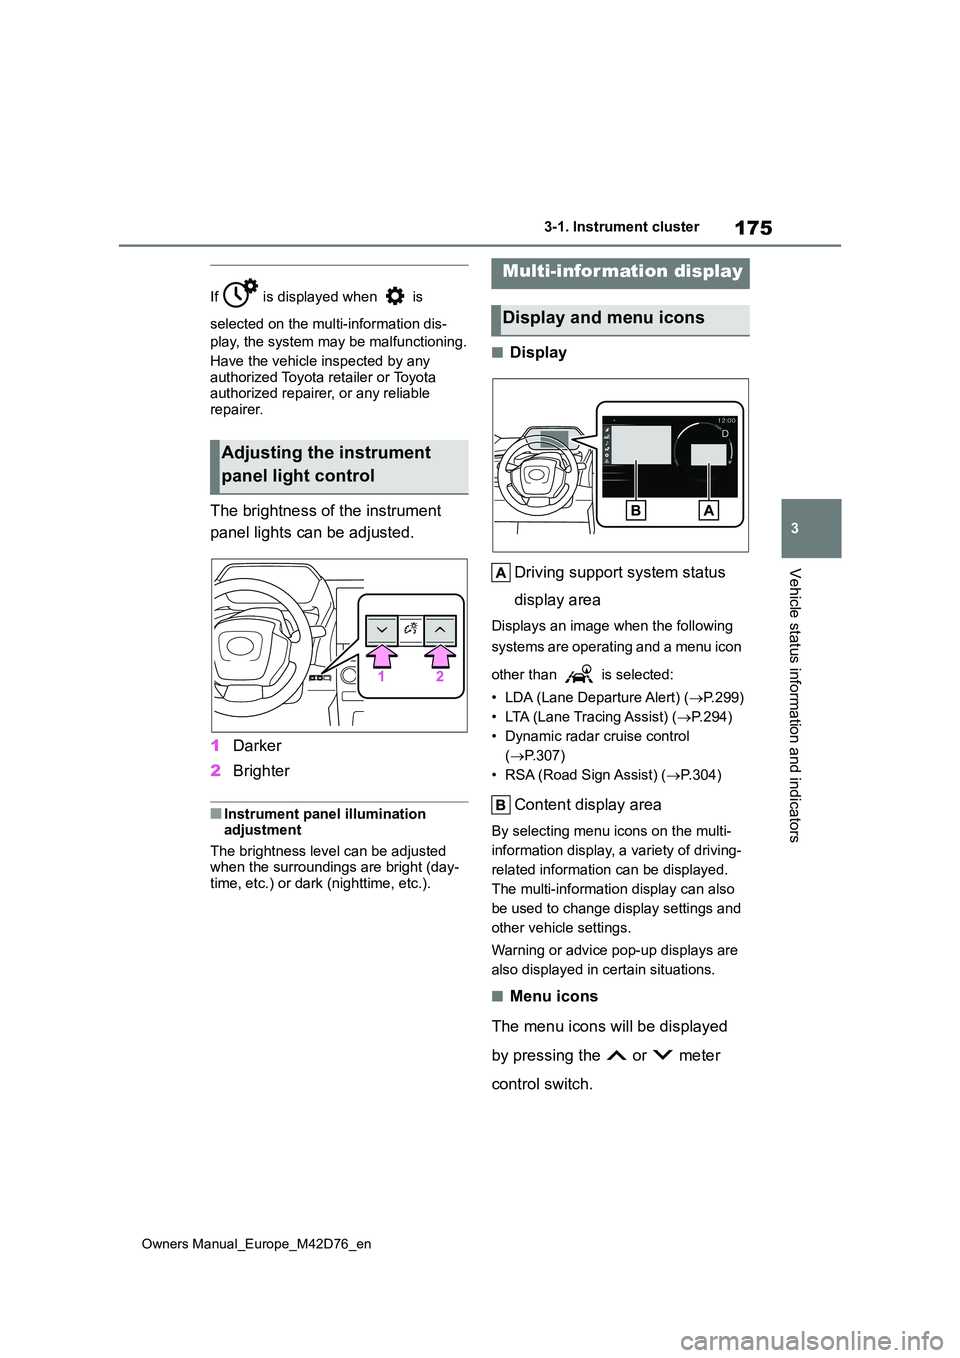
■Display
Driving support system status
display area
Displays an image when the following
systems are operating and a menu icon
other than is selected:
• LDA (Lane Departure Alert) ( P.299)
• LTA (Lane Tracing Assist) ( P. 2 9 4 )
• Dynamic radar cruise control
( P.307)
• RSA (Road Sign Assist) ( P.304)
Content display area
By selecting menu icons on the multi-
information display, a variety of driving-
related information can be displayed.
The multi-information display can also
be used to change display settings and
other vehicle settings.
Warning or advice pop-up displays are
also displayed in certain situations.
■Menu icons
The menu icons will be displayed
by pressing the or meter
control switch.
Adjusting the instrument
panel light control
Multi-information display
Display and menu icons
Page 178 of 674
176
Owners Manual_Europe_M42D76_en
3-1. Instrument cluster
■Liquid crystal display
Small spots or light spots may appear
on the display. This phenomenon is characteristic of liquid crystal displays, and there is no problem continuing to
use the display.
The multi-information display is
operated using the meter control
switches.
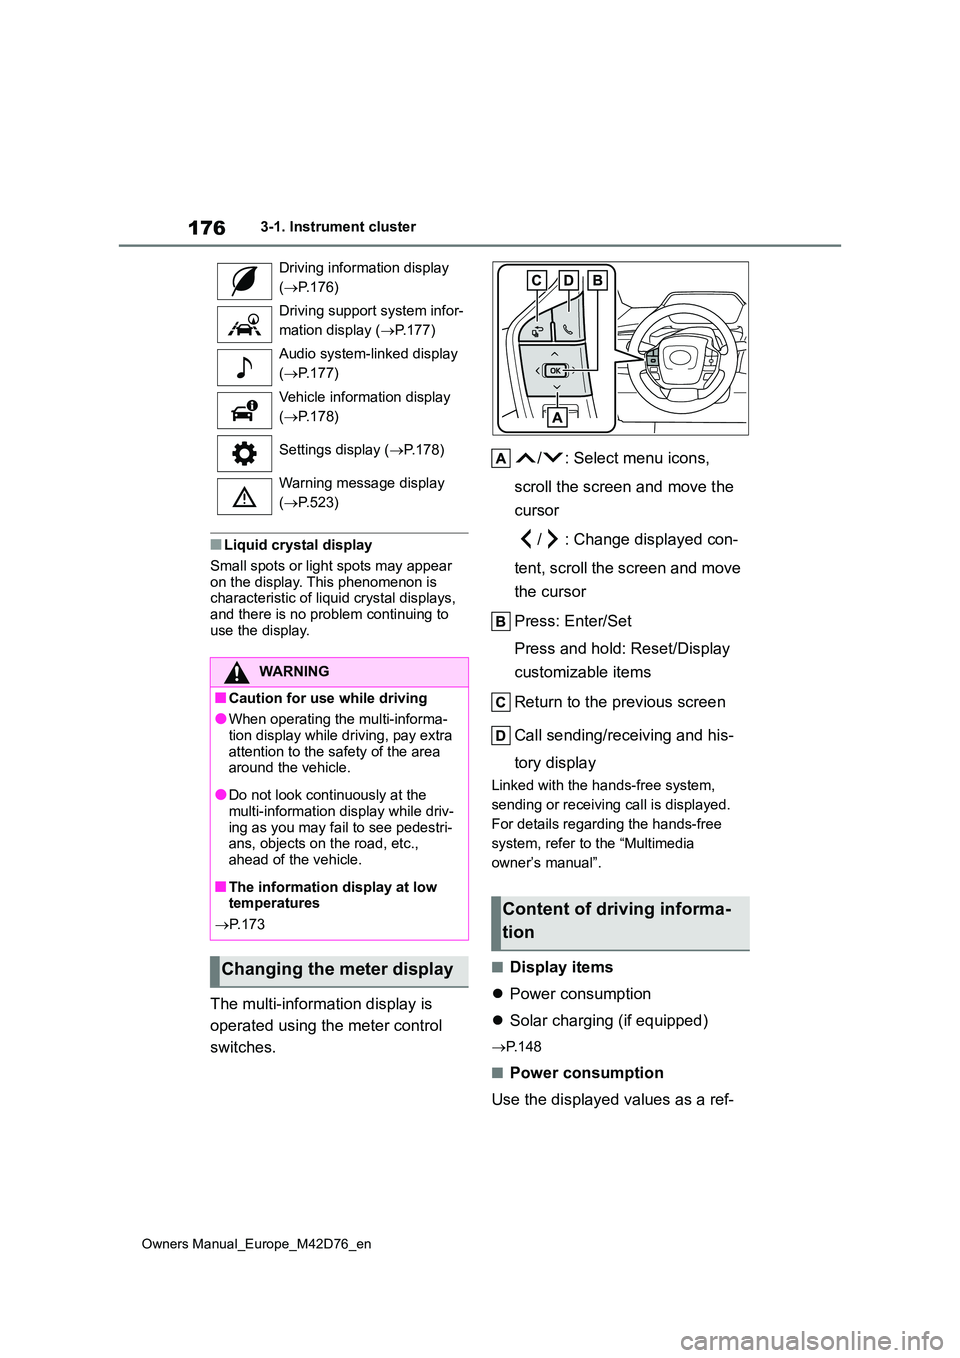
/ : Select menu icons,
scroll the screen and move the
cursor
/ : Change displayed con-
tent, scroll the screen and move
the cursor
Press: Enter/Set
Press and hold: Reset/Display
customizable items
Return to the previous screen
Call sending/receiving and his-
tory display
Linked with the hands-free system,
sending or receiving call is displayed.
For details regarding the hands-free
system, refer to the “Multimedia
owner’s manual”.
■Display items
Power consumption
Solar charging (if equipped)
P. 1 4 8
■Power consumption
Use the displayed values as a ref-
Driving information display
( P.176)
Driving support system infor-
mation display ( P.177)
Audio system-linked display
( P.177)
Vehicle information display
( P.178)
Settings display ( P.178)
Warning message display
( P.523)
WARNING
■Caution for use while driving
●When operating the multi-informa-
tion display while driving, pay extra attention to the safety of the area around the vehicle.
●Do not look continuously at the multi-information display while driv-
ing as you may fail to see pedestri- ans, objects on the road, etc., ahead of the vehicle.
■The information display at low temperatures
P. 1 7 3
Changing the meter display
Content of driving informa-
tion
Page 180 of 674
178
Owners Manual_Europe_M42D76_en
3-1. Instrument cluster
■Display items
Drive information
Torque distribution (if equipped)
Tire inflation pressure
■Drive information
2 items that are selected using the
“Drive Info. Items” setting (average
speed, distance and total time) can
be displayed vertically.
The displayed information changes
according to the “Drive Info. Type”
setting (since the system was
started or between resets).
( P.178)
Use the displayed information as a
reference only.
Following items will be displayed.
“Trip”
• “Average Speed”: Displays the aver-
age vehicle speed since EV system
start*
• “Distance”: Displays the distance
driven since EV system start*
• “Total Time”: Displays the elapsed
time since EV system start*
*: These items are reset each time the
EV system stops.
“Total”
• “Average Speed”: Displays the aver-
age vehicle speed since the display
was reset*
• “Distance”: Displays the distance
driven since the display was reset*
• “Total Time”: Displays the elapsed
time since the display was reset*
*: To reset, display the desired item and
press and hold the meter control
switch.
■Torque distribution (if
equipped)
Displays the drive status of each
wheel in 6 steps from 0 to 5.
■Tire inflation pressure
Displays inflation pressure of each
tire.
■Meter display settings that can
be changed
Clock setting
P. 1 7 4
Language
Select to change the language dis-
played.
Units
Select to change the units of measure
displayed.
• Power consumption display
Select to change the average power
consumption display between Trip
Average/Total Average. ( P.176)
Select to display/not display the audio
system linked display.
Select to change the displayed content
of the following:
Vehicle information display
Settings display