Time setting TOYOTA BZ4X 2022 (in English) Workshop Manual
[x] Cancel search | Manufacturer: TOYOTA, Model Year: 2022, Model line: BZ4X, Model: TOYOTA BZ4X 2022Pages: 674, PDF Size: 120.02 MB
Page 487 of 674
485
7
Owners Manual_Europe_M42D76_en
7-3. Do-it-yourself maintenance
Maintenance and care
7Press or of the meter
control switches and select
“Register New Valve/ID” and
then press “OK”.
8 Check if the desired wheel set
(“Tyre Set 1” or “Tyre Set 2”) is
displayed.
ID codes will be registered to the dis- played wheel set.
To change the wheel set to be regis-
tered, press or of the meter
control switches, and then select the
wheel set you wish to register.
If ID codes have already been regis-
tered for that wheel set, the tire pres- sure warning light will slowly blink 3 times, and a message indicating that
change is occurring will be displayed on the multi-information display.
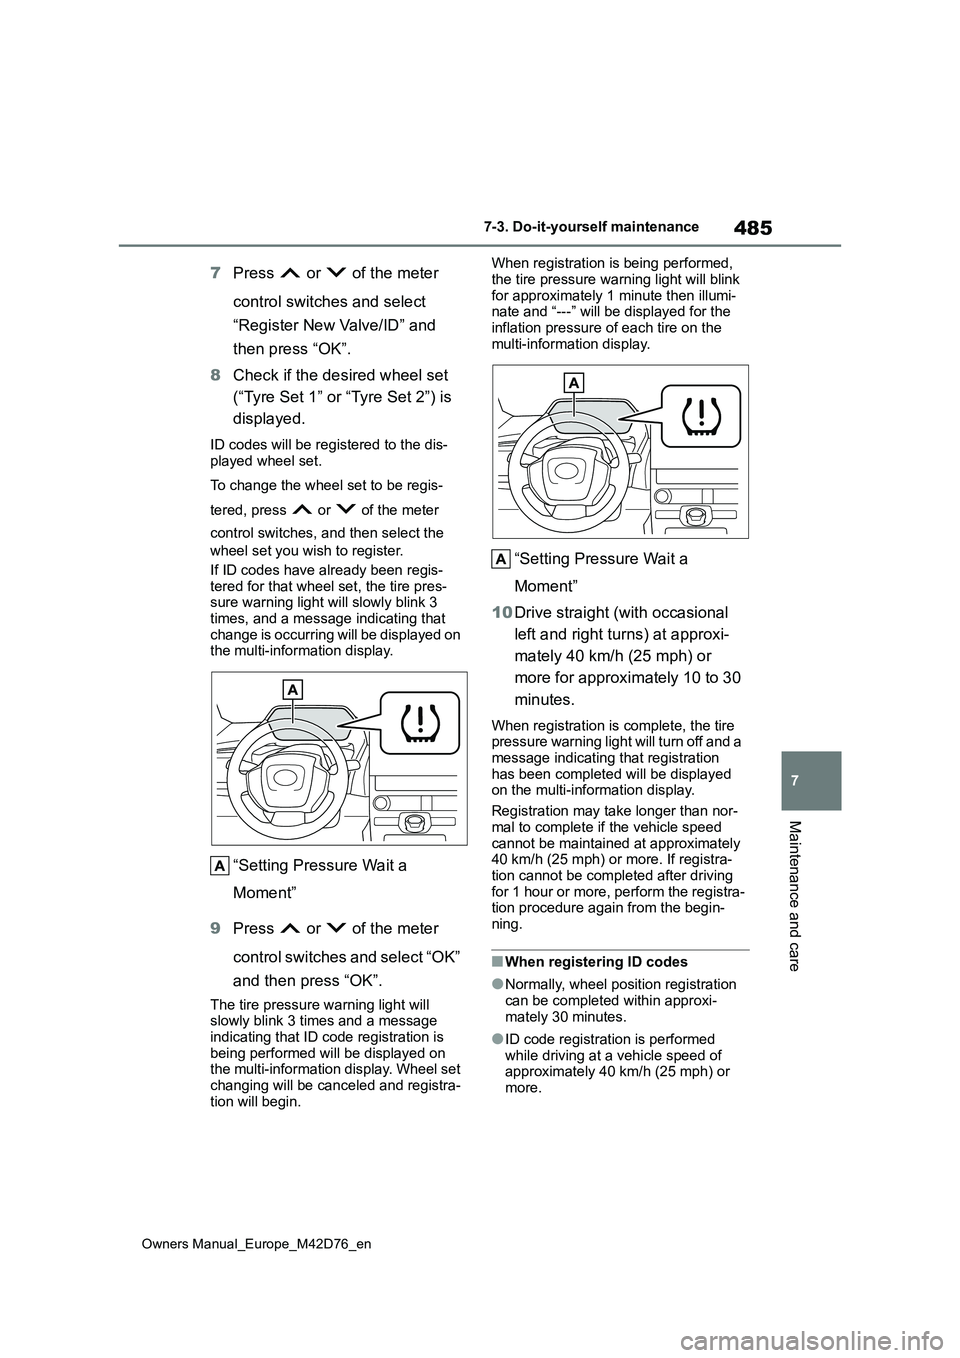
“Setting Pressure Wait a
Moment”
9 Press or of the meter
control switches and select “OK”
and then press “OK”.
The tire pressure warning light will slowly blink 3 times and a message
indicating that ID code registration is being performed will be displayed on the multi-information display. Wheel set
changing will be canceled and registra- tion will begin.
When registration is being performed,
the tire pressure warning light will blink for approximately 1 minute then illumi-nate and “---” will be displayed for the
inflation pressure of each tire on the multi-information display.
“Setting Pressure Wait a
Moment”
10 Drive straight (with occasional
left and right turns) at approxi-
mately 40 km/h (25 mph) or
more for approximately 10 to 30
minutes.
When registration is complete, the tire pressure warning light will turn off and a message indicating that registration
has been completed will be displayed on the multi-information display.
Registration may take longer than nor-
mal to complete if the vehicle speed cannot be maintained at approximately 40 km/h (25 mph) or more. If registra-
tion cannot be completed after driving for 1 hour or more, perform the registra-tion procedure again from the begin-
ning.
■When registering ID codes
●Normally, wheel position registration
can be completed within approxi- mately 30 minutes.
●ID code registration is performed while driving at a vehicle speed of approximately 40 km/h (25 mph) or
more.
Page 489 of 674
487
7
Owners Manual_Europe_M42D76_en
7-3. Do-it-yourself maintenance
Maintenance and care
is not supported.
While registering ID codes, it
may not be possible to change
between wheel sets normally.
Cancel registration before
changing between wheel sets.
■How to change between wheel
sets
1 Install the desired wheel set.
2 Start the EV system. (P.243)
The ID code selecting procedure can- not be performed while the vehicle is moving.
3 Press or of the meter
control switches and select .
4 Press or of the meter
control switches and select
“Vehicle Settings”, and then
press and hold the “OK”.
5 Press or of the meter
control switches and select
“TPWS Setting”, and then press
“OK”.
6 Press or of the meter
control switches and select
“Tyre Set Switching”, and then
press “OK”.
7 Press or of the meter
control switches and select
“Register Valve/ID” and then
press “OK”.
8 Press or of the meter
control switches and wheel set
(“Tyre Set 1” or “Tyre Set 2”) is
selected.
9 Press or of the meter
control switches and select “OK”
and then press “OK”. The tire
pressure warning light will
slowly blink 3 times, a message
indicating that change is occur-
ring will be displayed, and the
wheel set change will begin.
Wheel set change will begin and the tire
pressure warning light will blink for 1 minute and then illuminate. Also, while the change is being performed, “---” will
be displayed for the tire inflation pres- sure of each tire on the multi-informa-tion display.
After approximately 2 minutes, the wheel set change will complete, the tire pressure warning light will turn off, and
a completion message will be displayed on the multi-information display.
If changing does not complete after
approximately 4 minutes, a message indicating that the change could not be completed will be displayed.
Check which wheel set is installed and perform the change procedure again from the beginning.
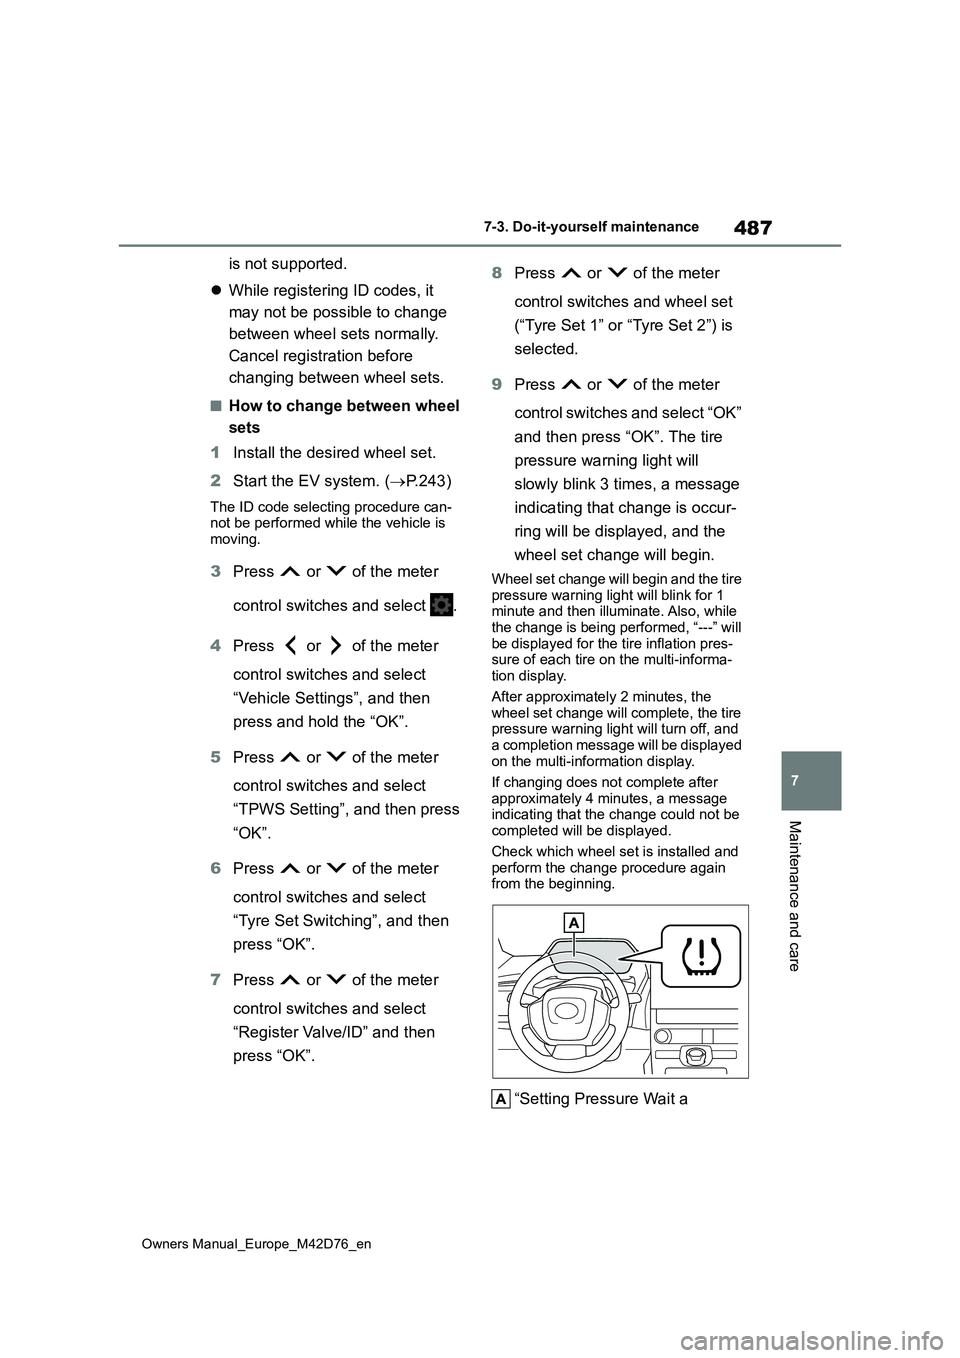
“Setting Pressure Wait a
Page 563 of 674
561
9
Owners Manual_Europe_M42D76_en
9-2. Customization
Vehicle specifications
9-2.Customiz ation
■Changing using the multi-
information display
1 Press or of the meter
control switches and select .
2 Press or of the meter
control switches, select the item.
3 To switch the function on and
off, press icon to switch to
the desired setting.
4 To perform detailed setting of
the function, press and hold
and display the setting screen.
The method of detailed setting differs
for each screen. Please refer to the advice sentence displayed on the screen.
To go back to the previous screen or
exit the customize mode, press .
■Changing by using the multi-
media system
1 Select on the main menu
2 Select “Vehicle customize”.
3 According to the display, select
the desired setting.
Various setting can be changed.
Refer to the list of settings that can be
changed for details.
■When customizing using the multi-
media system or multi-information display
Stop the vehicle in a safe place, apply
the parking brake, and shift the shift position to P. Also, to prevent 12-volt battery discharge, leave the EV system
operating while customizing the fea- tures.
Some function settings are changed simultaneously with other fu nctions
being customized. Contact any authorized Toyota retailer or Toy ota autho-
rized repairer, or any reliable repairer for further details.
Customizable features
Your vehicle includes a variety
of electronic features that can
be personalized to your prefer-
ences. The settings of these
features can be changed by
using the multi-information
display, multimedia system, at
any authorized Toyota retailer
or Toyota authorized repairer,
or any reliable repairer.
Customizing vehicle fea-
tures
NOTICE
■During customization
To prevent 12-volt battery discharge, ensure that the EV system is operat-
ing while customizing features.
Customizable features
Page 564 of 674
562
Owners Manual_Europe_M42D76_en
9-2. Customization
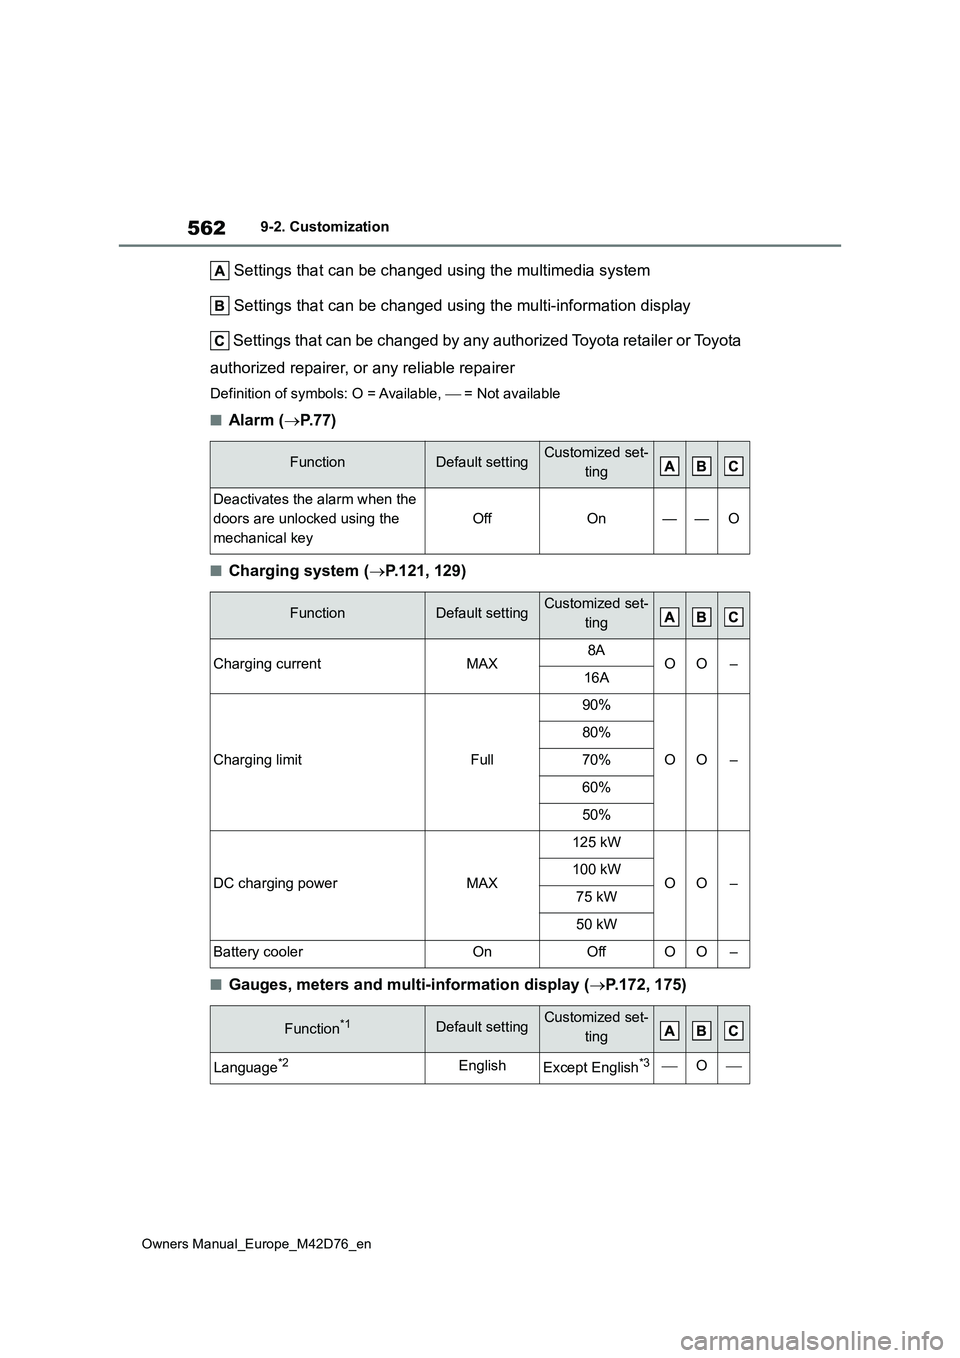
Settings that can be changed using the multimedia system
Settings that can be changed using the multi-information displ ay
Settings that can be changed by any authorized Toyota retailer or Toy ota
authorized repairer, or any reliable repairer
Definition of symbols: O = Available, = Not available
■Alarm (P.77)
■Charging system (P.121, 129)
■Gauges, meters and multi-information display (P.172, 175)
FunctionDefault settingCustomized set-
ting
Deactivates the alarm when the
doors are unlocked using the
mechanical key
OffOn——O
FunctionDefault settingCustomized set-
ting
Charging currentMAX8AOO–16A
Charging limitFull
90%
OO–
80%
70%
60%
50%
DC charging powerMAX
125 kW
OO–100 kW
75 kW
50 kW
Battery coolerOnOffOO–
Function*1Default settingCustomized set-
ting
Language*2EnglishExcept English*3O
Page 567 of 674
565
9
Owners Manual_Europe_M42D76_en
9-2. Customization
Vehicle specifications
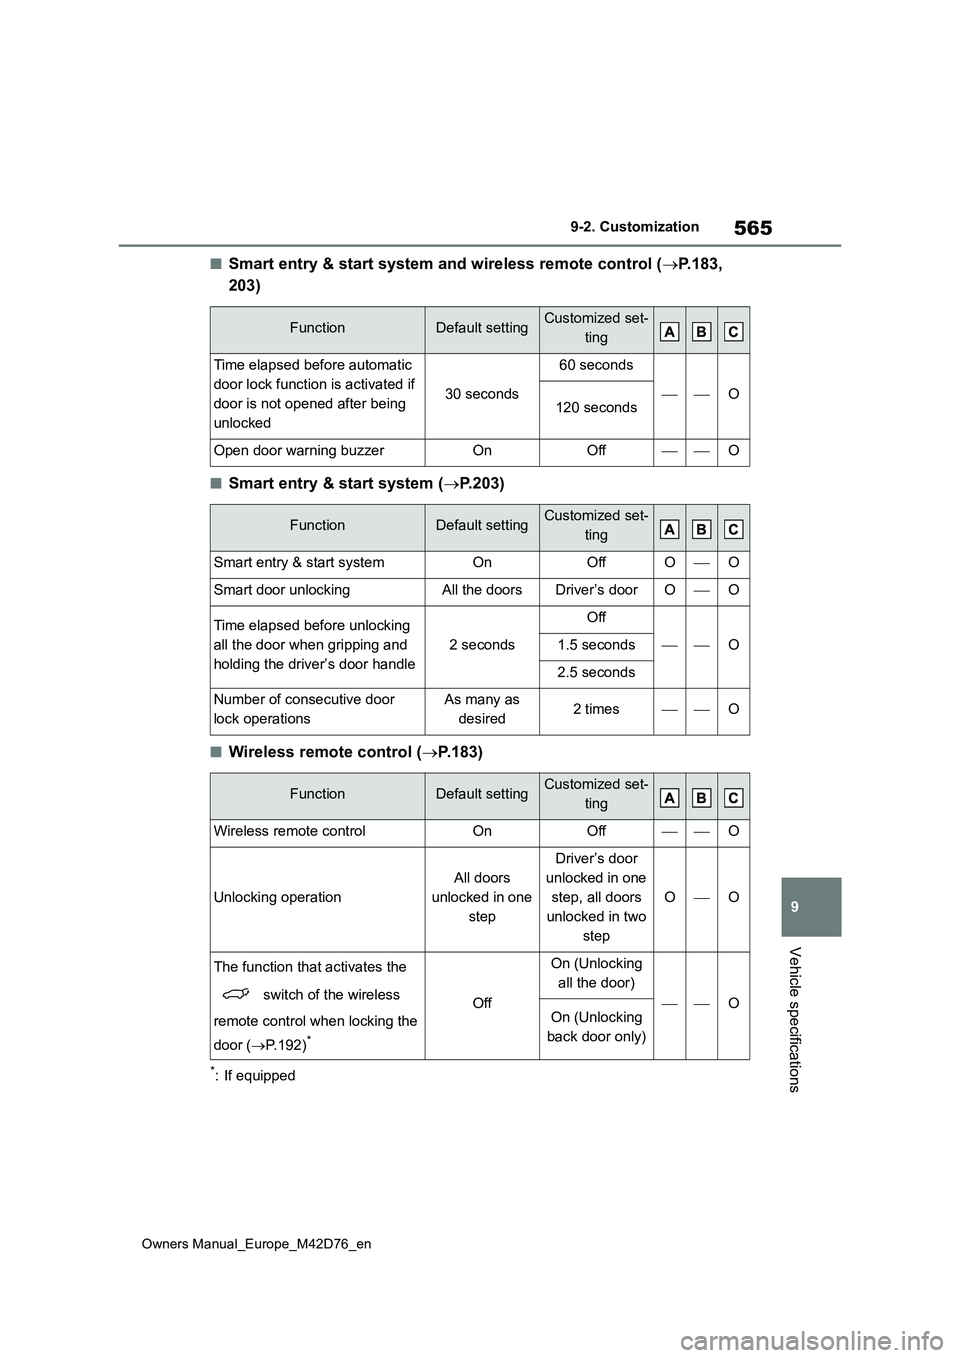
■Smart entry & start system and wireless remote control (P.183,
203)
■Smart entry & start system ( P.203)
■Wireless remote control (P.183)
*: If equipped
FunctionDefault settingCustomized set-
ting
Time elapsed before automatic
door lock function is activated if
door is not opened after being
unlocked
30 seconds
60 seconds
O120 seconds
Open door warning buzzerOnOffO
FunctionDefault settingCustomized set-
ting
Smart entry & start systemOnOffOO
Smart door unlockingAll the doorsDriver’s doorOO
Time elapsed before unlocking
all the door when gripping and
holding the driver’s door handle
2 seconds
Off
O1.5 seconds
2.5 seconds
Number of consecutive door
lock operations
As many as
desired2 timesO
FunctionDefault settingCustomized set-
ting
Wireless remote controlOnOffO
Unlocking operation
All doors
unlocked in one
step
Driver’s door
unlocked in one
step, all doors
unlocked in two
step
OO
The function that activates the
switch of the wireless
remote control when locking the
door ( P.192)*
Off
On (Unlocking
all the door)
OOn (Unlocking
back door only)
Page 569 of 674
567
9
Owners Manual_Europe_M42D76_en
9-2. Customization
Vehicle specifications
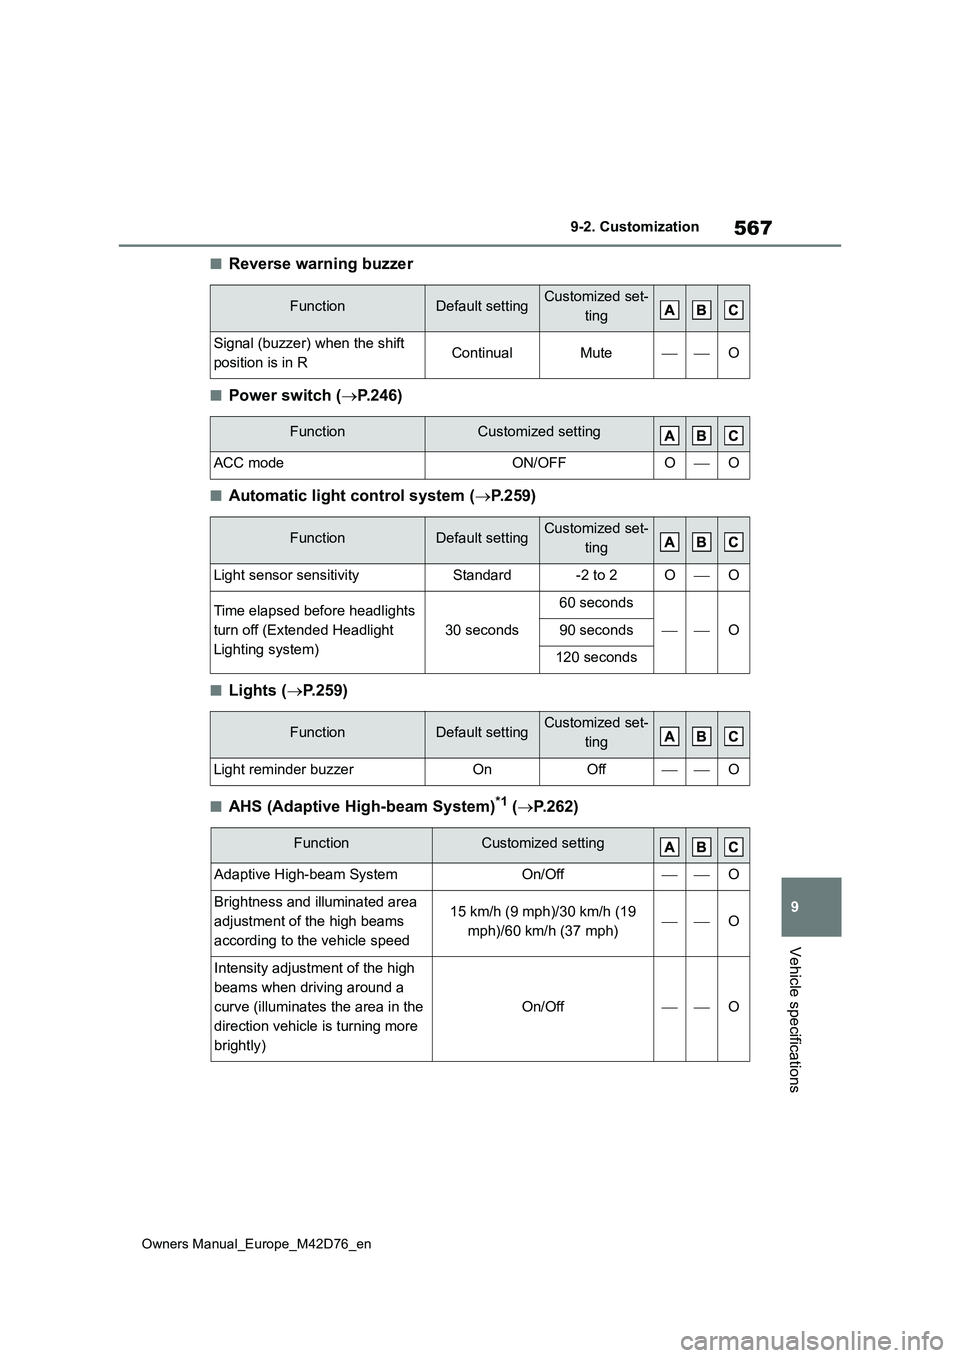
■Reverse warning buzzer
■Power switch (P.246)
■Automatic light control system (P.259)
■Lights (P.259)
■AHS (Adaptive High-beam System)*1 (P.262)
FunctionDefault settingCustomized set-
ting
Signal (buzzer) when the shift
position is in RContinualMuteO
FunctionCustomized setting
ACC modeON/OFFOO
FunctionDefault settingCustomized set-
ting
Light sensor sensitivityStandard-2 to 2OO
Time elapsed before headlights
turn off (Extended Headlight
Lighting system)
30 seconds
60 seconds
O90 seconds
120 seconds
FunctionDefault settingCustomized set-
ting
Light reminder buzzerOnOffO
FunctionCustomized setting
Adaptive High-beam SystemOn/OffO
Brightness and illuminated area
adjustment of the high beams
according to the vehicle speed
15 km/h (9 mph)/30 km/h (19
mph)/60 km/h (37 mph)O
Intensity adjustment of the high
beams when driving around a
curve (illuminates the area in the
direction vehicle is turning more
brightly)
On/OffO
Page 570 of 674
568
Owners Manual_Europe_M42D76_en
9-2. Customization
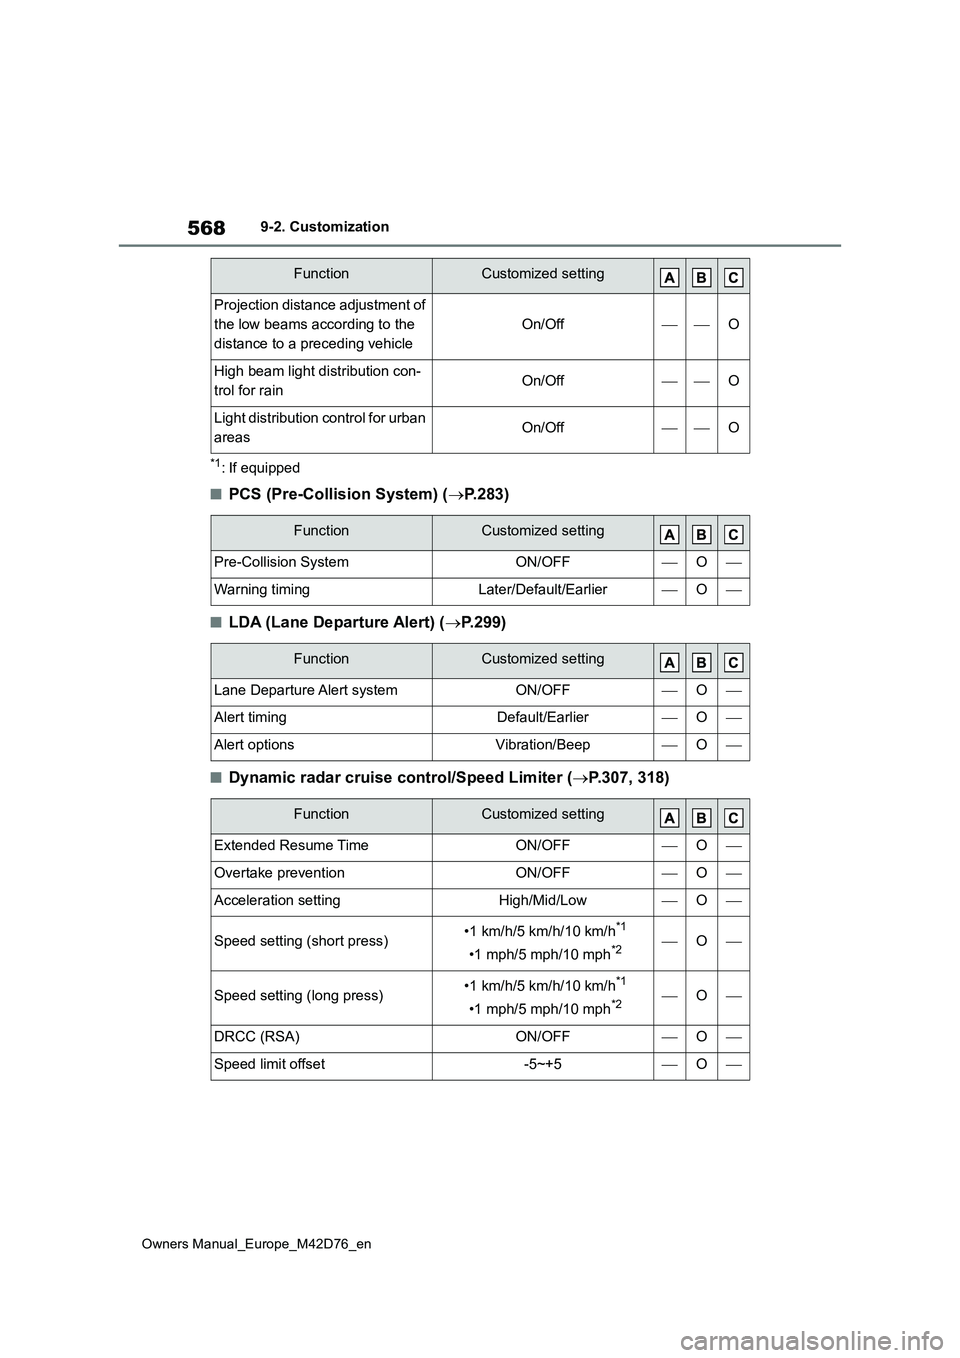
*1: If equipped
■PCS (Pre-Collision System) (P.283)
■LDA (Lane Departure Alert) (P.299)
■Dynamic radar cruise control/Speed Limiter (P.307, 318)
Projection distance adjustment of
the low beams according to the
distance to a preceding vehicle
On/OffO
High beam light distribution con-
trol for rainOn/OffO
Light distribution control for urban
areasOn/OffO
FunctionCustomized setting
Pre-Collision SystemON/OFFO
Warning timingLater/Default/EarlierO
FunctionCustomized setting
Lane Departure Alert systemON/OFFO
Alert timingDefault/EarlierO
Alert optionsVibration/BeepO
FunctionCustomized setting
Extended Resume TimeON/OFFO
Overtake preventionON/OFFO
Acceleration settingHigh/Mid/LowO
Speed setting (short press)•1 km/h/5 km/h/10 km/h*1
•1 mph/5 mph/10 mph*2O
Speed setting (long press)•1 km/h/5 km/h/10 km/h*1
•1 mph/5 mph/10 mph*2O
DRCC (RSA)ON/OFFO
Speed limit offset-5~+5O
FunctionCustomized setting
Page 574 of 674
572
Owners Manual_Europe_M42D76_en
9-2. Customization
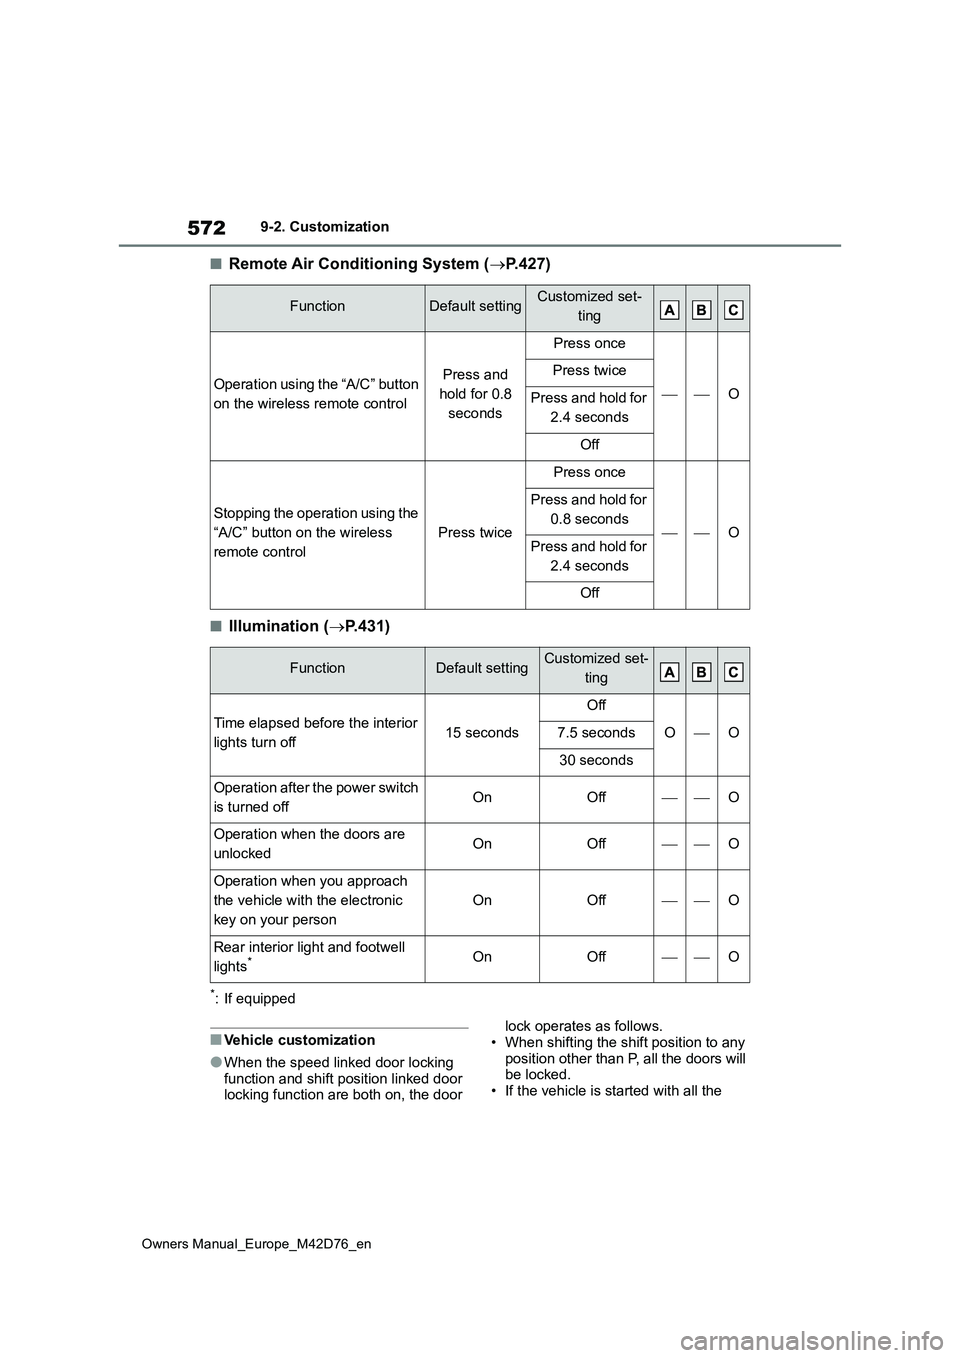
■Remote Air Conditioning System (P.427)
■Illumination (P.431)
*: If equipped
■Vehicle customization
●When the speed linked door locking function and shift position linked door locking function are both on, the door
lock operates as follows. • When shifting the shift position to any
position other than P, all the doors will be locked.• If the vehicle is started with all the
FunctionDefault settingCustomized set-
ting
Operation using the “A/C” button
on the wireless remote control
Press and
hold for 0.8
seconds
Press once
O
Press twice
Press and hold for
2.4 seconds
Off
Stopping the operation using the
“A/C” button on the wireless
remote control
Press twice
Press once
O
Press and hold for
0.8 seconds
Press and hold for
2.4 seconds
Off
FunctionDefault settingCustomized set-
ting
Time elapsed before the interior
lights turn off15 seconds
Off
OO7.5 seconds
30 seconds
Operation after the power switch
is turned offOnOffO
Operation when the doors are
unlockedOnOffO
Operation when you approach
the vehicle with the electronic
key on your person
OnOffO
Rear interior light and footwell
lights*OnOffO
Page 579 of 674
577
Owners Manual_Europe_M42D76_en
What to do if... (Troubleshooting)
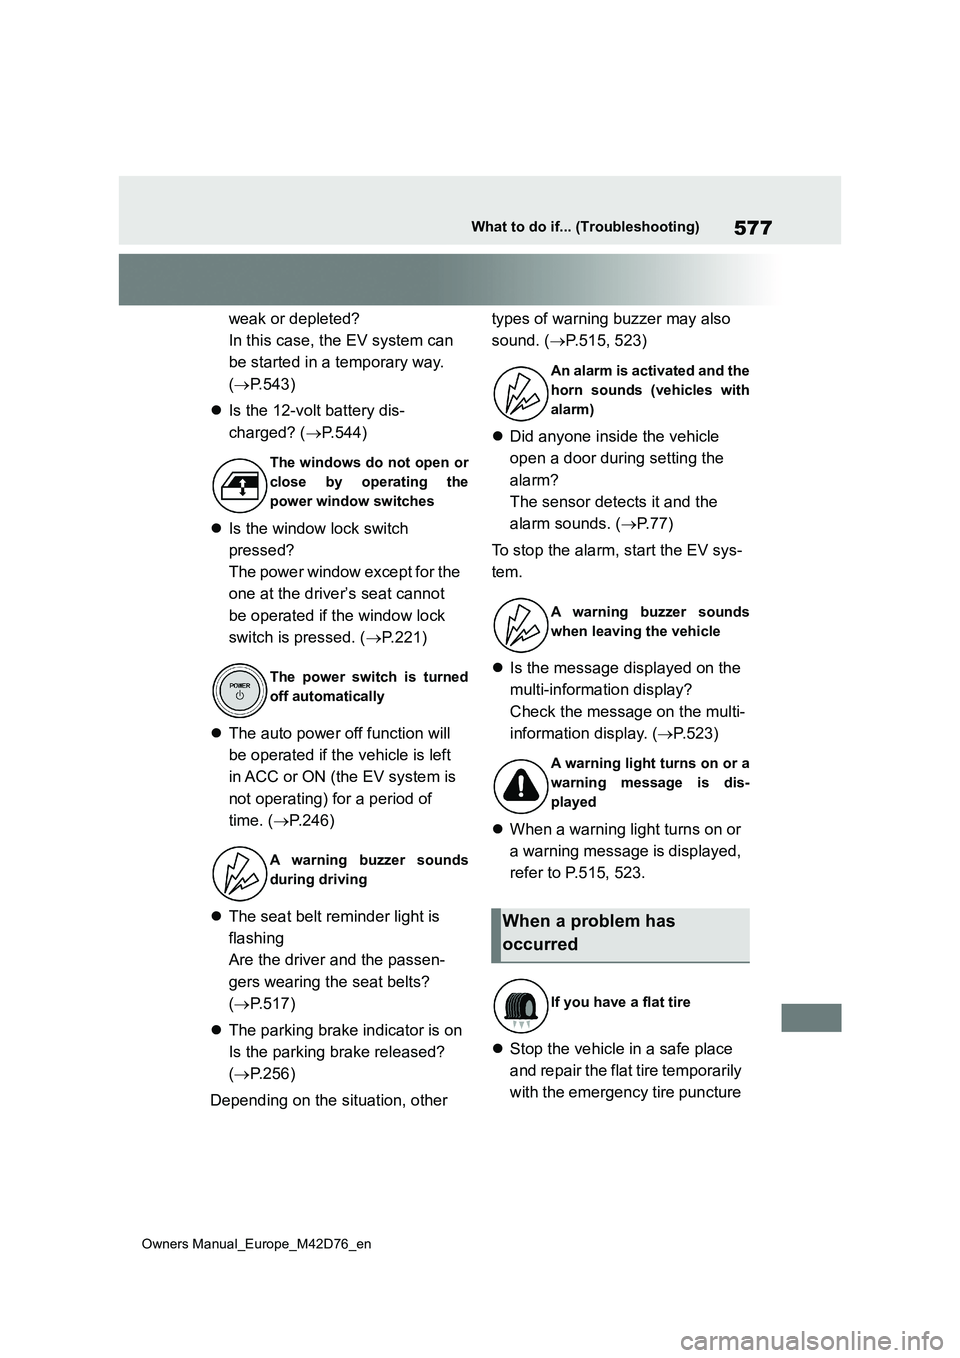
weak or depleted?
In this case, the EV system can
be started in a temporary way.
( P.543)
Is the 12-volt battery dis-
charged? ( P.544)
Is the window lock switch
pressed?
The power window except for the
one at the driver’s seat cannot
be operated if the window lock
switch is pressed. ( P.221)
The auto power off function will
be operated if the vehicle is left
in ACC or ON (the EV system is
not operating) for a period of
time. ( P.246)
The seat belt reminder light is
flashing
Are the driver and the passen-
gers wearing the seat belts?
( P.517)
The parking brake indicator is on
Is the parking brake released?
( P.256)
Depending on the situation, other
types of warning buzzer may also
sound. ( P.515, 523)
Did anyone inside the vehicle
open a door during setting the
alarm?
The sensor detects it and the
alarm sounds. ( P.77)
To stop the alarm, start the EV sys-
tem.
Is the message displayed on the
multi-information display?
Check the message on the multi-
information display. ( P.523)
When a warning light turns on or
a warning message is displayed,
refer to P.515, 523.
Stop the vehicle in a safe place
and repair the flat tire temporarily
with the emergency tire puncture
The windows do not open or
close by operating the
power window switches
The power switch is turned
off automatically
A warning buzzer sounds
during driving
An alarm is activated and the
horn sounds (vehicles with
alarm)
A warning buzzer sounds
when leaving the vehicle
A warning light turns on or a
warning message is dis-
played
When a problem has
occurred
If you have a flat tire
Page 583 of 674
581
Owners Manual_Europe_M42D76_en
Alphabetical Index
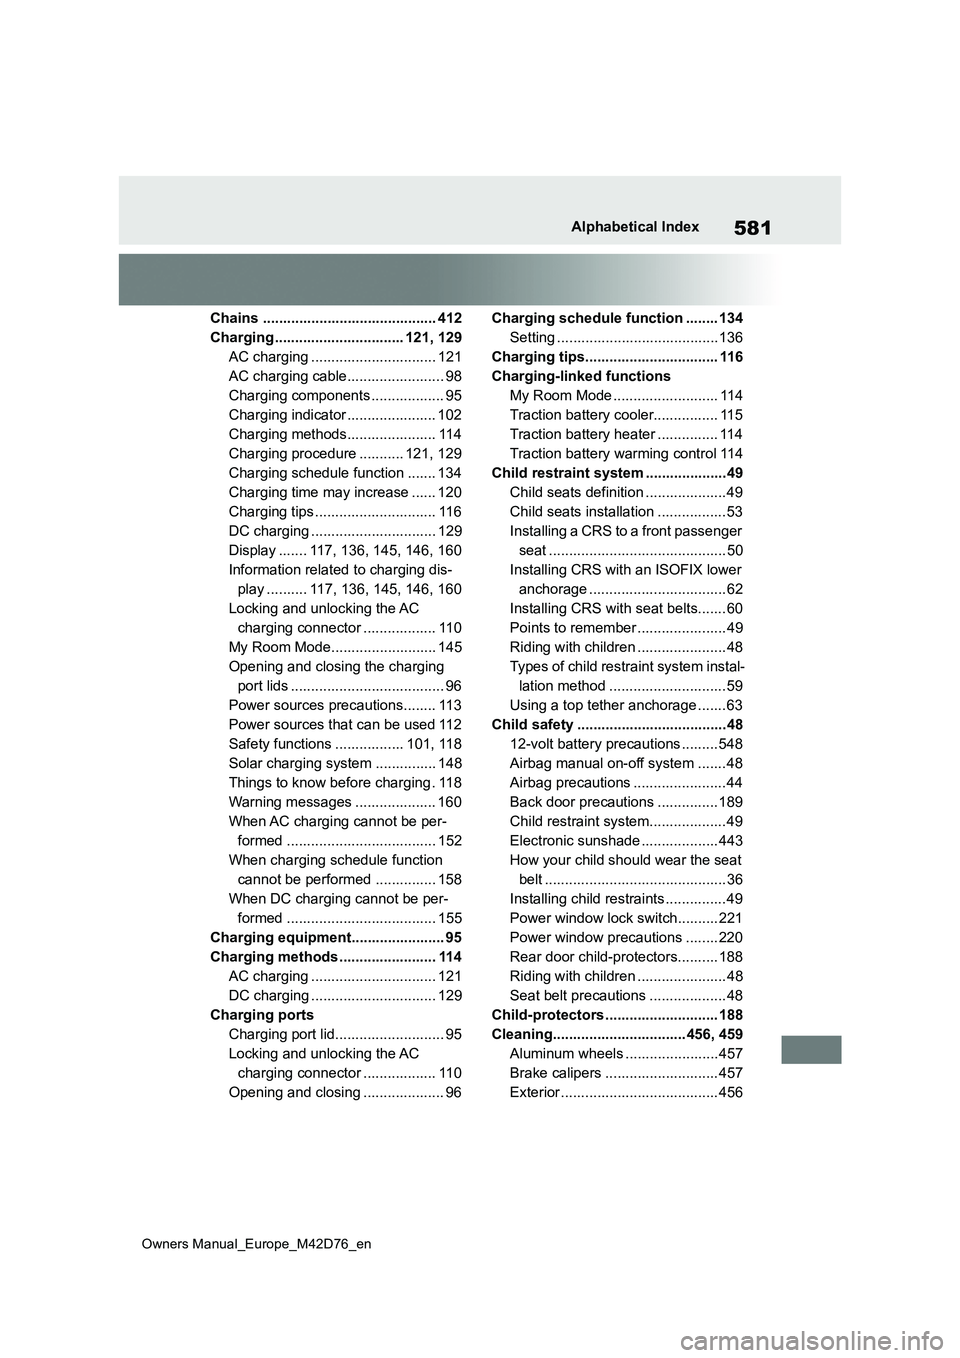
Chains ........................................... 412
Charging ................................ 121, 129
AC charging ............................... 121
AC charging cable........................ 98
Charging components .................. 95
Charging indicator ...................... 102
Charging methods...................... 114
Charging procedure ........... 121, 129
Charging schedule function ....... 134
Charging time may increase ...... 120
Charging tips .............................. 116
DC charging ............................... 129
Display ....... 117, 136, 145, 146, 160
Information related to charging dis-
play .......... 117, 136, 145, 146, 160
Locking and unlocking the AC
charging connector .................. 110
My Room Mode.......................... 145
Opening and closing the charging
port lids ...................................... 96
Power sources precautions........ 113
Power sources that can be used 112
Safety functions ................. 101, 118
Solar charging system ............... 148
Things to know before charging . 118
Warning messages .................... 160
When AC charging cannot be per-
formed ..................................... 152
When charging schedule function
cannot be performed ............... 158
When DC charging cannot be per-
formed ..................................... 155
Charging equipment....................... 95
Charging methods ........................ 114
AC charging ............................... 121
DC charging ............................... 129
Charging ports
Charging port lid........................... 95
Locking and unlocking the AC
charging connector .................. 110
Opening and closing .................... 96
Charging schedule function ........ 134
Setting ........................................136
Charging tips................................. 116
Charging-linked functions
My Room Mode .......................... 114
Traction battery cooler................ 115
Traction battery heater ............... 114
Traction battery warming control 114
Child restraint system ....................49
Child seats definition ....................49
Child seats installation ................. 53
Installing a CRS to a front passenger
seat ............................................ 50
Installing CRS with an ISOFIX lower
anchorage .................................. 62
Installing CRS with seat belts....... 60
Points to remember ...................... 49
Riding with children ...................... 48
Types of child restraint system instal-
lation method ............................. 59
Using a top tether anchorage ....... 63
Child safety .....................................48
12-volt battery precautions ......... 548
Airbag manual on-off system ....... 48
Airbag precautions ....................... 44
Back door precautions ............... 189
Child restraint system................... 49
Electronic sunshade ................... 443
How your child should wear the seat
belt ............................................. 36
Installing child restraints ............... 49
Power window lock switch.......... 221
Power window precautions ........ 220
Rear door child-protectors.......... 188
Riding with children ...................... 48
Seat belt precautions ................... 48
Child-protectors ............................ 188
Cleaning................................. 456, 459
Aluminum wheels .......................457
Brake calipers ............................ 457
Exterior ....................................... 456