clock TOYOTA C-HR 2019 Owners Manual (in English)
[x] Cancel search | Manufacturer: TOYOTA, Model Year: 2019, Model line: C-HR, Model: TOYOTA C-HR 2019Pages: 532, PDF Size: 10.35 MB
Page 4 of 532

TABLE OF CONTENTS4
C-HR_OM_USA_OM10569U5-1. Using the air conditioning
system and defogger
Air conditioning system ..... 292
Seat heaters ...................... 300
5-2. Using the interior lights Interior lights list ................ 302• Interior lights ................. 303
• Personal lights .............. 304
5-3. Using the storage features
List of storage features...... 305 • Glove box...................... 306
• Console box .................. 306
• Bottle holders ................ 307
• Cup holders .................. 308
Luggage compartment features ........................... 309
5-4. Using the other interior features
Other interior features ....... 315 • Sun visors ..................... 315
• Vanity mirrors................ 315
• Clock ............................. 316
• Power outlet .................. 317
• Assist grips ................... 318
Safety Connect.................. 319 6-1. Maintenance and care
Cleaning and protecting the vehicle exterior .......... 328
Cleaning and protecting the vehicle interior ........... 333
6-2. Maintenance Maintenance requirements ................... 336
General maintenance ........ 339
Emission inspection and maintenance (I/M)
programs ......................... 343
6-3. Do-it-yourself maintenance Do-it-yourself service precautions ...................... 344
Hood .................................. 347
Positioning a floor jack....... 349
Engine compartment ......... 350
Tires................................... 365
Tire inflation pressure ........ 375
Wheels............................... 379
Air conditioning filter .......... 382
Wireless remote control/electronic key
battery ............................. 386
Checking and replacing fuses ................................ 390
Light bulbs ......................... 394
5Interior features6Maintenance and care
Page 291 of 532
291
5Interior features
C-HR_OM_USA_OM10569U5-1. Using the air conditioning
system and defogger
Air conditioning system ..... 292
Seat heaters ...................... 300
5-2. Using the interior lights Interior lights list ................ 302• Interior lights ................. 303
• Personal lights .............. 304 5-3. Using the storage
features
List of storage features ..... 305 • Glove box...................... 306
• Console box .................. 306
• Bottle holders ................ 307
• Cup holders .................. 308
Luggage compartment features ........................... 309
5-4. Using the other interior features
Other interior features ....... 315 • Sun visors ..................... 315
• Vanity mirrors................ 315
• Clock ............................. 316
• Power outlet .................. 317
• Assist grips ................... 318
Safety Connect ................. 319
Page 316 of 532
3165-4. Using the other interior features
C-HR_OM_USA_OM10569U
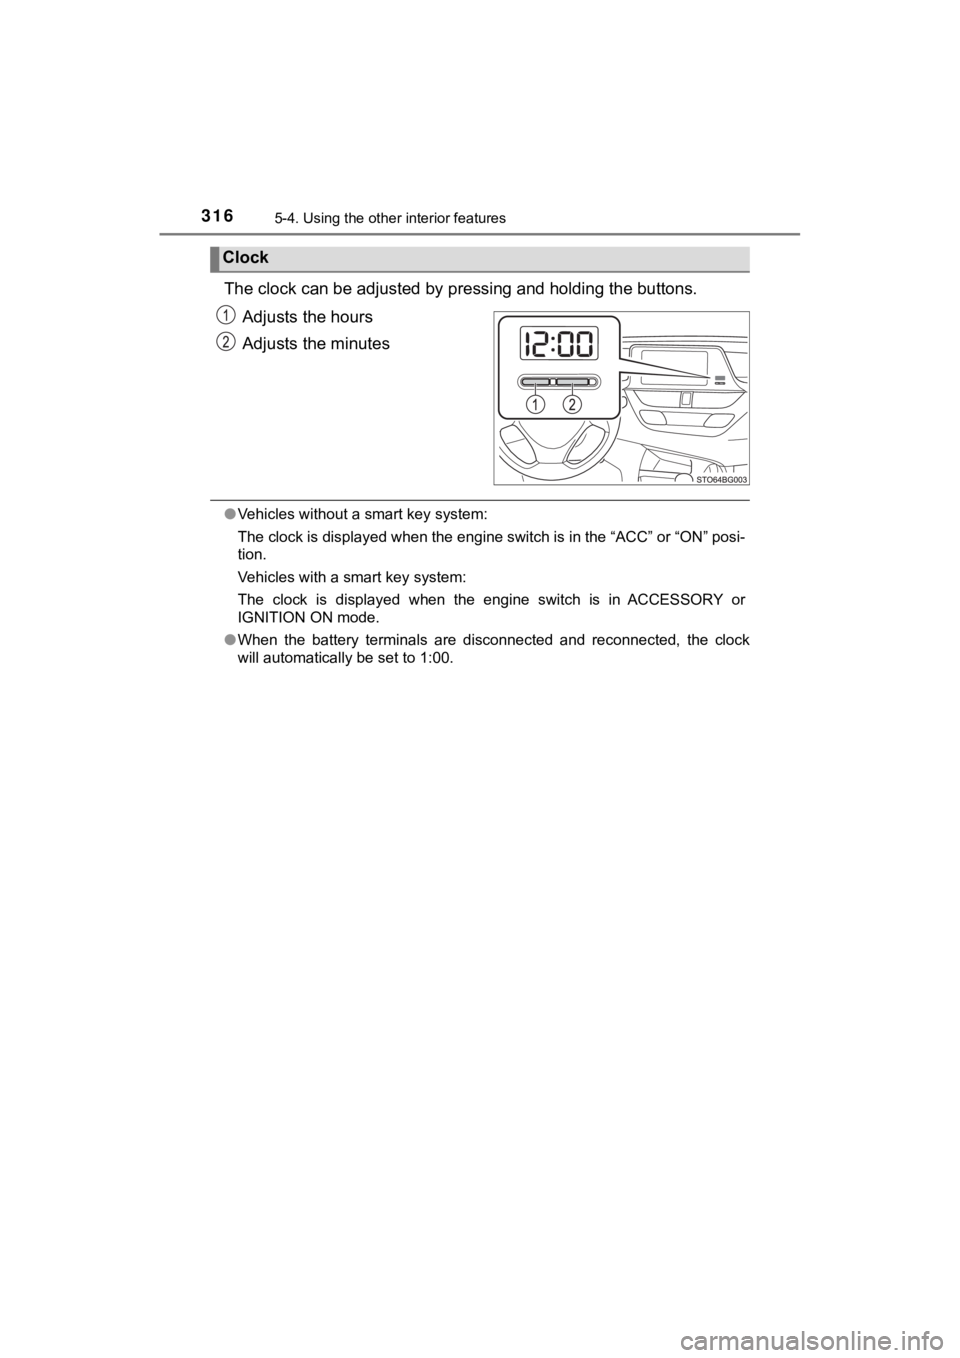
The clock can be adjusted by p ressing and holding the buttons.
Adjusts the hours
Adjusts the minutes
● Vehicles without a smart key system:
The clock is displayed when the engine switch is in the “ACC” o r “ON” posi-
tion.
Vehicles with a smart key system:
The clock is displayed when the engine switch is in ACCESSORY o r
IGNITION ON mode.
● When the battery terminals are disconnected and reconnected, th e clock
will automatically be set to 1:00.
Clock
Page 352 of 532
3526-3. Do-it-yourself maintenance
C-HR_OM_USA_OM10569U■
Adding engine oil
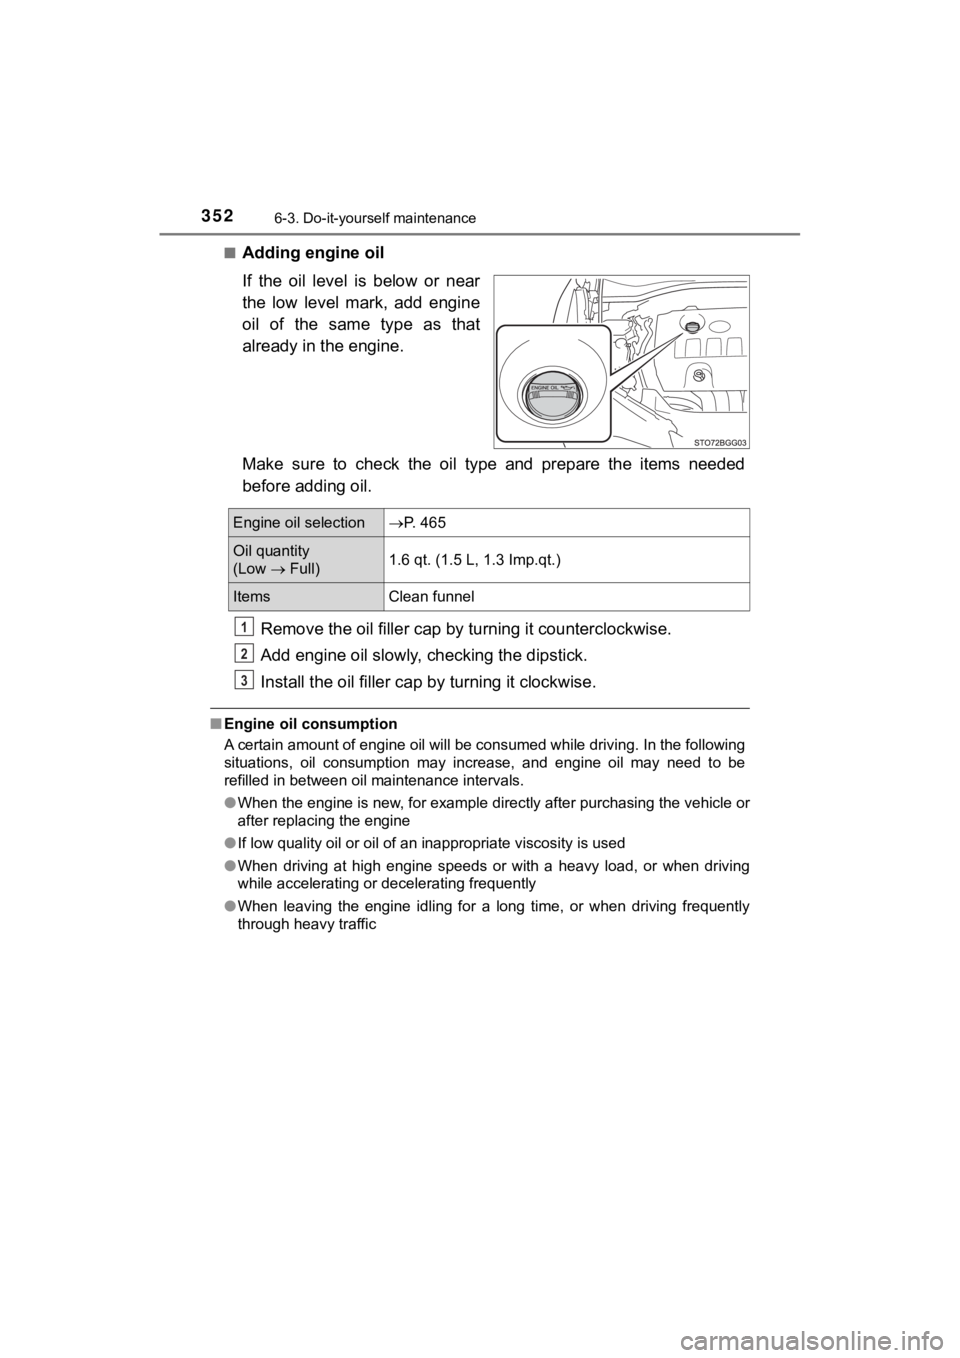
If the oil level is below or near
the low level mark, add engine
oil of the same type as that
already in the engine.
Make sure to check the oil type and prepare the items needed
before adding oil.
Remove the oil fille r cap by turning it counterclockwise.
Add engine oil slowly, checking the dipstick.
Install the oil filler cap by turning it clockwise.
■Engine oil consumption
A certain amount of engine oil will be consumed while driving. In the following
situations, oil consumption may increase, and engine oil may ne ed to be
refilled in between oil maintenance intervals.
● When the engine is new, for example directly after purchasing t he vehicle or
after replacing the engine
● If low quality oil or oil of an inappropriate viscosity is used
● When driving at high engine speeds or with a heavy load, or when driving
while accelerating or decelerating frequently
● When leaving the engine idling for a long time, or when driving frequently
through heavy traffic
Engine oil selection P. 465
Oil quantity
(Low Full) 1.6 qt. (1.5 L, 1.3 Imp.qt.)
Items
Clean funnel
1
2
3
Page 395 of 532
3956-3. Do-it-yourself maintenance
6
Maintenance and care
C-HR_OM_USA_OM10569U■
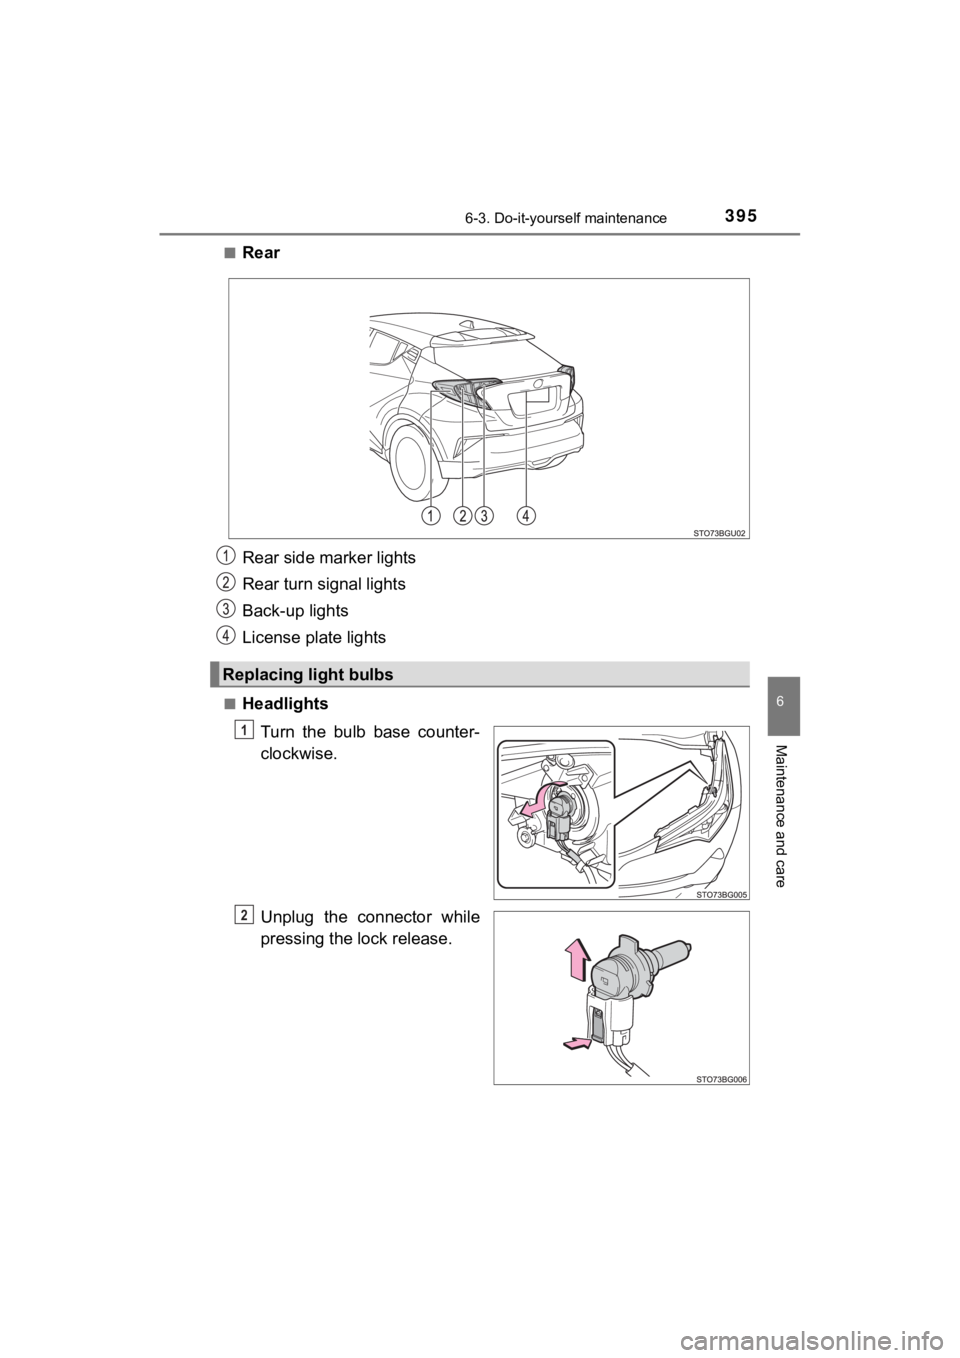
Rear
Rear side marker lights
Rear turn signal lights
Back-up lights
License plate lights
■Headlights
Turn the bulb base counter-
clockwise.
Unplug the connector while
pressing the lock release.
Replacing light bulbs
1
2
Page 396 of 532
3966-3. Do-it-yourself maintenance
C-HR_OM_USA_OM10569U
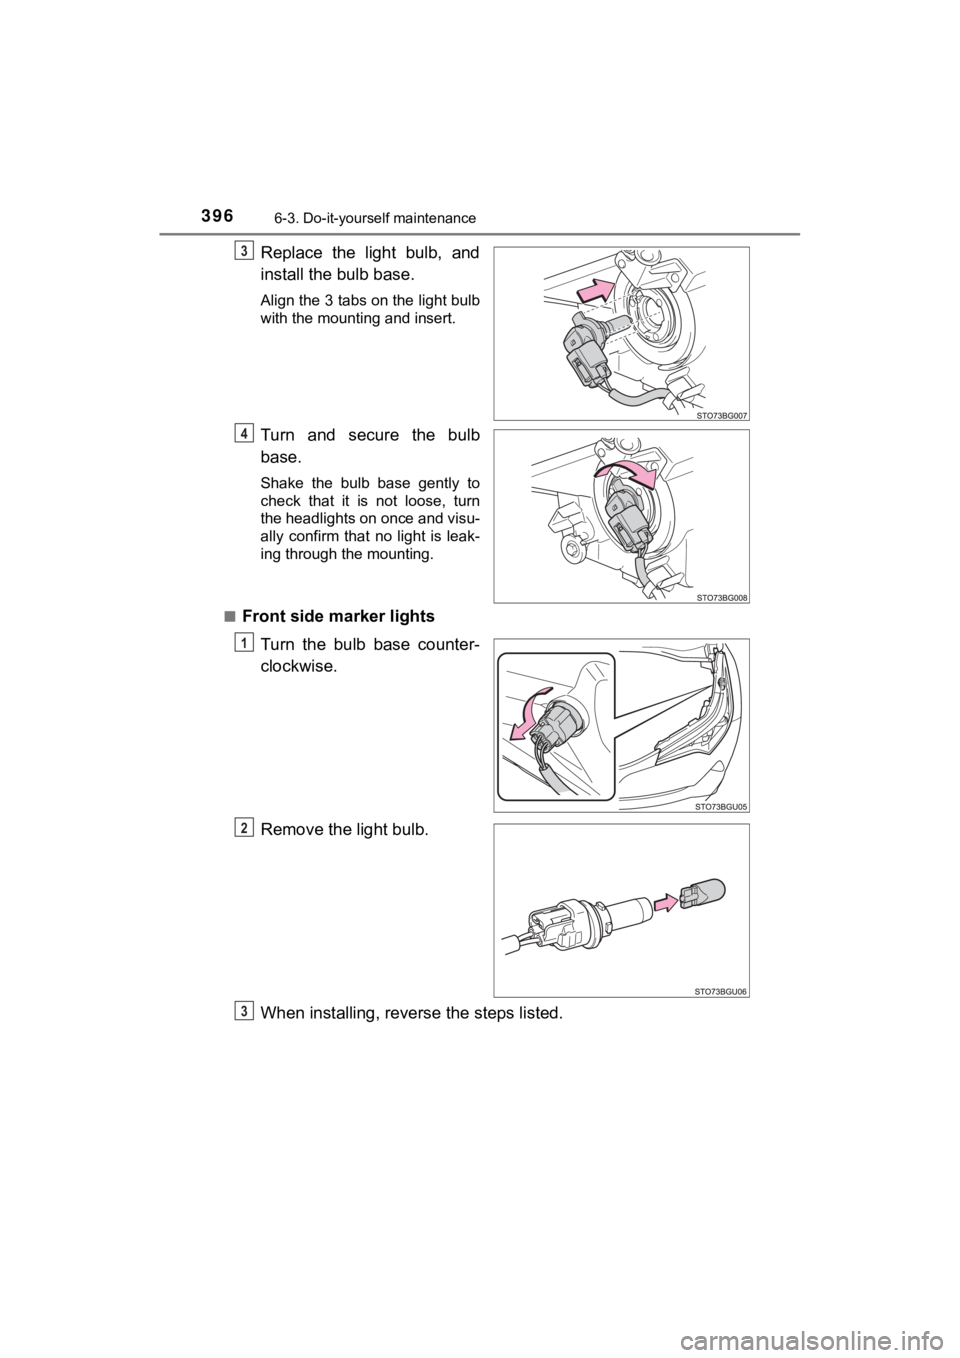
Replace the light bulb, and
install the bulb base.
Align the 3 tabs on the light bulb
with the mounting and insert.
Turn and secure the bulb
base.
Shake the bulb base gently to
check that it is not loose, turn
the headlights on once and visu-
ally confirm that no light is leak-
ing through the mounting.
■
Front side marker lights Turn the bulb base counter-
clockwise.
Remove the light bulb.
When installing, reverse the steps listed.
3
4
1
2
3
Page 397 of 532
3976-3. Do-it-yourself maintenance
6
Maintenance and care
C-HR_OM_USA_OM10569U■
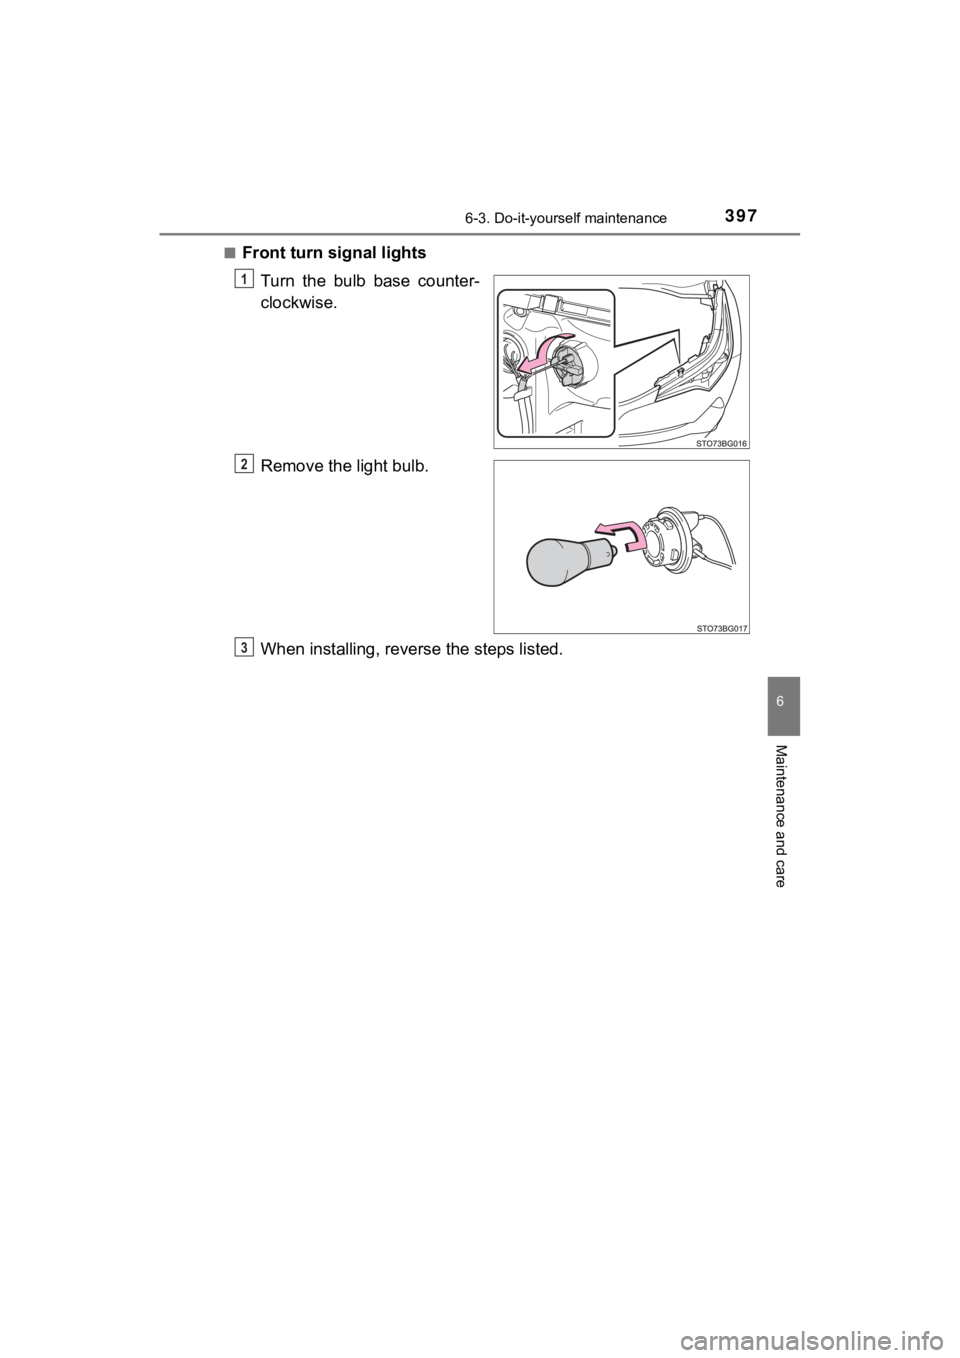
Front turn signal lights
Turn the bulb base counter-
clockwise.
Remove the light bulb.
When installing, reverse the steps listed.
1
2
3
Page 398 of 532
3986-3. Do-it-yourself maintenance
C-HR_OM_USA_OM10569U■
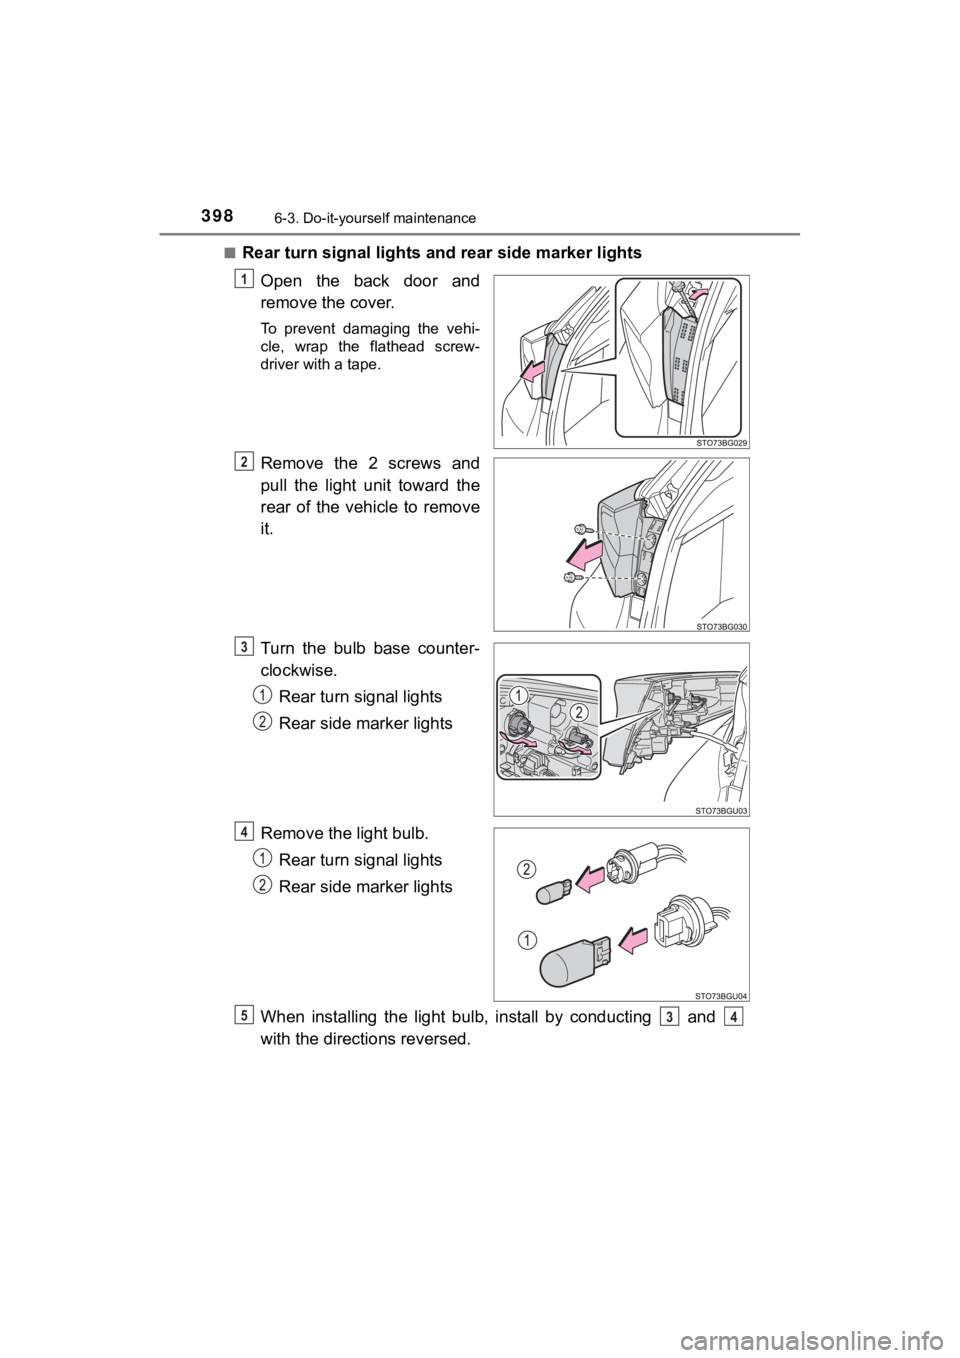
Rear turn signal lights and
rear side marker lights
Open the back door and
remove the cover.
To prevent damaging the vehi-
cle, wrap the flathead screw-
driver with a tape.
Remove the 2 screws and
pull the light unit toward the
rear of the vehicle to remove
it.
Turn the bulb base counter-
clockwise. Rear turn signal lights
Rear side marker lights
Remove the light bulb. Rear turn signal lights
Rear side marker lights
When installing the light bulb, install by conducting and
with the directions reversed.
1
2
3
4
534
Page 400 of 532
4006-3. Do-it-yourself maintenance
C-HR_OM_USA_OM10569U■
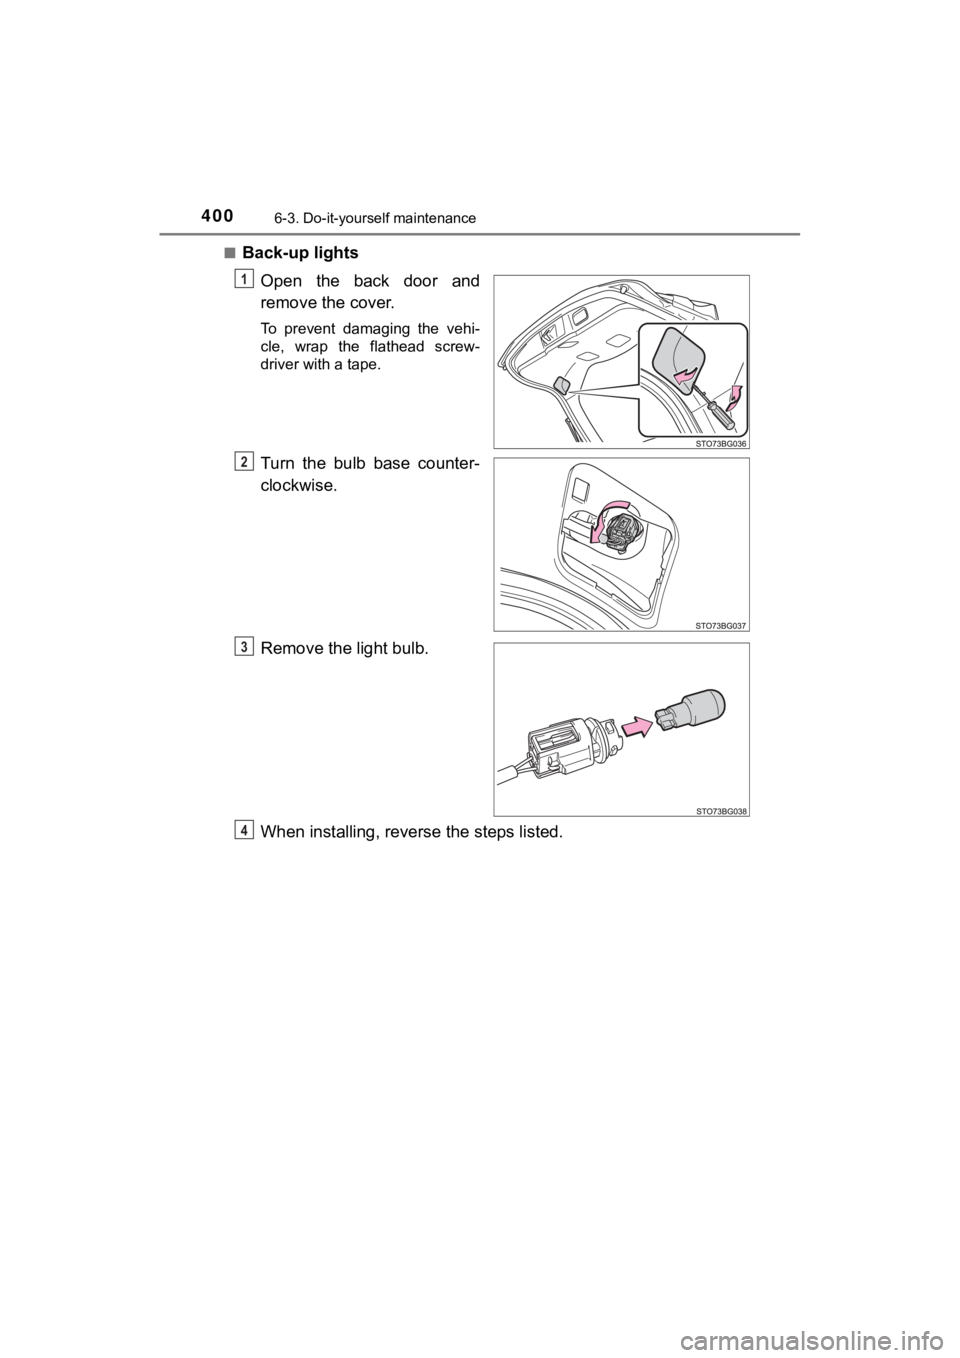
Back-up lights
Open the back door and
remove the cover.
To prevent damaging the vehi-
cle, wrap the flathead screw-
driver with a tape.
Turn the bulb base counter-
clockwise.
Remove the light bulb.
When installing, reverse the steps listed.
1
2
3
4
Page 401 of 532
4016-3. Do-it-yourself maintenance
6
Maintenance and care
C-HR_OM_USA_OM10569U■
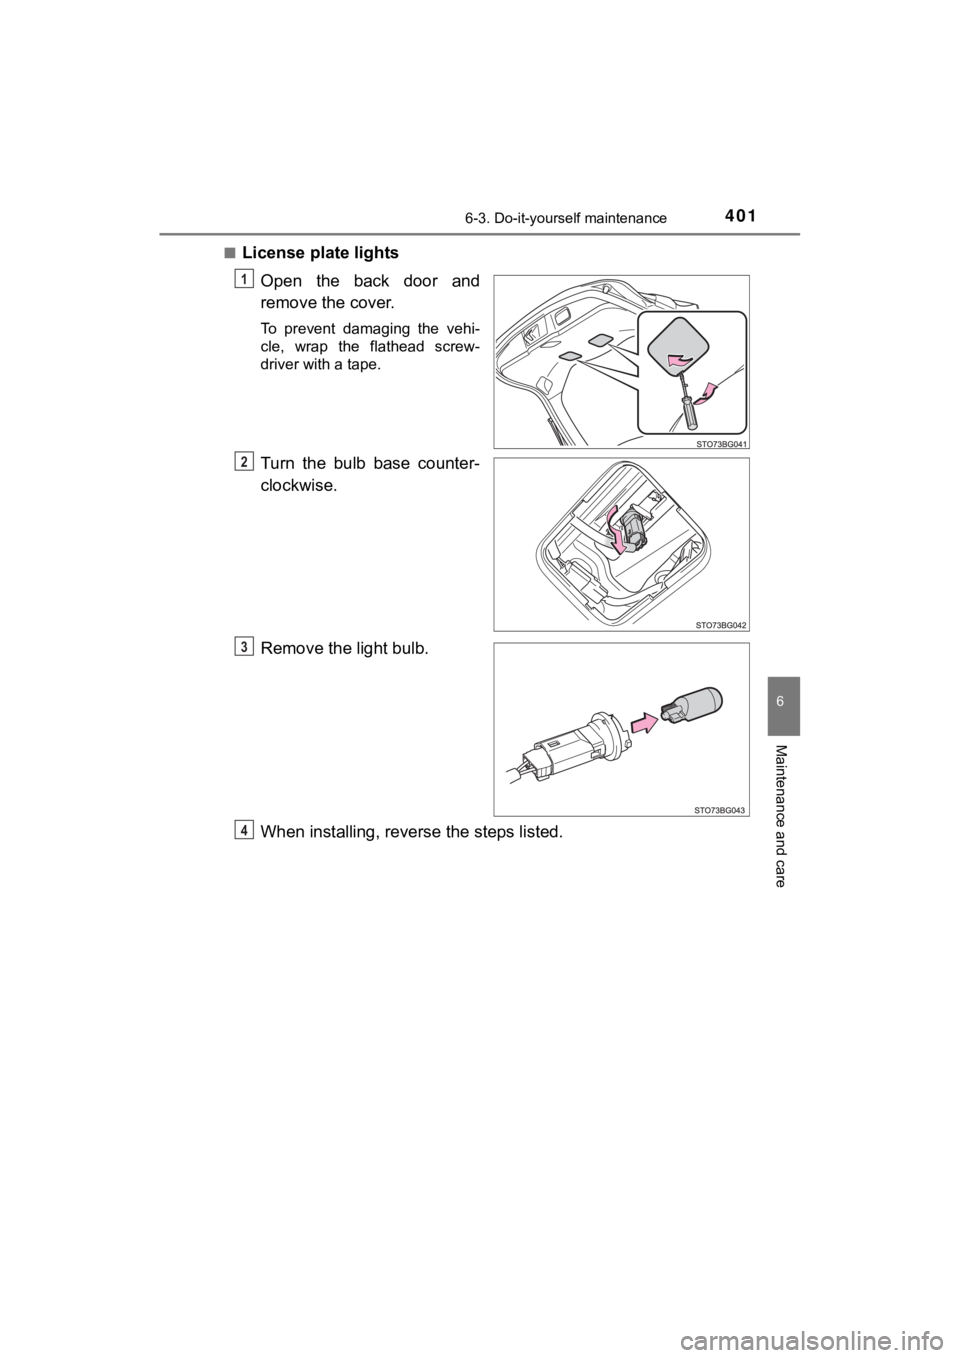
License plate lights
Open the back door and
remove the cover.
To prevent damaging the vehi-
cle, wrap the flathead screw-
driver with a tape.
Turn the bulb base counter-
clockwise.
Remove the light bulb.
When installing, reverse the steps listed.
1
2
3
4