TOYOTA CAMRY 2000 Service Repair Manual
Manufacturer: TOYOTA, Model Year: 2000, Model line: CAMRY, Model: TOYOTA CAMRY 2000Pages: 4770, PDF Size: 86.41 MB
Page 4521 of 4770

BR002±94
BRAKE VIBRATION AND/OR PULSATIONPage 5 of 6
B. Installation of Rotor
± Check wheel bearing pre±load. If excessive movement is found, adjust bearing
pre±load.
± Using a dial indicator, measure the rotor 10 mm from the outside edge
(See Figure 5 below).
Figure 5
Page 4522 of 4770

BR002±94
BRAKE VIBRATION AND/OR PULSATIONPage 6 of 6
C. Phase Match Rotor To Hub
± If rotor runout is at the maximum value or greater, (refer to appropriate repair manual)
index the rotor one lug and measure the runout again. Repeat this process, moving the
rotor one lug each time, until the position is found where the runout is at the minimum and
within the maximum value listed in the appropriate repair manual
(See Figure 6 below).
± Tighten lug nuts to the specified torque following a star sequence when installing wheel
(See Figure 7 below).
Note: DO NOT USE AIR IMPACT WRENCH.
Four Holes Five Holes
Figure 7Figure 6
Page 4523 of 4770
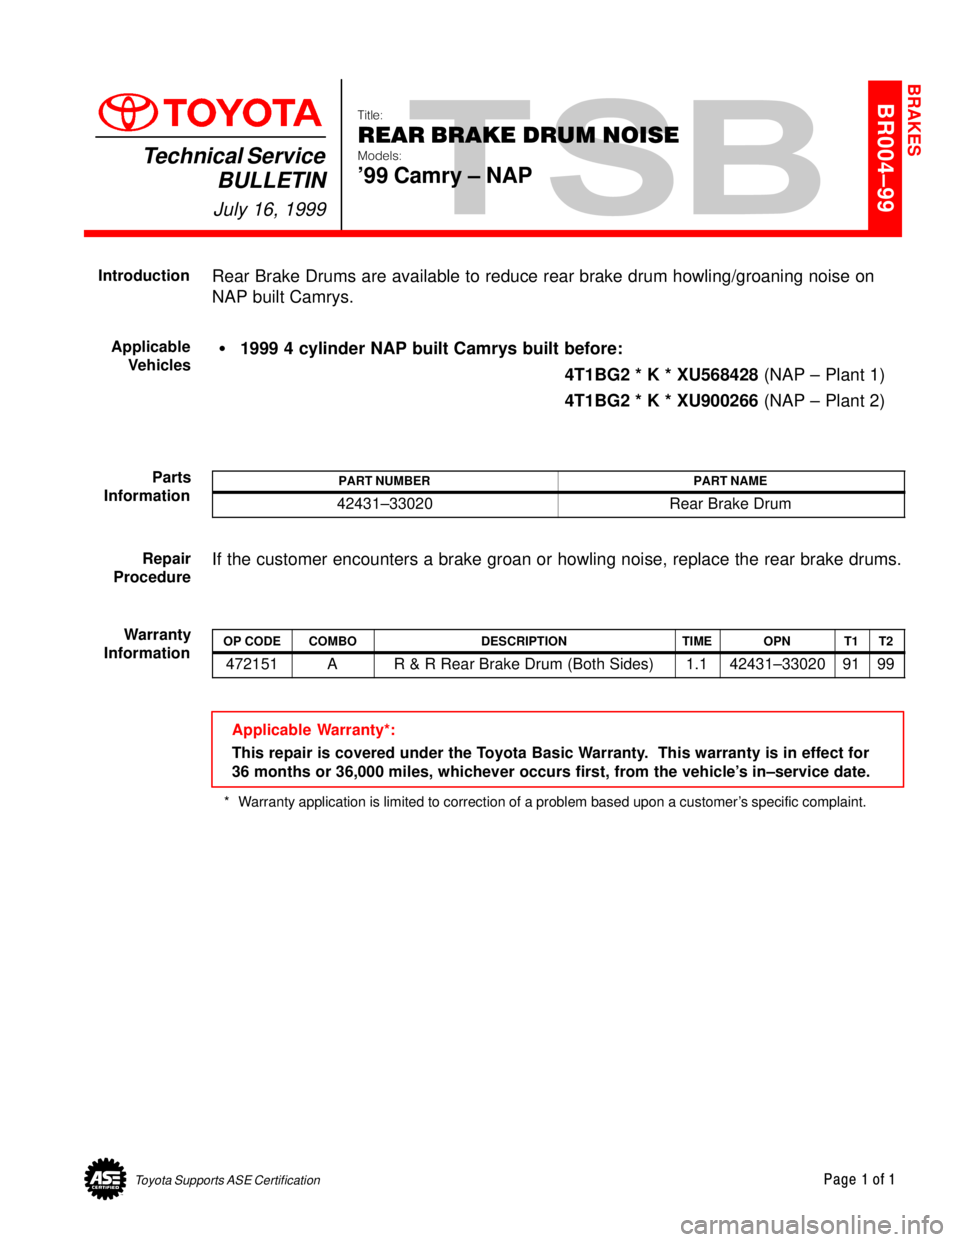
Toyota Supports ASE CertificationPage 1 of 1
BR004±99
Title:
REAR BRAKE DRUM NOISE
Models:
'99 Camry ± NAP
Technical Service
BULLETIN
July 16, 1999
Rear Brake Drums are available to reduce rear brake drum howling/groaning noise on
NAP built Camrys.
�1999 4 cylinder NAP built Camrys built before:
4T1BG2 * K * XU568428 (NAP ± Plant 1)
4T1BG2 * K * XU900266 (NAP ± Plant 2)
PART NUMBERPART NAME
42431±33020Rear Brake Drum
If the customer encounters a brake groan or howling noise, replace the rear brake drums.
OP CODECOMBODESCRIPTIONTIMEOPNT1T2
472151AR & R Rear Brake Drum (Both Sides)1.142431±330209199
Applicable Warranty*:
This repair is covered under the Toyota Basic Warranty. This warranty is in effect for
36 months or 36,000 miles, whichever occurs first, from the vehicle's in±service date.
* Warranty application is limited to correction of a problem based upon a customer's specific complaint.
BRAKES
Introduction
Applicable
Vehicles
Parts
Information
Repair
Procedure
Warranty
Information
Page 4524 of 4770

Toyota Supports ASE CertificationPage 1 of 4
BR004±00
Title:
BRAKE PAD CLICKING NOISE
Models:
'90 ± '00 All Models
Technical Service
BULLETIN
October 20, 2000
A clicking type noise may be noticed when first applying the brakes after changing
vehicle travel direction (
Drive/Forward to Reverse, Reverse to Drive/Forward). This is a
normal noise caused by the required brake pad±to±caliper clearances. When the
direction of travel is changed, the brake pads may ªshiftº towards the new direction of
travel. When the brake pad contacts the caliper, a clicking noise may be heard.
To minimize this clicking noise, a disc brake caliper grease has been made available for
use during brake service/maintenance operations. Under normal usage conditions this
grease should be effective for a period of 6 months to 1 year.
�1990 ± 2000 model year Toyota vehicles, all models.
PREVIOUS PART NUMBERCURRENT PART NUMBERPART NAME
N/A08887±80609Disc Brake Caliper Grease (50 g tube)
OP CODEDESCRIPTIONTIMEOPNT1T2
N/ANot Applicable to Warranty ±±±±
BRAKES
Introduction
Applicable
Vehicles
Parts
Information
Warranty
Information
Page 4525 of 4770
BRAKE PAD CLICKING NOISE ± BR004±00 October 20, 2000
Page 2 of 4
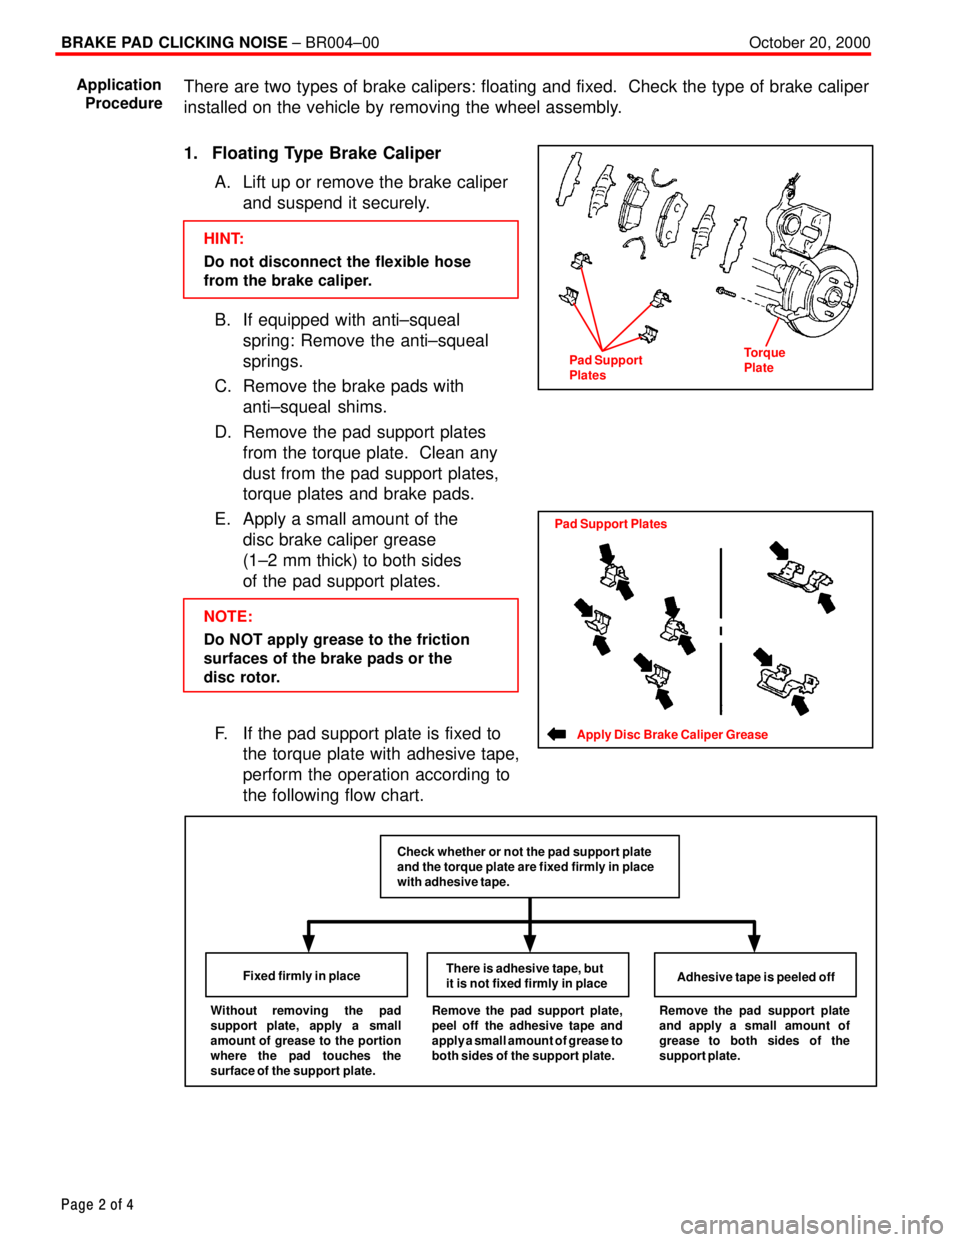
There are two types of brake calipers: floating and fixed. Check the type of brake caliper
installed on the vehicle by removing the wheel assembly.
1. Floating Type Brake Caliper
A. Lift up or remove the brake caliper
and suspend it securely.
HINT:
Do not disconnect the flexible hose
from the brake caliper.
B. If equipped with anti±squeal
spring: Remove the anti±squeal
springs.
C. Remove the brake pads with
anti±squeal shims.
D. Remove the pad support plates
from the torque plate. Clean any
dust from the pad support plates,
torque plates and brake pads.
E. Apply a small amount of the
disc brake caliper grease
(1±2 mm thick) to both sides
of the pad support plates.
NOTE:
Do NOT apply grease to the friction
surfaces of the brake pads or the
disc rotor.
F. If the pad support plate is fixed to
the torque plate with adhesive tape,
perform the operation according to
the following flow chart.
Without removing the pad
support plate, apply a small
amount of grease to the portion
where the pad touches the
surface of the support plate.Fixed firmly in placeThere is adhesive tape, but
it is not fixed firmly in placeAdhesive tape is peeled offRemove the pad support plate,
peel off the adhesive tape and
apply a small amount of grease to
both sides of the support plate.Remove the pad support plate
and apply a small amount of
grease to both sides of the
support plate.
Check whether or not the pad support plate
and the torque plate are fixed firmly in place
with adhesive tape.
Application
Procedure
Pad Support
PlatesTorque
Plate
Apply Disc Brake Caliper Grease
Pad Support Plates
Page 4526 of 4770
BRAKE PAD CLICKING NOISE ± BR004±00 October 20, 2000
Page 3 of 4
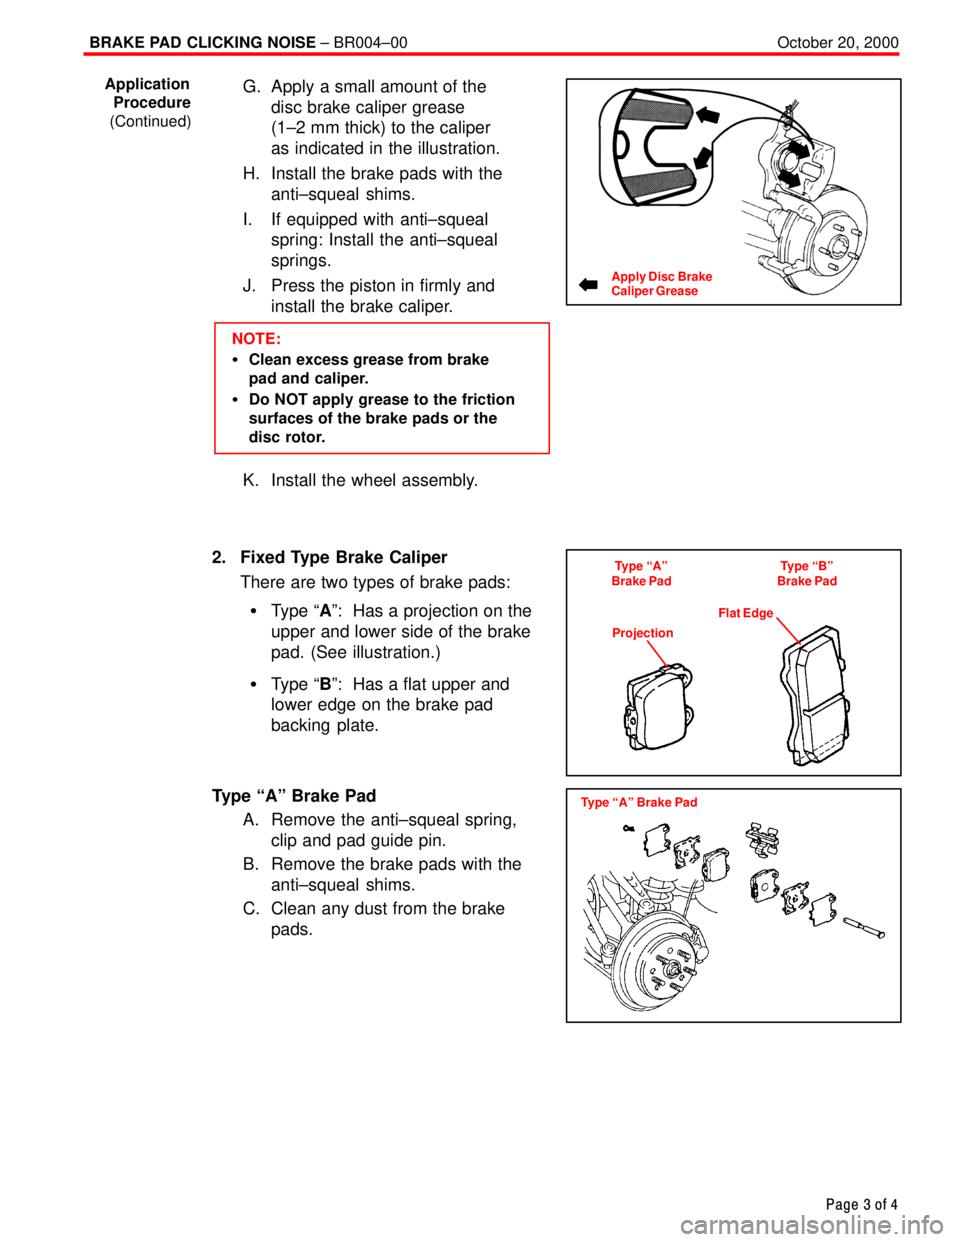
G. Apply a small amount of the
disc brake caliper grease
(1±2 mm thick) to the caliper
as indicated in the illustration.
H. Install the brake pads with the
anti±squeal shims.
I. If equipped with anti±squeal
spring: Install the anti±squeal
springs.
J. Press the piston in firmly and
install the brake caliper.
NOTE:
�Clean excess grease from brake
pad and caliper.
�Do NOT apply grease to the friction
surfaces of the brake pads or the
disc rotor.
K. Install the wheel assembly.
2. Fixed Type Brake Caliper
There are two types of brake pads:
�Type ªAº: Has a projection on the
upper and lower side of the brake
pad. (See illustration.)
�Type ªBº: Has a flat upper and
lower edge on the brake pad
backing plate.
Type ªAº Brake Pad
A. Remove the anti±squeal spring,
clip and pad guide pin.
B. Remove the brake pads with the
anti±squeal shims.
C. Clean any dust from the brake
pads.
Application
Procedure
(Continued)
Apply Disc Brake
Caliper Grease
Type ªAº
Brake PadType ªBº
Brake Pad
ProjectionFlat Edge
Type ªAº Brake Pad
Page 4527 of 4770
BRAKE PAD CLICKING NOISE ± BR004±00 October 20, 2000
Page 4 of 4
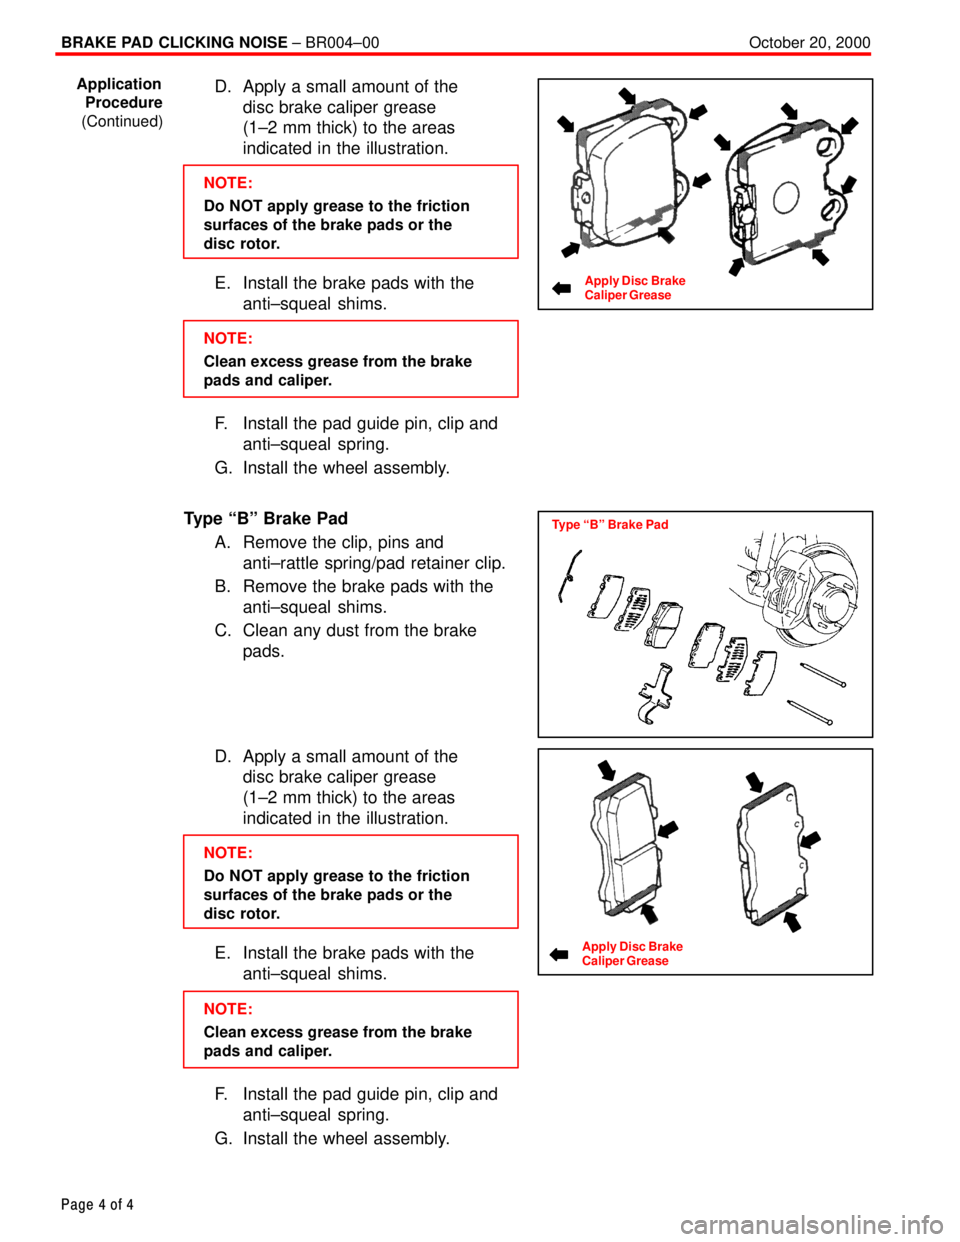
D. Apply a small amount of the
disc brake caliper grease
(1±2 mm thick) to the areas
indicated in the illustration.
NOTE:
Do NOT apply grease to the friction
surfaces of the brake pads or the
disc rotor.
E. Install the brake pads with the
anti±squeal shims.
NOTE:
Clean excess grease from the brake
pads and caliper.
F. Install the pad guide pin, clip and
anti±squeal spring.
G. Install the wheel assembly.
Type ªBº Brake Pad
A. Remove the clip, pins and
anti±rattle spring/pad retainer clip.
B. Remove the brake pads with the
anti±squeal shims.
C. Clean any dust from the brake
pads.
D. Apply a small amount of the
disc brake caliper grease
(1±2 mm thick) to the areas
indicated in the illustration.
NOTE:
Do NOT apply grease to the friction
surfaces of the brake pads or the
disc rotor.
E. Install the brake pads with the
anti±squeal shims.
NOTE:
Clean excess grease from the brake
pads and caliper.
F. Install the pad guide pin, clip and
anti±squeal spring.
G. Install the wheel assembly.
Application
Procedure
(Continued)
Apply Disc Brake
Caliper Grease
Type ªBº Brake Pad
Apply Disc Brake
Caliper Grease
Page 4528 of 4770
Toyota Supports ASE CertificationPage 1 of 2
EG001±00
Title:
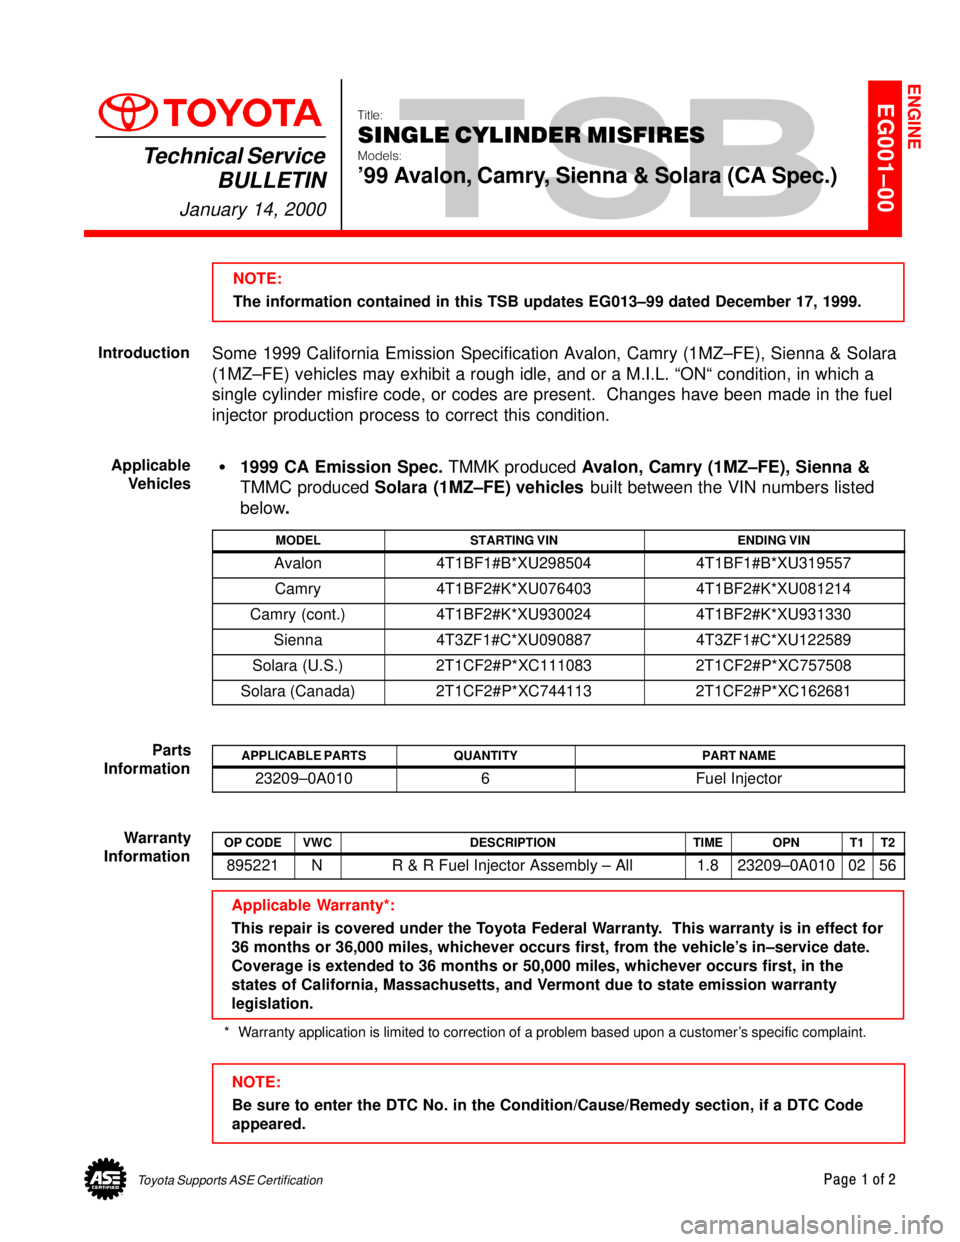
SINGLE CYLINDER MISFIRES
Models:
'99 Avalon, Camry, Sienna & Solara (CA Spec.)
Technical Service
BULLETIN
January 14, 2000
NOTE:
The information contained in this TSB updates EG013±99 dated December 17, 1999.
Some 1999 California Emission Specification Avalon, Camry (1MZ±FE), Sienna & Solara
(1MZ±FE) vehicles may exhibit a rough idle, and or a M.I.L. ªONª condition, in which a
single cylinder misfire code, or codes are present. Changes have been made in the fuel
injector production process to correct this condition.
�1999 CA Emission Spec. TMMK produced Avalon, Camry (1MZ±FE), Sienna &
TMMC produced Solara (1MZ±FE) vehicles built between the VIN numbers listed
below.
MODELSTARTING VINENDING VIN
Avalon4T1BF1#B*XU2985044T1BF1#B*XU319557
Camry4T1BF2#K*XU0764034T1BF2#K*XU081214
Camry (cont.)4T1BF2#K*XU9300244T1BF2#K*XU931330
Sienna4T3ZF1#C*XU0908874T3ZF1#C*XU122589
Solara (U.S.)2T1CF2#P*XC1110832T1CF2#P*XC757508
Solara (Canada)2T1CF2#P*XC7441132T1CF2#P*XC162681
APPLICABLE PARTSQUANTITYPART NAME
23209±0A0106Fuel Injector
OP CODEVWCDESCRIPTIONTIMEOPNT1T2
895221NR & R Fuel Injector Assembly ± All1.823209±0A0100256
Applicable Warranty*:
This repair is covered under the Toyota Federal Warranty. This warranty is in effect for
36 months or 36,000 miles, whichever occurs first, from the vehicle's in±service date.
Coverage is extended to 36 months or 50,000 miles, whichever occurs first, in the
states of California, Massachusetts, and Vermont due to state emission warranty
legislation.
* Warranty application is limited to correction of a problem based upon a customer's specific complaint.
NOTE:
Be sure to enter the DTC No. in the Condition/Cause/Remedy section, if a DTC Code
appeared.
ENGINE
Introduction
Applicable
Vehicles
Parts
Information
Warranty
Information
Page 4529 of 4770
SINGLE CYLINDER MISFIRE ± EG001-00 January 14, 2000
Page 2 of 2
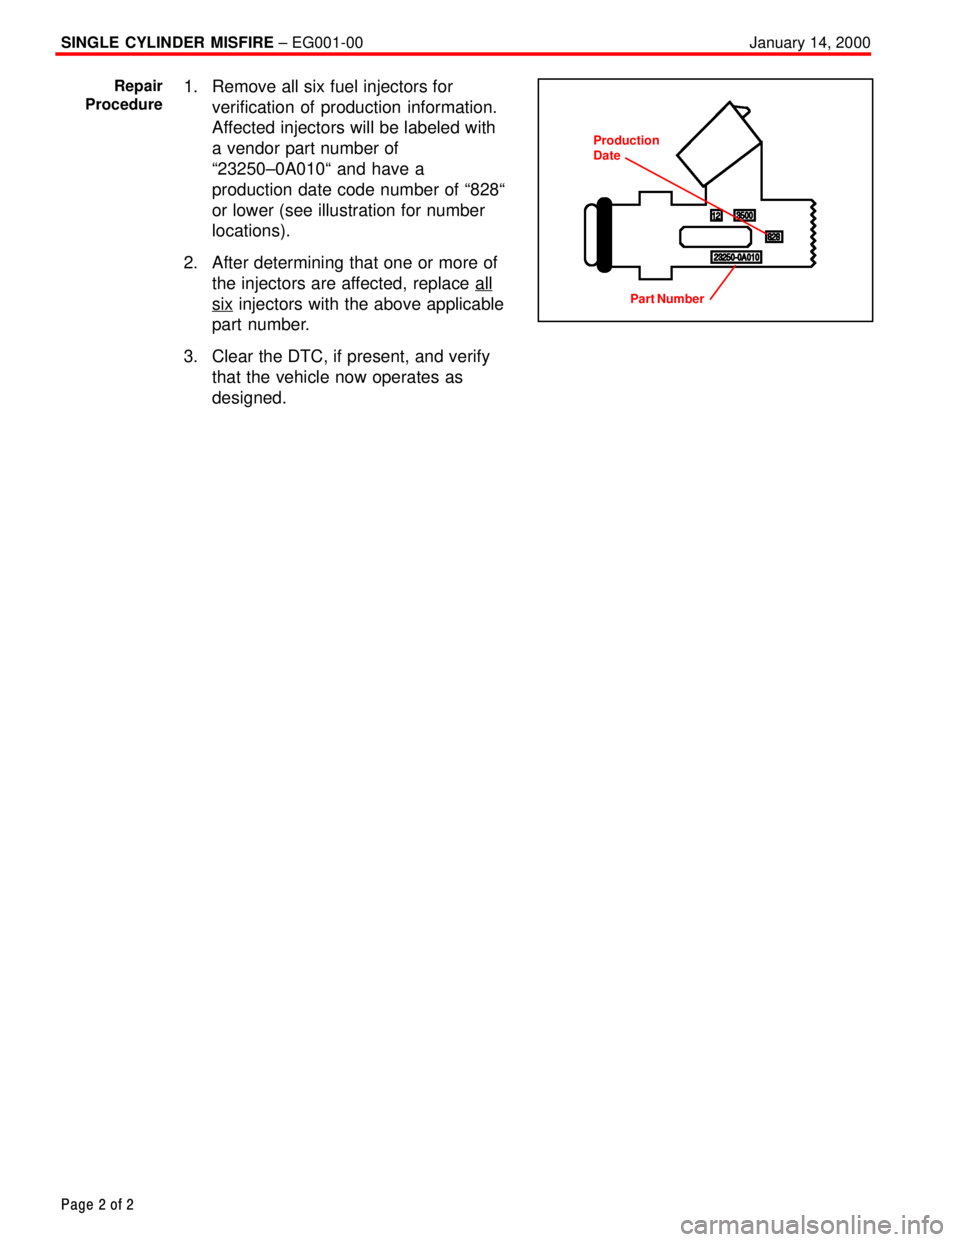
1. Remove all six fuel injectors for
verification of production information.
Affected injectors will be labeled with
a vendor part number of
ª23250±0A010ª and have a
production date code number of ª828ª
or lower (see illustration for number
locations).
2. After determining that one or more of
the injectors are affected, replace all
six injectors with the above applicable
part number.
3. Clear the DTC, if present, and verify
that the vehicle now operates as
designed.
Repair
Procedure
Production
Date
Part Number
Page 4530 of 4770
Toyota Supports ASE CertificationPage 1 of 1
EG002±00
Title:
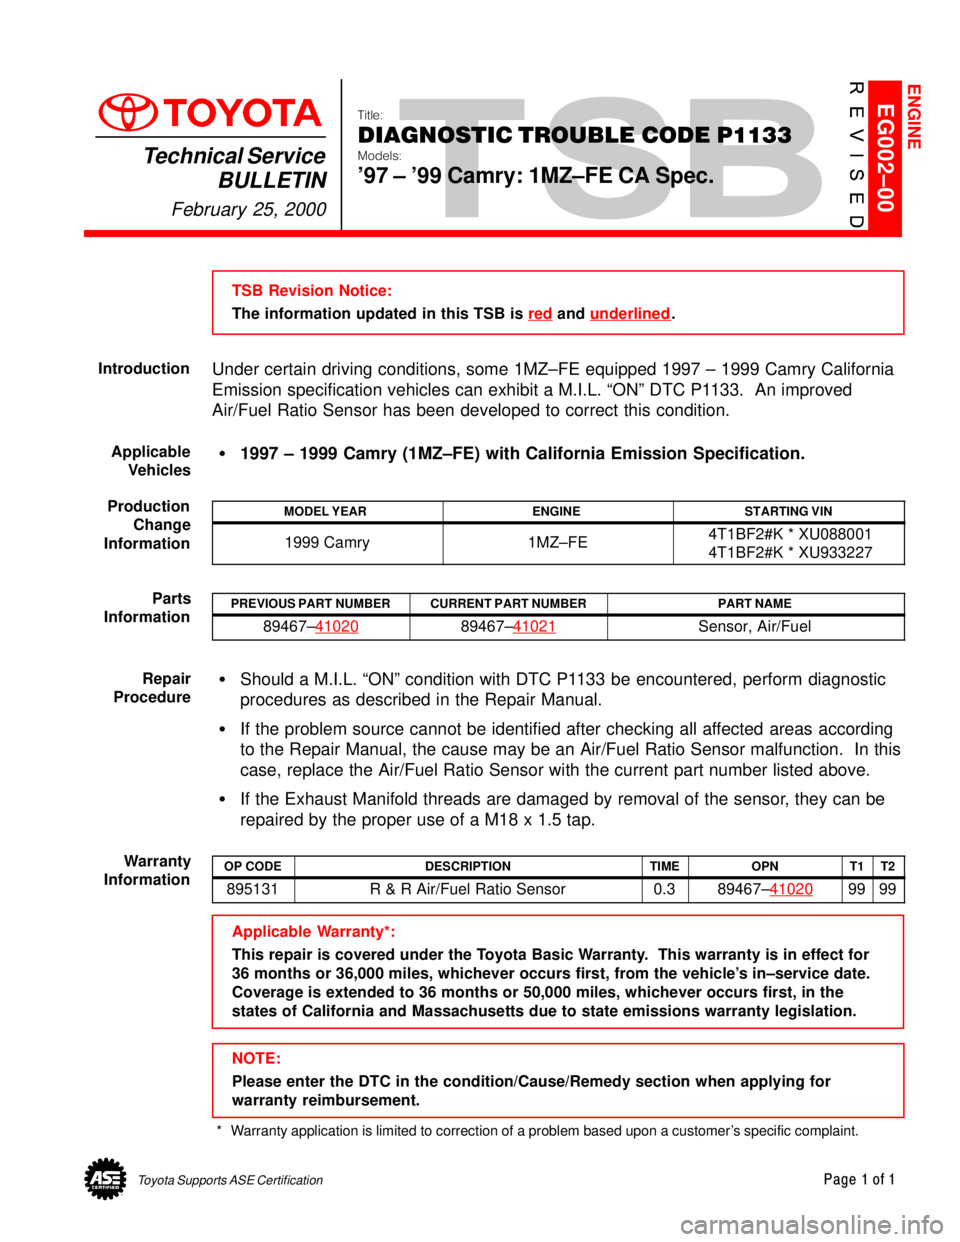
DIAGNOSTIC TROUBLE CODE P1133
Models:
'97 ± '99 Camry: 1MZ±FE CA Spec.
Technical Service
BULLETIN
February 25, 2000
TSB Revision Notice:
The information updated in this TSB is red
and underlined.
Under certain driving conditions, some 1MZ±FE equipped 1997 ± 1999 Camry California
Emission specification vehicles can exhibit a M.I.L. ªONº DTC P1133. An improved
Air/Fuel Ratio Sensor has been developed to correct this condition.
�1997 ± 1999 Camry (1MZ±FE) with California Emission Specification.
MODEL YEARENGINESTARTING VIN
1999 Camry1MZ±FE4T1BF2#K * XU088001
4T1BF2#K * XU933227
PREVIOUS PART NUMBERCURRENT PART NUMBERPART NAME
89467±4102089467±41021Sensor, Air/Fuel
�Should a M.I.L. ªONº condition with DTC P1133 be encountered, perform diagnostic
procedures as described in the Repair Manual.
�If the problem source cannot be identified after checking all affected areas according
to the Repair Manual, the cause may be an Air/Fuel Ratio Sensor malfunction. In this
case, replace the Air/Fuel Ratio Sensor with the current part number listed above.
�If the Exhaust Manifold threads are damaged by removal of the sensor, they can be
repaired by the proper use of a M18 x 1.5 tap.
OP CODEDESCRIPTIONTIMEOPNT1T2
895131R & R Air/Fuel Ratio Sensor0.389467±410209999
Applicable Warranty*:
This repair is covered under the Toyota Basic Warranty. This warranty is in effect for
36 months or 36,000 miles, whichever occurs first, from the vehicle's in±service date.
Coverage is extended to 36 months or 50,000 miles, whichever occurs first, in the
states of California and Massachusetts due to state emissions warranty legislation.
NOTE:
Please enter the DTC in the condition/Cause/Remedy section when applying for
warranty reimbursement.
* Warranty application is limited to correction of a problem based upon a customer's specific complaint.
ENGINE
Introduction
Applicable
Vehicles
Production
Change
Information
Parts
Information
Repair
Procedure
Warranty
Information