check engine TOYOTA CAMRY V20 1986 Service Information
[x] Cancel search | Manufacturer: TOYOTA, Model Year: 1986, Model line: CAMRY V20, Model: TOYOTA CAMRY V20 1986Pages: 2389, PDF Size: 84.44 MB
Page 1326 of 2389
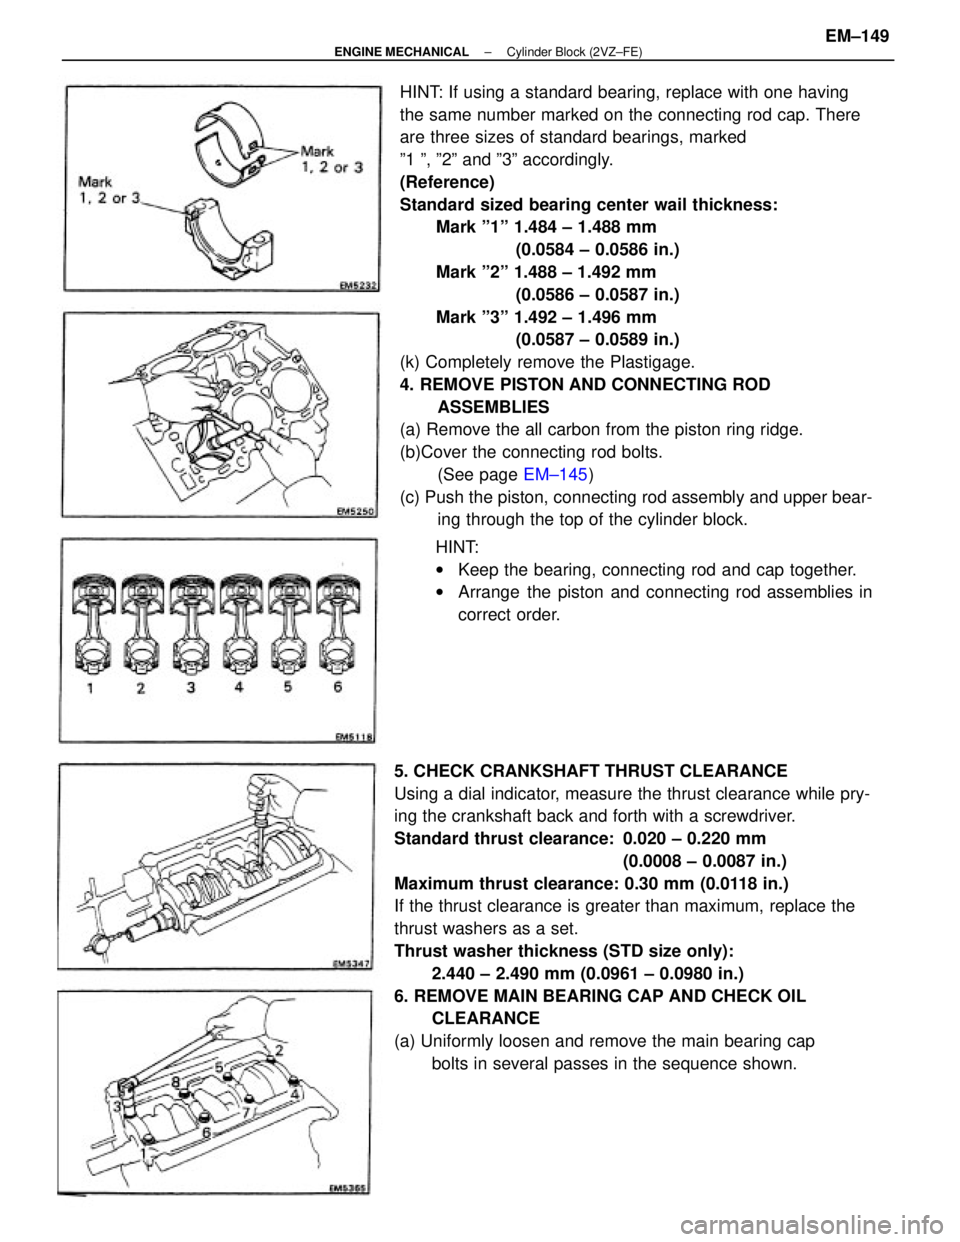
HINT: If using a standard bearing, replace with one having
the same number marked on the connecting rod cap. There
are three sizes of standard bearings, marked
º1 º, º2º and º3º accordingly.
(Reference)
Standard sized bearing center wail thickness:
Mark º1º 1.484 ± 1.488 mm
(0.0584 ± 0.0586 in.)
Mark º2º 1.488 ± 1.492 mm
(0.0586 ± 0.0587 in.)
Mark º3º 1.492 ± 1.496 mm
(0.0587 ± 0.0589 in.)
(k) Completely remove the Plastigage.
4. REMOVE PISTON AND CONNECTING ROD
ASSEMBLIES
(a) Remove the all carbon from the piston ring ridge.
(b)Cover the connecting rod bolts.
(See page EM±145)
(c) Push the piston, connecting rod assembly and upper bear-
ing through the top of the cylinder block.
5. CHECK CRANKSHAFT THRUST CLEARANCE
Using a dial indicator, measure the thrust clearance while pry-
ing the crankshaft back and forth with a screwdriver.
Standard thrust clearance: 0.020 ± 0.220 mm
(0.0008 ± 0.0087 in.)
Maximum thrust clearance: 0.30 mm (0.0118 in.)
If the thrust clearance is greater than maximum, replace the
thrust washers as a set.
Thrust washer thickness (STD size only):
2.440 ± 2.490 mm (0.0961 ± 0.0980 in.)
6. REMOVE MAIN BEARING CAP AND CHECK OIL
CLEARANCE
(a) Uniformly loosen and remove the main bearing cap
bolts in several passes in the sequence shown.HINT:
wKeep the bearing, connecting rod and cap together.
wArrange the piston and connecting rod assemblies in
correct order.
± ENGINE MECHANICALCylinder Block (2VZ±FE)EM±149
Page 1327 of 2389
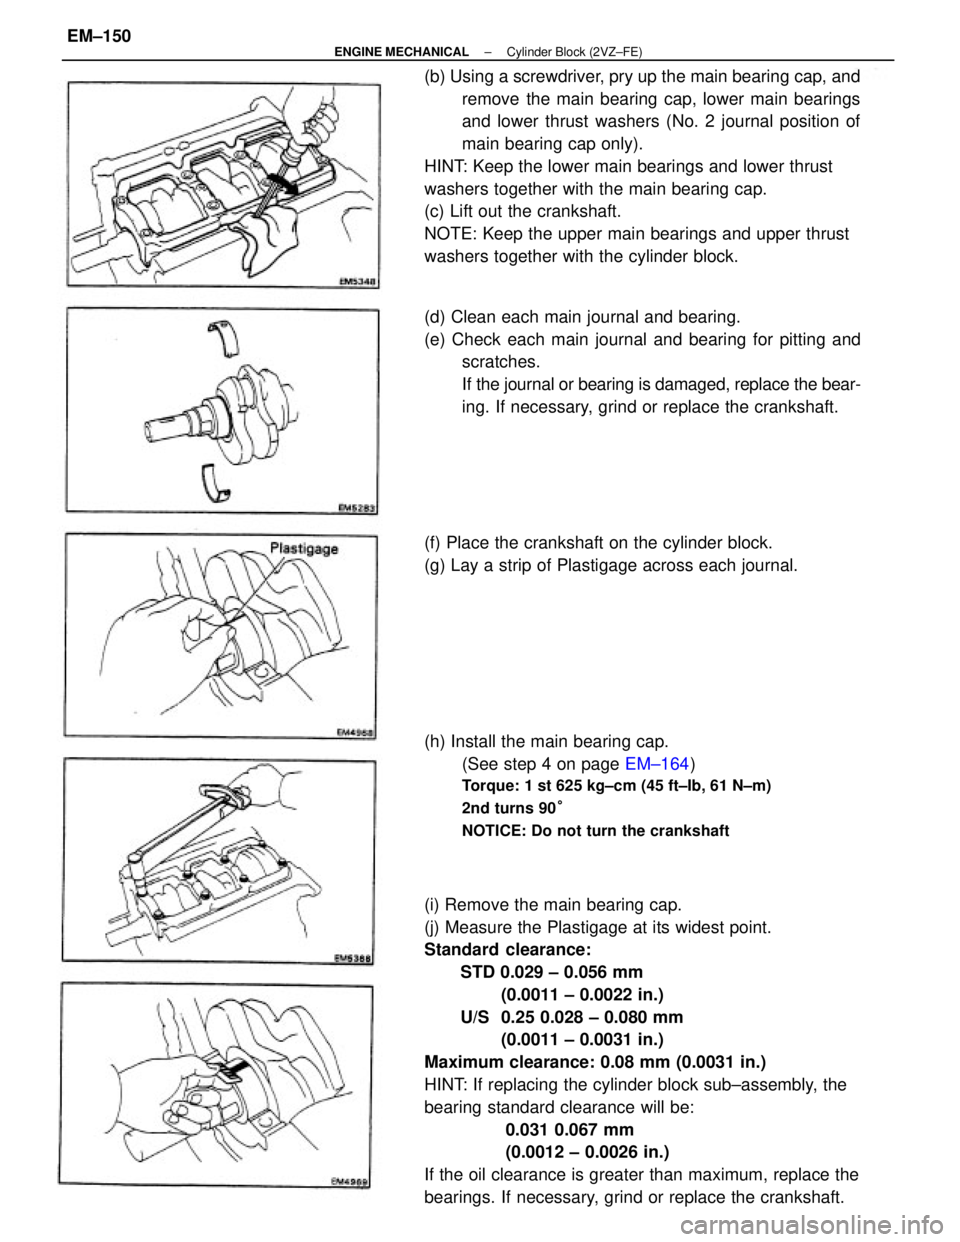
(i) Remove the main bearing cap.
(j) Measure the Plastigage at its widest point.
Standard clearance:
STD 0.029 ± 0.056 mm
(0.0011 ± 0.0022 in.)
U/S 0.25 0.028 ± 0.080 mm
(0.0011 ± 0.0031 in.)
Maximum clearance: 0.08 mm (0.0031 in.)
HINT: If replacing the cylinder block sub±assembly, the
bearing standard clearance will be:
0.031 0.067 mm
(0.0012 ± 0.0026 in.)
If the oil clearance is greater than maximum, replace the
bearings. If necessary, grind or replace the crankshaft. (b) Using a screwdriver, pry up the main bearing cap, and
remove the main bearing cap, lower main bearings
and lower thrust washers (No. 2 journal position of
main bearing cap only).
HINT: Keep the lower main bearings and lower thrust
washers together with the main bearing cap.
(c) Lift out the crankshaft.
NOTE: Keep the upper main bearings and upper thrust
washers together with the cylinder block.
(d) Clean each main journal and bearing.
(e) Check each main journal and bearing for pitting and
scratches.
If the journal or bearing is damaged, replace the bear-
ing. If necessary, grind or replace the crankshaft.
(h) Install the main bearing cap.
(See step 4 on page EM±164)
Torque: 1 st 625 kg±cm (45 ft±Ib, 61 N±m)
2nd turns 90°
NOTICE: Do not turn the crankshaft
(f) Place the crankshaft on the cylinder block.
(g) Lay a strip of Plastigage across each journal.
± ENGINE MECHANICALCylinder Block (2VZ±FE)EM±150
Page 1329 of 2389
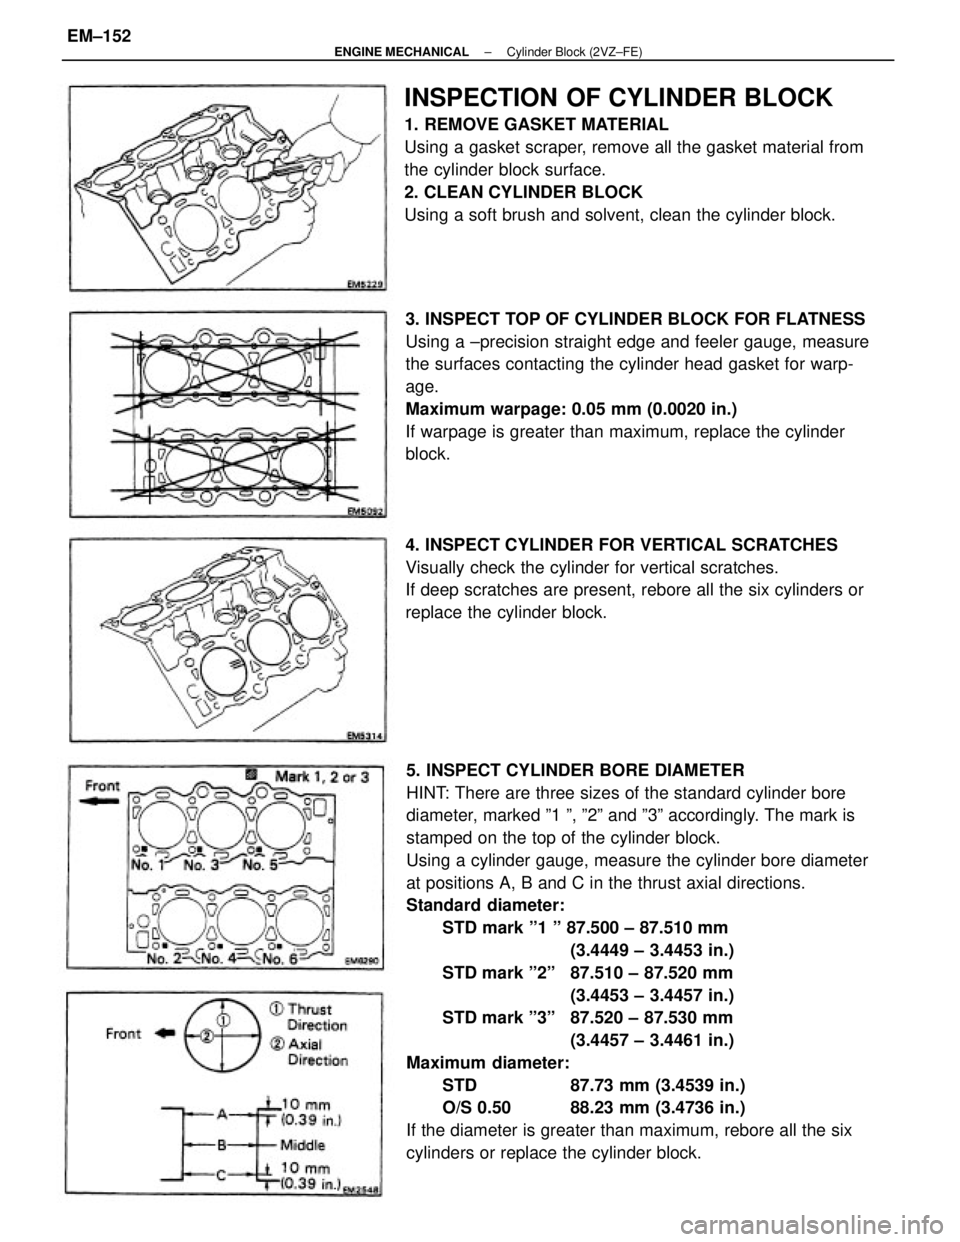
5. INSPECT CYLINDER BORE DIAMETER
HINT: There are three sizes of the standard cylinder bore
diameter, marked º1 º, º2º and º3º accordingly. The mark is
stamped on the top of the cylinder block.
Using a cylinder gauge, measure the cylinder bore diameter
at positions A, B and C in the thrust axial directions.
Standard diameter:
STD mark º1 º 87.500 ± 87.510 mm
(3.4449 ± 3.4453 in.)
STD mark º2º 87.510 ± 87.520 mm
(3.4453 ± 3.4457 in.)
STD mark º3º 87.520 ± 87.530 mm
(3.4457 ± 3.4461 in.)
Maximum diameter:
STD 87.73 mm (3.4539 in.)
O/S 0.50 88.23 mm (3.4736 in.)
If the diameter is greater than maximum, rebore all the six
cylinders or replace the cylinder block.
INSPECTION OF CYLINDER BLOCK
1. REMOVE GASKET MATERIAL
Using a gasket scraper, remove all the gasket material from
the cylinder block surface.
2. CLEAN CYLINDER BLOCK
Using a soft brush and solvent, clean the cylinder block.
3. INSPECT TOP OF CYLINDER BLOCK FOR FLATNESS
Using a ±precision straight edge and feeler gauge, measure
the surfaces contacting the cylinder head gasket for warp-
age.
Maximum warpage: 0.05 mm (0.0020 in.)
If warpage is greater than maximum, replace the cylinder
block.
4. INSPECT CYLINDER FOR VERTICAL SCRATCHES
Visually check the cylinder for vertical scratches.
If deep scratches are present, rebore all the six cylinders or
replace the cylinder block.
± ENGINE MECHANICALCylinder Block (2VZ±FE)EM±152
Page 1330 of 2389
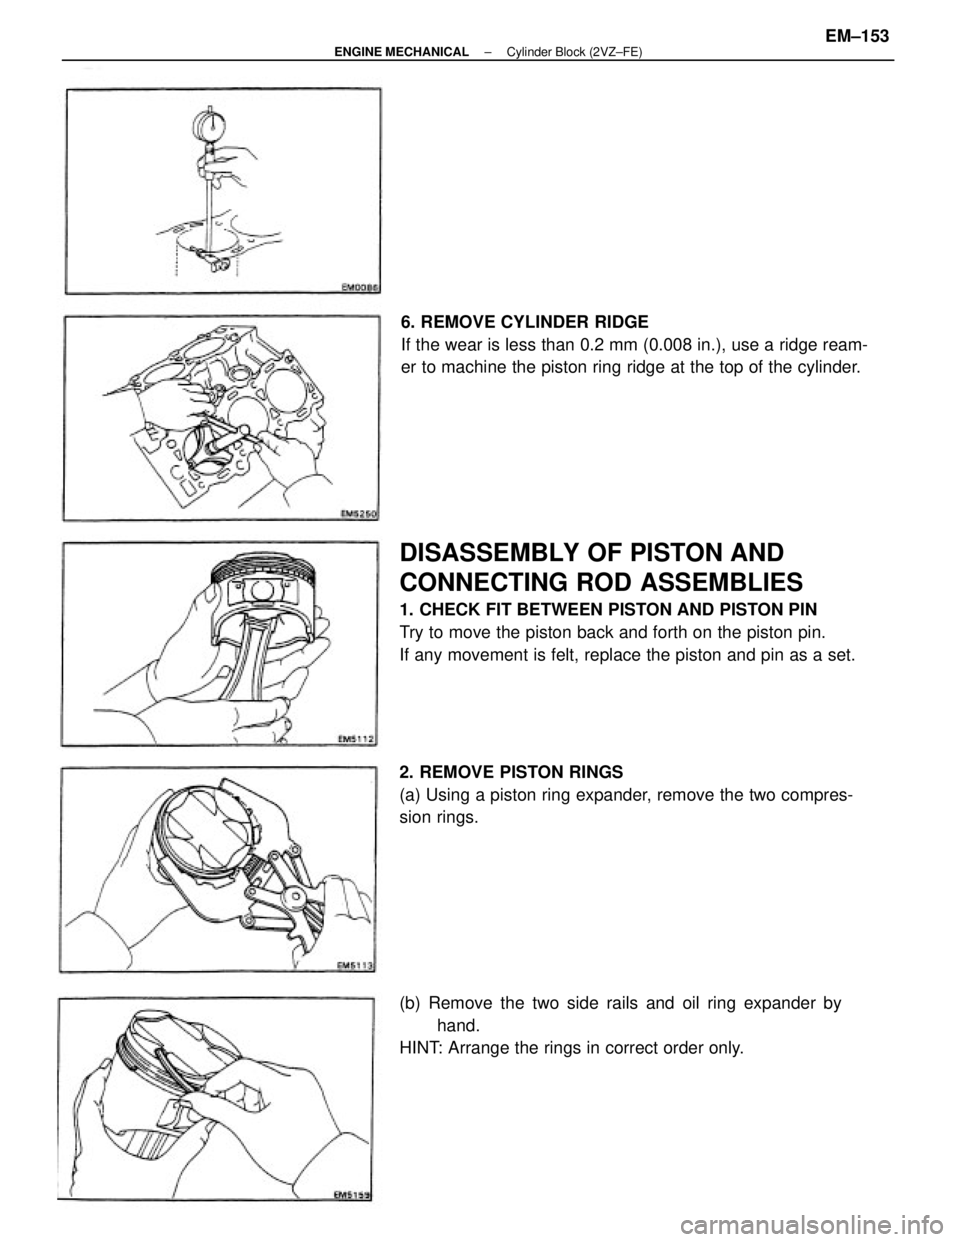
DISASSEMBLY OF PISTON AND
CONNECTING ROD ASSEMBLIES
1. CHECK FIT BETWEEN PISTON AND PISTON PIN
Try to move the piston back and forth on the piston pin.
If any movement is felt, replace the piston and pin as a set.6. REMOVE CYLINDER RIDGE
If the wear is less than 0.2 mm (0.008 in.), use a ridge ream-
er to machine the piston ring ridge at the top of the cylinder.
2. REMOVE PISTON RINGS
(a) Using a piston ring expander, remove the two compres-
sion rings.
(b) Remove the two side rails and oil ring expander by
hand.
HINT: Arrange the rings in correct order only.
± ENGINE MECHANICALCylinder Block (2VZ±FE)EM±153
Page 1333 of 2389
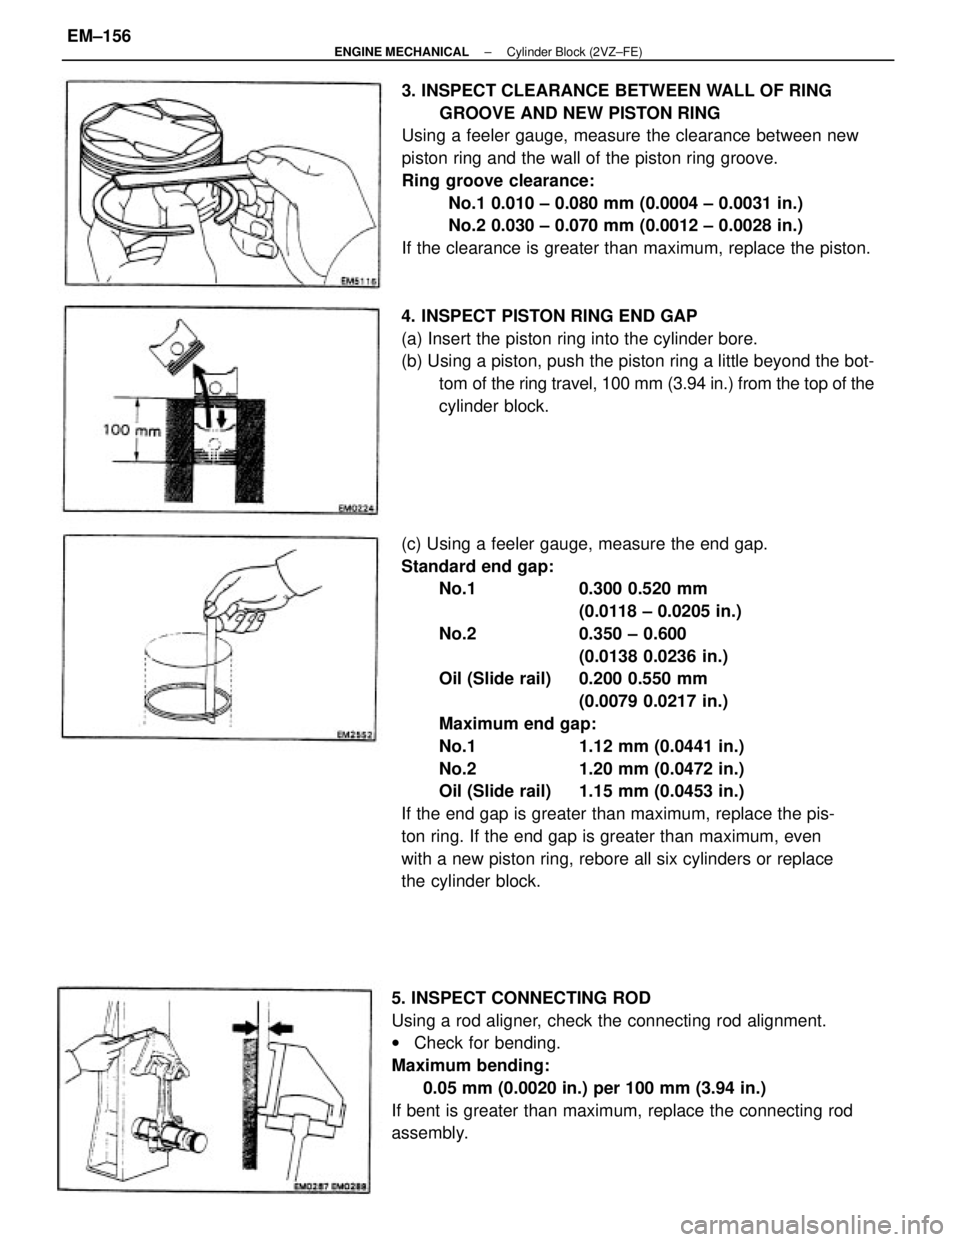
(c) Using a feeler gauge, measure the end gap.
Standard end gap:
No.1 0.300 0.520 mm
(0.0118 ± 0.0205 in.)
No.2 0.350 ± 0.600
(0.0138 0.0236 in.)
Oil (Slide rail) 0.200 0.550 mm
(0.0079 0.0217 in.)
Maximum end gap:
No.1 1.12 mm (0.0441 in.)
No.2 1.20 mm (0.0472 in.)
Oil (Slide rail) 1.15 mm (0.0453 in.)
If the end gap is greater than maximum, replace the pis-
ton ring. If the end gap is greater than maximum, even
with a new piston ring, rebore all six cylinders or replace
the cylinder block.3. INSPECT CLEARANCE BETWEEN WALL OF RING
GROOVE AND NEW PISTON RING
Using a feeler gauge, measure the clearance between new
piston ring and the wall of the piston ring groove.
Ring groove clearance:
No.1 0.010 ± 0.080 mm (0.0004 ± 0.0031 in.)
No.2 0.030 ± 0.070 mm (0.0012 ± 0.0028 in.)
If the clearance is greater than maximum, replace the piston.
5. INSPECT CONNECTING ROD
Using a rod aligner, check the connecting rod alignment.
wCheck for bending.
Maximum bending:
0.05 mm (0.0020 in.) per 100 mm (3.94 in.)
If bent is greater than maximum, replace the connecting rod
assembly.4. INSPECT PISTON RING END GAP
(a) Insert the piston ring into the cylinder bore.
(b) Using a piston, push the piston ring a little beyond the bot-
tom of the ring travel, 100 mm (3.94 in.) from the top of the
cylinder block.
± ENGINE MECHANICALCylinder Block (2VZ±FE)EM±156
Page 1334 of 2389
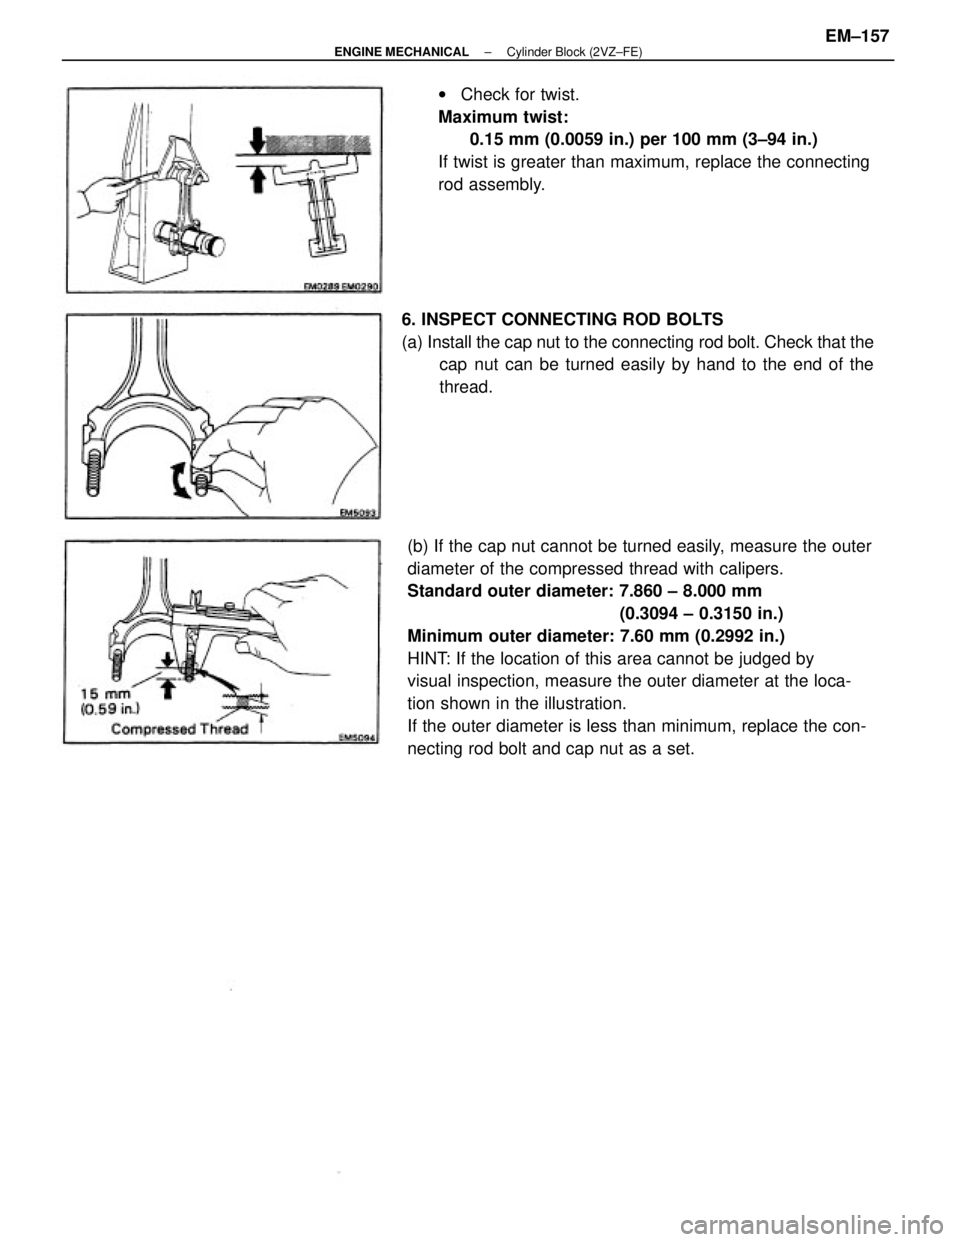
(b) If the cap nut cannot be turned easily, measure the outer
diameter of the compressed thread with calipers.
Standard outer diameter: 7.860 ± 8.000 mm
(0.3094 ± 0.3150 in.)
Minimum outer diameter: 7.60 mm (0.2992 in.)
HINT: If the location of this area cannot be judged by
visual inspection, measure the outer diameter at the loca-
tion shown in the illustration.
If the outer diameter is less than minimum, replace the con-
necting rod bolt and cap nut as a set.wCheck for twist.
Maximum twist:
0.15 mm (0.0059 in.) per 100 mm (3±94 in.)
If twist is greater than maximum, replace the connecting
rod assembly.
6. INSPECT CONNECTING ROD BOLTS
(a) Install the cap nut to the connecting rod bolt. Check that the
cap nut can be turned easily by hand to the end of the
thread.
± ENGINE MECHANICALCylinder Block (2VZ±FE)EM±157
Page 1336 of 2389
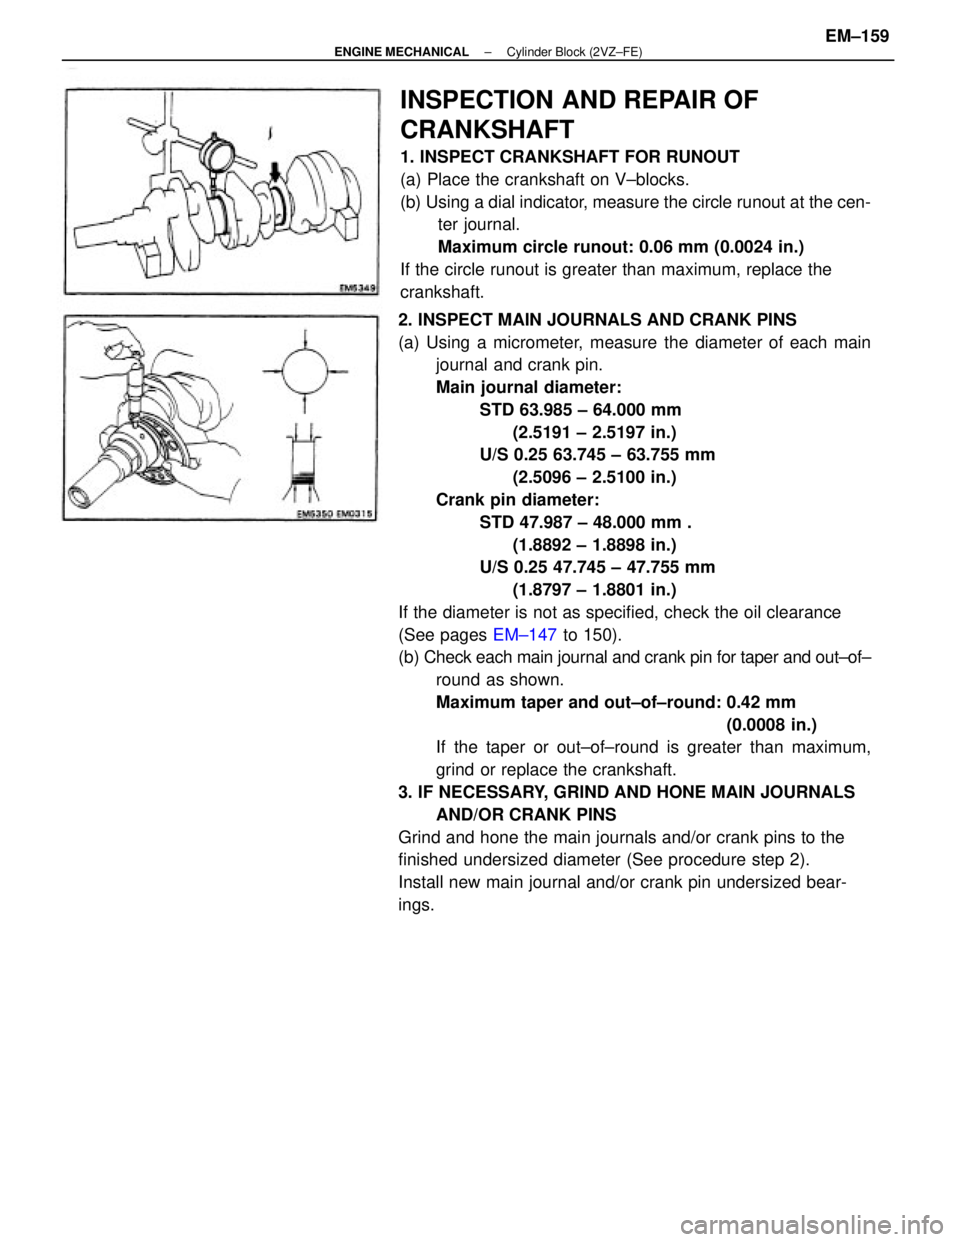
2. INSPECT MAIN JOURNALS AND CRANK PINS
(a) Using a micrometer, measure the diameter of each main
journal and crank pin.
Main journal diameter:
STD 63.985 ± 64.000 mm
(2.5191 ± 2.5197 in.)
U/S 0.25 63.745 ± 63.755 mm
(2.5096 ± 2.5100 in.)
Crank pin diameter:
STD 47.987 ± 48.000 mm .
(1.8892 ± 1.8898 in.)
U/S 0.25 47.745 ± 47.755 mm
(1.8797 ± 1.8801 in.)
If the diameter is not as specified, check the oil clearance
(See pages EM±147 to 150).
(b) Check each main journal and crank pin for taper and out±of±
round as shown.
Maximum taper and out±of±round: 0.42 mm
(0.0008 in.)
If the taper or out±of±round is greater than maximum,
grind or replace the crankshaft.
3. IF NECESSARY, GRIND AND HONE MAIN JOURNALS
AND/OR CRANK PINS
Grind and hone the main journals and/or crank pins to the
finished undersized diameter (See procedure step 2).
Install new main journal and/or crank pin undersized bear-
ings.
INSPECTION AND REPAIR OF
CRANKSHAFT
1. INSPECT CRANKSHAFT FOR RUNOUT
(a) Place the crankshaft on V±blocks.
(b) Using a dial indicator, measure the circle runout at the cen-
ter journal.
Maximum circle runout: 0.06 mm (0.0024 in.)
If the circle runout is greater than maximum, replace the
crankshaft.
± ENGINE MECHANICALCylinder Block (2VZ±FE)EM±159
Page 1339 of 2389
ASSEMBLY OF PISTON AND CONNECTING
ROD ASSEMBLIES
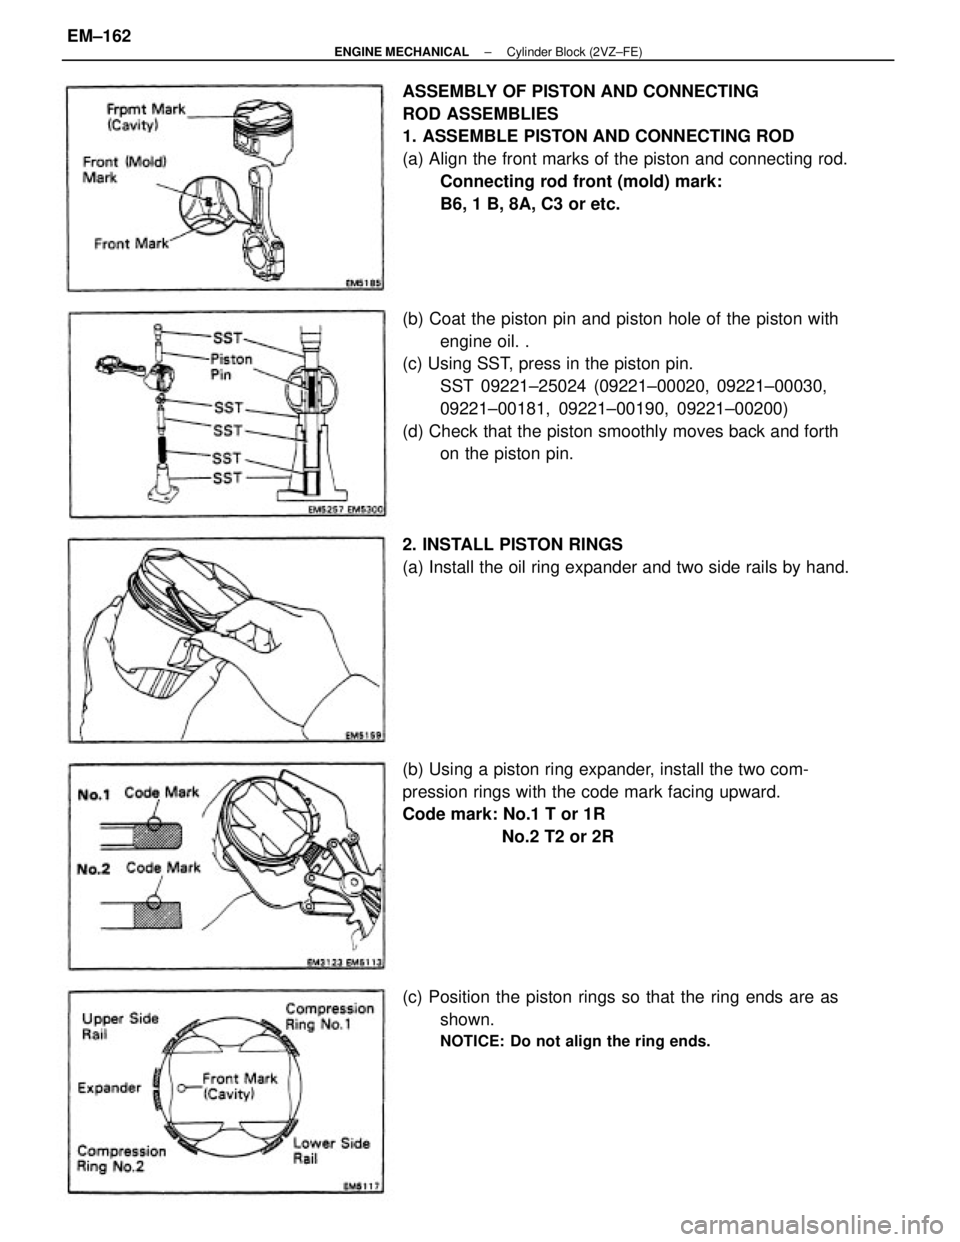
1. ASSEMBLE PISTON AND CONNECTING ROD
(a) Align the front marks of the piston and connecting rod.
Connecting rod front (mold) mark:
B6, 1 B, 8A, C3 or etc.
(b) Coat the piston pin and piston hole of the piston with
engine oil. .
(c) Using SST, press in the piston pin.
SST 09221±25024 (09221±00020, 09221±00030,
09221±00181, 09221±00190, 09221±00200)
(d) Check that the piston smoothly moves back and forth
on the piston pin.
(b) Using a piston ring expander, install the two com-
pression rings with the code mark facing upward.
Code mark: No.1 T or 1R
No.2 T2 or 2R 2. INSTALL PISTON RINGS
(a) Install the oil ring expander and two side rails by hand.
(c) Position the piston rings so that the ring ends are as
shown.
NOTICE: Do not align the ring ends.
± ENGINE MECHANICALCylinder Block (2VZ±FE)EM±162
Page 1341 of 2389
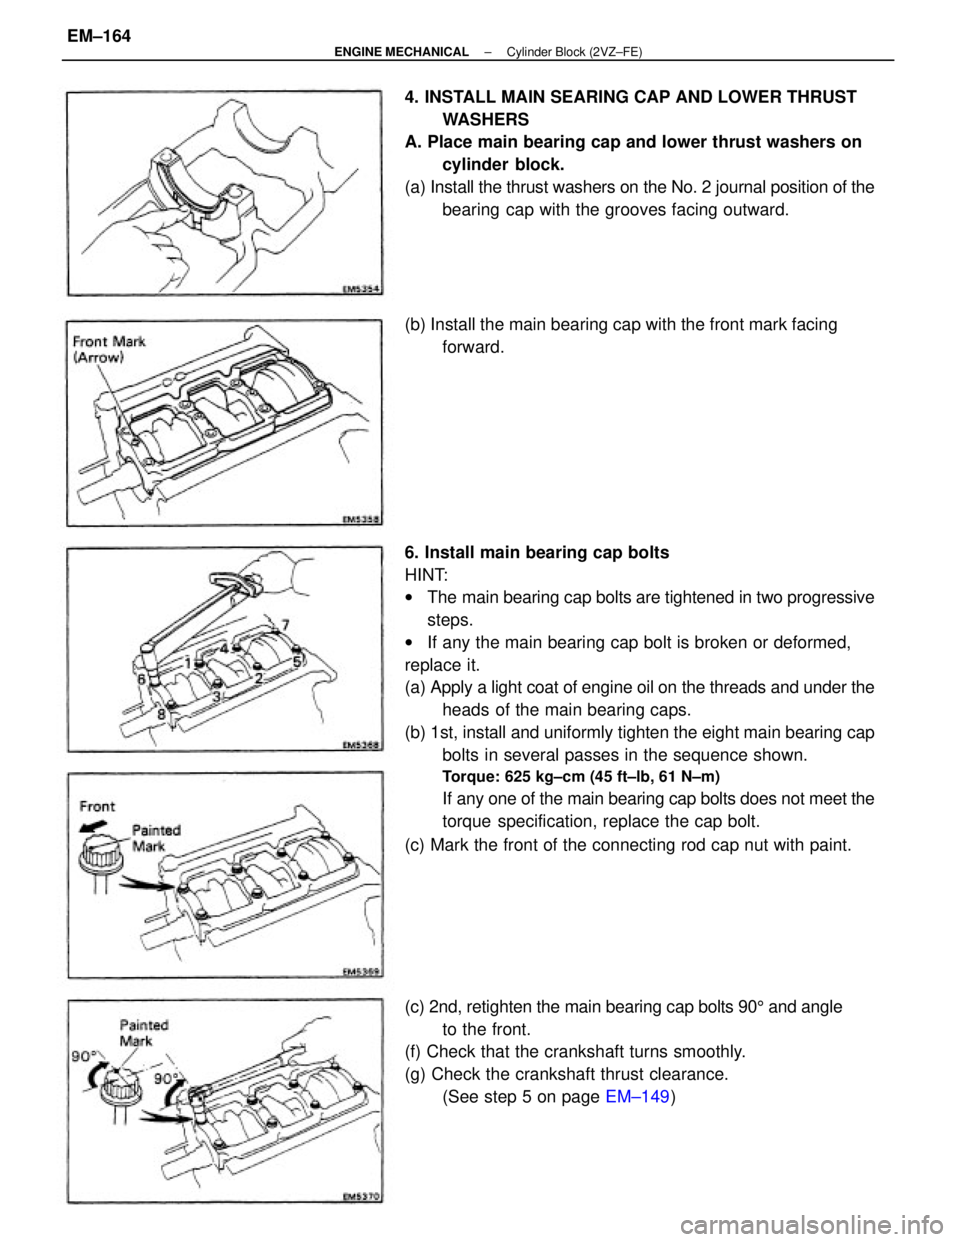
6. Install main bearing cap bolts
HINT:
wThe main bearing cap bolts are tightened in two progressive
steps.
wIf any the main bearing cap bolt is broken or deformed,
replace it.
(a) Apply a light coat of engine oil on the threads and under the
heads of the main bearing caps.
(b) 1st, install and uniformly tighten the eight main bearing cap
bolts in several passes in the sequence shown.
Torque: 625 kg±cm (45 ft±lb, 61 N±m)
If any one of the main bearing cap bolts does not meet the
torque specification, replace the cap bolt.
(c) Mark the front of the connecting rod cap nut with paint. 4. INSTALL MAIN SEARING CAP AND LOWER THRUST
WASHERS
A. Place main bearing cap and lower thrust washers on
cylinder block.
(a) Install the thrust washers on the No. 2 journal position of the
bearing cap with the grooves facing outward.
(c) 2nd, retighten the main bearing cap bolts 905 and angle
to the front.
(f) Check that the crankshaft turns smoothly.
(g) Check the crankshaft thrust clearance.
(See step 5 on page EM±149) (b) Install the main bearing cap with the front mark facing
forward.
± ENGINE MECHANICALCylinder Block (2VZ±FE)EM±164
Page 1343 of 2389
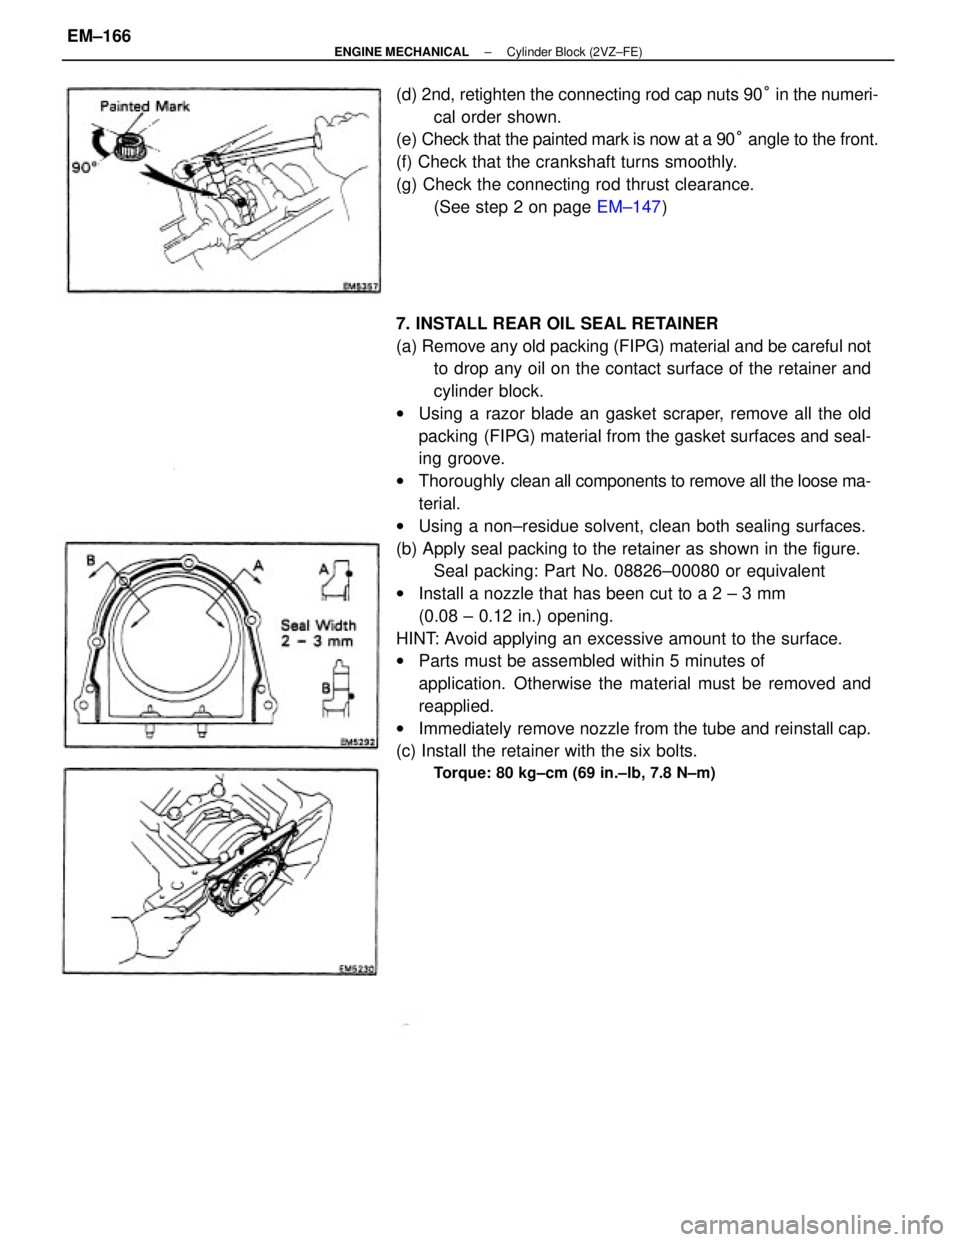
7. INSTALL REAR OIL SEAL RETAINER
(a) Remove any old packing (FIPG) material and be careful not
to drop any oil on the contact surface of the retainer and
cylinder block.
wUsing a razor blade an gasket scraper, remove all the old
packing (FIPG) material from the gasket surfaces and seal-
ing groove.
wThoroughly clean all components to remove all the loose ma-
terial.
wUsing a non±residue solvent, clean both sealing surfaces.
(b) Apply seal packing to the retainer as shown in the figure.
Seal packing: Part No. 08826±00080 or equivalent
wInstall a nozzle that has been cut to a 2 ± 3 mm
(0.08 ± 0.12 in.) opening.
HINT: Avoid applying an excessive amount to the surface.
wParts must be assembled within 5 minutes of
application. Otherwise the material must be removed and
reapplied.
wImmediately remove nozzle from the tube and reinstall cap.
(c) Install the retainer with the six bolts.
Torque: 80 kg±cm (69 in.±lb, 7.8 N±m)
(d) 2nd, retighten the connecting rod cap nuts 90° in the numeri-
cal order shown.
(e) Check that the painted mark is now at a 90° angle to the front.
(f) Check that the crankshaft turns smoothly.
(g) Check the connecting rod thrust clearance.
(See step 2 on page EM±147)
± ENGINE MECHANICALCylinder Block (2VZ±FE)EM±166