TOYOTA CAMRY V20 1986 Service Information
Manufacturer: TOYOTA, Model Year: 1986, Model line: CAMRY V20, Model: TOYOTA CAMRY V20 1986Pages: 2389, PDF Size: 84.44 MB
Page 971 of 2389
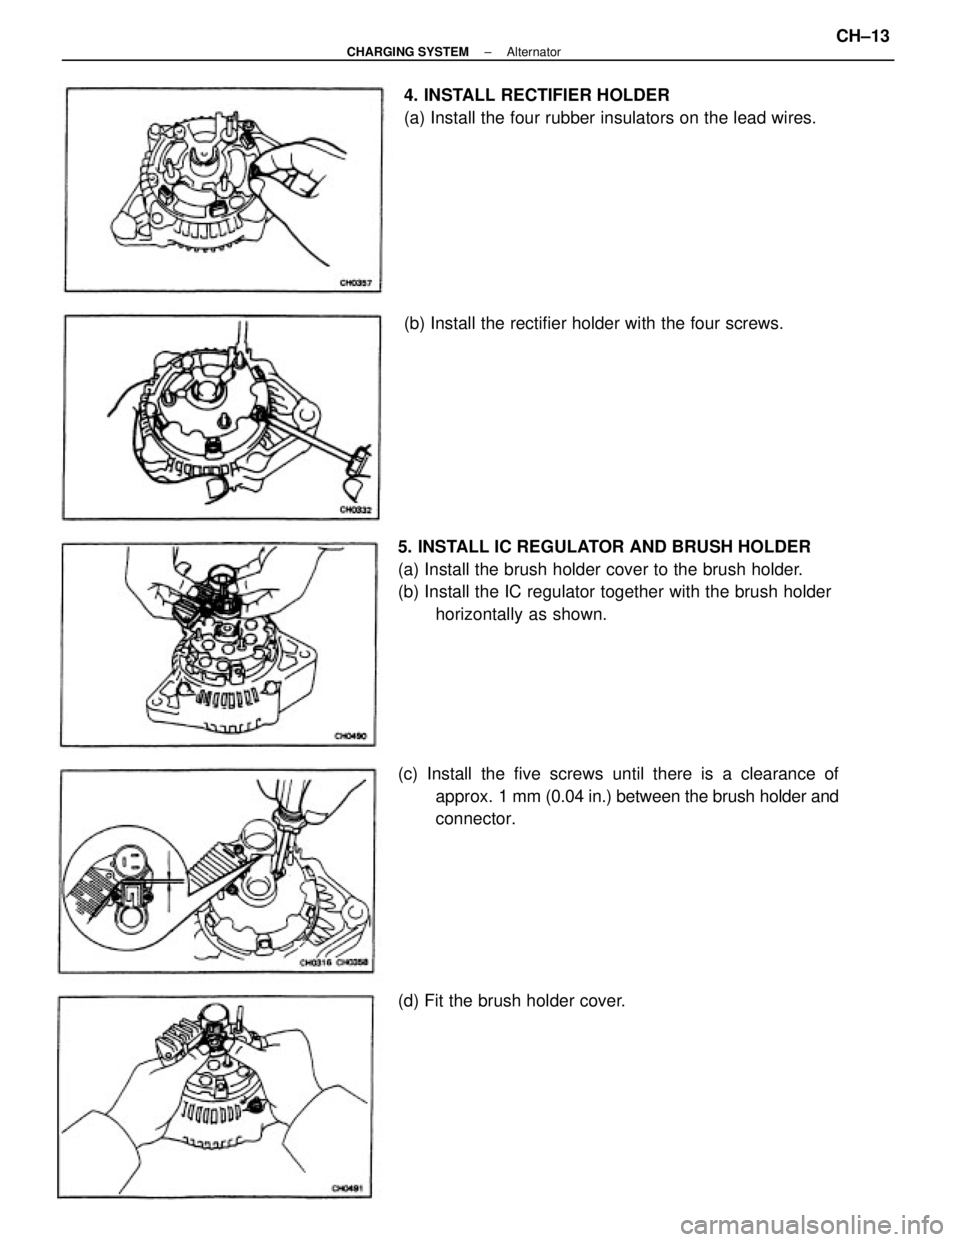
5. INSTALL IC REGULATOR AND BRUSH HOLDER
(a) Install the brush holder cover to the brush holder.
(b) Install the IC regulator together with the brush holder
horizontally as shown.
(c) Install the five screws until there is a clearance of
approx. 1 mm (0.04 in.) between the brush holder and
connector. 4. INSTALL RECTIFIER HOLDER
(a) Install the four rubber insulators on the lead wires.
(b) Install the rectifier holder with the four screws.
(d) Fit the brush holder cover.
± CHARGING SYSTEMAlternatorCH±13
Page 972 of 2389
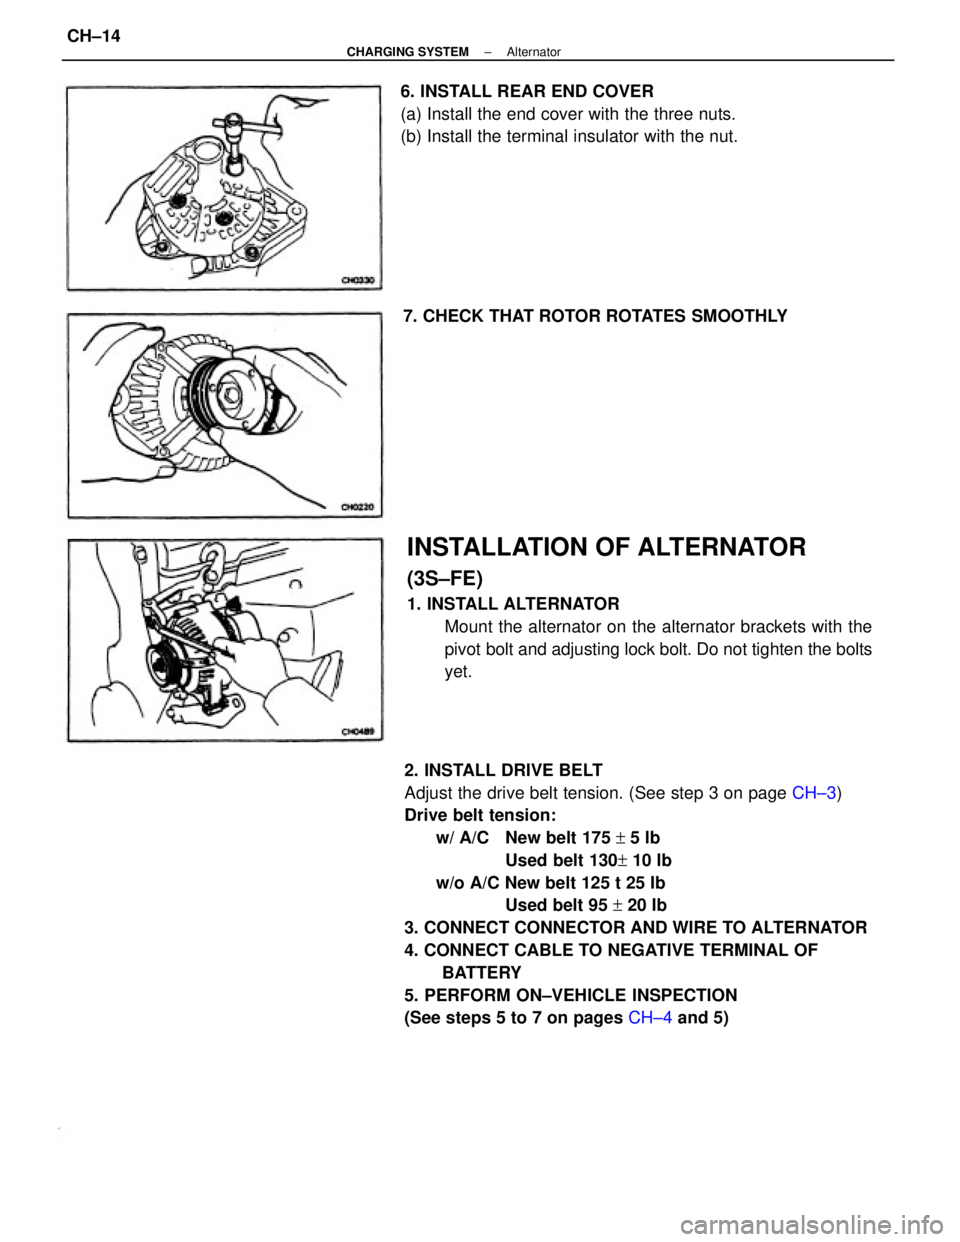
2. INSTALL DRIVE BELT
Adjust the drive belt tension. (See step 3 on page CH±3)
Drive belt tension:
w/ A/C New belt 175 + 5 lb
Used belt 130+ 10 lb
w/o A/C New belt 125 t 25 Ib
Used belt 95 + 20 Ib
3. CONNECT CONNECTOR AND WIRE TO ALTERNATOR
4. CONNECT CABLE TO NEGATIVE TERMINAL OF
BATTERY
5. PERFORM ON±VEHICLE INSPECTION
(See steps 5 to 7 on pages CH±4 and 5)
INSTALLATION OF ALTERNATOR
(3S±FE)
1. INSTALL ALTERNATOR
Mount the alternator on the alternator brackets with the
pivot bolt and adjusting lock bolt. Do not tighten the bolts
yet. 6. INSTALL REAR END COVER
(a) Install the end cover with the three nuts.
(b) Install the terminal insulator with the nut.
7. CHECK THAT ROTOR ROTATES SMOOTHLY
± CHARGING SYSTEMAlternatorCH±14
Page 973 of 2389
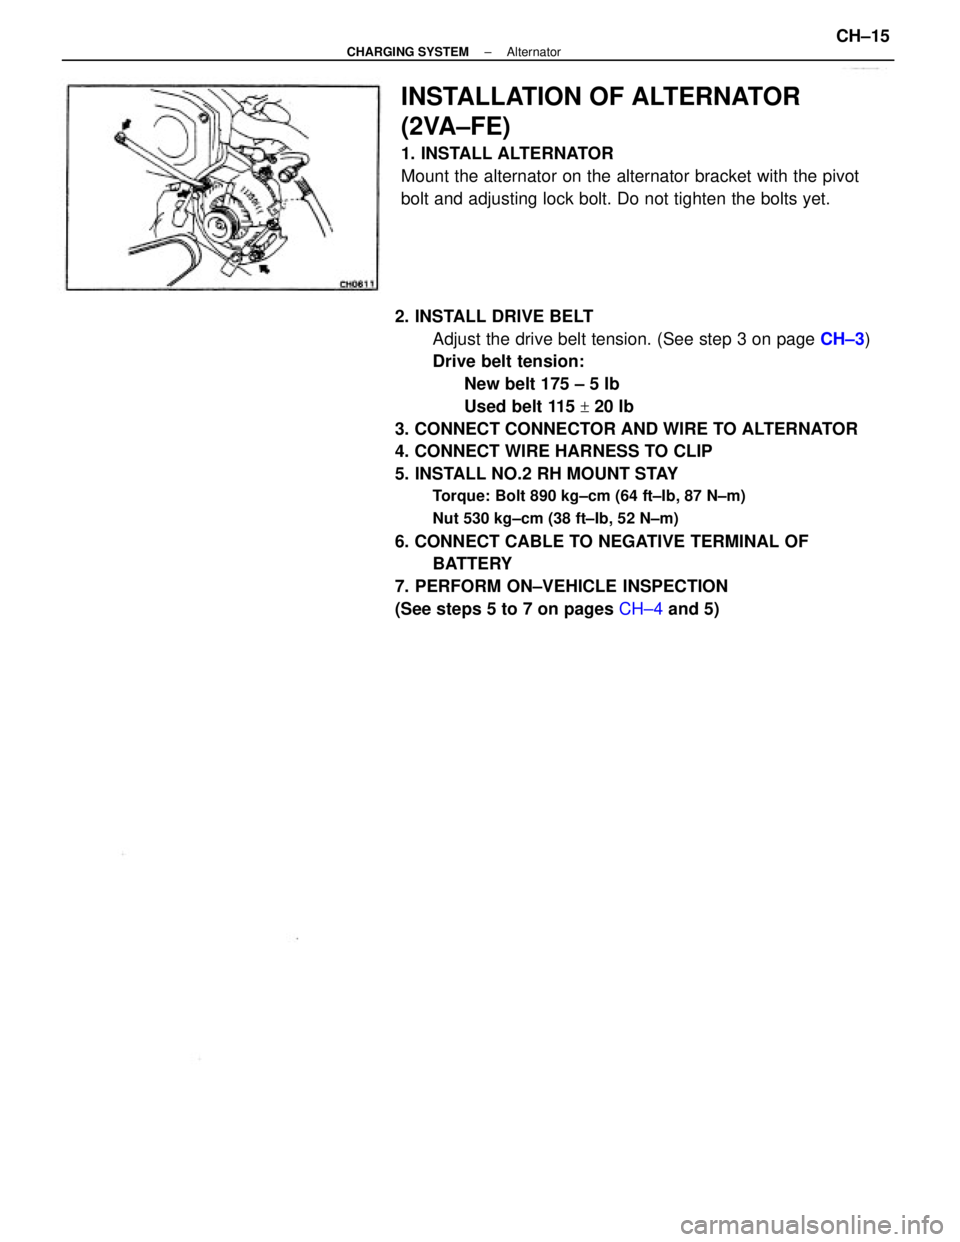
2. INSTALL DRIVE BELT
Adjust the drive belt tension. (See step 3 on page CH±3)
Drive belt tension:
New belt 175 ± 5 Ib
Used belt 115
+ 20 Ib
3. CONNECT CONNECTOR AND WIRE TO ALTERNATOR
4. CONNECT WIRE HARNESS TO CLIP
5. INSTALL NO.2 RH MOUNT STAY
Torque: Bolt 890 kg±cm (64 ft±Ib, 87 N±m)
Nut 530 kg±cm (38 ft±Ib, 52 N±m)
6. CONNECT CABLE TO NEGATIVE TERMINAL OF
BATTERY
7. PERFORM ON±VEHICLE INSPECTION
(See steps 5 to 7 on pages CH±4 and 5)
INSTALLATION OF ALTERNATOR
(2VA±FE)
1. INSTALL ALTERNATOR
Mount the alternator on the alternator bracket with the pivot
bolt and adjusting lock bolt. Do not tighten the bolts yet.
± CHARGING SYSTEMAlternatorCH±15
Page 974 of 2389
CLUTCH
CLUTCHCL±1
Page 975 of 2389
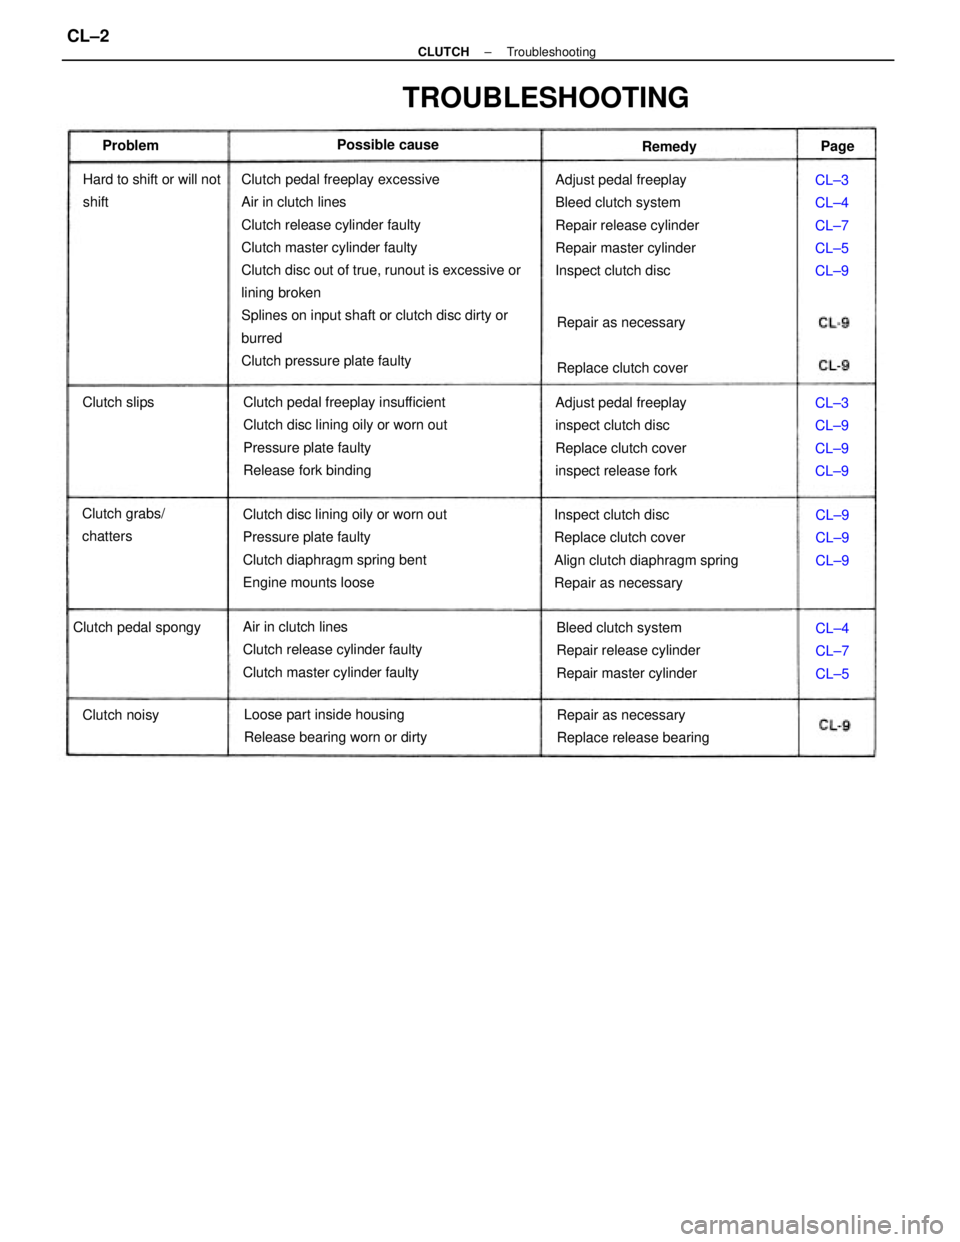
Clutch pedal freeplay excessive
Air in clutch lines
Clutch release cylinder faulty
Clutch master cylinder faulty
Clutch disc out of true, runout is excessive or
lining broken
Splines on input shaft or clutch disc dirty or
burred
Clutch pressure plate faulty
Clutch disc lining oily or worn out
Pressure plate faulty
Clutch diaphragm spring bent
Engine mounts looseClutch pedal freeplay insufficient
Clutch disc lining oily or worn out
Pressure plate faulty
Release fork binding
Inspect clutch disc
Replace clutch cover
Align clutch diaphragm spring
Repair as necessaryAdjust pedal freeplay
Bleed clutch system
Repair release cylinder
Repair master cylinder
Inspect clutch disc
Air in clutch lines
Clutch release cylinder faulty
Clutch master cylinder faultyAdjust pedal freeplay
inspect clutch disc
Replace clutch cover
inspect release fork
Bleed clutch system
Repair release cylinder
Repair master cylinder
Loose part inside housing
Release bearing worn or dirtyRepair as necessary
Replace clutch cover
TROUBLESHOOTING
Repair as necessary
Replace release bearing Hard to shift or will not
shiftCL±3
CL±4
CL±7
CL±5
CL±9
Clutch pedal spongyClutch grabs/
chattersCL±3
CL±9
CL±9
CL±9
CL±9
CL±9
CL±9
CL±4
CL±7
CL±5 Possible cause
Clutch noisy Clutch slipsProblem
RemedyPage
± CLUTCHTroubleshootingCL±2
Page 976 of 2389
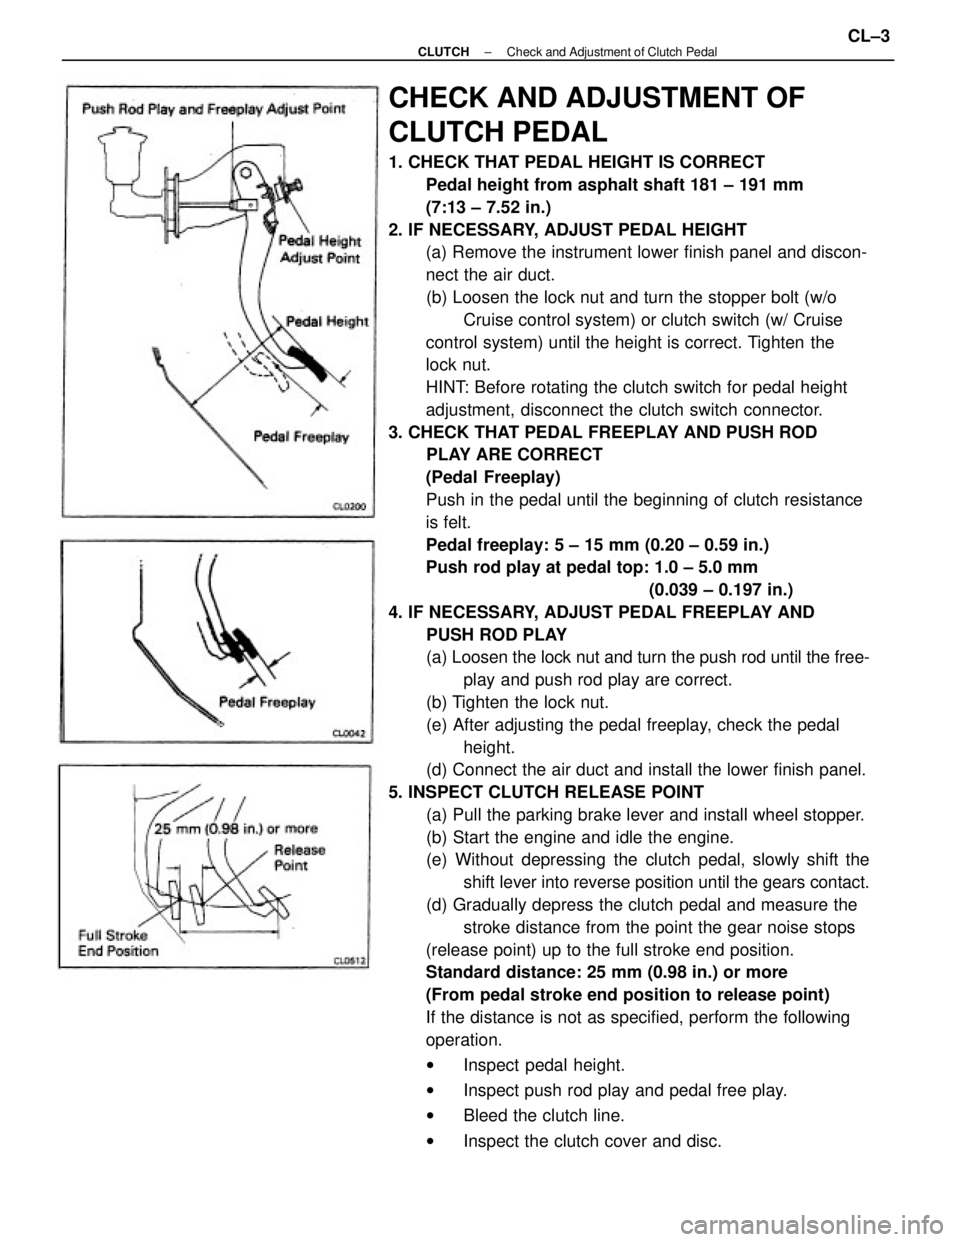
CHECK AND ADJUSTMENT OF
CLUTCH PEDAL
1. CHECK THAT PEDAL HEIGHT IS CORRECT
Pedal height from asphalt shaft 181 ± 191 mm
(7:13 ± 7.52 in.)
2. IF NECESSARY, ADJUST PEDAL HEIGHT
(a) Remove the instrument lower finish panel and discon-
nect the air duct.
(b) Loosen the lock nut and turn the stopper bolt (w/o
Cruise control system) or clutch switch (w/ Cruise
control system) until the height is correct. Tighten the
lock nut.
HINT: Before rotating the clutch switch for pedal height
adjustment, disconnect the clutch switch connector.
3. CHECK THAT PEDAL FREEPLAY AND PUSH ROD
PLAY ARE CORRECT
(Pedal Freeplay)
Push in the pedal until the beginning of clutch resistance
is felt.
Pedal freeplay: 5 ± 15 mm (0.20 ± 0.59 in.)
Push rod play at pedal top: 1.0 ± 5.0 mm
(0.039 ± 0.197 in.)
4. IF NECESSARY, ADJUST PEDAL FREEPLAY AND
PUSH ROD PLAY
(a) Loosen the lock nut and turn the push rod until the free-
play and push rod play are correct.
(b) Tighten the lock nut.
(e) After adjusting the pedal freeplay, check the pedal
height.
(d) Connect the air duct and install the lower finish panel.
5. INSPECT CLUTCH RELEASE POINT
(a) Pull the parking brake lever and install wheel stopper.
(b) Start the engine and idle the engine.
(e) Without depressing the clutch pedal, slowly shift the
shift lever into reverse position until the gears contact.
(d) Gradually depress the clutch pedal and measure the
stroke distance from the point the gear noise stops
(release point) up to the full stroke end position.
Standard distance: 25 mm (0.98 in.) or more
(From pedal stroke end position to release point)
If the distance is not as specified, perform the following
operation.
wInspect pedal height.
wInspect push rod play and pedal free play.
wBleed the clutch line.
wInspect the clutch cover and disc.
± CLUTCHCheck and Adjustment of Clutch PedalCL±3
Page 977 of 2389
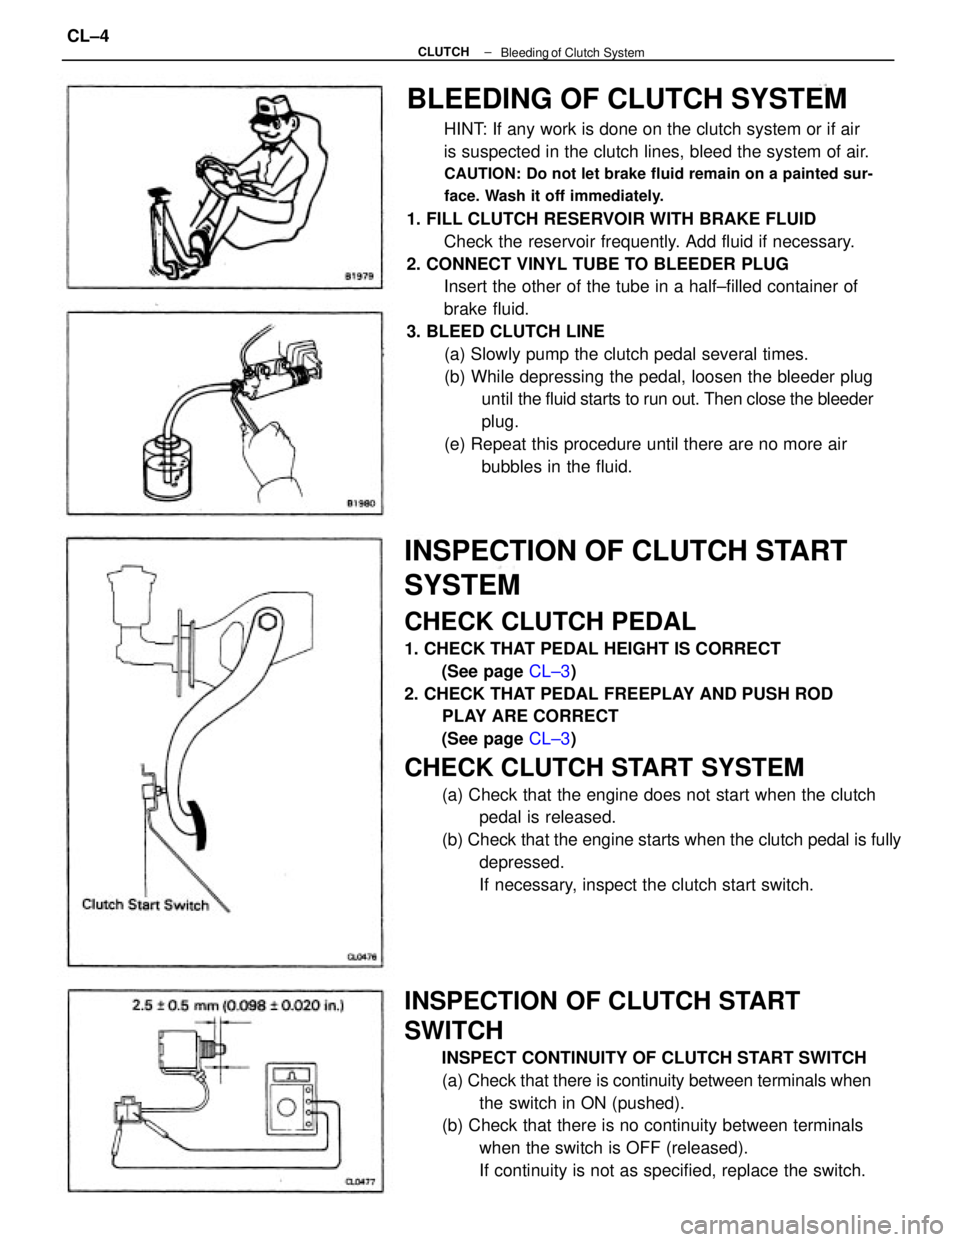
BLEEDING OF CLUTCH SYSTEM
HINT: If any work is done on the clutch system or if air
is suspected in the clutch lines, bleed the system of air.
CAUTION: Do not let brake fluid remain on a painted sur-
face. Wash it off immediately.
1. FILL CLUTCH RESERVOIR WITH BRAKE FLUID
Check the reservoir frequently. Add fluid if necessary.
2. CONNECT VINYL TUBE TO BLEEDER PLUG
Insert the other of the tube in a half±filled container of
brake fluid.
3. BLEED CLUTCH LINE
(a) Slowly pump the clutch pedal several times.
(b) While depressing the pedal, loosen the bleeder plug
until the fluid starts to run out. Then close the bleeder
plug.
(e) Repeat this procedure until there are no more air
bubbles in the fluid.
INSPECTION OF CLUTCH START
SYSTEM
CHECK CLUTCH PEDAL
1. CHECK THAT PEDAL HEIGHT IS CORRECT
(See page CL±3)
2. CHECK THAT PEDAL FREEPLAY AND PUSH ROD
PLAY ARE CORRECT
(See page CL±3)
CHECK CLUTCH START SYSTEM
(a) Check that the engine does not start when the clutch
pedal is released.
(b) Check that the engine starts when the clutch pedal is fully
depressed.
If necessary, inspect the clutch start switch.
INSPECTION OF CLUTCH START
SWITCH
INSPECT CONTINUITY OF CLUTCH START SWITCH
(a) Check that there is continuity between terminals when
the switch in ON (pushed).
(b) Check that there is no continuity between terminals
when the switch is OFF (released).
If continuity is not as specified, replace the switch.
± CLUTCH
Bleeding of Clutch SystemCL±4
Page 978 of 2389
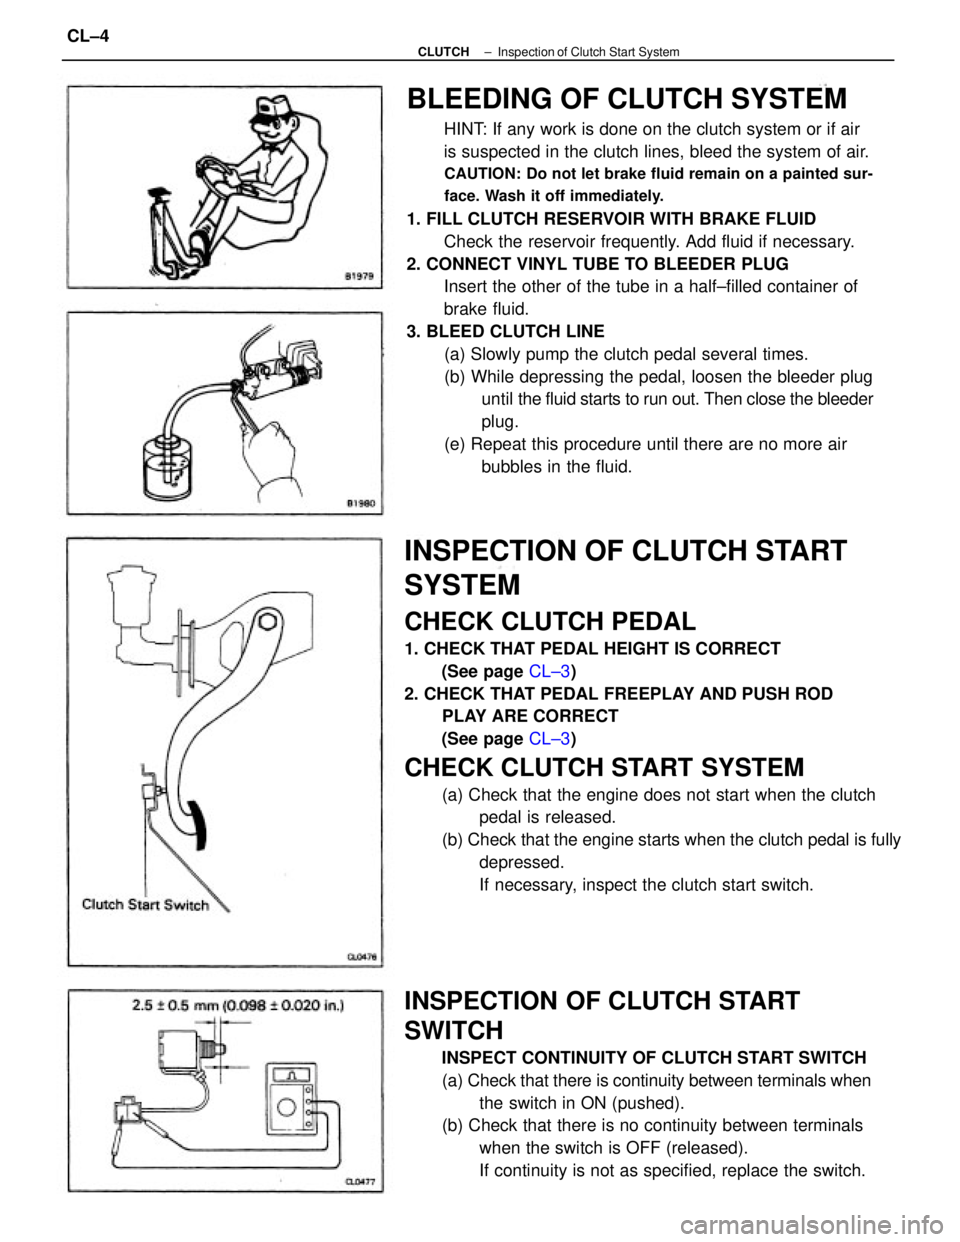
BLEEDING OF CLUTCH SYSTEM
HINT: If any work is done on the clutch system or if air
is suspected in the clutch lines, bleed the system of air.
CAUTION: Do not let brake fluid remain on a painted sur-
face. Wash it off immediately.
1. FILL CLUTCH RESERVOIR WITH BRAKE FLUID
Check the reservoir frequently. Add fluid if necessary.
2. CONNECT VINYL TUBE TO BLEEDER PLUG
Insert the other of the tube in a half±filled container of
brake fluid.
3. BLEED CLUTCH LINE
(a) Slowly pump the clutch pedal several times.
(b) While depressing the pedal, loosen the bleeder plug
until the fluid starts to run out. Then close the bleeder
plug.
(e) Repeat this procedure until there are no more air
bubbles in the fluid.
INSPECTION OF CLUTCH START
SYSTEM
CHECK CLUTCH PEDAL
1. CHECK THAT PEDAL HEIGHT IS CORRECT
(See page CL±3)
2. CHECK THAT PEDAL FREEPLAY AND PUSH ROD
PLAY ARE CORRECT
(See page CL±3)
CHECK CLUTCH START SYSTEM
(a) Check that the engine does not start when the clutch
pedal is released.
(b) Check that the engine starts when the clutch pedal is fully
depressed.
If necessary, inspect the clutch start switch.
INSPECTION OF CLUTCH START
SWITCH
INSPECT CONTINUITY OF CLUTCH START SWITCH
(a) Check that there is continuity between terminals when
the switch in ON (pushed).
(b) Check that there is no continuity between terminals
when the switch is OFF (released).
If continuity is not as specified, replace the switch.
± CLUTCHInspection of Clutch Start SystemCL±4
Page 979 of 2389
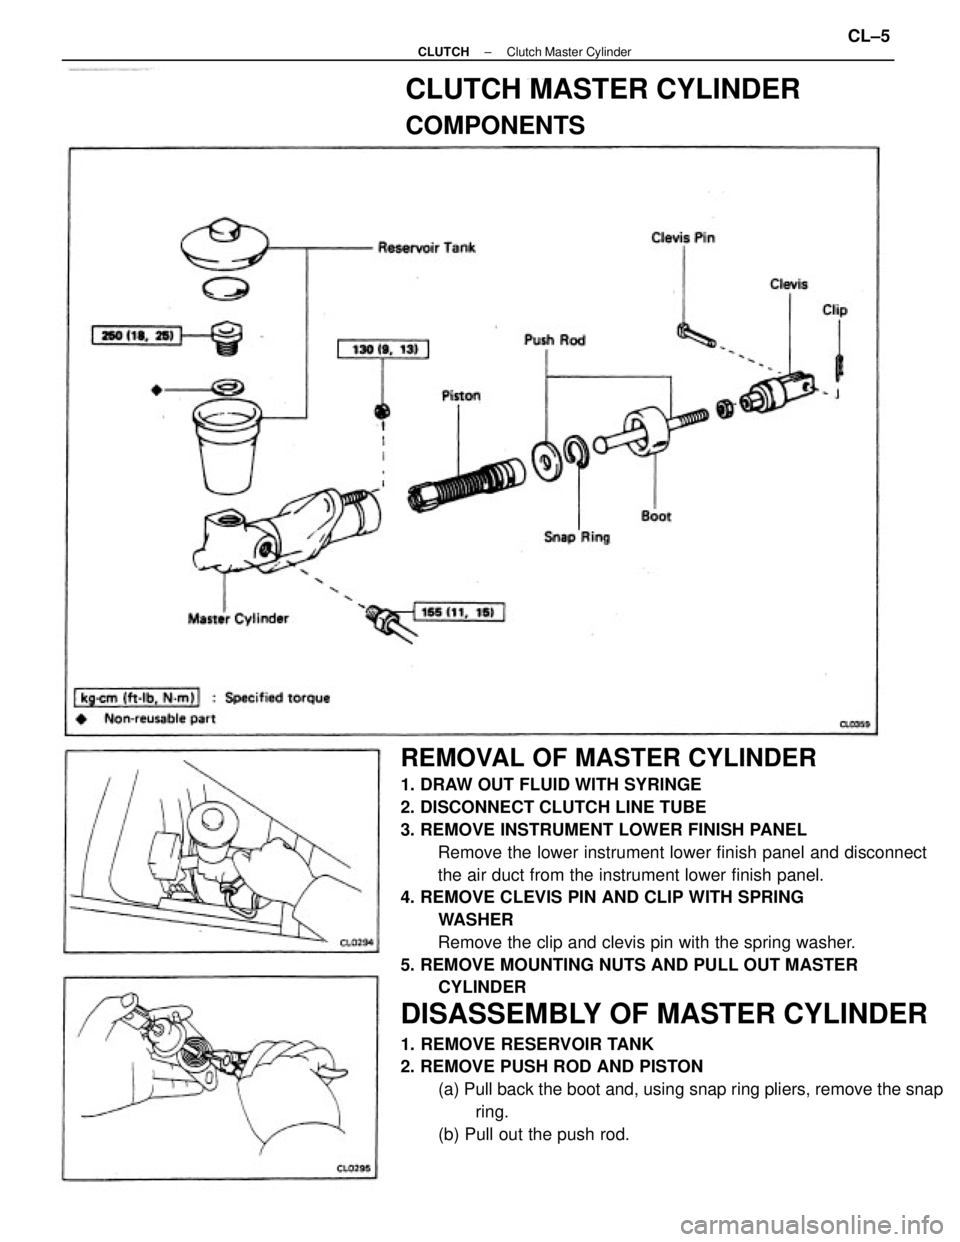
REMOVAL OF MASTER CYLINDER
1. DRAW OUT FLUID WITH SYRINGE
2. DISCONNECT CLUTCH LINE TUBE
3. REMOVE INSTRUMENT LOWER FINISH PANEL
Remove the lower instrument lower finish panel and disconnect
the air duct from the instrument lower finish panel.
4. REMOVE CLEVIS PIN AND CLIP WITH SPRING
WASHER
Remove the clip and clevis pin with the spring washer.
5. REMOVE MOUNTING NUTS AND PULL OUT MASTER
CYLINDER
DISASSEMBLY OF MASTER CYLINDER
1. REMOVE RESERVOIR TANK
2. REMOVE PUSH ROD AND PISTON
(a) Pull back the boot and, using snap ring pliers, remove the snap
ring.
(b) Pull out the push rod.
CLUTCH MASTER CYLINDER
COMPONENTS
± CLUTCHClutch Master CylinderCL±5
Page 980 of 2389
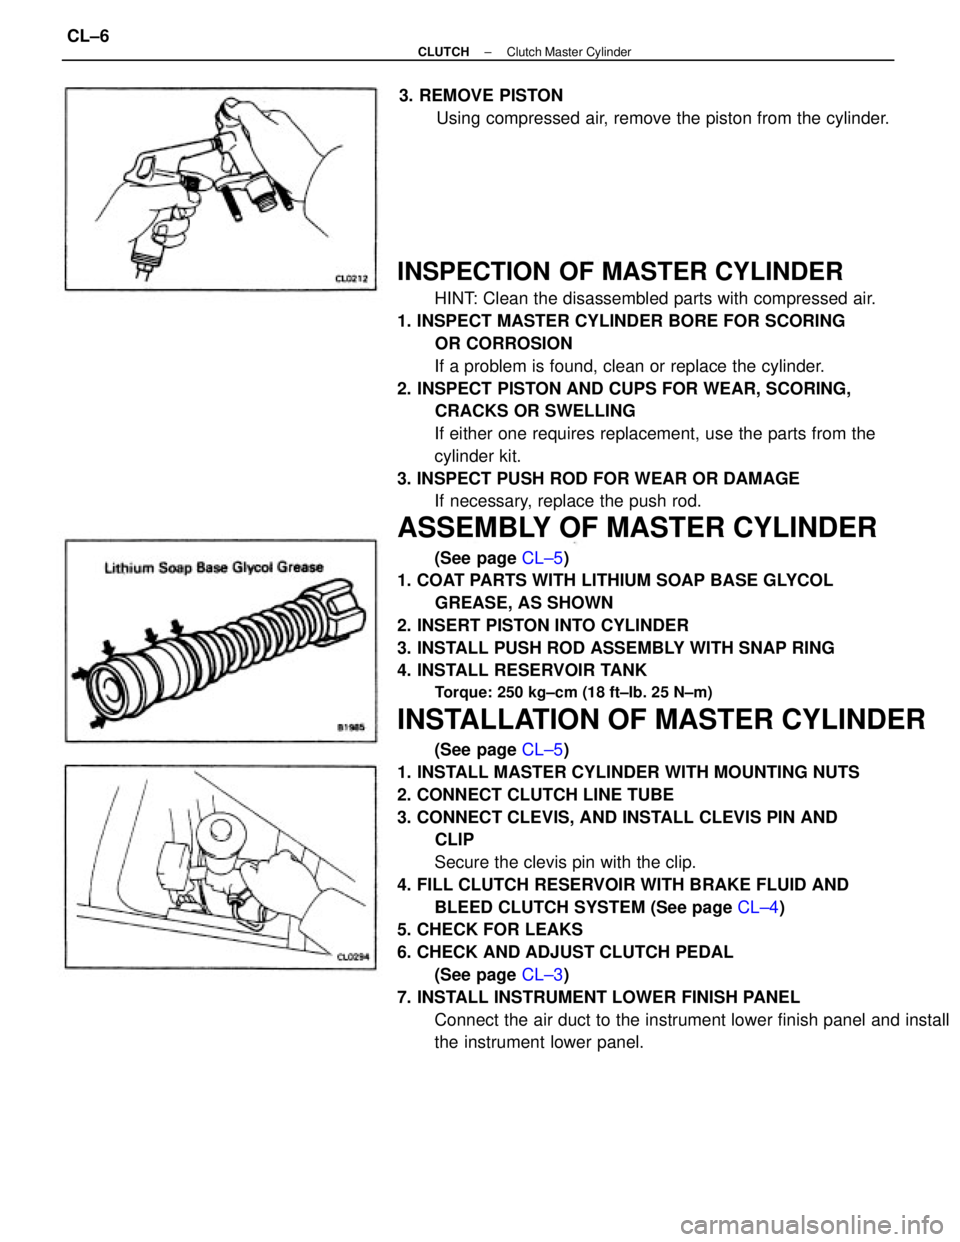
INSPECTION OF MASTER CYLINDER
HINT: Clean the disassembled parts with compressed air.
1. INSPECT MASTER CYLINDER BORE FOR SCORING
OR CORROSION
If a problem is found, clean or replace the cylinder.
2. INSPECT PISTON AND CUPS FOR WEAR, SCORING,
CRACKS OR SWELLING
If either one requires replacement, use the parts from the
cylinder kit.
3. INSPECT PUSH ROD FOR WEAR OR DAMAGE
If necessary, replace the push rod.
ASSEMBLY OF MASTER CYLINDER
(See page CL±5)
1. COAT PARTS WITH LITHIUM SOAP BASE GLYCOL
GREASE, AS SHOWN
2. INSERT PISTON INTO CYLINDER
3. INSTALL PUSH ROD ASSEMBLY WITH SNAP RING
4. INSTALL RESERVOIR TANK
Torque: 250 kg±cm (18 ft±Ib. 25 N±m)
INSTALLATION OF MASTER CYLINDER
(See page CL±5)
1. INSTALL MASTER CYLINDER WITH MOUNTING NUTS
2. CONNECT CLUTCH LINE TUBE
3. CONNECT CLEVIS, AND INSTALL CLEVIS PIN AND
CLIP
Secure the clevis pin with the clip.
4. FILL CLUTCH RESERVOIR WITH BRAKE FLUID AND
BLEED CLUTCH SYSTEM (See page CL±4)
5. CHECK FOR LEAKS
6. CHECK AND ADJUST CLUTCH PEDAL
(See page CL±3)
7. INSTALL INSTRUMENT LOWER FINISH PANEL
Connect the air duct to the instrument lower finish panel and install
the instrument lower panel. 3. REMOVE PISTON
Using compressed air, remove the piston from the cylinder.
± CLUTCHClutch Master CylinderCL±6