warning light TOYOTA COROLLA 2023 Owners Manual
[x] Cancel search | Manufacturer: TOYOTA, Model Year: 2023, Model line: COROLLA, Model: TOYOTA COROLLA 2023Pages: 468, PDF Size: 14.4 MB
Page 2 of 468
2TABLE OF CONTENTS
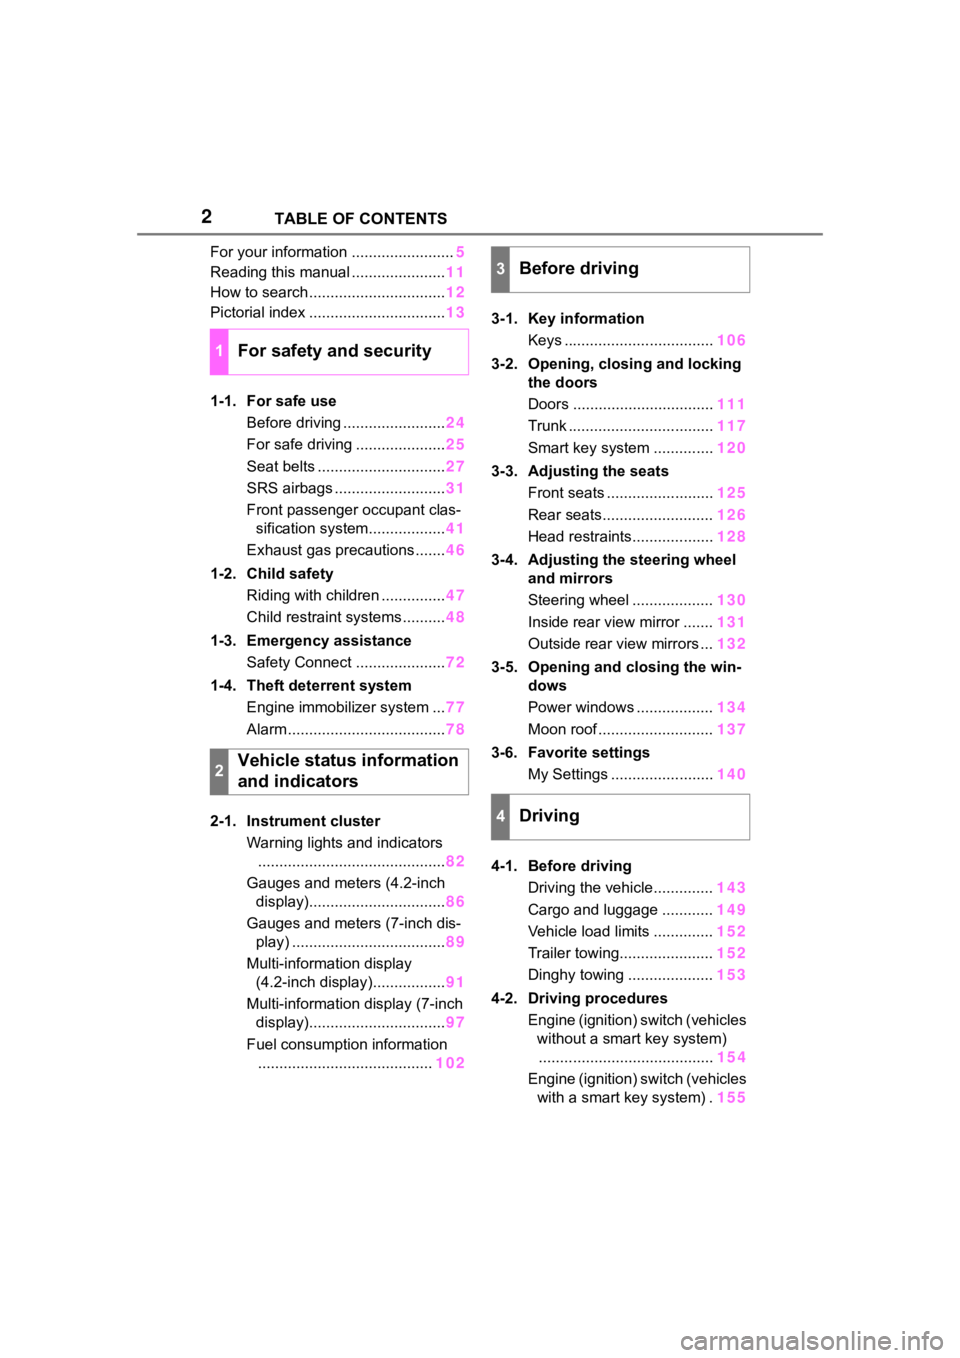
For your information ........................5
Reading this manual ...................... 11
How to search ................................ 12
Pictorial index ................................ 13
1-1. For safe use Before driving ........................ 24
For safe driving ..................... 25
Seat belts .............................. 27
SRS airbags .......................... 31
Front passenger occupant clas- sification system.................. 41
Exhaust gas precautions....... 46
1-2. Child safety Riding with children ............... 47
Child restraint systems .......... 48
1-3. Emergency assistance Safety Connect ..................... 72
1-4. Theft deterrent system Engine immobilizer system ... 77
Alarm ..................................... 78
2-1. Instrument cluster Warning lights and indicators............................................ 82
Gauges and meters (4.2-inch display)................................ 86
Gauges and meters (7-inch dis- play) .................................... 89
Multi-information display (4.2-inch display)................. 91
Multi-information display (7-inch display)................................ 97
Fuel consumption information ......................................... 1023-1. Key information
Keys ................................... 106
3-2. Opening, closing and locking the doors
Doors ................................. 111
Trunk .................................. 117
Smart key system .............. 120
3-3. Adjusting the seats Front seats ......................... 125
Rear seats.......................... 126
Head restraints................... 128
3-4. Adjusting the steering wheel and mirrors
Steering wheel ................... 130
Inside rear view mirror ....... 131
Outside rear view mirrors ... 132
3-5. Opening and closing the win- dows
Power windows .................. 134
Moon roof ........................... 137
3-6. Favorite settings My Settings ........................ 140
4-1. Before driving Driving the vehicle.............. 143
Cargo and luggage ............ 149
Vehicle load limits .............. 152
Trailer towing...................... 152
Dinghy towing .................... 153
4-2. Driving procedures Engine (ignition) switch (vehicles without a smart key system)........ ................................. 154
Eng
ine (ignition) switch (vehicles
with a smart key system) . 155
1For safety and security
2Vehicle status information
and indicators
3Before driving
4Driving
Page 4 of 468
4TABLE OF CONTENTS
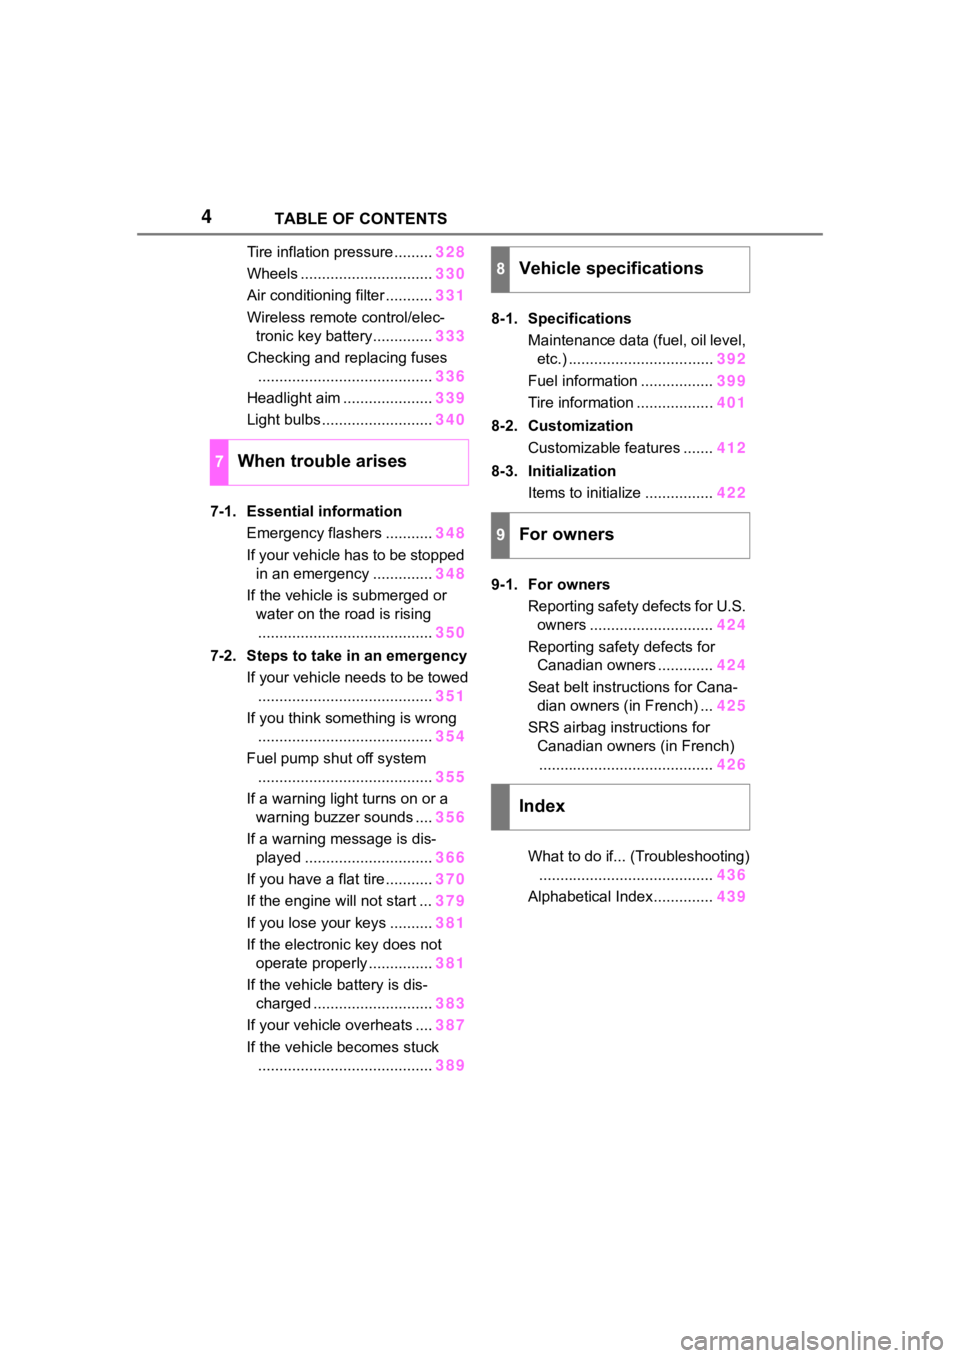
Tire inflation pressure.........328
Wheels ............................... 330
Air conditioning filter ........... 331
Wireless remote control/elec- tronic key battery.............. 333
Checking and replacing fuses ......................................... 336
Headlight aim ..................... 339
Light bulbs .......................... 340
7-1. Essential information Emergency flashers ........... 348
If your vehicle has to be stopped in an emergency .............. 348
If the vehicle is submerged or water on the road is rising......................................... 350
7-2. Steps to take in an emergency If your vehicle needs to be towed......................................... 351
If you think something is wrong ......................................... 354
Fuel pump shut off system ......................................... 355
If a warning light turns on or a warning buzzer sounds .... 356
If a warning message is dis- played .............................. 366
If you have a flat tire ........... 370
If the engine will not start ... 379
If you lose your keys .......... 381
If the electronic key does not operate properly ............... 381
If the vehicle battery is dis- charged ............................ 383
If your vehicle overheats .... 387
If the vehicle becomes stuck ......................................... 3898-1. Specifications
Maintenance data (fuel, oil level, etc.) .................................. 392
Fuel information ................. 399
Tire information .................. 401
8-2. Customization Customizable features ....... 412
8-3. Initialization Items to initialize ................ 422
9-1. For owners Reporting safety defects for U.S. owners ............................. 424
Reporting safety defects for Canadian owners ............. 424
Seat belt instructions for Cana- dian owners (in French) ... 425
SRS airbag instructions for Canadian owners (in French)......................................... 426
What to do if... (Troubleshooting) ......................................... 436
Alphabetical Index.............. 439
7When trouble arises
8Vehicle specifications
9For owners
Index
Page 14 of 468
14Pictorial index
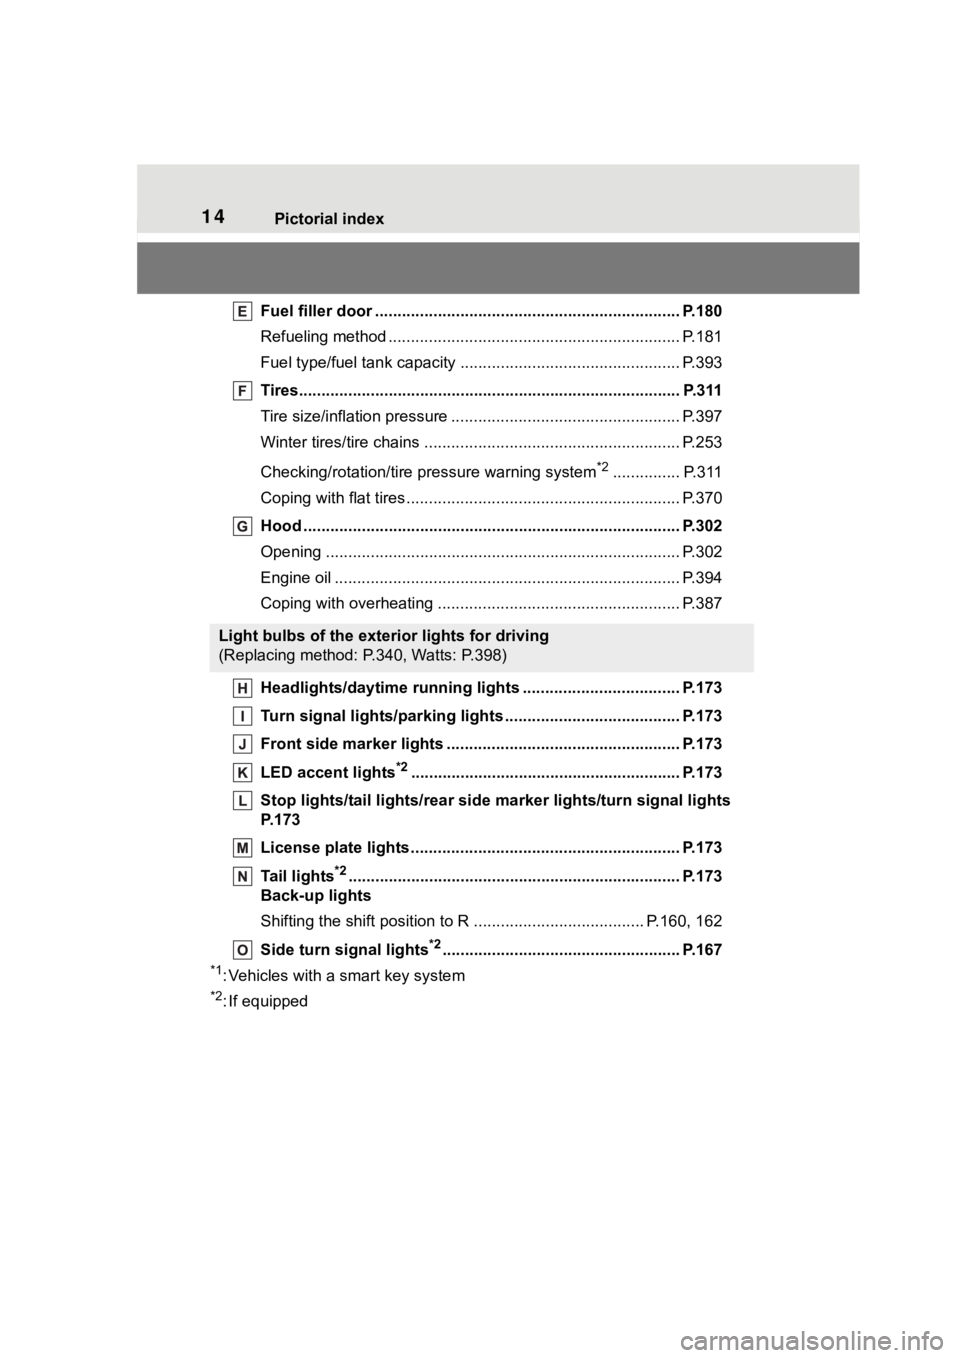
Fuel filler door .................................................................... P.180
Refueling method ............................................... .................. P.181
Fuel type/fuel tan k capacity ................................... .............. P.393
Tires..................................................................................... P.311
Tire size/inflation pressure ................................... ................ P.397
Winter tires/tire chains ....................................... .................. P.253
Checking/rotation/tire pressure warning system
*2............... P.311
Coping with flat tires......................................... .................... P.370
Hood ........................................................... ......................... P.302
Opening ............................................................................... P.302
Engine oil ..................................................... ........................ P.394
Coping with overheating ...................................................... P.387
Headlights/daytime running lights .............................. ..... P.173
Turn signal lights/parking lights .............................. ......... P.173
Front side marker lights ....................................... ............. P.173
LED accent lights
*2............................................................ P.1 73
Stop lights/tail lights/rear side marker lights/turn signal lig hts
P. 1 7 3
License plate lights........................................... ................. P.173
Tail lights
*2............................................................... ........... P.173
Back-up lights
Shifting the shift position to R ............................... ....... P.160, 162
Side turn signal lights
*2..................................................... P.167
*1: Vehicles with a smart key system
*2: If equipped
Light bulbs of the exterior lights for driving
(Replacing method: P.340, Watts: P.398)
Page 15 of 468
15Pictorial index
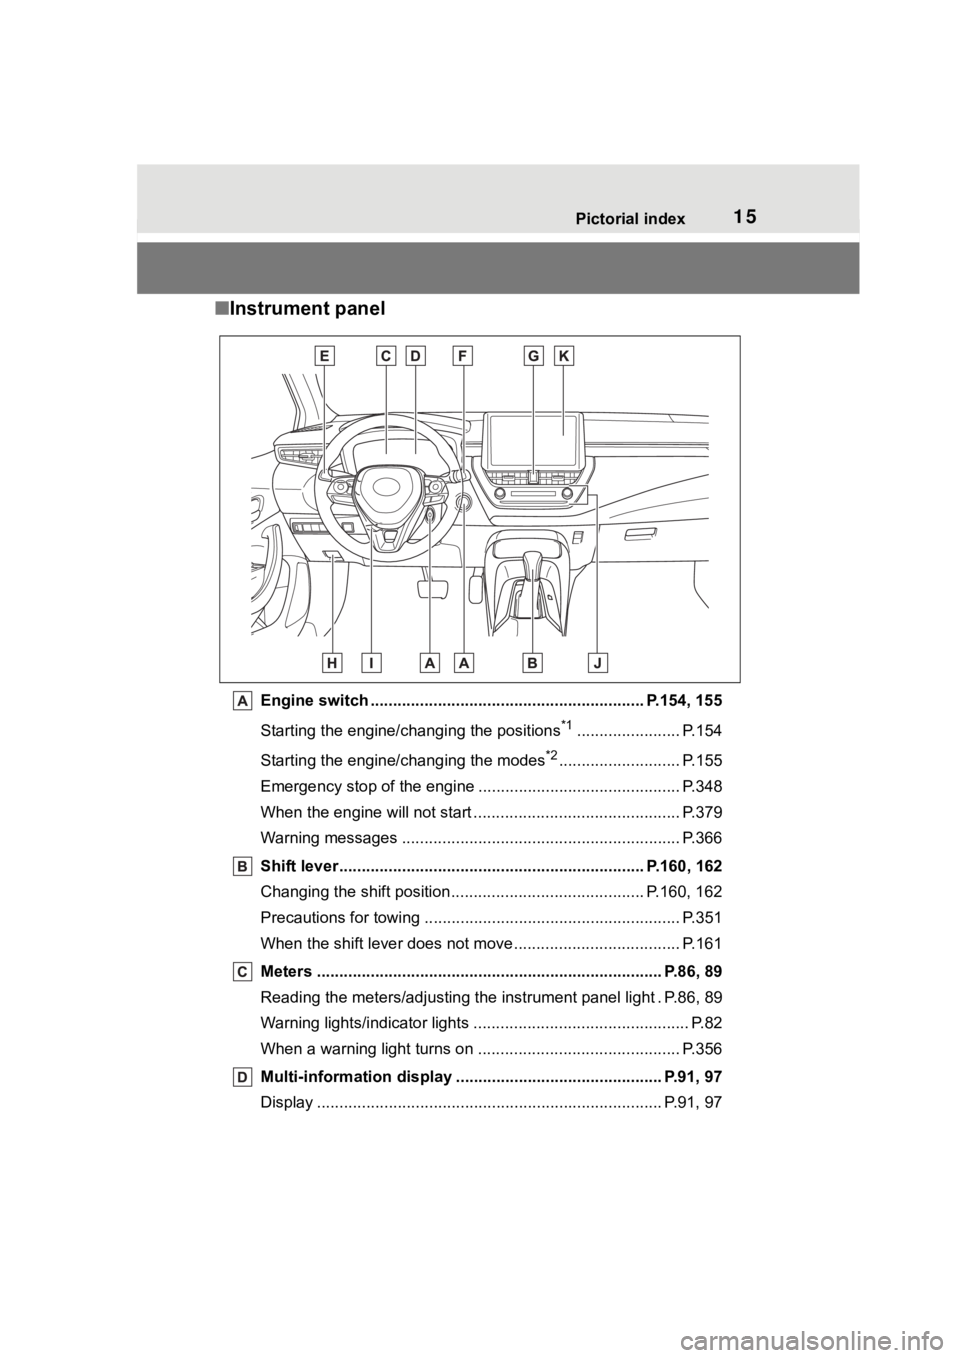
■Instrument panel
Engine switch ............................................................. P.154, 155
Starting the engine/changing the positions
*1....................... P.154
Starting the engine/changing the modes
*2........................... P.155
Emergency stop of the engin e ............................................. P.348
When the engine will not start ................................. ............. P.379
Warning messages ............................................... ............... P.366
Shift lever.................................................... ................ P.160, 162
Changing the shift position.................................... ....... P.160, 162
Precautions for towing .. ....................................... ................ P.351
When the shift lever does not move............................. ........ P.161
Meters ............................................................................. P.86, 89
Reading the meters/adjusting the instrument panel light . P.86, 8 9
Warning lights/indicator lights ................................ ................ P.82
When a warning light turns on .................................. ........... P.356
Multi-information display . ............................................. P.91, 97
Display ........................................................ ..................... P.91, 97
Page 16 of 468
16Pictorial index
When a warning message is displayed ................................ P.366
Turn signal lever.............................................. ................... P.167
Headlight switch ............................................... ................. P.173
Headlights/parking lights/tail lig hts/side marker lights/daytime run-
ning lights/LED accent lights
*3............................................. P.173
Windshield wiper and washer switch............................... P.178
Usage................................................................................... P.178
Adding washer fluid .............................................................. P.310
Emergency flasher switch ....................................... .......... P.348
Hood lock release lever ........................................ ............. P.302
Tilt and telescopic steering lock release lever ................P. 1 3 0
Air conditioning system ............................. ............... P.258, 263
Usage.......................................................... ................. P.258, 263
Rear window defogger ........................................... ...... P.260, 265
Audio system
*4
*1
: Vehicles without a smart key system
*2: Vehicles with a smart key system
*3: If equipped
*4: Refer to “MULTIMEDIA OWNER’S MANUAL”.
Page 25 of 468
251-1. For safe use
1
For safety and security
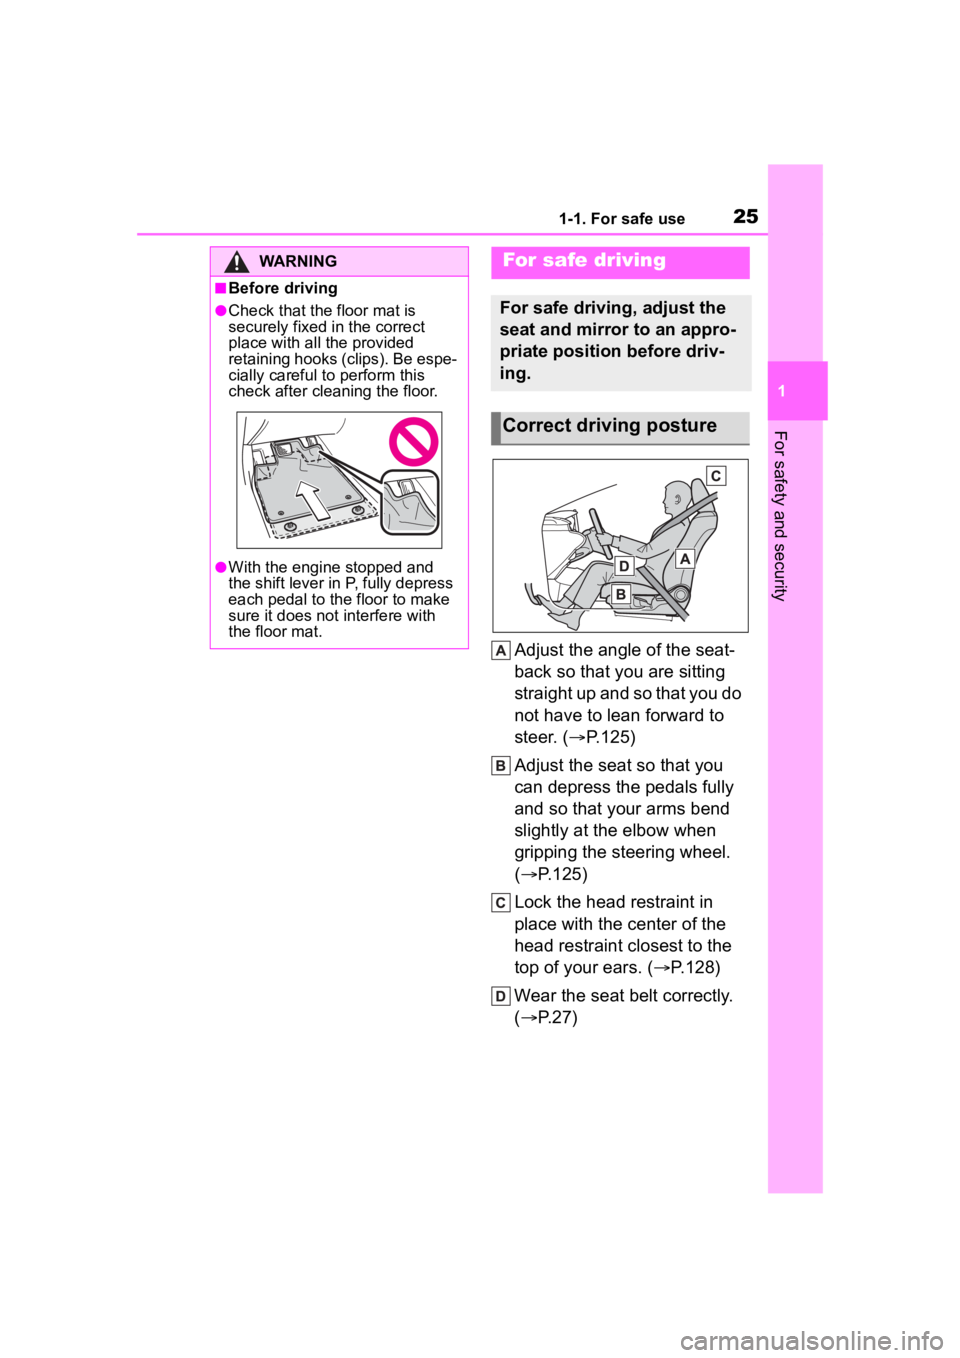
Adjust the angle of the seat-
back so that you are sitting
straight up and so that you do
not have to lean forward to
steer. (P.125)
Adjust the seat so that you
can depress the pedals fully
and so that your arms bend
slightly at the elbow when
gripping the steering wheel.
( P.125)
Lock the head restraint in
place with the center of the
head restraint closest to the
top of your ears. ( P.128)
Wear the seat belt correctly.
( P.27)
WARNING
■Before driving
●Check that the floor mat is
securely fixed in the correct
place with all the provided
retaining hooks (clips). Be espe-
cially careful to perform this
check after cleaning the floor.
●With the engine stopped and
the shift lever in P, fully depress
each pedal to the floor to make
sure it does not interfere with
the floor mat.
For safe driving
For safe driving, adjust the
seat and mirror to an appro-
priate position before driv-
ing.
Correct driving posture
Page 29 of 468
291-1. For safe use
1
For safety and security
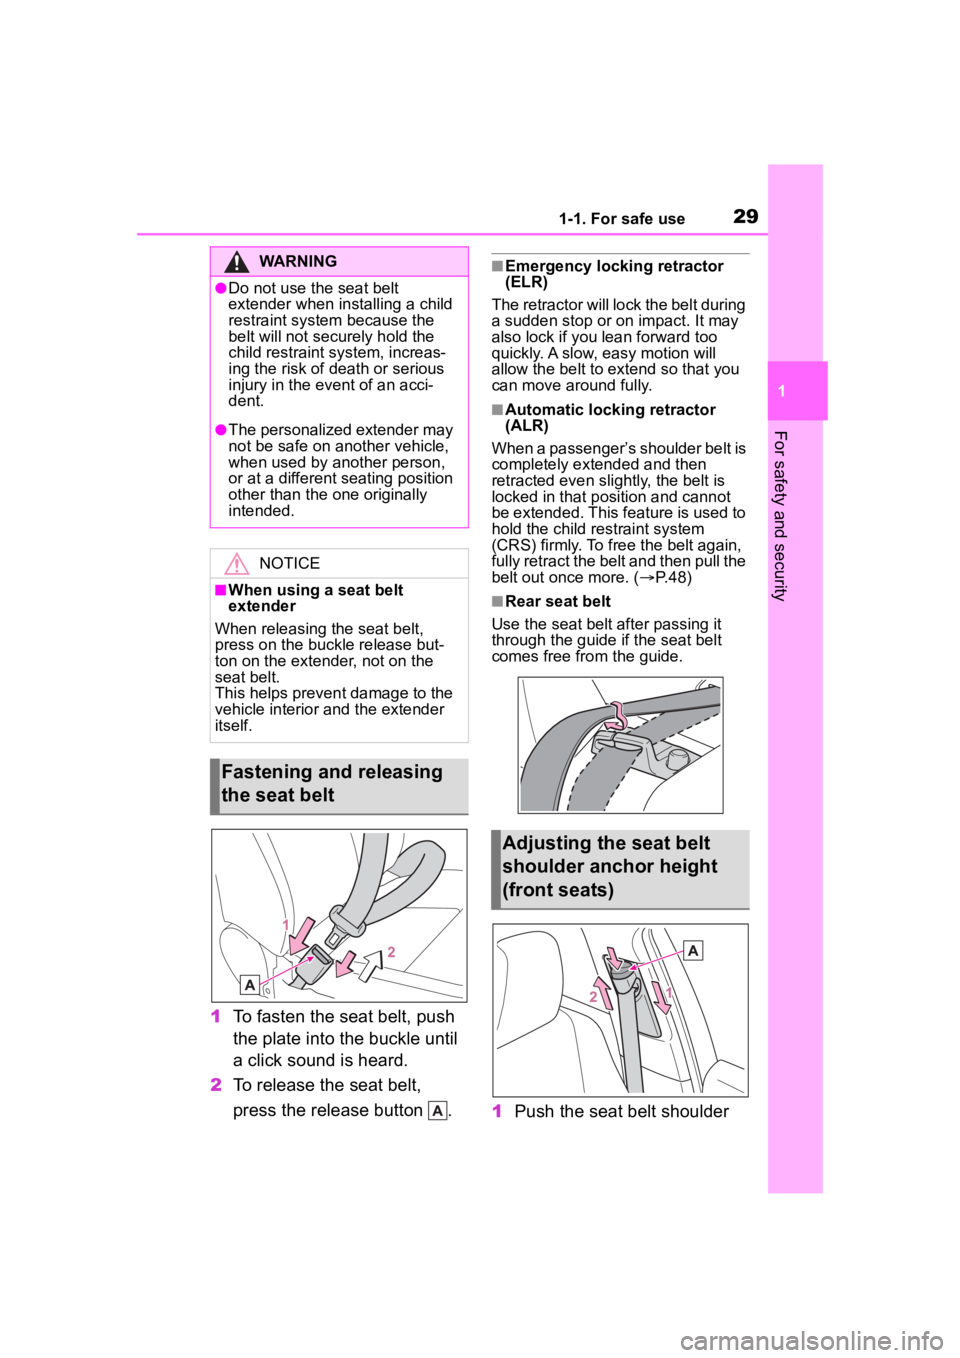
1To fasten the seat belt, push
the plate into the buckle until
a click sound is heard.
2 To release the seat belt,
press the release button .
■Emergency locking retractor
(ELR)
The retractor will lock the belt during
a sudden stop or on impact. It may
also lock if you lean forward too
quickly. A slow, easy motion will
allow the belt to extend so that you
can move around fully.
■Automatic locking retractor
(ALR)
When a passenger’s shoulder belt is
completely extended and then
retracted even slightly, the belt is
locked in that position and cannot
be extended. This feature is used to
hold the child restraint system
(CRS) firmly. To free the belt again,
fully retract the belt and then pull the
belt out once more. ( P. 4 8 )
■Rear seat belt
Use the seat belt after passing it
through the guide if the seat belt
comes free fro m the guide.
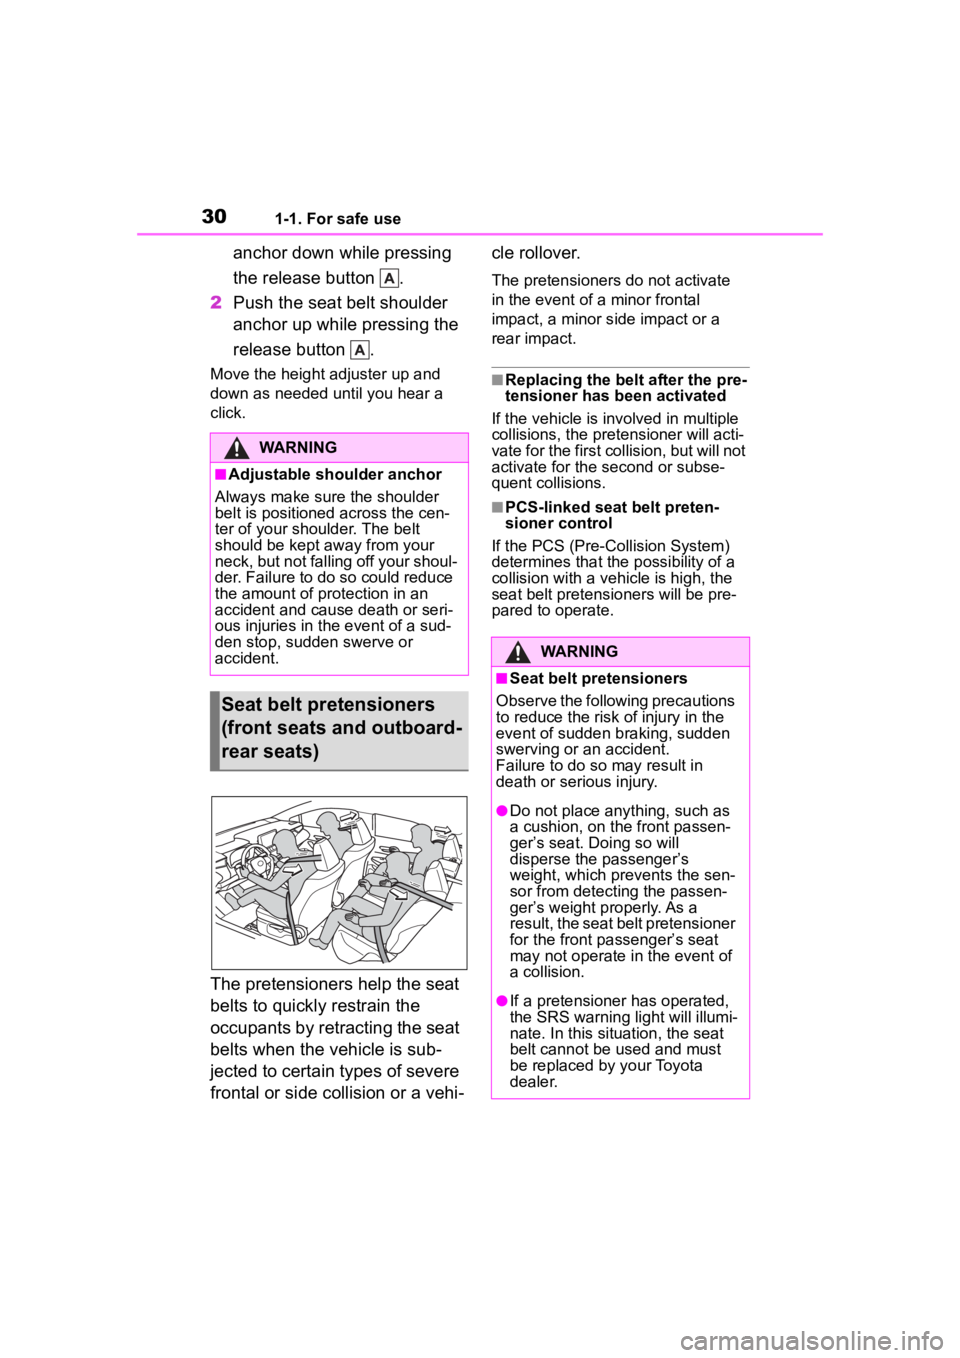
1Push the seat belt shoulder
WARNING
●Do not use the seat belt
extender when installing a child
restraint system because the
belt will not securely hold the
child restraint system, increas-
ing the risk of death or serious
injury in the event of an acci-
dent.
●The personalized extender may
not be safe on another vehicle,
when used by another person,
or at a different seating position
other than the one originally
intended.
NOTICE
■When using a seat belt
extender
When releasing the seat belt,
press on the buckle release but-
ton on the extender, not on the
seat belt.
This helps prevent damage to the
vehicle interior and the extender
itself.
Fastening and releasing
the seat belt
Adjusting the seat belt
shoulder anchor height
(front seats)
Page 30 of 468
301-1. For safe use
anchor down while pressing
the release button .
2 Push the seat belt shoulder
anchor up while pressing the
release button .
Move the height adjuster up and
down as needed until you hear a
click.
The pretensioners help the seat
belts to quickly restrain the
occupants by retracting the seat
belts when the vehicle is sub-
jected to certain types of severe
frontal or side collision or a vehi- cle rollover.
The pretensioners do not activate
in the event of a minor frontal
impact, a minor s
ide impact or a
rear impact.
■Replacing the belt after the pre-
tensioner has been activated
If the vehicle is involved in multiple
collisions, the pretensioner will acti-
vate for the first collision, but will not
activate for the second or subse-
quent collisions.
■PCS-linked seat belt preten-
sioner control
If the PCS (Pre-Collision System)
determines that the possibility of a
collision with a vehi cle is high, the
seat belt pretensioners will be pre-
pared to operate.
WARNING
■Adjustable shoulder anchor
Always make sure the shoulder
belt is positioned across the cen-
ter of your shoulder. The belt
should be kept away from your
neck, but not falling off your shoul-
der. Failure to do so could reduce
the amount of protection in an
accident and cause death or seri-
ous injuries in the event of a sud-
den stop, sudden swerve or
accident.
Seat belt pretensioners
(front seats and outboard-
rear seats)
WARNING
■Seat belt pretensioners
Observe the following precautions
to reduce the risk of injury in the
event of sudden braking, sudden
swerving or an accident.
Failure to do so may result in
death or serious injury.
●Do not place anything, such as
a cushion, on the front passen-
ger’s seat. Doing so will
disperse the passenger’s
weight, which prevents the sen-
sor from detecting the passen-
ger’s weight properly. As a
result, the seat belt pretensioner
for the front passenger’s seat
may not operate in the event of
a collision.
●If a pretensioner has operated,
the SRS warning light will illumi-
nate. In this situation, the seat
belt cannot be used and must
be replaced by your Toyota
dealer.
Page 32 of 468
321-1. For safe use
SRS rear side airbags
Can help protect the torso of occupants in the rear outer seats
SRS curtain shield airbags
• Can help protect primarily the h ead of occupants in the outer seats
• Can help prevent the occupants from being thrown from the vehi cle in the
event of vehicle rollover
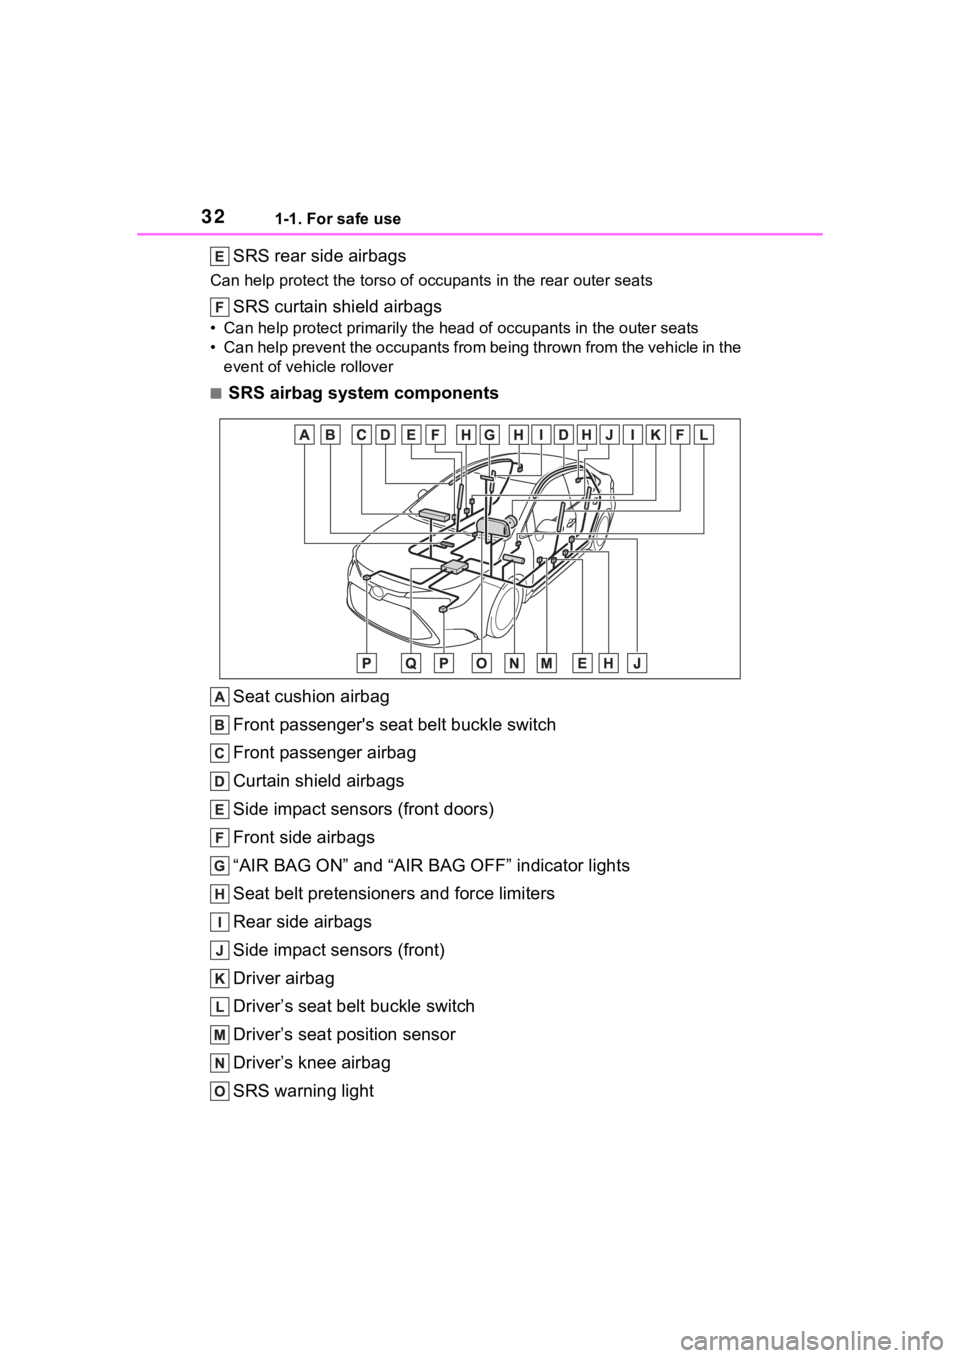
■SRS airbag system components
Seat cushion airbag
Front passenger's seat belt buckle switch
Front passenger airbag
Curtain shield airbags
Side impact sensors (front doors)
Front side airbags
“AIR BAG ON” and “AIR BAG OFF” indicator lights
Seat belt pretensioners and force limiters
Rear side airbags
Side impact sensors (front)
Driver airbag
Driver’s seat bel t buckle switch
Driver’s seat position sensor
Driver’s knee airbag
SRS warning light
Page 36 of 468
361-1. For safe use
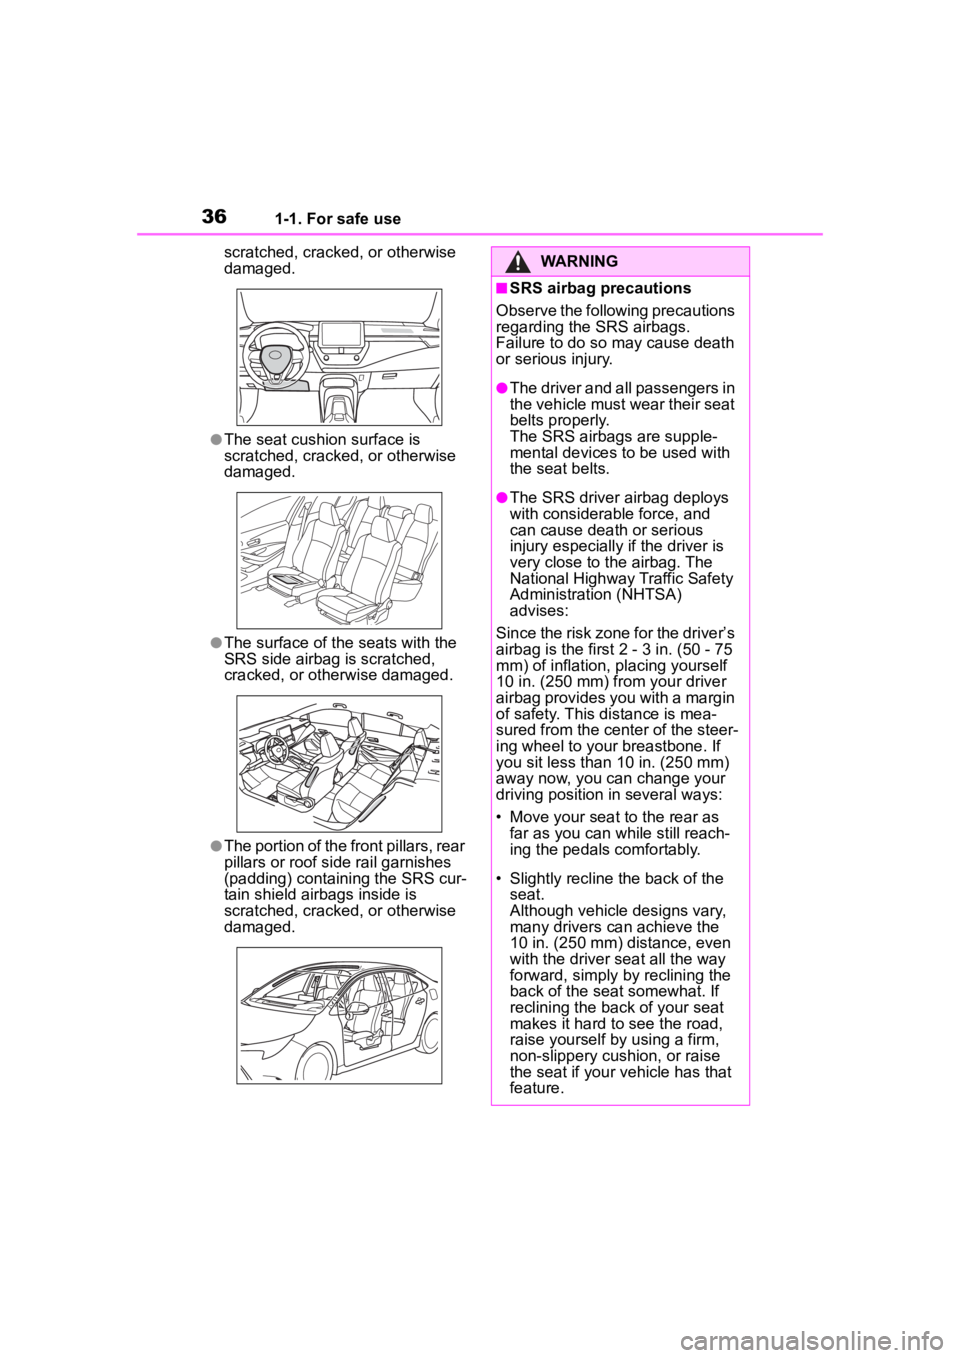
scratched, cracked, or otherwise
damaged.
●The seat cushion surface is
scratched, cracked, or otherwise
damaged.
●The surface of the seats with the
SRS side airbag is scratched,
cracked, or otherwise damaged.
●The portion of the front pillars, rear
pillars or roof side rail garnishes
(padding) containing the SRS cur-
tain shield airbags inside is
scratched, cracked, or otherwise
damaged.
WARNING
■SRS airbag precautions
Observe the following precautions
regarding the SRS airbags.
Failure to do so may cause death
or serious injury.
●The driver and all passengers in
the vehicle must wear their seat
belts properly.
The SRS airbags are supple-
mental devices to be used with
the seat belts.
●The SRS driver airbag deploys
with considerable force, and
can cause death or serious
injury especially if the driver is
very close to the airbag. The
National Highway Traffic Safety
Administration (NHTSA)
advises:
Since the risk zone for the driver’s
airbag is the first 2 - 3 in. (50 - 75
mm) of inflation, placing yourself
10 in. (250 mm) from your driver
airbag provides you with a margin
of safety. This distance is mea-
sured from the center of the steer-
ing wheel to your breastbone. If
you sit less than 10 in. (250 mm)
away now, you can change your
driving position in several ways:
• Move your seat to the rear as far as you can while still reach-
ing the pedals comfortably.
• Slightly recline the back of the seat.
Although vehicle designs vary,
many drivers can achieve the
10 in. (250 mm) distance, even
with the driver seat all the way
forward, simply by reclining the
back of the seat somewhat. If
reclining the back of your seat
makes it hard to see the road,
raise yourself by using a firm,
non-slippery cushion, or raise
the seat if your vehicle has that
feature.