navigation TOYOTA COROLLA iM 2018 Accessories, Audio & Navigation (in English)
[x] Cancel search | Manufacturer: TOYOTA, Model Year: 2018, Model line: COROLLA iM, Model: TOYOTA COROLLA iM 2018Pages: 164, PDF Size: 8.51 MB
Page 143 of 164
4. ROUTE GUIDANCE 5. FAVORITE DESTINATIONS
5. FAVORITE DESTINATIONS
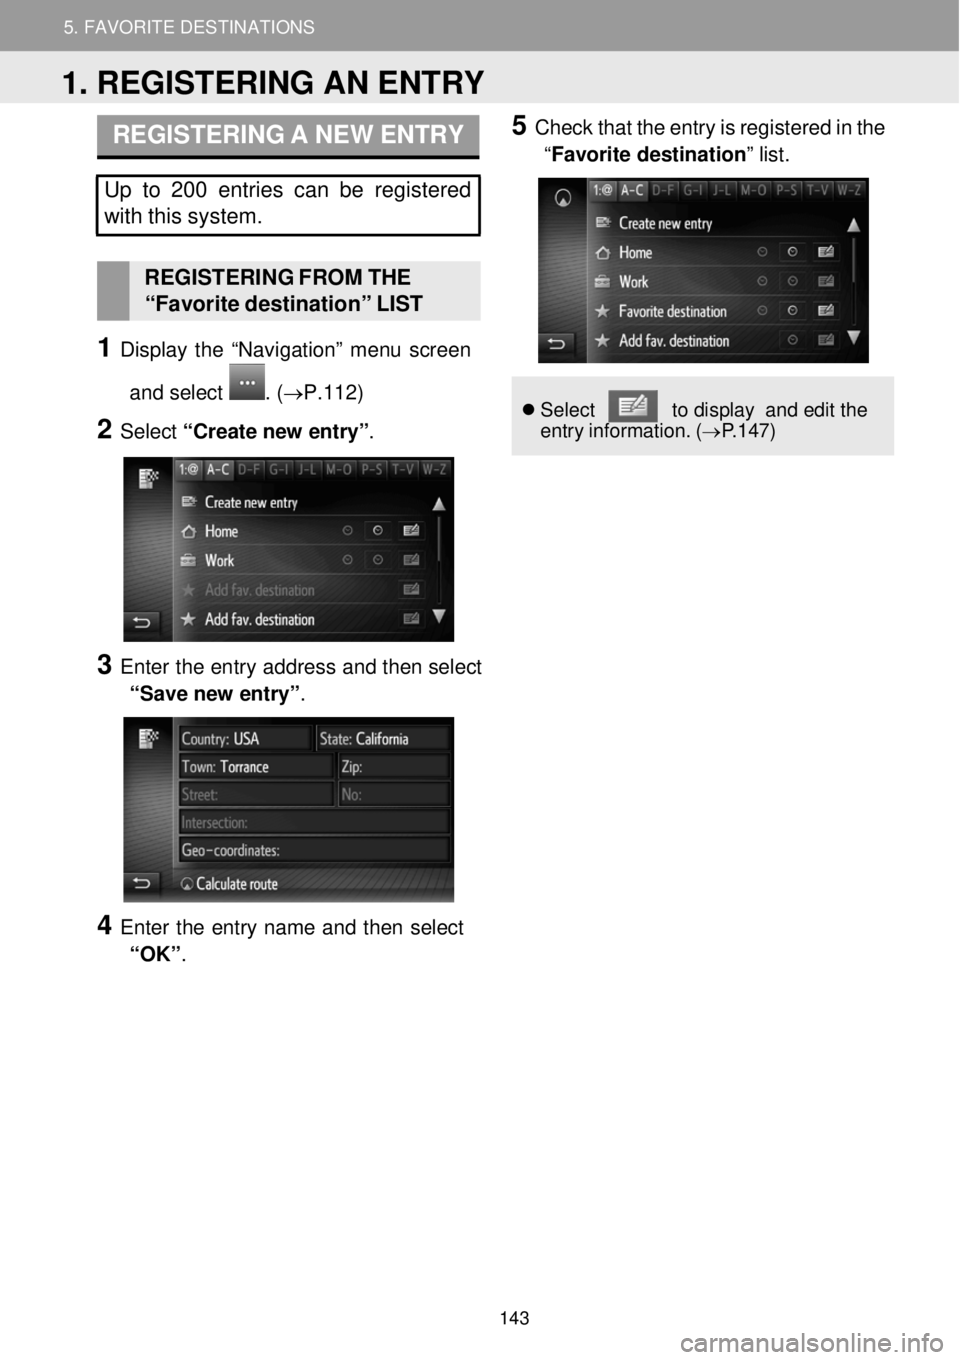
REGISTERING A NEW ENTRY
Up to 200 entries can be registered
with this system.
REGISTERI NG FROM THE
“Favor ite destination” LIST
1 Display the “Navigation” me nu screen
and select
. (→ P.1 12)
2 Select “Create n ew e ntry” .
3 Enter the en try ad dress and then sel ect
“Save new entry” .
4 Enter the entry name and then select
“OK” .
5 Check that the en try is reg istered in the
“Favorite destination” list.
Se lect to d ispla y and e dit the
entry inf ormation. (→P.1 47)
1. REGISTERING AN ENTRY
143
Page 146 of 164
5.MYDESTINATIONS5.FAVORITEDESTINATIONS
REGISTERING FROMENTRY
OPT IONS SCR EEN
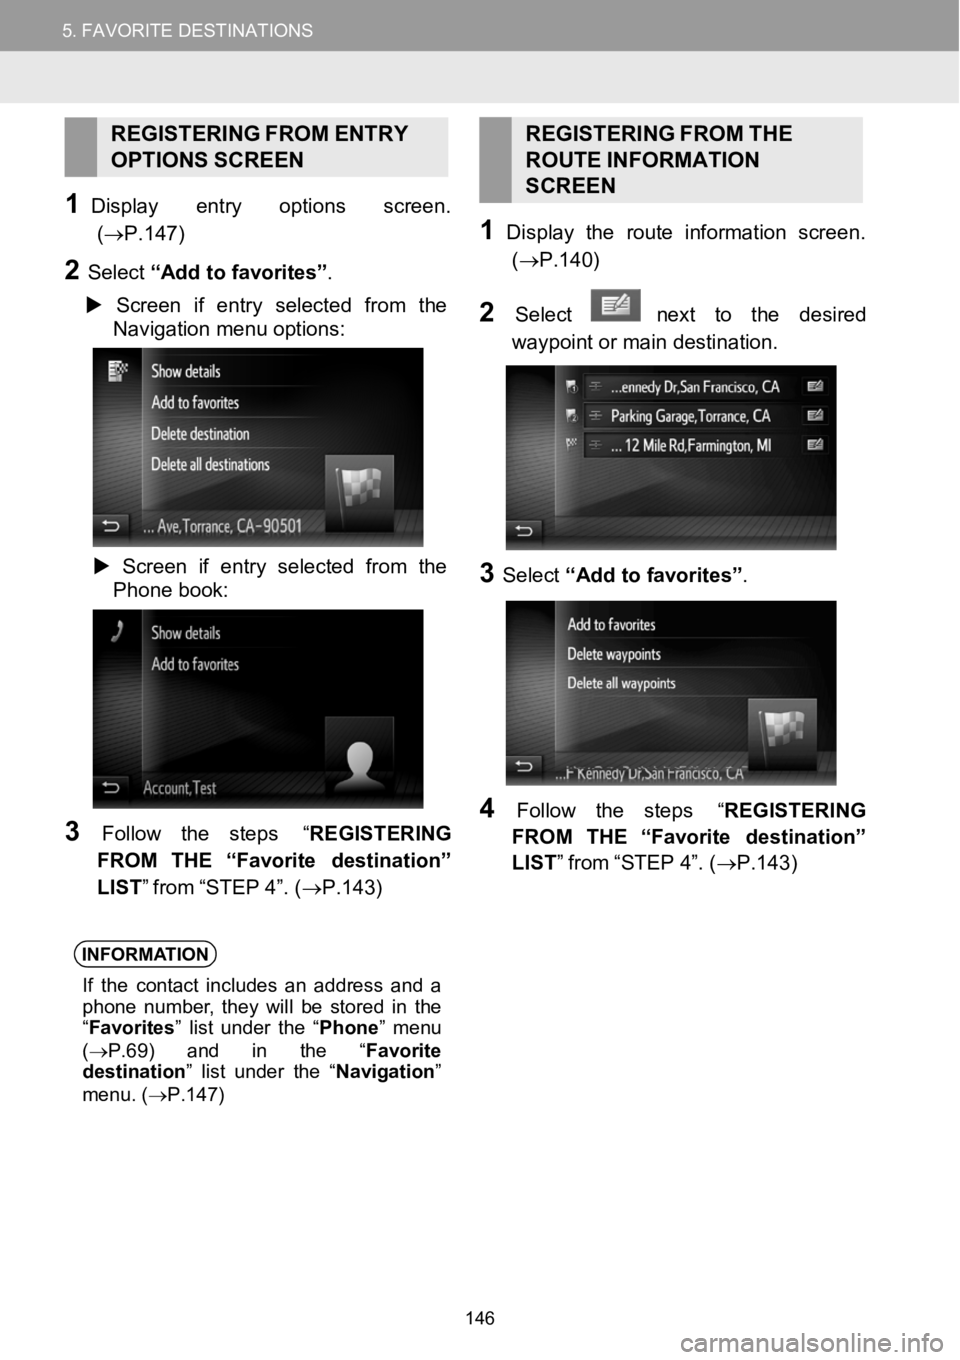
1D ispl ay entry options scre en.
(→P.1 47)
2Select “Add to favorites ”.
Screen i fentry selected from the
Navigation menu options:
Screen if entry selected from the
Phone book :
3Follow the st eps “REGISTERING
FROM THE“Favorite destination”
LIST” from“STEP 4”. ( →P.143)
INFORMA TION
If thecontact includes an ad dressand a
phone number , they will be stored inthe
“ Favorites ” list under the “Phone ” menu
( → P.69 )and in the “Favorite
destination ” list under the “ Navigation”
menu. ( →P.147)
REGISTERING FROMTHE
RO UTE INFORMA TION
SCREEN
1Disp laythe route information screen.
(→P.1 40)
2Select nexttothe desired
waypoint or main desti nation.
3Select “Add to favorites ”.
4Fol low the st eps “REGIS TERING
FROM THE“Favorite destination”
LIST” from“STEP 4”. ( →P.143)
146
Page 149 of 164
.5.FAVORITE DESTINATION S
SETTING UP
AUTO- NAVIGATION
AUTO-NAVIGATION OPTIONS
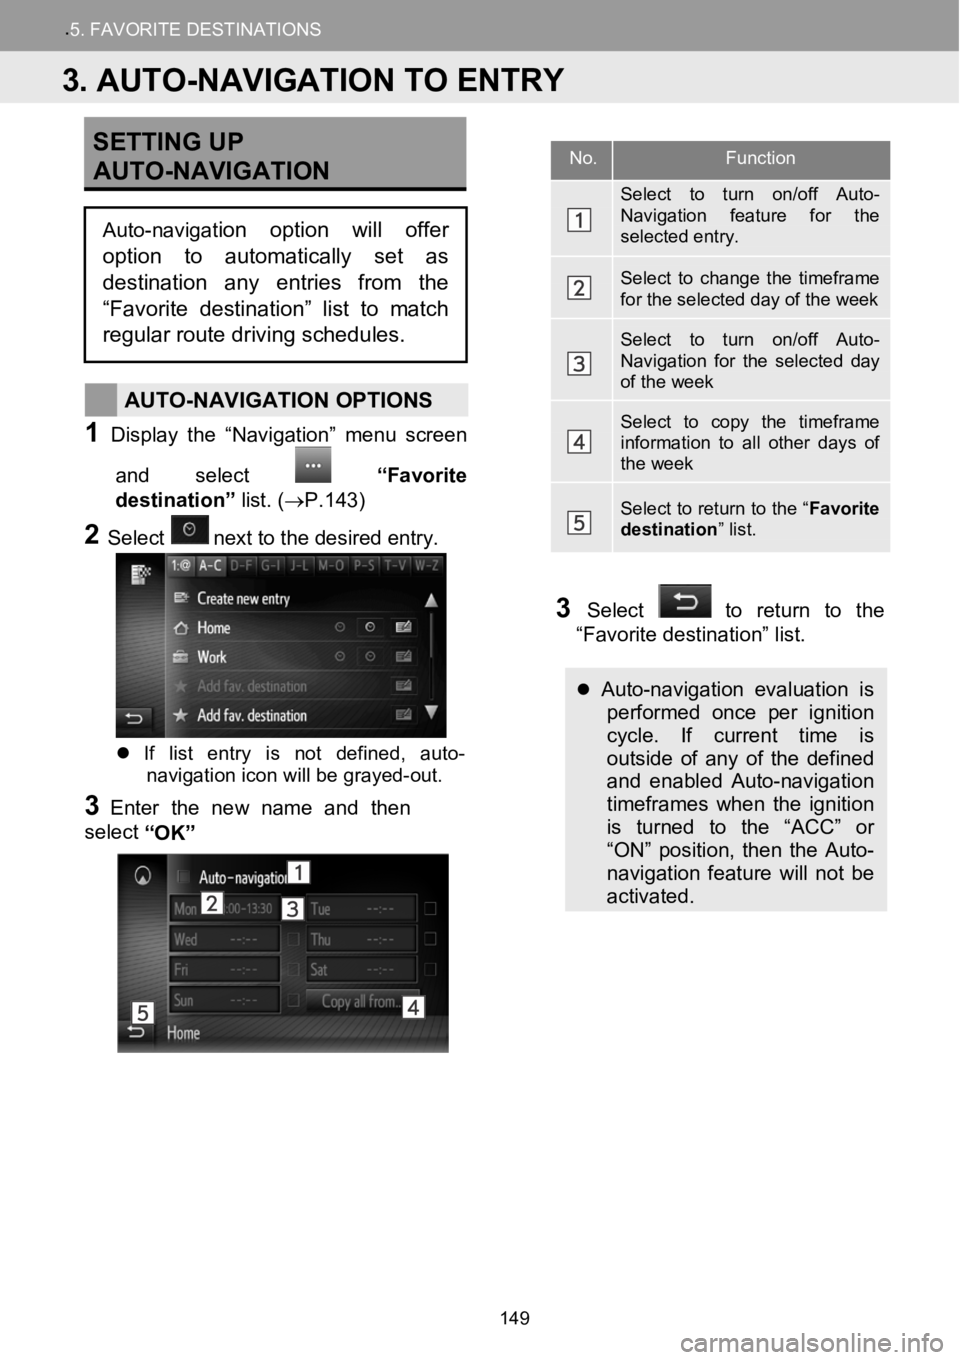
1Disp lay t he “Nav igation ” menu screen
and select
“Favorite
destination” list.(→P.143)
2Selectne xt to the de sired entry.
If list entry is not defined, auto-
navigation icon will be grayed-out.
3Enter the newname and then
select “OK”
3Select to return to the
“Favorite destination” list.
Auto-navigation evaluation is performed once per ignition
cycle. If current time is
outside of any of the defined
and enabled Auto-navigation
timeframes when the ignition
is turned to the “ACC” or
“ON” position, then the Auto-
navigation feature will not be
activated.
No.Function
Select to turn on/off Auto-Navigation feature for the selected entry.
Select to change the timeframe for the selected day of the week
Select to turn on/off Auto-Navigation for the selected day of the week
Select to copy the timeframe information to all other days of the week
Select to return to the “ Favorite destination” list.
3. AUTO-NAVIGATION TO ENTRY
Auto-navigation option will offer
option to automatically set as
destination any entries from the
“Favorite destination” list to match
regular route driving schedules.
149
Page 150 of 164
5. MY DESTINATIONS 5. FAVORITE DESTINATIONS
SENDING STORED
CONTACTS TO A USB
ME MO RY
The entries stor ed in th e “Favorites”
list under the “ Phone” menu ( →P.69)
and in the “ Favorite destination ” list
under the “ Navigation” menu.
( →P.147) can be transferred to a
USB memory.
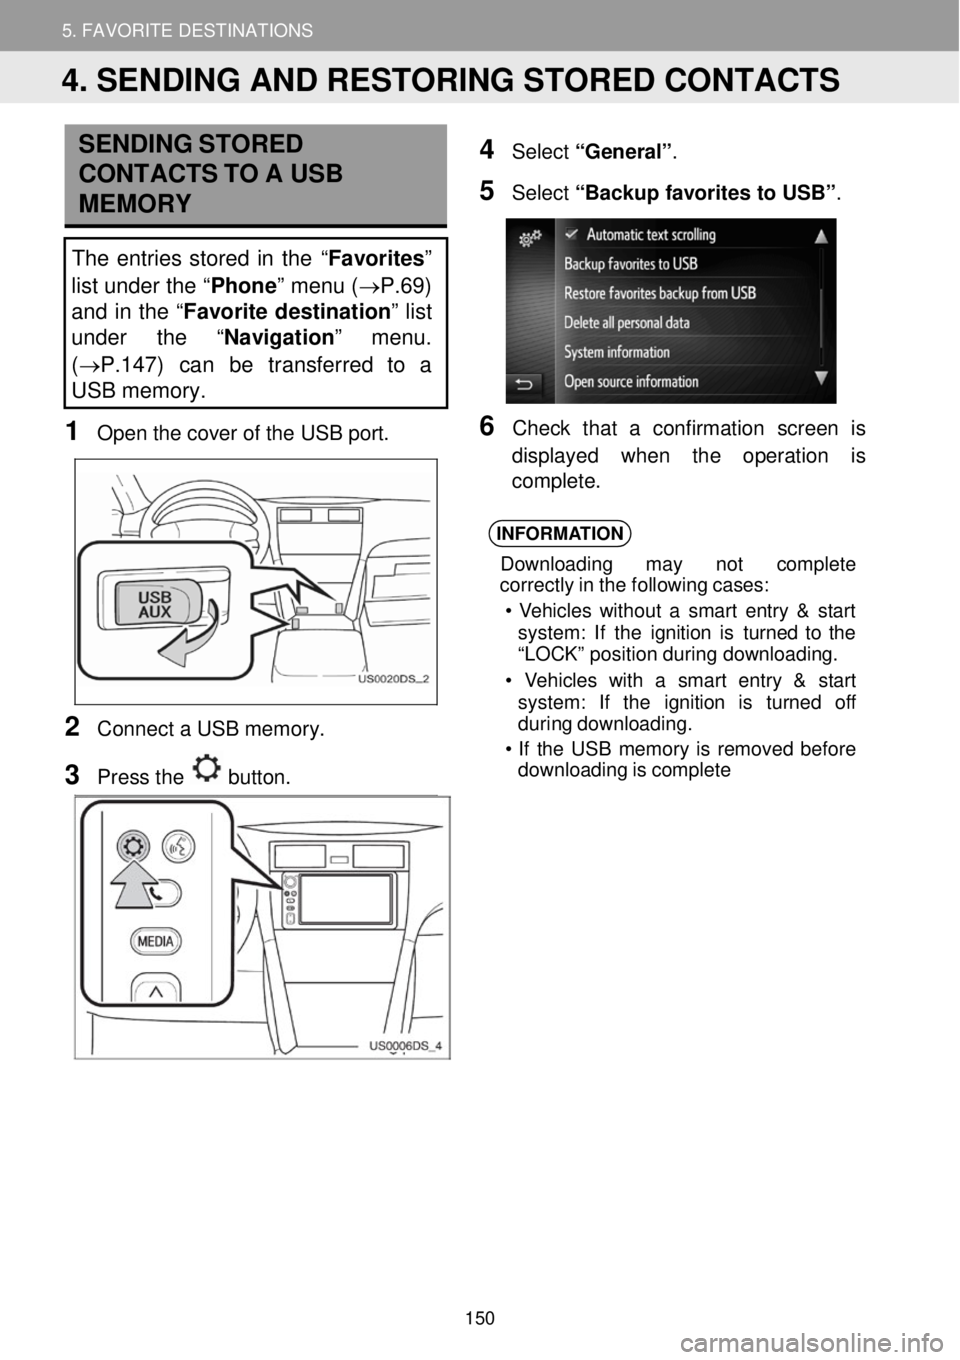
1 Op en th e cove r of the USB port.
2 Conne ct a USB memo ry.
3 Press the button.
4 Select “General” .
5 Select “Backup favorit es to USB ”.
6 Ch eck t hat a confirmation scre en is
di splay ed w hen th e operation is
compl ete.
INFORMA TION
Down loading may not c omplet e
cor rectl y in the following cases:
• Veh icles with out a smart entry & st art
system : If the ignition is turn ed to the
“L OCK ” pos ition duri ng downloa ding.
• V ehicles wit h a smart entry & st art
system : If the ignition is t urned off
duri ng dow nloading.
• If the USB memor y is re moved before
downloading is comple te
4. SENDING AND RESTORING STORED CONTACTS
150
Page 151 of 164
5. MY DESTINATIONS 5. FAVORITE DESTINATIONS
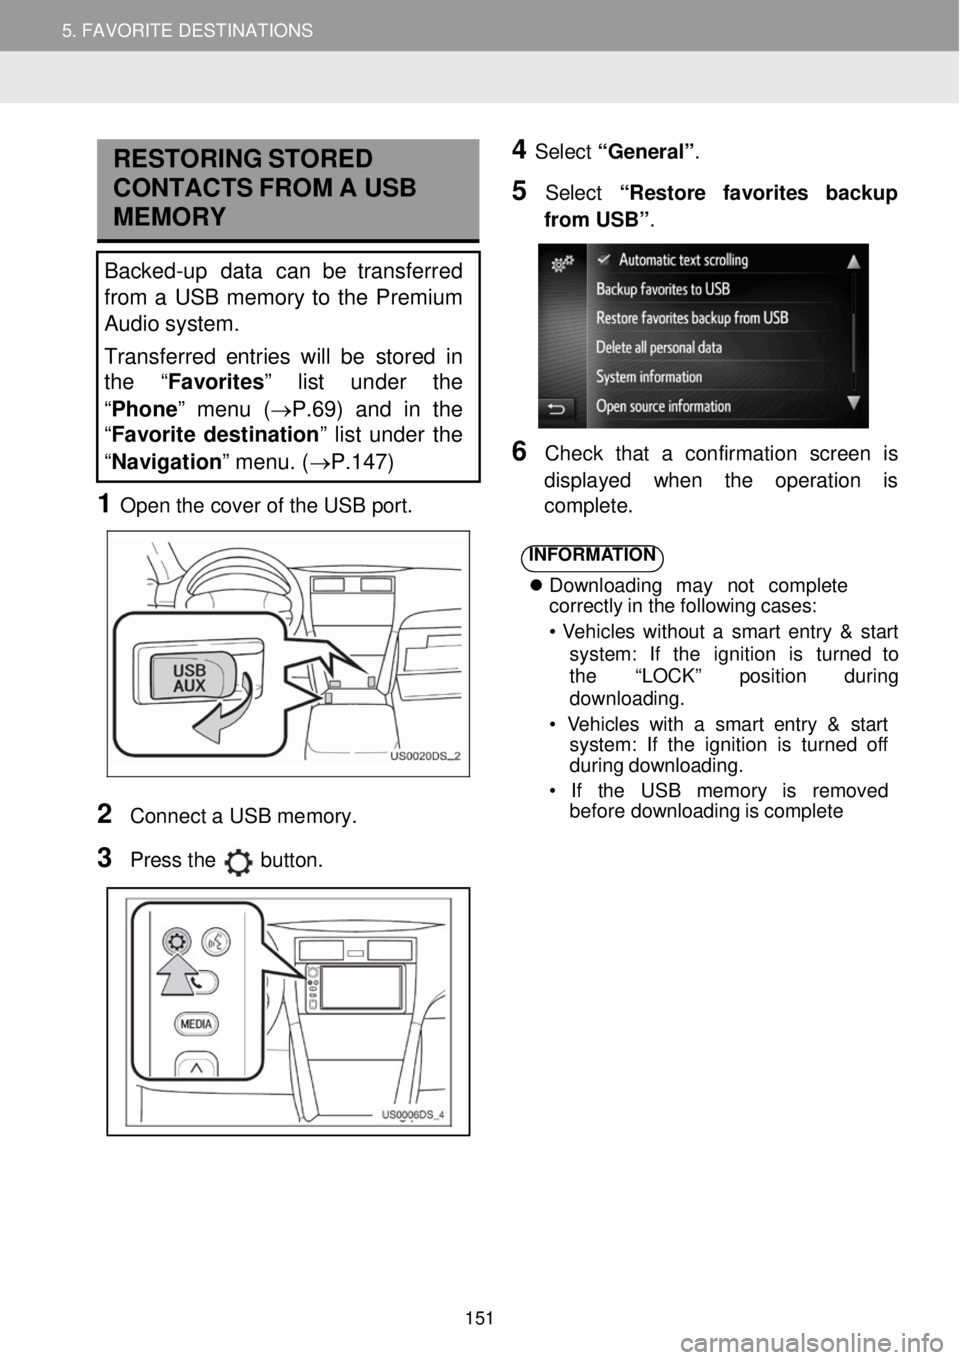
RESTORING STORED
C ONTA CTS FR OM A USB
MEMORY
Backed-up data can be transferred
from a USB memory to the Premium
Audio system.
Transferred entries will be stor ed in
th e “Favorites” list under the
“ Phone ” menu (→P.69) and in the
“ Favorite destination ” list under the
“ Navigation ” menu. (→P.147)
1 Open t he c over of the USB port.
4 Select “General” .
5 Select “R estore favorites backup
fr om USB” .
6 Check that a confir mation screen is
d ispl ayed when the operati on is
co mp lete.
2
Conn ect a USB me mory.
3 Pr ess the button.
INFORMA TION
Downl oad ing may no t co mpl ete
cor rectly in the following cases:
• Vehi cles wi thout a smart entry & s tart
syst em: If the ignition is tu rn ed to
the “LOCK” position d uring
downl oading.
• Vehicles with a sm art entry & start
syst em: If the ignition is turned of f
d urin g downloading.
• If the USB me mory is remo ved
bef ore downl oading is comp lete
151
Page 152 of 164
5.MYDESTINATIONS6.NAVIGATIONSETTING
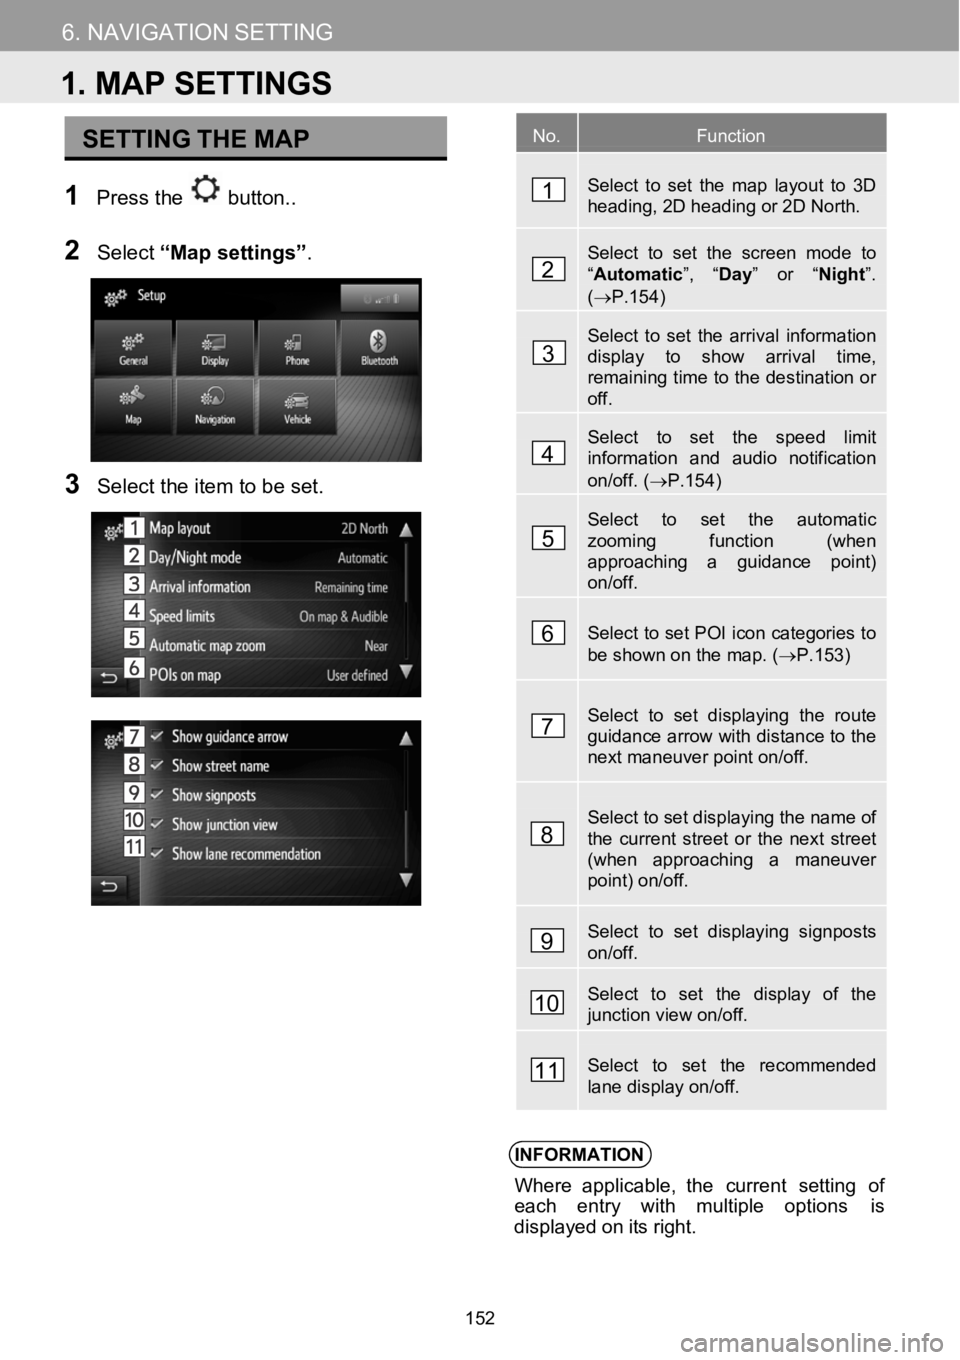
SETTINGTHEMAP
1Press the button. .
N
2Select“Mapsetting s”.
3Select the item to b e set.
INFORMATION
Where applicable, the c urrentsetting of
ea ch entry with multiple options is
displa yed on its right.
No.Function
Select to set the map layout to 3D heading, 2D heading or 2D North.
Select to set the screen mode to
Page 153 of 164
6. NAVIGATION SETTING 6. NAVIGATION SETTING
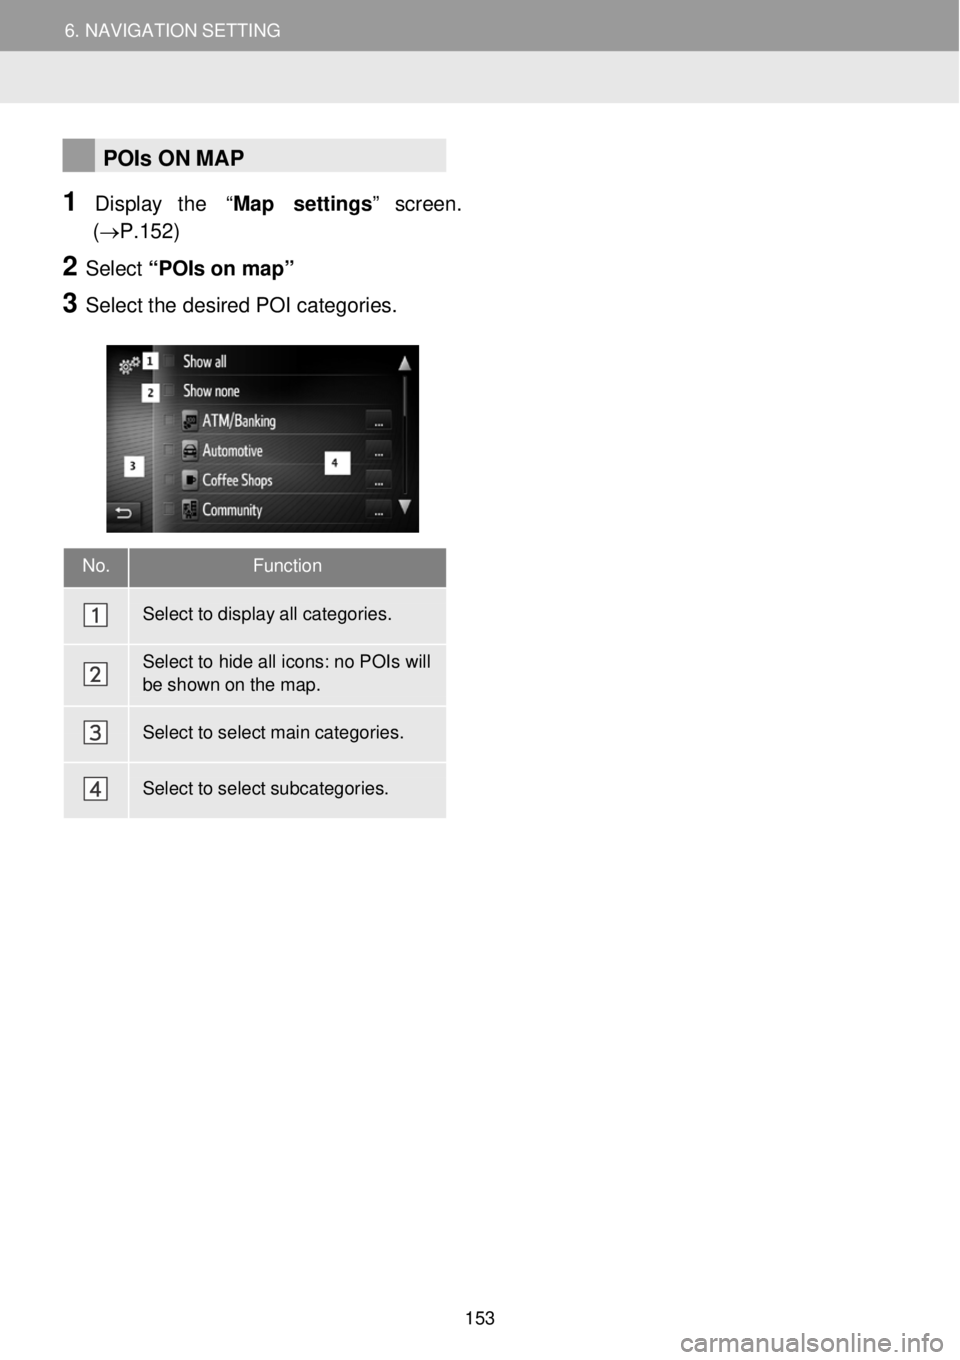
No. Function
Select to display all categories.
Select to hide all icons: no POIs will
be shown on the map.
Select to select main categories.
Select to select subcategories.
POIs ON MAP
1 Display the “Map settings” s creen.
(→P.152)
2 Select “POI s on m ap”
3 Se lect the d esired POI categor ies.
153
Page 154 of 164
6. NAVIGATION SETTING 6. NAVIGATION SETTING
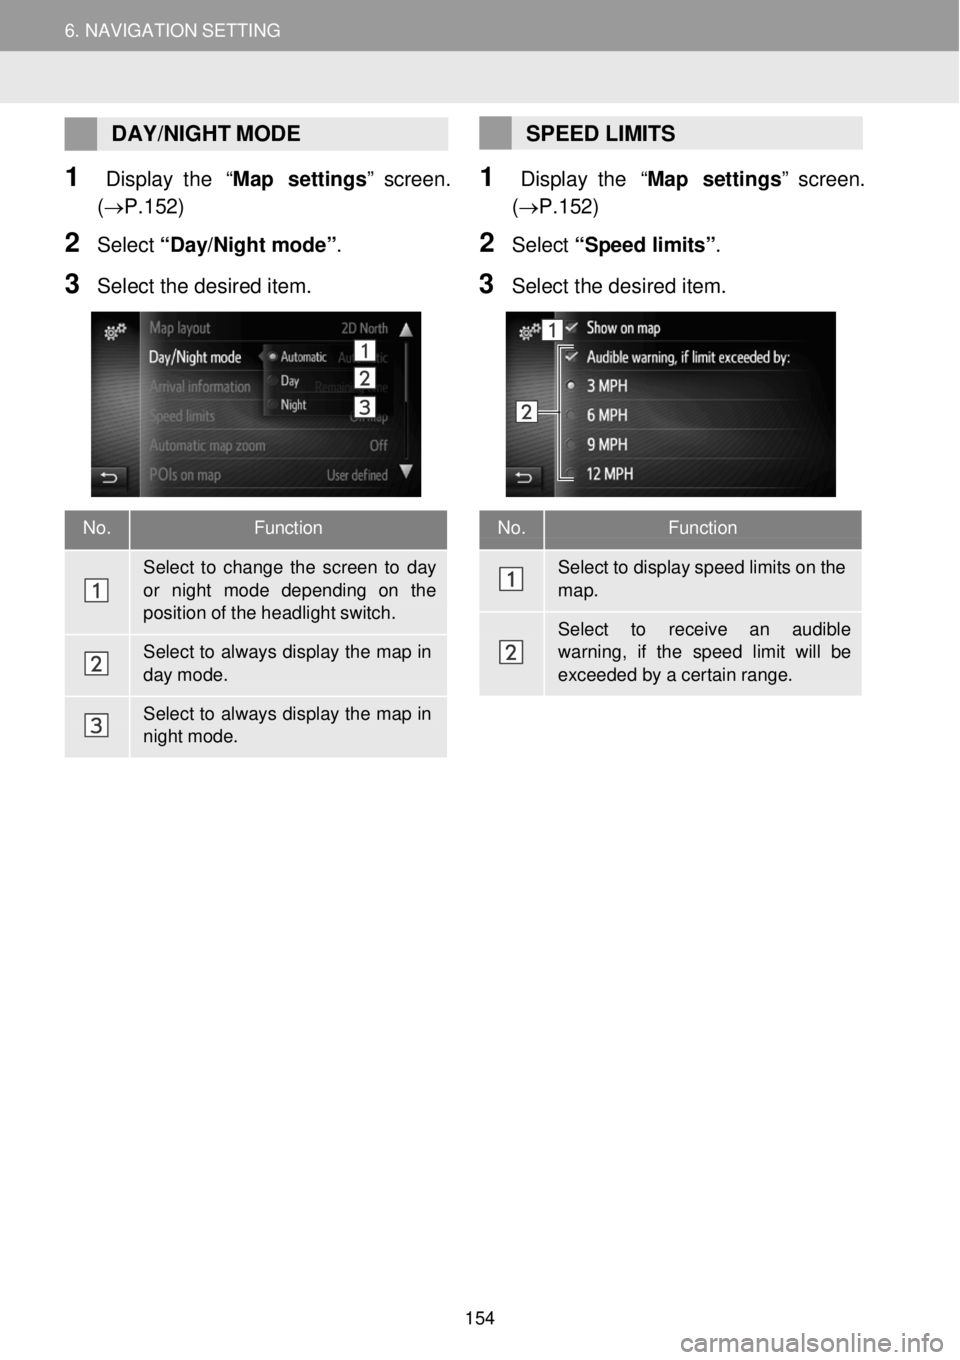
No. Function
Select to display speed limits on the map.
Select to re ceive an audible warning, if the speed limit will be
exceeded by a certain range.
DAY/ NIGHT MODE
1 Display the “Map settings” s creen.
(→P.152)
2 Selec t “D ay/Night mode” .
3 Se lect the desired item.
SPEED LIMITS
1 Display the “Map settings” s creen.
(→P.152)
2 Select “Speed limits”.
3 Sele ct the desi red item.
No. Function
Select to change the screen to day or ni ght mode depending on the position of the headlight switch.
Select to always display the map in day mode.
Select to always display the map in night mode.
154
Page 155 of 164
6. NAVIGATION SETTING
2. ROUTE SETTINGS
6. NAV IGAT ION SETTING
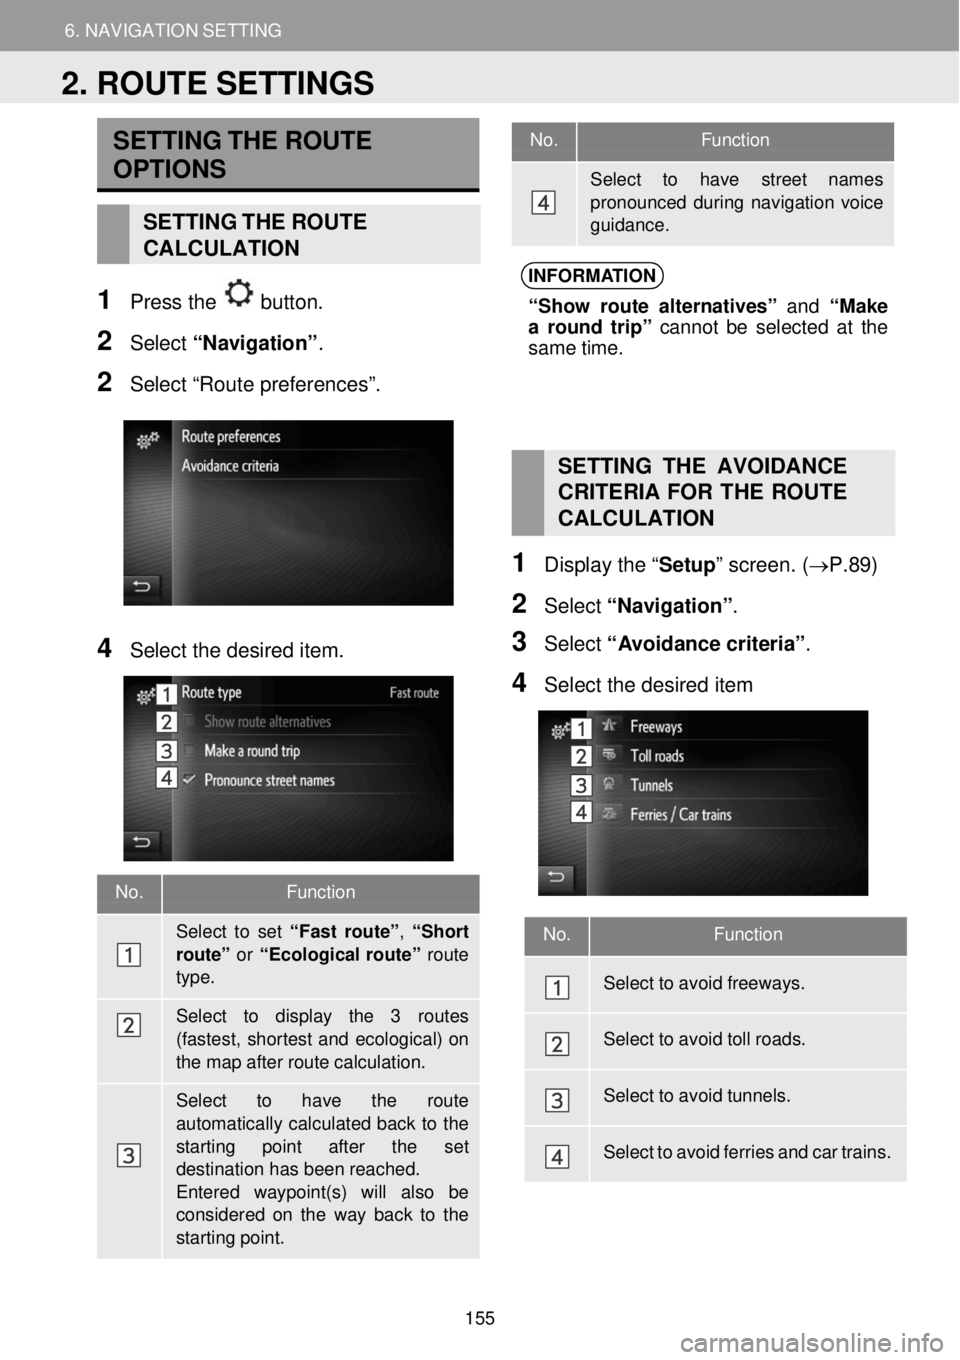
No. Function
Select to have street names pronounced during navigatio n voice guidance.
No. Functi on
Sele ct to set “Fast route”, “Sh ort route” or “Ecol ogical ro ute” route type.
Sele ct to display the 3 routes
(fastest, shortest and ecological) on the map after route calculation.
Select to have the route
automatically calculated back to the starting point after the set destination has been reached. Entered waypoint(s) will also be
considered on the way back to the starting point.
SETT ING THE ROUTE
OPTIONS
SETTING THE ROUTE
CALCULATION
1 Press the button.
2 Select “Navig ati on” .
2 Select “Route preferences”.
INFORMA TION
“Sho w route alte rnatives” and “Make
a ro und trip” cannot be selected at the
sam e time.
4 Select the desired item.
SETTING THE AVOIDANCE
C RITERIA FOR THE ROUTE
C AL CULATION
1 Displ ay the “ Setup” scre en. (→P.89)
2 Select “Navi gati on” .
3 Select “A voi dance criteria” .
4 Se lect the de sired item
No. Function
Select to avoid freew ays.
Select to avoid toll roads.
Select to avoid tunnels.
Select to avoid ferries and car trains.
2. ROUTE SETTINGS
155
Page 156 of 164
7. NAVIGATION SYSTEM INFORMATION
1. LIMITATIONS OF THE NAVIGATION SYSTEM
7. NAVIGATION SYSTEM INFORMATION
This navigation system calculates the
cu rrent vehicle position using satellite
s ignals, various vehicle signals, map
data, etc. However, an accurate
positi on may not be shown depending
on satellite condition, road
configuration, vehicle condition or
other circumstances.
The Gl obal Pos iti onin g System (GPS)
deve loped and op erated by the U.S.
Departme nt o f D efense prov ides an
a ccurate current vehicle pos ition, normal ly
using 4 or more sate llites, and in some
case 3 satellites. The GPS system has a
certain level of inaccuracy. While the
navi gation system w ill compe nsate for this
most of th e time, occasion al po sitioning
errors of up to
1 00 m (300 feet) can and shou ld be
ex pe cted. Gen erally, p osit ion errors w ill
b e c orrected w ith in a few seconds.
The GPS signal may be physic ally
ob structed, l ead ing to inaccura te veh icle
posi tion on t he map d isplay. Tunne ls,
ta ll buil dings, trucks, or even the
p lacement of obje cts on the instrume nt
pan el may obstruct the GPS signals.
Th e GPS satel lites may not send sign als
du e to r epairs or improvemen ts be ing
ma de to them.
Even when the navigation system is
rece iving clear GPS si gnals, the v ehicle
po sition ma y not be shown accurately or
i na ppr opri ate route guidance may occur in
som e cases.
NOTICE
The ins tallat ion of wi ndow tint ing may
obstr uct the GPS s ignals . Mos t window
tinting co ntains som e me tallic cont ent that
w ill int erfere with GP S si gnal re ception of
the antenna . We advise agai nst the use of
win dow ti nting on vehicles eq uip ped w ith
n avi gation s ystems.
Accurate current ve hicle position may no t
be sh own in the following cases:
• When drivin g o n a smal l a ngled Y-
shap ed ro ad.
• When driving on a wi nding road.
• When driving on a sli ppery ro ad such as
in sand, gravel , snow, et c.
• When driving on a long s traight ro ad.
• When highway and surf ace streets run
in p arallel.
• After moving by ferry or vehi cle carri er.
• When a long route is searc hed during
hi gh speed drivi ng.
• Whe n driv ing wi thout setting the cu rrent
position ca librat ion co rrectly.
• After re peating a change of di rection by
going for
war d and backward, or t urning
on a turntable in the park ing lo t.
• When leaving a co vered parking lot or
p ark ing garage.
• When a roof carrie r is instal led.
• When driving w ith tir e cha ins i nst alled.
• When the t ires ar e wor n.
• After replacing a tire or t ires.
• Whe n us ing tire s tha t ar e sma lle r or
larg er than the fa ctory sp ecifi catio ns.
• When the tire pressur e in any of the f our
ti res is not corre ct.
1. LIMITATIONS OF THE NAVIGATION SYSTEM
156