TOYOTA COROLLA iM 2018 (in English) User Guide
Manufacturer: TOYOTA, Model Year: 2018, Model line: COROLLA iM, Model: TOYOTA COROLLA iM 2018Pages: 36, PDF Size: 1.57 MB
Page 11 of 36
9
OVERVIEW
FEATURES & OPERATIONS
TOYOTA SAFETY SENSE
SAFETY & EMERGENCY FEATURES
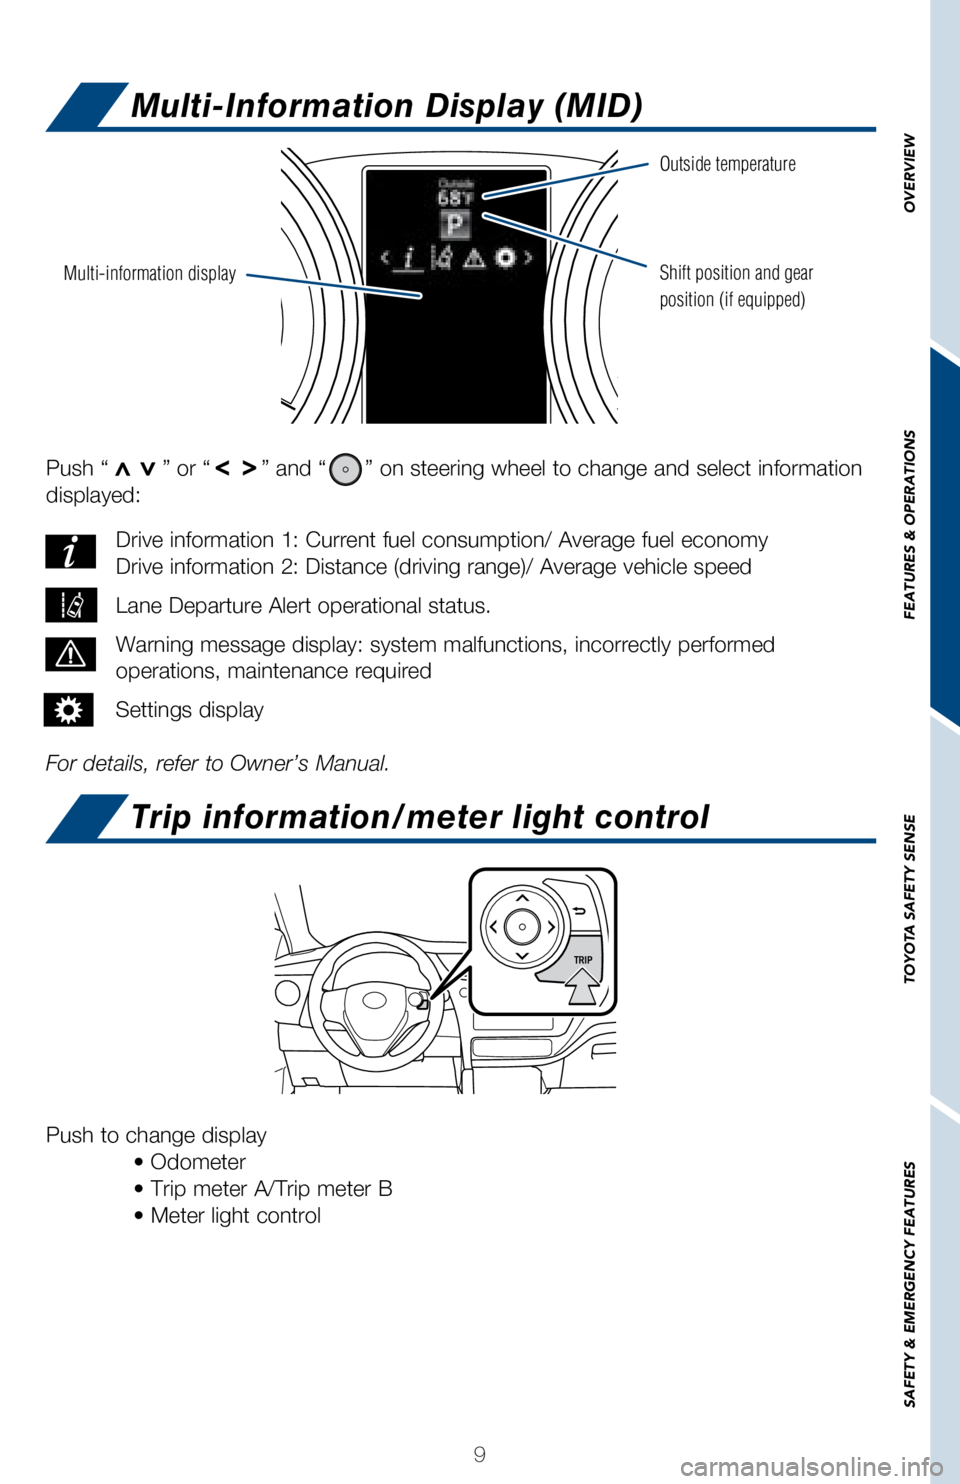
Push “>>” or “>>” and “” on steering wheel to change and select information
displayed:
For details, refer to Owner’s Manual. Drive information 1: Current fuel consumption/ Average fuel economy
Drive information 2: Distance (driving range)/ Average vehicle speed
Lane Departure Alert operational status.
Warning message display: system malfunctions, incorrectly performed
operations, maintenance required
Settings display
Push to change display
• Odometer
• Trip meter A/Trip meter B
• Meter light control
Multi-information display
Outside temperature
Shift position and gear
position (if equipped)
Multi-Information Display (MID)
Trip information/meter light control
Page 12 of 36
10
Lights & turn signals
HeadlightsHeadlights
AUTO on/off
AUTO on/off
Parking lights
Parking lights
Daytime running lighs (DRL) offDaytime running lighs (DRL) on
Steering wheel switches
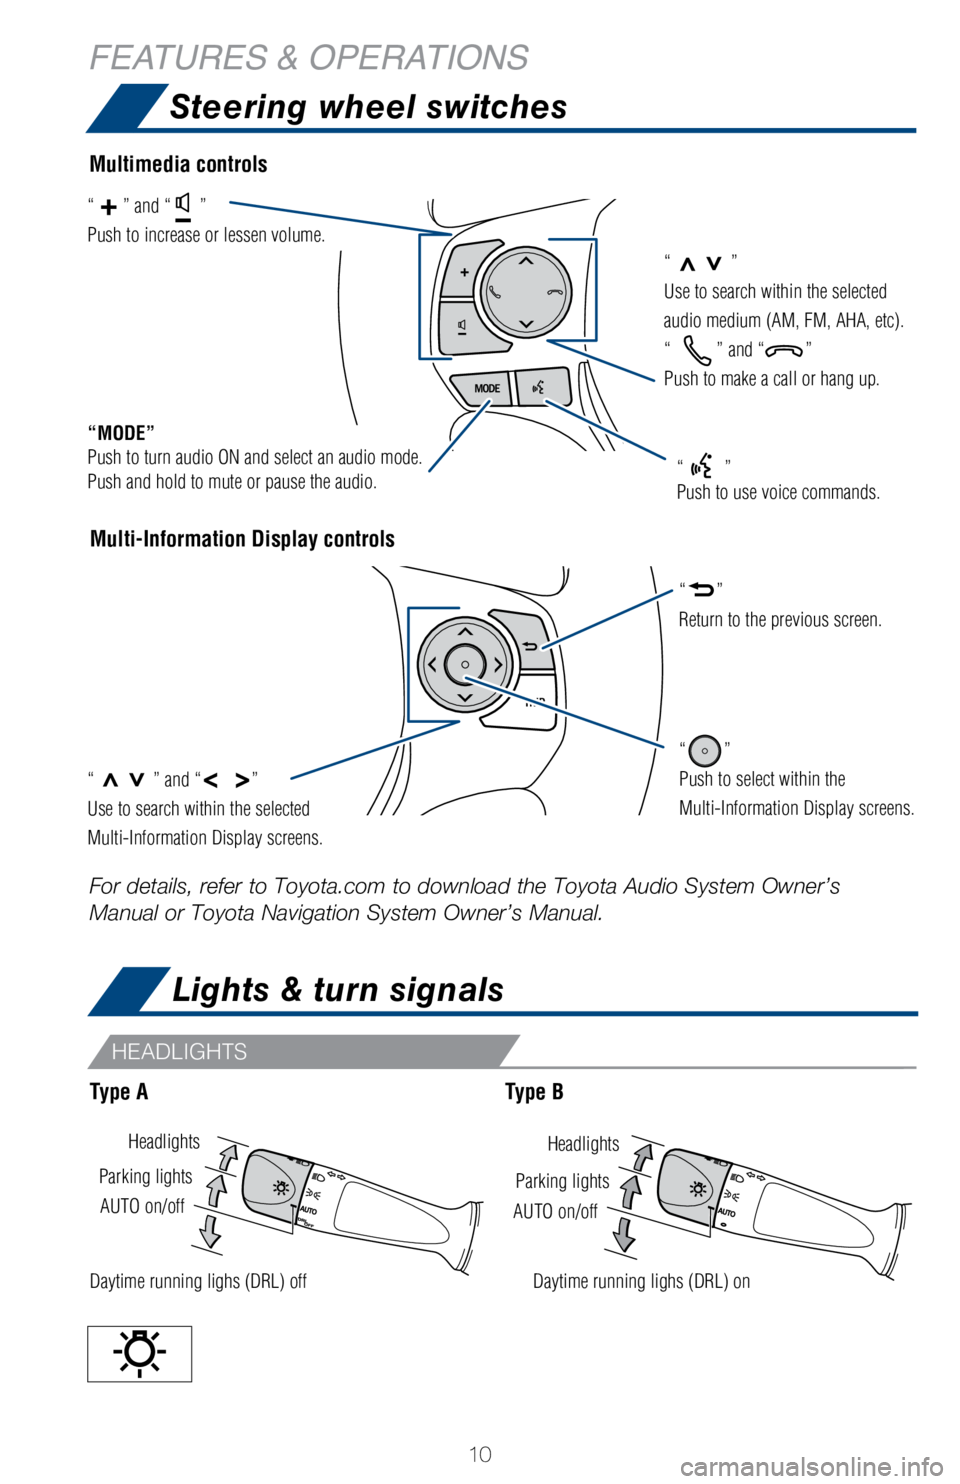
Multi-Information Display controls
“>>”
Use to search within the selected
audio medium (AM, FM, AHA, etc).
“
” and “”
Push to make a call or hang up.
“MODE”
Push to turn audio ON and select an audio mode.
Push and hold to mute or pause the audio.
“>>” and “< >”
Use to search within the selected
Multi-Information Display screens.
“”
Push to select within the
Multi-Information Display screens.
“”
Return to the previous screen.
“” and “”
Push to increase or lessen volume.
“”
Push to use voice commands.
Multimedia controls
Type AType B
For details, refer to Toyota.com to download the Toyota Audio System Own\
er’s
Manual or Toyota Navigation System Owner’s Manual.
HEADLIGHTS
FEATURES & OPERATIONS
Page 13 of 36
11
OVERVIEW
FEATURES & OPERATIONS
TOYOTA SAFETY SENSE
SAFETY & EMERGENCY FEATURES
Windshield wipers & washer
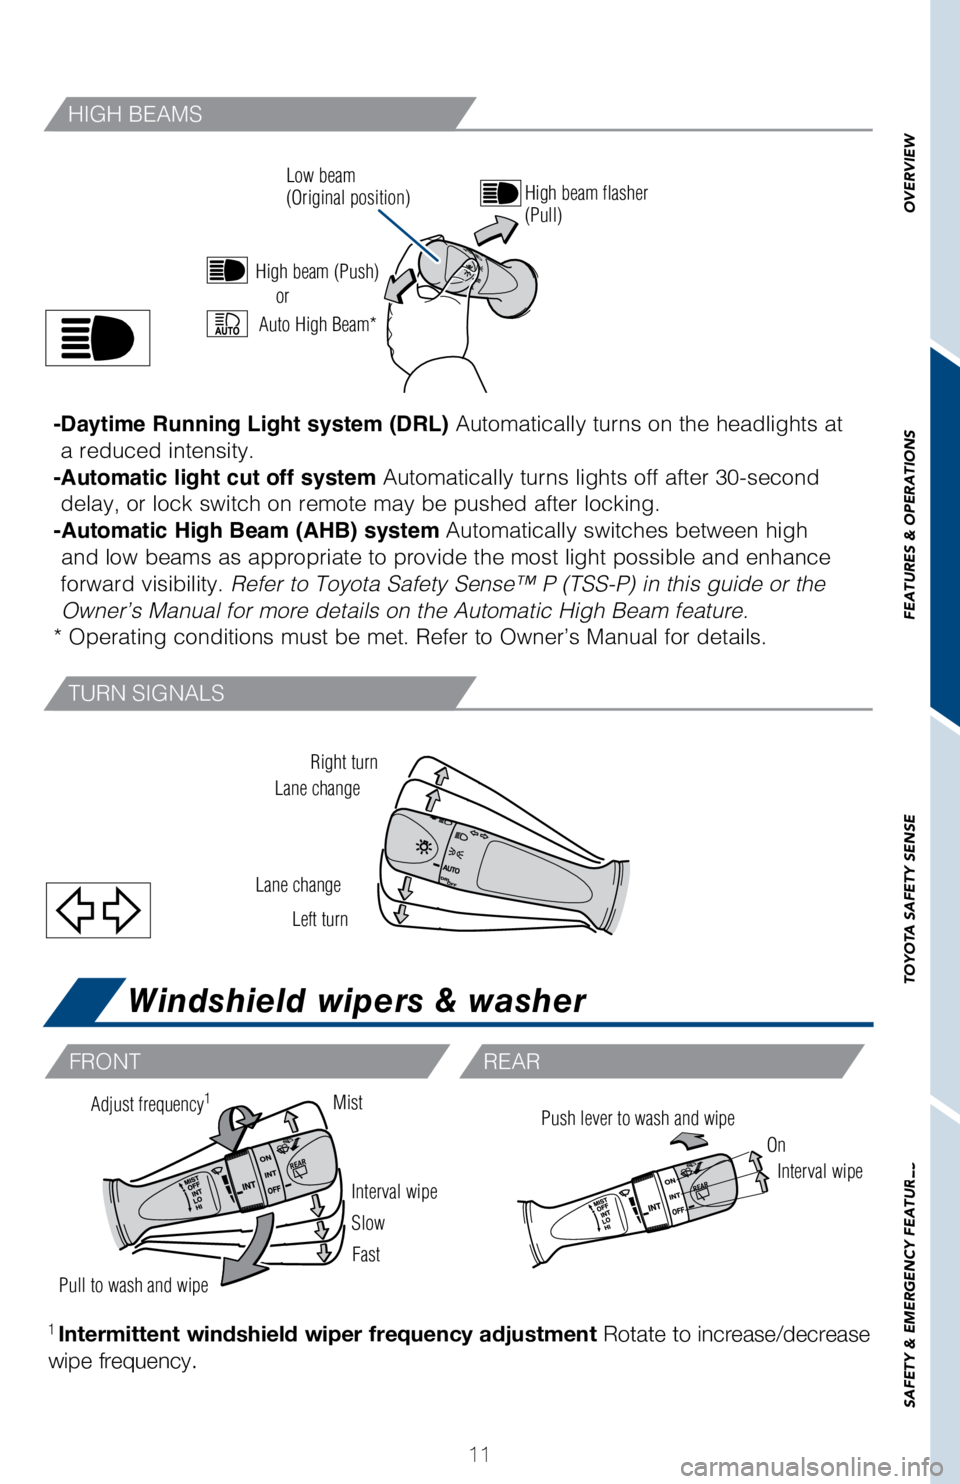
Right turn
Lane change
Lane change Left turn
High beam flasher
(Pull)
Low beam
(Original position)
or
Interval wipe
Slow
Fast
Pull to wash and wipe
Push lever to wash and wipeAdjust frequency1Mist
On
Interval wipe
1 Intermittent windshield wiper frequency adjustment Rotate to increase/decrease
wipe frequency.
FRONT REAR
-Daytime Running Light system (DRL) Automatically turns on the headlights at
a reduced intensity.
-Automatic light cut off system Automatically turns lights off after 30-second delay, or lock switch on remote may be pushed after locking.
-Automatic High Beam (AHB) system Automatically switches between high and low beams as appropriate to provide the most light possible and enha\
nce
forward visibility. Refer to Toyota Safety Sense™ P (TSS-P) in this guide or the Owner’s Manual for more details on the Automatic High Beam feature.
* Operating conditions must be met. Refer to Owner’s Manual for detai\
ls.
High beam (Push)
Auto High Beam*
TURN SIGNALS
HIGH BEAMS
Page 14 of 36
12
Windows
Cruise control
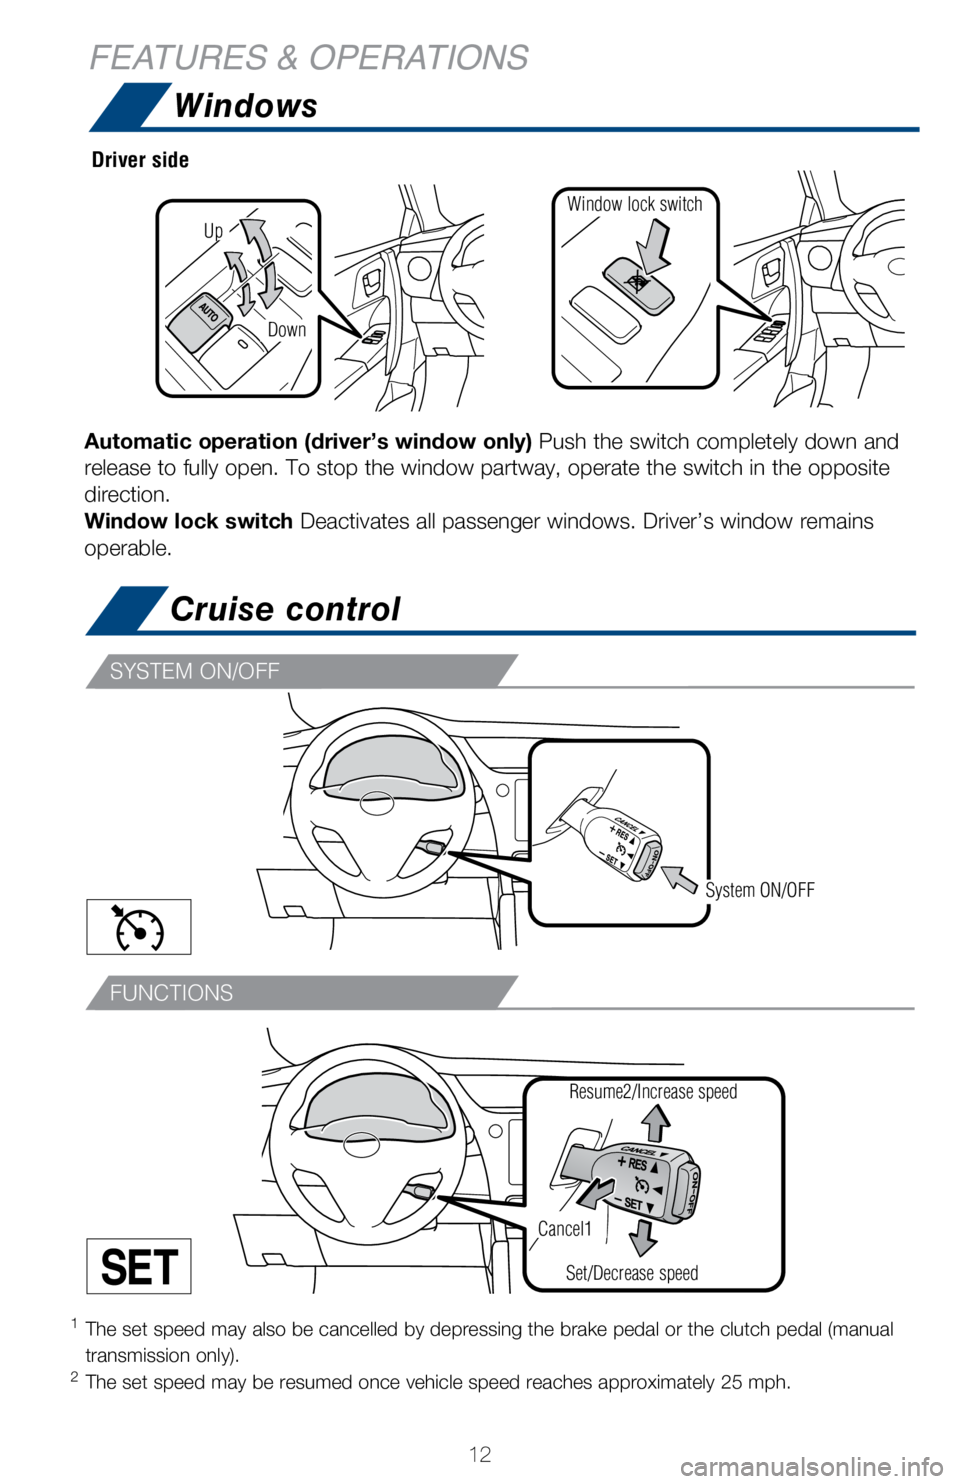
Automatic operation (driver’s window only) Push the switch completely down and
release to fully open. To stop the window partway, operate the switch in\
the opposite
direction.
Window lock switch Deactivates all passenger windows. Driver’s window remains
operable.
Up
Down
Driver side
Window lock switch
1 The set speed may also be cancelled by depressing the brake pedal or the\
clutch pedal (manual
transmission only).
2 The set speed may be resumed once vehicle speed reaches approximately 25\
mph.
System ON/OFF
Resume2/Increase speed
Set/Decrease speed
Cancel1
FEATURES & OPERATIONS
SYSTEM ON/OFF
FUNCTIONS
Page 15 of 36
13
OVERVIEW
FEATURES & OPERATIONS
TOYOTA SAFETY SENSE
SAFETY & EMERGENCY FEATURES
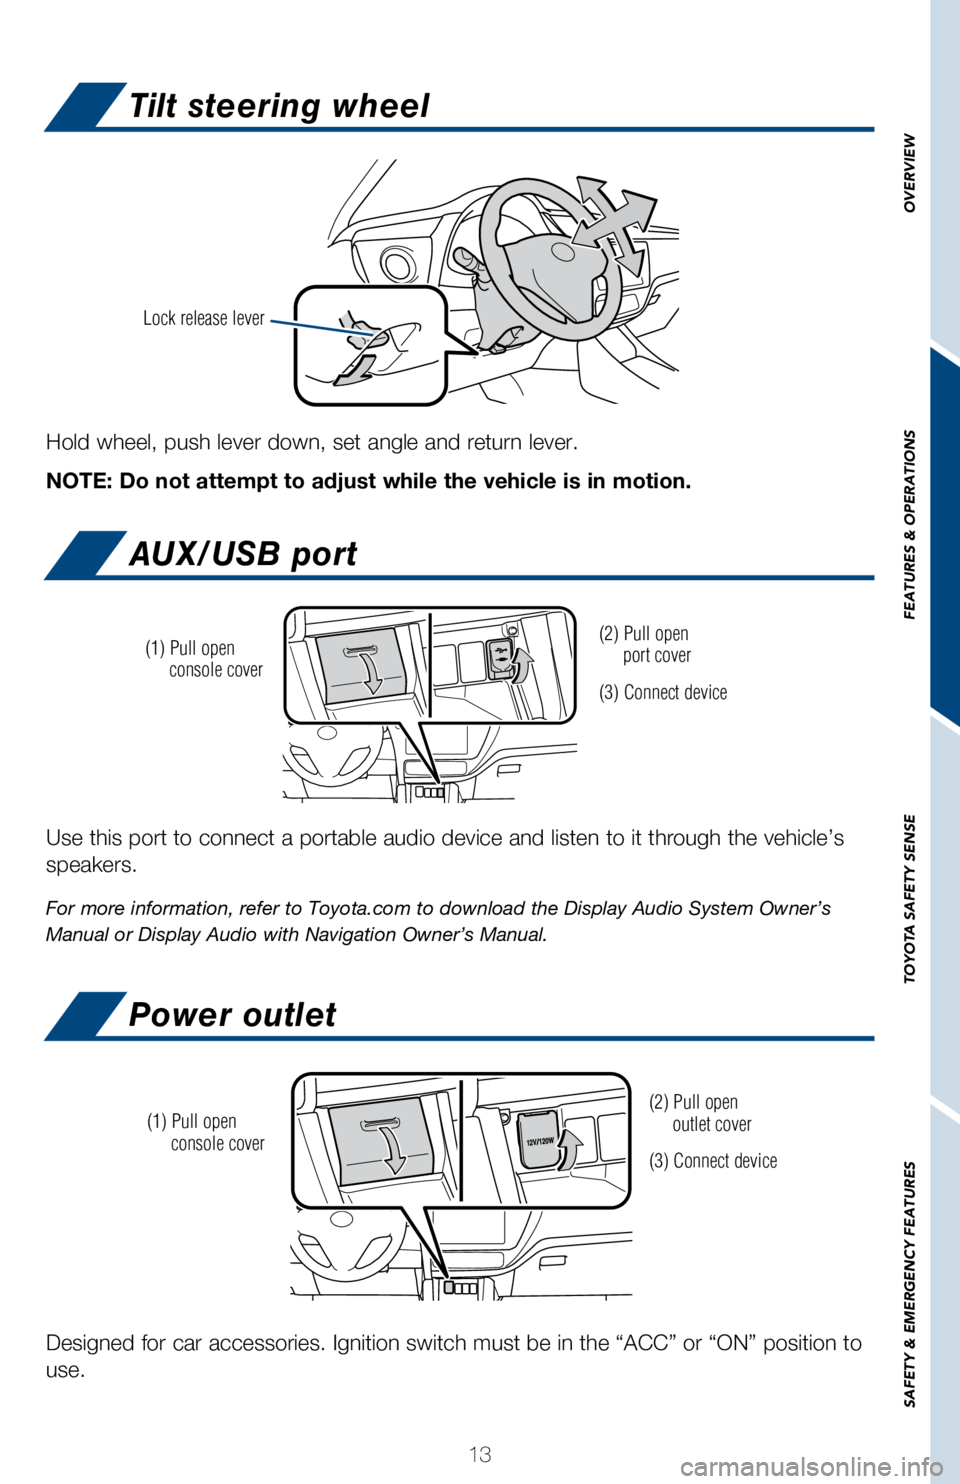
Tilt steering wheel
AUX/USB port
Power outlet
Hold wheel, push lever down, set angle and return lever.
NOTE: Do not attempt to adjust while the vehicle is in motion.
Lock release lever
Use this port to connect a portable audio device and listen to it throug\
h the vehicle’s
speakers.
For more information, refer to Toyota.com to download the Display Audio \
System Owner’s
Manual or Display Audio with Navigation Owner’s Manual.
(2) Pull open
port cover
(3) Connect device
(1) Pull open
console cover
Designed for car accessories. Ignition switch must be in the “ACC”\
or “ON” position to
use.
(2) Pull open
outlet cover
(3) Connect device
(1) Pull open
console cover
Page 16 of 36
14
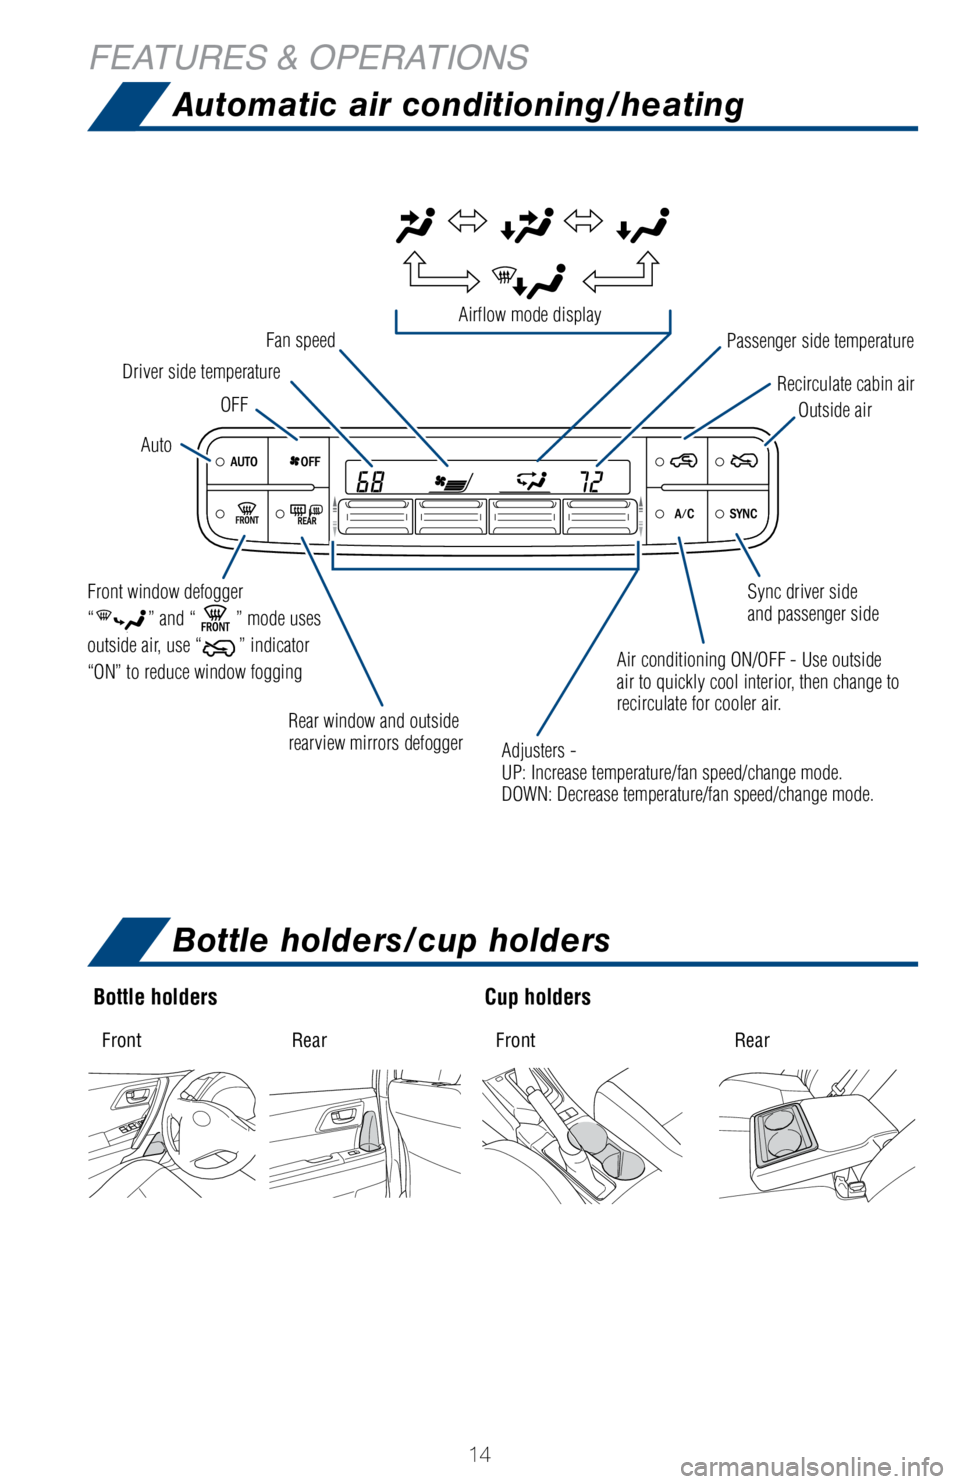
Air conditioning ON/OFF - Use outside
air to quickly cool interior, then change to
recirculate for cooler air.
Front window defogger
“
” and “” mode uses
outside air, use “
” indicator
“ON” to reduce window fogging
Automatic air conditioning/heating
Adjusters -
UP: Increase temperature/fan speed/change mode.
DOWN: Decrease temperature/fan speed/change mode. Sync driver side
and passenger side
Rear window and outside
rearview mirrors defogger
Driver side temperature
Passenger side temperature
Recirculate cabin air
Outside air
Fan speed
Auto
OFF
Airflow mode display
FEATURES & OPERATIONS
Bottle holders
Fr on tR earFront Rear
Cup holders
Front RearFron tR ear
Bottle holders/cup holders
Page 17 of 36
15
OVERVIEW
FEATURES & OPERATIONS
TOYOTA SAFETY SENSE
SAFETY & EMERGENCY FEATURES
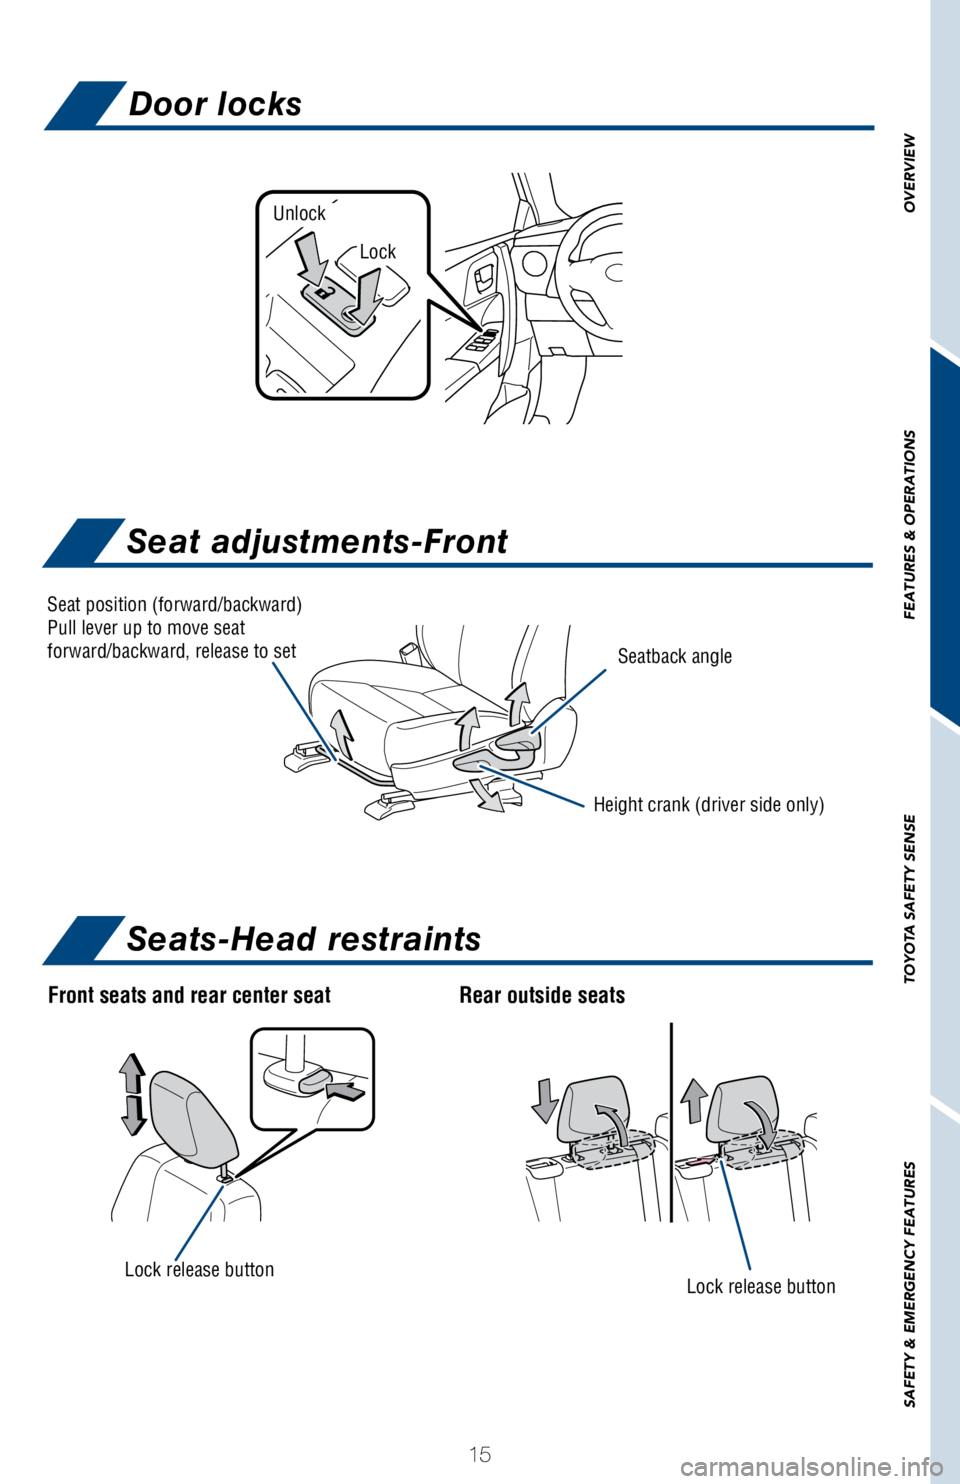
Front seats and rear center seatRear outside seats
Seat position (forward/backward)
Pull lever up to move seat
forward/backward, release to set
Height crank (driver side only)
Lock release buttonLock release button
Seatback angle
Seat adjustments-Front
Seats-Head restraints
Unlock
Lock
Door locks
Page 18 of 36
16
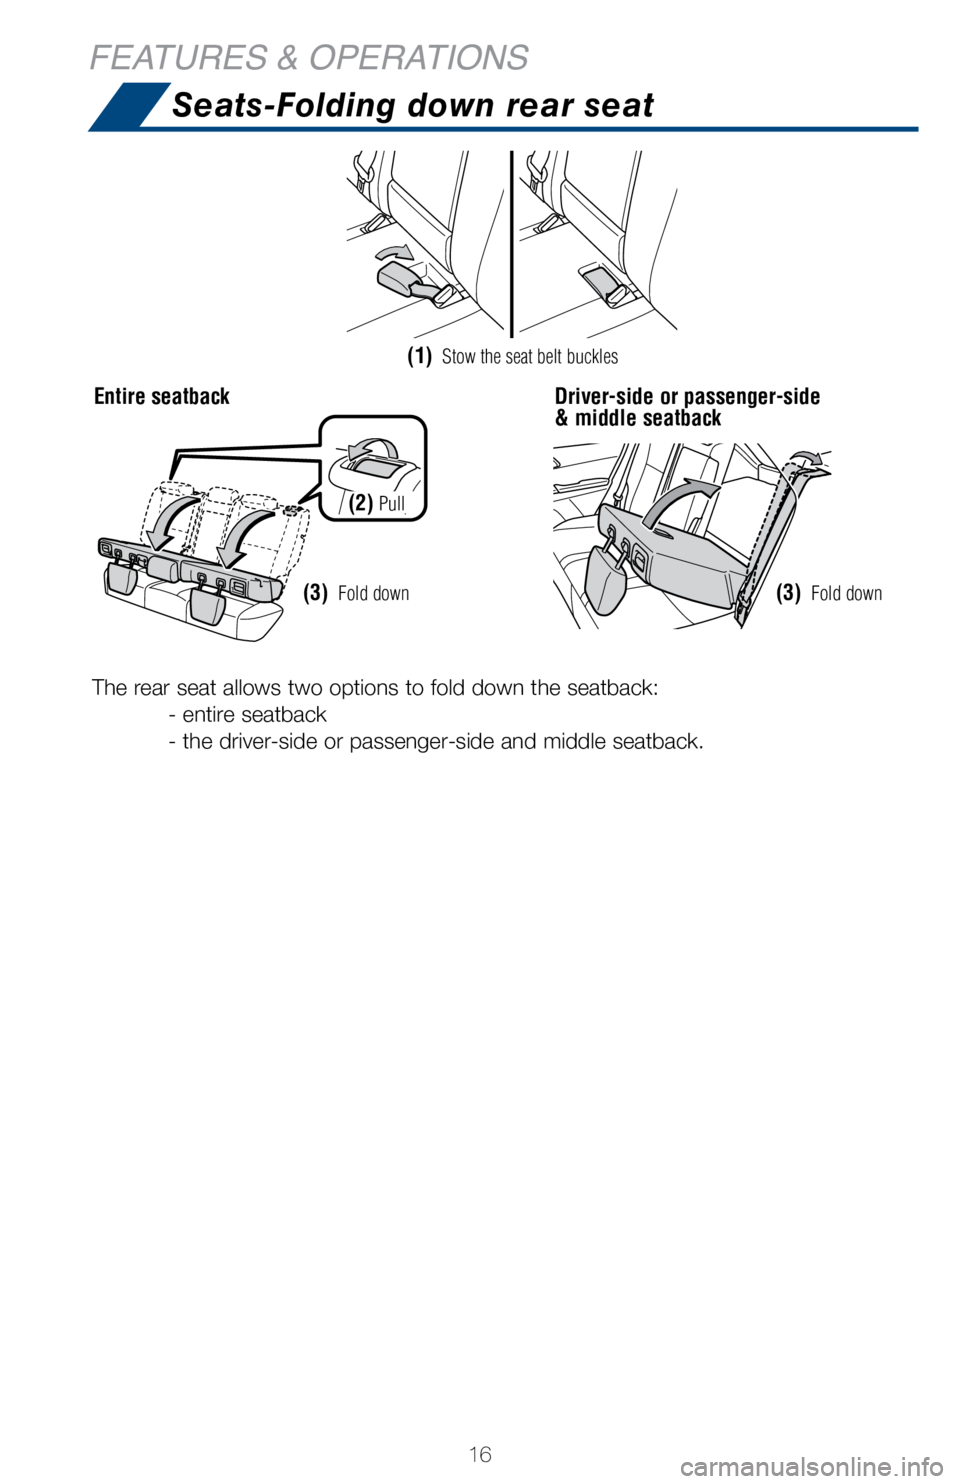
FEATURES & OPERATIONSSeats-Folding down rear seat
(1) Stow the seat belt buckles
(3) Fold down(3) Fold down
(2) Pull
Entire seatback Driver-side or passenger-side
& middle seatback
The rear seat allows two options to fold down the seatback: - entire seatback
- the driver-side or passenger-side and middle seatback.
Page 19 of 36
17
OVERVIEW
FEATURES & OPERATIONS
TOYOTA SAFETY SENSE
SAFETY & EMERGENCY FEATURES
Rear view monitor system
The rear view monitor system assists the driver by displaying an image o\
f the camera’s
view behind the vehicle when in reverse.
To see the camera’s image of the view behind the vehicle on the monit\
or screen, the
vehicle ignition switch must be in the ON position and the gear selector\
must be in the
REVERSE position.
If you shift the vehicle out of the “R” position, the screen retur\
ns to the previous
image.
The rear view monitor system is a device intended to supplement the driv\
er when
motoring in reverse and should not be relied upon solely. Drivers should\
check
behind the vehicle before entering and are reminded to use the rear view\
and side
mirrors once seated to ensure the intended path is clear before moving t\
he vehicle.
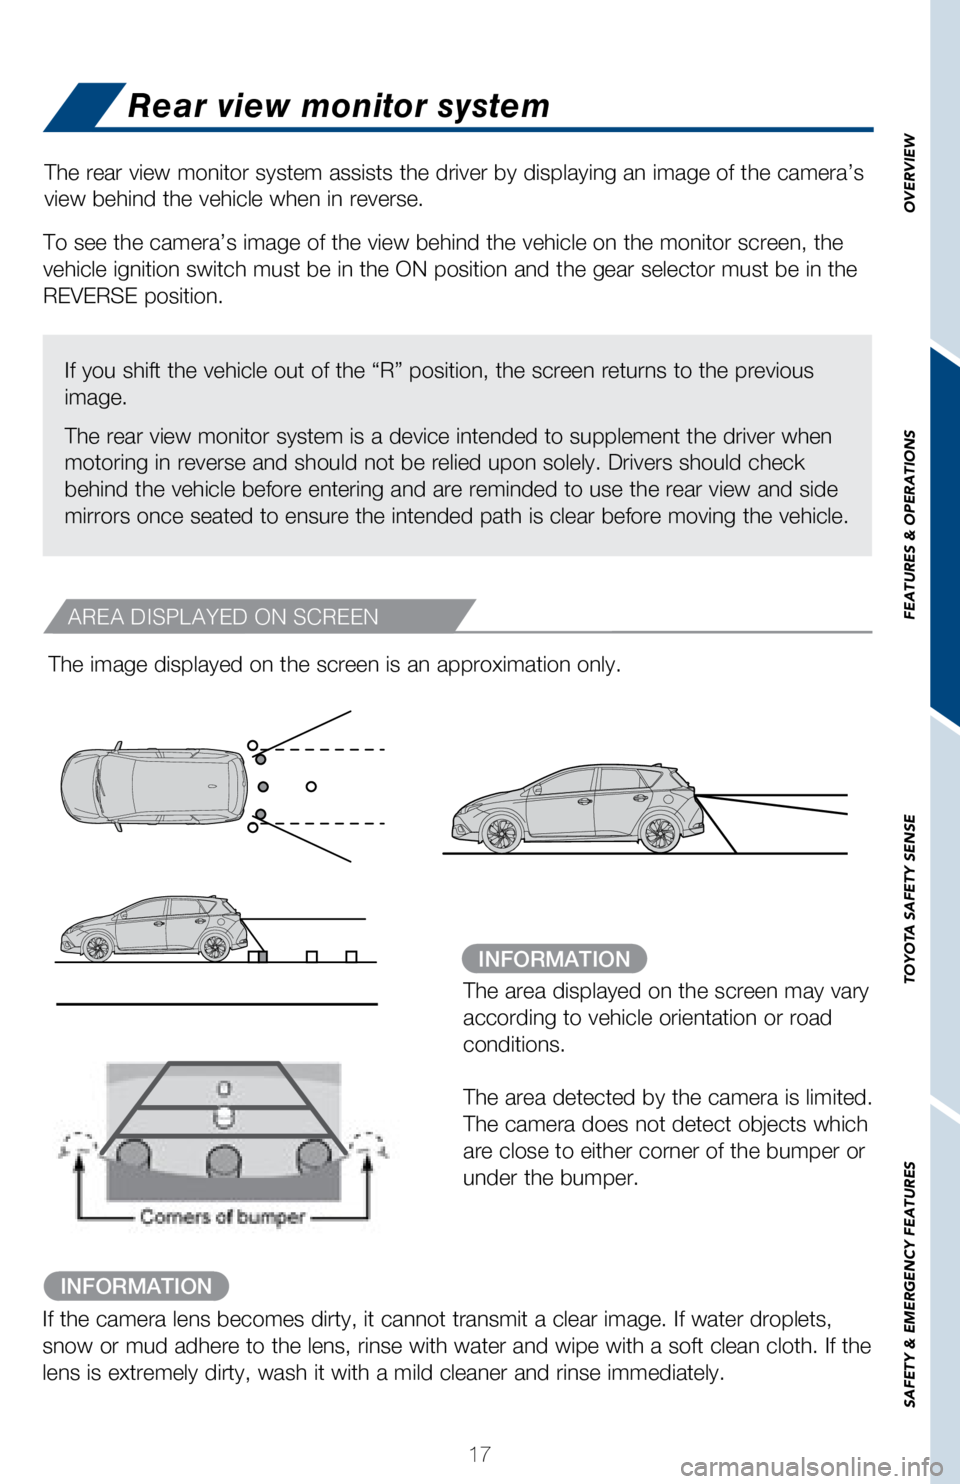
The image displayed on the screen is an approximation only.
The area displayed on the screen may vary
according to vehicle orientation or road
conditions.
The area detected by the camera is limited.
The camera does not detect objects which
are close to either corner of the bumper or
under the bumper.
INFORMATION
AREA DISPLAYED ON SCREEN
INFORMATION
If the camera lens becomes dirty, it cannot transmit a clear image. If w\
ater droplets,
snow or mud adhere to the lens, rinse with water and wipe with a soft cl\
ean cloth. If the
lens is extremely dirty, wash it with a mild cleaner and rinse immediate\
ly.
Page 20 of 36
18
INFORMATION
REAR VIEW MONITOR SYSTEM CAMERA
FEATURES & OPERATIONS
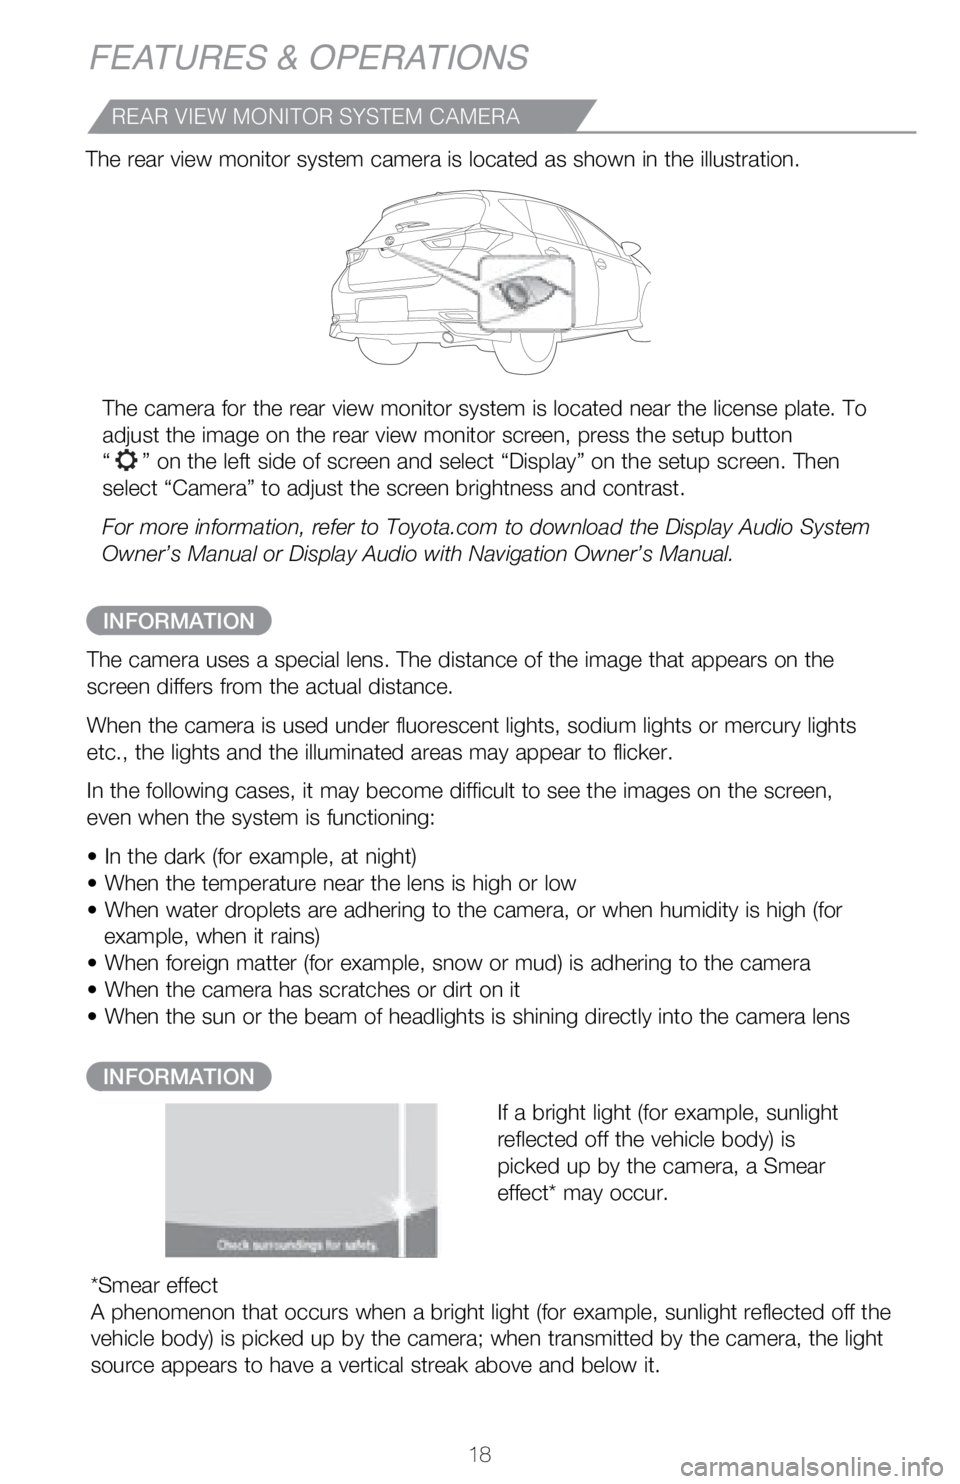
The camera for the rear view monitor system is located near the license \
plate. To
adjust the image on the rear view monitor screen, press the setup button\
“
” on the left side of screen and select “Display” on the setup \
screen. Then
select “Camera” to adjust the screen brightness and contrast.
For more information, refer to Toyota.com to download the Display Audio \
System
Owner’s Manual or Display Audio with Navigation Owner’s Manual.
The rear view monitor system camera is located as shown in the illustrat\
ion.
The camera uses a special lens. The distance of the image that appears o\
n the
screen differs from the actual distance.
When the camera is used under fluorescent lights, sodium lights or mercu\
ry lights
etc., the lights and the illuminated areas may appear to flicker.
In the following cases, it may become difficult to see the images on the\
screen,
even when the system is functioning:
• In the dark (for example, at night)
• When the temperature near the lens is high or low
• When water droplets are adhering to the camera, or when humidity is\
high (for
example, when it rains)
• When foreign matter (for example, snow or mud) is adhering to the\
camera
• When the camera has scratches or dirt on it
• When the sun or the beam of headlights is shining directly into the\
camera lens
*Smear effect
A phenomenon that occurs when a bright light (for example, sunlight ref\
lected off the
vehicle body) is picked up by the camera; when transmitted by the camer\
a, the light
source appears to have a vertical streak above and below it.
INFORMATION
If a bright light (for example, sunlight
reflected off the vehicle body) is
picked up by the camera, a Smear
effect* may occur.