TOYOTA GR86 2022 Owners Manual (in English)
Manufacturer: TOYOTA, Model Year: 2022, Model line: GR86, Model: TOYOTA GR86 2022Pages: 582, PDF Size: 86.38 MB
Page 531 of 582
69
6
6-2. Radio operation
Audio
■News announcement
A pop-up screen is displayed on the
screen and a news announcement
is played when, a news announce-
ment is received.
●This function can be turned on/off.
( P. 3 7 )
*: Use of this function may not be possi-
ble depending on country and vehi-
cle.
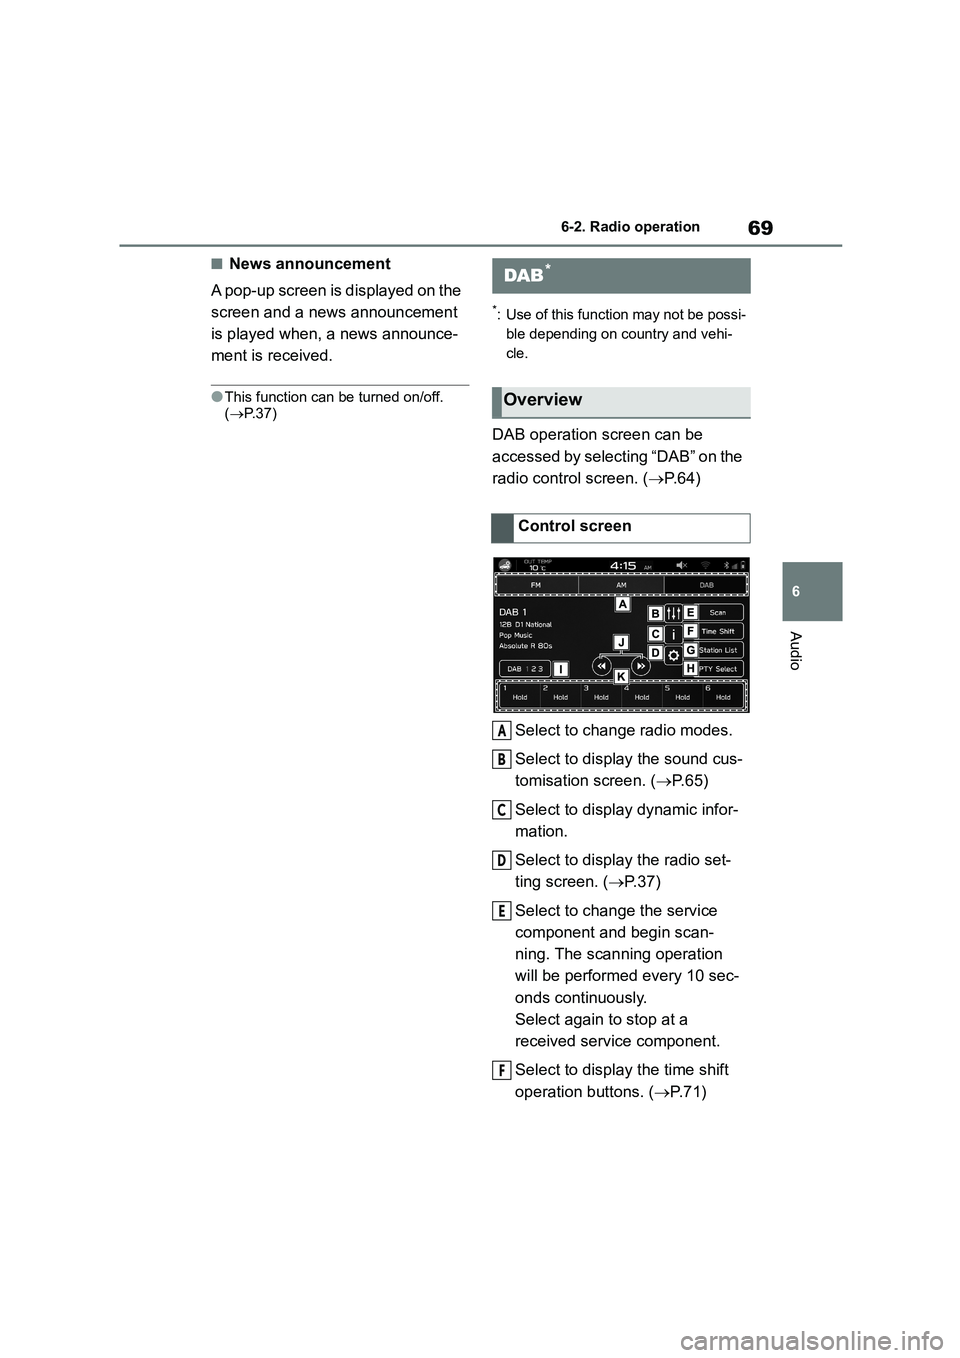
DAB operation screen can be
accessed by selecting “DAB” on the
radio control screen. ( P. 6 4 )
Select to change radio modes.
Select to display the sound cus-
tomisation screen. ( P. 6 5 )
Select to display dynamic infor-
mation.
Select to display the radio set-
ting screen. ( P.37)
Select to change the service
component and begin scan-
ning. The scanning operation
will be performed every 10 sec-
onds continuously.
Select again to stop at a
received service component.
Select to display the time shift
operation buttons. ( P. 7 1 )
DAB*
Overview
Control screen
A
B
C
D
E
F
Page 532 of 582
706-2. Radio operation
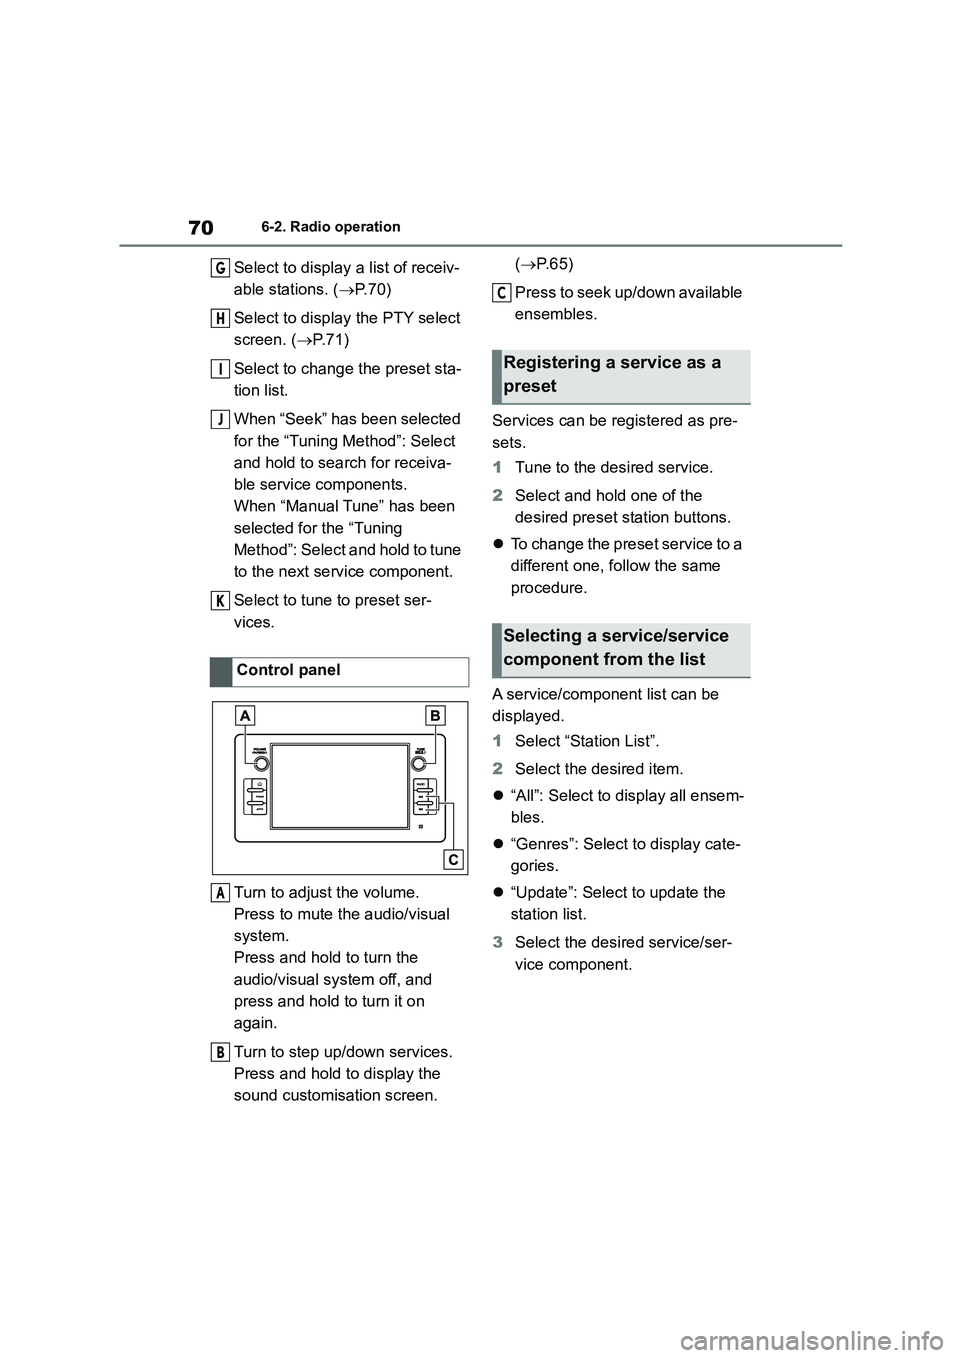
Select to display a list of receiv-
able stations. ( P. 7 0 )
Select to displa y the PTY select
screen. ( P. 7 1 )
Select to change the preset sta-
tion list.
When “Seek” has been selected
for the “Tuning Method”: Select
and hold to search for receiva-
ble service components.
When “Manual Tune” has been
selected for the “Tuning
Method”: Select and hold to tune
to the next service component.
Select to tune to preset ser-
vices.
Turn to adjust the volume.
Press to mute the audio/visual
system.
Press and hold to turn the
audio/visual system off, and
press and hold to turn it on
again.
Turn to step up/down services.
Press and hold to display the
sound customisation screen.
( P. 6 5 )
Press to seek up/down available
ensembles.
Services can be registered as pre-
sets.
1 Tune to the desired service.
2 Select and hold one of the
desired preset station buttons.
To change the preset service to a
different one, follow the same
procedure.
A service/component list can be
displayed.
1 Select “Station List”.
2 Select the desired item.
“All”: Select to display all ensem-
bles.
“Genres”: Select to display cate-
gories.
“Update”: Select to update the
station list.
3 Select the desired service/ser-
vice component.
Control panel
G
H
I
J
K
A
B
Registering a service as a
preset
Selecting a service/service
component from the list
C
Page 533 of 582
71
6
6-2. Radio operation
Audio
The service components of a
selected PTY (Programme Type)
can be seeked.
1 Select “PTY Select”.
2 Select the desired PTY.
3 Select “Seek”.
This function allows your radio to
receive station and programme
information from radio stations
which broadcast this information.
Depending on the availability of
RDS infrastructure, this function
may not operate properly.
■Traffic announcements func-
tion
A pop-up screen is displayed on the
screen and a traffic announcement
is played when, a traffic announce-
ment is received.
●This function can be turned on/off. ( P. 3 7 )
A service/component can be
cached and played back in a
time-shifted manner.
A service/component that is cur-
rently being listened to can be
cached.
■Playing back the cache
A service/component cached in the
programme cache can be played
back.
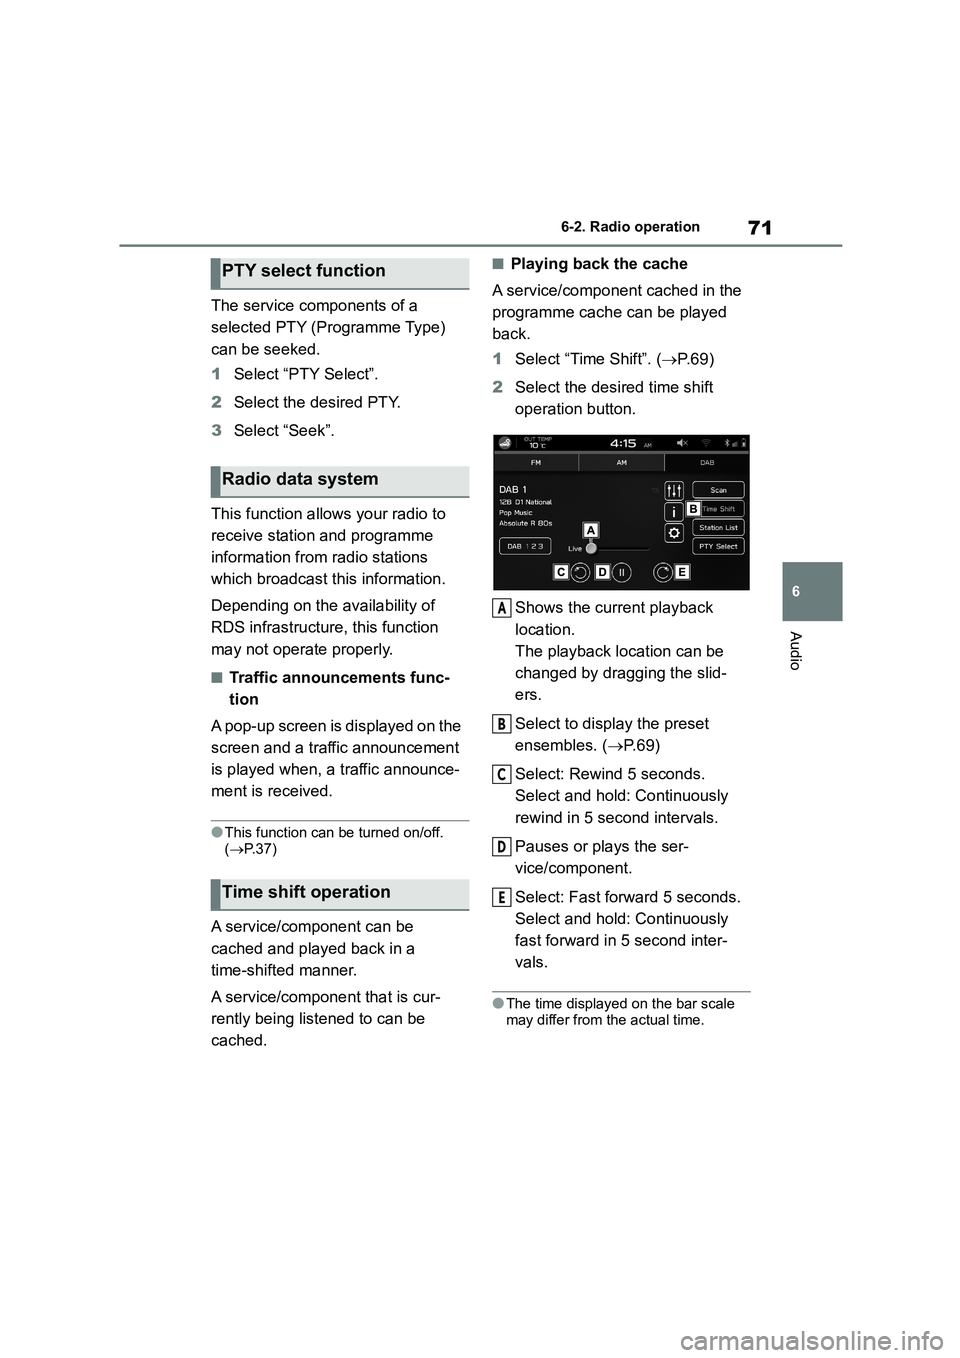
1 Select “Time Shift”. (P. 6 9 )
2 Select the desired time shift
operation button.
Shows the current playback
location.
The playback location can be
changed by dragging the slid-
ers.
Select to display the preset
ensembles. ( P. 6 9 )
Select: Rewind 5 seconds.
Select and hold: Continuously
rewind in 5 second intervals.
Pauses or plays the ser-
vice/component.
Select: Fast forward 5 seconds.
Select and hold: Continuously
fast forward in 5 second inter-
vals.
●The time displayed on the bar scale
may differ from the actual time.
PTY select function
Radio data system
Time shift operation
A
B
C
D
E
Page 534 of 582
726-3. Media operation
6-3.Media operation
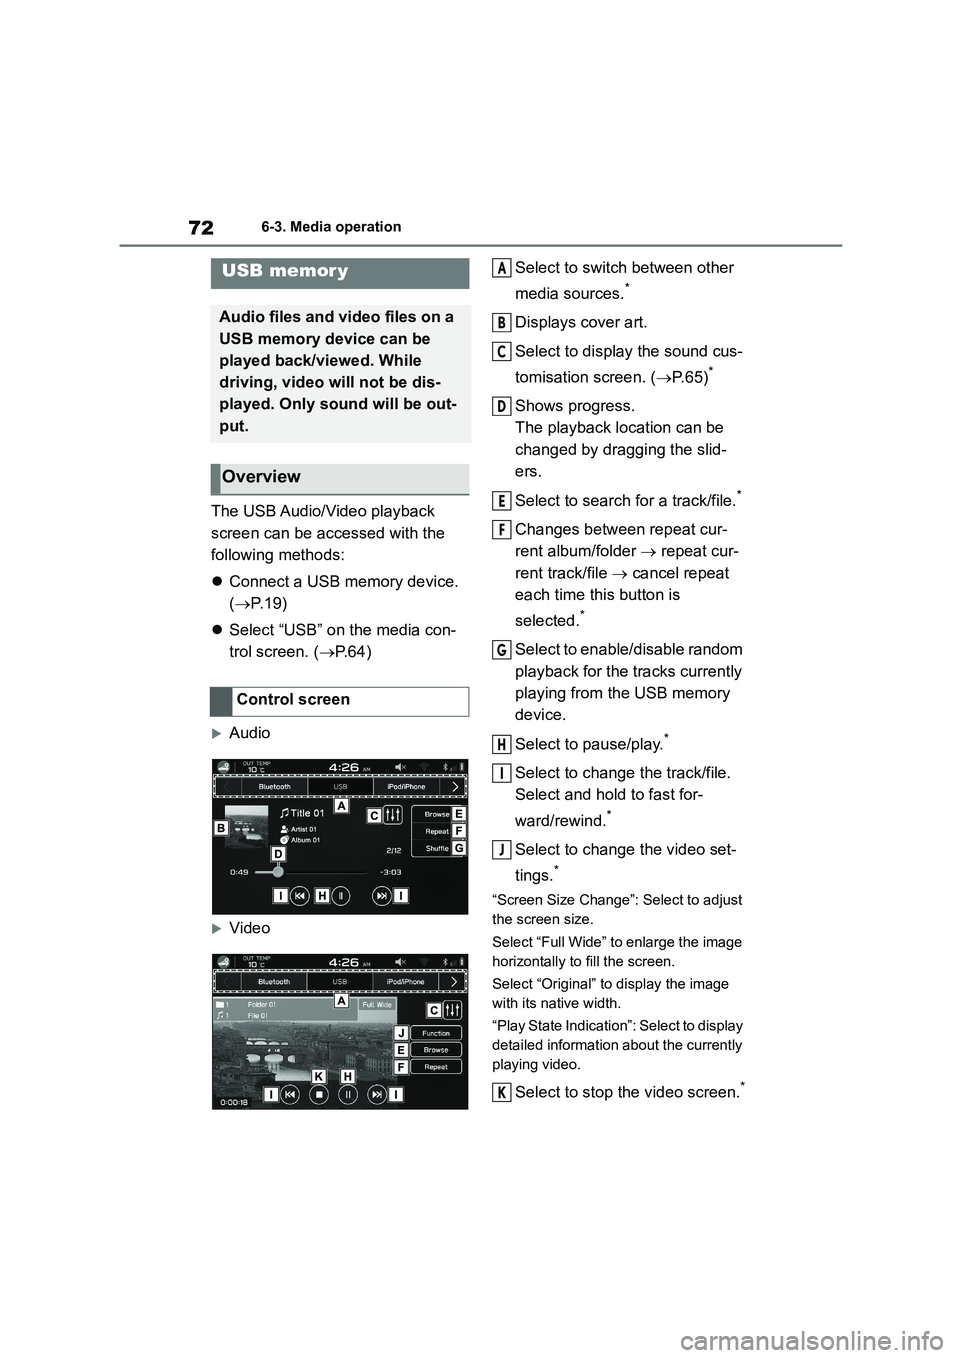
The USB Audio/Video playback
screen can be accessed with the
following methods:
Connect a USB memory device.
( P. 1 9 )
Select “USB” on the media con-
trol screen. ( P.64)
Audio
Video
Select to switch between other
media sources.*
Displays cover art.
Select to display the sound cus-
tomisation screen. ( P. 6 5 )*
Shows progress.
The playback location can be
changed by dragging the slid-
ers.
Select to search for a track/file.*
Changes between repeat cur-
rent album/folder repeat cur-
rent track/file cancel repeat
each time this button is
selected.*
Select to enable/disable random
playback for the tracks currently
playing from the USB memory
device.
Select to pause/play.*
Select to change the track/file.
Select and hold to fast for-
ward/rewind.*
Select to change the video set-
tings.*
“Screen Size Change”: Select to adjust
the screen size.
Select “Full Wide” to enlarge the image
horizontally to fill the screen.
Select “Original” to display the image
with its native width.
“Play State Indication”: Select to display
detailed information about the currently
playing video.
Select to stop the video screen.*
USB memor y
Audio files and video files on a
USB memory device can be
played back/viewed. While
driving, video will not be dis-
played. Only sound will be out-
put.
Overview
Control screen
A
B
C
D
E
F
G
H
I
J
K
Page 535 of 582
73
6
6-3. Media operation
Audio
*: This switch will be displayed when
the video screen is touched.
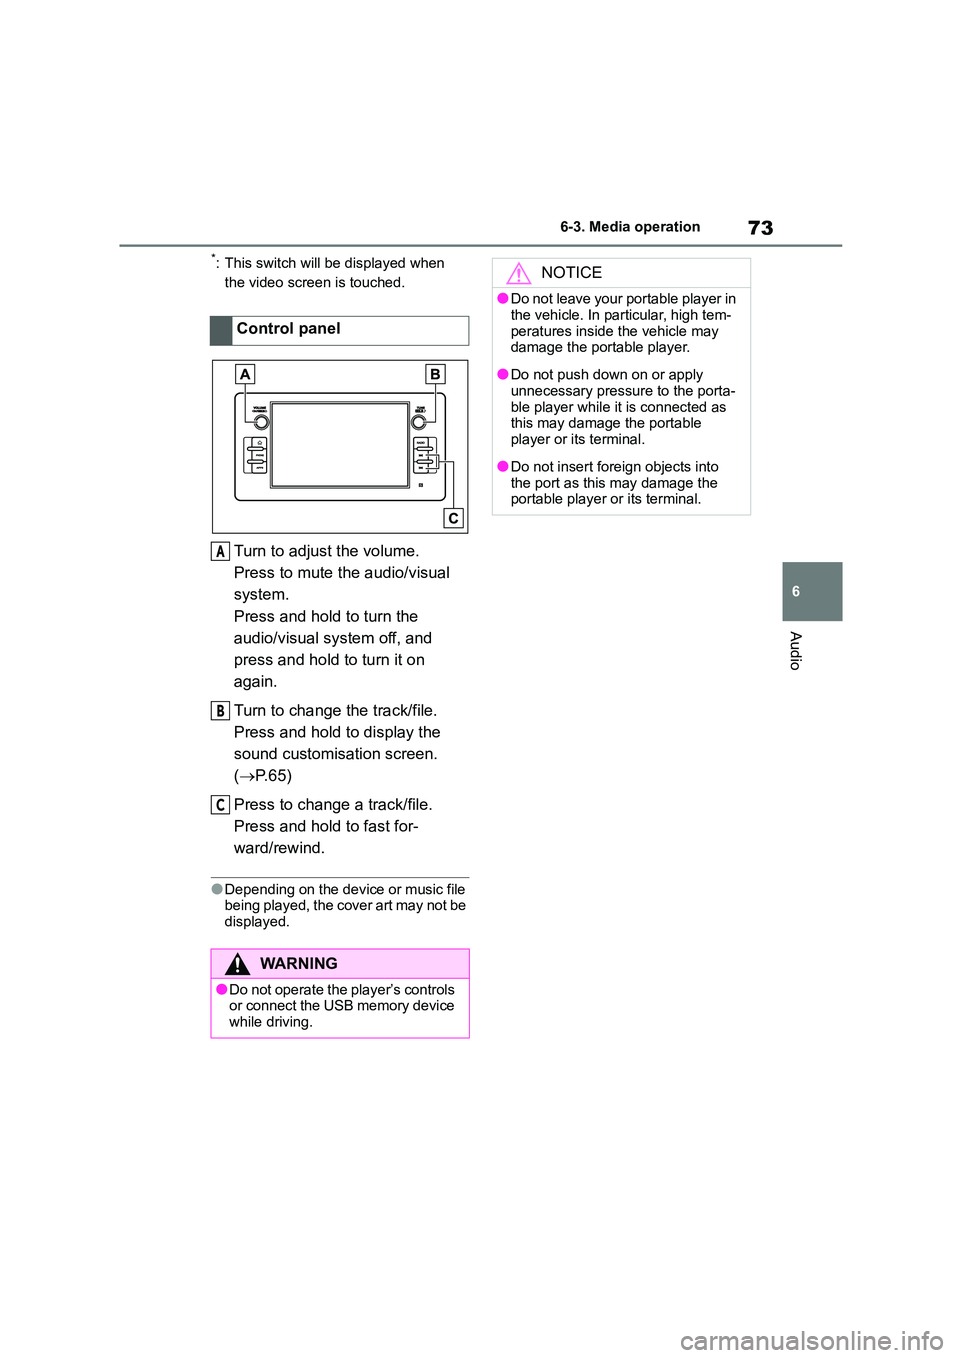
Turn to adjust the volume.
Press to mute the audio/visual
system.
Press and hold to turn the
audio/visual system off, and
press and hold to turn it on
again.
Turn to change the track/file.
Press and hold to display the
sound customisation screen.
( P.65)
Press to change a track/file.
Press and hold to fast for-
ward/rewind.
●Depending on the device or music file
being played, the cover art may not be
displayed.
Control panel
WA R N I N G
●Do not operate the player’s controls or connect the USB memory device
while driving.
A
B
C
NOTICE
●Do not leave your portable player in
the vehicle. In particular, high tem-
peratures inside the vehicle may damage the portable player.
●Do not push down on or apply unnecessary pressure to the porta-
ble player while it is connected as
this may damage the portable
player or its terminal.
●Do not insert foreign objects into
the port as this may damage the portable player or its terminal.
Page 536 of 582
746-3. Media operation
1Connect an iPod/iPhone to the
USB port. ( P. 1 9 )
2 Check the confirmation mes-
sage, and then select “No”.
If “Don’t show again.” is selected,
the confirmation message will
not be displayed again.
If the connected iPhone is recog-
nised as an Apple CarPlay
device, select the device from
the Apple CarPlay device list to
remove the check mark. ( P. 5 9 )
Select “iPod/iPhone” on the media
control screen. ( P. 6 4 )
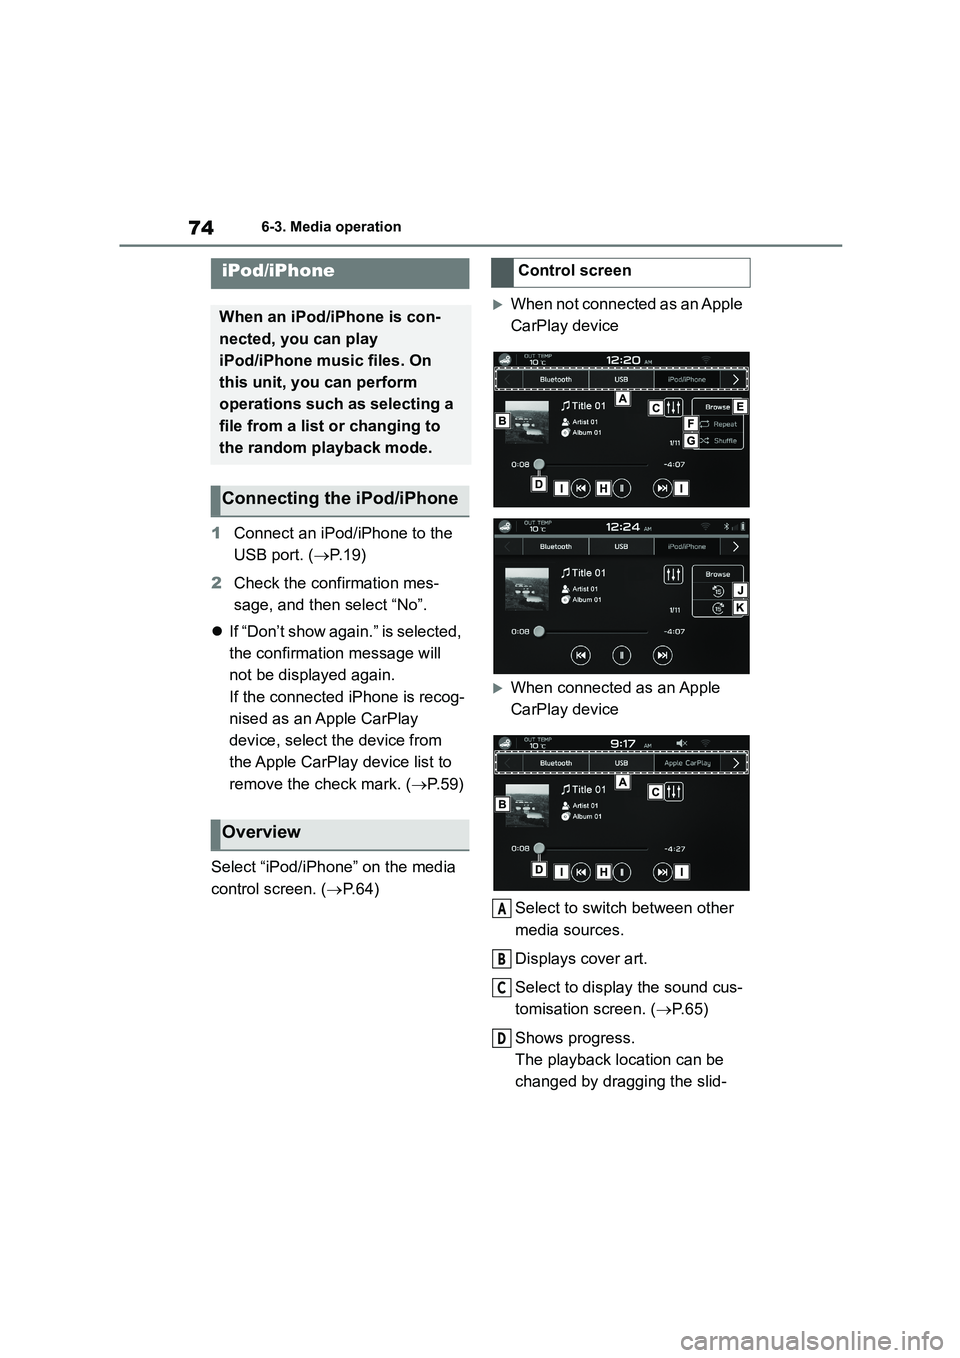
When not connected as an Apple
CarPlay device
When connected as an Apple
CarPlay device
Select to switch between other
media sources.
Displays cover art.
Select to display the sound cus-
tomisation screen. ( P. 6 5 )
Shows progress.
The playback location can be
changed by dragging the slid-
iPod/iPhone
When an iPod/iPhone is con-
nected, you can play
iPod/iPhone music files. On
this unit, you can perform
operations such as selecting a
file from a list or changing to
the random playback mode.
Connecting the iPod/iPhone
Overview
Control screen
A
B
C
D
Page 537 of 582
75
6
6-3. Media operation
Audio
ers.
Select to search for a track.
Changes between repeat cur-
rent album repeat current
track cancel repeat each time
this button is selected.
Select to enable/disable random
playback for the tracks currently
playing on the iPod/iPhone.
Select to pause/play.
Select to change the track.
Select and hold to fast for-
ward/rewind.
Select to rewind the current con-
tent item in fixed intervals.*
Select to fast forward the current
content item in fixed intervals.*
*: Display when playing Audiobooks or
Podcasts
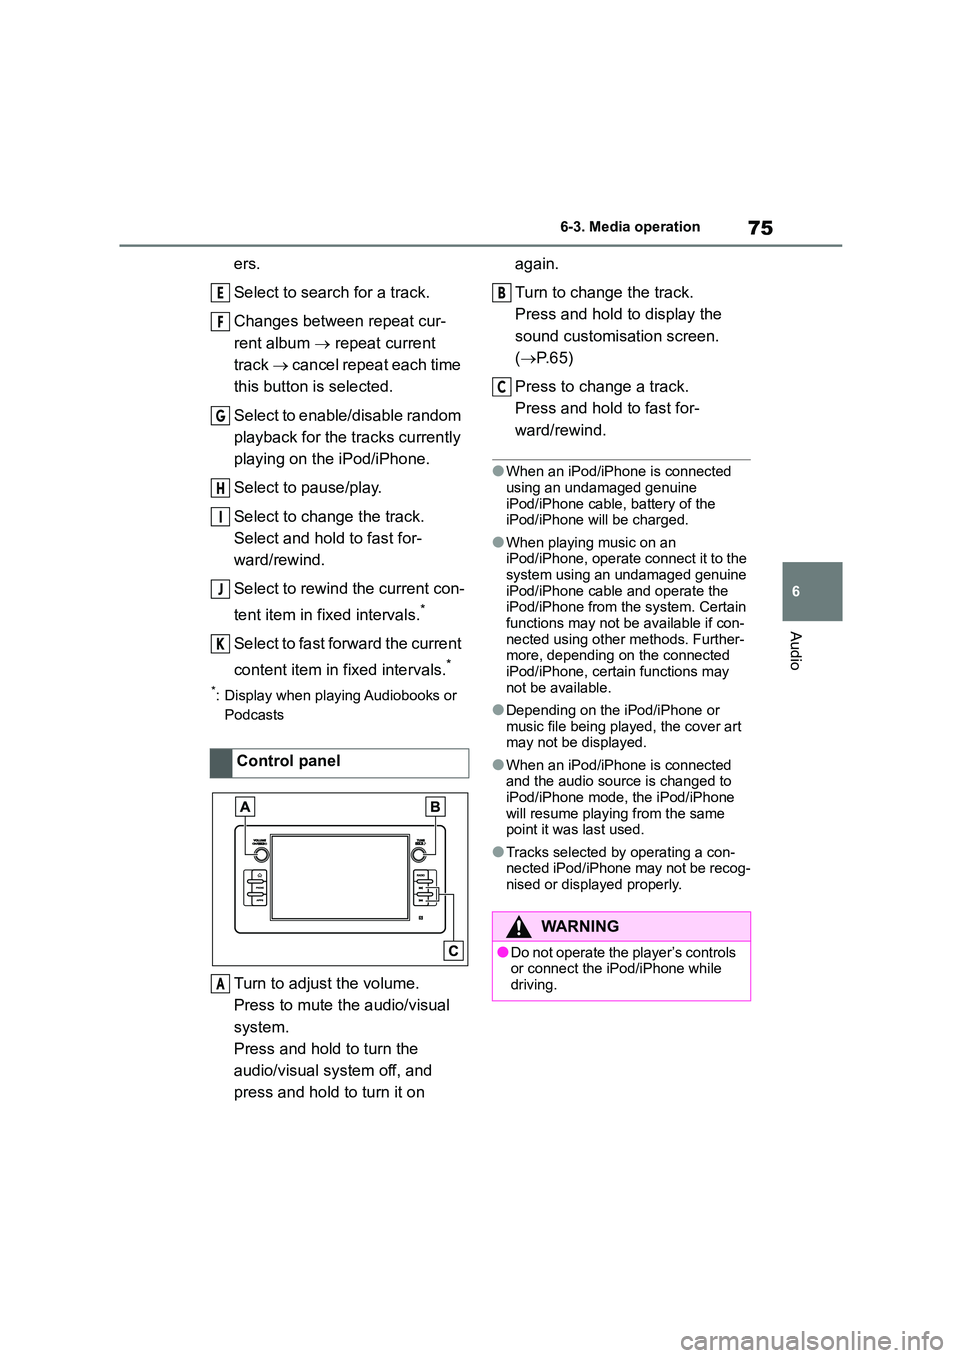
Turn to adjust the volume.
Press to mute the audio/visual
system.
Press and hold to turn the
audio/visual system off, and
press and hold to turn it on
again.
Turn to change the track.
Press and hold to display the
sound customisation screen.
( P. 6 5 )
Press to change a track.
Press and hold to fast for-
ward/rewind.
●When an iPod/iPhone is connected using an undamaged genuine
iPod/iPhone cable, battery of the
iPod/iPhone will be charged.
●When playing music on an
iPod/iPhone, operate connect it to the
system using an undamaged genuine iPod/iPhone cable and operate the
iPod/iPhone from the system. Certain
functions may not be available if con- nected using other methods. Further-
more, depending on the connected
iPod/iPhone, certain functions may not be available.
●Depending on the iPod/iPhone or music file being played, the cover art
may not be displayed.
●When an iPod/iPhone is connected
and the audio source is changed to
iPod/iPhone mode, the iPod/iPhone will resume playing from the same
point it was last used.
●Tracks selected by operating a con-
nected iPod/iPhone may not be recog-
nised or displayed properly.
Control panel
E
F
G
H
I
J
K
A
WA R N I N G
●Do not operate the player’s controls or connect the iPod/iPhone while
driving.
B
C
Page 538 of 582
766-3. Media operation
The Bluetooth® audio control
screen can be accessed by select-
ing “Bluetooth” on the media control
screen. ( P. 6 4 )
Depending on the type of portable
player connected, some functions
may not be available and/or the
screen may look differently than
shown in this manual.
NOTICE
●Do not leave your portable player in
the vehicle. In particular, high tem-
peratures inside the vehicle may damage the portable player.
●Do not push down on or apply unnecessary pressure to the porta-
ble player while it is connected as
this may damage the portable
player or its terminal.
●Do not insert foreign objects into
the port as this may damage the portable player or its terminal.
Bluetooth® audio
The Bluetooth® audio system
enables users to play music
files stored on Bluetooth®
devices through the vehicle
speakers via wireless commu-
nication.
This audio/visual system sup-
ports Bluetooth®, a wireless
data system capable of playing
portable audio music without
cables. If your device does not
support Bluetooth®, the
Bluetooth® audio system will
not function.
Overview
Page 539 of 582
77
6
6-3. Media operation
Audio
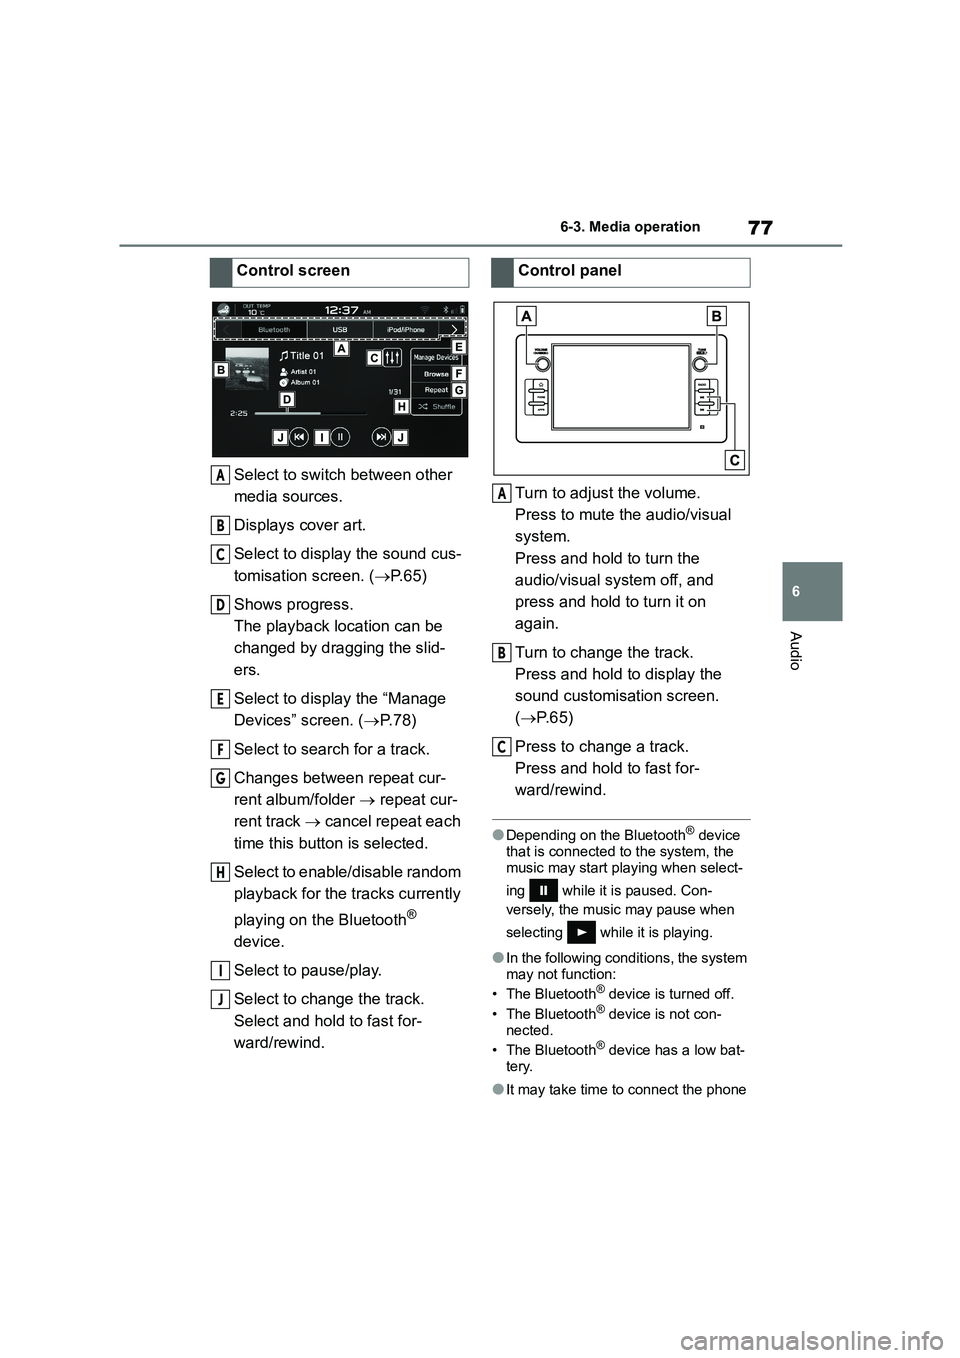
Select to switch between other
media sources.
Displays cover art.
Select to displa y the sound cus-
tomisation screen. ( P.65)
Shows progress.
The playback location can be
changed by dragging the slid-
ers.
Select to display the “Manage
Devices” screen. ( P. 7 8 )
Select to search for a track.
Changes between repeat cur-
rent album/folder repeat cur-
rent track cancel repeat each
time this button is selected.
Select to enable/disable random
playback for the tracks currently
playing on the Bluetooth®
device.
Select to pause/play.
Select to change the track.
Select and hold to fast for-
ward/rewind.
Turn to adjust the volume.
Press to mute the audio/visual
system.
Press and hold to turn the
audio/visual system off, and
press and hold to turn it on
again.
Turn to change the track.
Press and hold to display the
sound customisation screen.
( P. 6 5 )
Press to change a track.
Press and hold to fast for-
ward/rewind.
●Depending on the Bluetooth® device
that is connected to the system, the
music may start playing when select-
ing while it is paused. Con-
versely, the music may pause when
selecting while it is playing.
●In the following conditions, the system
may not function:
• The Bluetooth® device is turned off.
• The Bluetooth® device is not con-
nected.
• The Bluetooth® device has a low bat-
tery.
●It may take time to connect the phone
Control screen
A
B
C
D
E
F
G
H
I
J
Control panel
A
B
C
Page 540 of 582
786-3. Media operation
when Bluetooth® audio is being
played.
●For operating the portable player, see
the instruction manual that comes with it.
●If the Bluetooth® device is discon-
nected due to poor reception from the
Bluetooth® network when the engine switch is changed to ACC or ON, the
system will automatica lly reconnect to
the portable player.
●If the Bluetooth® device is discon-
nected on purpose, such as it was turned off, this does not happen.
Reconnect the portable player manu-
ally.
●Bluetooth® device information is regis-
tered when the Bluetooth® device is
connected to the Bluetooth®
audio/visual system. When selling or disposing of the vehicle, remove the
Bluetooth® audio information from the
system. ( P. 2 9 )
●Depending on the Bluetooth® device
or music file being played, the cover
art may not be displayed.
●If the Bluetooth® device does not play
automatically when connected, device
operation may be necessary.
To use the Bluetooth® audio/visual
system, it is necessary to register a
Bluetooth® device with the system.
Registering an additional device
1 Select “Manage Devices” on the
Bluetooth® audio control screen.
2 For more information: P. 2 4
Selecting a registered device
1 Select “Manage Devices” on the
Bluetooth® audio control screen.
2 Select the Bluetooth® device to
be connected.
WA R N I N G
●Do not operate the player’s controls
or connect to the Bluetooth® audio/visual system while driving.
●This system is fitted with Bluetooth®
antennas. People with implantable
cardiac pacemakers, cardiac resyn- chronisation therapy-pacemakers
or implantable cardioverter
defibrillators should maintain a rea- sonable distance between them-
selves and the Bluetooth®
antennas. The radio waves may affect the operation of such
devices.
●Before using Bluetooth® devices,
users of any electrical medical
device other than implantable car- diac pacemakers, cardiac resyn-
chronisation therapy-pacemakers
or implantable cardioverter defibrillators should consult the
manufacturer of the device for infor-
mation about its operation under the influence of radio waves. Radio
waves could have unexpected
effects on the operation of such medical devices.
NOTICE
●Do not leave your portable player in
the vehicle. In particular, high tem-
peratures inside the vehicle may damage the portable player.
Connecting a Bluetooth®
device