TOYOTA GT86 2018 Accessories, Audio & Navigation (in English)
Manufacturer: TOYOTA, Model Year: 2018, Model line: GT86, Model: TOYOTA GT86 2018Pages: 164, PDF Size: 6.35 MB
Page 101 of 164
1.SETUPOPERATION1.SETUPOPERATION
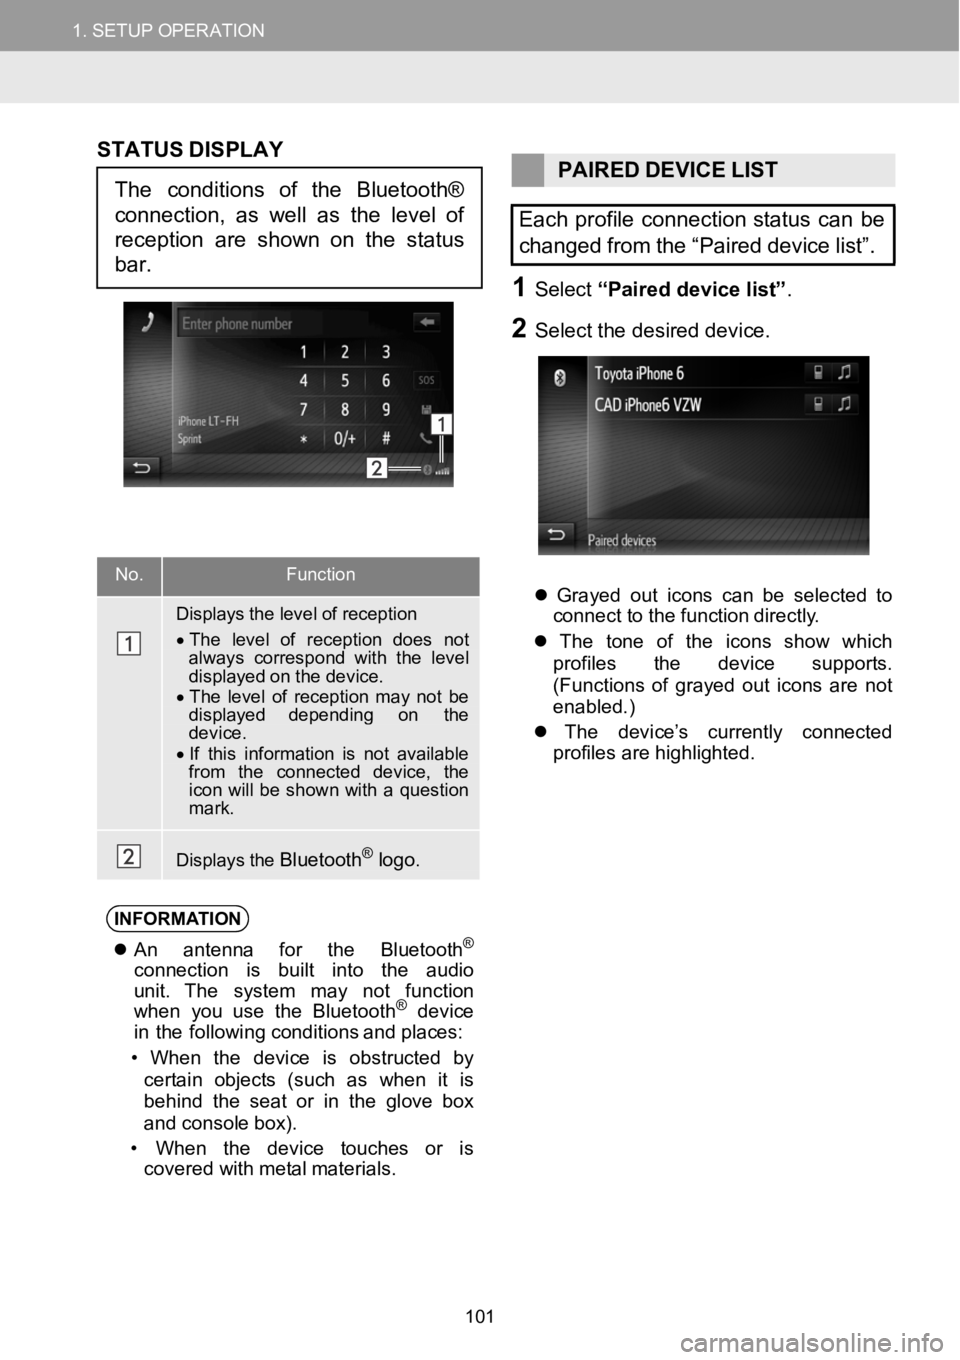
No.Functi on
Displays the level of reception
•The level of reception does notalways correspond with thelevel displayed on the device.•The level of reception m aynot be displayed depending on thedevice.•If this information isnot available from the connected device, the icon willbe shown witha question mark.
Displays theBluetooth®logo.
STAT US DISPLAY
PAIREDDEVICELIST
Each profile connection status canbe
changed from the “Paired devicelist”.
1Select“Paired device list ”.
2Se lect the d esired d evice.
Grayed out icons can be selected to
c onne ct to the f unction dire ctly.
The tone of the icons show which
pro files the d evice su pports.
( Functions of grayed out icons are not
enabled.)
The de vice’s cu rrently connec ted
pro files ar e highlig hted.
INFORMA TION
An ant enna for the Bluet ooth®
conn ect ion is built into the audio
unit . Th esystem may not funct ion
when youuse the Bluet ooth
®device
in the f ollowin g conditions and p laces:
• When the dev ice is obstructed by
cer tai n objects (such as when it is
beh ind the seat or in the g love box
and conso lebo x).
• When the device t ouches or is
covered with me talma terials.
Theconditions of theBluetooth®
connection, as well as the level of
reception are shownon the status
bar.
101
Page 102 of 164
1. SETUP OPERATION 1. SETUP OPERATION
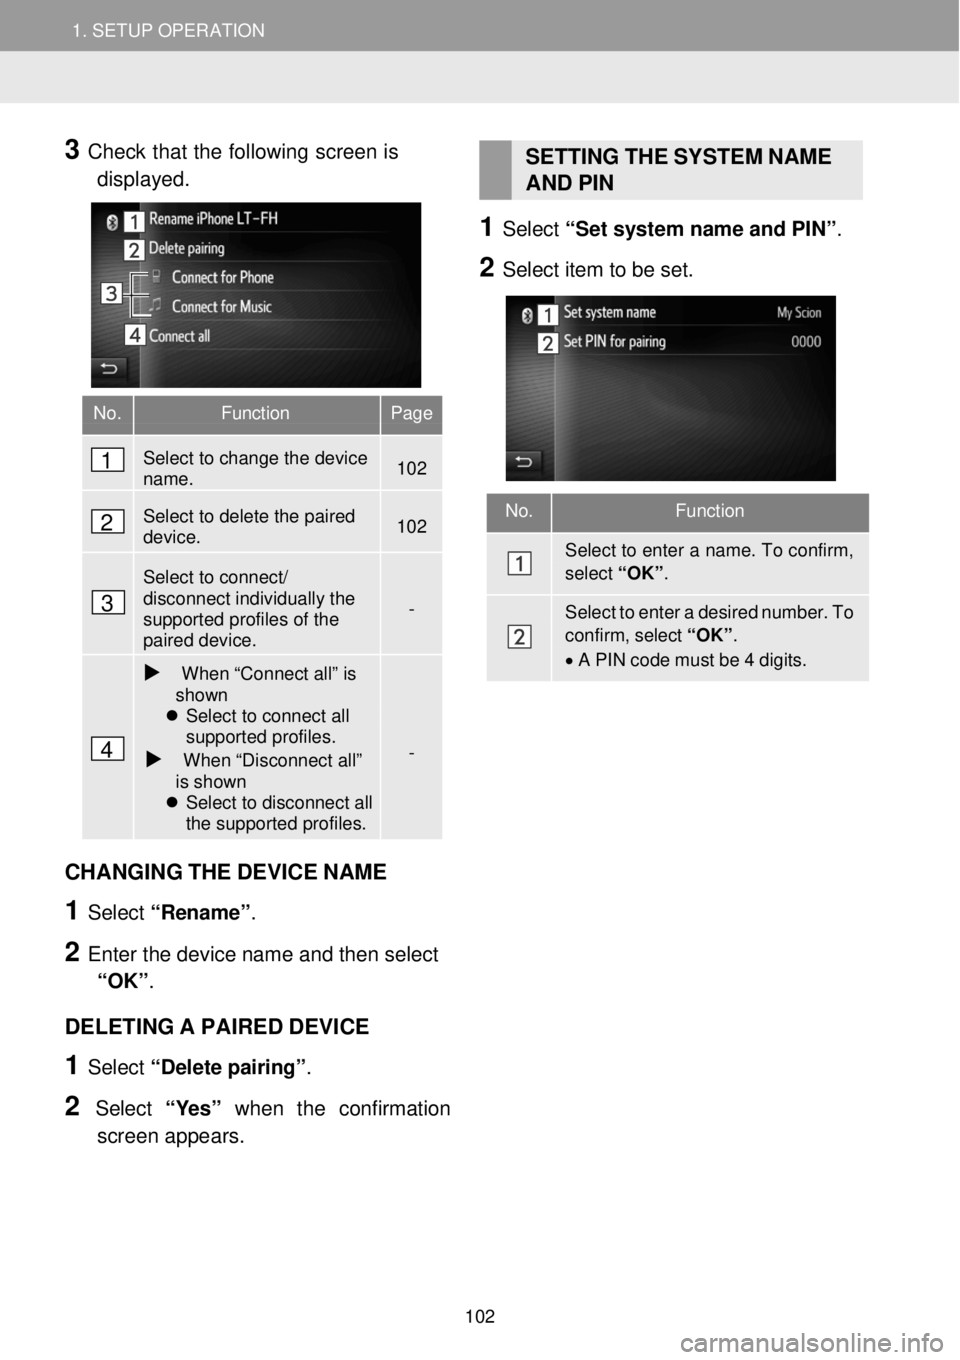
3 Check that the follow ing screen is
di sp laye d.
SETT ING THE SYSTEM NAME
AND PIN
1 Select “Set sy stem na me an d PIN”.
2 Se lec t item t o be se t.
CH ANGING THE DEVICE NAME
1 Select “Re name ”.
2 Enter the device na me and then se lect
“OK” .
DELETI NG A PA IRED DEVICE
1 Select “De lete pa iring” .
2 Select “Yes” when the confirmation
scree n appe ars.
No. Function Page
Select to change the device name. 102
Select to delete the paired device. 102
Select to connect/ disconnect individually the supported profiles of the paired device.
-
When “Connect all” is shown Select to connect all supported profiles.
When “Disconnect all” is shown Select to disconnect all the supported profiles.
-
No. Function
Select to enter a name. To confirm,
select “OK”.
Select to enter a desired number. To
confirm, select “OK”.
• A PIN code must be 4 digits.
1
2
3
4
102
Page 103 of 164

1. SETUP OPERATION 1. SETUP OPERATION
1 Display any audio source top screen.
USB Memory ( →P.22)
iPod ( →P.26)
Bluetooth® device Audio (→P.30)
Aha ( →P.36)
2 Select
3 Select ite ms to be set.
TONE
How good an audio program sounds is
largely determined by the mix of the
treble, mid and bass levels. In fact,
dif ferent kinds of music and vocal
programs usually sound better with
different mi xes of treble, mid and bass.
1 Disp lay t he audi o setti ngs scre en.
(→P.1 03)
2 Adjust the le vel of the bass, mid and
treble selecting
or for the
desired setting.
No. Function Page
Select to adjust the bass/mid/treble. 103
Select to adjust the balance/fader. 104
Select to set the Equalizer (EQ) to VOCAL, NATURAL or POWERFUL. (see more details in the Base Display Audio owner’s manual)
-
Select to set the Automatic Sound Leveling (ASL) to Low, Mid, High or Off (see more details in the Base Display Audio owner’s manual)
104
6. AUDIO SETTINGS
1
2
3
4
103
Page 104 of 164
1. SETUP OPERATION 1. SETUP OPERATION
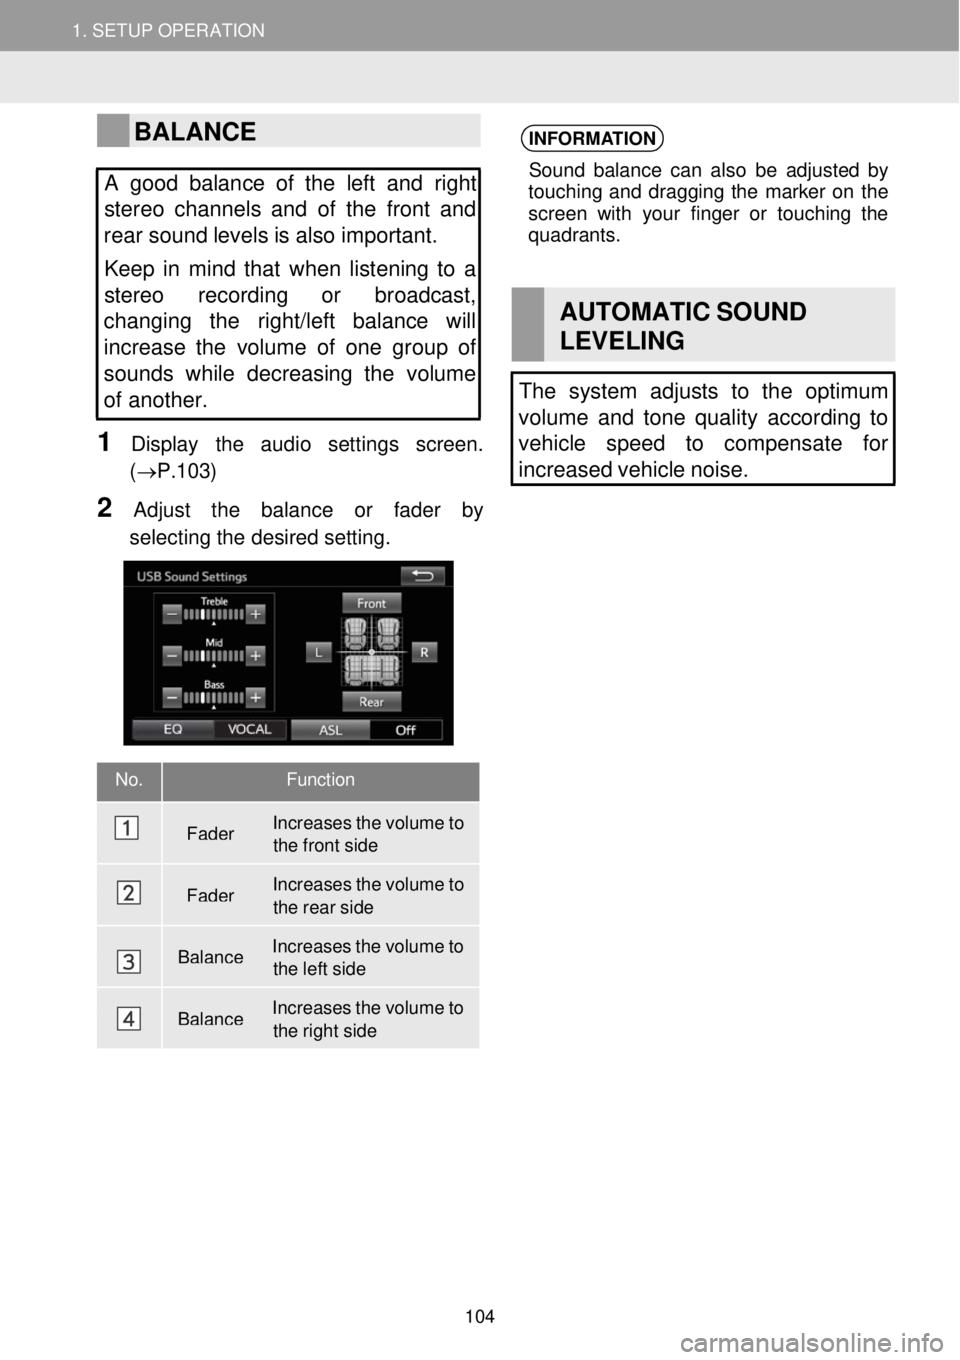
BALANCE
A good balance of the le ft and right
stereo channels and of the front and
rear so und levels is also important.
Keep in mind that when listening to a
ste reo recording or broadcast,
changing the right/left balance will
increase the volume of one group of
sounds while decreasing the volume
of another.
1 Display the a udio sett ings scre en.
(→ P.1 03)
2 Adjust the balance or fa der by
sel ect ing the d esired sett ing.
INFORMA TION
Sound ba lanc e can also be a djust ed by
to uching and dragging the marker on the
scree n with your finger or tou ching the
qua drant s.
AUT OMA TIC SOUND
LEVEL ING
The system adjusts to the optimum
volume and tone quality accord ing to
vehicle speed to compensate for
increased vehicle noise.
No. Functi on
Fader Increases the volume to the front side
Fader Increases the volume to the
rear side
Balance Increases the volume to the left side
Balance Increases the volume to the right side
104
Page 105 of 164

1.SETUPOPERATION
1Displ ay the “Setup” scr een. ( →P.8 9)
2Select “Vehicle”.
3Select the desired item
7. VEHICLE SETTINGS
Vehicle model specific
customization settings can be
changed
105
Page 106 of 164
1.SETUP OPERATION
6
NAVIGATION
SYSTEM
1
BASIC INFORMATION
BEFORE OPERATION
1. QUICK REFERENCE ...... ............ 108
2. DISPLAYING THE NA VIGATION
SCREEN.. ....... .............................. 112
DISPLAYING MAP SCREEN ............... 112
DISPLAYING THE NAVIGATION
MENU SCREEN.................................... 112
3. NAVIGATION SYSTEM FUNCTION
INDEX ...... .................................... 114
2 MAP SCREEN OPERATION
AND MAP ICONS
1 . MAP SCREEN OPERATION ...... . 116
CURRENT VEHICLE POSITION
DISPLAY……………………….............. 116
MAP CONFIGURATIONS……….......... 118
2. MAP ICONS……. ......................... 120
DISPLAYING VARIOUS
INFORMATION ON THE MAP........... 120
POI* ICONS……………………. ......... 120
3 DESTINATION SEARCH
1. DESTINATION SEARCH INDEX. . 123
2. SEARCH OPERATION………….. 124
BY REGISTERED POINTS ................ 124
FROM PREVIOUS DESTINATIONS.... 124
BY PHONE BOOK ............................... 125
BY ADDRESS...................................... 125
BY POIs*.............................................. 126
BY NAME…………............................... 127
BY CATEGORY…................................ 128
ON THE MAP....................................... 130
BY COORDINATES............................. 130
4
ROUTE GUIDANCE
1. STARTING ROUTE GUIDANCE ... 132
STARTING ROUTE GUIDANCE
SCREEN………………………............... 132
ADJUSTING THE ROUTE…..….......... 133
2. ROUTE GUID ANCE….................... 134
ROUTE GUIDANCE SCREEN......... 134
VOICE GUIDANCE…………….......... 135
*: Point of Interest
106
Page 107 of 164

6
NAVIGATION SYSTEM
3 . SETTING AND DELETING THE
ROUTE……………………….... ...... 137
STOPPING ROUTE GUIDANCE........ . 138
ADDING AND EDITING WAY POINTS. 138
DISPLAYING ROUTE INFORMATION.. 140
DISPLAYING THE TURN LIST……..... 141
BLOCKING ROAD AHEAD……..…..... 141
DETOURING A SEGMENT O N THE
ROUTE…………………………….…..... 142
5 FAVORITE DESTINATION S
1 . REGISTERING AN ENTRY…....... 143
REGISTERING A NEW ENTRY........... 143
2. DISPLAYING AND EDITING THE
ENTRY INFORMATION………. ..... 1 47
DISPLAYING AND EDITING THE
ENTRY INFORMATION………............ 147
3. AUTO -NAVIGATION TO ENTRY.. 1 49
SETTING UP AUTO -NAVIGATION...... 149
4. SENDING AND RESTORING
STORED CONTACTS USING A
USB MEMORY……………….. ...... 150
SENDING STORED CONTACTS TO A
USB MEMORY…………………... ......... 150
RESTORING STORED CONTACTS
FROM A USB MEMORY……….. ......... 151
6
NAVIGATION SETTING
1. MAP SETTINGS………………….. 152
SETTING THE MAP………………….. 152
2. ROUTE SETTINGS……………….. 155
SETTING THE ROUTE OPTIONS….... 155
7
NAVIGATION SYSTEM
INFORMATION
1. LIMITATIONS OF THE
NAVIGATION SYSTEM. .... ........... 156
2. NAVIGATION DATABASE
UPDATES.. ................................... 158
107
Page 108 of 164
1. BASIC INFORMATION BEFORE OPERATION
1. QUICK REFERENCE
1. BASIC INFORMATION BEFORE OPERATION
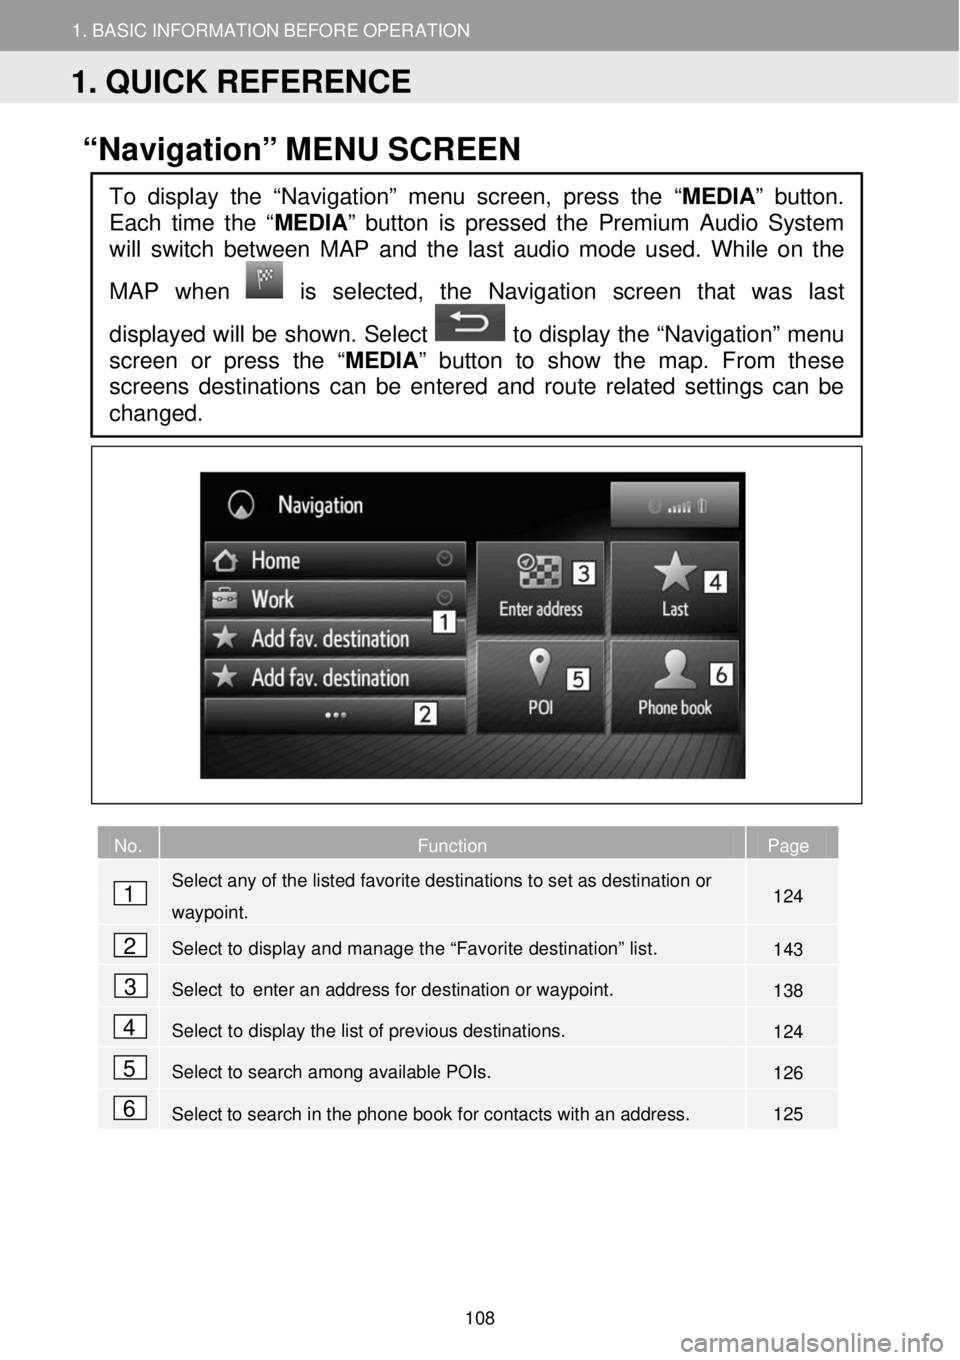
“Navigation” MENU SCREEN
No. Function Page
Select any of the listed favorite destinations to set as destination or
waypoint. 124
Select to display and manage the “Favorite destination” list. 143
Select to enter an address for destination or waypoint. 138
Select to display the list of previous destinations. 124
Select to search among available POIs. 126
Select to search in the phone book for contacts with an address. 125
To display the “Navigation” menu screen, press the “MEDIA” button.
Each time the “
MEDIA” button is pressed the Premium Audio System
will switch between MAP and the la st audio mode used. While on the
MAP when
is selected, the Navigation screen that was last
displayed will be shown. Select to display the “Navigation” menu
screen or press the “MEDIA ” button to show the map. From these
screens destinations can be entered and route related settings can be
changed.
1
2
3
4
5
6
1. QUICK REFERENCE
108
Page 109 of 164

1. BASIC INFORMATION BEFORE OPERATION
1. QUICK REFERENCE
1. BASIC INFORMATION BEFORE OPERATION
OVERVIEW GUID ANCE SCREEN
No. Function Page
Displays the distance, the estimated arrival time or remaining time to
arrive to the destination. -
Displays the distance to the next turn with the arrow indicating the
turn direction. Select to repeat the last navigation announcement. -
Guidance route. -
Select to display the navigation menu screen: Destination Entry, POI
search, etc. 108
Select to change the map scale. 118
This symbol indicates the active map layout. Selecting this symbol
changes the map layout: 2D, 2D North, 3D. 119
Mute/Unmute navigation voice guidance. -
Select to display the active route options. 110
Current position. -
Displays the name of the current street or the next street (when
approaching a maneuver point). -
1
2
3
4
5
6
7
8
9
10
109
Page 110 of 164

1. BASIC INFORMATION BEFORE OPERATION
1. QUICK REFERENCE
1. BASIC INFORMATION BEFORE OPERATION
No. Function Page
Select to stop active route guidance. 138
Select to display list of nearby gas stations locations (Gas Station
POIs) -
Select to display list of nearby parking locations (Parking POIs). -
Select to display additional options of the active route. 111
11
12
13
14
11 12 13
14
110