TOYOTA GT86 2018 Accessories, Audio & Navigation (in English)
Manufacturer: TOYOTA, Model Year: 2018, Model line: GT86, Model: TOYOTA GT86 2018Pages: 164, PDF Size: 6.35 MB
Page 61 of 164
1. BASIC INFORMATION BEFORE OPERATION
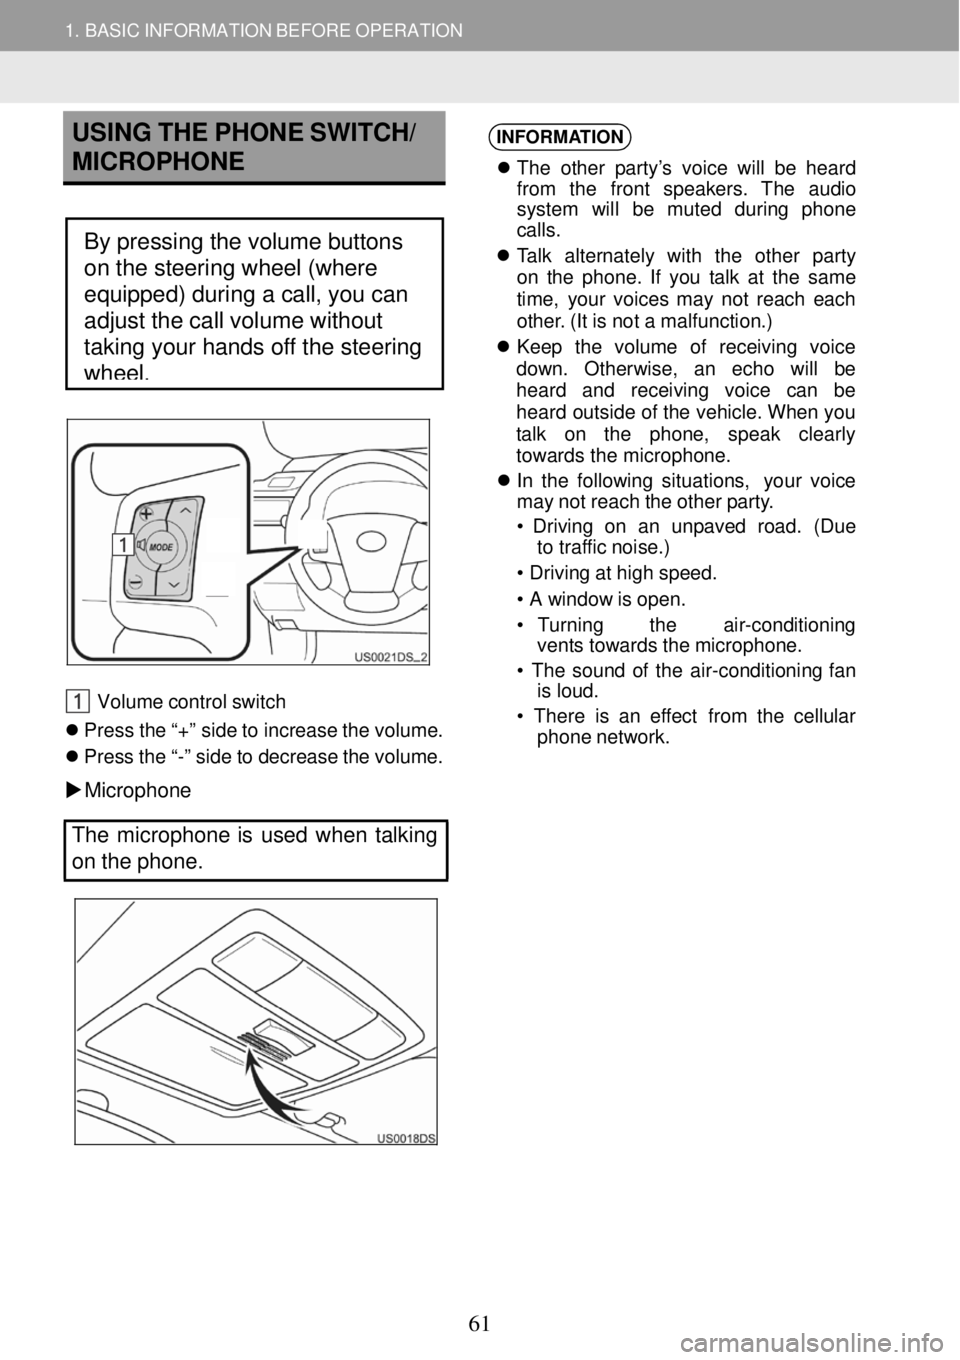
USING THE PHONE SWITCH/
MICROPHO NE
Steeri ng switch (IF EQUIPPED)
Volum e control sw itch
Pr ess the “+ ” side to i ncrease the vo lume.
Press the “-” side to decrease the volume.
Microph one
INFORMA
TION
Th e othe r par ty’s voice will be h eard
fro m the front speak ers. Th e audio
sys tem will be muted during phon e
c al ls.
Ta lk a lternately with the ot her p arty
on the phone . If you t alk at the same
t im e, yo ur voices may not re ach each
ot her. ( It is not a malfunct ion.)
Kee p the volume o f rece iving voice
down. Otherw ise, an echo will be
h eard and rece iving voice can be
he ard o utside of the vehicle. When you
ta lk on t he phone, speak cl early
towards the micro phone.
In th e f o
l lowing situ ations, your vo ice
ma y not reach the ot her party.
• Dr iving on an unpaved road. (Due
to tra ffic noise.)
• Dr ivi ng a t high speed.
• A window is open.
• Turnin g the air-conditioni ng
vents towards the mi crophone.
• Th e sound of the a ir-conditio ning fan
is loud.
• Ther e is an effect from the cellular
phone n etwork.
The micropho ne is used when talking
on the phone.
By pressing the volume buttons
on the steering wheel (where
equipped) during a call, you can
adjust the call volume without
taking your hands off the steering
wheel.
61
Page 62 of 164
1. BASIC INFORMATION BE FORE OPERATION
ABOUT
THE PHONE BOOK IN
THIS SYSTEM
The following data is st ore d for every
regi stere d phon e. When another p hone is
conn ecting , you cannot read the
re giste red dat a.
• P hone b ook data
• Call hist ory data
INFORMA TION
When you d elete the pho ne, th e above
listed details are also deleted.
WHEN YOU SELL YOUR C AR
A lot of personal data is registered
when you use the Hands-free system.
Wh en you sell your car, erase your
data. (→P.90)
You can erase the following data from the 3 sy
stem.
• Ph one book dat a
• Call h istor y data
• Volume setting
• Bluet ooth
® setting
• A ll te lepho n e settings
• Sh ort message templa te
INFORMATION
When utilizing the “ Delete all personal
data ” function, all personal da ta will be
erased.
62
Page 63 of 164
1. BASIC INFORMATION BEFORE OPERATION
CONNECTI NG A Bluetooth®
PHONE
In order to us e the hands -free system,
it is necessary to pair the phone and
connect the phone’s profile (HFP) with
the system.
Once the profile has been connected,
hands -free calls can be made.
If you have not yet connected any
Bluetooth
® phone s with phone profile
(HFP), you must first connec t your
phone with phone profile (HFP)
according to the following procedure.
Connect your Bluet ooth
® phone with
phone profile (HFP) after bringing the
vehicle to a complete stop.
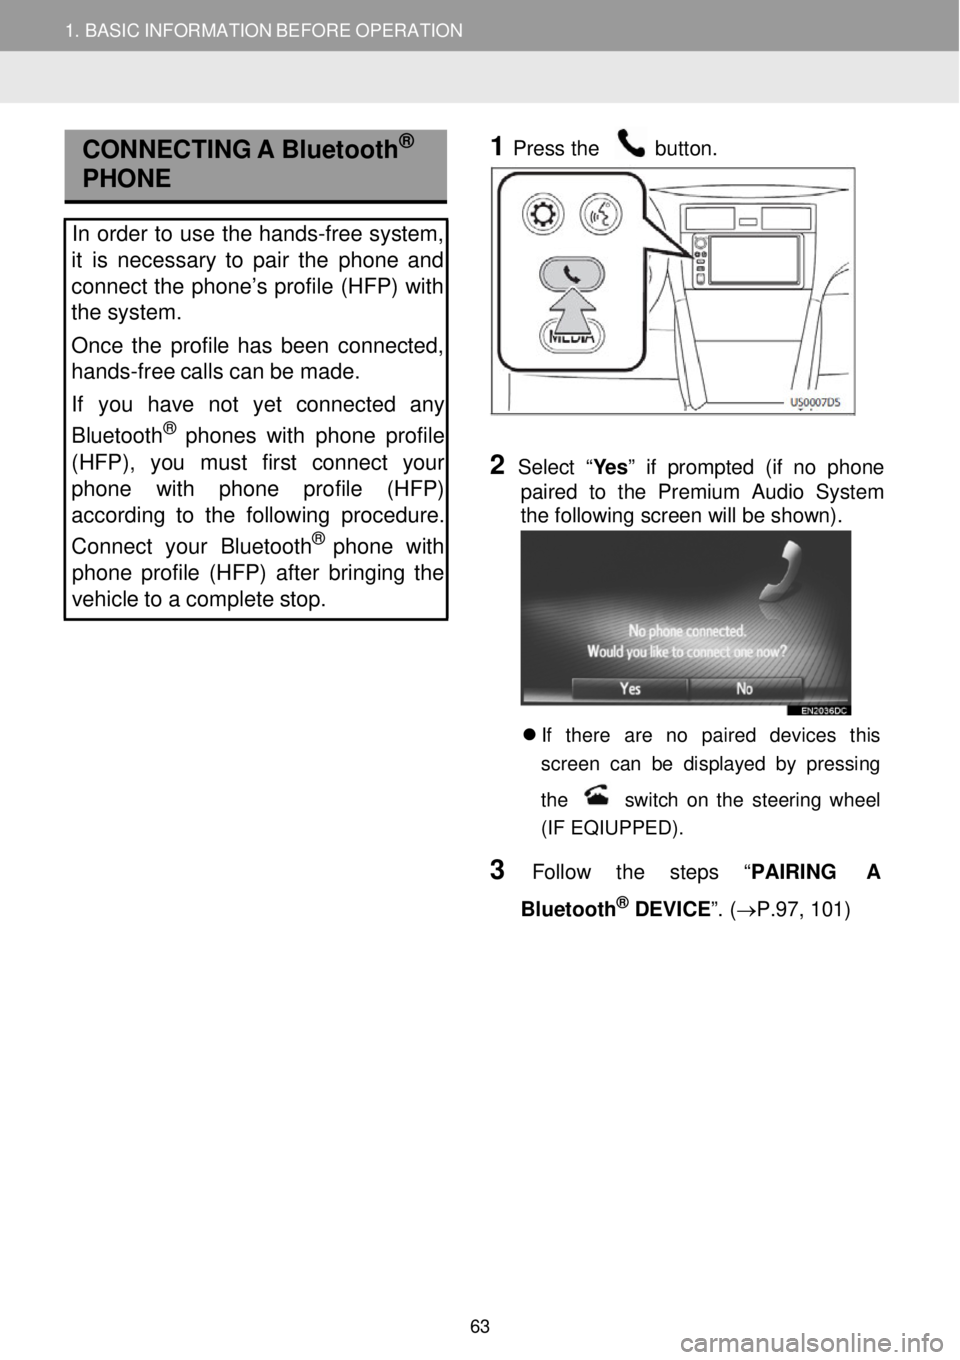
1
Pres
s the button.
2 Selec t “Yes” if prompted (if no phone
paired to the Premium Audio System
the following screen will be shown) .
If there are no paired devices t his
s creen can be d ispla yed by pressing
the
switch on the s teering wheel
(IF EQIUPPED) .
3 Follow the step s “PAI RING A
Bl uetooth
® DEVICE”. ( →P.97, 101)
63
Page 64 of 164
1. BASIC INFORMATION BEFORE OPER ATION
3. REGISTERING AN ENTRY
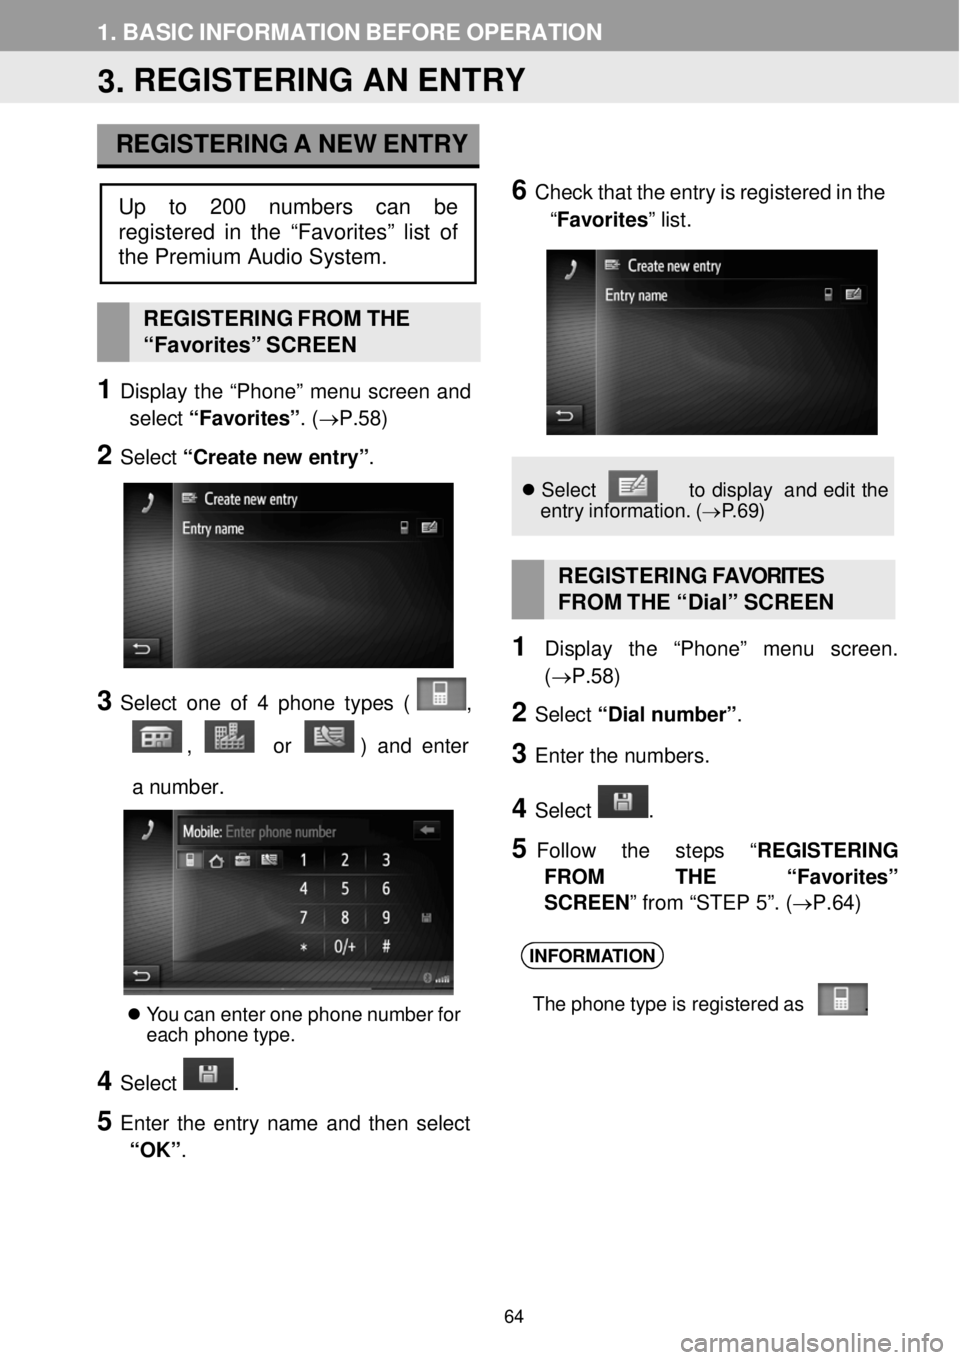
REGISTERING A NEW ENTRY
6 C heck that the en try is reg istered in the
“Favorites ” list.
REGISTERI NG FROM THE
“Favor ites” SCREEN
1 Display the “Phon e” menu screen and
select “Favorites” . (→P.58)
2 Select “Create n ew e ntry” .
3 Select one of 4 ph one types ( ,
, or ) and en ter
a numb er.
You can enter one phone number for
ea ch phone type.
4 Select .
5 Enter the entry name a nd then select
“OK” .
Se lect t o dis pla y an d edi t the
entry inf ormation. (→P.6 9)
REGISTERING FAVOR ITES
FROM THE “ Dial” SC REEN
1 Display the “Pho ne” me nu scree n.
(→P. 58)
2 Select “Dial number ”.
3 Enter the num bers.
4 Select .
5 Follow the step s “REGIS TERING
FROM THE “ Favorites”
SCREEN ” from “STEP 5”. (→ P.64)
INFORMATION
The phone t ype is re gis tere d as .
Up to 200 numbers can be
register ed in the “Favorites” list of
the Premium Audio System.
64
Page 65 of 164
1. BASIC INFORMATION BEFORE OPERATION
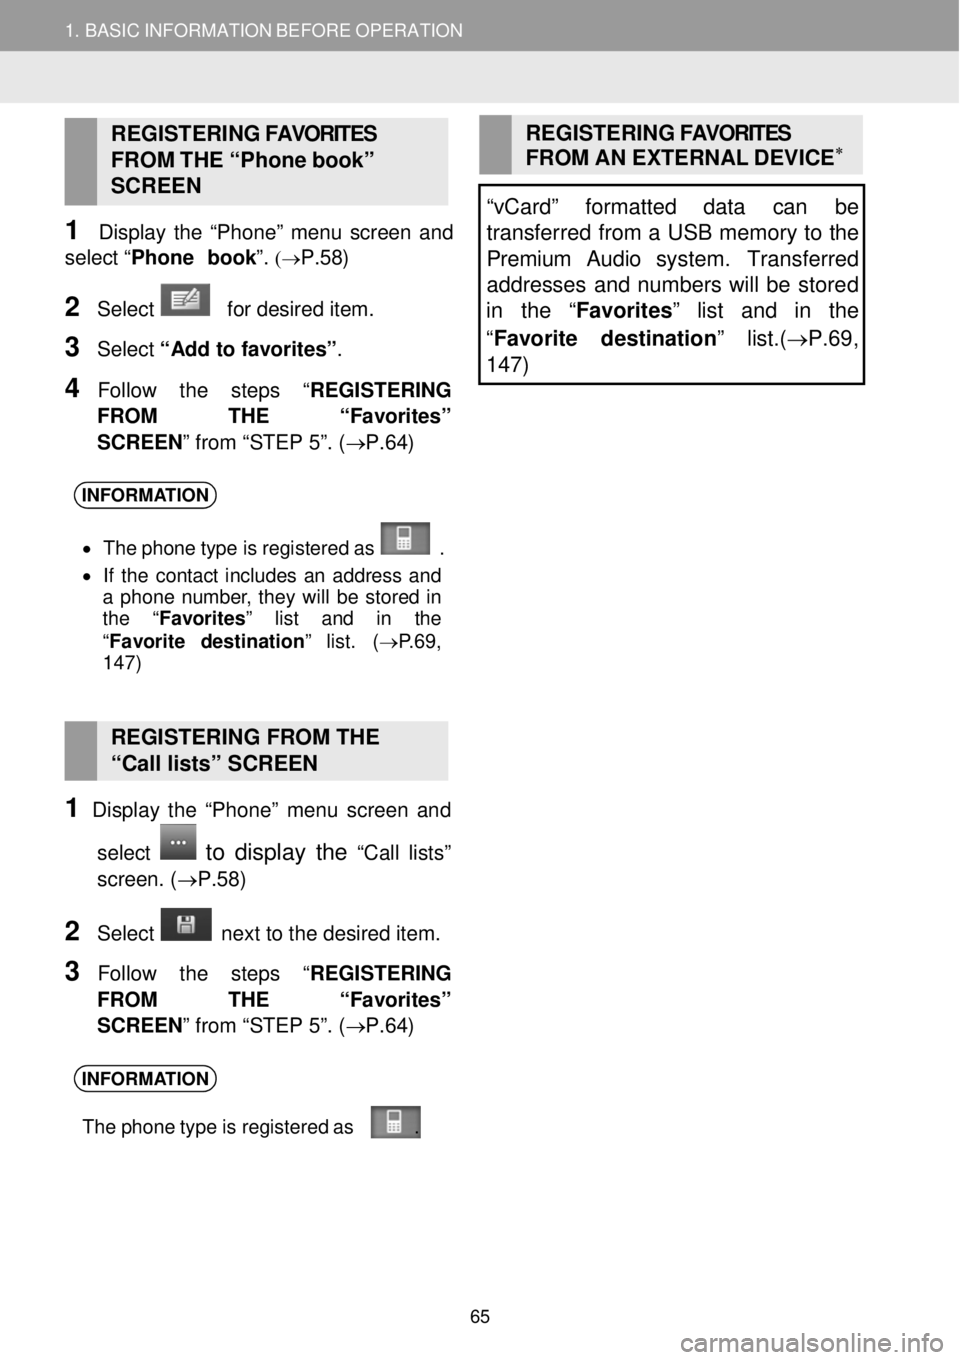
REGISTERING FAVORITES
FROM THE “Ph one bo ok”
SC REEN
1 Disp lay the “Phon e” menu screen an d
select “Phone b ook ”.
(→P.58)
2 Select for desired item.
3 Select “Add to favorites” .
4 Follow the step s “REGISTERING
FROM THE “ Favorites”
SCREEN ” from “STEP 5”. (→ P.64)
REGISTERING FAVORITES
FROM AN EXTERNAL DEVIC E∗
“vCard” formatted data can be
transferred from a USB memory to the
Premium Audio system. Transfe rred
addresses and numbers will be stored
in the “ Favorites” list and in the
“ Favorite destination ” list.(→P.69 ,
1 47)
INFORMA TION
• Th e phone t ype is re gis tere d as .
• If the contact includes an ad dress and
a phone number , they will be s tored in
the “ Favorites ” list and in the
“ Fav orite d est inati on” list. ( →P.69,
1 47)
RE GISTERING FROM THE
“Call lists” SCREEN
1 Display the “Phon e” menu screen an d
select
to display the “C all lists”
screen . (→P. 58)
2 Select ne xt to the de sired item.
3 Follow the step s “REGISTERING
FROM THE “ Favorites”
SCREEN ” from “STEP 5”. (→ P.64)
INFORMATION
The phone t ype is re gis tere d as .
65
Page 66 of 164
1. BASIC INFORMATION BE FORE OPERATION
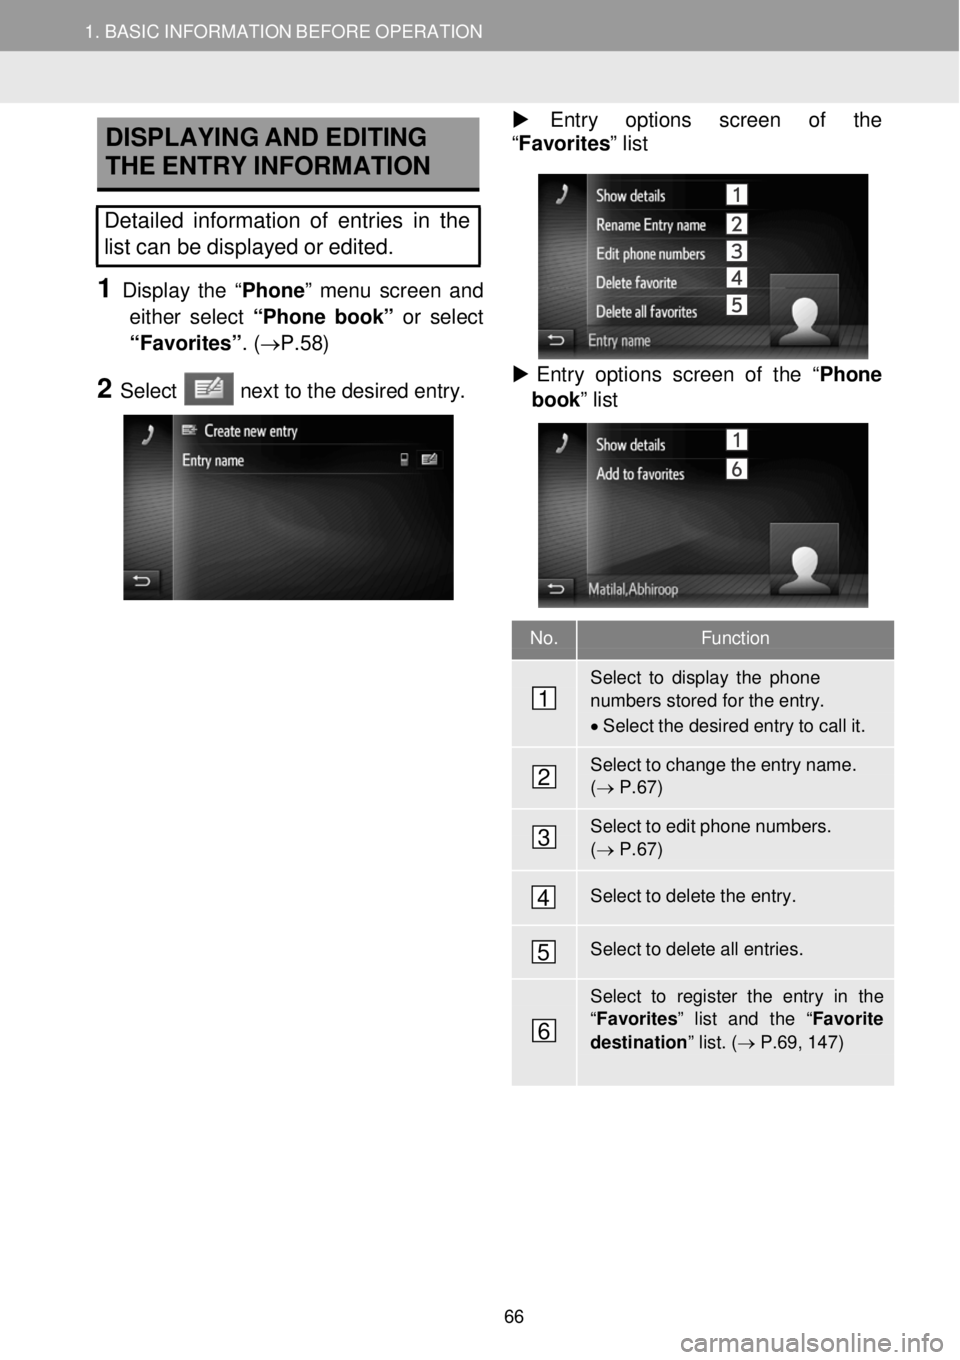
DISPLAYING
AND EDITING
THE ENTRY INFORMATION Entry op tions screen of the
“Fa vorites ” list
Detailed information of entries in the
list can be displayed or edited.
1 Disp lay the “Phone ” menu scree n and
either s elect “Phone bo ok” or select
“Fav orites”. (→P.58)
2 Select next to the de sired e ntry.
Entry o ptions scre en of the “ Phone
book ” list
No. Function
Select to display the phone numbers stored for the entry.
• Select the desired entry to call it.
Select to change the entry name. (→ P.67)
Select to edit phone numbers. (→ P.67)
Select to delete the entry.
Select to delete all entries.
Select to register the entry in the “Favor ites” list and the “Favorite
destination ” list. (→ P.69, 147)
1
2
3
4
5
6
66
Page 67 of 164
1. BASIC INFORMATION BEFORE OPERATION
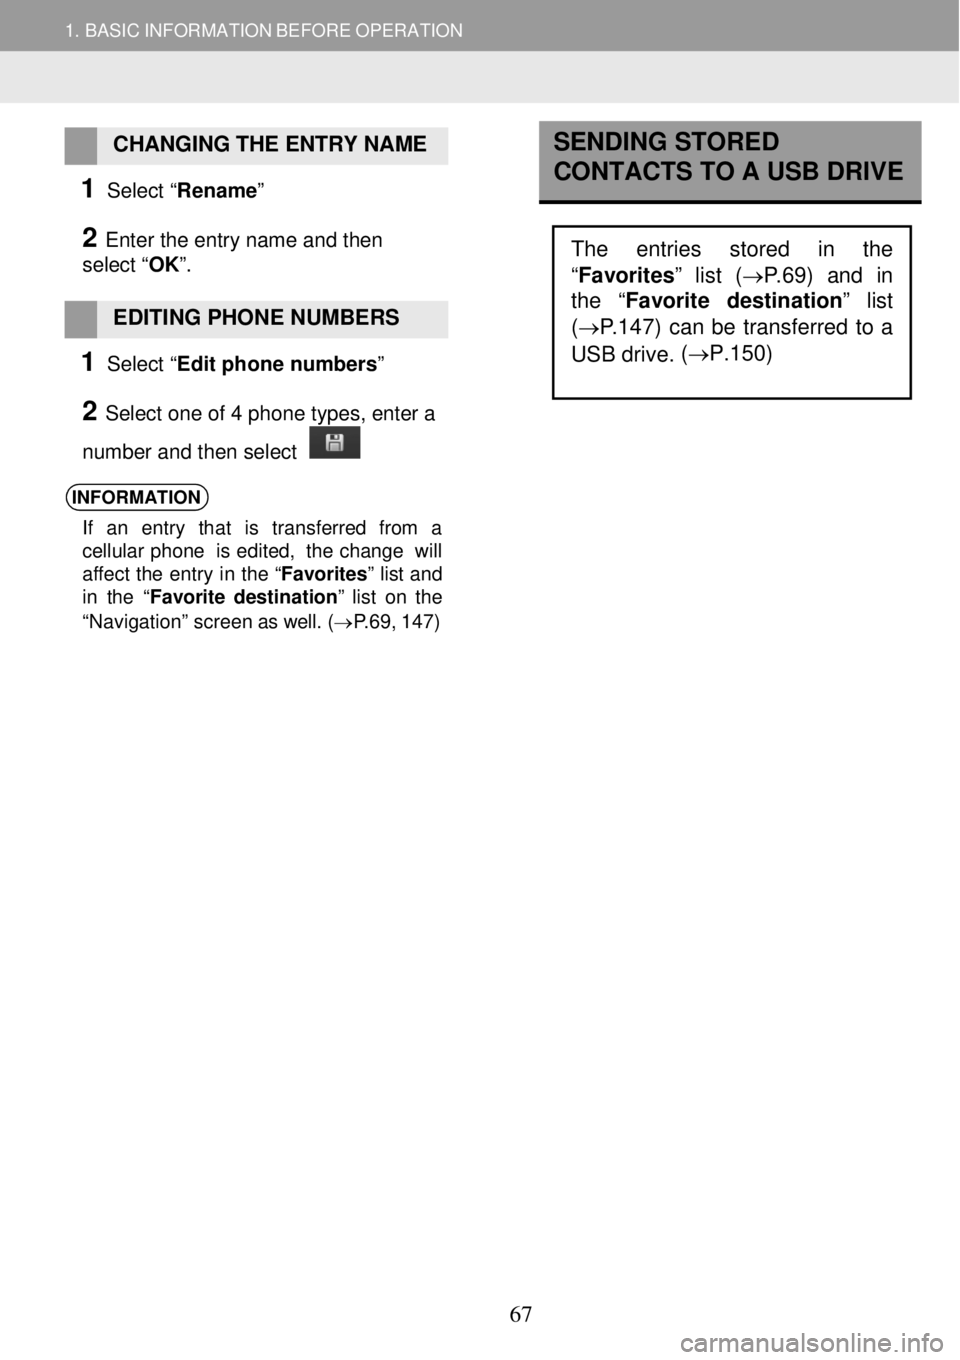
CHANGING THE ENTRY NAME
1 Select “Rename”
2 Enter the entry name and then
select “ OK”.
EDITING PHONE NUMBERS
1 Select “Edit phone numbers”
2 Select one of 4 phone types, enter a
number and then select
INFORMATION
If an entry t hat is transf erre d from a
ce llu la r phon e is edited, the cha nge will
aff ect the entry in th e “Favorites ” list and
in the “ Favorite dest inati on ” list on the
“Navigati on” screen as well. (→ P.69 , 147)
SENDING STORED
CONTACTS TO A USB DRIVE
The entries stored in the
“Favorites” list ( →P.69) and in
the “ Favorite destination
” list
( → P.147) can be transferred to a
USB drive. (
→P.150)
67
Page 68 of 164
How to make a call listPage
Bydial68
By“Favorites ”list69
By phone book69
Bycall lists70
By using a short messa ge71
ByPOI call71
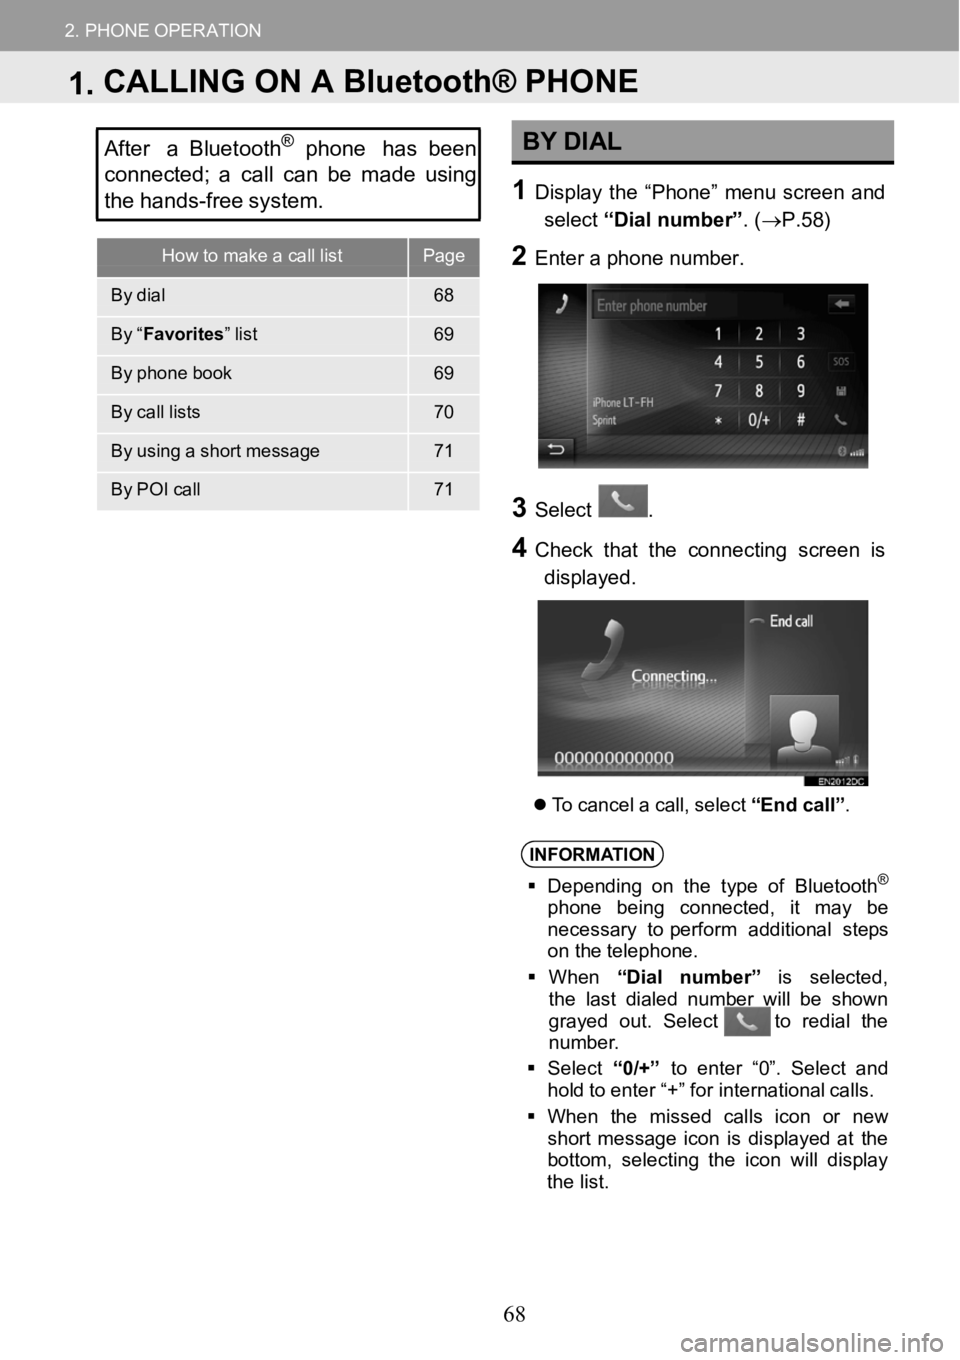
2.PHONEOPERATION
After a Bluetooth®phone has been
co nnected; acall can be made using
the hands -fr ee system.BY DIAL
1Displ aythe “Phon e” menuscreen and
select “Dialnum ber” . (→P. 58)
2Ente r a ph one numb er.
3
3Select.
4Check that the conn ectingscreenis
displayed.
To ca ncel a cal l,sel ect “End call”.
INFORM ATION
Depending on the type of Bl uetooth®
phone beingconnect ed , it may be
necessary to perfor m add itional steps
on t heteleph one.
When “Dial n umber ” is select ed,
t he l ast dia led num berwillbe sh own
gra yed out. Select to redia l the
nu mbe r.
Se lect “0/+” to enter “0”. Select and
hold to en ter“+ ” for i nter nat ional calls.
When the missed cal lsicon or new
short messag e icon isdisp lay ed at the
bottom, selecting t he i con w illdis pla y
t he l ist.
1.CALLING ON A Bluetooth® PHONE
68
Page 69 of 164
2. PHONE OPERATION 2. PHONE OPERATION
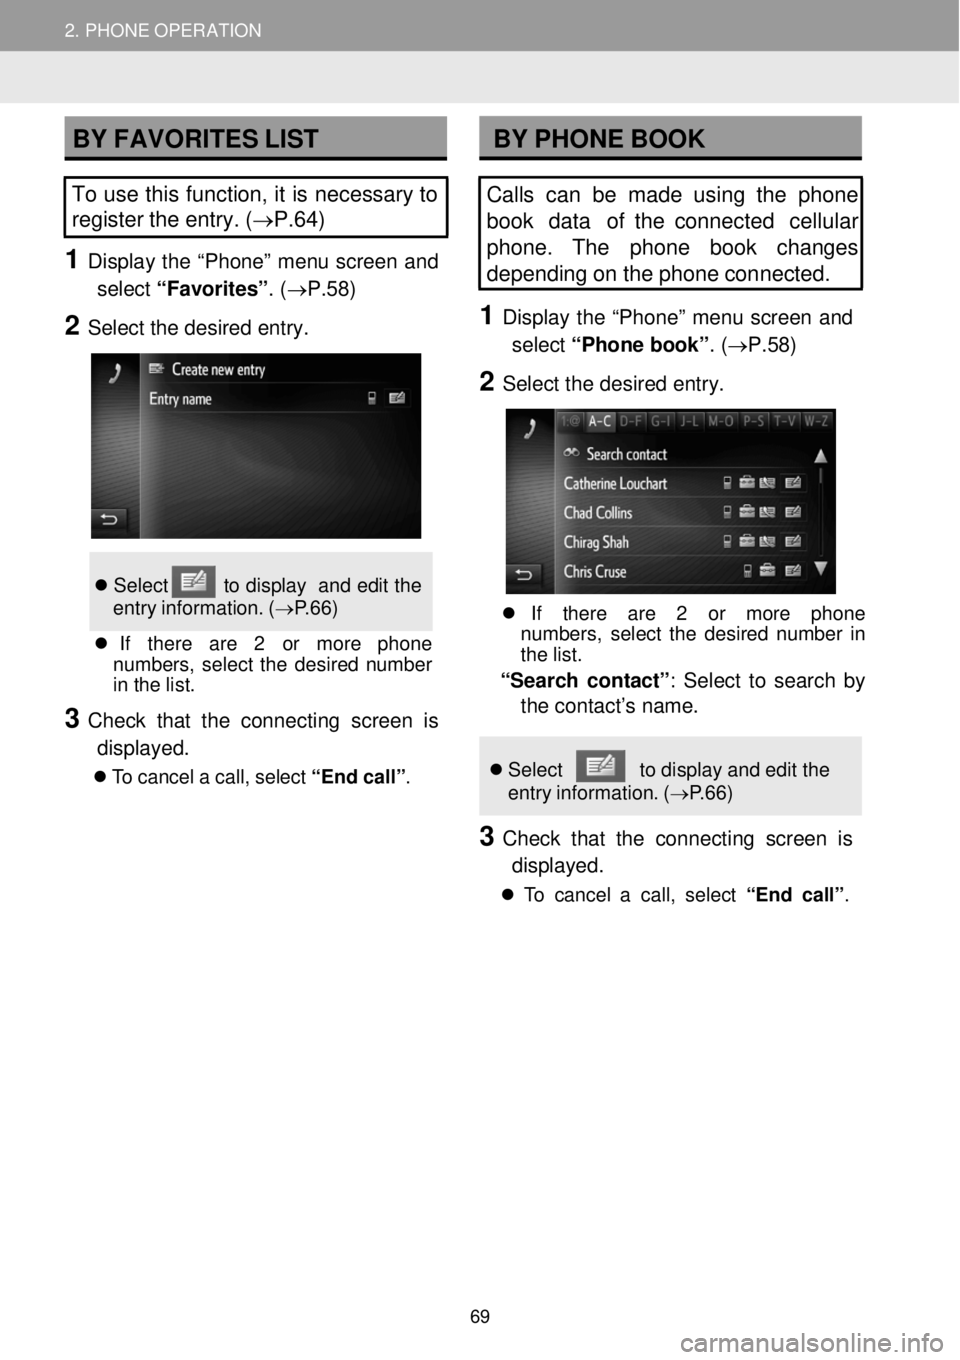
BY FAVORITES LIST BY PHONE BOOK
To use this function, it is necessary to
register the entry. (→P.6 4)
1 Displ ay the “Phon e” menu screen and
select “Favorites” . (→P. 58)
2 Select the desired entry.
Se lec t to d ispla y and edi t the
e ntr y inf ormat ion. (→P.66)
If t here are 2 or more phone
numbers , sel ect the d esired number
in the l ist.
3 C heck that the conn ecting screen is
displayed.
To can cel a cal l, sel ect “En d call” .
Calls can be made us ing the phone
book data of the connected c ellular
phone. The phone book chan ges
depending on the p hone connected.
1 Display the “Ph one” menu scre en and
select “Phone b ook”. ( →P.58)
2 Sele ct the d esired entry.
If t here are 2 or more ph one
num bers, select the desired number in
th e list.
“Sear ch con tact” : Select to sear ch by
the contact’s name.
Se lect to displ ay and edit the
entry inf ormatio n. ( →P.66)
3 Ch eck that the connecti ng screen is
displayed.
To c ancel a c all, se lect “End ca ll”.
69
Page 70 of 164
2.PHONEOPERATION2.PHONEOPERATION
INFORMATION
•When a phoneisconnecte d for the
f irst ti me, its phone book must be
d own loaded . Ifthe phone book cannot
be downloaded, a pop-upwindow will
be di splayed.
• If the contact does not have p hone
n umber stored, the entry will be grayed
out .
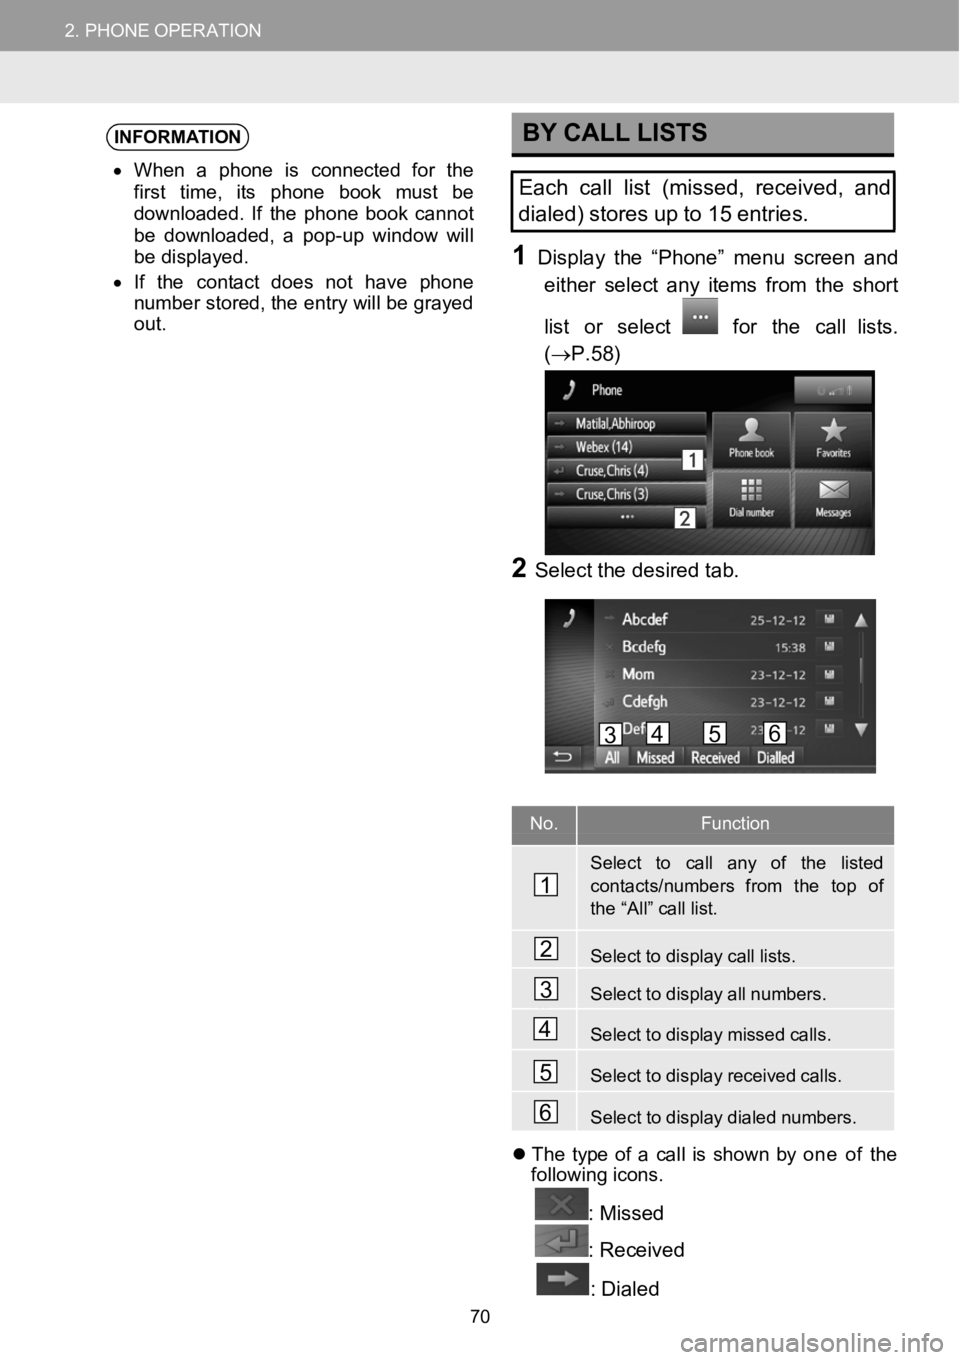
BY CALL LISTS
Eachcall list (missed, rec eived, and
dialed) stor es upto 15 entries.
1Displ aythe “Phon e” menu scre enand
e ither select any items from theshort
list or select
for the call lists.
( →P. 58)
2Se lect the d esired tab.
No.Function
Select to callany of the listedcontacts/numbe rs from the top ofthe “A ll” call list.
Selecttodisplaycalllists.
Select to display all numbers.
Select to display missed calls.
Se lect to display received calls.
Selecttodisplaydialednumbers.
Th etype of a c allis show n by one of the
fo llow ing icons.
: Missed
: Received
: Dialed
1
2
3
4
5
6
3456
70