TOYOTA GT86 2018 Accessories, Audio & Navigation (in English)
Manufacturer: TOYOTA, Model Year: 2018, Model line: GT86, Model: TOYOTA GT86 2018Pages: 164, PDF Size: 6.35 MB
Page 11 of 164
2.CONTROLS ANDFEATURES
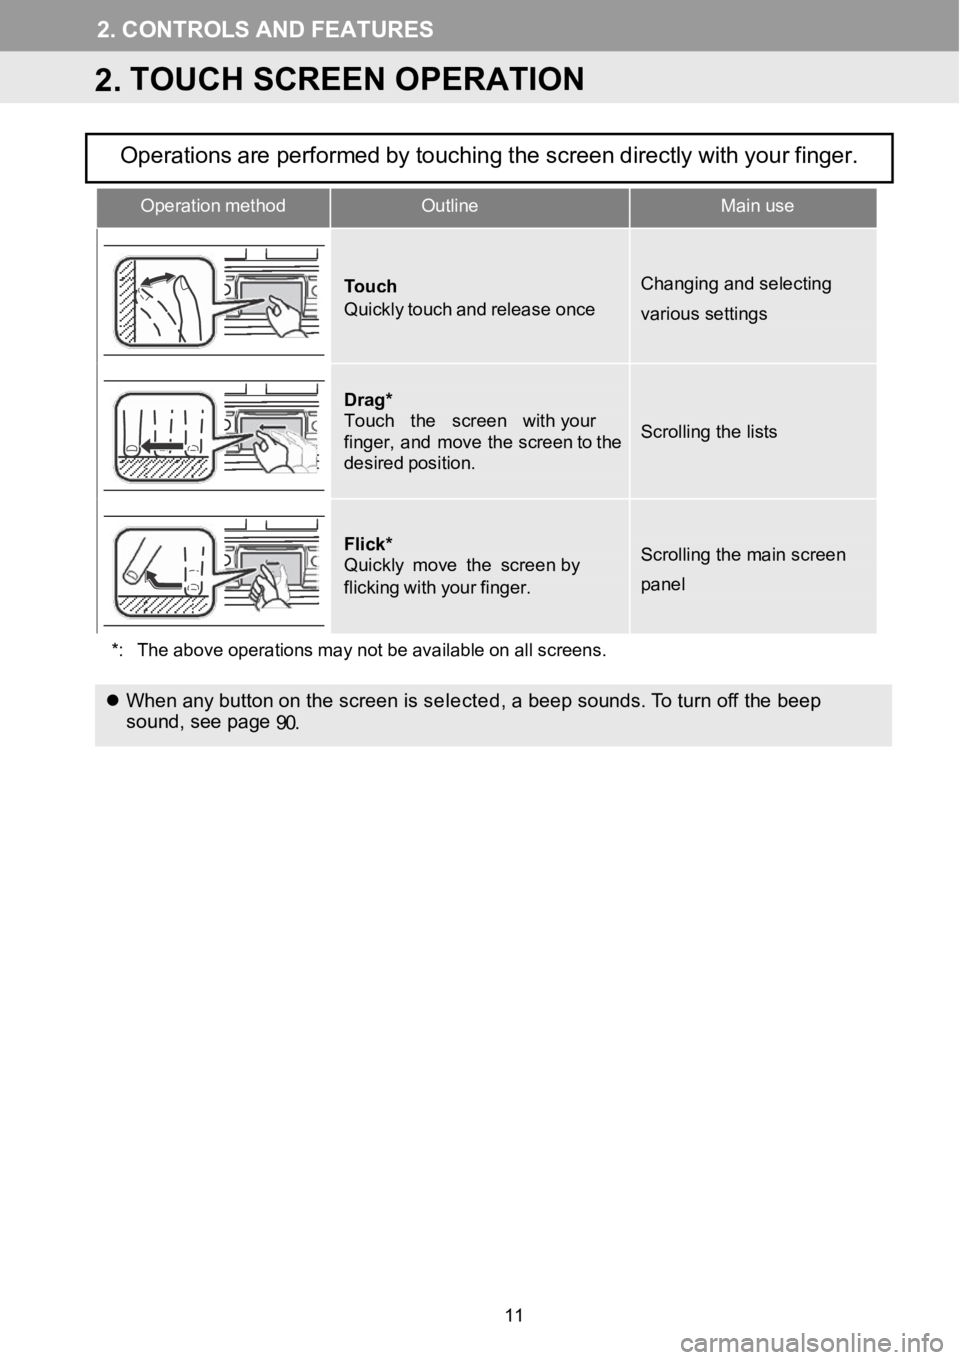
2.TOUCH SCREEN OPERATION
Operation methodOutlineMain use
To
uchQuickly touch and release once
Changing and selecting
various settings
Drag*Touch the screen with yourfinger, and move the screen to thedesired position.
Scrolling the lists
Flick*Quickly move the sc reen byflicking withyour finger.
Scrolling the main screen
panel
*: The above operations maynot be available on allscreens.
When a ny button on the screen is selected,a beep sounds. To t urn off the beep
soun d, see page
90.
Operationsareperformedbytouchingthescreendirectlywithyourfinger.
11
Page 12 of 164
2. CONTROLS AND FEATURES
This
system is operated mainly by the
s creen buttons.
When a screen button is selected, a
beep sounds. (To set beep sound,
→ P.90.)
NOTICE
To prevent dam agi ng the screen, li ghtly
to uch the s creen buttons w ith y our
fi nger.
Do not use objects o ther than your f inger
to t ouch the screen.
Wi pe off f ingerpri nts using a glass
c le anin g cloth. Do not use chem ical
cleane rs to clean the screen, as they
ma y damage the touch screen.
To prevent the battery from being
di scharged, do not leave the sys tem on
longer than necessar y whe n the e ngine
is not runnin g.
INFORMA TION
I f the sy stem does not respond t o a
to uch on a s creen but ton, move your
fi nger away from the scr een and th en
to uch it agai n.
Grayed out screen buttons cannot be
operat ed.
The displa yed i mag e ma y bec ome
darker and moving i mages may be
sl ig ht ly dist orted when the display is
cold.
Under extremely cold cond itio ns, t he
scree n ma y not be displa yed and the
data inpu t by a user may be deleted.
Al so, the s cree n button s ma y be
h arder t han usual to d epress.
When you l ook at the screen
t hro ugh pol arized materia l such as
pol arized su nglasses, the screen may
be d ark a nd har d to see. If so, l ook
at the screen fr om diff erent angles,
adj ust the scr een sett ings (→P.93) , or
t ake off your sungl asses.
Se lect
to re turn to the
pre vious screen.
12
Page 13 of 164
2. CONTROLS AND FEATURES
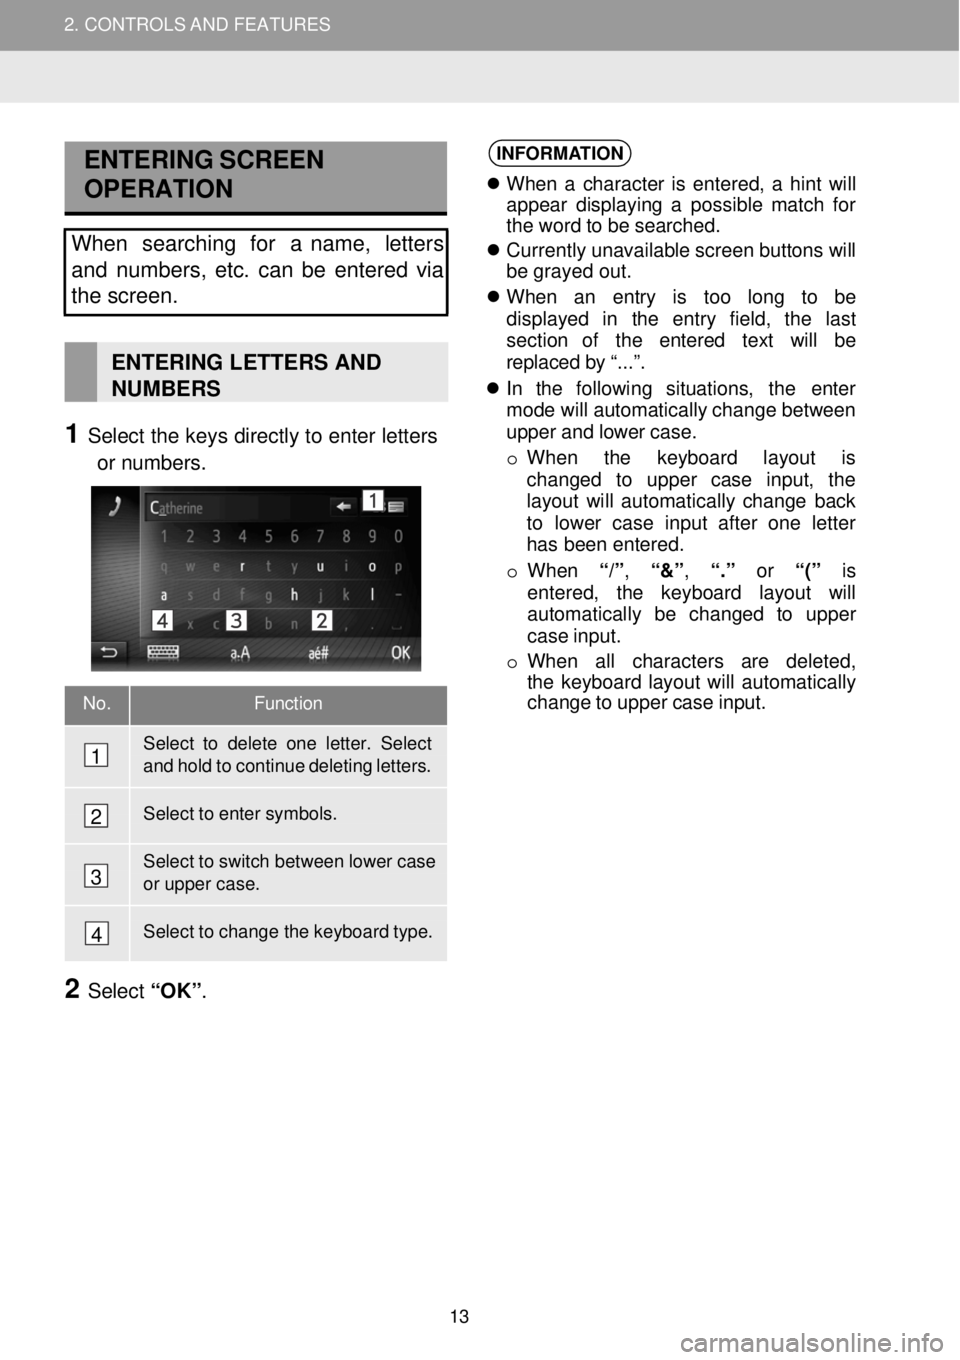
No. Function
Select to delete one letter. Select and hold to continue deleting letters.
Select to enter symbols.
Select to switch between lower case
or upper case.
Select to change the keyboard type.
ENTERING SCREEN
OPERATION
Wh en searching for a name, letters
and numbers, etc. can be entered via
the screen.
ENTERING LETTERS AND
NUMBERS
1 Select the keys di rectly to enter letters
or num bers.
INFORMA TION
When a c haracter is ent ered, a hint will
appear di splayi ng a poss ible mat ch for
the word to be searc hed.
Currently unavaila ble screen butt ons will
be grayed out .
When an entry is too long to be
displ ayed in the entry fiel d, the l ast
secti on o f the entered text will be
replaced by “. ..”.
In the foll owing situ ations, the en ter
mo de will automati cally cha nge between
up per and lower case.
o When the key board layout is
chan ged t o upper case inpu t, the
la you t wi ll automat ical ly change back
to lower case inpu t after one let ter
has be en entered.
o Whe n
“/”, “&” , “.” or “(” is
ent ere d, the keybo ard layou t will
aut oma tical ly be changed to u pper
case inpu t.
o When a ll charact ers are deleted,
t he keybo ard la yout will automatical ly
chan ge to up per case inpu t.
2 Select “OK” .
3
4
2
1
2. CONT ROLS AND FEATURES
13
Page 14 of 164
2. CONTROLS AND FEATURES
EN
TERING FROM THE LIST OF
MATC HING ENTR IES
On certain screens, a candidate entry
text or word prediction list based on the
i nput letters will be displayed. The
des ired item can be selected and
entered.
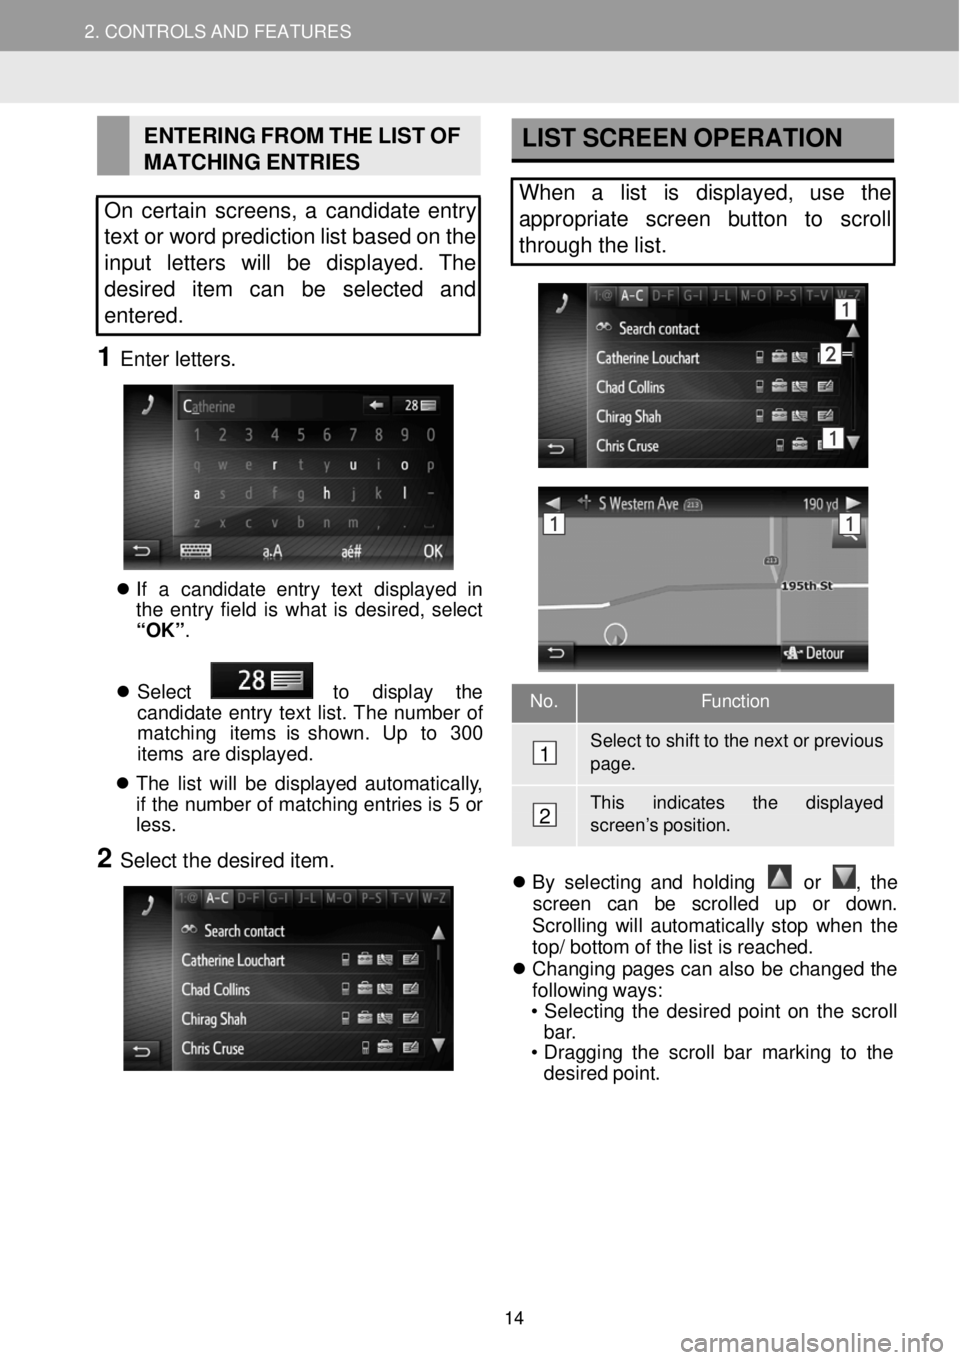
1 Enter let ters.
If a candidate entry t ext displ ayed in
t he ent ry fie ld is wha t is desir ed, sel ect
“OK” .
Se lect
to display the
candida te entry t ext lis t. Th e nu mber of
ma tching
item s is sho wn. Up to 300
items are displ ayed.
The list will be d isplay ed automa tically,
if the nu mber of matchi ng en tries is 5 or
le ss.
2 Select the desired item.
LIST SCREEN OPERATION
When a list is displayed, use the
a ppropriate screen button to scroll
through the list.
No. Function
Select to shift to the next or previous page.
This in dicates the display ed scree n’s position.
By se lecting and hol ding
or , th e
screen can be s crolled up or down.
Scro lling will au tomatica lly stop when the
top / bottom o f the list is reache d.
Changing pages can also be changed the
f ol low ing ways:
• Se lecting the desired point on the scroll
bar.
• Dra ggi ng the scroll bar mark ing to the
desired point.
1
2
14
Page 15 of 164
2. CONTROLS AND FEATURES
AUTOMATIC TEXT
SCROLLING
Entries that are too long to fit in the
current field are scrol led automatically
from right to left.
This function is not available while
driving.
INFORMA TION
This funct ion can be turned on or off
through the Premium Audio Setup
menu. ( →P.90)
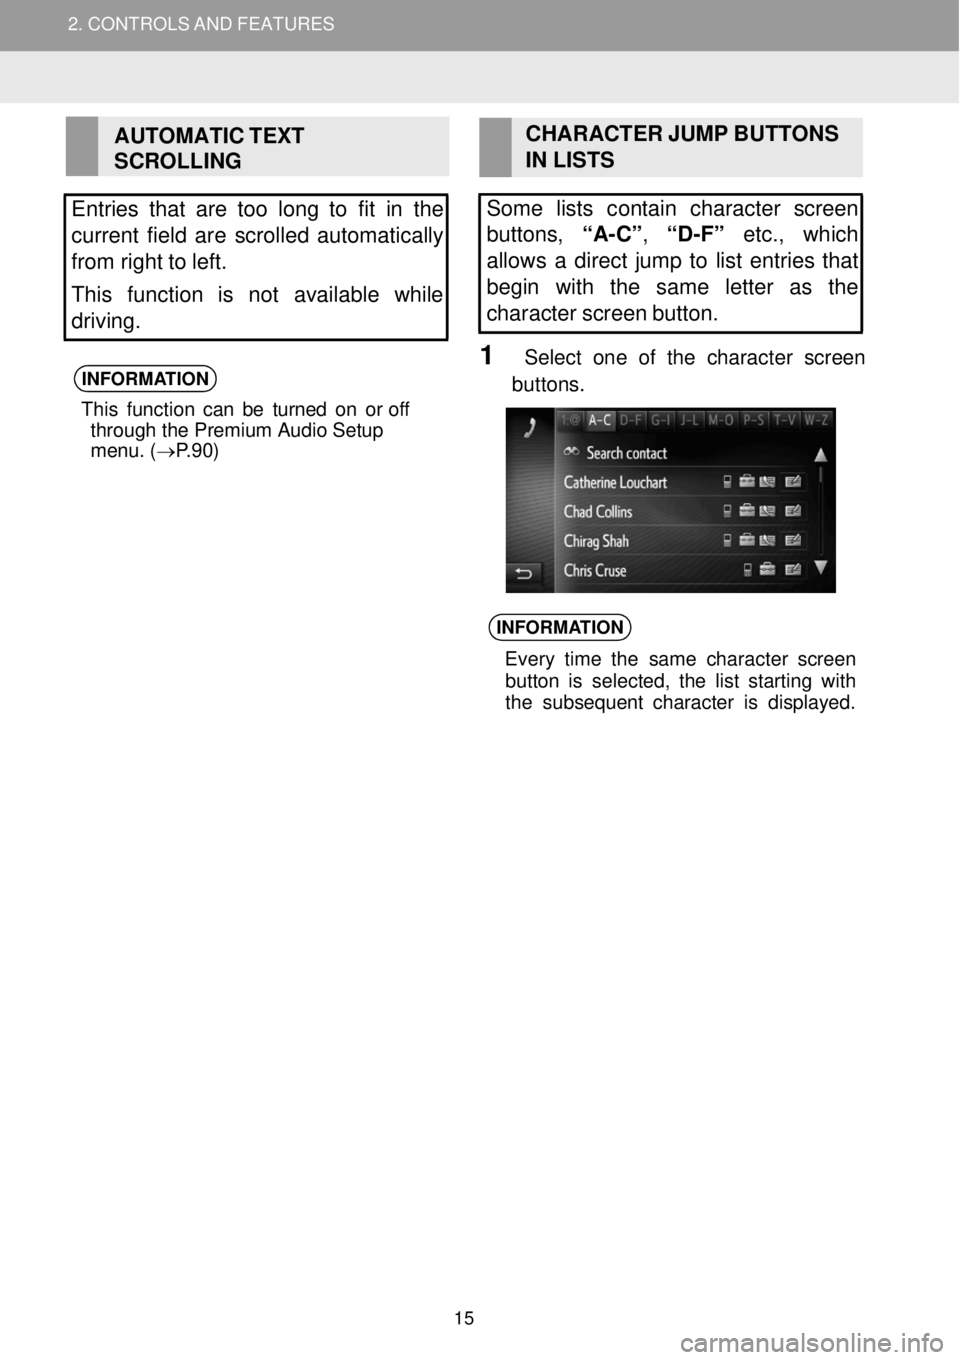
CH ARACTER JUMP BUTTONS
IN LIS TS
Some lists con tain character screen
buttons, “A-C”, “D- F” etc., which
al low s a direct jump to list entries that
begin with the same letter as the
character screen button.
1 Select one of the character screen
but tons.
INFORMA TION
Every time the s ame c haracter screen
button is sel ected, the list s tarting with
the subsequent character is di spl ayed.
2. CONT ROLS AND FEATURES
15
Page 16 of 164
2
AUDIO SYSTEM
1 BASIC OPER ATION
1. Q UICK REFERENCE ..... ........ ..... 17
2. SO ME BASICS. ........... ..... ...... ..... 18
TURNING THE AUDIO S YSTEM
ON OR OFF ................................ 18
SELEC TING AN AU DIO
SOURCE ...... 19
USB PORT......................................... 20
2 RADIO OPE RATION
1. TUNER FUNCTIONS ........ ...... ..... 21
3
MEDIA OPER ATION
1. US B MEMORY .. ...... ............... ... .... 22
OVERVIEW ........................................ 22
PLAYING A USB MEMORY ............... 25
USB MEMORY OPTIONS.................. 25
2. iP od . ..... ... ...... ... ..... ... ... ........ ........ 26
OVERVIEW ................................. ..... 26
iPod AUDIO ........................................ 29
iPod OPTIONS. .................................... 29
3. Blueto oth® AUD IO........... ... ... ..... 30
OVERVIEW .......................................... 30
CONNECTING Bluetooth® AUDIO .... 34
LISTENING TO Bluetooth® AUDIO ..... 35
Bluetooth® AUDIO OPTIONS ............. 35
4 . Aha ...... ......... ............. ..... ... ......... .. 36
OVERVIEW ........................................ 37
SWITCHIN G TO Aha MODE …… …… 42
PLAYING Aha PRE SETS…................ 44
SELECTING Aha LOCATION BASED
SERVICE………................................. 46
SELECTING Aha FEATURED
CONTENT……..................................... 47
IF A MESSAGE APPEARS ON THE
SCREEN……...................................... 48
4 A UDIO REMOTE CONTROLS
1. STEER ING S WIT CHES
(IF EQUPPED) ....... ..... ..... 50
5 SOUND SETTING S
1. SOUND SETTINGS.. ..... .......... 51
6 TIPS FOR OP ERATING
THE AUDIO SYSTEM
1. OPERATING INFORMATION ... .. 52
iPod……………………………………… 53 FILE INFORMATION………................ 54
TERMS………………..…................. 56
So me of the f unctions cann ot be o perated while driving.
16
Page 17 of 164
Page
Function Page
Using the radio (tuner) 21
Playing content from USB memory 22
Playing an iPod 26
Playing audio from a Bluetooth® device 30
Playing Aha 36
Using the steering wheel audio switches 50
Audio settings 51
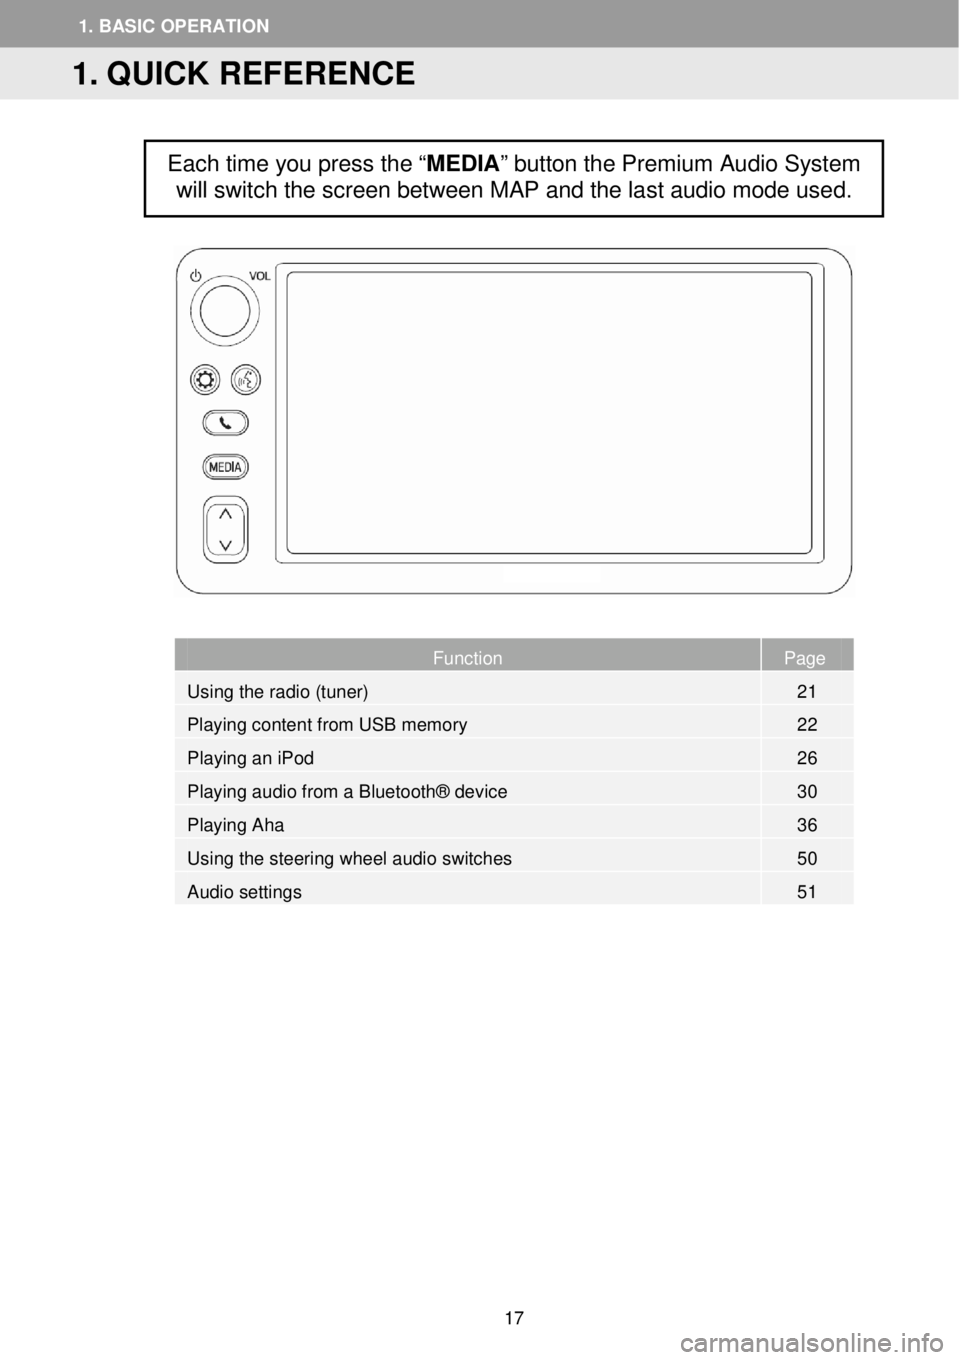
Each time you press the “MEDIA” button the Premium Audio System
will switch the screen between MAP and the last audio mode
used.
1. QUICK REFERENCE
1. BASIC OP ERATION
17
Page 18 of 164
1. BASI C OPERA TION
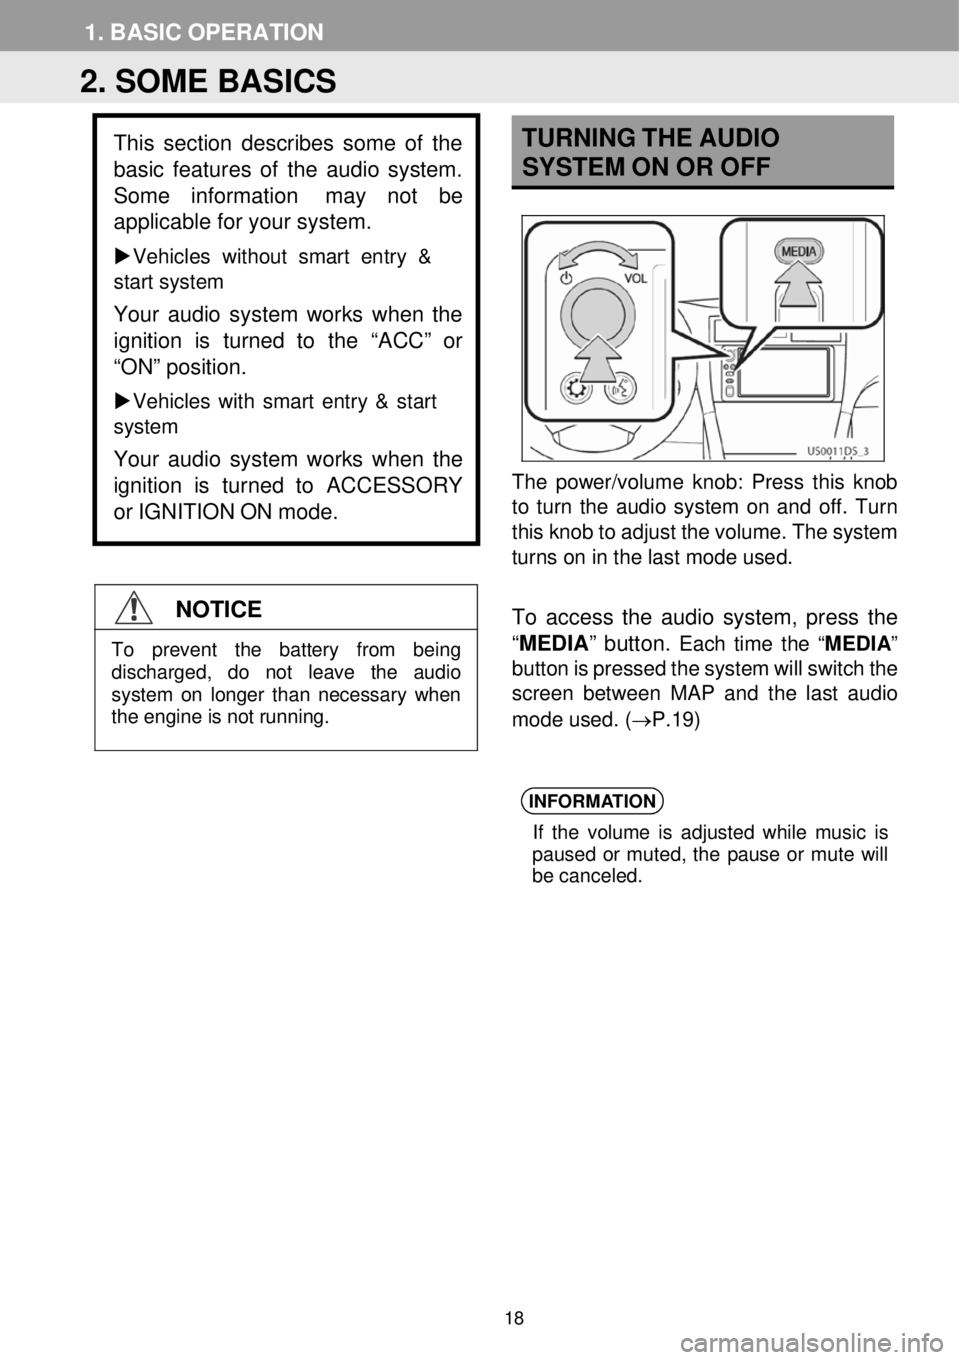
TURN ING THE A UDIO
SYSTEM ON OR OFF
The power/volume kn ob: Press this knob
to turn the audio system on and off. Turn
this knob to adjust the volume. The system
turns on in the l ast mode us ed.
To access the audio system, press the
“ MEDIA ” button.
Each time the “ MEDIA”
button is pressed the system will switch the
screen between MAP and the last a udio
mo de used . (→P.19)
INFORMA TION
If the volume is ad justed whi le mus ic is
pau sed or muted, the pause or mute wi ll
be can celed.
2. SOME BASICS
This section des cribes some of the
bas ic features of the audio system.
Some inf ormation
may not be
applicable for your system.
Veh icles without smart en try &
start system
Your audio system works when the
ignition is tur ned to the “ACC” or
“ON” position.
Vehicles with smart entry & start
system
Your audio system works when the
ignition is turned to ACCESSORY
or IGNITION ON mode.
NOTICE
To prevent the battery from being discharged, do not leave the audio system on longer than necessary when
the engine is not running.
18
Page 19 of 164
1. BASIC OPERATION
SELECTING AN AUDIO
SOURCE
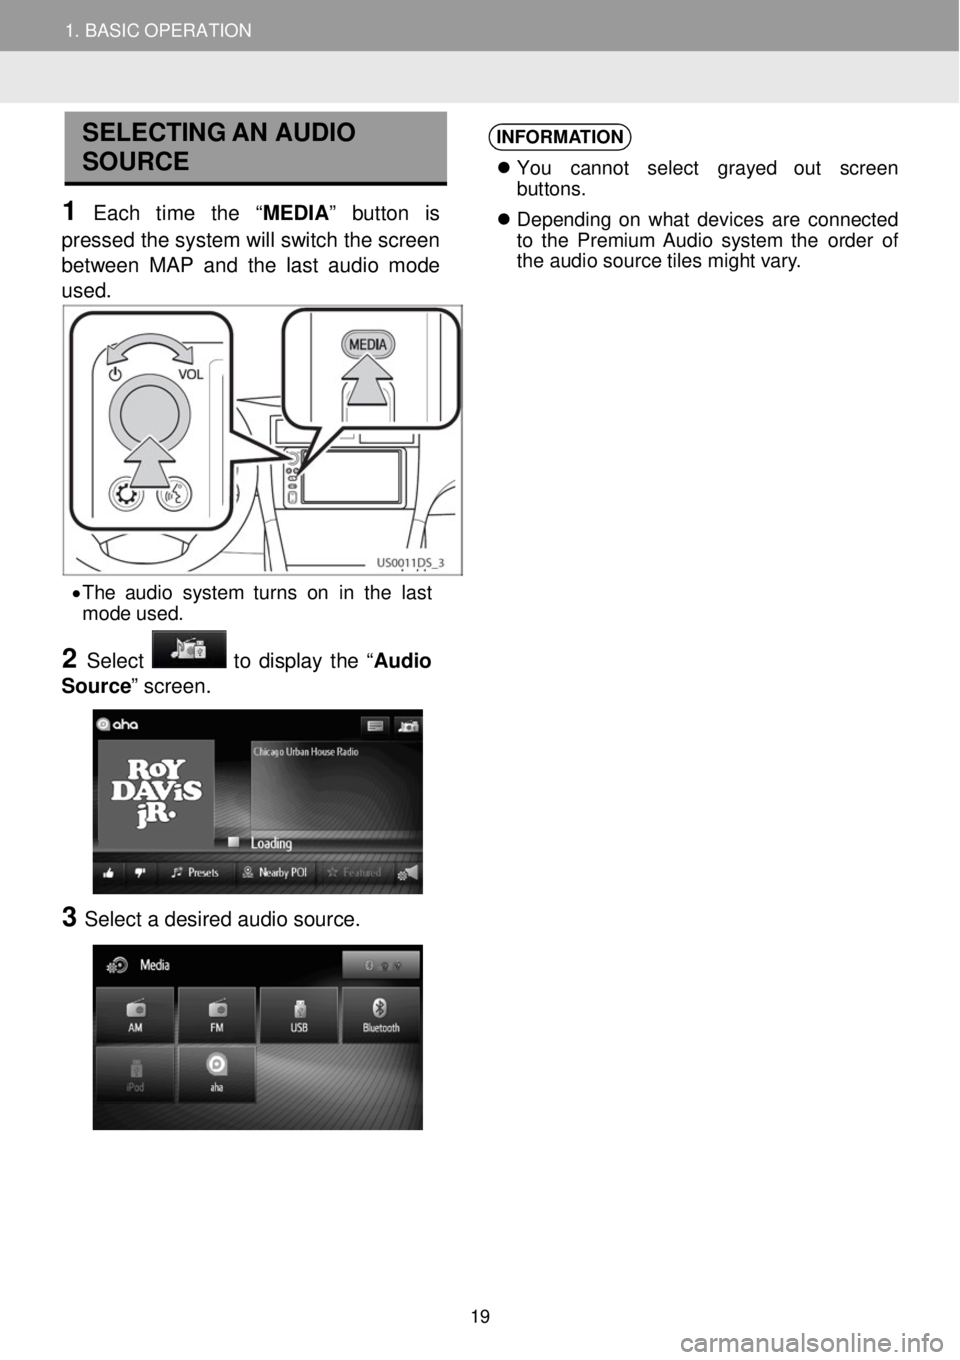
1 Each time the “MEDIA ” button is
pressed the system will switch the scre en
between MAP a nd the last audio mode
us ed.
INFORMA TION
You cannot select grayed out scree n
b ut tons.
Depe nding on what devices are connected
to the Pre mium Audio system the order of
the au dio sourc e tile s mig ht var y.
• The a udio sy stem turn s on in the last
mo de u sed.
2 Select to display the “ Audio
Source ” screen.
3 Select a d esir ed aud io sour ce.
19
Page 20 of 164
1. BASIC OPERATION
USB PORT
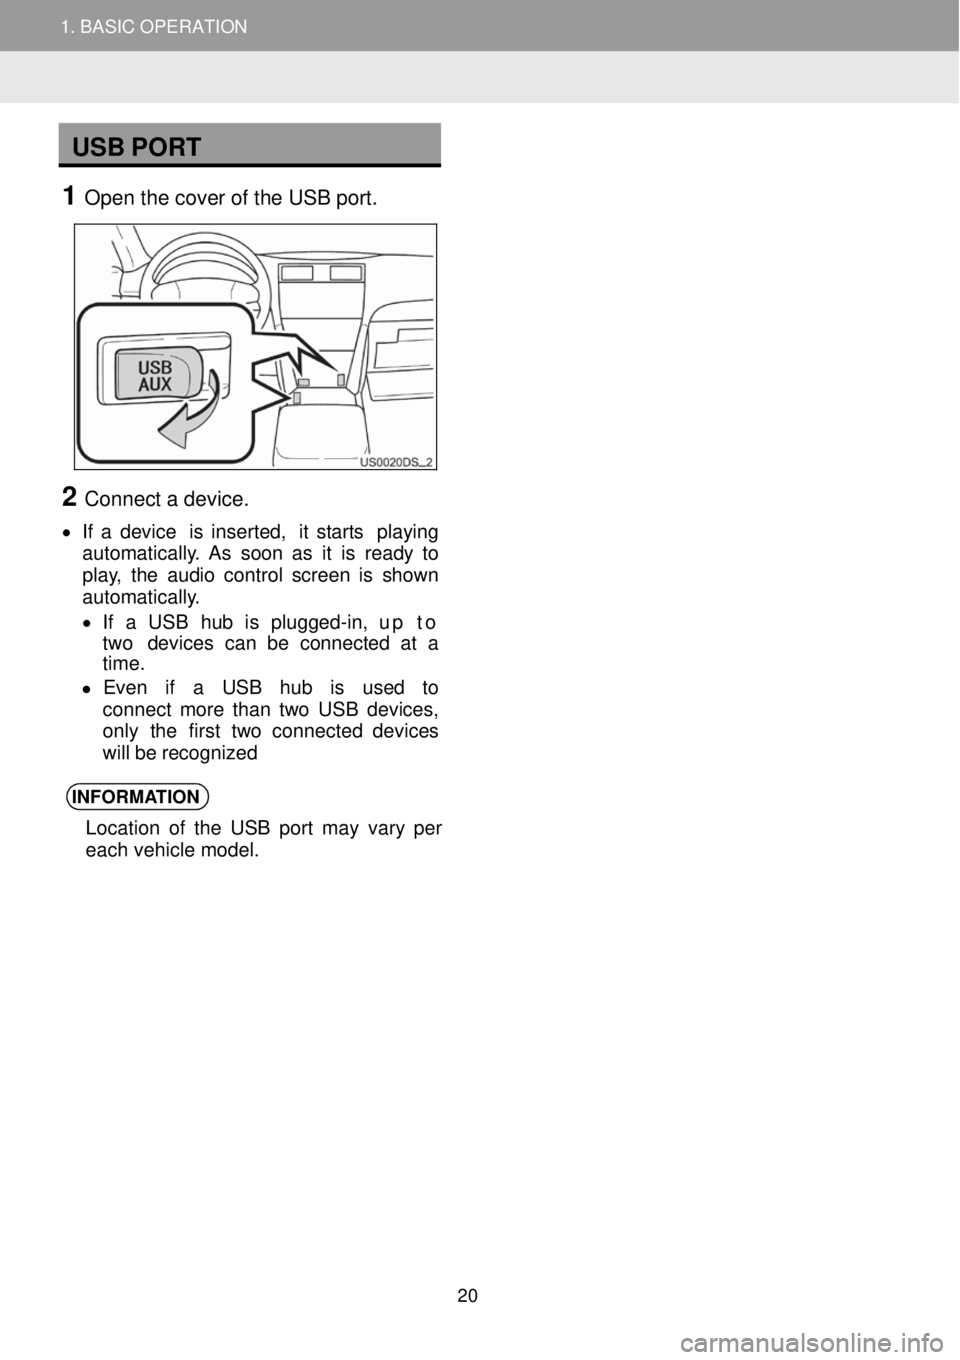
1 Open t he c over of the U SB port.
2 Connect a d evice.
• If a device is inser ted, it star ts pl aying
aut oma tica lly. As soon as it is re ady to
play, the audio cont rol scree n is shown
aut oma tica lly.
• If a USB hub is plugg ed-in, up to
two devi ces ca n be co nnected at a
ti me.
• Even if a USB hub is used to
co nnect mor e than two US B devi ces,
only the f irst tw o con nected de vices
will be re cognized
INFORMA TION
Location of the USB port may vary per
each vehicle model.
2
1. BASIC OPERATION
20