TOYOTA HIGHLANDER HYBRID 2020 (in English) Workshop Manual
Manufacturer: TOYOTA, Model Year: 2020, Model line: HIGHLANDER HYBRID, Model: TOYOTA HIGHLANDER HYBRID 2020Pages: 72, PDF Size: 6.67 MB
Page 51 of 72
49
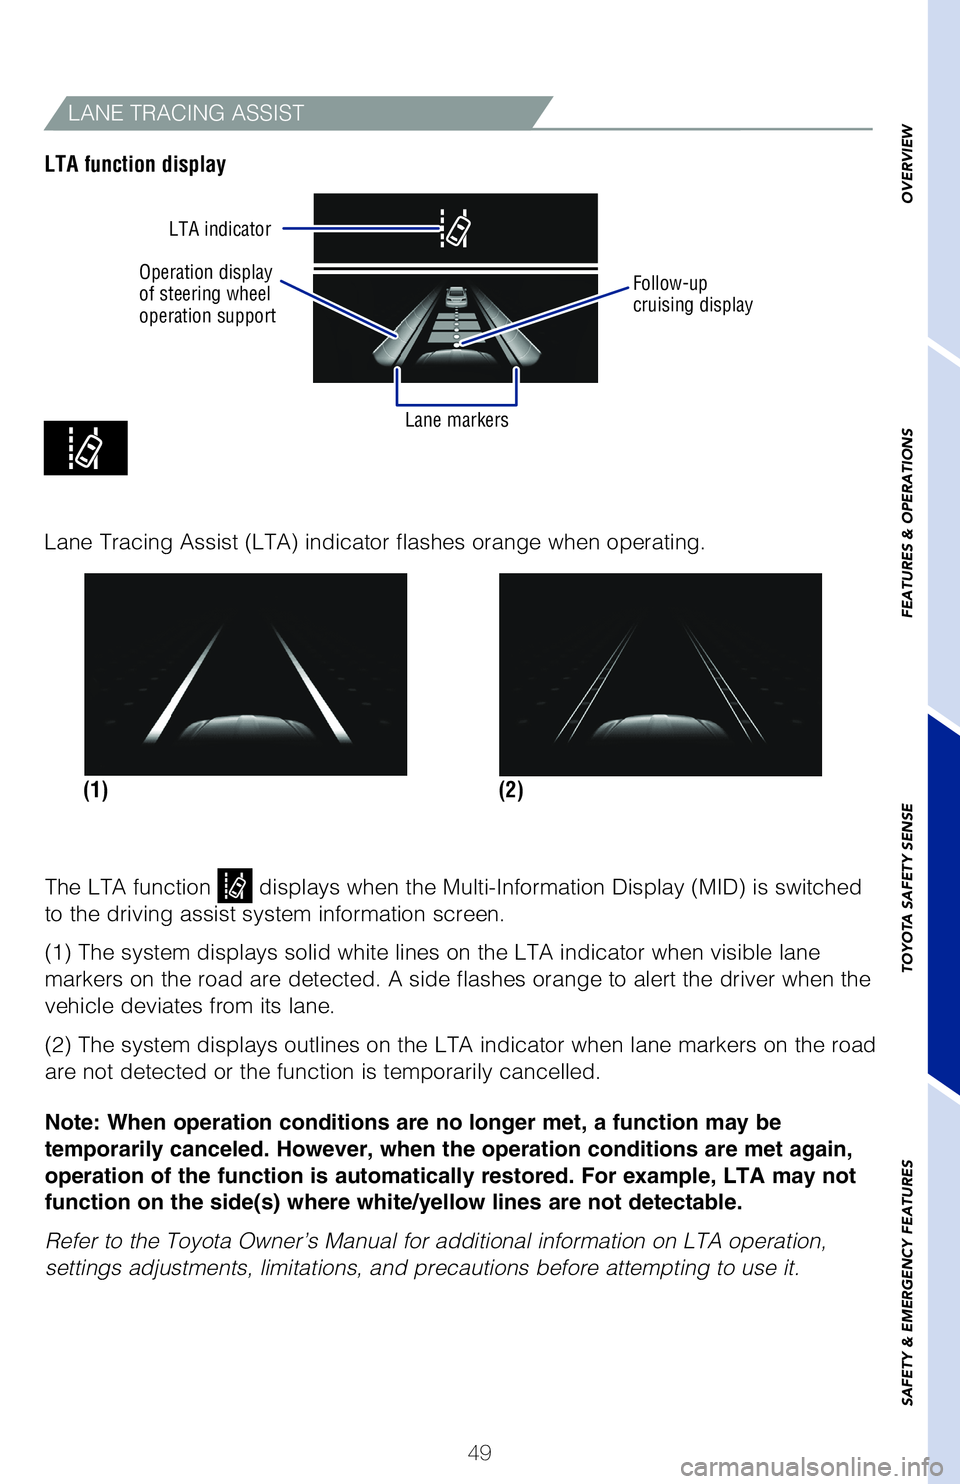
Operation display
of steering wheel
operation supportLTA indicator
Lane markers
LANE TRACING ASSIST
The LTA function displays when the Multi-Information Display (MID) is switched
to the driving assist system information screen.
(1) The system displays solid white lines on the LTA indicator when vi\�sible lane
markers on the road are detected. A side flashes orange to alert the dri\�ver when the
vehicle deviates from its lane.
(2) The system displays outlines on the LTA indicator when lane marker\�s on the road
are not detected or the function is temporarily cancelled.
Note: When operation conditions are no longer met, a function may be
temporarily canceled. However, when the operation conditions are met aga\�in,
operation of the function is automatically restored. For example, LTA ma\�y not
function on the side(s) where white/yellow lines are not detectable.
Refer to the Toyota Owner’s Manual for additional information on LTA \�operation,
settings adjustments, limitations, and precautions before attempting to \�use it.
LTA function display
Follow-up
cruising display
(2)
(1)
Lane Tracing Assist (LTA) indicator flashes orange when operating.
OVERVIEW
FEATURES & OPERATIONS
TOYOTA SAFETY SENSE
SAFETY & EMERGENCY FEATURES
Page 52 of 72
50
TOYOTA SAFETY SENSE™
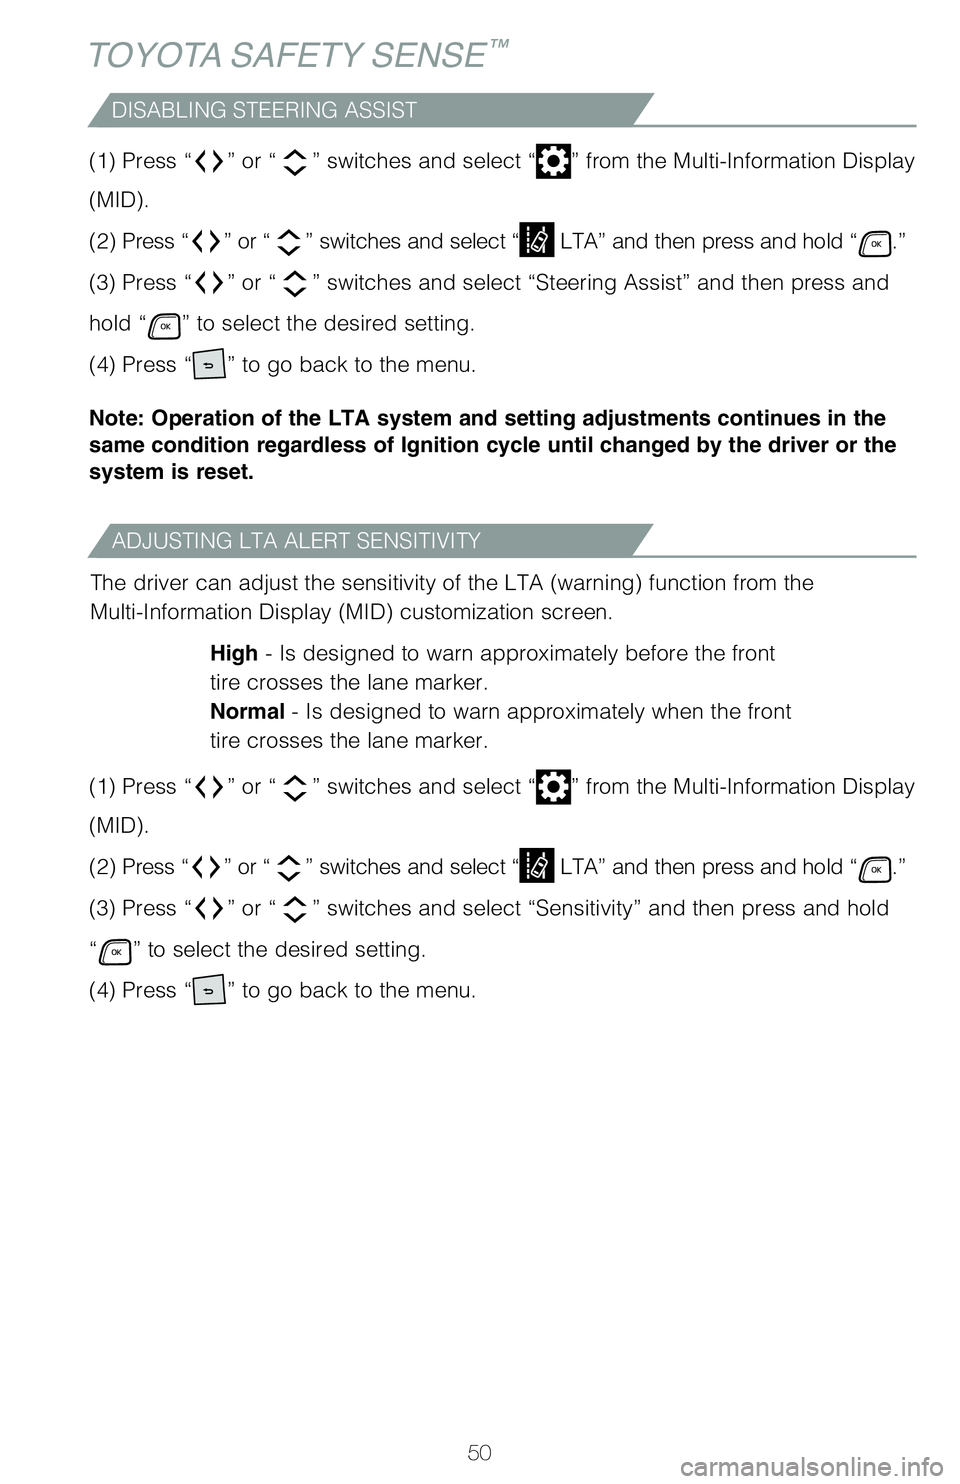
ADJUSTING LTA ALERT SENSITIVITY
DISABLING STEERING ASSIST
The driver can adjust the sensitivity of the LTA (warning) function fr\�om the
Multi-Information Display (MID) customization screen.High - Is designed to warn approximately before the front
tire crosses the lane marker.
Normal - Is designed to warn approximately when the front
tire crosses the lane marker.
(1) Press “
” or “” switches and select “” from the Multi-Information Display
(MID).
(2) Press “
” or “” switches and select “ LTA” and then press and hold “.”
(3) Press “
” or “” switches and select “Sensitivity” and then press and hold
“
” to select the desired setting.
(4) Press “
” to go back to the menu.
(1) Press “
” or “” switches and select “” from the Multi-Information Display
(MID).
(2) Press “
” or “” switches and select “ LTA” and then press and hold “.”
(3) Press “
” or “” switches and select “Steering Assist” and then press and
hold “
” to select the desired setting.
(4) Press “
” to go back to the menu.
Note: Operation of the LTA system and setting adjustments continues in t\�he
same condition regardless of Ignition cycle until changed by the driver \�or the
system is reset.
Page 53 of 72
51
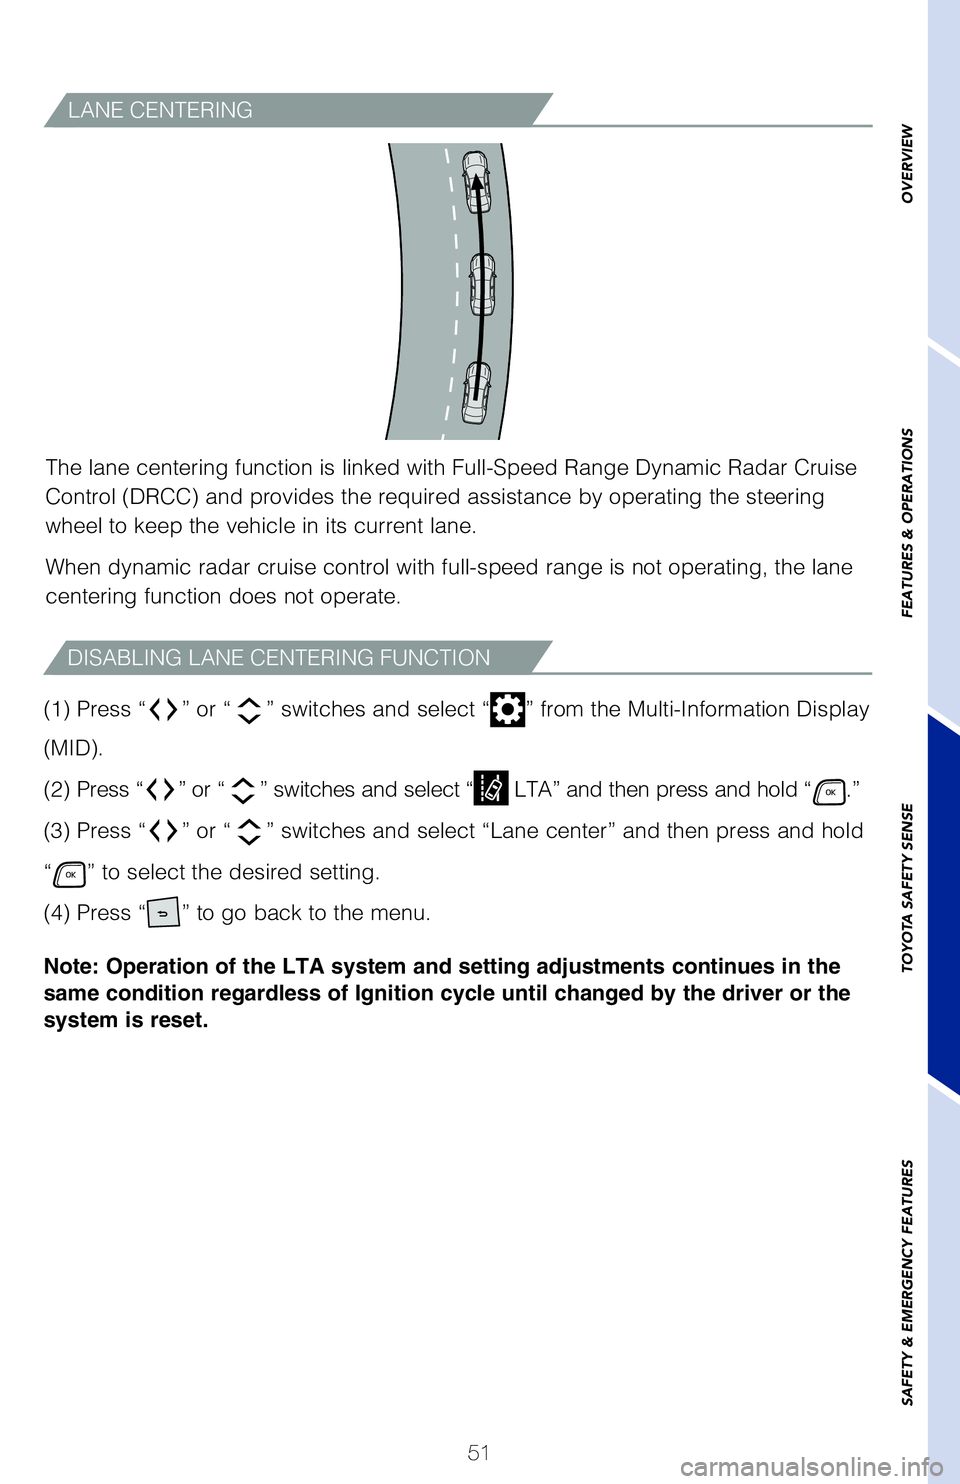
LANE CENTERING
The lane centering function is linked with Full-Speed Range Dynamic Rada\�r Cruise
Control (DRCC) and provides the required assistance by operating the s\�teering
wheel to keep the vehicle in its current lane.
When dynamic radar cruise control with full-speed range is not operating\�, the lane
centering function does not operate.
(1) Press “
” or “” switches and select “” from the Multi-Information Display
(MID).
(2) Press “
” or “” switches and select “ LTA” and then press and hold “.”
(3) Press “
” or “” switches and select “Lane center” and then press and hold
“
” to select the desired setting.
(4) Press “
” to go back to the menu.
Note: Operation of the LTA system and setting adjustments continues in t\�he
same condition regardless of Ignition cycle until changed by the driver \�or the
system is reset.
DISABLING LANE CENTERING FUNCTION
OVERVIEW
FEATURES & OPERATIONS
TOYOTA SAFETY SENSE
SAFETY & EMERGENCY FEATURES
Page 54 of 72
52
TOYOTA SAFETY SENSE™
TURNING SYSTEM ON/OFF
(1)
Push once: On
Push twice: Off
Full-Speed Range Dynamic Radar Cruise Control
(DRCC)
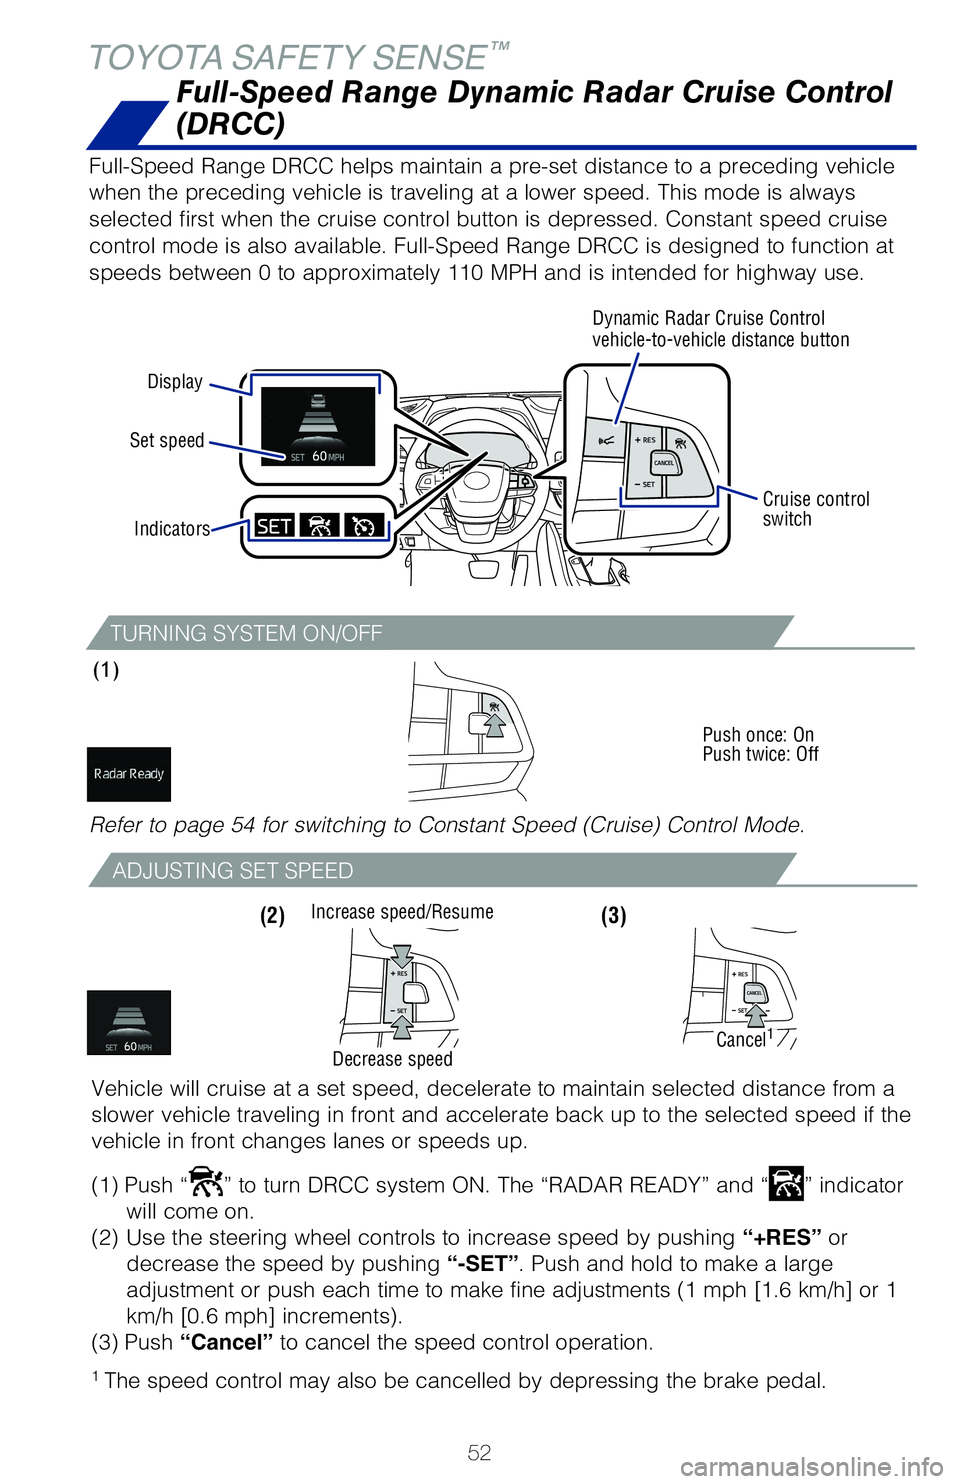
Full-Speed Range DRCC helps maintain a pre-set distance to a preceding v\�ehicle
when the preceding vehicle is traveling at a lower speed. This mode is a\�lways
selected first when the cruise control button is depressed. Constant spe\�ed cruise
control mode is also available. Full-Speed Range DRCC is designed to fun\�ction at
speeds between 0 to approximately 110 MPH and is intended for highway us\�e.
Display
Set speed Dynamic Radar Cruise Control
vehicle-to-vehicle distance button
Cruise control
switch
Indicators
Refer to page 54 for switching to Constant Speed (Cruise) Control Mode\�.
ADJUSTING SET SPEED
(3) (2)
Vehicle will cruise at a set speed, decelerate to maintain selected dist\�ance from a
slower vehicle traveling in front and accelerate back up to the selected\� speed if the
vehicle in front changes lanes or speeds up.
(1) Push “
” to turn DRCC system ON. The “RADAR READY” and “” indicator
will come on.
(2)
Use the steering wheel controls to increase speed by pushing “+RES” or
decrease the speed by pushing “-SET”. Push and hold to make a large
adjustment or push each time to make fine adjustments (1 mph [1.6 km/h]\� or 1
km/h [0.6 mph] increments).
(3) Push “Cancel” to cancel the speed control operation.
1 The speed control may also be cancelled by depressing the brake pedal.
Increase speed/Resume
Cancel1
Decrease speed
Page 55 of 72
53
ADJUSTING DISTANCE
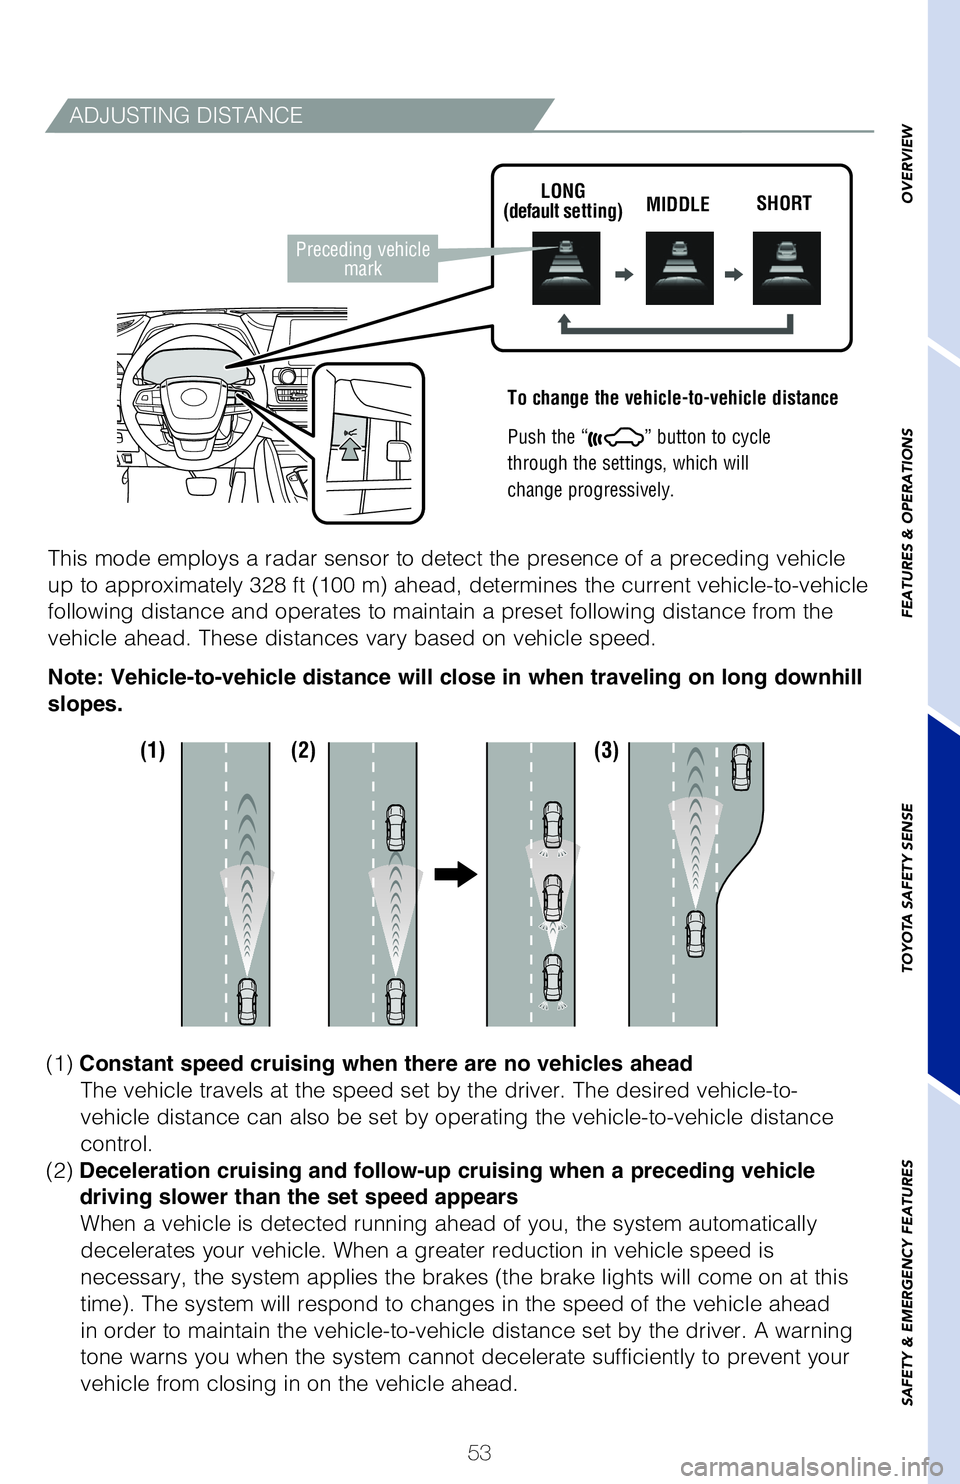
To change the vehicle-to-vehicle distance
Push the “
” button to cycle
through the settings, which will
change progressively.
This mode employs a radar sensor to detect the presence of a preceding v\�ehicle
up to approximately 328 ft (100 m) ahead, determines the current vehic\�le-to-vehicle
following distance and operates to maintain a preset following distance \�from the
vehicle ahead. These distances vary based on vehicle speed.
LONG
(default setting) MIDDLE
SHORT
Note: Vehicle-to-vehicle distance will close in when traveling on long d\�ownhill
slopes.
Preceding vehicle
mark
(1) (2) (3)
(1) Constant speed cruising when there are no vehicles ahead
The vehicle travels at the speed set by the driver. The desired vehicle-\�to-
vehicle distance can also be set by operating the vehicle-to-vehicle dis\�tance
control.
(2) Deceleration cruising and follow-up cruising when a preceding vehicle
driving slower than the set speed appears
When a vehicle is detected running ahead of you, the system automaticall\�y
decelerates your vehicle. When a greater reduction in vehicle speed is
necessary, the system applies the brakes (the brake lights will come on\� at this
time). The system will respond to changes in the speed of the vehicle a\�head
in order to maintain the vehicle-to-vehicle distance set by the driver. \�A warning
tone warns you when the system cannot decelerate sufficiently to prevent\� your
vehicle from closing in on the vehicle ahead.
OVERVIEW
FEATURES & OPERATIONS
TOYOTA SAFETY SENSE
SAFETY & EMERGENCY FEATURES
Page 56 of 72
54
TOYOTA SAFETY SENSE™
ADJUSTING DISTANCE (CONTINUED)
Note: When your vehicle is too close to a vehicle ahead, and sufficient \�automatic
deceleration via the cruise control is not possible, the display will fl\�ash and the
buzzer will sound to alert the driver. An example of this would be if an\�other driver
cuts in front of you while you are following a vehicle. Depress the brak\�e pedal to
ensure an appropriate vehicle-to-vehicle distance.
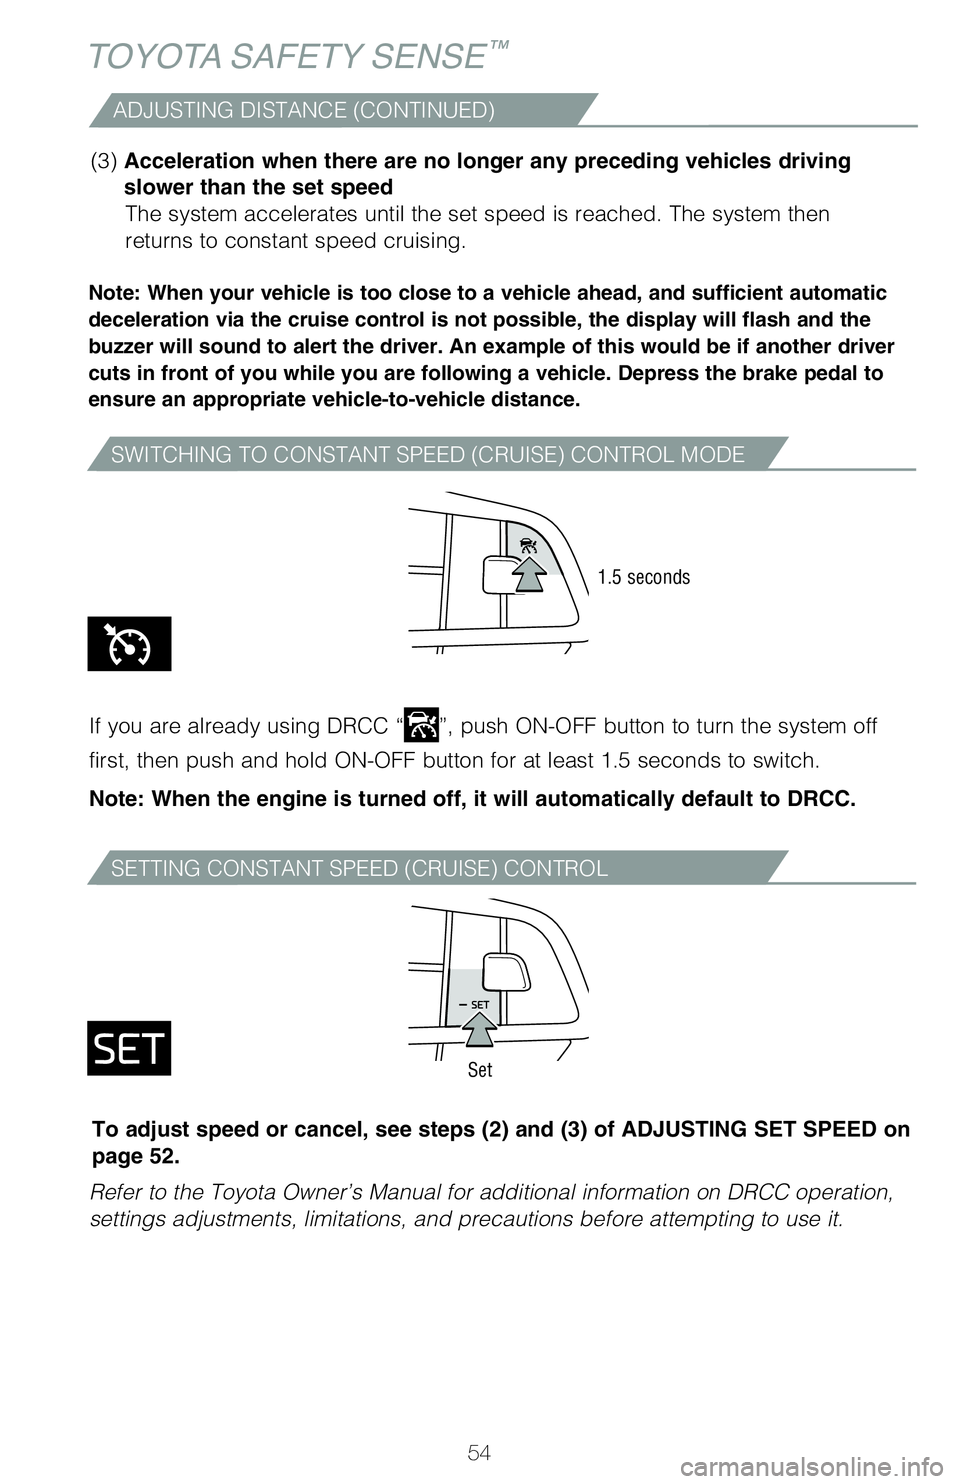
(3) Acceleration when there are no longer any preceding vehicles driving
slower than the set speed
The system accelerates until the set speed is reached. The system then
returns to constant speed cruising.
SWITCHING TO CONSTANT SPEED (CRUISE) CONTROL MODE
SETTING CONSTANT SPEED (CRUISE) CONTROL
If you are already using DRCC “”, push ON-OFF button to turn the system off
first, then push and hold ON-OFF button for at least 1.5 seconds to swit\�ch.
Note: When the engine is turned off, it will automatically default to DR\�CC.
Refer to the Toyota Owner’s Manual for additional information on DRCC\� operation,
settings adjustments, limitations, and precautions before attempting to \�use it.
1.5 seconds
Set
To adjust speed or cancel, see steps (2) and (3) of ADJUSTING SET SP\�EED on
page 52.
Page 57 of 72
55
Automatic High Beams (AHB)
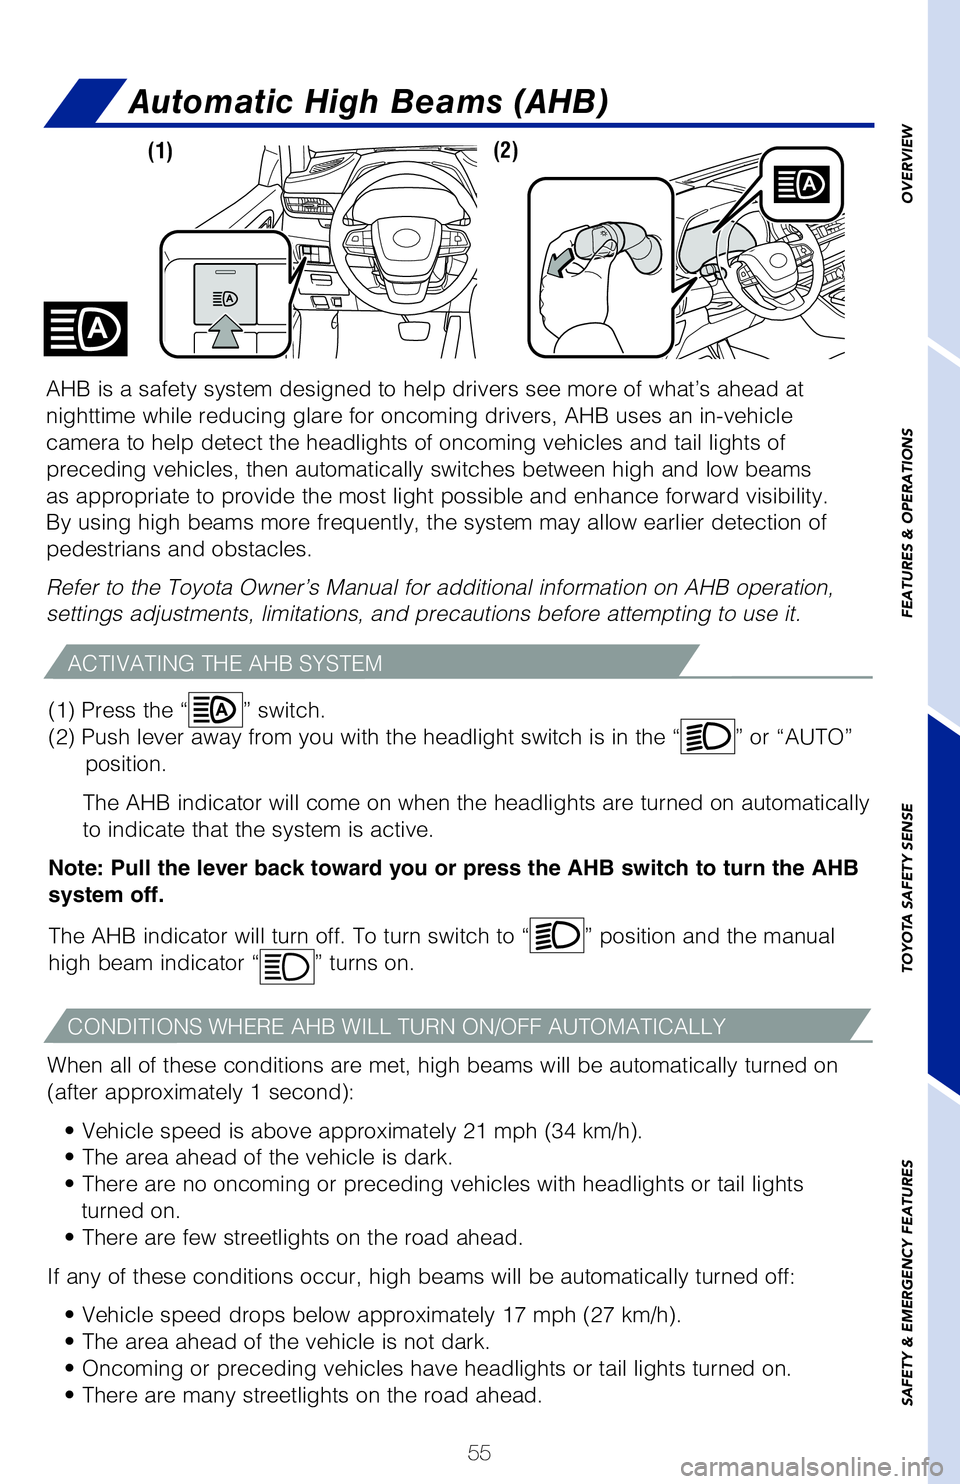
ACTIVATING THE AHB SYSTEM
CONDITIONS WHERE AHB WILL TURN ON/OFF AUTOMATICALLY
When all of these conditions are met, high beams will be automatically t\�urned on
(after approximately 1 second):• Vehicle speed is above approximately 21 mph (34 km/h).
• The area ahead of the vehicle is dark.
• There are no oncoming or preceding vehicles with headlights or tail\� lights turned on.
• There are few streetlights on the road ahead.
If any of these conditions occur, high beams will be automatically turne\�d off: • Vehicle speed drops below approximately 17 mph (27 km/h).
• The area ahead of the vehicle is not dark.
• Oncoming or preceding vehicles have headlights or tail lights turne\�d on.
• There are many streetlights on the road ahead.
AHB is a safety system designed to help drivers see more of what’s ah\�ead at
nighttime while reducing glare for oncoming drivers, AHB uses an in-vehi\�cle
camera to help detect the headlights of oncoming vehicles and tail light\�s of
preceding vehicles, then automatically switches between high and low bea\�ms
as appropriate to provide the most light possible and enhance forward vi\�sibility.
By using high beams more frequently, the system may allow earlier detect\�ion of
pedestrians and obstacles.
Refer to the Toyota Owner’s Manual for additional information on AHB \�operation,
settings adjustments, limitations, and precautions before attempting to \�use it.
(2) (1)
(1) Press the “
” switch.
(2) Push lever away from you with the headlight switch is in the “
” or “AUTO”
position.
The AHB indicator will come on when the headlights are turned on automat\�ically
to indicate that the system is active.
Note: Pull the lever back toward you or press the AHB switch to turn the\� AHB
system off.
The AHB indicator will turn off. To turn switch to “
” position and the manual
high beam indicator “
” turns on.
OVERVIEW
FEATURES & OPERATIONS
TOYOTA SAFETY SENSE
SAFETY & EMERGENCY FEATURES
Page 58 of 72
56
TOYOTA SAFETY SENSE™
Road Sign Assist (RSA)
Road Sign Assist is designed to help ensure drivers are kept informed. T\�he RSA
system recognizes specific road signs using a forward-facing intelligent\� camera to
provide information to the driver via a Multi-information Display (MID)\�. If the system
judges that the vehicle is being driven over the speed limit, or perform\�ing actions
prohibited by other support types of road signs, it alerts the driver us\�ing a warning
display and may sound a warning buzzer.
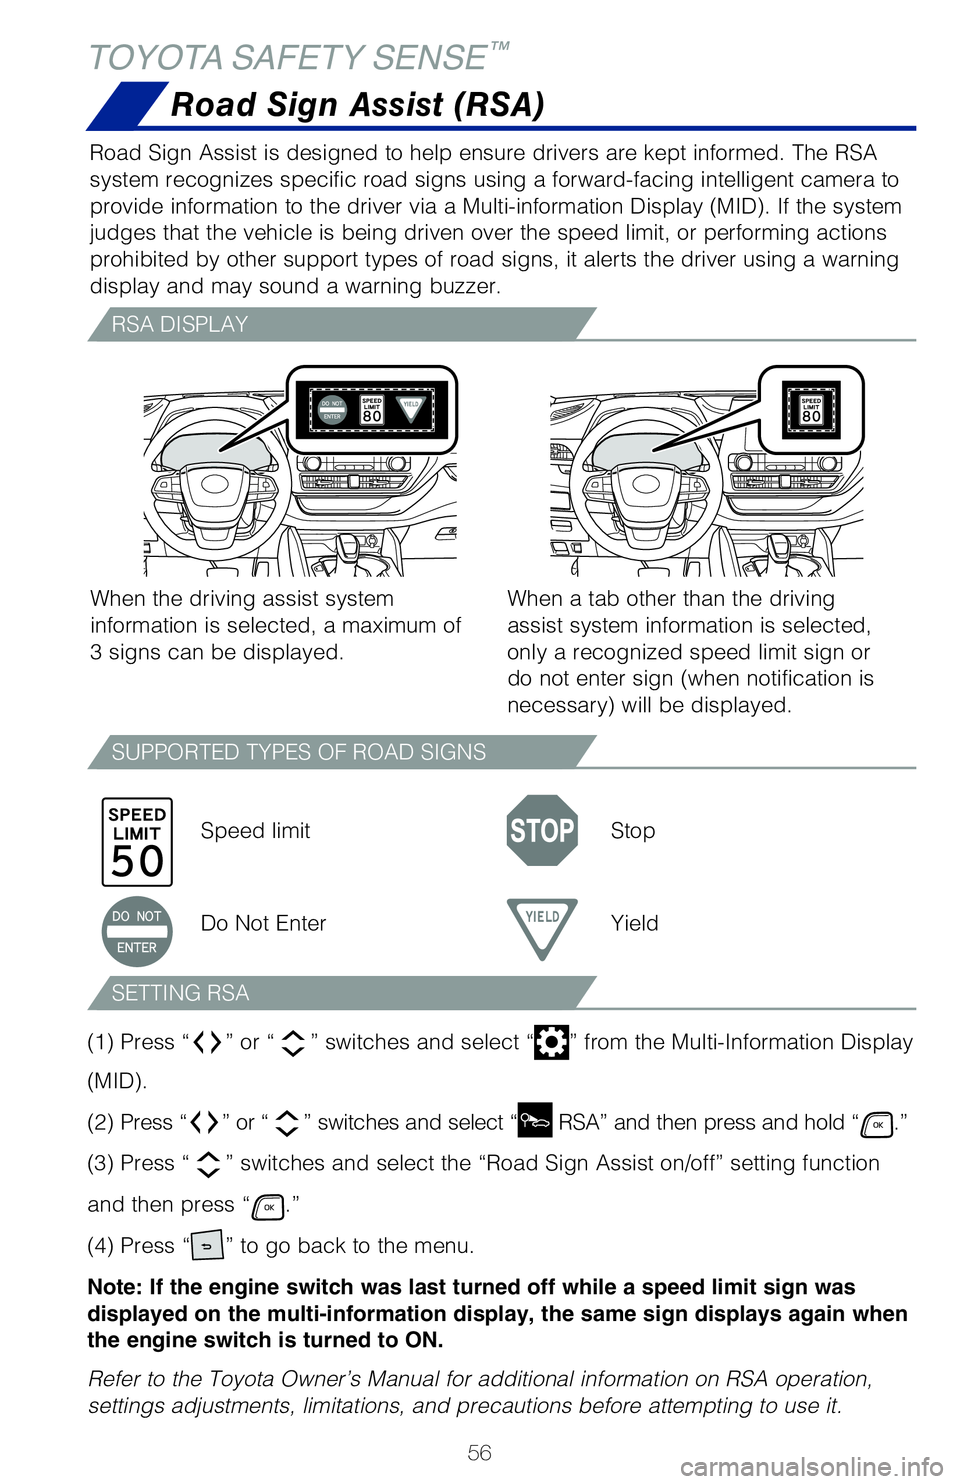
RSA DISPLAY
SUPPORTED TYPES OF ROAD SIGNS
SETTING RSA
When the driving assist system
information is selected, a maximum of
3 signs can be displayed.Speed limit Stop
Do Not Enter Yield
When a tab other than the driving
assist system information is selected,
only a recognized speed limit sign or
do not enter sign (when notification is
necessary) will be displayed.
(1) Press “
” or “” switches and select “” from the Multi-Information Display
(MID).
(2) Press “
” or “” switches and select “ RSA” and then press and hold “.”
(3) Press “
” switches and select the “Road Sign Assist on/off” setting functio\�n
and then press “
.”
(4) Press “
” to go back to the menu.
Note: If the engine switch was last turned off while a speed limit sign \�was
displayed on the multi-information display, the same sign displays again\� when
the engine switch is turned to ON.
Refer to the Toyota Owner’s Manual for additional information on RSA \�operation,
settings adjustments, limitations, and precautions before attempting to \�use it.
Page 59 of 72
57
SAFETY & EMERGENCY FEATURES
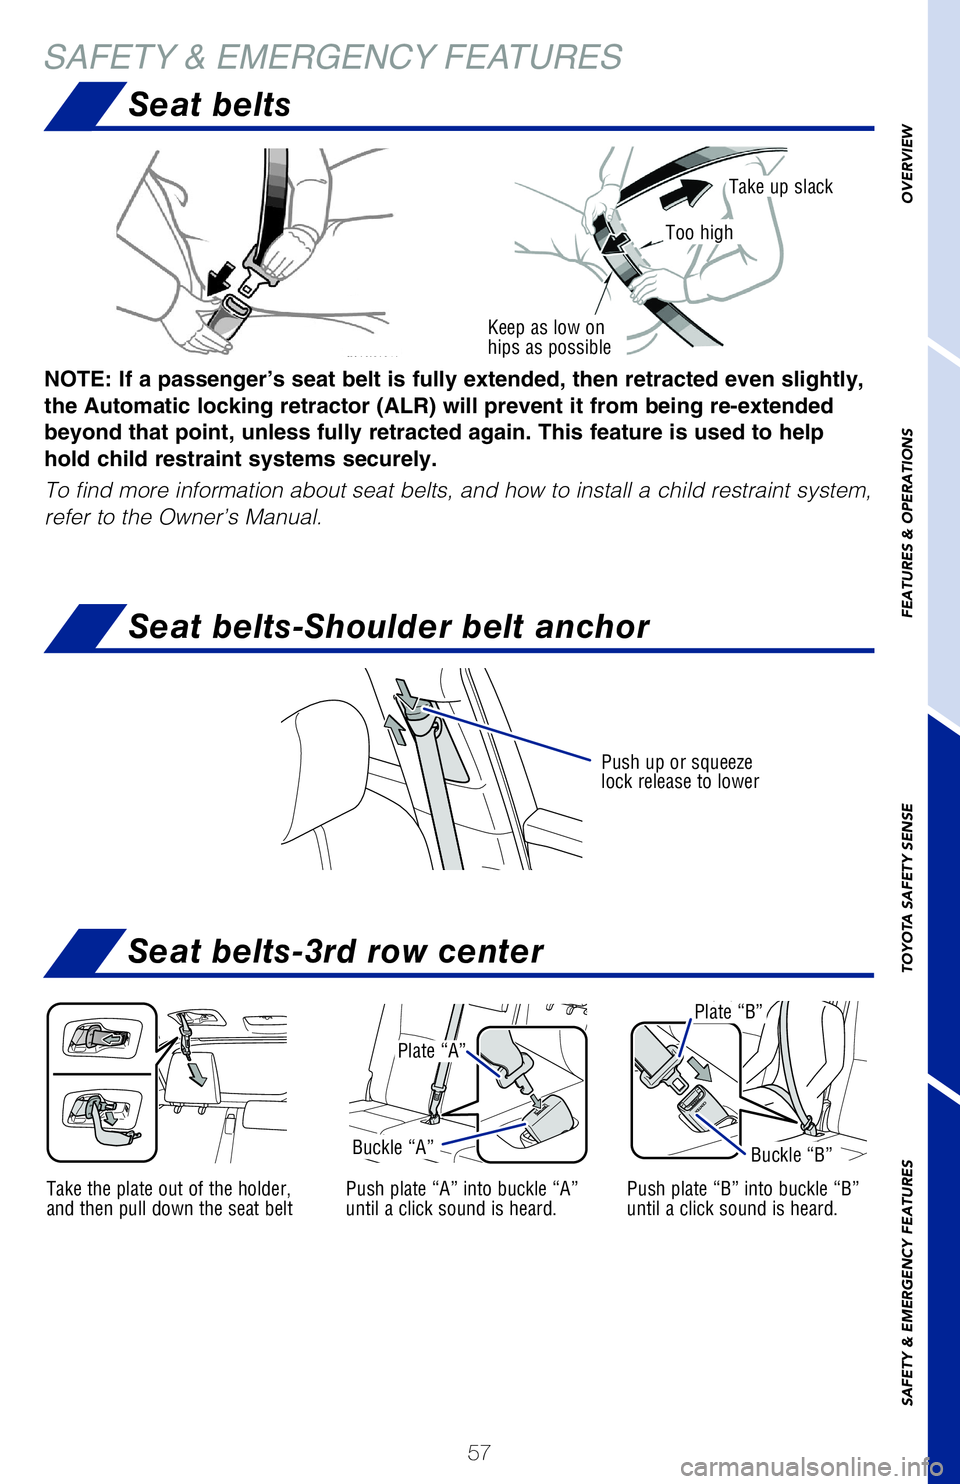
Push up or squeeze
lock release to lower
Seat belts
Seat belts-3rd row center
Seat belts-Shoulder belt anchor
Take the plate out of the holder,
and then pull down the seat beltPush plate “A” into buckle “A”
until a click sound is heard.
Plate “A”
Plate “B”
Buckle “A”Buckle “B”
Push plate “B” into buckle “B”
until a click sound is heard.
Keep as low on
hips as possible
Take up slack
Too high
NOTE: If a passenger’s seat belt is fully extended, then retracted ev\�en slightly,
the Automatic locking retractor (ALR) will prevent it from being re-ex\�tended
beyond that point, unless fully retracted again. This feature is used to\� help
hold child restraint systems securely.
To find more information about seat belts, and how to install a child re\�straint system,
refer to the Owner’s Manual.
OVERVIEW
FEATURES & OPERATIONS
TOYOTA SAFETY SENSE
SAFETY & EMERGENCY FEATURES
Page 60 of 72
58
SAFETY & EMERGENCY FEATURES
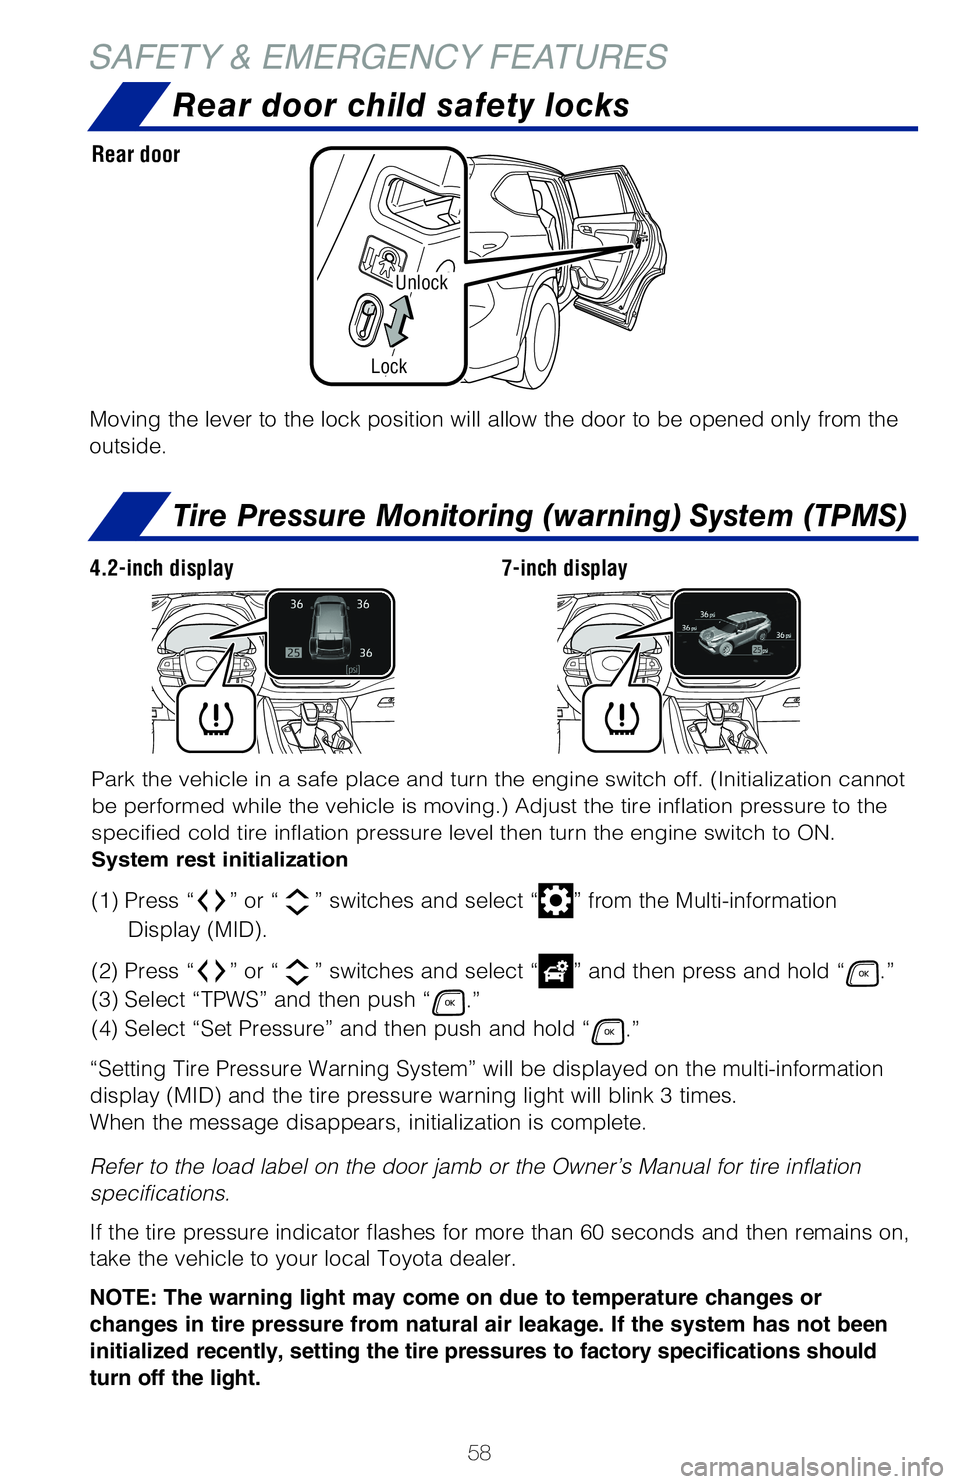
Unlock
Lock
Rear door child safety locks
Tire Pressure Monitoring (warning) System (TPMS)
Moving the lever to the lock position will allow the door to be opened o\�nly from the
outside.
Rear door
Refer to the load label on the door jamb or the Owner’s Manual for ti\�re inflation
specifications.
If the tire pressure indicator flashes for more than 60 seconds and then\� remains on,
take the vehicle to your local Toyota dealer.
NOTE:
The warning light may come on due to temperature changes or
changes in tire pressure from natural air leakage. If the system has not\� been
initialized recently, setting the tire pressures to factory specifications should
turn off the light.
Park the vehicle in a safe place and turn the engine switch off. (Initi\�alization cannot
be performed while the vehicle is moving.) Adjust the tire inflation pr\�essure to the
specified cold tire inflation pressure level then turn the engine switch\� to ON.
System rest initialization
(1) Press “” or “” switches and select “” from the Multi-information
Display (MID).
(2) Press “
” or “” switches and select “” and then press and hold “.”
(3) Select “TPWS” and then push “
.”
(4) Select “Set Pressure” and then push and hold “
.”
“Setting Tire Pressure Warning System” will be displayed on the mu\�lti-information
display (MID) and the tire pressure warning light will blink 3 times.
When the message disappears, initialization is complete.
4.2-inch display 7-inch display