TOYOTA HIGHLANDER HYBRID 2020 Owners Manual (in English)
Manufacturer: TOYOTA, Model Year: 2020, Model line: HIGHLANDER HYBRID, Model: TOYOTA HIGHLANDER HYBRID 2020Pages: 572, PDF Size: 21.11 MB
Page 471 of 572
4717-2. Steps to take in an emergency
HIGHLANDER HV_U
7
When trouble arises
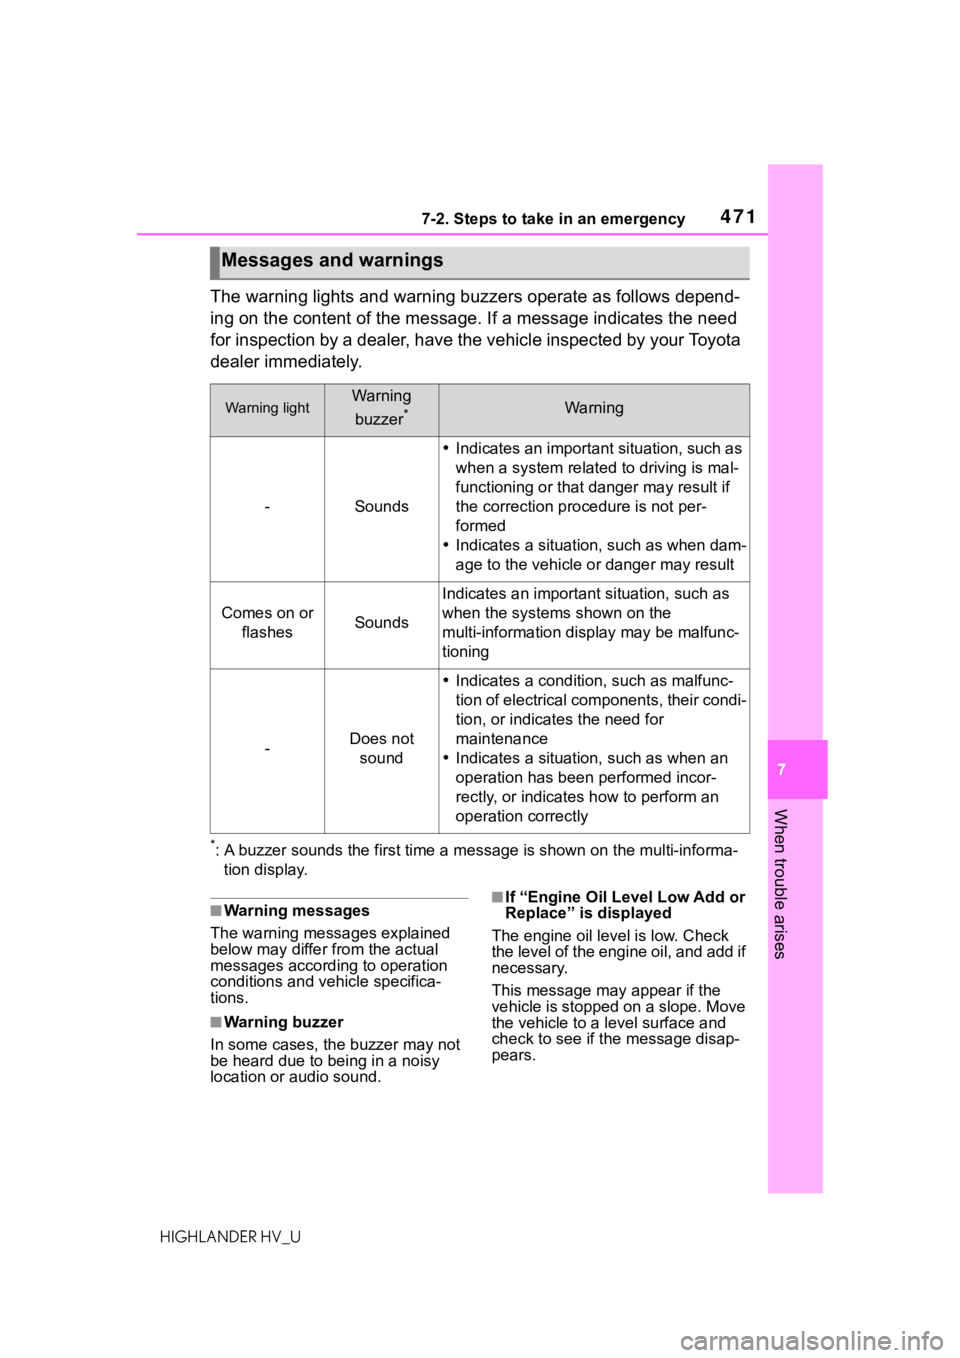
The warning lights and warning buzzers operate as follows depend-
ing on the content of the message. If a message indicates the need
for inspection by a dealer, have the vehicle inspected by your To y o t a
dealer immediately.
*: A buzzer sounds the first time a message is shown on the multi-informa-
tion display.
■Warning messages
The warning messages explained
below may differ from the actual
messages according to operation
conditions and vehicle specifica-
tions.
■Warning buzzer
In some cases, the buzzer may not
be heard due to being in a noisy
location or audio sound.
■If “Engine Oil Level Low Add or
Replace” is displayed
The engine oil level is low. Check
the level of the engine oil, and add if
necessary.
This message may appear if the
vehicle is stopped on a slope. Move
the vehicle to a l evel surface and
check to see if the message disap-
pears.
Messages and warnings
Warning lightWarning
buzzer
*Warning
-Sounds
Indicates an important situation, such as
when a system relate d to driving is mal-
functioning or that danger may result if
the correction procedure is not per-
formed
Indicates a situation, such as when dam-
age to the vehicle or danger may result
Comes on or
flashesSounds
Indicates an importan t situation, such as
when the systems shown on the
multi-information display may be malfunc-
tioning
-Does not sound
Indicates a condition, such as malfunc-
tion of electrical components, their condi-
tion, or indicates the need for
maintenance
Indicates a situatio n, such as when an
operation has been performed incor-
rectly, or indicates how to perform an
operation correctly
Page 472 of 572

4727-2. Steps to take in an emergency
HIGHLANDER HV_U
■If “Hybrid System Stopped
Steering Power Low” is dis-
played
This message is displayed if the
hybrid system is stopped while driv-
ing.
When steering wheel operations are
heavier than usual, grip the steering
wheel firmly and operate it using
more force th an usual.
■If “Hybrid System Overheated
Output Power Reduced” is dis-
played
This message may be displayed
when driving under severe operat-
ing conditions. (For example, when
driving up a long steep hill.)
Handling method: P. 4 9 7
■If “Traction Battery Needs to be
Protected Refrain from the Use
of N Position” is displayed
This message may be displayed
when the shift lever is in N.
As the hybrid batte ry (traction bat-
tery) cannot be charged when the
shift lever is in N, shift the shift lever
to P when the vehicle is stopped.
■If “Traction Battery Needs to be
Protected Shift into P to
Restart” is displayed
This message is displayed when the
hybrid battery (traction battery)
charge has become extremely low
because the shift lever has been left
in N for a certain amount of time.
When operating the vehicle, shift to
P and restart the hybrid system.
■If “Shift to P Before Exiting
Vehicle” or “Shift to P when
Parked” is displayed
This message is displayed when the
driver’s door is opened without turn-
ing the power swit ch off with the
shift lever in any position other than
P. Change the shift lever to P.
■If “Shift is in N Release Acceler-
ator Before Shifting” is dis-
played
The accelerator pedal has been
depressed when the shift lever is in
N.
Release the accelerator pedal and
shift the shift le ver to D, S or R.
■If “Press Brake when Vehicle is
Stopped Hybrid System may
Overheat” is displayed
The message may be displayed
when the accelerator pedal is
depressed to hold the vehicle while
the vehicle is stopped on an incline,
etc. The hybrid system may over-
heat. Release the accelerator pedal
and depress the brake pedal.
■If “Auto Power OFF to Conserve
Battery” is displayed
Power was cut off due to the auto-
matic power off function. Next time
when starting the hybrid system,
operate the hybrid system for
approximately 5 minutes to
recharge the 12-volt battery.
■If “Headlight System Malfunc-
tion Visit Your Dealer” is dis-
played
The following systems may be mal-
functioning. Hav e the vehicle
inspected by your Toyota dealer
immediately.
●The LED headlight system (if AFS
[Adaptive Front-lighting System]
equipped)
●AFS (Adaptive Front-lighting Sys-
tem) (if equipped)
●The automatic headlight leveling
system (if equipped)
●Automatic High Beam
■If “Radar Cruise Control
Unavailable” is displayed
The dynamic radar cruise control
with full-speed range system cannot
be used temporarily. Use the system
when it becomes available again.
Page 473 of 572

4737-2. Steps to take in an emergency
HIGHLANDER HV_U
7
When trouble arises
■If “Front Camera Unavailable”
or “Front Camera Unavailable
See Owner's Manual” is dis-
played
The following sys tems may be sus-
pended until the pr oblem shown in
the message is resolved. ( P.247,
466)
●PCS (Pre-Collision system)
●LTA (Lane Tracing Assist)
●Automatic High Beam
●RSA (Road Sign Assist) (if
equipped)
●Dynamic radar cruise control with
full-speed range
■If “AWD System Overheated
Switching to 2WD Mode” or
“AWD System Overheated 2WD
Mode Engaged” is displayed
(AWD models)
This message may be displayed
when driving under extremely high
load conditions.
Drive the vehicle at low speeds and
stop the vehicle in a safe place with
the engine running until the mes-
sage is cleared.
If the message is not cleared, have
the vehicle inspected by your Toyota
dealer.
■If “Check Fuel Cap” is dis-
played
The fuel tank cap is not properly
installed. Correctly install the fuel
tank cap.
■If “Maintenance Required
Soon” is displayed
Indicates that all maintenance
according to the dr iven distance on
the maintenance schedule
* should
be performed soon.
Comes on approximately 4500
miles (7200 km) after the message
has been reset. If necessary, per-
form maintenance. Please reset the
message after the maintenance is
performed. ( P.401)
*: Refer to the separate “Scheduled
Maintenance” or “Owner’s Man-
ual Supplement” for the mainte-
nance interval applicable to your
vehicle.
■If “Maintenance Required Visit
Your Dealer” is displayed
Indicates that all maintenance is
required to correspond to the driven
distance on the maintenance sched-
ule
*.
Comes on approximately 5000
miles (8000 km) after the message
has been reset. (The indicator will
not work properly unless the mes-
sage has been rese t.) Perform the
necessary maintenance. Please
reset the message after the mainte-
nance is performed. ( P.401)
*: Refer to the separate “Scheduled
Maintenance” or “Owner’s Man-
ual Supplement” for the mainte-
nance interval applicable to your
vehicle.
■If a message that indicates the
need for visiting your Toyota
dealer is displayed
The system or part shown on the
multi-information di splay is malfunc-
tioning. Have the vehicle inspected
by your Toyota dealer immediately.
■If a message that indicates the
need for referring to Owner’s
Manual is displayed
●If any of the following messages
are shown on the multi-informa-
tion display, it may indicate a mal-
function. Immediately stop the
vehicle and contact your Toyota
dealer.
• “Braking Power Low Stop in a Safe Place See Owner's Manual”
• “Oil Pressure Low Stop in a Safe
Place See Owner's Manual”
• “Charging System Malfunction Stop in a Safe Place See Owner's
Manual”
• “Hybrid System Stopped”
Page 474 of 572
4747-2. Steps to take in an emergency
HIGHLANDER HV_U• “Engine Stopped”
• “Stop in a Safe Place See Owner's
Manual”
• “Shift to P See Owner's Manual”
●If any of the following messages
are shown on the multi-informa-
tion display, it may indicate a mal-
function. Have the vehicle
inspected by you r Toyota dealer
immediately.
• “Hybrid System Malfunction”
• “Check Engine”
• “Hybrid Battery System Malfunc- tion”
• “Accelerator Syst em Malfunction”
• “Smart Key System Malfunction See Owner's Manual”
●If any of the following messages
are shown on the multi-informa-
tion display, follow the instruc-
tions.
• “Engine Coolant Temp High Stop
in a Safe Place See Owner's Man-
ual” ( P.497)
• “Maintenance Required for Trac-
tion Battery Cooling Parts See
Owner's Manual” ( P.497)
Stop the vehicle in a safe
place on a hard, flat surface.
Set the parking brake.
Shift the shift lever to P.
Stop the hybrid system.
Turn on the emergency flash-
ers. ( P.452)
Turn off the power back door
system. ( P.526)
NOTICE
■If “High Power Consumption
Partial Limit on AC/Heater
Operation” is displayed fre-
quently
There is a possible malfunction
relating to the ch arging system or
the 12-volt battery may be deteri-
orating. Have the vehicle
inspected by your Toyota dealer.
If you have a flat tire
Your vehicle is equipped
with a spare tire. The flat tire
can be replaced with the
spare tire.
For details about tires:
P. 4 1 8
WA R N I N G
■If you have a flat tire
Do not continue driving with a flat
tire.
Driving even a sho rt distance with
a flat tire can damage the tire and
the wheel beyond repair, which
could result in an accident.
Before jacking up the
vehicle
Page 475 of 572
4757-2. Steps to take in an emergency
HIGHLANDER HV_U
7
When trouble arises
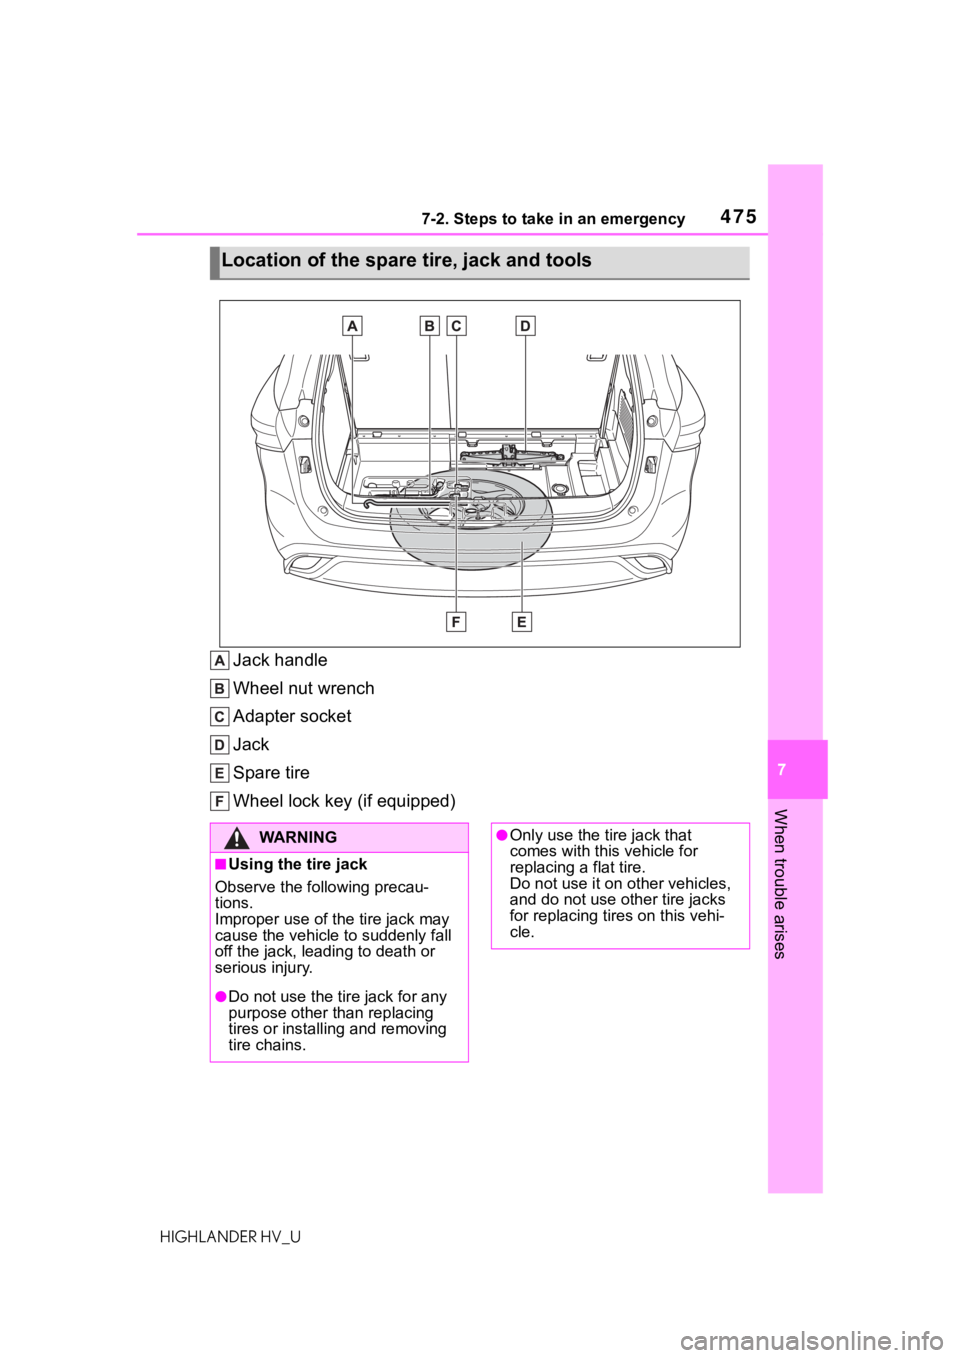
Jack handle
Wheel nut wrench
Adapter socket
Jack
Spare tire
Wheel lock key (if equipped)
Location of the spare t ire, jack and tools
WA R N I N G
■Using the tire jack
Observe the following precau-
tions.
Improper use of th e tire jack may
cause the vehicle to suddenly fall
off the jack, leading to death or
serious injury.
●Do not use the tir e jack for any
purpose other than replacing
tires or installing and removing
tire chains.
●Only use the tire jack that
comes with this vehicle for
replacing a flat tire.
Do not use it on other vehicles,
and do not use other tire jacks
for replacing tires on this vehi-
cle.
Page 476 of 572
4767-2. Steps to take in an emergency
HIGHLANDER HV_U
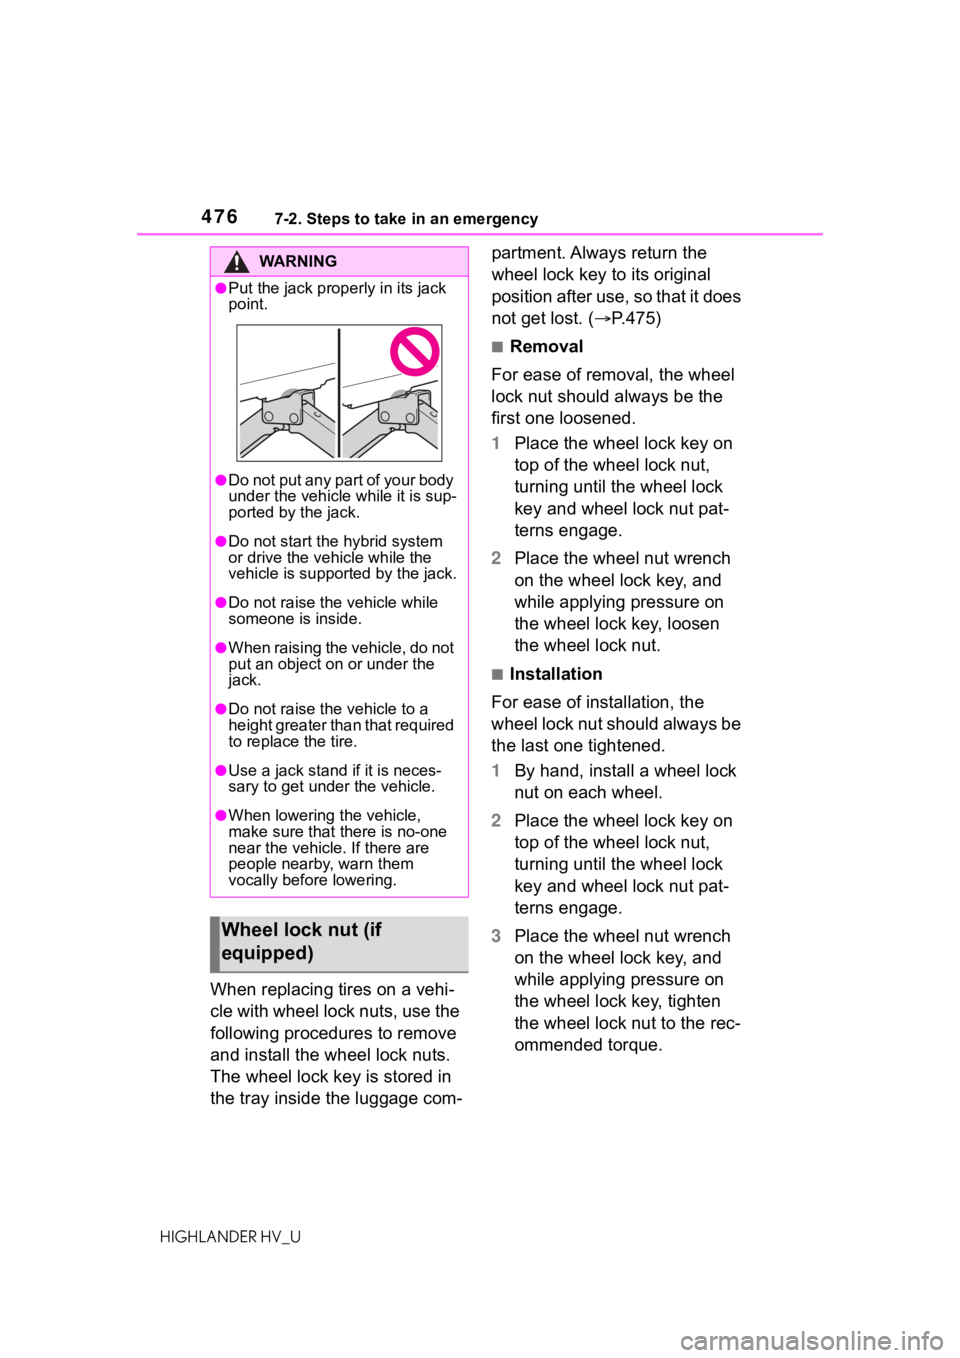
When replacing tires on a vehi-
cle with wheel lock nuts, use the
following procedures to remove
and install the wheel lock nuts.
The wheel lock key is stored in
the tray inside the luggage com- partment. Always return the
wheel lock key to its original
position after use, so that it does
not get lost. (
P.475)
■Removal
For ease of removal, the wheel
lock nut should always be the
first one loosened.
1 Place the wheel lock key on
top of the wheel lock nut,
turning until the wheel lock
key and wheel lock nut pat-
terns engage.
2 Place the wheel nut wrench
on the wheel lock key, and
while applying pressure on
the wheel lock key, loosen
the wheel lock nut.
■Installation
For ease of installation, the
wheel lock nut should always be
the last one tightened.
1 By hand, install a wheel lock
nut on each wheel.
2 Place the wheel lock key on
top of the wheel lock nut,
turning until the wheel lock
key and wheel lock nut pat-
terns engage.
3 Place the wheel nut wrench
on the wheel lock key, and
while applying pressure on
the wheel lock key, tighten
the wheel lock nut to the rec-
ommended torque.
WA R N I N G
●Put the jack prope rly in its jack
point.
●Do not put any part of your body
under the vehicle while it is sup-
ported by the jack.
●Do not start the hybrid system
or drive the vehicle while the
vehicle is suppor ted by the jack.
●Do not raise the vehicle while
someone is inside.
●When raising the vehicle, do not
put an object on or under the
jack.
●Do not raise the vehicle to a
height greater than that required
to replace the tire.
●Use a jack stand if it is neces-
sary to get under the vehicle.
●When lowering the vehicle,
make sure that there is no-one
near the vehicle. If there are
people nearby, warn them
vocally before lowering.
Wheel lock nut (if
equipped)
Page 477 of 572
4777-2. Steps to take in an emergency
HIGHLANDER HV_U
7
When trouble arises
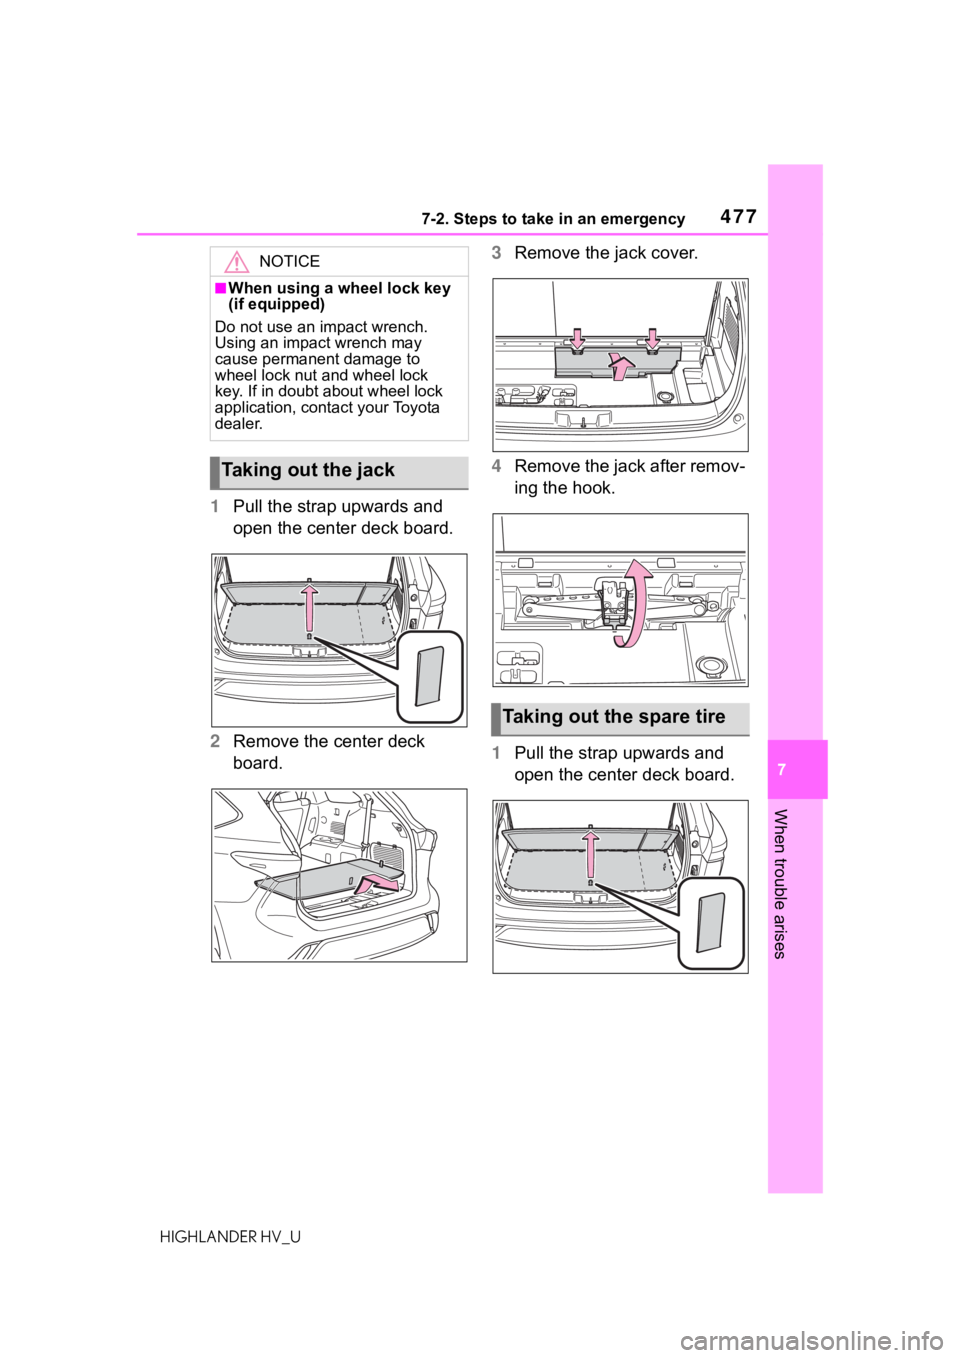
1 Pull the strap upwards and
open the center deck board.
2 Remove the center deck
board. 3
Remove the jack cover.
4 Remove the jack after remov-
ing the hook.
1 Pull the strap upwards and
open the center deck board.
NOTICE
■When using a wheel lock key
(if equipped)
Do not use an impact wrench.
Using an impact wrench may
cause permanent damage to
wheel lock nut and wheel lock
key. If in doubt about wheel lock
application, contact your Toyota
dealer.
Taking out the jack
Taking out the spare tire
Page 478 of 572
4787-2. Steps to take in an emergency
HIGHLANDER HV_U
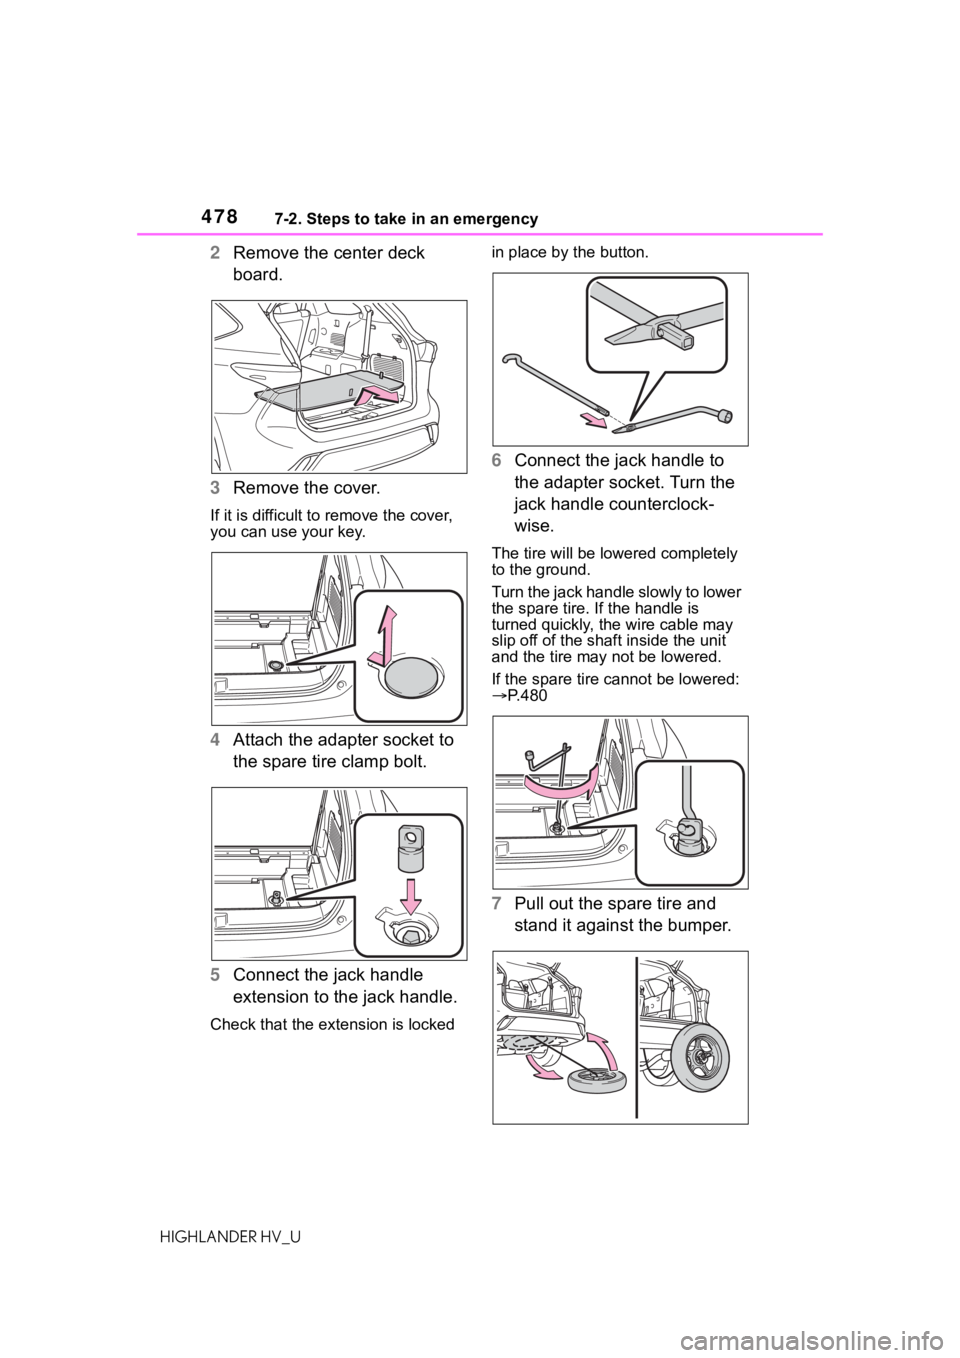
2Remove the center deck
board.
3 Remove the cover.
If it is difficult to remove the cover,
you can use your key.
4Attach the adapter socket to
the spare tire clamp bolt.
5 Connect the jack handle
extension to the jack handle.
Check that the extension is locked in place by the button.
6
Connect the jack handle to
the adapter socket. Turn the
jack handle counterclock-
wise.
The tire will be low ered completely
to the ground.
Turn the jack handle slowly to lower
the spare tire. If the handle is
turned quickly, the wire cable may
slip off of the shaf t inside the unit
and the tire may not be lowered.
If the spare tire cannot be lowered:
P.480
7 Pull out the spare tire and
stand it against the bumper.
Page 479 of 572
4797-2. Steps to take in an emergency
HIGHLANDER HV_U
7
When trouble arises
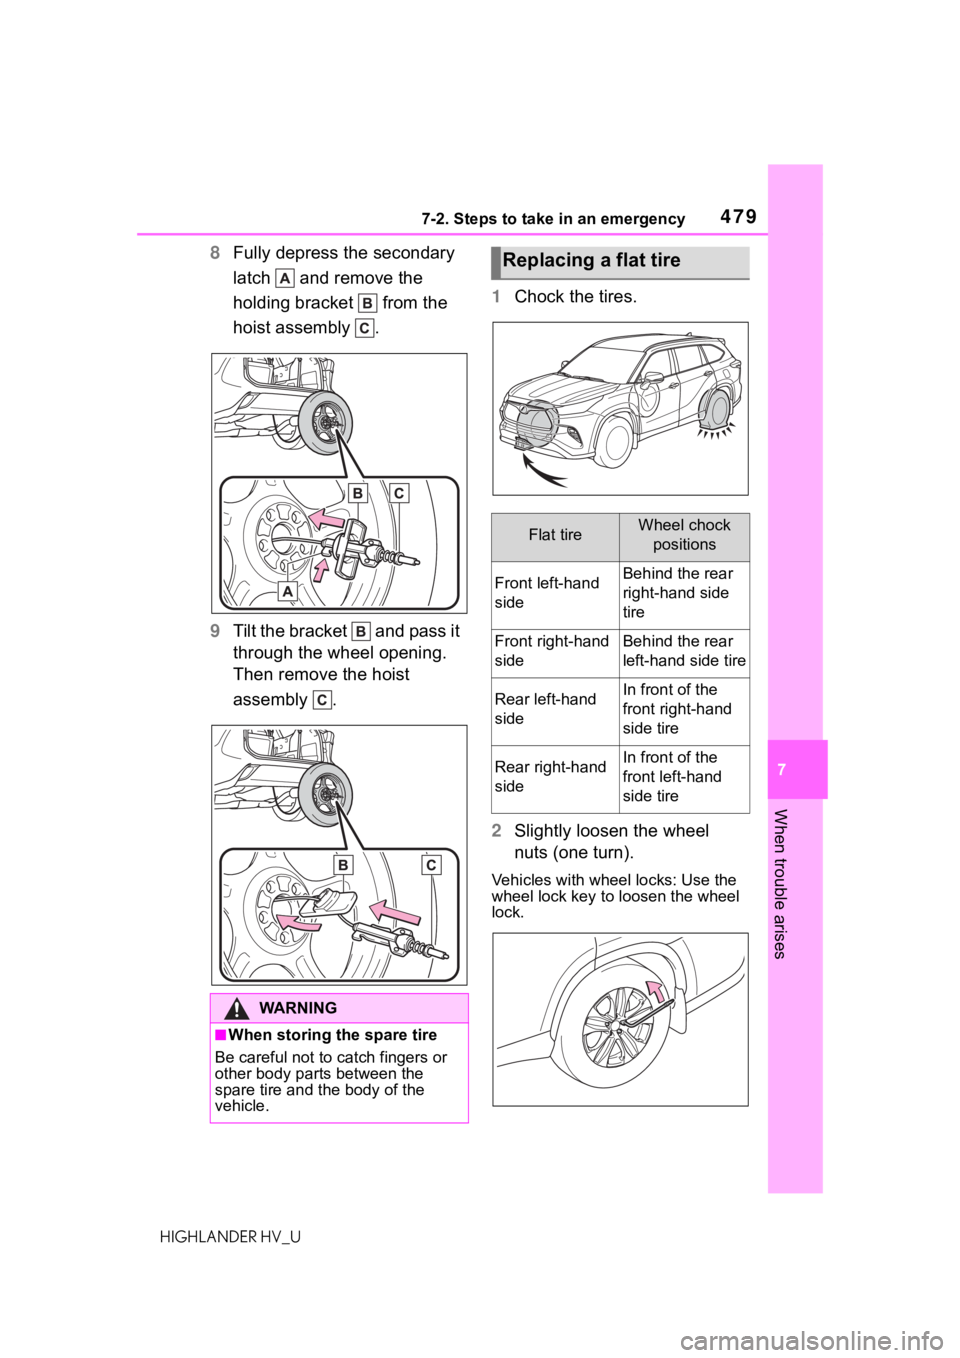
8 Fully depress the secondary
latch and remove the
holding bracket from the
hoist assembly .
9 Tilt the bracket and pass it
through the wheel opening.
Then remove the hoist
assembly . 1
Chock the tires.
2 Slightly loosen the wheel
nuts (one turn).
Vehicles with wheel locks: Use the
wheel lock key to loosen the wheel
lock.
WA R N I N G
■When storing the spare tire
Be careful not to catch fingers or
other body parts between the
spare tire and the body of the
vehicle.
Replacing a flat tire
Flat tireWheel chock positions
Front left-hand
sideBehind the rear
right-hand side
tire
Front right-hand
sideBehind the rear
left-hand side tire
Rear left-hand
sideIn front of the
front right-hand
side tire
Rear right-hand
sideIn front of the
front left-hand
side tire
Page 480 of 572
4807-2. Steps to take in an emergency
HIGHLANDER HV_U
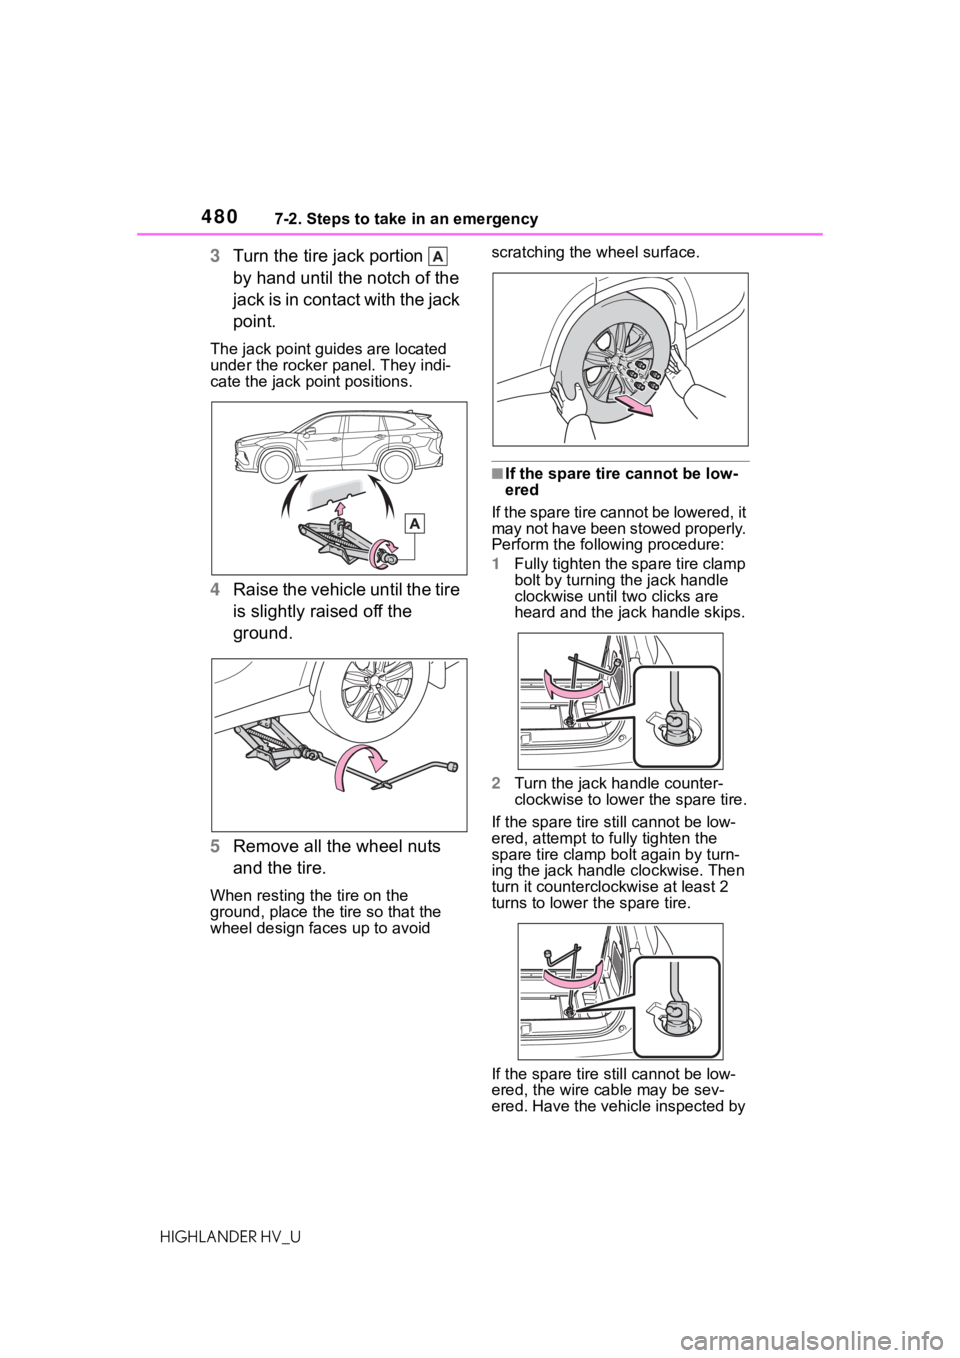
3Turn the tire jack portion
by hand until the notch of the
jack is in contact with the jack
point.
The jack point guides are located
under the rocker panel. They indi-
cate the jack po int positions.
4Raise the vehicle until the tire
is slightly raised off the
ground.
5 Remove all the wheel nuts
and the tire.
When resting the tire on the
ground, place the tire so that the
wheel design faces up to avoid scratching the wheel surface.
■If the spare tire cannot be low-
ered
If the spare tire cannot be lowered, it
may not have been stowed properly.
Perform the following procedure:
1 Fully tighten the spare tire clamp
bolt by turning the jack handle
clockwise until two clicks are
heard and the jack handle skips.
2 Turn the jack handle counter-
clockwise to lower the spare tire.
If the spare tire still cannot be low-
ered, attempt to fully tighten the
spare tire clamp bolt again by turn-
ing the jack handle clockwise. Then
turn it counterclockwise at least 2
turns to lower the spare tire.
If the spare tire still cannot be low-
ered, the wire cable may be sev-
ered. Have the vehicle inspected by