TOYOTA HILUX 2020 Owners Manual (in English)
Manufacturer: TOYOTA, Model Year: 2020, Model line: HILUX, Model: TOYOTA HILUX 2020Pages: 744, PDF Size: 108.13 MB
Page 381 of 744
3814-5. Using the driving support systems
4
Driving
HILUX_OM_OM0K321E_(EE)
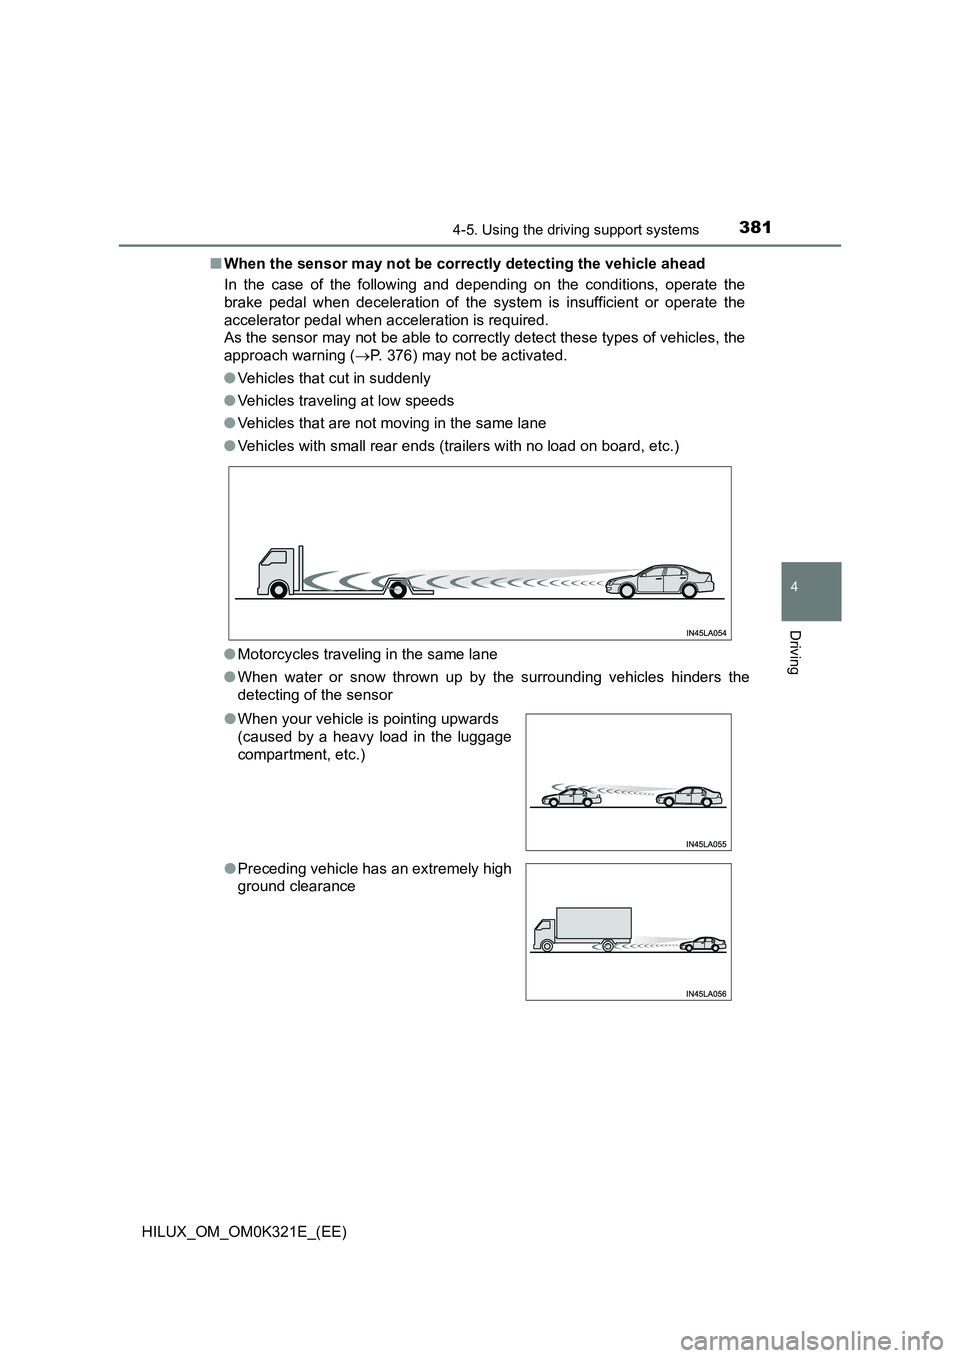
■ When the sensor may not be correctly detecting the vehicle ahead
In the case of the following and depending on the conditions, operate the
brake pedal when deceleration of the system is insufficient or operate the
accelerator pedal when acceleration is required.
As the sensor may not be able to correctly detect these types of vehicles, the
approach warning ( P. 376) may not be activated.
● Vehicles that cut in suddenly
● Vehicles traveling at low speeds
● Vehicles that are not moving in the same lane
● Vehicles with small rear ends (trailers with no load on board, etc.)
● Motorcycles traveling in the same lane
● When water or snow thrown up by the surrounding vehicles hinders the
detecting of the sensor
● When your vehicle is pointing upwards
(caused by a heavy load in the luggage
compartment, etc.)
● Preceding vehicle has an extremely high
ground clearance
Page 382 of 744
3824-5. Using the driving support systems
HILUX_OM_OM0K321E_(EE)
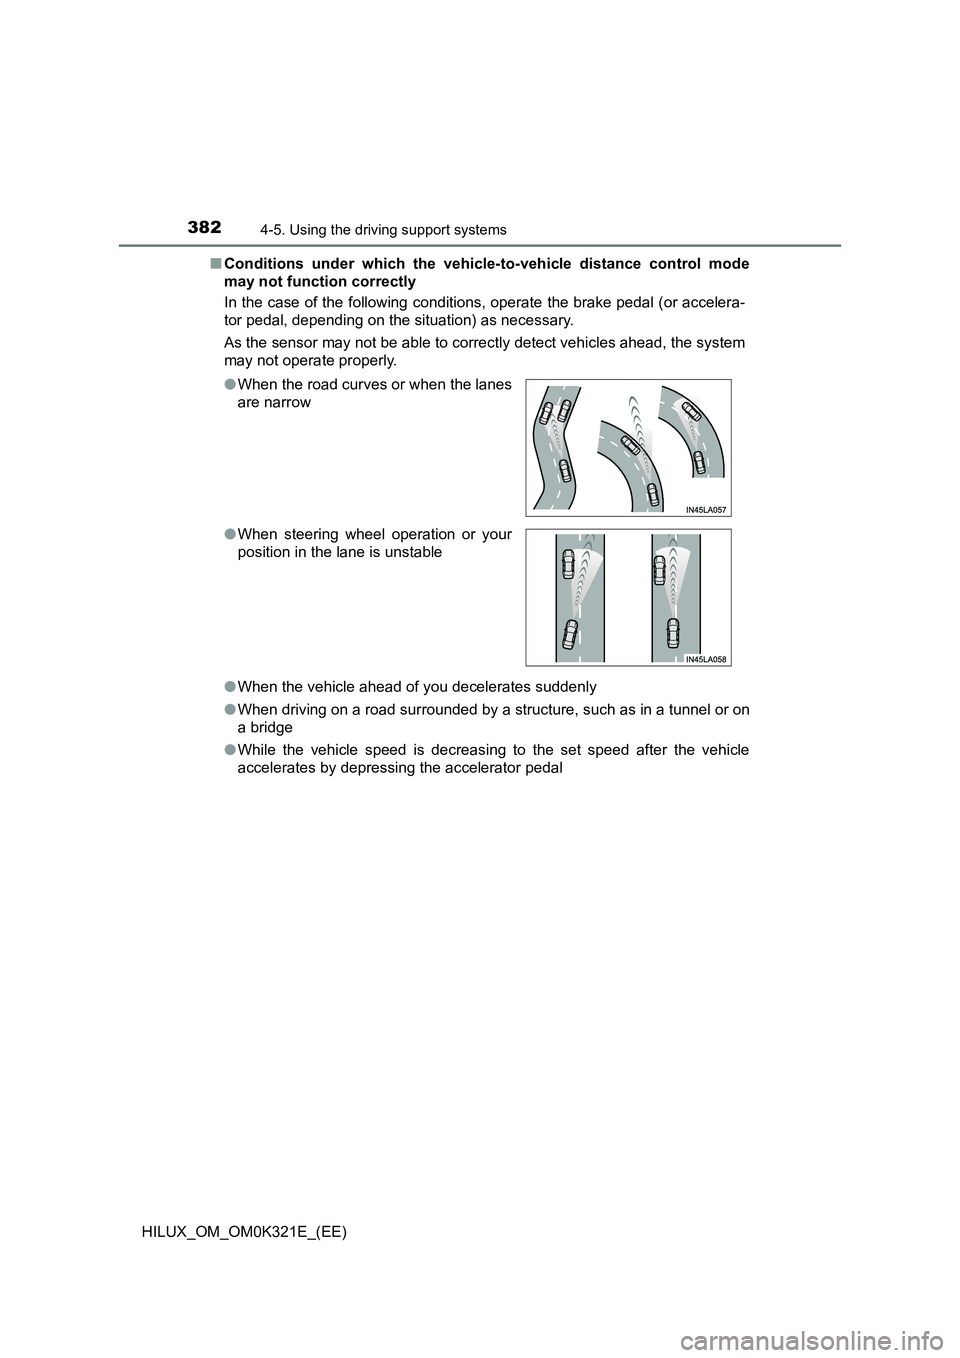
■ Conditions under which the vehicle-to-vehicle distance control mode
may not function correctly
In the case of the following conditions, operate the brake pedal (or accelera-
tor pedal, depending on the situation) as necessary.
As the sensor may not be able to correctly detect vehicles ahead, the system
may not operate properly.
● When the vehicle ahead of you decelerates suddenly
● When driving on a road surrounded by a structure, such as in a tunnel or on
a bridge
● While the vehicle speed is decreasing to the set speed after the vehicle
accelerates by depressing the accelerator pedal
● When the road curves or when the lanes
are narrow
● When steering wheel operation or your
position in the lane is unstable
Page 383 of 744
383
4
4-5. Using the driving support systems
Driving
HILUX_OM_OM0K321E_(EE)
Cruise control
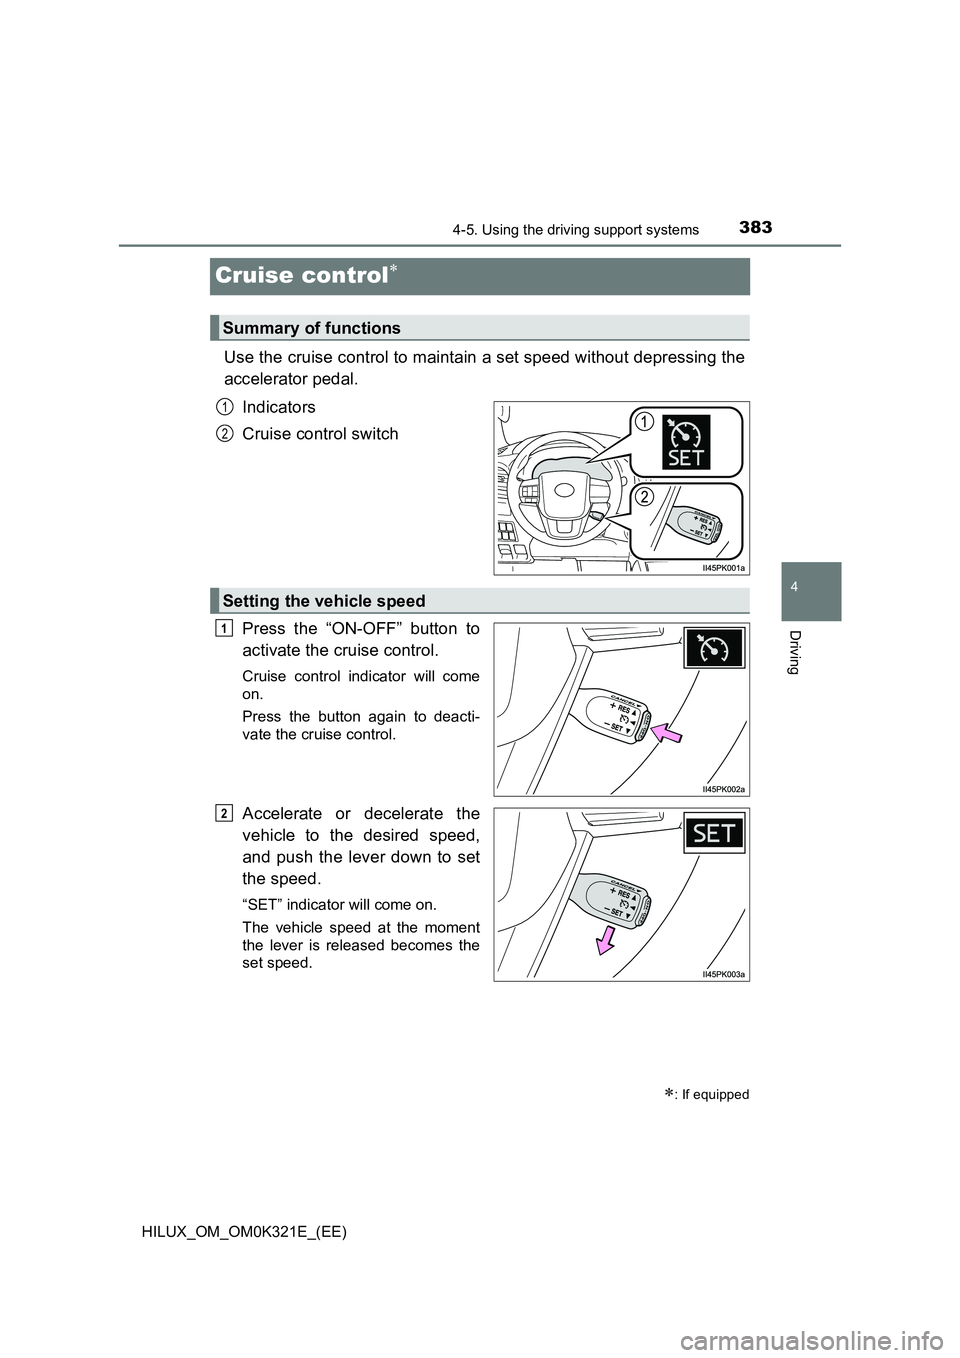
Use the cruise control to maintain a set speed without depressing the
accelerator pedal.
Indicators
Cruise control switch
Press the “ON-OFF” button to
activate the cruise control.
Cruise control indicator will come
on.
Press the button again to deacti-
vate the cruise control.
Accelerate or decelerate the
vehicle to the desired speed,
and push the lever down to set
the speed.
“SET” indicator will come on.
The vehicle speed at the moment
the lever is released becomes the
set speed.
: If equipped
Summary of functions
1
2
Setting the vehicle speed
1
2
Page 384 of 744
3844-5. Using the driving support systems
HILUX_OM_OM0K321E_(EE)
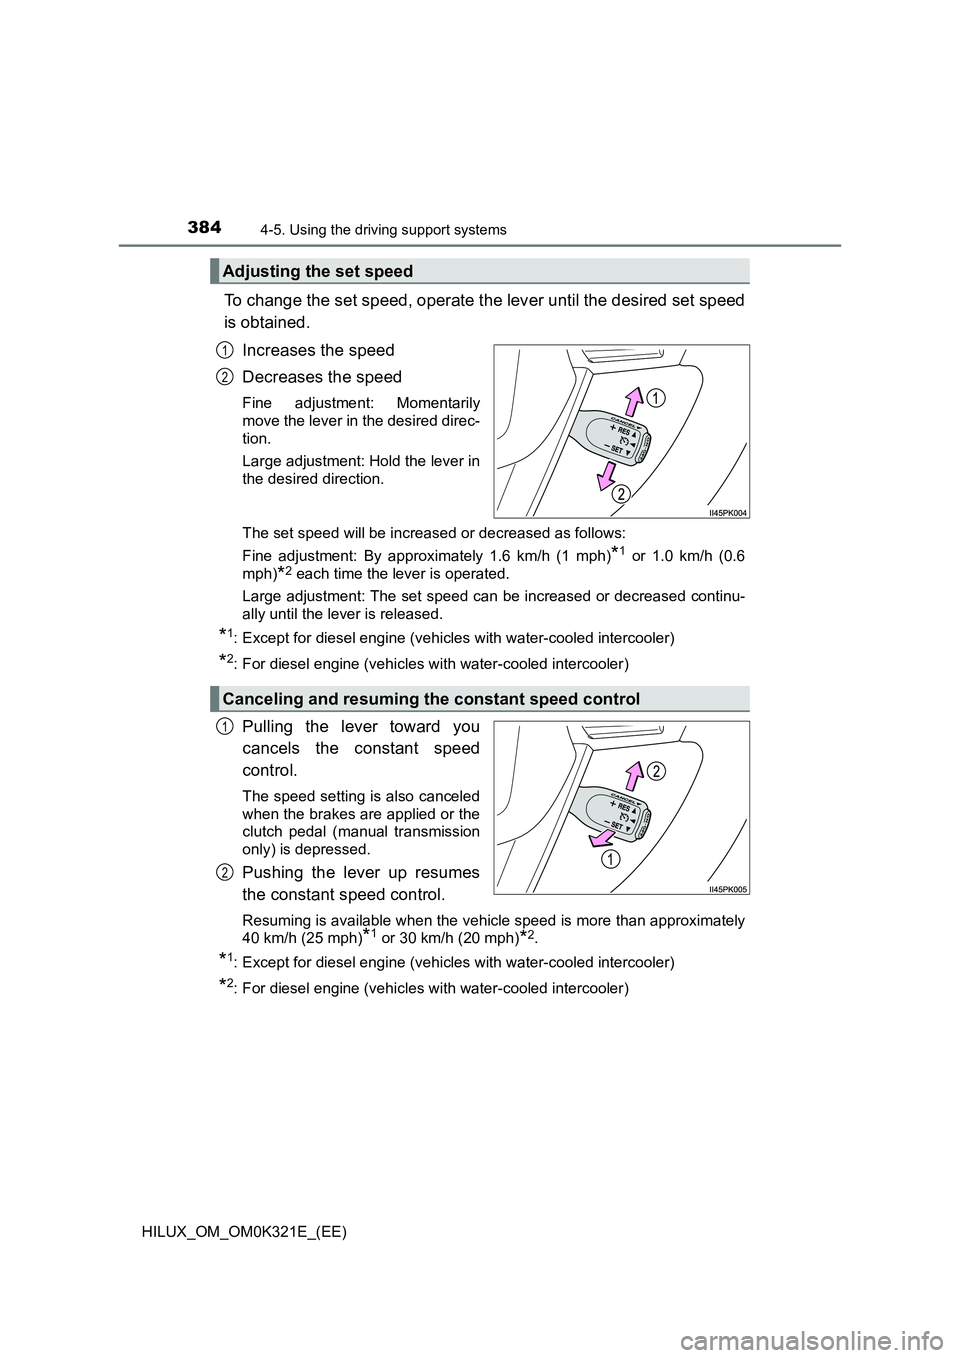
To change the set speed, operate the lever until the desired set speed
is obtained.
Increases the speed
Decreases the speed
Fine adjustment: Momentarily
move the lever in the desired direc-
tion.
Large adjustment: Hold the lever in
the desired direction.
The set speed will be increased or decreased as follows:
Fine adjustment: By approximately 1.6 km/h (1 mph)*1 or 1.0 km/h (0.6
mph)*2 each time the lever is operated.
Large adjustment: The set speed can be increased or decreased continu-
ally until the lever is released.
*1: Except for diesel engine (vehicles with water-cooled intercooler)
*2: For diesel engine (vehicles wi th water-cooled intercooler)
Pulling the lever toward you
cancels the constant speed
control.
The speed setting is also canceled
when the brakes are applied or the
clutch pedal (manual transmission
only) is depressed.
Pushing the lever up resumes
the constant speed control.
Resuming is available when the vehicle speed is more than approximately
40 km/h (25 mph)*1 or 30 km/h (20 mph)*2.
*1: Except for diesel engine (vehicles with water-cooled intercooler)
*2: For diesel engine (vehicles wi th water-cooled intercooler)
Adjusting the set speed
1
2
Canceling and resuming the constant speed control
1
2
Page 385 of 744
3854-5. Using the driving support systems
4
Driving
HILUX_OM_OM0K321E_(EE)
■Cruise control can be set when
● The shift lever is in the D or range 4 or higher of S has been selected. (vehi-
cles with automatic transmission)
● Vehicle speed is above approximately 40 km/h (25 mph)*1 or 30 km/h (20
mph)*2.
*1: Except for diesel engine (vehicles with water-cooled intercooler)
*2: For diesel engine (vehicles with water-cooled intercooler)
■ Accelerating after setting the vehicle speed
● The vehicle can be accelerated normally. After acceleration, the set speed
resumes.
● Even without canceling the cruise control, the set speed can be increased
by first accelerating the vehicle to the desired speed and then pushing the
lever down to set the new speed.
■ Automatic cruise control cancelation
Cruise control will stop maintaining the vehicle speed in any of the following
situations:
● Actual vehicle speed falls more than approximately 16 km/h (10 mph) below
the preset vehicle speed.
At this time, the memorized set speed is not retained.
● Actual vehicle speed is below approximately 40 km/h (25 mph)*1 or 30 km/h
(20 mph)*2.
● VSC is activated. (if equipped)
● 4WD models: Switching the transfer mode is not completed within 5 sec-
onds while the cruise control system is on.
● TRC/A-TRC is activated for a period of time.
● When the VSC, TRC/A-TRC system is turned off. (if equipped)
*1: Except for diesel engine (vehicles with water-cooled intercooler)
*2: For diesel engine (vehicles with water-cooled intercooler)
■ If the warning message for the cruise control is shown on the multi-
information display
Press the “ON-OFF” button once to deactivate the system, and then press
the button again to reactivate the system.
If the cruise control speed cannot be set or if the cruise control cancels imme-
diately after being activated, there may be a malfunction in the cruise control
system. Have the vehicle inspected by any authorized Toyota retailer or
Toyota authorized repairer, or any reliable repairer.
Page 386 of 744
3864-5. Using the driving support systems
HILUX_OM_OM0K321E_(EE)
WARNING
■To avoid operating the cruise control by mistake
Switch the cruise control off using the “ON-OFF” button when not in use.
■ Situations unsuitable for cruise control
Do not use cruise control in any of the following situations.
Doing so may result in loss of control and could cause an accident resulting
in death or serious injury.
● In heavy traffic
● On roads with sharp bends
● On winding roads
● On slippery roads, such as those covered with rain, ice or snow
● On steep hills
Vehicle speed may exceed the set speed when driving down a steep hill.
● When your vehicle is towing a trailer (with towing hitch) or during emer-
gency towing
Page 387 of 744
387
4
4-5. Using the driving support systems
Driving
HILUX_OM_OM0K321E_(EE)
Rear view monitor system
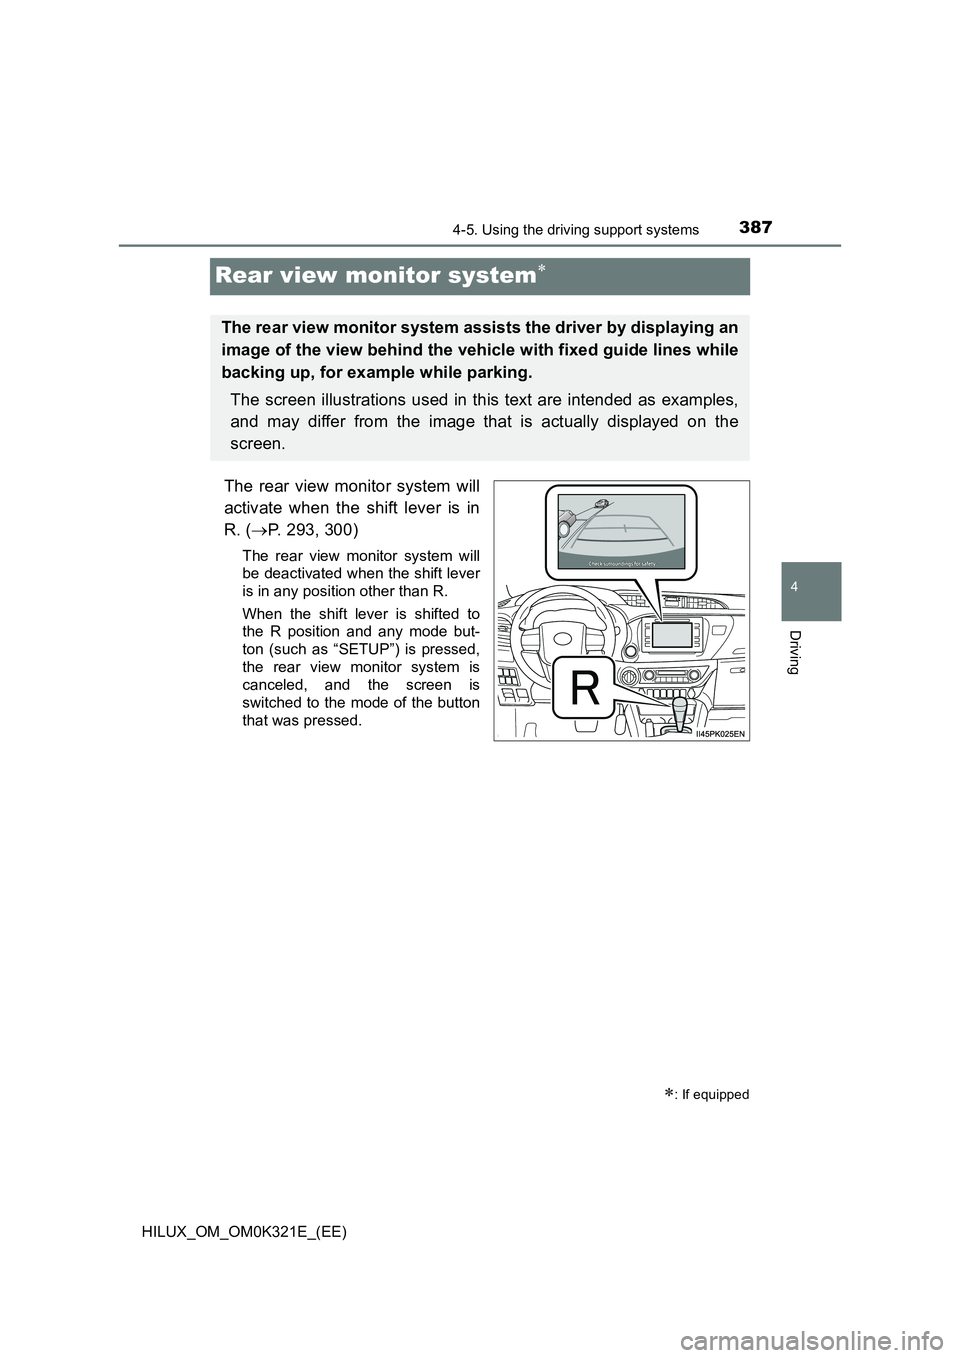
The rear view monitor system will
activate when the shift lever is in
R. ( P. 293, 300)
The rear view monitor system will
be deactivated when the shift lever
is in any position other than R.
When the shift lever is shifted to
the R position and any mode but-
ton (such as “SETUP”) is pressed,
the rear view monitor system is
canceled, and the screen is
switched to the mode of the button
that was pressed.
: If equipped
The rear view monitor system assists the driver by displaying an
image of the view behind the vehicle with fixed guide lines while
backing up, for example while parking.
The screen illustrations used in this text are intended as examples,
and may differ from the image that is actually displayed on the
screen.
Page 388 of 744
3884-5. Using the driving support systems
HILUX_OM_OM0K321E_(EE)
■Screen description
Vehicles without smart entry & start system
The rear view monitor system screen will be displayed if the shift
lever is shifted to R while the engine switch is in the “ON” position.
Vehicles with smart entry & start system
The rear view monitor system screen will be displayed if the shift
lever is shifted to R while the engine switch is in IGNITION ON
mode.
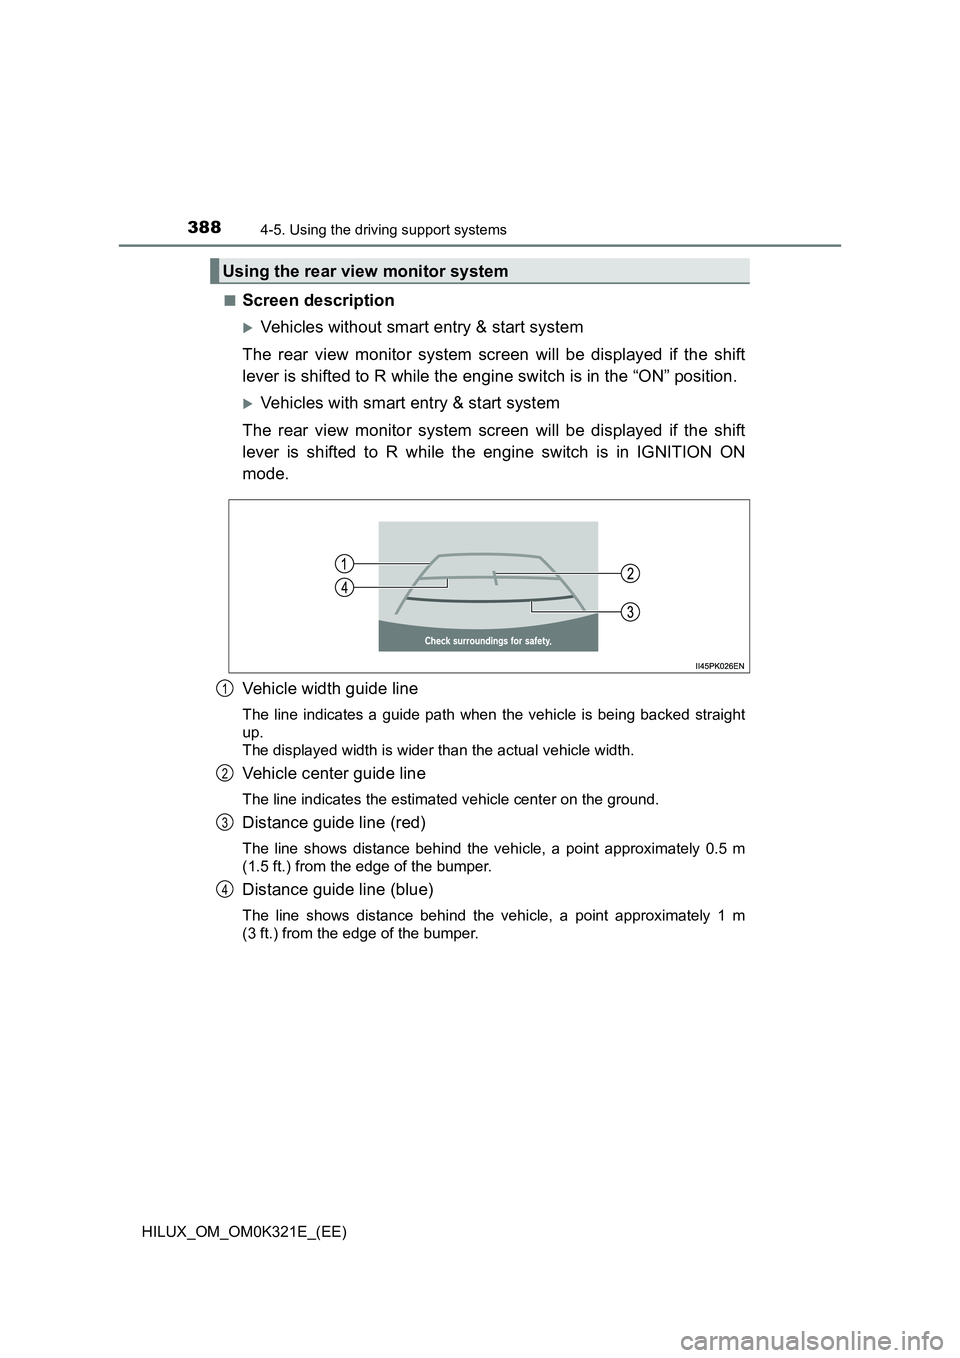
Vehicle width guide line
The line indicates a guide path when the vehicle is being backed straight
up.
The displayed width is wider than the actual vehicle width.
Vehicle center guide line
The line indicates the estimated vehicle center on the ground.
Distance guide line (red)
The line shows distance behind the vehicle, a point approximately 0.5 m
(1.5 ft.) from the edge of the bumper.
Distance guide line (blue)
The line shows distance behind the vehicle, a point approximately 1 m
(3 ft.) from the edge of the bumper.
Using the rear view monitor system
1
2
3
4
Page 389 of 744
3894-5. Using the driving support systems
4
Driving
HILUX_OM_OM0K321E_(EE)
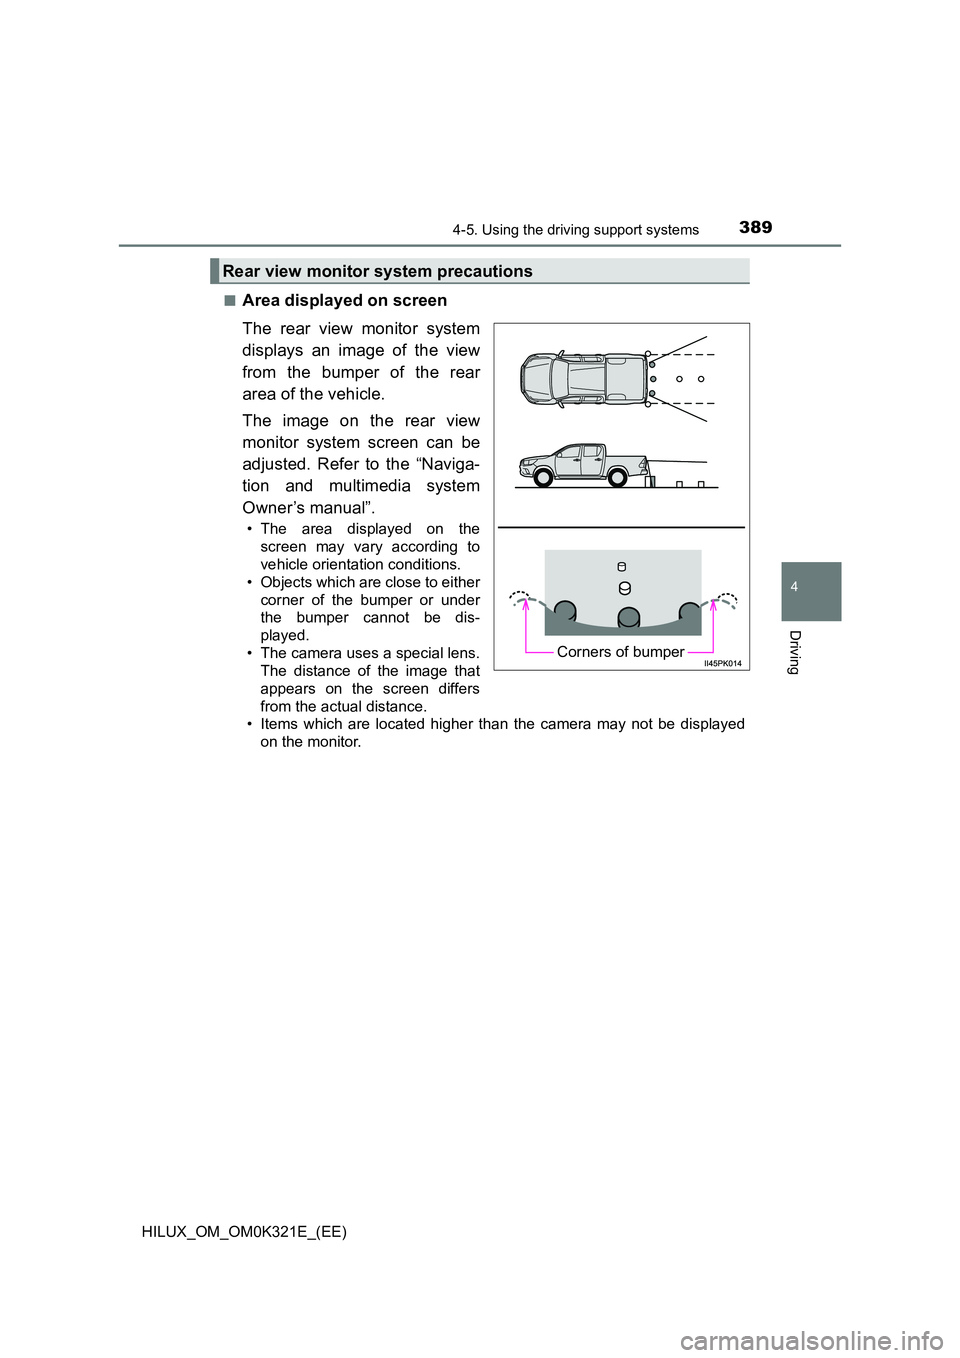
■Area displayed on screen
The rear view monitor system
displays an image of the view
from the bumper of the rear
area of the vehicle.
The image on the rear view
monitor system screen can be
adjusted. Refer to the “Naviga-
tion and multimedia system
Owner’s manual”.
• The area displayed on the
screen may vary according to
vehicle orientation conditions.
• Objects which are close to either
corner of the bumper or under
the bumper cannot be dis-
played.
• The camera uses a special lens.
The distance of the image that
appears on the screen differs
from the actual distance.
• Items which are located higher than the camera may not be displayed
on the monitor.
Rear view monitor system precautions
Corners of bumper
Page 390 of 744
3904-5. Using the driving support systems
HILUX_OM_OM0K321E_(EE)
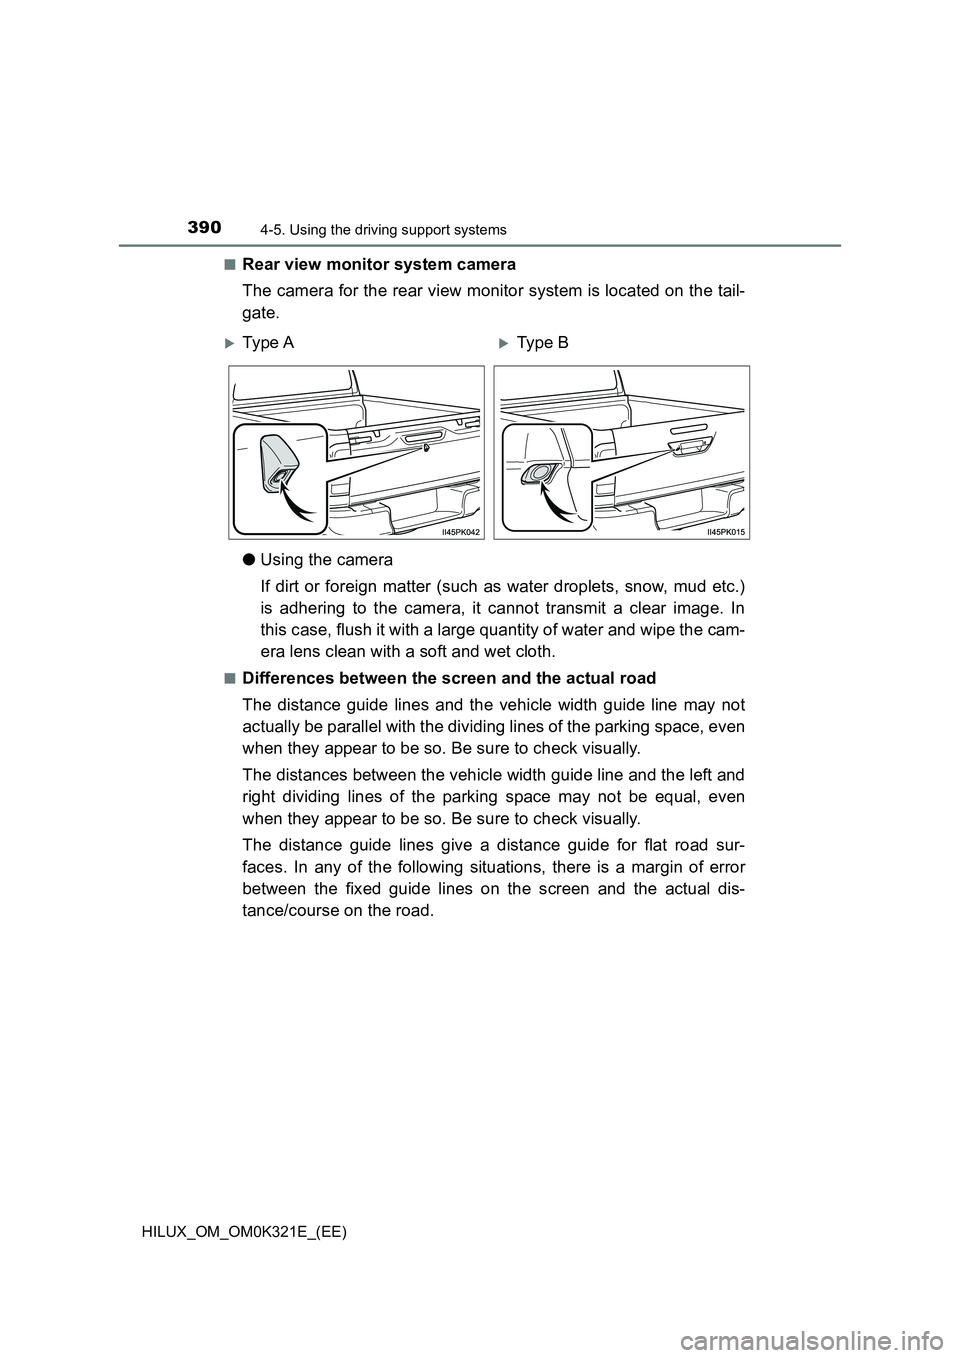
■Rear view monitor system camera
The camera for the rear view monitor system is located on the tail-
gate.
● Using the camera
If dirt or foreign matter (such as water droplets, snow, mud etc.)
is adhering to the camera, it cannot transmit a clear image. In
this case, flush it with a large quantity of water and wipe the cam-
era lens clean with a soft and wet cloth.
■Differences between the screen and the actual road
The distance guide lines and the vehicle width guide line may not
actually be parallel with the dividing lines of the parking space, even
when they appear to be so. Be sure to check visually.
The distances between the vehicle width guide line and the left and
right dividing lines of the parking space may not be equal, even
when they appear to be so. Be sure to check visually.
The distance guide lines give a distance guide for flat road sur-
faces. In any of the following situations, there is a margin of error
between the fixed guide lines on the screen and the actual dis-
tance/course on the road.
Ty pe AType B