TOYOTA HILUX 2020 Owners Manual (in English)
Manufacturer: TOYOTA, Model Year: 2020,
Model line: HILUX,
Model: TOYOTA HILUX 2020
Pages: 744, PDF Size: 108.13 MB
TOYOTA HILUX 2020 Owners Manual (in English)
HILUX 2020
TOYOTA
TOYOTA
https://www.carmanualsonline.info/img/14/48622/w960_48622-0.png
TOYOTA HILUX 2020 Owners Manual (in English)
Trending: fuel, ignition, recommended oil, rear view mirror, maintenance reset, sport mode, seats
Page 611 of 744
6117-3. Do-it-yourself maintenance
HILUX_OM_OM0K321E_(EE)
7
Maintenance and care
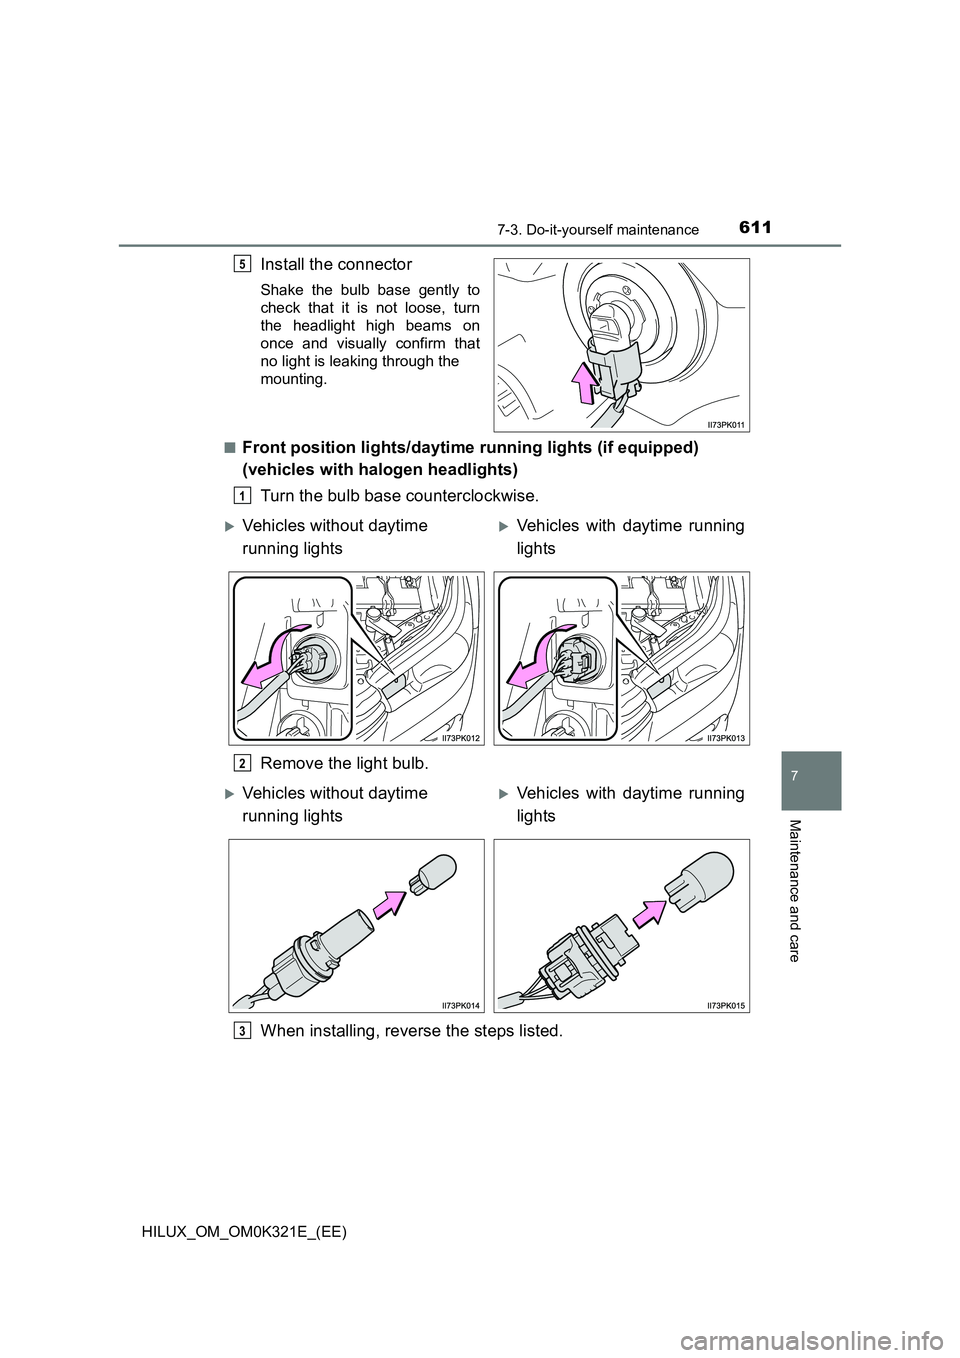
Install the connector
Shake the bulb base gently to
check that it is not loose, turn
the headlight high beams on
once and visually confirm that
no light is leaking through the
mounting.
■Front position lights/daytime running lights (if equipped)
(vehicles with halogen headlights)
Turn the bulb base counterclockwise.
Remove the light bulb.
When installing, reverse the steps listed.
5
1
Vehicles without daytime
running lights
Vehicles with daytime running
lights
2
Vehicles without daytime
running lights
Vehicles with daytime running
lights
3
Page 612 of 744
6127-3. Do-it-yourself maintenance
HILUX_OM_OM0K321E_(EE)
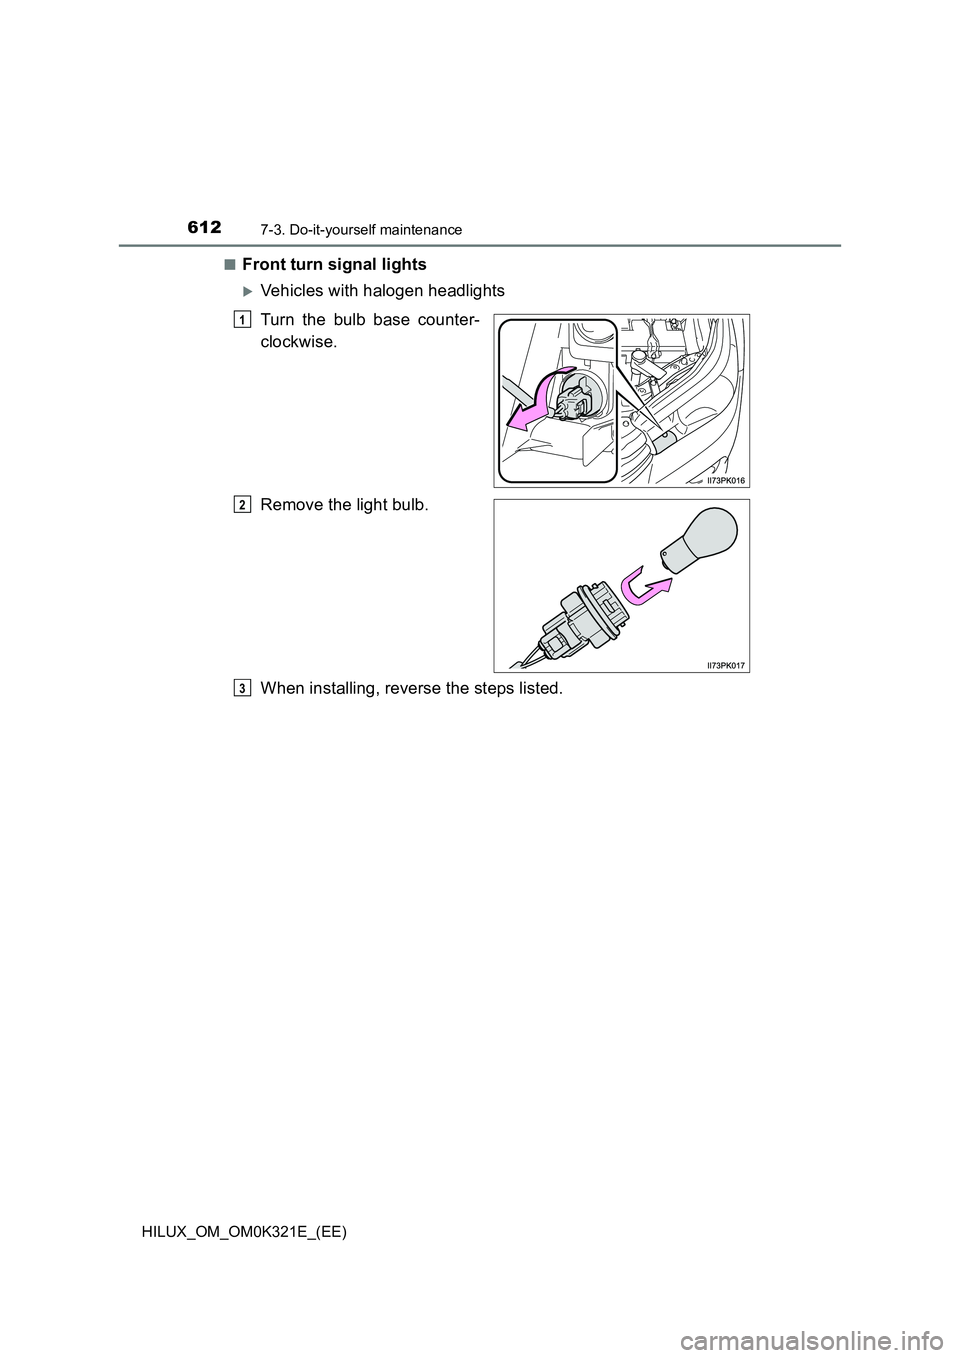
■Front turn signal lights
Vehicles with halogen headlights
Turn the bulb base counter-
clockwise.
Remove the light bulb.
When installing, reverse the steps listed.
1
2
3
Page 613 of 744
6137-3. Do-it-yourself maintenance
HILUX_OM_OM0K321E_(EE)
7
Maintenance and care
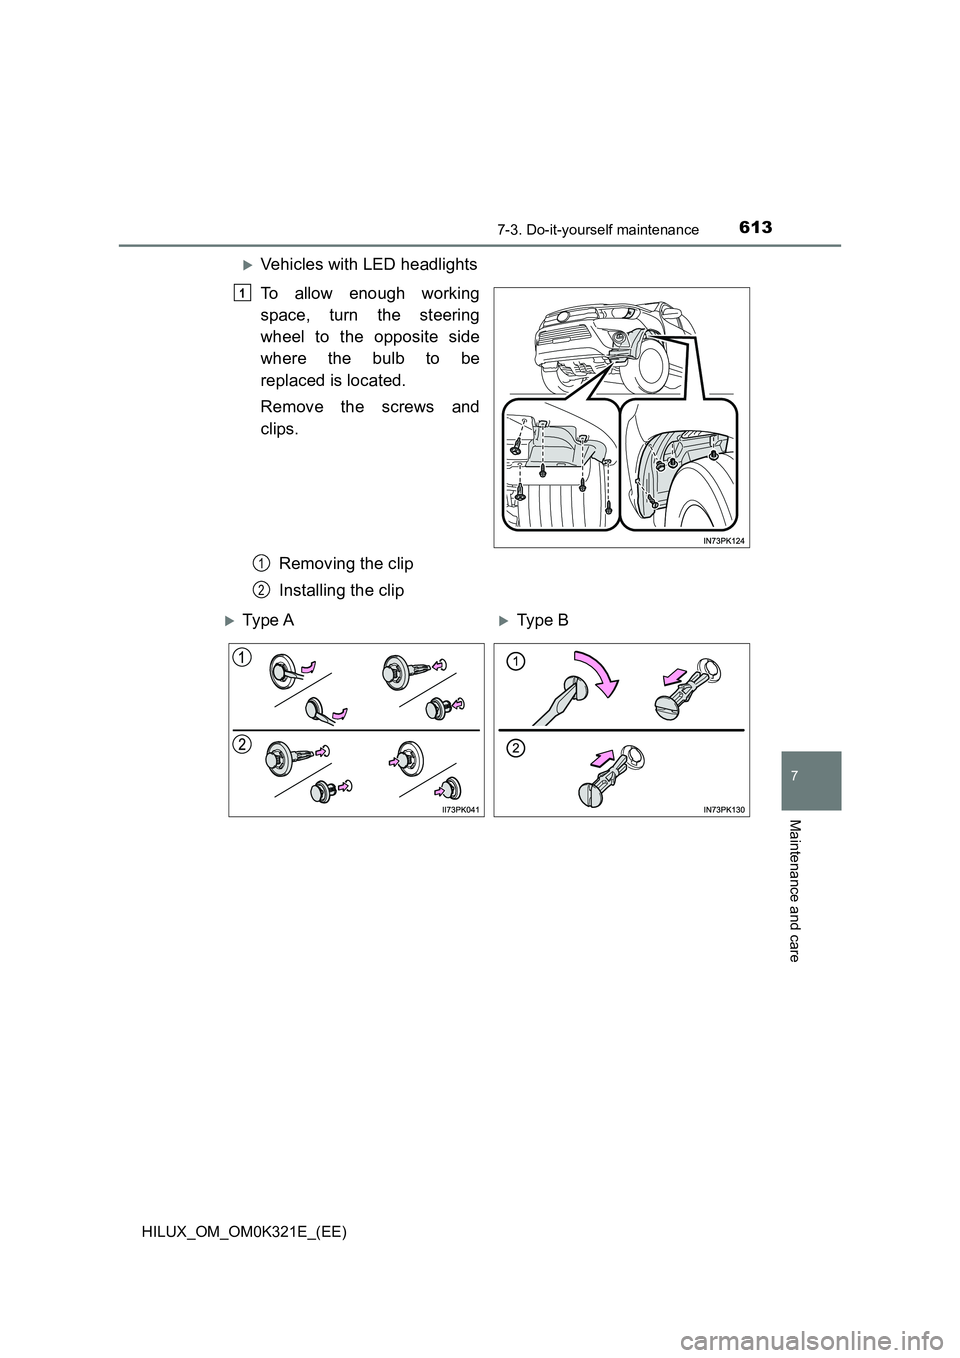
Vehicles with LED headlights
To allow enough working
space, turn the steering
wheel to the opposite side
where the bulb to be
replaced is located.
Remove the screws and
clips.
Removing the clip
Installing the clip
1
1
2
Ty pe AType B
Page 614 of 744
6147-3. Do-it-yourself maintenance
HILUX_OM_OM0K321E_(EE)
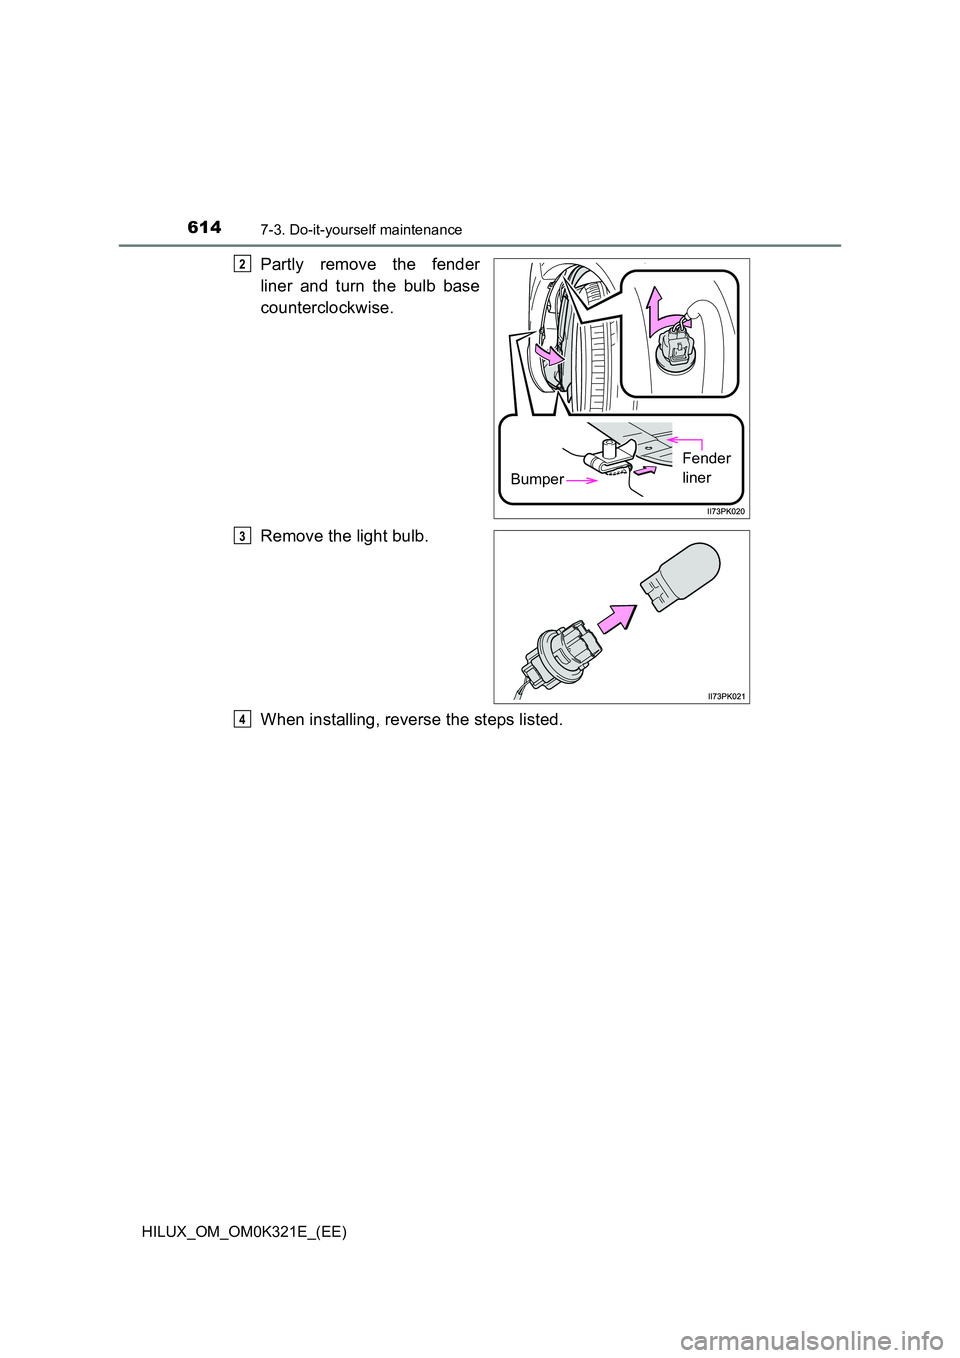
Partly remove the fender
liner and turn the bulb base
counterclockwise.
Remove the light bulb.
When installing, reverse the steps listed.
Bumper
Fender
liner
2
3
4
Page 615 of 744
6157-3. Do-it-yourself maintenance
HILUX_OM_OM0K321E_(EE)
7
Maintenance and care
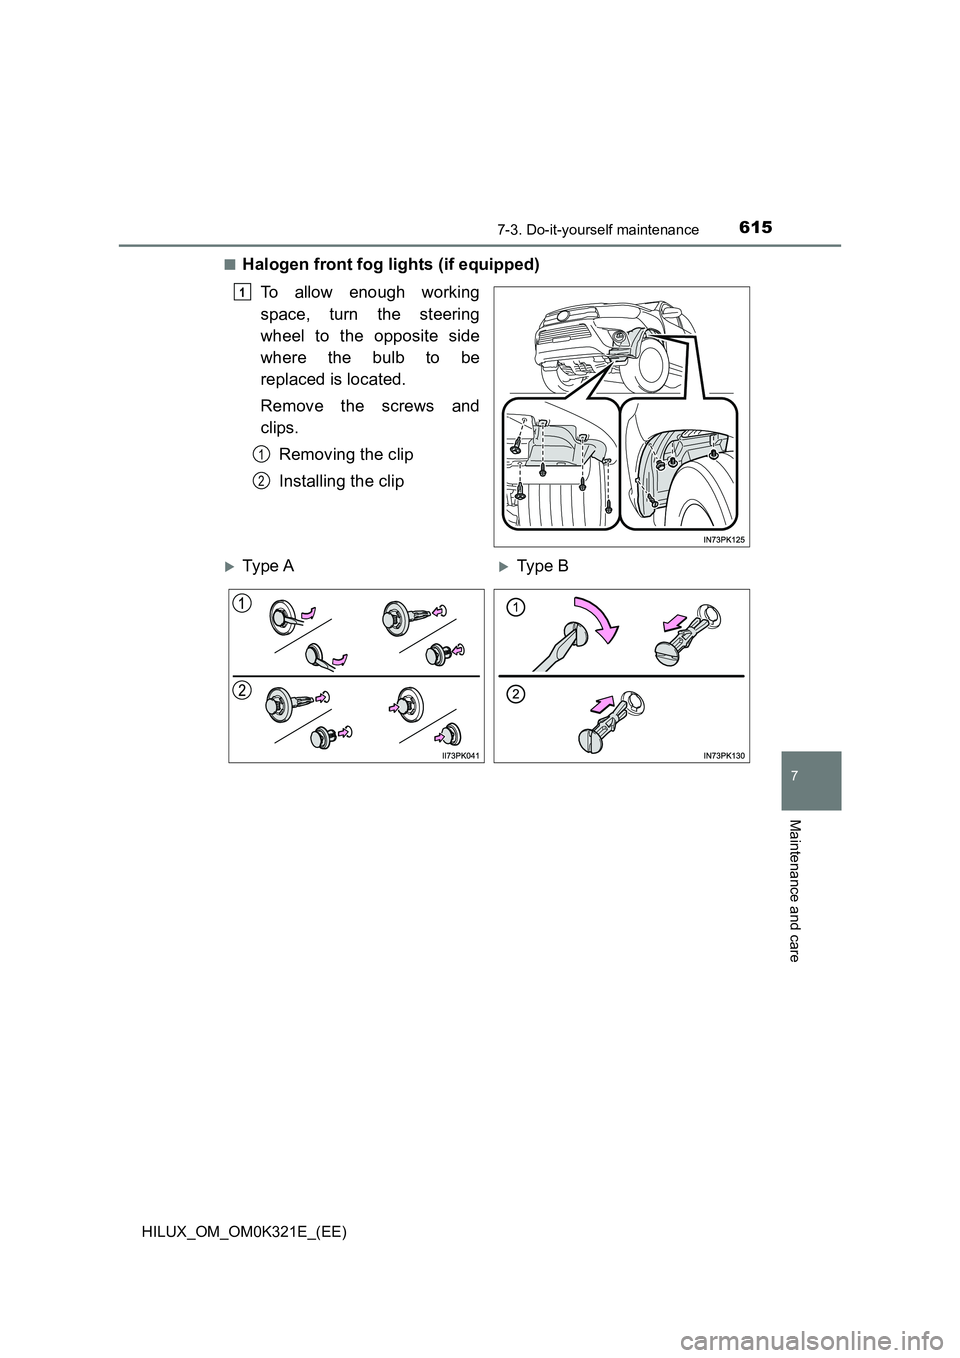
■Halogen front fog lights (if equipped)
To allow enough working
space, turn the steering
wheel to the opposite side
where the bulb to be
replaced is located.
Remove the screws and
clips.
Removing the clip
Installing the clip
1
1
2
Ty pe AType B
Page 616 of 744
6167-3. Do-it-yourself maintenance
HILUX_OM_OM0K321E_(EE)
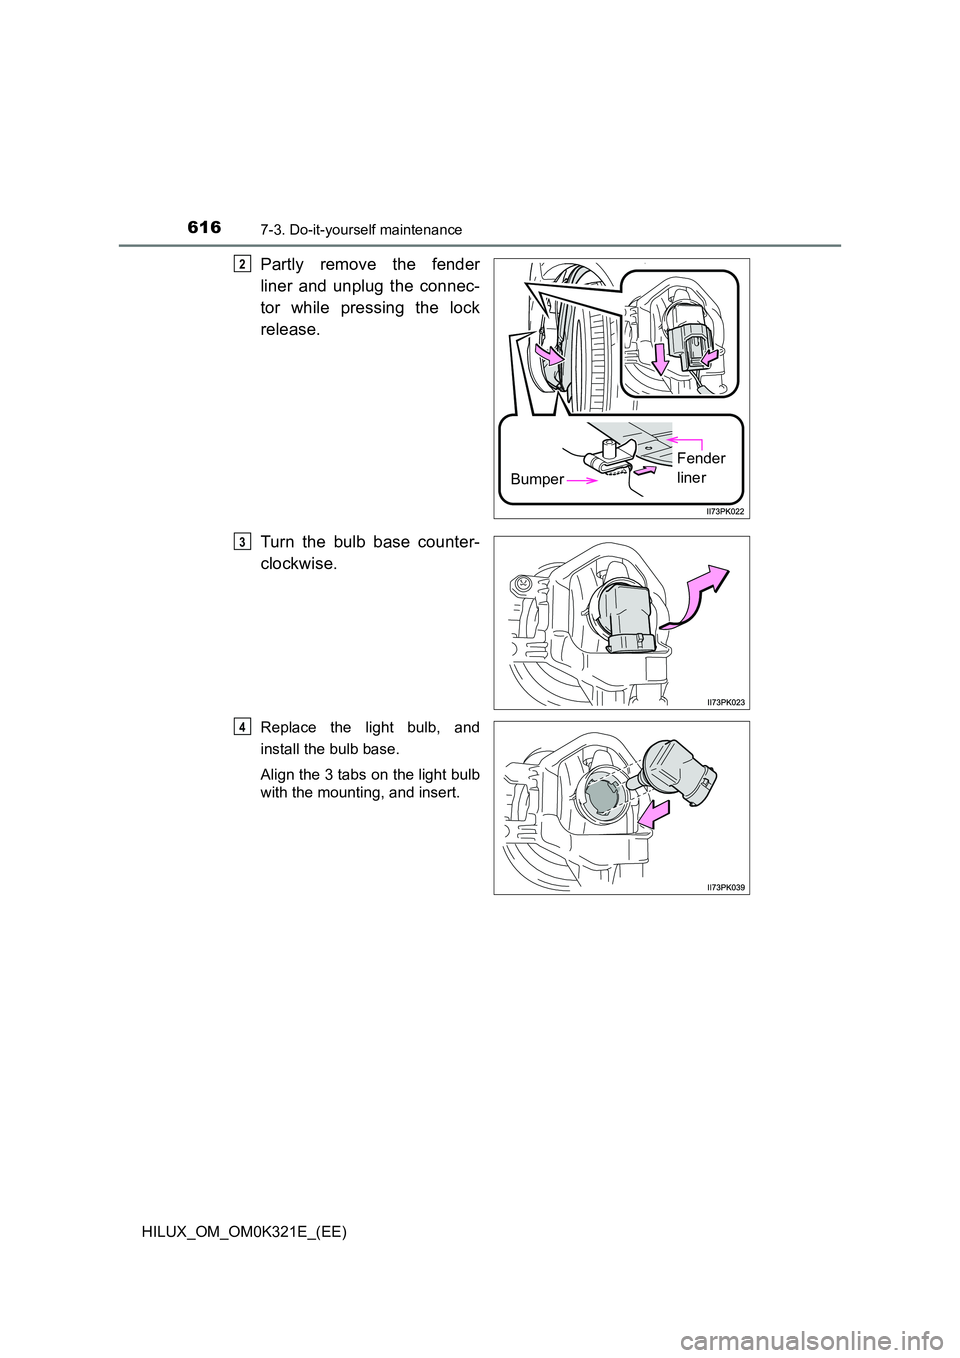
Partly remove the fender
liner and unplug the connec-
tor while pressing the lock
release.
Turn the bulb base counter-
clockwise.
Replace the light bulb, and
install the bulb base.
Align the 3 tabs on the light bulb
with the mounting, and insert.
Bumper
Fender
liner
2
3
4
Page 617 of 744
6177-3. Do-it-yourself maintenance
HILUX_OM_OM0K321E_(EE)
7
Maintenance and care
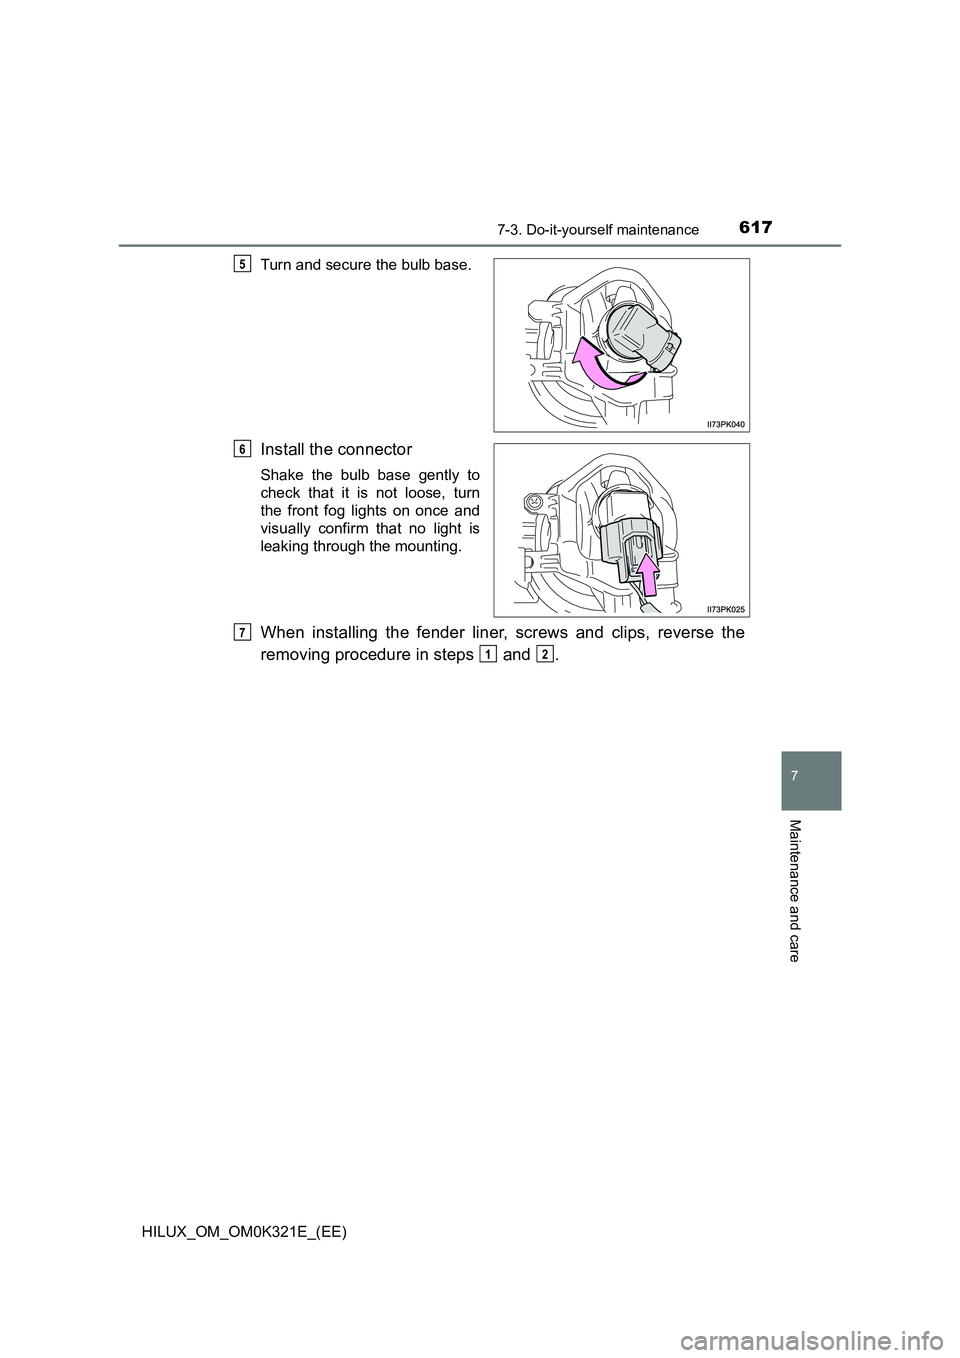
Turn and secure the bulb base.
Install the connector
Shake the bulb base gently to
check that it is not loose, turn
the front fog lights on once and
visually confirm that no light is
leaking through the mounting.
When installing the fender liner, screws and clips, reverse the
removing procedure in steps and .
5
6
7
12
Page 618 of 744
6187-3. Do-it-yourself maintenance
HILUX_OM_OM0K321E_(EE)
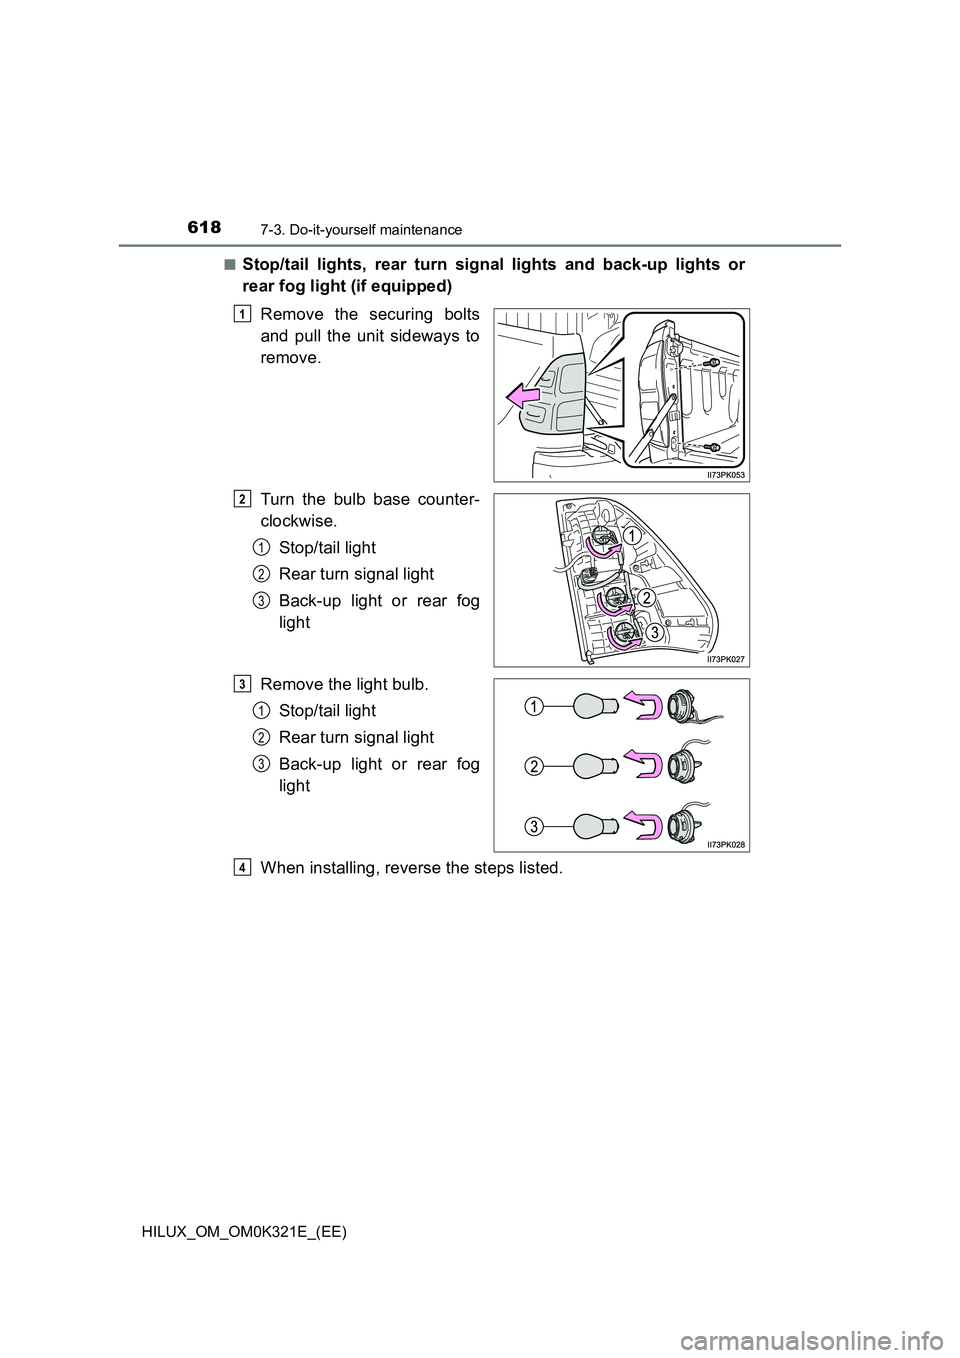
■Stop/tail lights, rear turn signal lights and back-up lights or
rear fog light (if equipped)
Remove the securing bolts
and pull the unit sideways to
remove.
Turn the bulb base counter-
clockwise.
Stop/tail light
Rear turn signal light
Back-up light or rear fog
light
Remove the light bulb.
Stop/tail light
Rear turn signal light
Back-up light or rear fog
light
When installing, reverse the steps listed.
1
2
1
2
3
3
1
2
3
4
Page 619 of 744
6197-3. Do-it-yourself maintenance
HILUX_OM_OM0K321E_(EE)
7
Maintenance and care
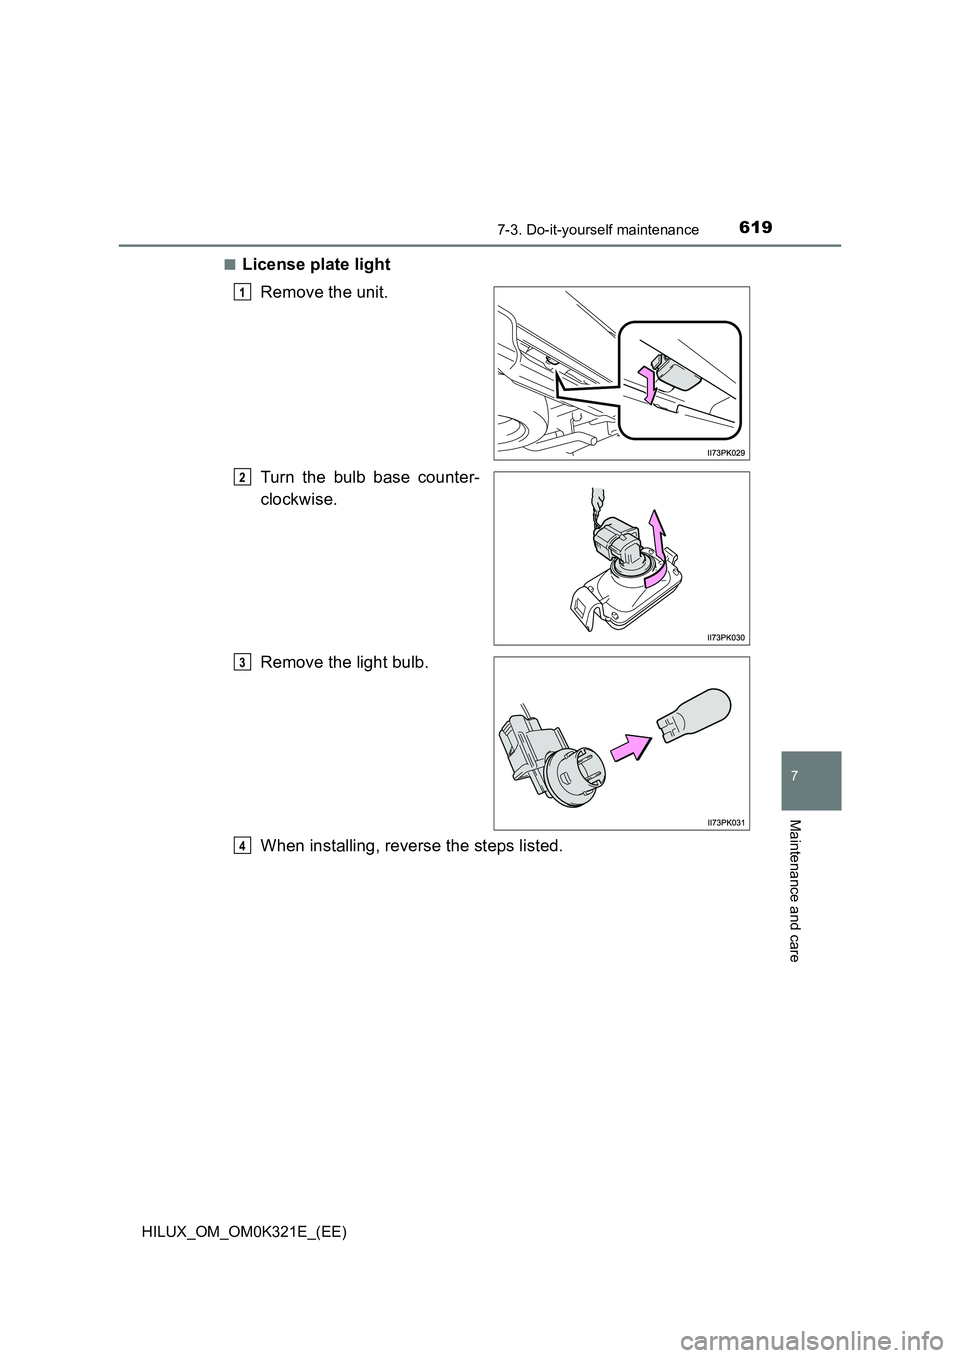
■License plate light
Remove the unit.
Turn the bulb base counter-
clockwise.
Remove the light bulb.
When installing, reverse the steps listed.
1
2
3
4
Page 620 of 744
6207-3. Do-it-yourself maintenance
HILUX_OM_OM0K321E_(EE)
■Replacing the following bulbs
If any of the lights listed below has burnt out, have it replaced by
any authorized Toyota retailer or Toyota authorized repairer, or any
reliable repairer.
● Headlight low beams (vehicles with LED headlights)
● Front position lights/daytime running lights (vehicles with LED
headlights)
● Side turn signal lights
● LED front fog lights (if equipped)
● High mounted stoplight (if equipped)
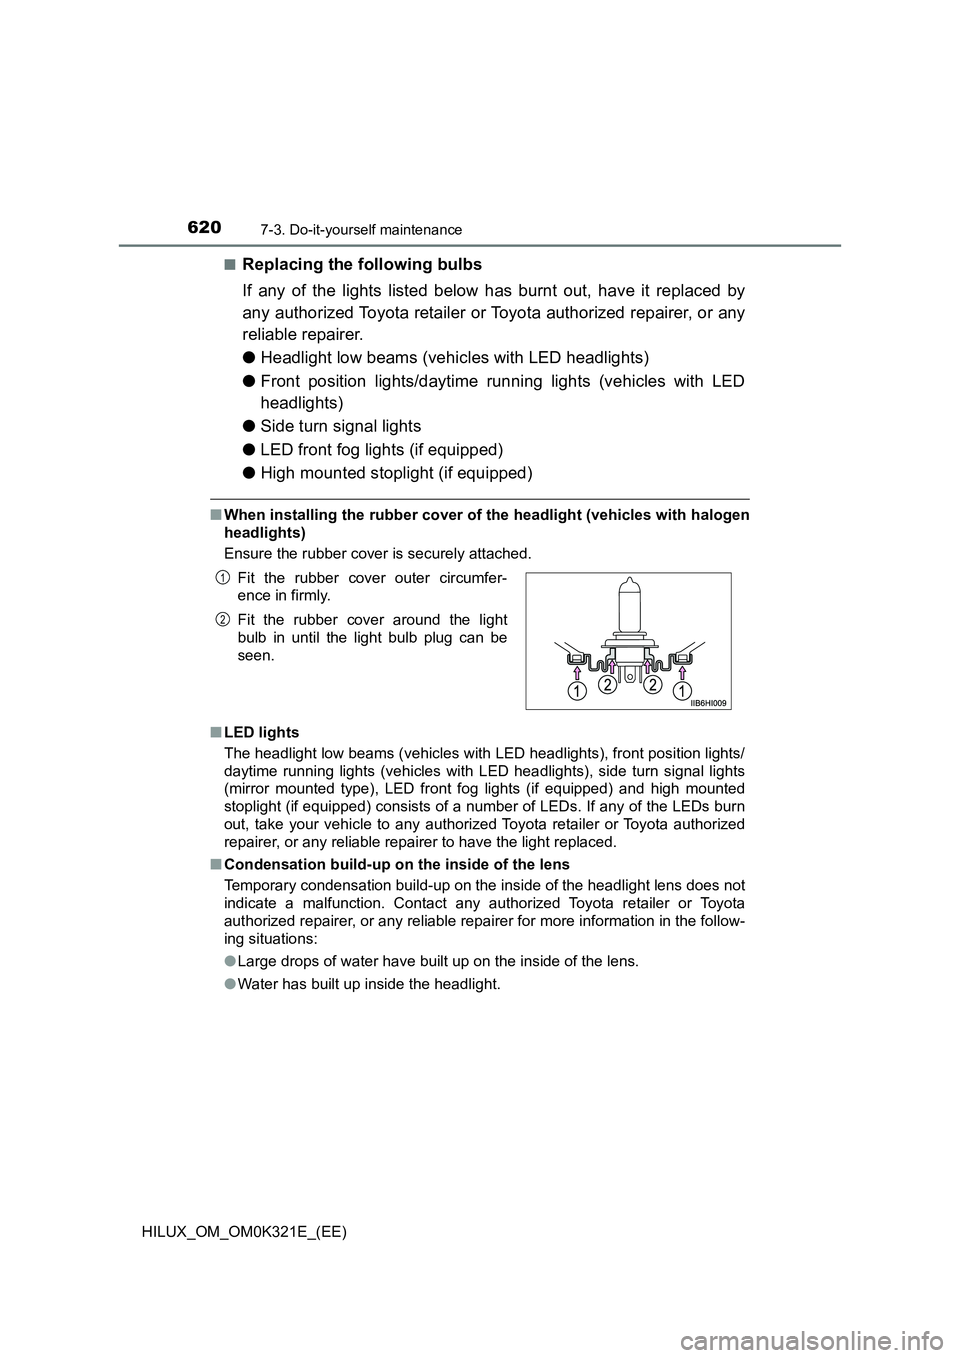
■When installing the rubber cover of the headlight (vehicles with halogen
headlights)
Ensure the rubber cover is securely attached.
■ LED lights
The headlight low beams (vehicles with LED headlights), front position lights/
daytime running lights (vehicles with LED headlights), side turn signal lights
(mirror mounted type), LED front fo g lights (if equipped) and high mounted
stoplight (if equipped) consists of a number of LEDs. If any of the LEDs burn
out, take your vehicle to any authorized Toyota retailer or Toyota authorized
repairer, or any reliable repairer to have the light replaced.
■ Condensation build-up on the inside of the lens
Temporary condensation build-up on the inside of the headlight lens does not
indicate a malfunction. Contact any authorized Toyota retailer or Toyota
authorized repairer, or any reliable repairer for more information in the follow-
ing situations:
● Large drops of water have built up on the inside of the lens.
● Water has built up inside the headlight.
Fit the rubber cover outer circumfer-
ence in firmly.
Fit the rubber cover around the light
bulb in until the light bulb plug can be
seen.
1
2
Trending: length, key, manual transmission, adding oil, fuel, steering wheel, vehicle specifications
