headlight bulb TOYOTA iQ EV 2013 Owners Manual (in English)
[x] Cancel search | Manufacturer: TOYOTA, Model Year: 2013, Model line: iQ EV, Model: TOYOTA iQ EV 2013Pages: 444, PDF Size: 7.34 MB
Page 13 of 444
13Pictorial index
Recharge inlet door (charging port lid) . . . . . . . . . . . . . . . . . P. 84
Charging equipment . . . . . . . . . . . . . . . . . . . . . . . . . . . . . . . . . P. 84
Power sources that can be used . . . . . . . . . . . . . . . . . . . . . . . . P. 88
How to charge your vehicle . . . . . . . . . . . . . . . . . . . . . . . . . . . . P. 91
If charging cannot be done . . . . . . . . . . . . . . . . . . . . . . . . . . . P. 377
Inspecting the charging cable . . . . . . . . . . . . . . . . . . . . . . . . . P. 262
Warning messages . . . . . . . . . . . . . . . . . . . . . . . . . . . . . . . . . P. 355
Tires . . . . . . . . . . . . . . . . . . . . . . . . . . . . . . . . . . . . . . . . . . . . P. 285
Tire size/inflation pressure . . . . . . . . . . . . . . . . . . . . . . . . . . . . P. 400
Winter tires/tire chain . . . . . . . . . . . . . . . . . . . . . . . . . . . . . . . . P. 215
Checking/rotation/tire pressure warning system . . . . . . . P. 285, 286
Replacement . . . . . . . . . . . . . . . . . . . . . . . . . . . . . . . . . . . . . . P. 269
Coping with flat tires . . . . . . . . . . . . . . . . . . . . . . . . . . . . . . . . P. 359
Hood . . . . . . . . . . . . . . . . . . . . . . . . . . . . . . . . . . . . . . . . . . . . P. 264
Opening . . . . . . . . . . . . . . . . . . . . . . . . . . . . . . . . . . . . . . . . . . P. 264
Coping with overheat . . . . . . . . . . . . . . . . . . . . . . . . . . . . . . . . P. 390
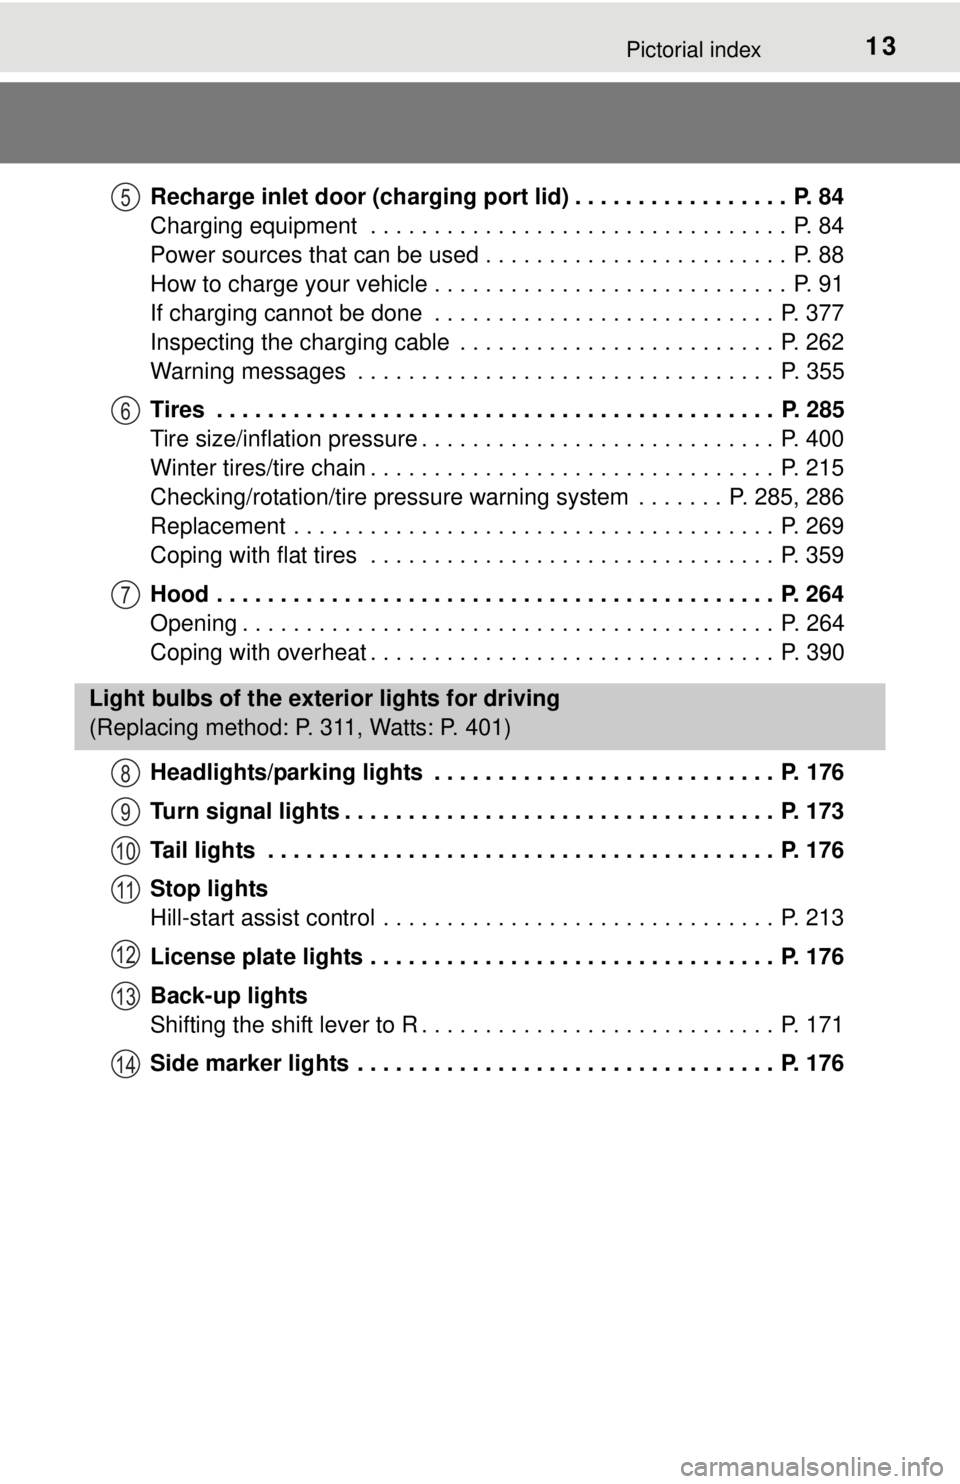
Headlights/parking lights . . . . . . . . . . . . . . . . . . . . . . . . . . . P. 176
Turn signal lights . . . . . . . . . . . . . . . . . . . . . . . . . . . . . . . . . . P. 173
Tail lights . . . . . . . . . . . . . . . . . . . . . . . . . . . . . . . . . . . . . . . . P. 176
Stop lights
Hill-start assist control . . . . . . . . . . . . . . . . . . . . . . . . . . . . . . . P. 213
License plate lights . . . . . . . . . . . . . . . . . . . . . . . . . . . . . . . . P. 176
Back-up lights
Shifting the shift lever to R . . . . . . . . . . . . . . . . . . . . . . . . . . . . P. 171
Side marker lights . . . . . . . . . . . . . . . . . . . . . . . . . . . . . . . . . P. 1765
6
7
Light bulbs of the exterior lights for driving
(Replacing method: P. 311, Watts: P. 401)
8
9
10
11
12
13
14
Page 311 of 444
3117-3. Do-it-yourself maintenance
7
Maintenance and care
Light bulbs
Check the wattage of the light bulb to be replaced. (P. 401)
■Front
You may replace the following bulbs by yourself. The difficulty
level of replacement varies de pending on the bulb. If necessary
bulb replacement seems difficult to perform, contact your Scion
dealer.
For more information about repl acing other light bulbs, contact
your Scion dealer.
Preparing for light bulb replacement
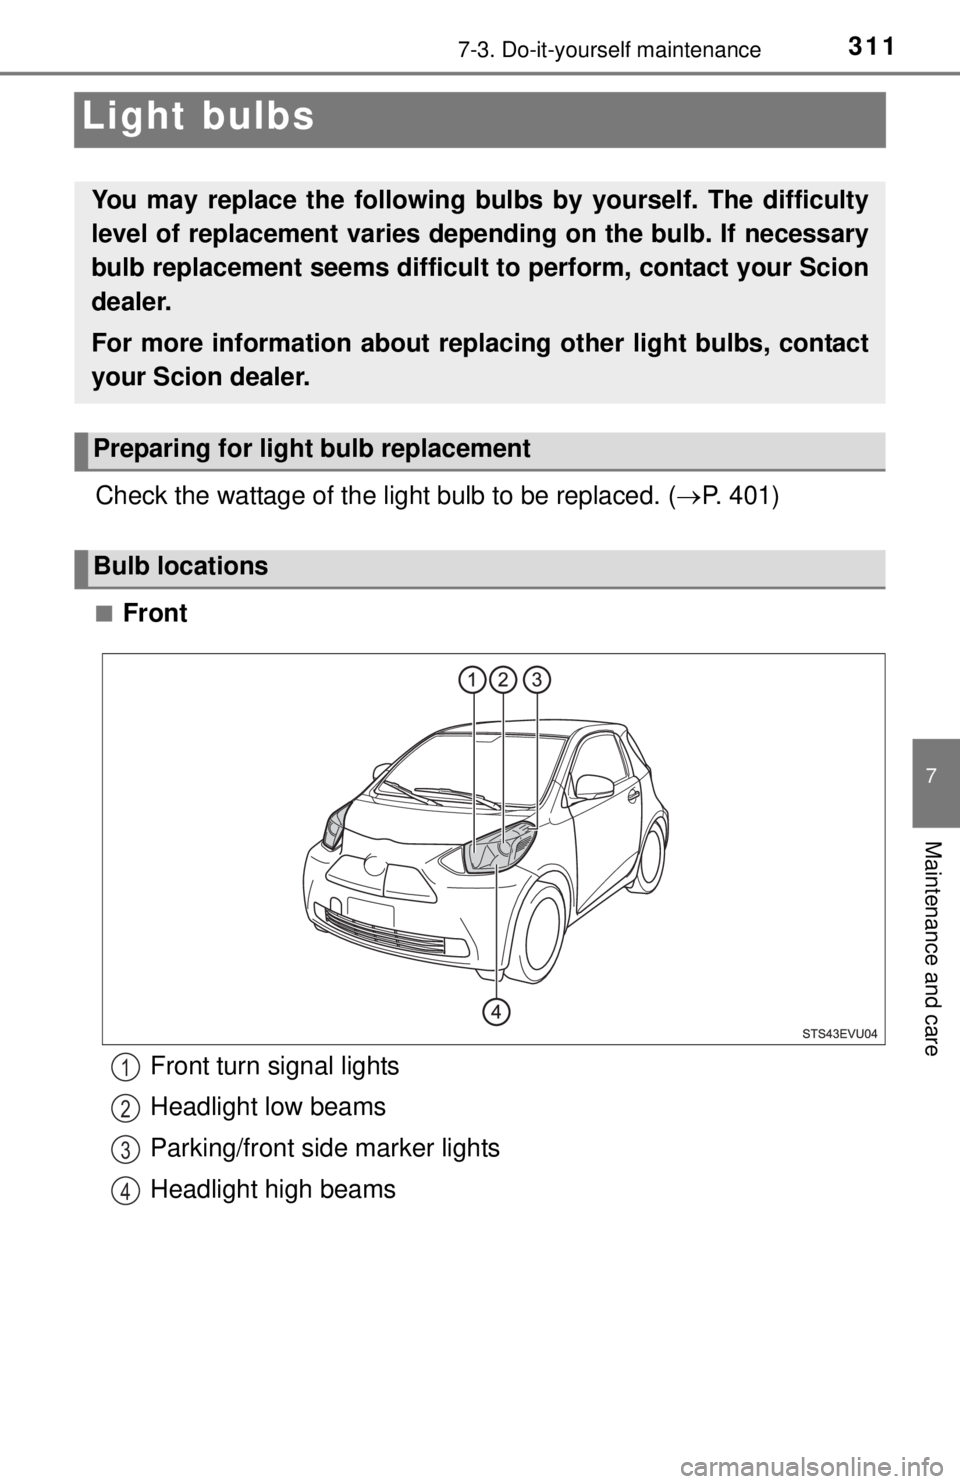
Bulb locations
Front turn signal lights
Headlight low beams
Parking/front side marker lights
Headlight high beams1
2
3
4
Page 313 of 444
3137-3. Do-it-yourself maintenance
7
Maintenance and care
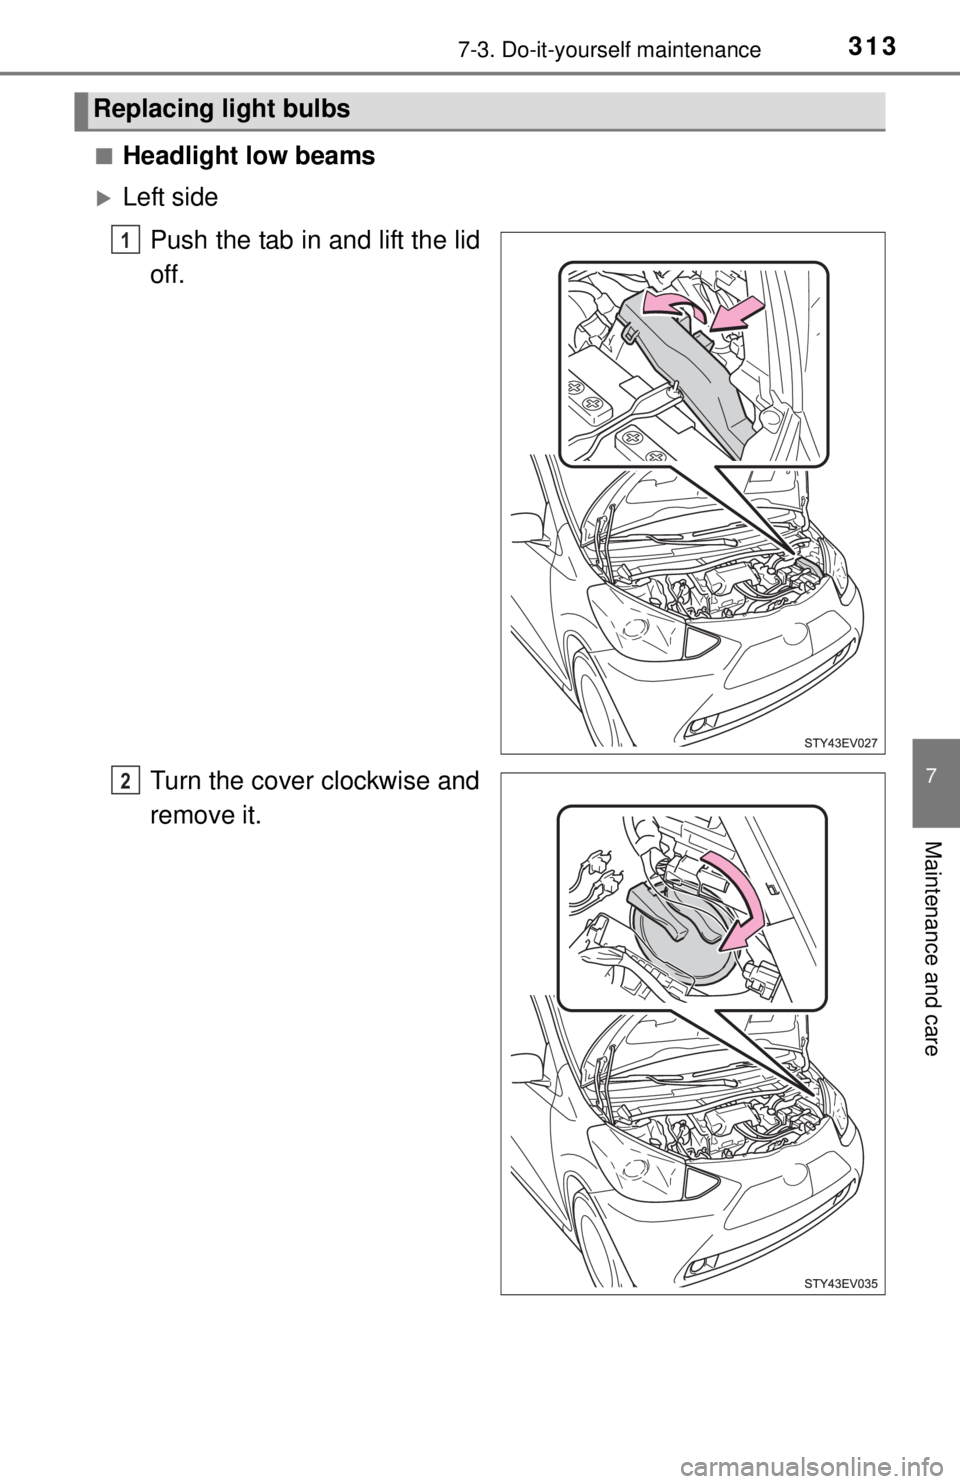
■Headlight low beams
Left sidePush the tab in and lift the lid
off.
Turn the cover clockwise and
remove it.
Replacing light bulbs
1
2
Page 314 of 444
3147-3. Do-it-yourself maintenance
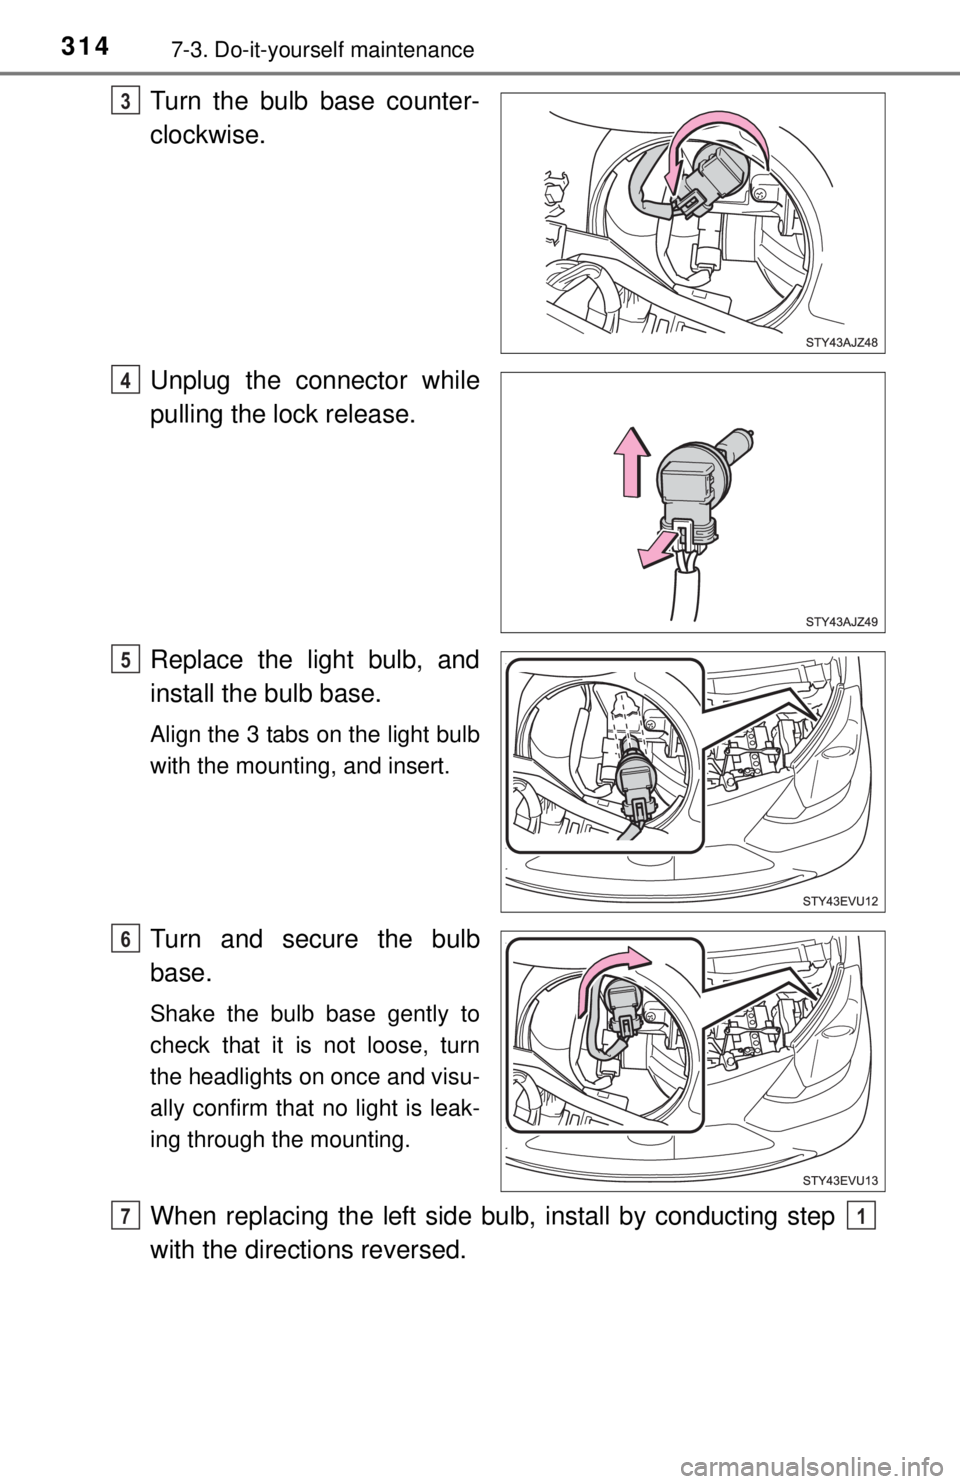
Turn the bulb base counter-
clockwise.
Unplug the connector while
pulling the lock release.
Replace the light bulb, and
install the bulb base.
Align the 3 tabs on the light bulb
with the mounting, and insert.
Turn and secure the bulb
base.
Shake the bulb base gently to
check that it is not loose, turn
the headlights on once and visu-
ally confirm that no light is leak-
ing through the mounting.
When replacing the left side bulb, install by conducting step
with the directions reversed.
3
4
5
6
71
Page 316 of 444
3167-3. Do-it-yourself maintenance
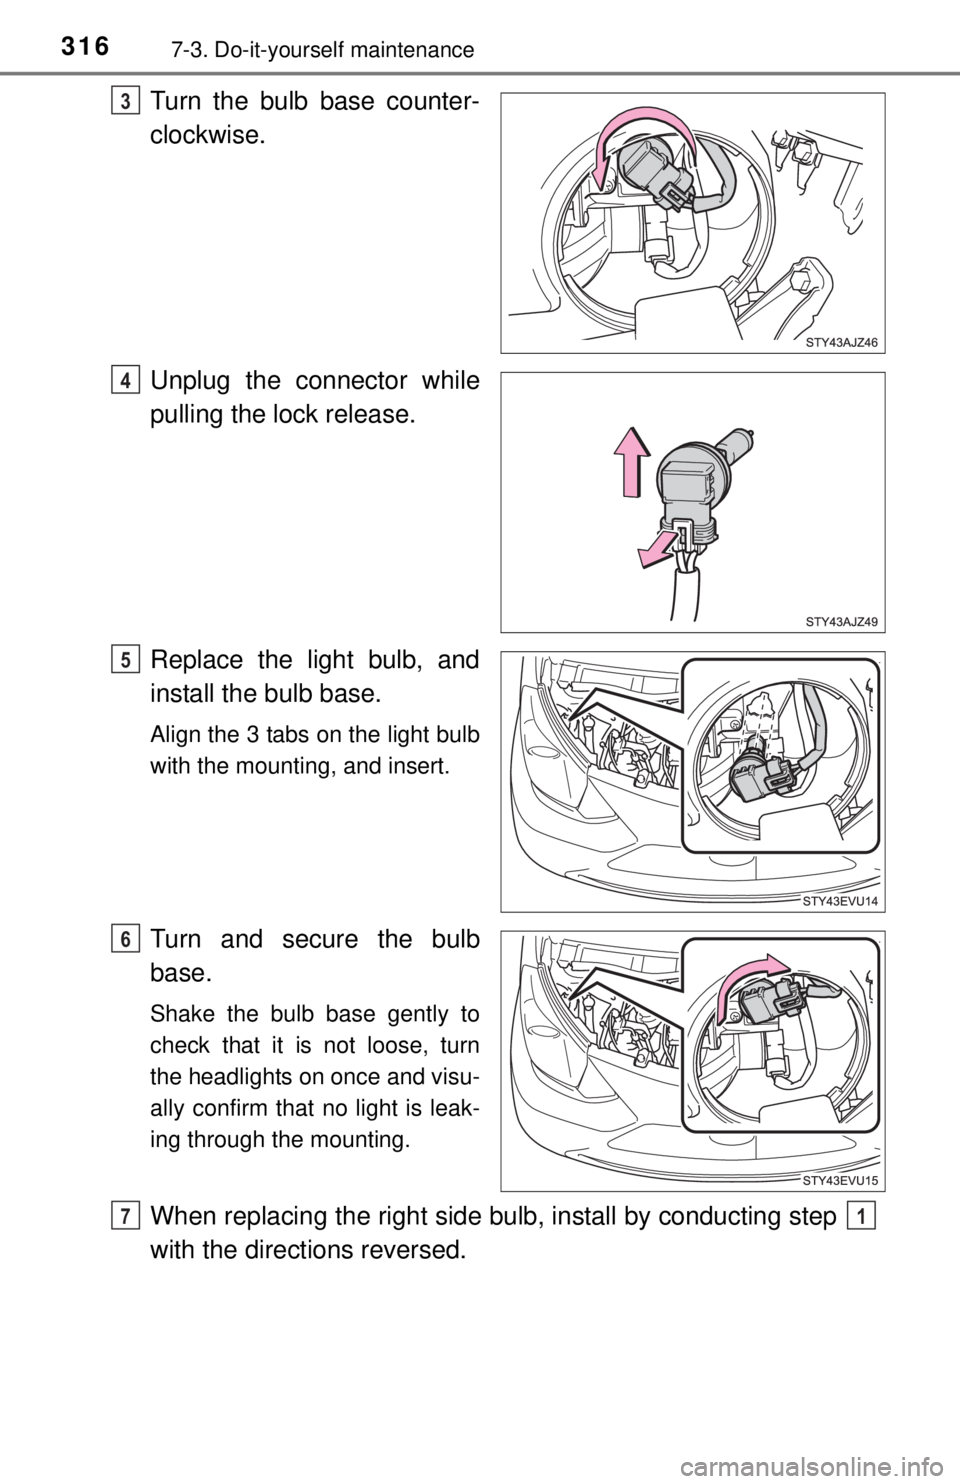
Turn the bulb base counter-
clockwise.
Unplug the connector while
pulling the lock release.
Replace the light bulb, and
install the bulb base.
Align the 3 tabs on the light bulb
with the mounting, and insert.
Turn and secure the bulb
base.
Shake the bulb base gently to
check that it is not loose, turn
the headlights on once and visu-
ally confirm that no light is leak-
ing through the mounting.
When replacing the right side bulb, install by conducting step
with the directions reversed.
3
4
5
6
71
Page 318 of 444
3187-3. Do-it-yourself maintenance
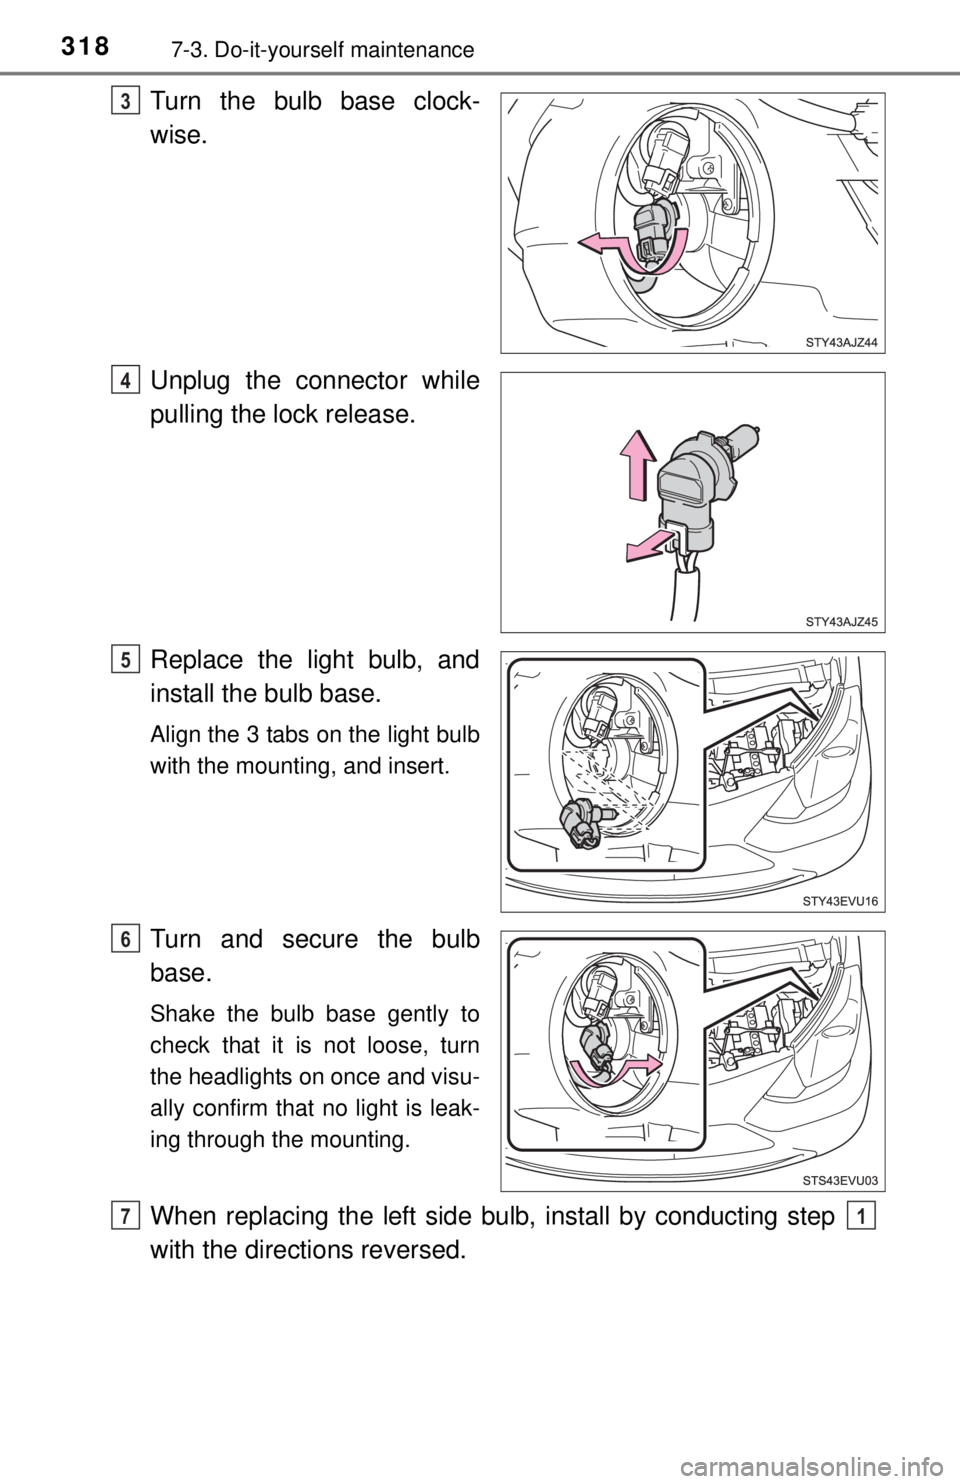
Turn the bulb base clock-
wise.
Unplug the connector while
pulling the lock release.
Replace the light bulb, and
install the bulb base.
Align the 3 tabs on the light bulb
with the mounting, and insert.
Turn and secure the bulb
base.
Shake the bulb base gently to
check that it is not loose, turn
the headlights on once and visu-
ally confirm that no light is leak-
ing through the mounting.
When replacing the left side bulb, install by conducting step
with the directions reversed.
3
4
5
6
71
Page 320 of 444
3207-3. Do-it-yourself maintenance
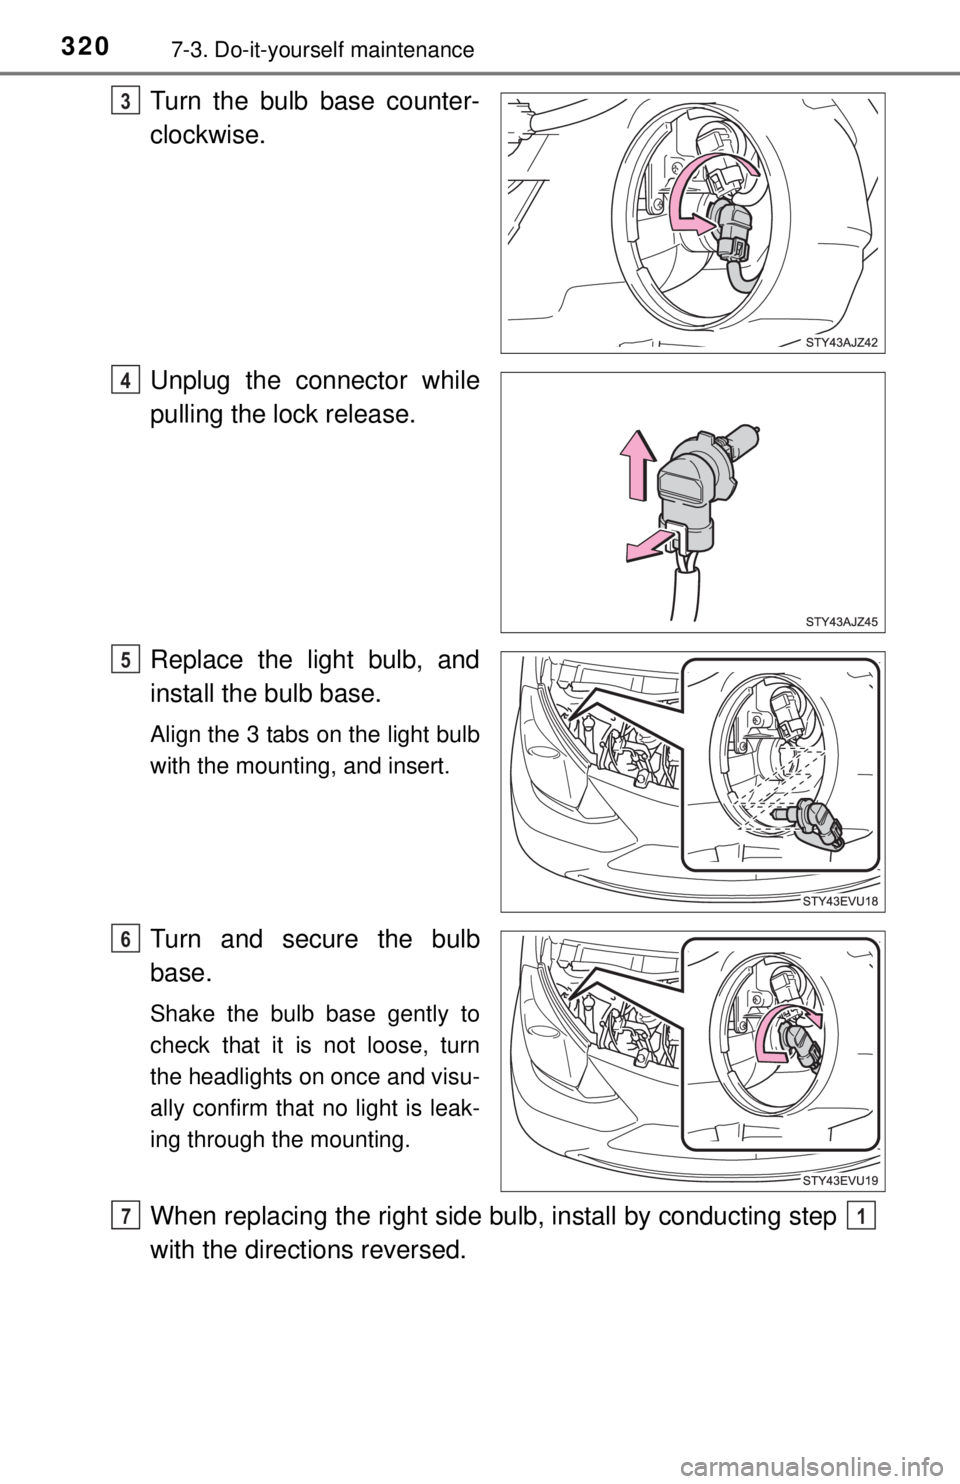
Turn the bulb base counter-
clockwise.
Unplug the connector while
pulling the lock release.
Replace the light bulb, and
install the bulb base.
Align the 3 tabs on the light bulb
with the mounting, and insert.
Turn and secure the bulb
base.
Shake the bulb base gently to
check that it is not loose, turn
the headlights on once and visu-
ally confirm that no light is leak-
ing through the mounting.
When replacing the right side bulb, install by conducting step
with the directions reversed.
3
4
5
6
171
Page 325 of 444
3257-3. Do-it-yourself maintenance
7
Maintenance and care
■Replacing the following bulbs
If any of the lights listed below has burnt out, have it replaced by
your Scion dealer.
● Charging inlet light
● Side turn signal lights
● High mounted stoplight
■When replacing the headlights
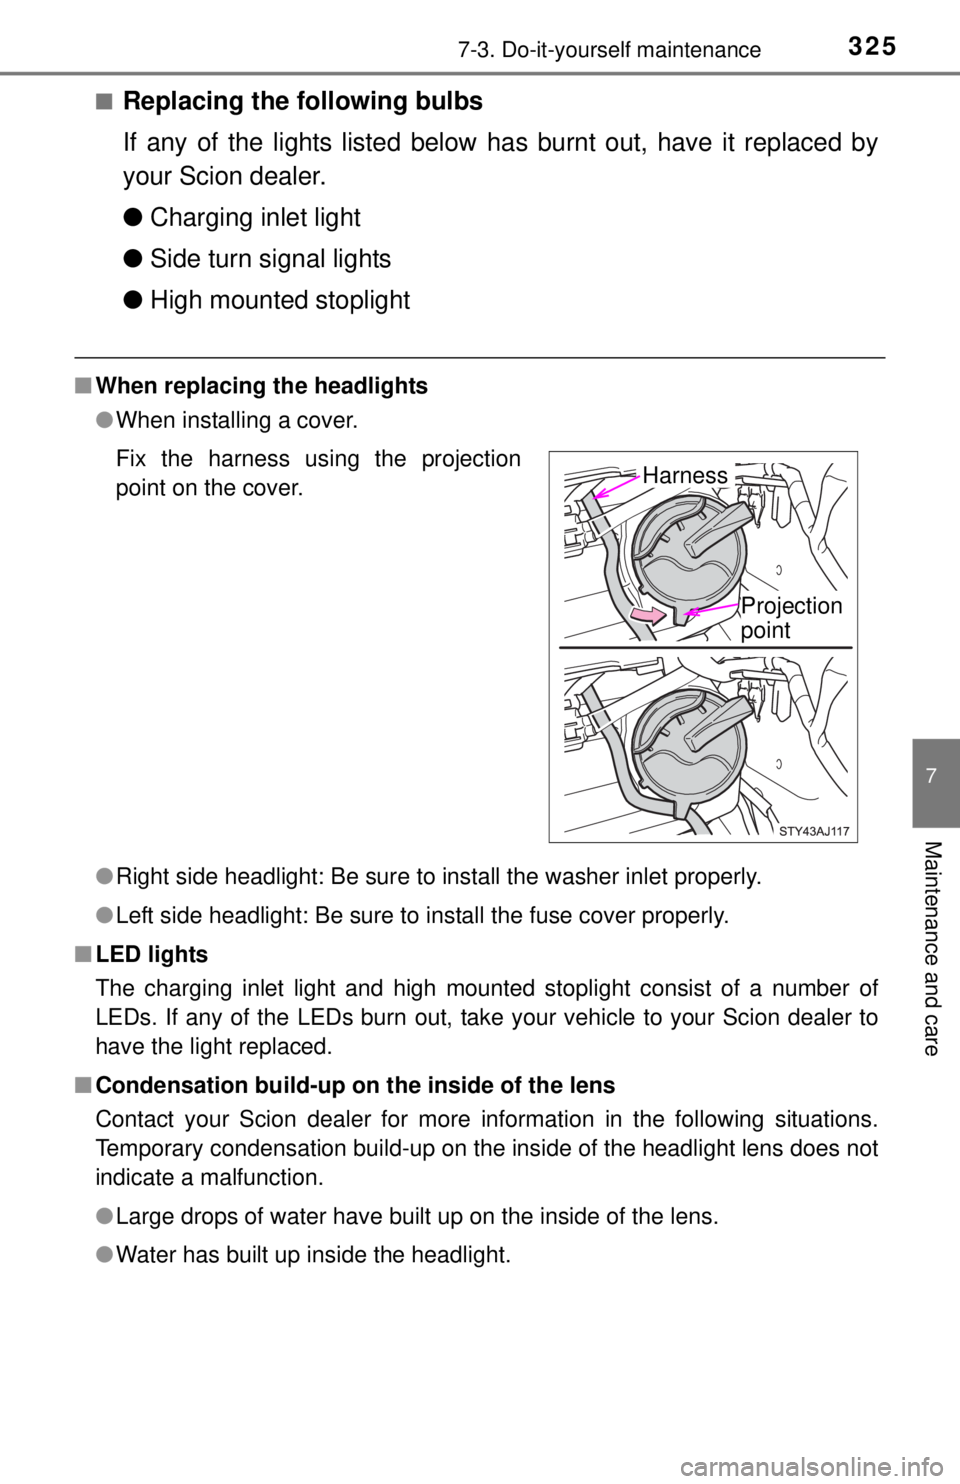
●When installing a cover.
● Right side headlight: Be sure to install the washer inlet properly.
● Left side headlight: Be sure to install the fuse cover properly.
■ LED lights
The charging inlet light and high mounted stoplight consist of a number of
LEDs. If any of the LEDs burn out, take your vehicle to your Scion dealer to
have the light replaced.
■ Condensation build-up on the inside of the lens
Contact your Scion dealer for more information in the following situations.
Temporary condensation build-up on the inside of the headlight lens does not
indicate a malfunction.
●Large drops of water have built up on the inside of the lens.
● Water has built up inside the headlight. Fix the harness using the projection
point on the cover.
Harness
Projection
point
Page 326 of 444
3267-3. Do-it-yourself maintenance
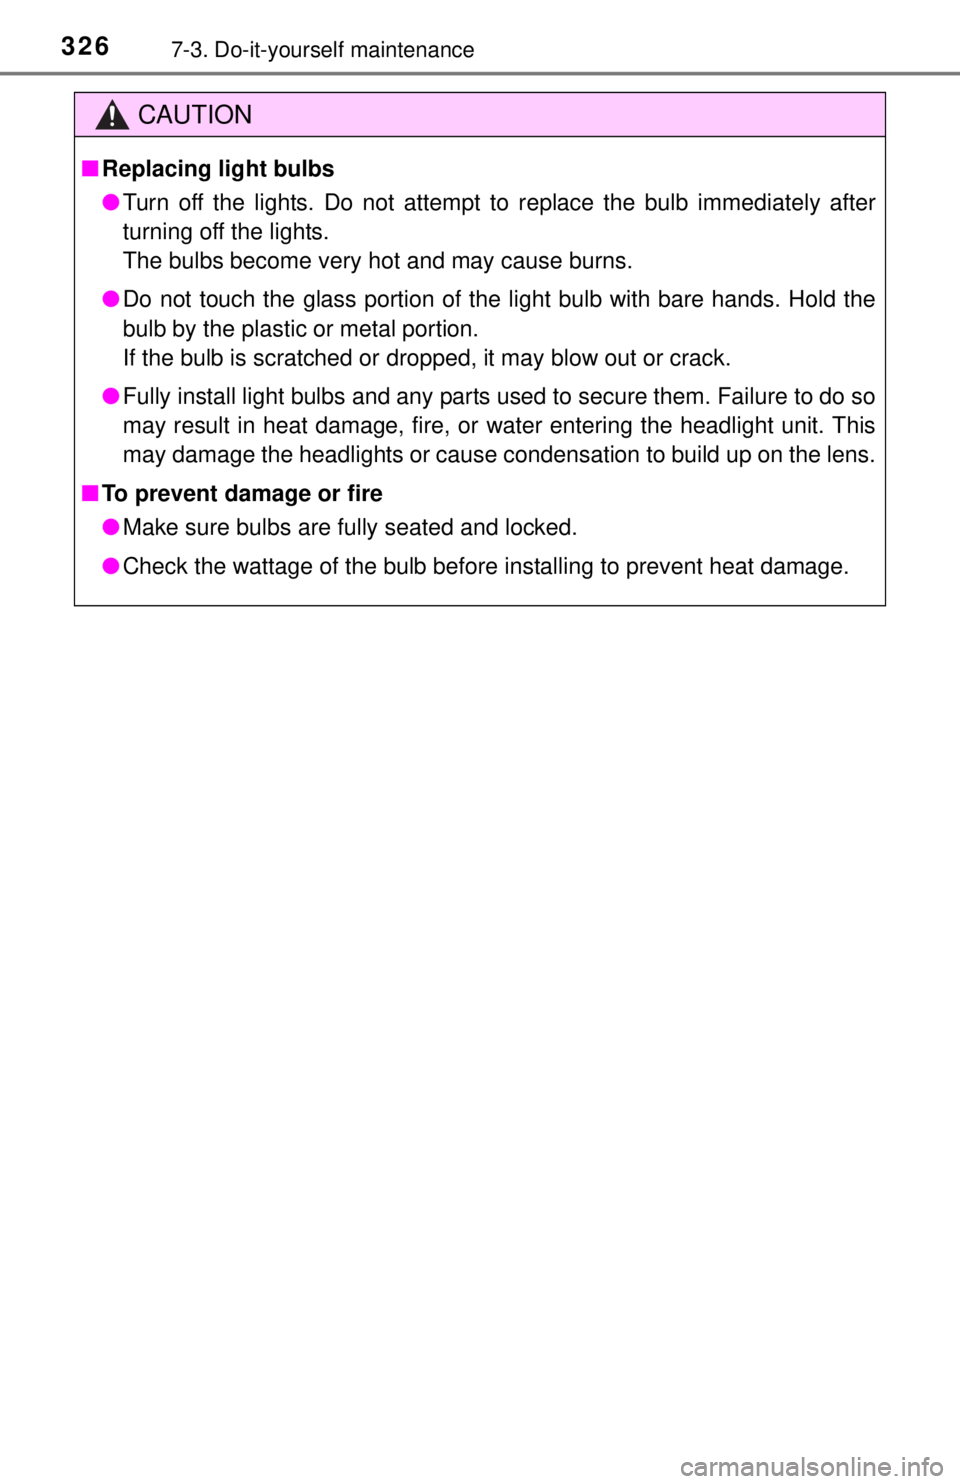
CAUTION
■Replacing light bulbs
● Turn off the lights. Do not attempt to replace the bulb immediately after
turning off the lights.
The bulbs become very hot and may cause burns.
● Do not touch the glass portion of the light bulb with bare hands. Hold the
bulb by the plastic or metal portion.
If the bulb is scratched or dropped, it may blow out or crack.
● Fully install light bulbs and any parts used to secure them. Failure to do so
may result in heat damage, fire, or water entering the headlight unit. This
may damage the headlights or cause condensation to build up on the lens.
■ To prevent damage or fire
● Make sure bulbs are fully seated and locked.
● Check the wattage of the bulb before installing to prevent heat damage.
Page 401 of 444
4019-1. Specifications
9
Vehicle specifications
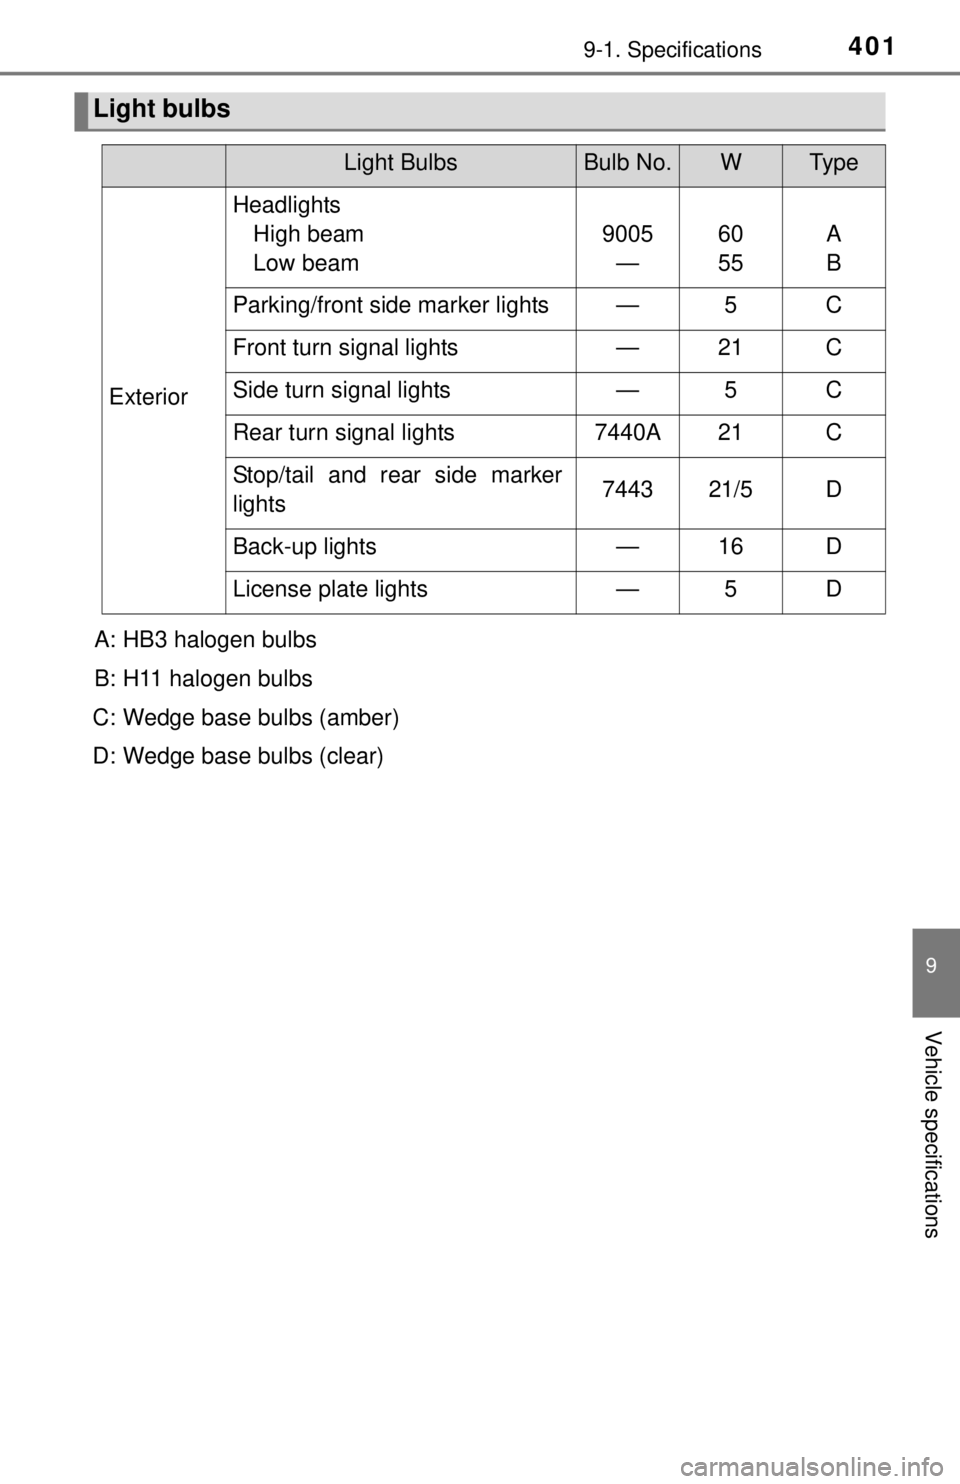
Light bulbs
Light BulbsBulb No.WTy p e
ExteriorHeadlights
High beam
Low beam 9005
— 60
55 A
B
Parking/front side marker lights — 5 C
Front turn signal lights—21C
Side turn signal lights — 5 C
Rear turn signal lights7440A21C
Stop/tail and rear side marker
lights7443 21/5 D
Back-up lights—16D
License plate lights—5D
A: HB3 halogen bulbs
B: H11 halogen bulbs
C: Wedge base bulbs (amber)
D: Wedge base bulbs (clear)