display TOYOTA MIRAI 2022 Workshop Manual
[x] Cancel search | Manufacturer: TOYOTA, Model Year: 2022, Model line: MIRAI, Model: TOYOTA MIRAI 2022Pages: 556, PDF Size: 17.34 MB
Page 146 of 556
1464-4. Adjusting the steering wheel and mirrors
Owners Manual_USA_M62084_endisplayed image are bothering
you, change to optical mirror
mode.
●When the trunk is open, the Digital
Rearview Mirror image may not
display properly. Before driving,
make sure the trunk is closed.
●If the display is difficult to see due
to reflected light, close the elec-
tronic sunshade for the panoramic
moon roof (if equipped).
●Any of the following conditions
may occur when d
riving in the
dark, such as at night. None of
them indicates that a malfunction
has occurred.
• Colors of objects in the displayed image may differ f rom their actual
color.
• Depending on the height of the lights of the vehicle behind, the
area around the vehicle may
appear white and blurry.
• Automatic image adjustment for
brighter surrounding image may
cause flickering.
If it is difficult to see the displayed
image or flickering bothers you,
change to optical mirror mode.
●The Digital Rearview Mirror may
become hot while it is in digital
mirror mode.
This is not a malfunction.
●Depending on your physical con-
dition or age, it may take longer
than usual to focus on the dis-
played image. In this case,
change to optical mirror mode.
●Do not let passengers stare at the
displayed image when the vehicle
is being driven, as doing so may
cause motion sickness.
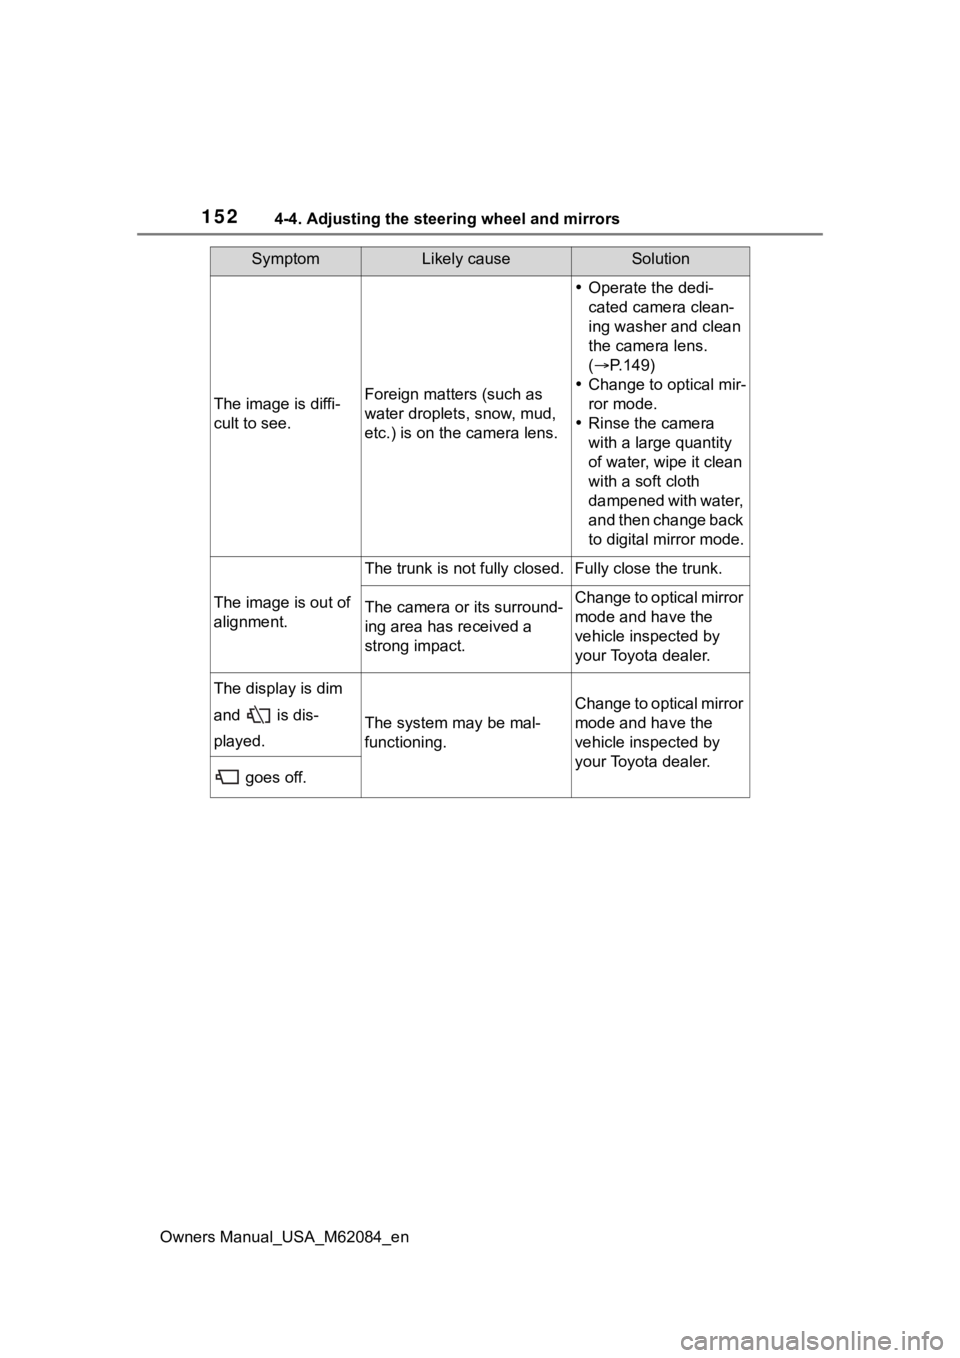
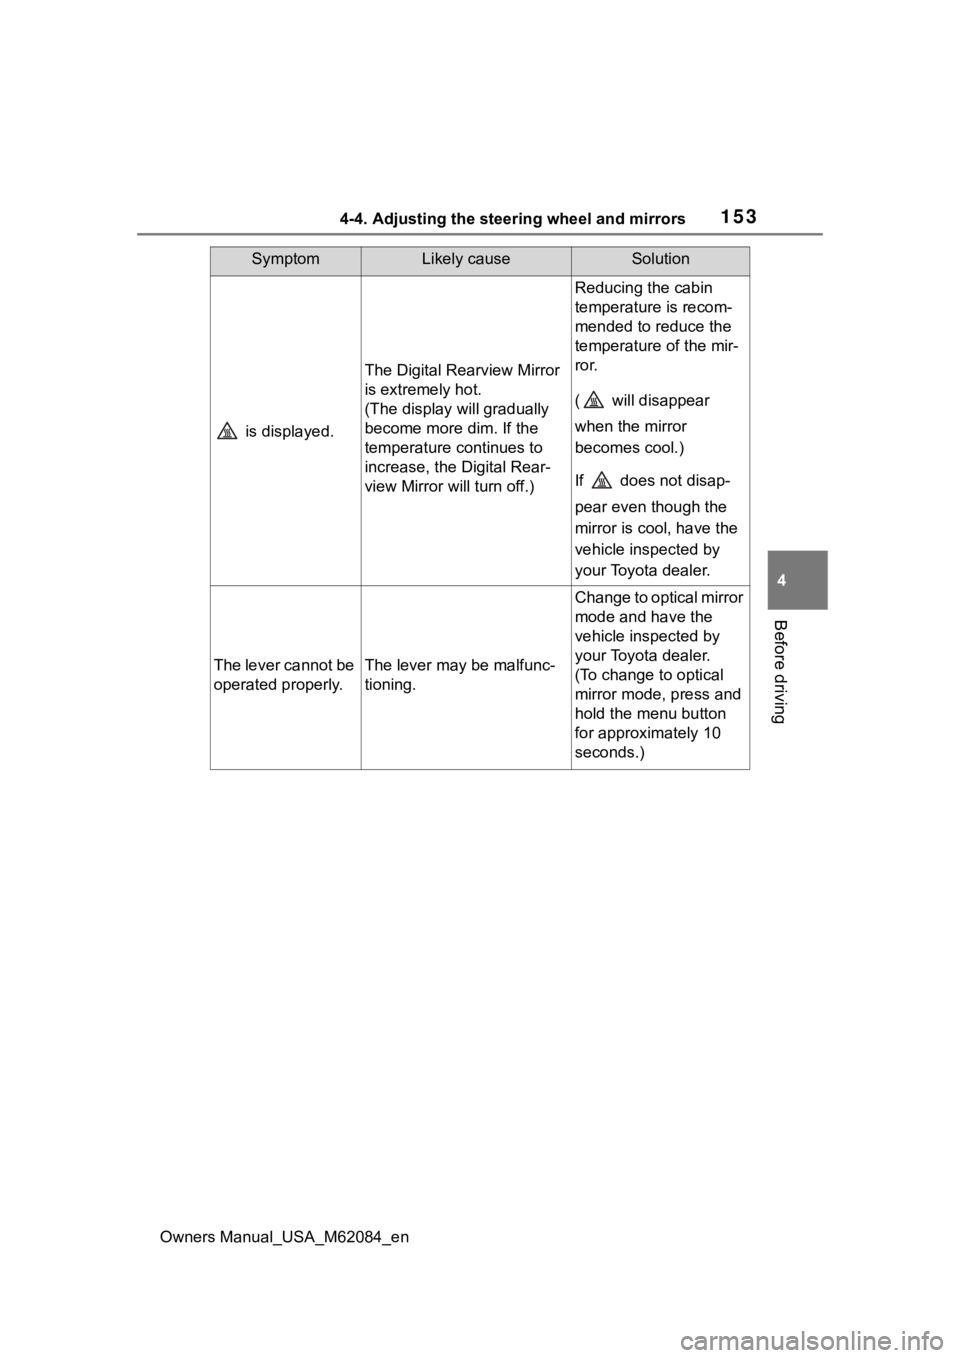
■When the system malfunctions
If the symbol show n in the illustra-
tion is displayed when using the
Digital Rearview Mirror in digital mir-
ror mode, the system may be mal-
functioning. The symbol will
disappear in a few seconds. Oper-
ate the lever, chang e to optical mir-ror mode and have the vehicle
inspected by your Toyota dealer.
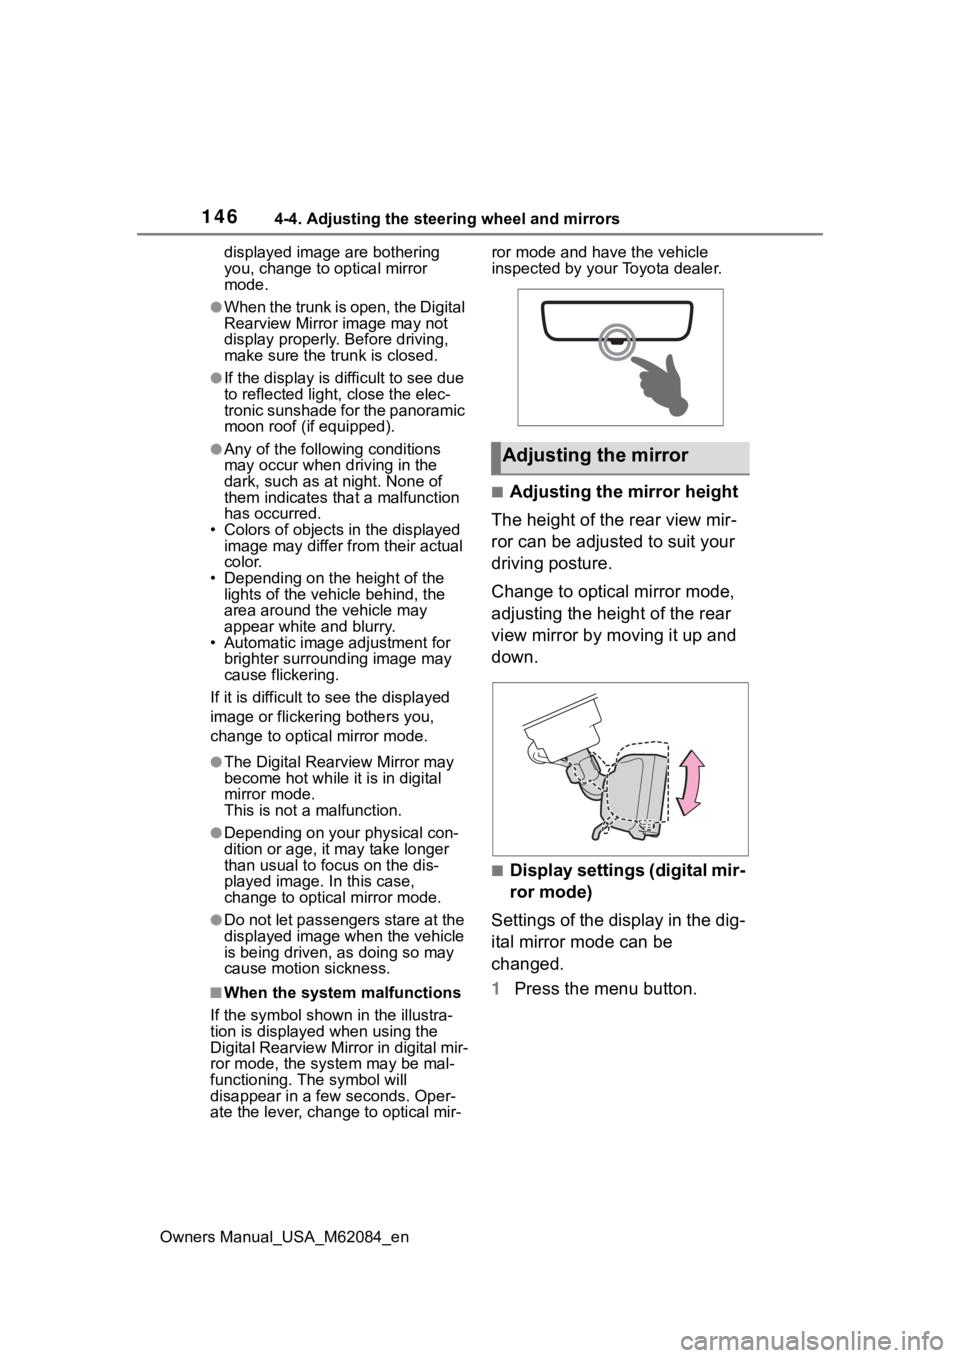
■Adjusting the mirror height
The height of the rear view mir-
ror can be adjusted to suit your
driving posture.
Change to optical mirror mode,
adjusting the height of the rear
view mirror by moving it up and
down.
■Display settings (digital mir-
ror mode)
Settings of the display in the dig-
ital mirror mode can be
changed.
1 Press the menu button.
Adjusting the mirror
Page 147 of 556
1474-4. Adjusting the steering wheel and mirrors
Owners Manual_USA_M62084_en
4
Before driving
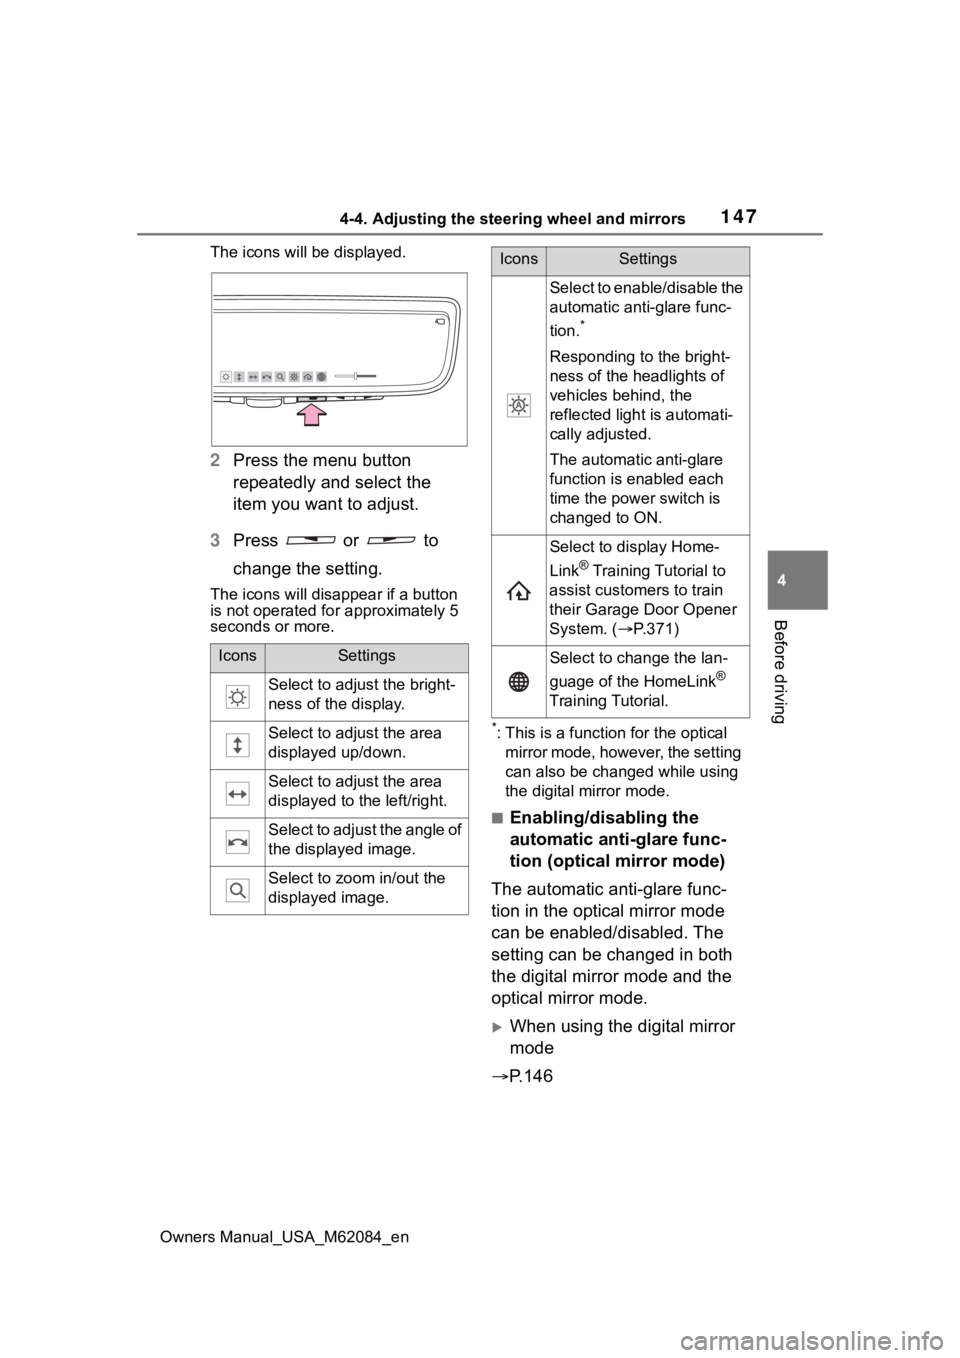
The icons will be displayed.
2 Press the menu button
repeatedly and select the
item you want to adjust.
3 Press or to
change the setting.
The icons will disapp ear if a button
is not operated fo r approximately 5
seconds or more.
*: This is a functi on for the optical
mirror mode, however, the setting
can also be changed while using
the digital mirror mode.
■Enabling/disabling the
automatic anti-glare func-
tion (optical mirror mode)
The automatic anti-glare func-
tion in the optical mirror mode
can be enabled/disabled. The
setting can be changed in both
the digital mirror mode and the
optical mirror mode.
When using the digital mirror
mode
P.146
IconsSettings
Select to adjust the bright-
ness of the display.
Select to adjust the area
displayed up/down.
Select to adjust the area
displayed to the left/right.
Select to adjust the angle of
the displayed image.
Select to zoom in/out the
displayed image.
Select to enable/disable the
automatic anti-glare func-
tion.
*
Responding to the bright-
ness of the headlights of
vehicles behind, the
reflected light is automati-
cally adjusted.
The automatic anti-glare
function is enabled each
time the power switch is
changed to ON.
Select to display Home-
Link
® Training Tutorial to
assist customers to train
their Garage Door Opener
System. ( P.371)
Select to change the lan-
guage of the HomeLink
®
Training Tutorial.
IconsSettings
Page 148 of 556
1484-4. Adjusting the steering wheel and mirrors
Owners Manual_USA_M62084_en
When using the optical mirror
mode
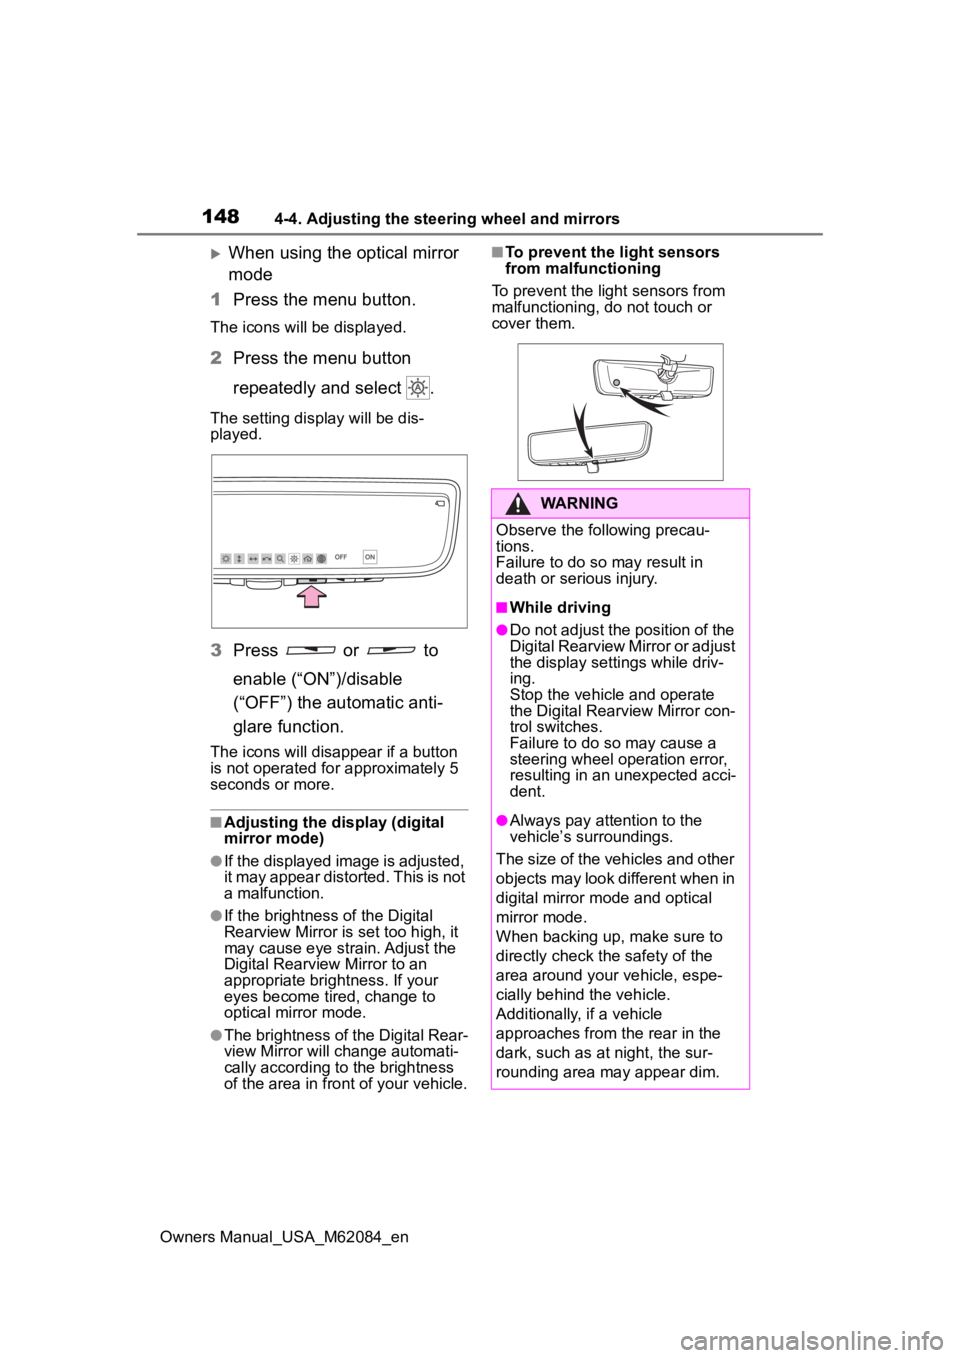
1 Press the menu button.
The icons will be displayed.
2Press the menu button
repeatedly and select .
The setting display will be dis-
played.
3Press or to
enable (“ON”)/disable
(“OFF”) the automatic anti-
glare function.
The icons will disappear if a button
is not operated fo r approximately 5
seconds or more.
■Adjusting the display (digital
mirror mode)
●If the displayed image is adjusted,
it may appear distorted. This is not
a malfunction.
●If the brightness of the Digital
Rearview Mirror is set too high, it
may cause eye strain. Adjust the
Digital Rearvie w Mirror to an
appropriate brightness. If your
eyes become tired, change to
optical mirror mode.
●The brightness of the Digital Rear-
view Mirror will ch ange automati-
cally according to the brightness
of the area in front of your vehicle.
■To prevent the light sensors
from malfunctioning
To prevent the light sensors from
malfunctioning, do not touch or
cover them.
WARNING
Observe the following precau-
tions.
Failure to do so may result in
death or serious injury.
■While driving
●Do not adjust the position of the
Digital Rearview Mirror or adjust
the display settings while driv-
ing.
Stop the vehicle and operate
the Digital Rearview Mirror con-
trol switches.
Failure to do so may cause a
steering wheel operation error,
resulting in an unexpected acci-
dent.
●Always pay attention to the
vehicle’s surroundings.
The size of the vehicles and other
objects may look different when in
digital mirror mode and optical
mirror mode.
When backing up, make sure to
directly check the safety of the
area around your vehicle, espe-
cially behind the vehicle.
Additionally, if a vehicle
approaches from the rear in the
dark, such as at night, the sur-
rounding area may appear dim.
Page 149 of 556
1494-4. Adjusting the steering wheel and mirrors
Owners Manual_USA_M62084_en
4
Before driving
■Cleaning the mirror surface
If the mirror surface is dirty, the
image on the display may be dif-
ficult to see.
Clean the mirror surface gently
using a soft dry cloth.
■Cleaning the camera
If the camera lens is dirty or cov-
ered with foreign matter, such as
water droplets, snow, mud, etc.,
the displayed image may not be
clear. In this case, rinse the
camera lens with a large quan-
tity of water and then wipe it
clean with a soft cloth damp-
ened with water.
Dirt on the camera lens can be
cleaned by operating the dedi-
cated camera cleaning washer.
( P.197)
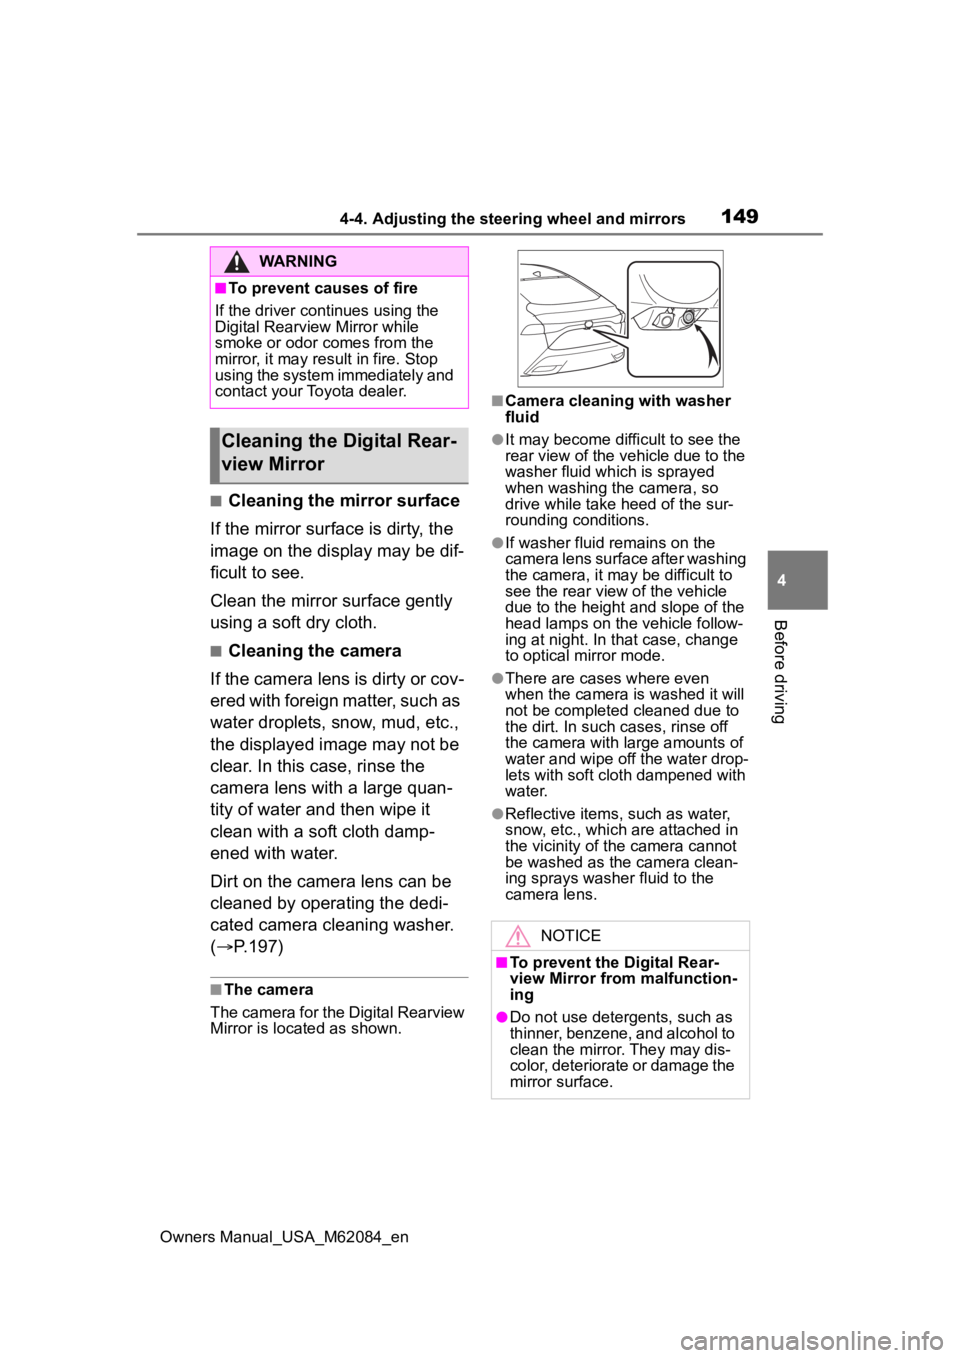
■The camera
The camera for the Digital Rearview
Mirror is located as shown.
■Camera cleaning with washer
fluid
●It may become difficult to see the
rear view of the vehicle due to the
washer fluid which is sprayed
when washing the camera, so
drive while take heed of the sur-
rounding conditions.
●If washer fluid remains on the
camera lens surface after washing
the camera, it may be difficult to
see the rear view of the vehicle
due to the height a nd slope of the
head lamps on the vehicle follow-
ing at night. In that case, change
to optical mirror mode.
●There are cases where even
when the camera is washed it will
not be completed cleaned due to
the dirt. In such cases, rinse off
the camera with large amounts of
water and wipe off the water drop-
lets with soft cloth dampened with
water.
●Reflective items, such as water,
snow, etc., which are attached in
the vicinity of the camera cannot
be washed as the camera clean-
ing sprays washer fluid to the
camera lens.
WARNING
■To prevent causes of fire
If the driver continues using the
Digital Rearview Mirror while
smoke or odor comes from the
mirror, it may res ult in fire. Stop
using the system immediately and
contact your Toyota dealer.
Cleaning the D igital Rear-
view Mirror
NOTICE
■To prevent the Digital Rear-
view Mirror from malfunction-
ing
●Do not use detergents, such as
thinner, benzene, and alcohol to
clean the mirror. They may dis-
color, deteriorate or damage the
mirror surface.
Page 152 of 556
1524-4. Adjusting the steering wheel and mirrors
Owners Manual_USA_M62084_en
The image is diffi-
cult to see.Foreign matters (such as
water droplets, snow, mud,
etc.) is on the camera lens.
Operate the dedi-
cated camera clean-
ing washer and clean
the camera lens.
( P.149)
Change to optical mir-
ror mode.
Rinse the camera
with a large quantity
of water, wipe it clean
with a soft cloth
dampened with water,
and then change back
to digital mirror mode.
The image is out of
alignment.
The trunk is not fully closed.Fully close the trunk.
The camera or its surround-
ing area has received a
strong impact.Change to optical mirror
mode and have the
vehicle inspected by
your Toyota dealer.
The display is dim
and is dis-
played.
The system may be mal-
functioning.
Change to optical mirror
mode and have the
vehicle inspected by
your Toyota dealer.
goes off.
SymptomLikely causeSolution
Page 153 of 556
1534-4. Adjusting the steering wheel and mirrors
Owners Manual_USA_M62084_en
4
Before driving
is displayed.
The Digital Rearview Mirror
is extremely hot.
(The display will gradually
become more dim. If the
temperature continues to
increase, the Digital Rear-
view Mirror will turn off.)
Reducing the cabin
temperature is recom-
mended to reduce the
temperature of the mir-
ror.
( will disappear
when the mirror
becomes cool.)
If does not disap-
pear even though the
mirror is cool, have the
vehicle inspected by
your Toyota dealer.
The lever cannot be
operated properly.The lever may be malfunc-
tioning.
Change to optical mirror
mode and have the
vehicle inspected by
your Toyota dealer.
(To change to optical
mirror mode, press and
hold the menu button
for approximately 10
seconds.)
SymptomLikely causeSolution
Page 162 of 556

1625-1. Before driving
Owners Manual_USA_M62084_en
■Driving in the rain
●Drive carefully when it is raining,
because visibility will be reduced,
the windows may become fogged-
up, and the road will be slippery.
●Drive carefully whe n it starts to
rain, because the road surface will
be especially slippery.
●Refrain from high speeds when
driving on an expressway in the
rain, because there may be a
layer of water between the tires
and the road surface, preventing
the steering and brakes from
operating properly.
■ECO Accelerator Guidance
( P.102)
Eco-friendly driving may be
achieved more easily by staying
within the zone of Eco acceleration.
Also, by staying w ithin the zone of
Eco acceleration, i t will be easier to
obtain a good Eco score.
●When starting off:
Gradually depress the accelerator
pedal to stay withi n the zone of Eco
acceleration and accelerate to the
desired speed. By refraining from
excessive acceleration, a good eco
start score will be obtained.
●When driving:
After accelerating to the desired
speed, release the accelerator
pedal and drive at a stable speed
while staying within the zone of Eco
acceleration. By staying within the
zone of Eco acceleration, a good
eco cruise score will be obtained.
●When stopping:
By starting to release the accelera-
tor pedal early before decelerating,
a good eco stop score will be
obtained.
■Restraining the fuel cell system
output (Brake Override System)
●When the accelera tor and brake
pedals are depressed at the same
time, the fuel cell system output
may be restrained.
●A warning message is displayed
on the multi-information display
and head-up display (if equipped)
while the system is operating.
( P.446)
■Breaking in your new Toyota
To extend the life of the vehicle,
observing the following precautions
is recommended:
●For the first 186 miles (300 km):
Avoid sudden stops.
●For the first 621 miles (1000 km):
• Do not drive at extremely high speeds.
• Avoid sudden acceleration.
• Do not drive continuously in low gears.
• Do not drive at a constant speed for extended periods.
■Drum-in-disc type parking
brake system
Your vehicle has a drum-in-disc type
parking brake system. This type of
brake system needs bedding-down
of the brake shoes periodically or
whenever the par king brake shoes
and/or drum are replaced. Have
your Toyota dealer perform the bed-
ding down operation.
■Operating your v ehicle in a for-
eign country
Comply with the relevant vehicle
registration laws and confirm the
availability of the correct fuel.
( P.483)
WARNING
Observe the following precau-
tions.
Failure to do so may result in
death or serious injury.
Page 164 of 556
1645-1. Before driving
Owners Manual_USA_M62084_en
WARNING
●Sudden acceleration or regen-
erative braking due to shifting
could cause the vehicle to skid.
●After driving through a puddle,
lightly depress the brake pedal
to make sure that the brakes
are functioning properly. Wet
brake pads may prevent the
brakes from functioning prop-
erly. If the brakes on only one
side are wet and not functioning
properly, steering control may
be affected.
■When shifting the shift posi-
tion
●Do not let the vehicle roll back-
ward while a forward driving
position is selected, or roll for-
ward while the shift position is in
R.
Doing so may result in an acci-
dent or damage to the vehicle.
●Do not shift the shift position to
P while the vehicle is moving.
Doing so can damage the trans-
mission and may result in a loss
of vehicle control.
●Do not shift the shift position to
R while the vehicle is moving
forward.
Doing so can damage the trans-
mission and may result in a loss
of vehicle control.
●Do not shift the shift position to
a driving position while the vehi-
cle is moving backward.
Doing so can damage the trans-
mission and may result in a loss
of vehicle control.
●Changing the shif t position to N
while the vehicle is moving will
disengage the fuel cell system.
Regenerative braking is not
available with the fuel cell sys-
tem disengaged.
●Be careful not to change the
shift position with the accelera-
tor pedal depressed. Changing
the shift position to any posi-
tions other than P or N may lead
to unexpected rapid accelera-
tion of the vehicle that may
cause an acciden t and result in
death or serious injury.
After changing the shift position,
make sure to confirm the cur-
rent shift position displayed on
the shift position indicator inside
the meter.
■If you hear a squealing or
scraping noise (brake pad
wear limit indicators)
Have the brake pads checked and
replaced by your Toyota dealer as
soon as possible.
Rotor damage may result if the
pads are not replaced when
needed.
It is dangerous to drive the vehicle
when the wear limits of the brake
pads and/or those of the brake
discs are exceeded.
■When the vehicle is stopped
●Do not depress the accelerator
pedal unnecessarily.
If the shift position is in any
position other than P or N, the
vehicle may accelerate sud-
denly and unexpectedly, caus-
ing an accident.
●In order to prevent accidents
due to the vehic le rolling away,
always keep depressing the
brake pedal while stopped with
the “READY” indicator is illumi-
nated, and apply the parking
brake as necessary.
Page 167 of 556
1675-1. Before driving
Owners Manual_USA_M62084_en
5
Driving
When the following unusual
operation is performed with the
accelerator pedal depressed,
the fuel cell system output may
be restrained.
• When the shift position is shifted to R
*.
• When the shift position is shifted from P or R to forward
drive shift position such as D
*.
When the system op erates, a mes-
sage appears on the multi-informa-
tion display. Read the message and
follow the instruction.
*: Depending on the situation, the shift position may not be
changed.
■Drive-Start Control (DSC)
●When the TRAC is turned off
( P.316), sudden start restraint
control also does not operate. If
your vehicle have trouble escap-
ing from the mud or fresh snow
due to sudden start restraint con-
trol operation, deactivate TRAC
( P.316) so that the vehicle may
become able to e scape from the
mud or fresh snow.
Cargo capacity depends on the
total weight of the occupants.
(Cargo capacity) = (Total load
capacity) — (Total weight of
occupants)
Steps for Determining Correct
Load Limit —
(1) Locate the statement “The
combined weight of occupants
and cargo should never exceed
XXX kg or XXX lbs.” on your
vehicle’s placard.
(2) Determine the combined
weight of the driver and passen-
gers that will be riding in your
vehicle.
(3) Subtract the combined
weight of the driver and passen-
gers from XXX kg or XXX lbs.
(4) The resulting figure equals
the available amount of cargo
and luggage load capacity.
For example, if the “XXX”
amount equals 1400 lbs. and
there will be five 150 lb passen-
gers in your vehicle, the amount
of available cargo and luggage
load capacity is 650 lbs. (1400 −
NOTICE
If the shift control system is dam-
aged by flooding, it may not be
possible to shift t he shift position
to P, or from P to other positions.
In this case, contact your Toyota
dealer.
Sudden start restraint
control (Drive-Start Con-
trol [DSC])
Cargo and luggage
Take notice of the following
information about storage
precautions, cargo capacity
and load:
Capacity and distribution
Page 172 of 556
1725-2. Driving procedures
Owners Manual_USA_M62084_en
5-2.Driving procedures
1Pull the parking brake switch
to check that the parking
brake is set. ( P.183)
The parking brake indicator will
come on.
2Firmly depress the brake
pedal.
and a message will be dis-
played on the multi-information dis-
play.
If it is not displayed, the fuel cell
system cannot be started.
When the shift position is N, the
fuel cell system cannot start. Shift
the shift position to P when starting
the fuel cell system. ( P.178)
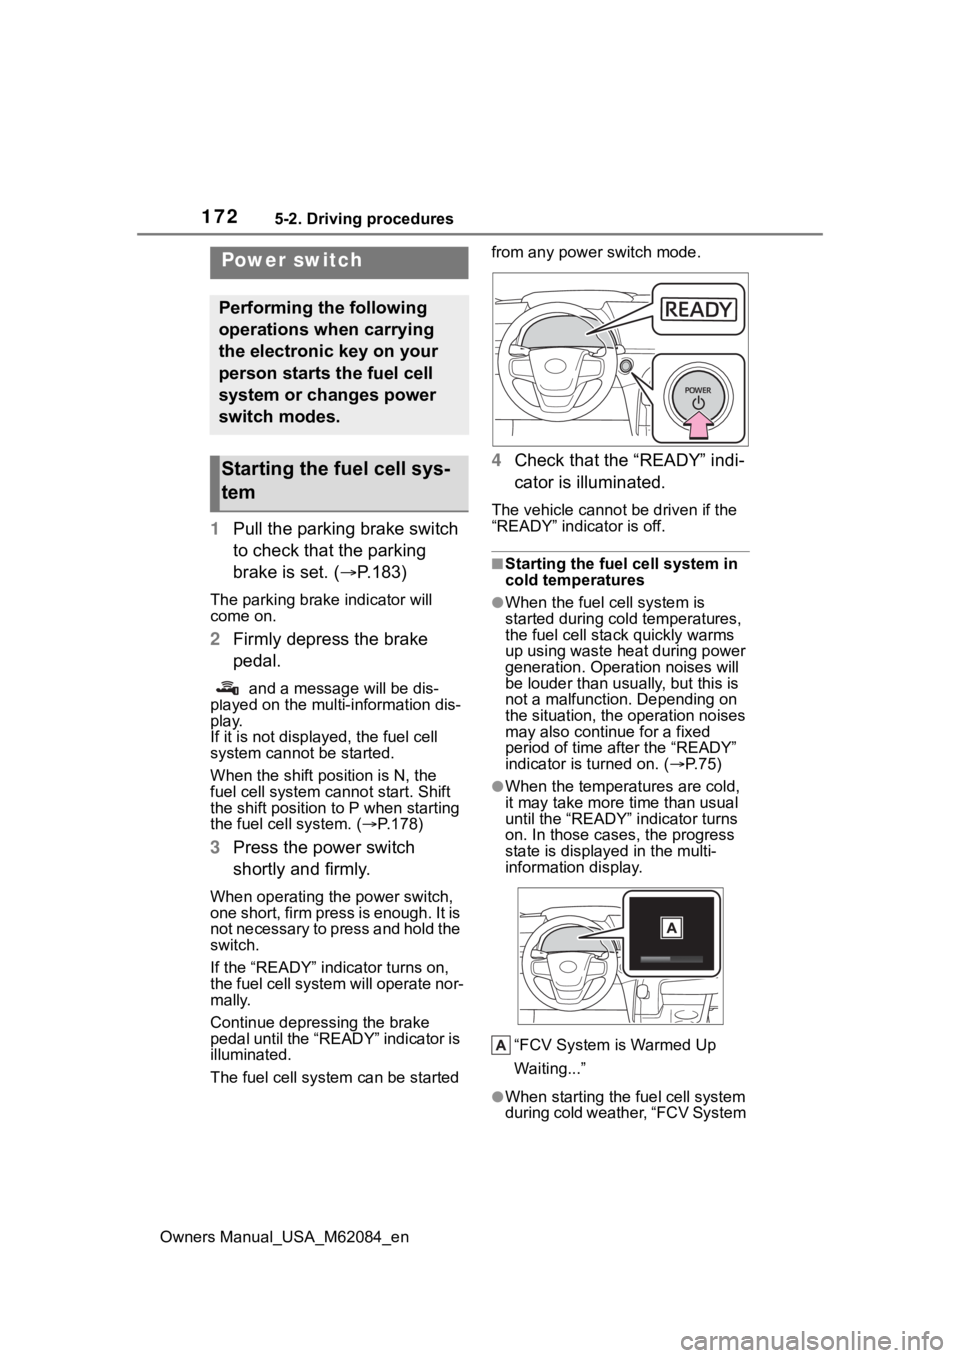
3 Press the power switch
shortly and firmly.
When operating the power switch,
one short, firm press is enough. It is
not necessary to press and hold the
switch.
If the “READY” indicator turns on,
the fuel cell system will operate nor-
mally.
Continue depressing the brake
pedal until the “READY” indicator is
illuminated.
The fuel cell system can be started from any power switch mode.
4
Check that the “READY” indi-
cator is illuminated.
The vehicle cannot be driven if the
“READY” indicator is off.
■Starting the fuel cell system in
cold temperatures
●When the fuel cell system is
started during cold temperatures,
the fuel cell stack quickly warms
up using waste heat during power
generation. Operation noises will
be louder than usually, but this is
not a malfunction. Depending on
the situation, the operation noises
may also continue for a fixed
period of time after the “READY”
indicator is turned on. ( P.75)
●When the temperatures are cold,
it may take more time than usual
until the “READY” indicator turns
on. In those case s, the progress
state is displayed in the multi-
information display.
“FCV System is Warmed Up
Waiting...”
●When starting the fuel cell system
during cold weather, “FCV System
Power switch
Performing the following
operations when carrying
the electronic key on your
person starts the fuel cell
system or changes power
switch modes.
Starting the fuel cell sys-
tem