display TOYOTA PRIUS V 2012 Accessories, Audio & Navigation (in English)
[x] Cancel search | Manufacturer: TOYOTA, Model Year: 2012, Model line: PRIUS V, Model: TOYOTA PRIUS V 2012Pages: 228, PDF Size: 3.73 MB
Page 41 of 228
41
2. DESTINATION SEARCH
2
APPLICATION-“Map”
■ENTER GEO-COORDINATES
1Touch “Enter Geo-coordinates” on
the “Advanced” screen.
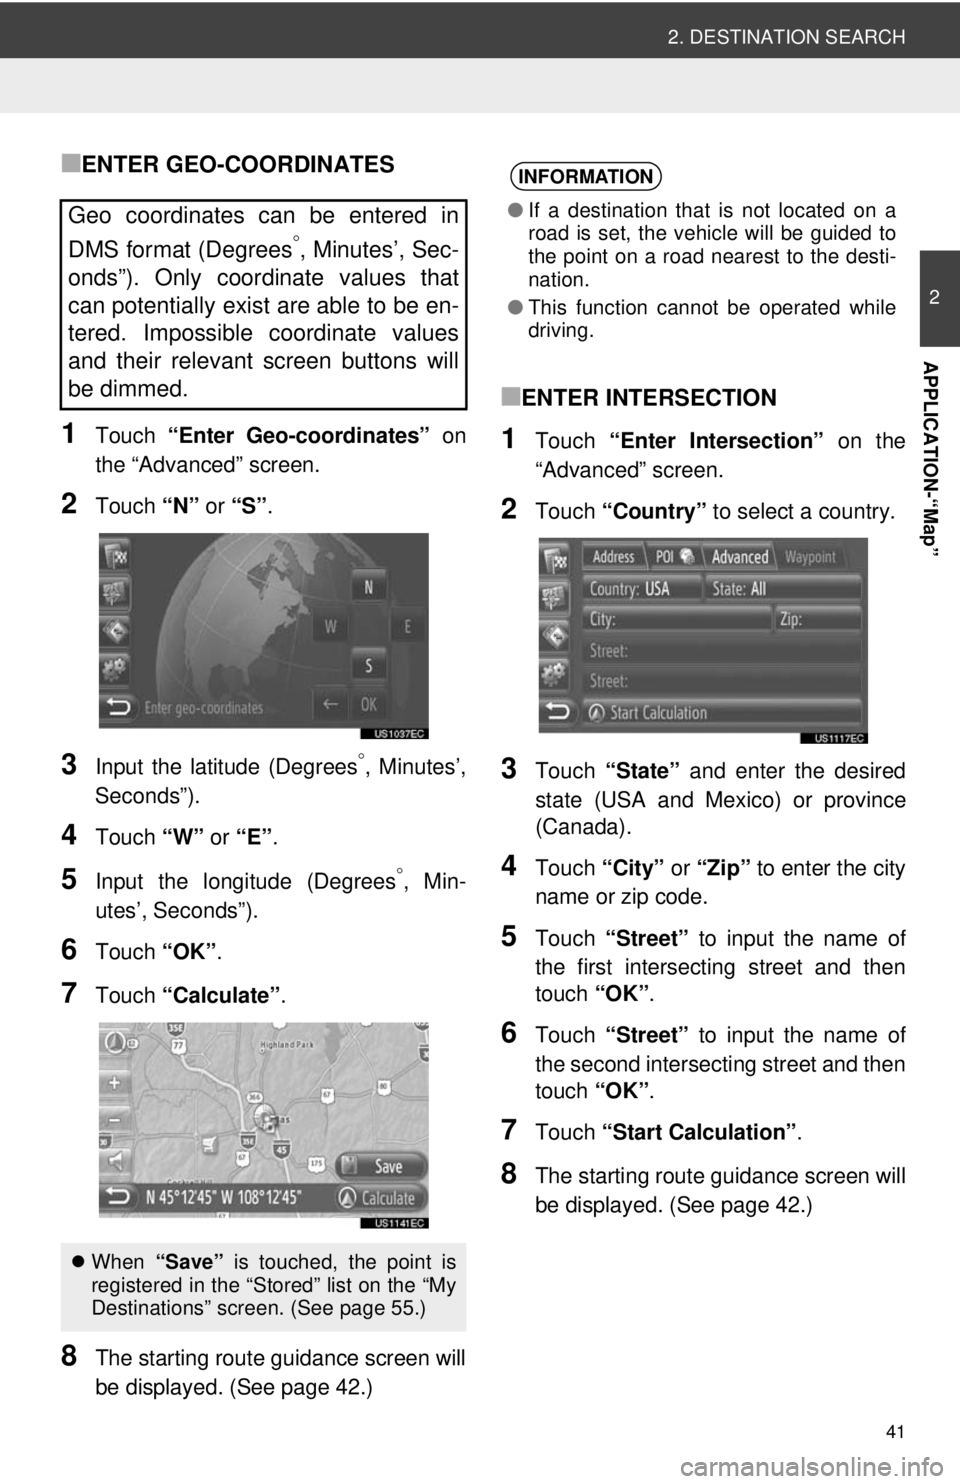
2Touch “N” or “S” .
3Input the latitude (Degrees°, Minutes’,
Seconds”).
4Touch “W” or “E”.
5Input the longitude (Degrees°, Min-
utes’, Seconds”).
6Touch “OK”.
7Touch “Calculate” .
8The starting route guidance screen will
be displayed. (See page 42.)
■ENTER INTERSECTION
1Touch “Enter Intersection” on the
“Advanced” screen.
2Touch “Country” to select a country.
3Touch “State” and enter the desired
state (USA and Mexico) or province
(Canada).
4Touch “City” or “Zip” to enter the city
name or zip code.
5Touch “Street” to input the name of
the first intersecting street and then
touch “OK”.
6Touch “Street” to input the name of
the second intersecting street and then
touch “OK”.
7Touch “Start Calculation” .
8The starting route guidance screen will
be displayed. (See page 42.)
Geo coordinates can be entered in
DMS format (Degrees
°, Minutes’, Sec-
onds”). Only coordinate values that
can potentially exist are able to be en-
tered. Impossible coordinate values
and their relevant screen buttons will
be dimmed.
When “Save” is touched, the point is
registered in the “Stored” list on the “My
Destinations” screen. (See page 55.)
INFORMATION
● If a destination that is not located on a
road is set, the vehicle will be guided to
the point on a road nearest to the desti-
nation.
● This function cannot be operated while
driving.
Page 42 of 228
42
3. ROUTE GUIDANCE
1. STARTING ROUTE GUIDANCE
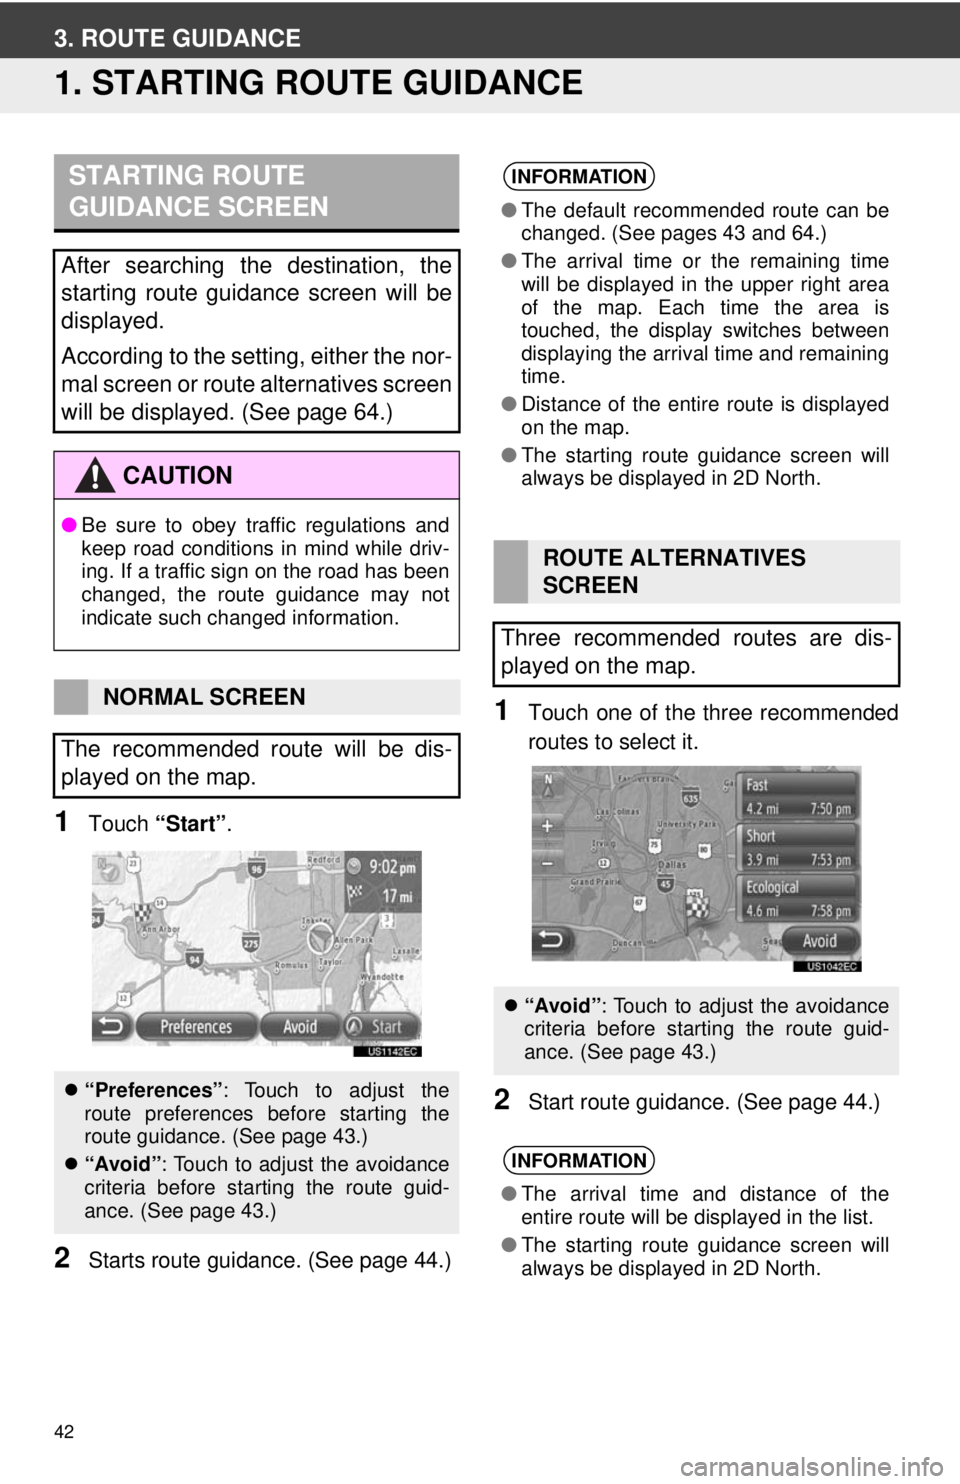
1Touch “Start” .
2Starts route guidan ce. (See page 44.)
1Touch one of the three recommended
routes to select it.
2Start route guidance. (See page 44.)
STARTING ROUTE
GUIDANCE SCREEN
After searching the destination, the
starting route guidance screen will be
displayed.
According to the setting, either the nor-
mal screen or route alternatives screen
will be displayed. (See page 64.)
CAUTION
●Be sure to obey traffic regulations and
keep road conditions in mind while driv-
ing. If a traffic sign on the road has been
changed, the route guidance may not
indicate such changed information.
NORMAL SCREEN
The recommended route will be dis-
played on the map.
“Preferences” : Touch to adjust the
route preferences before starting the
route guidance. (See page 43.)
“Avoid”: Touch to adjust the avoidance
criteria before starting the route guid-
ance. (See page 43.)
INFORMATION
●The default recommended route can be
changed. (See pages 43 and 64.)
● The arrival time or the remaining time
will be displayed in the upper right area
of the map. Each time the area is
touched, the display switches between
displaying the arrival time and remaining
time.
● Distance of the entire route is displayed
on the map.
● The starting route guidance screen will
always be displayed in 2D North.
ROUTE ALTERNATIVES
SCREEN
Three recommended routes are dis-
played on the map.
“Avoid”: Touch to adjust the avoidance
criteria before starting the route guid-
ance. (See page 43.)
INFORMATION
●The arrival time and distance of the
entire route will be displayed in the list.
● The starting route guidance screen will
always be displayed in 2D North.
Page 44 of 228
44
3. ROUTE GUIDANCE
2. ROUTE GUIDANCE
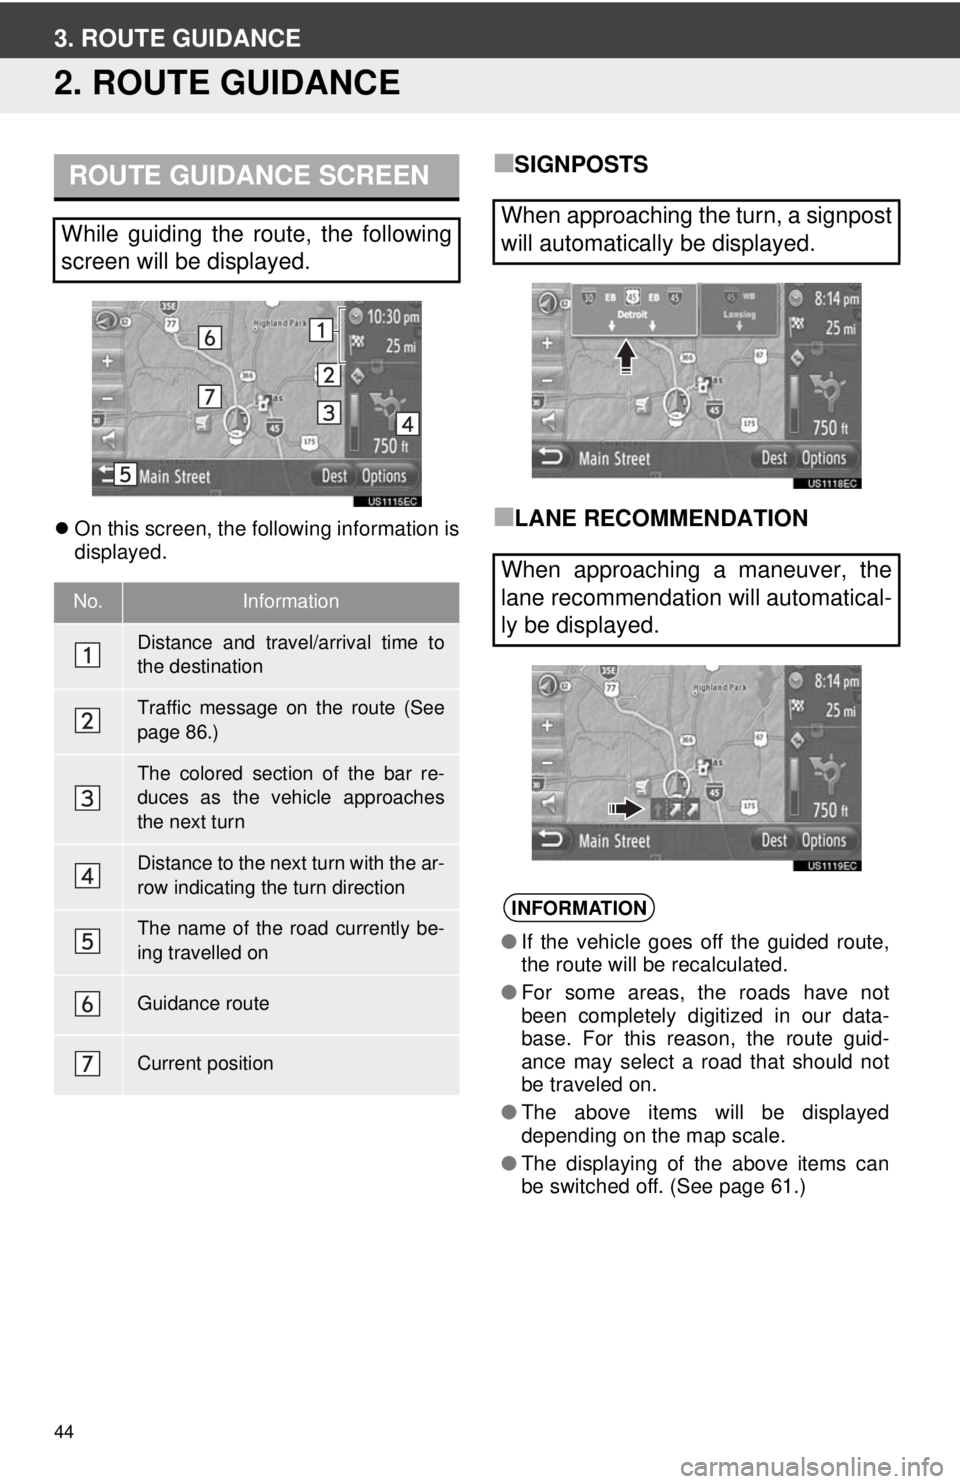
On this screen, the following information is
displayed.
■SIGNPOSTS
■LANE RECOMMENDATION
ROUTE GUIDANCE SCREEN
While guiding the route, the following
screen will be displayed.
No.Information
Distance and travel/arrival time to
the destination
Traffic message on the route (See
page 86.)
The colored section of the bar re-
duces as the vehicle approaches
the next turn
Distance to the next turn with the ar-
row indicating the turn direction
The name of the road currently be-
ing travelled on
Guidance route
Current position
When approaching the turn, a signpost
will automatically be displayed.
When approaching a maneuver, the
lane recommendation will automatical-
ly be displayed.
INFORMATION
●If the vehicle goes off the guided route,
the route will be recalculated.
● For some areas, the roads have not
been completely digitized in our data-
base. For this reason, the route guid-
ance may select a road that should not
be traveled on.
● The above items will be displayed
depending on the map scale.
● The displaying of the above items can
be switched off. (See page 61.)
Page 46 of 228
46
3. ROUTE GUIDANCE
3. SETTING AND DELETING THE ROUTE
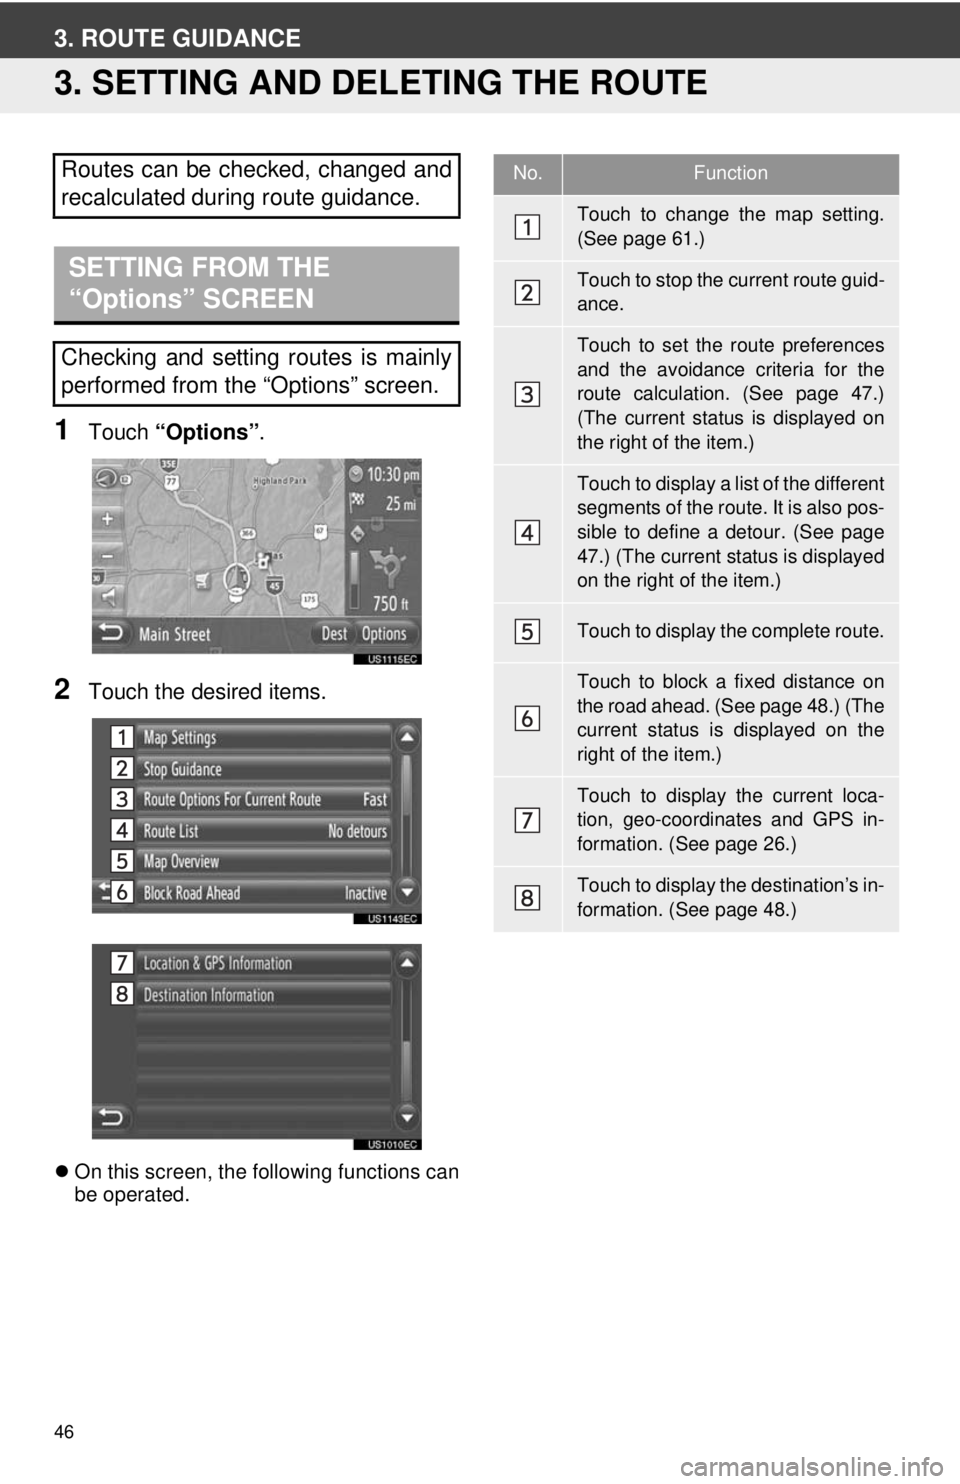
1Touch “Options”.
2Touch the desired items.
On this screen, the following functions can
be operated.
Routes can be checked, changed and
recalculated during route guidance.
SETTING FROM THE
“Options” SCREEN
Checking and setting routes is mainly
performed from the “Options” screen.
No.Function
Touch to change the map setting.
(See page 61.)
Touch to stop the current route guid-
ance.
Touch to set the route preferences
and the avoidance criteria for the
route calculation. (See page 47.)
(The current status is displayed on
the right of the item.)
Touch to display a list of the different
segments of the route. It is also pos-
sible to define a detour. (See page
47.) (The current status is displayed
on the right of the item.)
Touch to display the complete route.
Touch to block a fixed distance on
the road ahead. (See page 48.) (The
current status is displayed on the
right of the item.)
Touch to display the current loca-
tion, geo-coordinates and GPS in-
formation. (See page 26.)
Touch to display the destination’s in-
formation. (See page 48.)
Page 47 of 228
47
3. ROUTE GUIDANCE
2
APPLICATION-“Map”
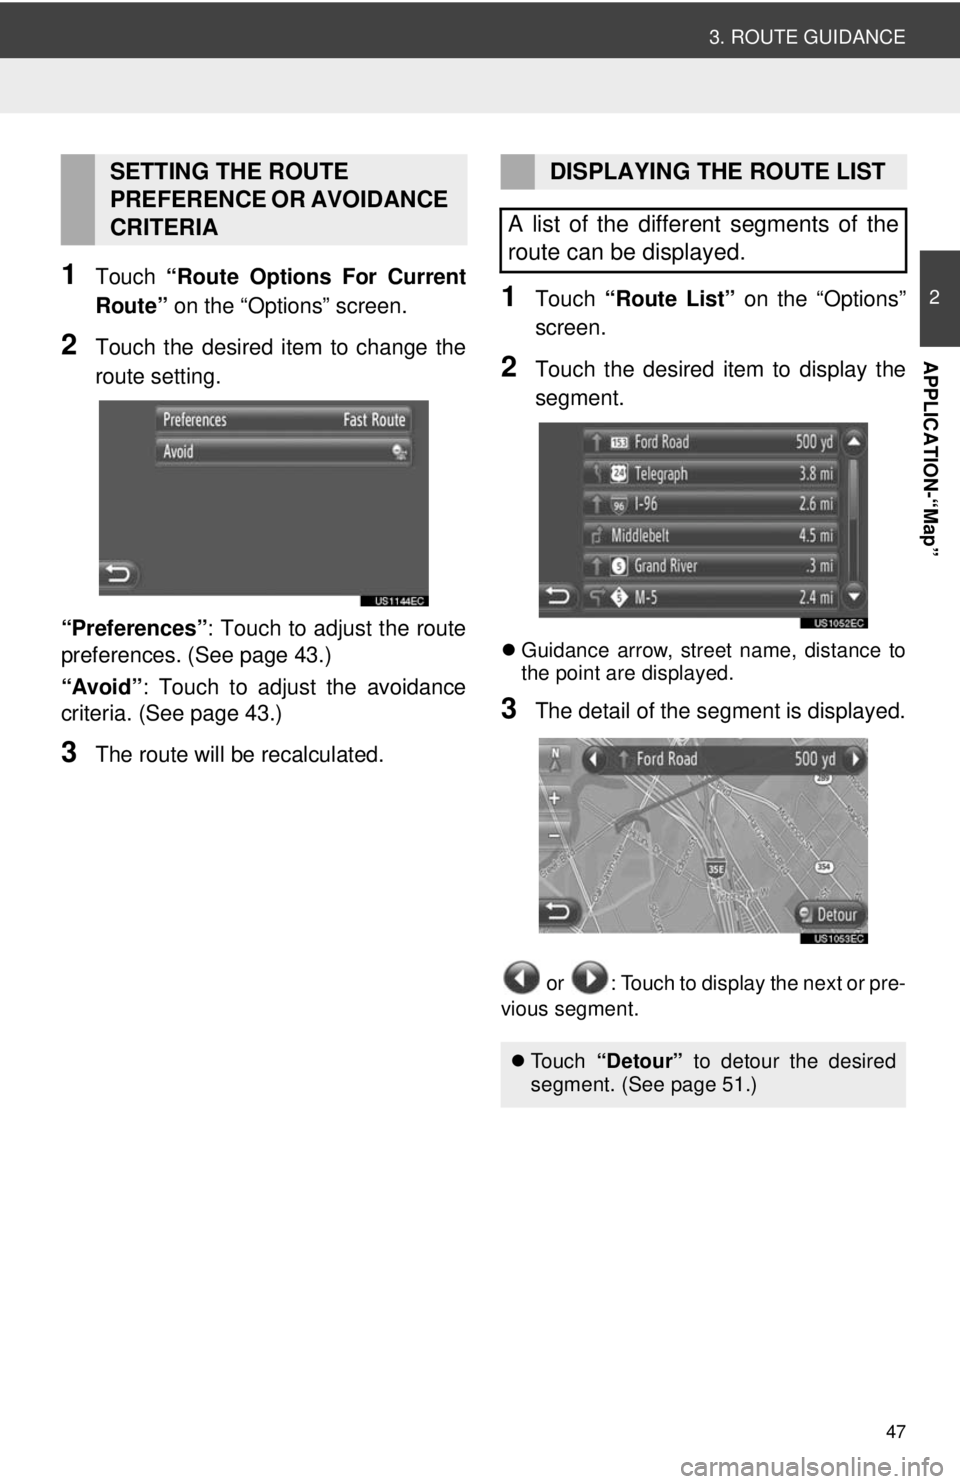
1Touch “Route Options For Current
Route” on the “Options” screen.
2Touch the desired item to change the
route setting.
“Preferences” : Touch to adjust the route
preferences. (See page 43.)
“Avoid”: Touch to adjust the avoidance
criteria. (See page 43.)
3The route will be recalculated.
1Touch “Route List” on the “Options”
screen.
2Touch the desired item to display the
segment.
Guidance arrow, street name, distance to
the point are displayed.
3The detail of the segment is displayed.
or : Touch to display the next or pre-
vious segment.
SETTING THE ROUTE
PREFERENCE OR AVOIDANCE
CRITERIADISPLAYING THE ROUTE LIST
A list of the different segments of the
route can be displayed.
To u c h “Detour” to detour the desired
segment. (See page 51.)
Page 48 of 228
48
3. ROUTE GUIDANCE
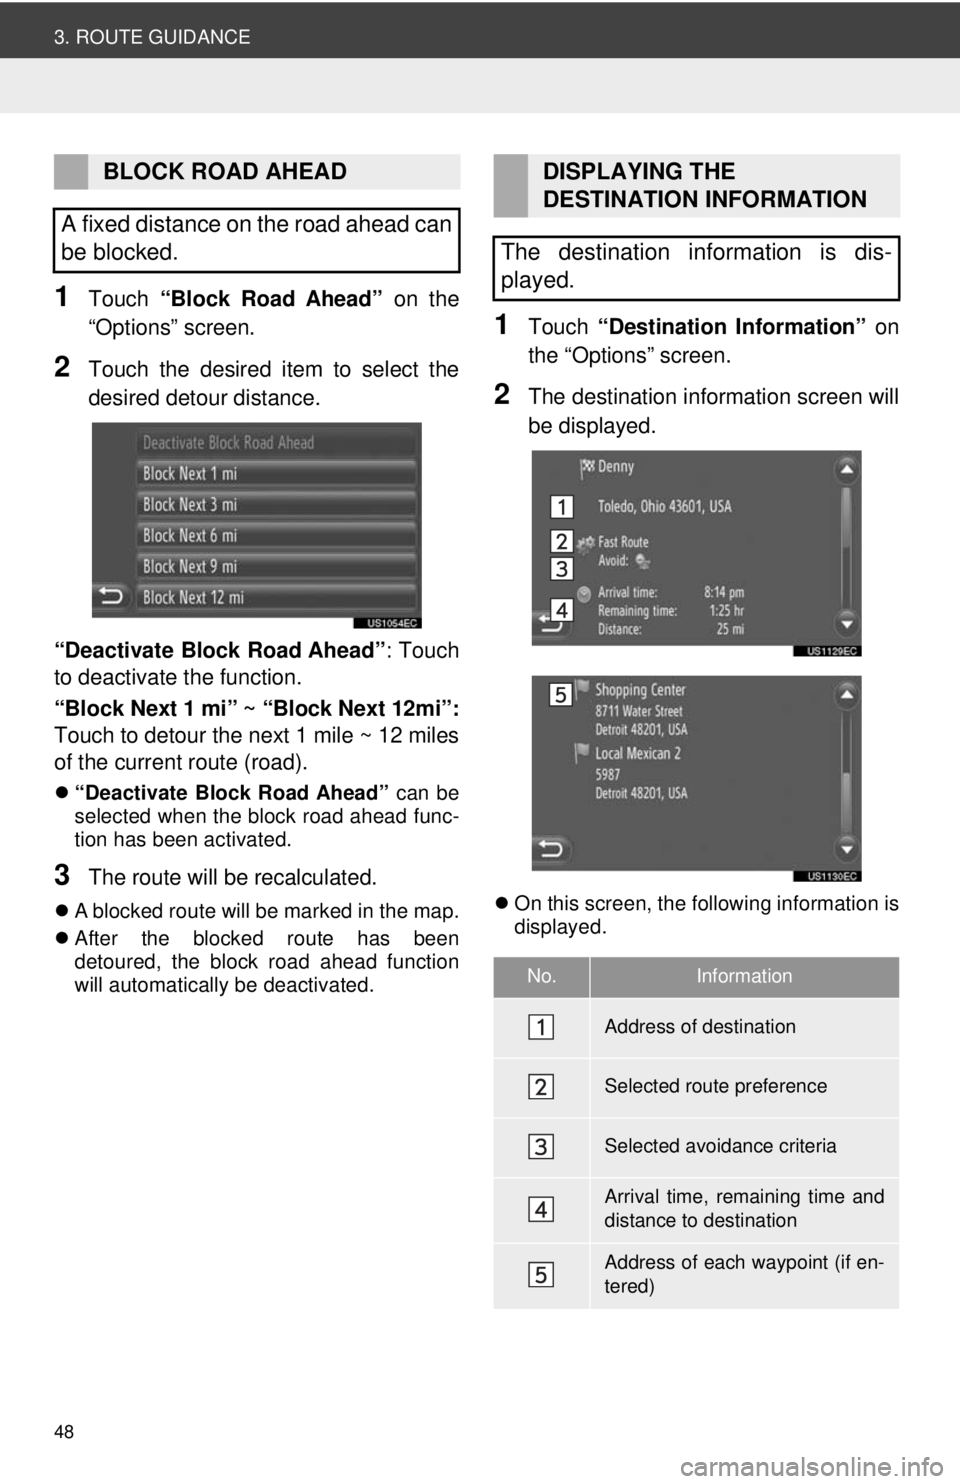
1Touch “Block Road Ahead” on the
“Options” screen.
2Touch the desired item to select the
desired detour distance.
“Deactivate Block Road Ahead” : Touch
to deactivate the function.
“Block Next 1 mi” ~ “Block Next 12mi”:
Touch to detour the next 1 mile ~ 12 miles
of the current route (road).
“Deactivate Block Road Ahead” can be
selected when the block road ahead func-
tion has been activated.
3The route will be recalculated.
A blocked route will be marked in the map.
After the blocked route has been
detoured, the block road ahead function
will automatically be deactivated.
1Touch “Destination Information” on
the “Options” screen.
2The destination information screen will
be displayed.
On this screen, the following information is
displayed.
BLOCK ROAD AHEAD
A fixed distance on the road ahead can
be blocked.DISPLAYING THE
DESTINATION INFORMATION
The destination information is dis-
played.
No.Information
Address of destination
Selected route preference
Selected avoidance criteria
Arrival time, remaining time and
distance to destination
Address of each waypoint (if en-
tered)
Page 50 of 228
50
3. ROUTE GUIDANCE
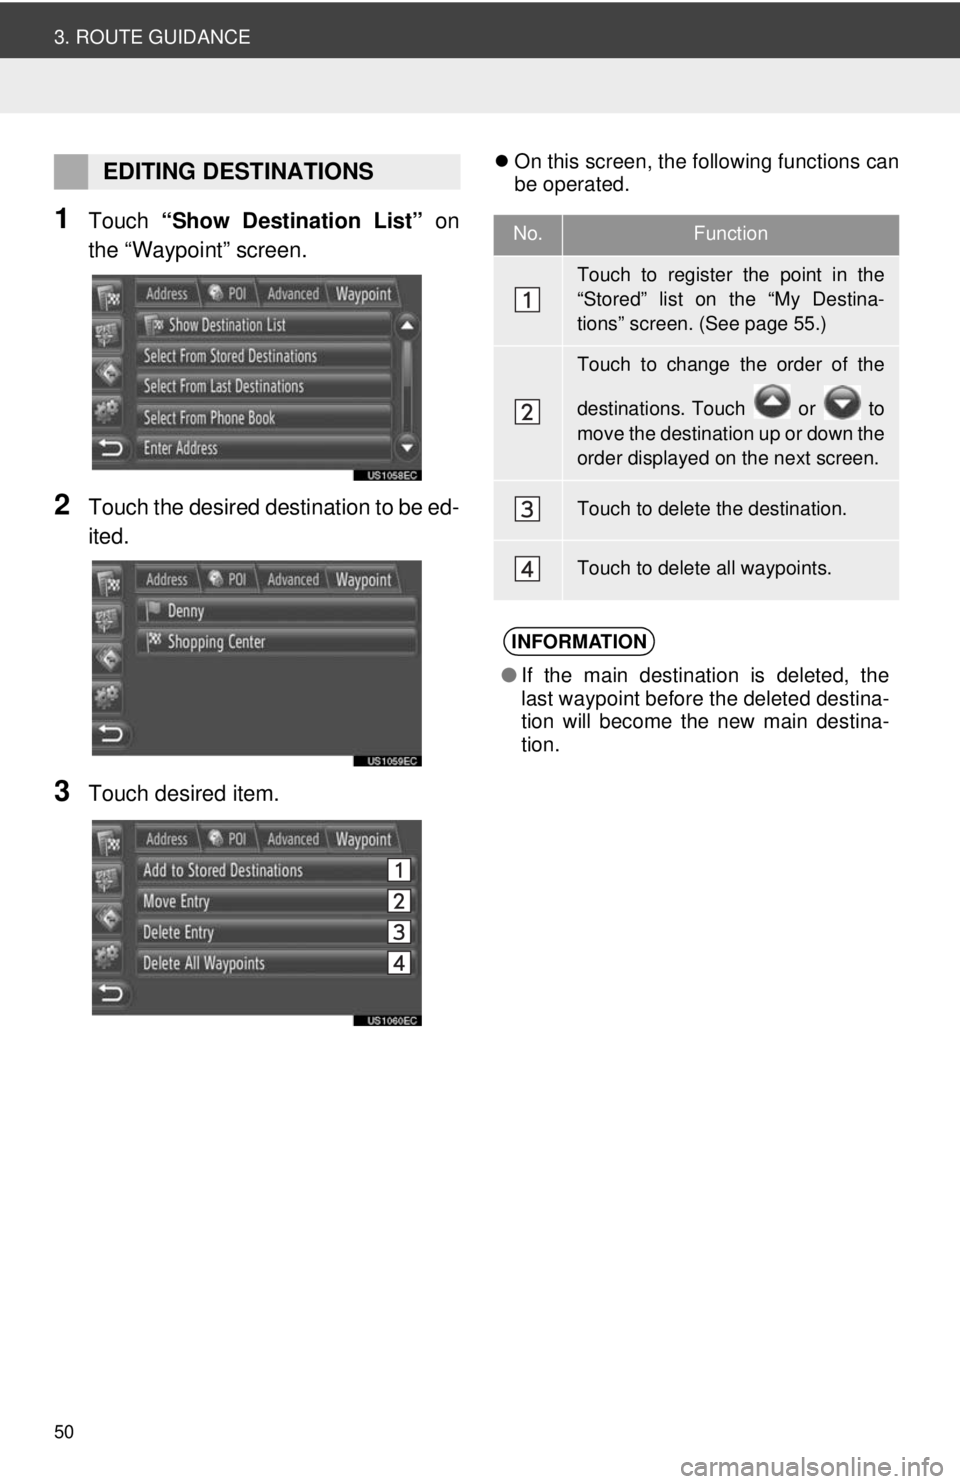
1Touch “Show Destination List” on
the “Waypoint” screen.
2Touch the desired destination to be ed-
ited.
3Touch desired item.
On this screen, the following functions can
be operated.EDITING DESTINATIONS
No.Function
Touch to register the point in the
“Stored” list on the “My Destina-
tions” screen. (See page 55.)
Touch to change the order of the
destinations. Touch or to
move the destination up or down the
order displayed on the next screen.
Touch to delete the destination.
Touch to delete all waypoints.
INFORMATION
●If the main destination is deleted, the
last waypoint before the deleted destina-
tion will become the new main destina-
tion.
Page 51 of 228
51
3. ROUTE GUIDANCE
2
APPLICATION-“Map”
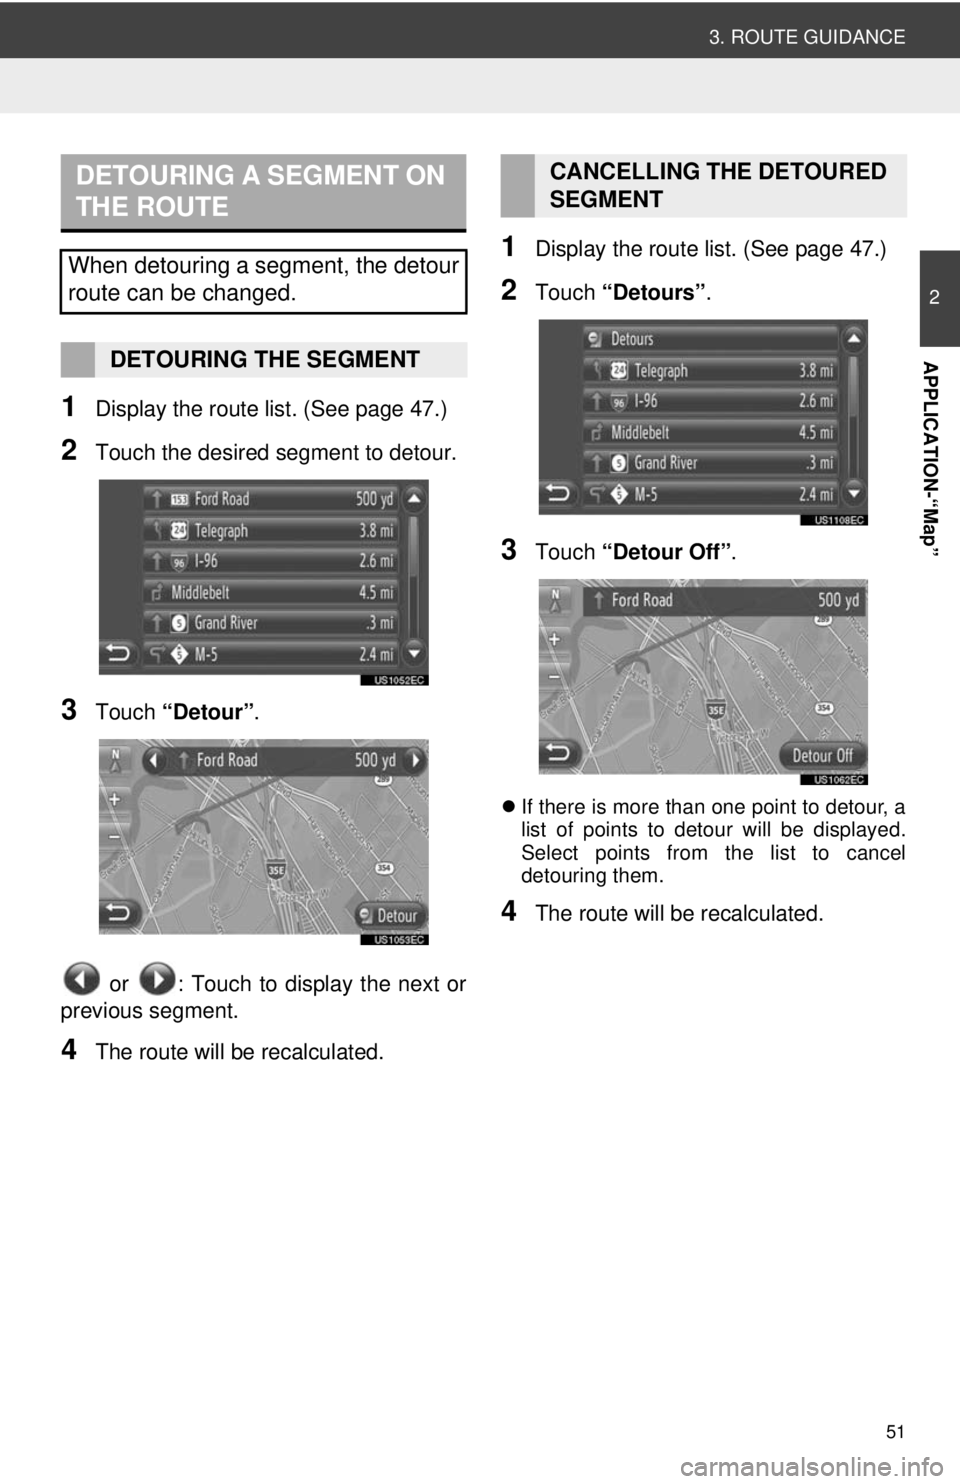
1Display the route list. (See page 47.)
2Touch the desired segment to detour.
3Touch “Detour” .
or : Touch to display the next or
previous segment.
4The route will be recalculated.
1Display the route list. (See page 47.)
2Touch “Detours” .
3Touch “Detour Off” .
If there is more than one point to detour, a
list of points to detour will be displayed.
Select points from the list to cancel
detouring them.
4The route will be recalculated.
DETOURING A SEGMENT ON
THE ROUTE
When detouring a segment, the detour
route can be changed.
DETOURING THE SEGMENT
CANCELLING THE DETOURED
SEGMENT
Page 52 of 228
52
4. MY DESTINATIONS
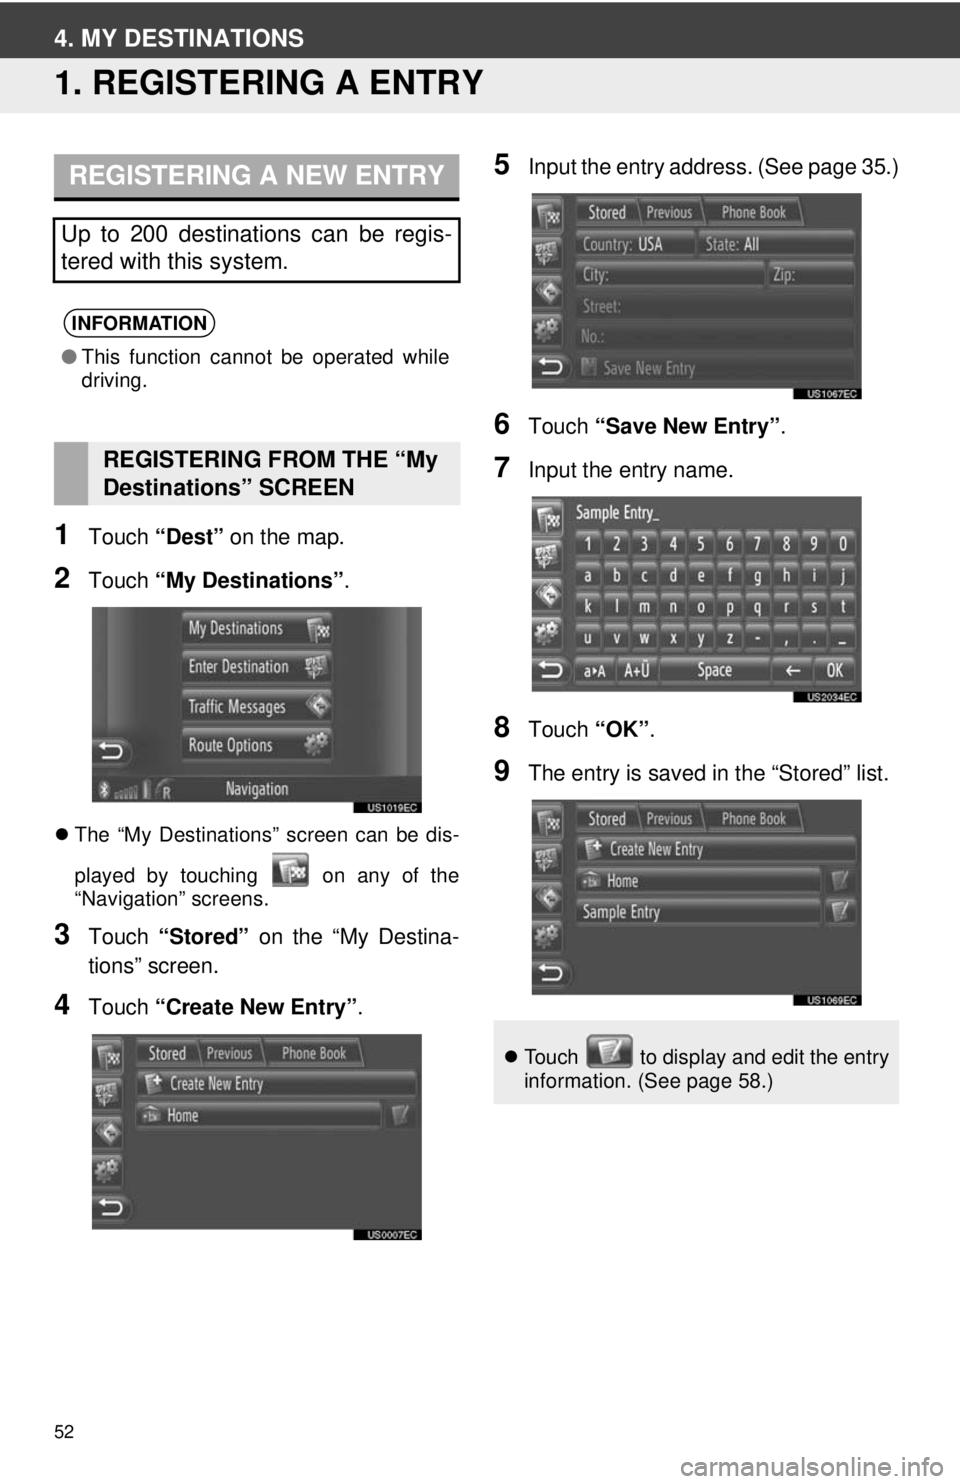
1. REGISTERING A ENTRY
1Touch “Dest” on the map.
2Touch “My Destinations”.
The “My Destinations” screen can be dis-
played by touching on any of the
“Navigation” screens.
3Touch “Stored” on the “My Destina-
tions” screen.
4Touch “Create New Entry” .
5Input the entry address. (See page 35.)
6Touch “Save New Entry” .
7Input the entry name.
8Touch “OK”.
9The entry is saved in the “Stored” list.
REGISTERING A NEW ENTRY
Up to 200 destinations can be regis-
tered with this system.
INFORMATION
●This function cannot be operated while
driving.
REGISTERING FROM THE “My
Destinations” SCREEN
Touch to display and edit the entry
information. (See page 58.)
Page 53 of 228
53
4. MY DESTINATIONS
2
APPLICATION-“Map”
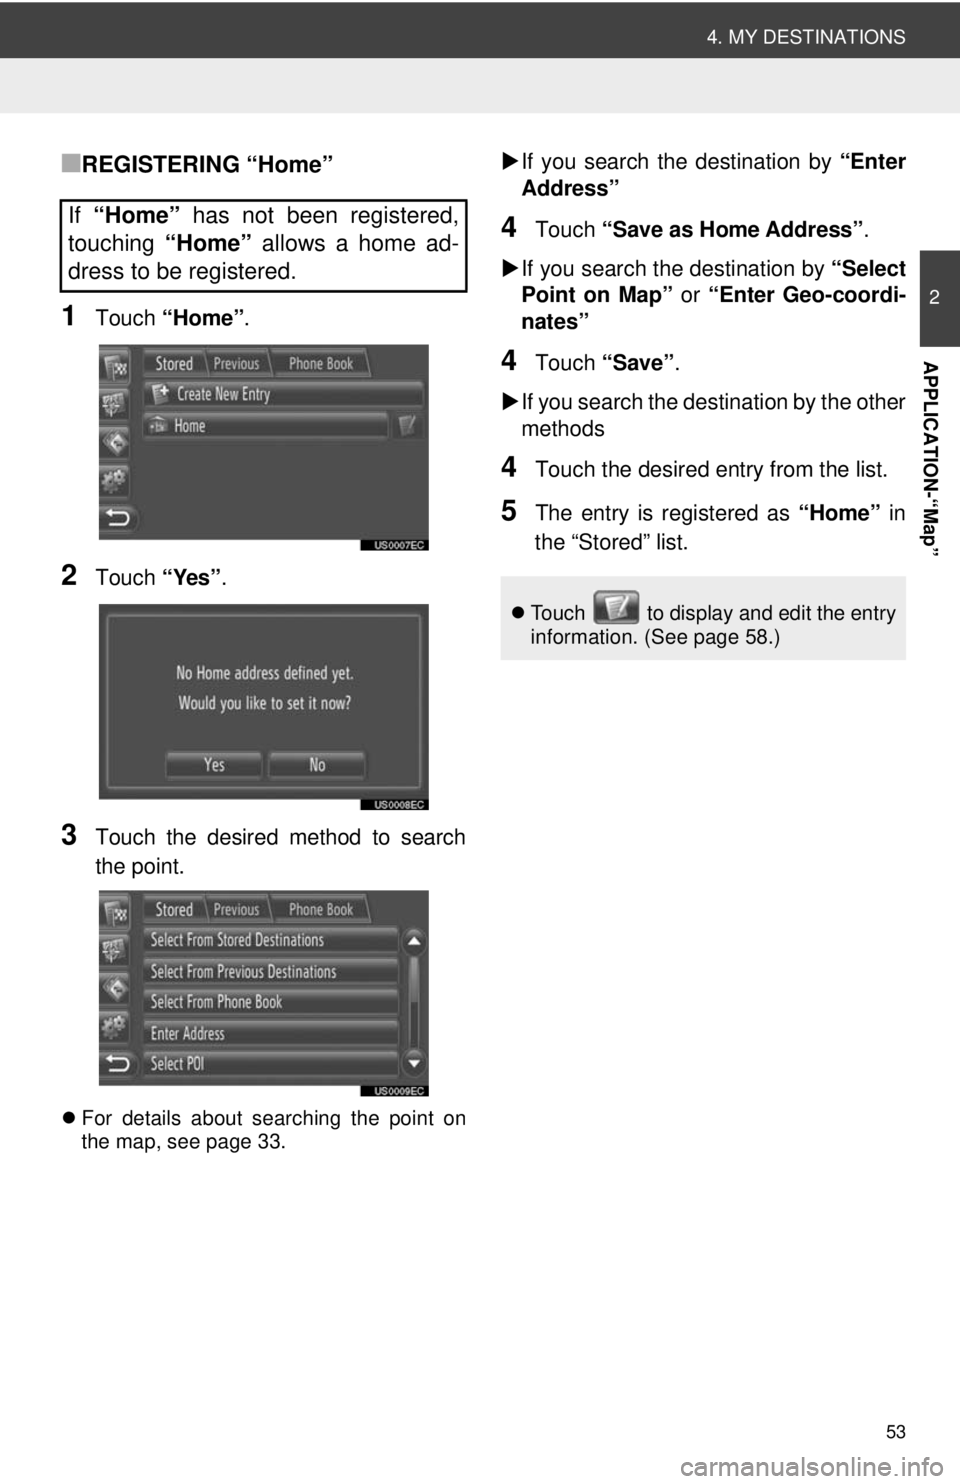
■REGISTERING “Home”
1Touch “Home” .
2Touch “Yes”.
3Touch the desired method to search
the point.
For details about searching the point on
the map, see page 33.
If you search the destination by “Enter
Address”
4Touch “Save as Home Address” .
If you search the destination by “Select
Point on Map” or “Enter Geo-coordi-
nates”
4Touch “Save” .
If you search the destination by the other
methods
4Touch the desired entry from the list.
5The entry is registered as “Home” in
the “Stored” list.
If “Home” has not been registered,
touching “Home” allows a home ad-
dress to be registered.
Touch to display and edit the entry
information. (See page 58.)