display TOYOTA PRIUS V 2012 Accessories, Audio & Navigation (in English)
[x] Cancel search | Manufacturer: TOYOTA, Model Year: 2012, Model line: PRIUS V, Model: TOYOTA PRIUS V 2012Pages: 228, PDF Size: 3.73 MB
Page 93 of 228
93
3
APPLICATION-THE OTHERS
2. ENTUNE SERVICE
3. OPERATING AN APPLICATION USING ENTUNE SERVICE
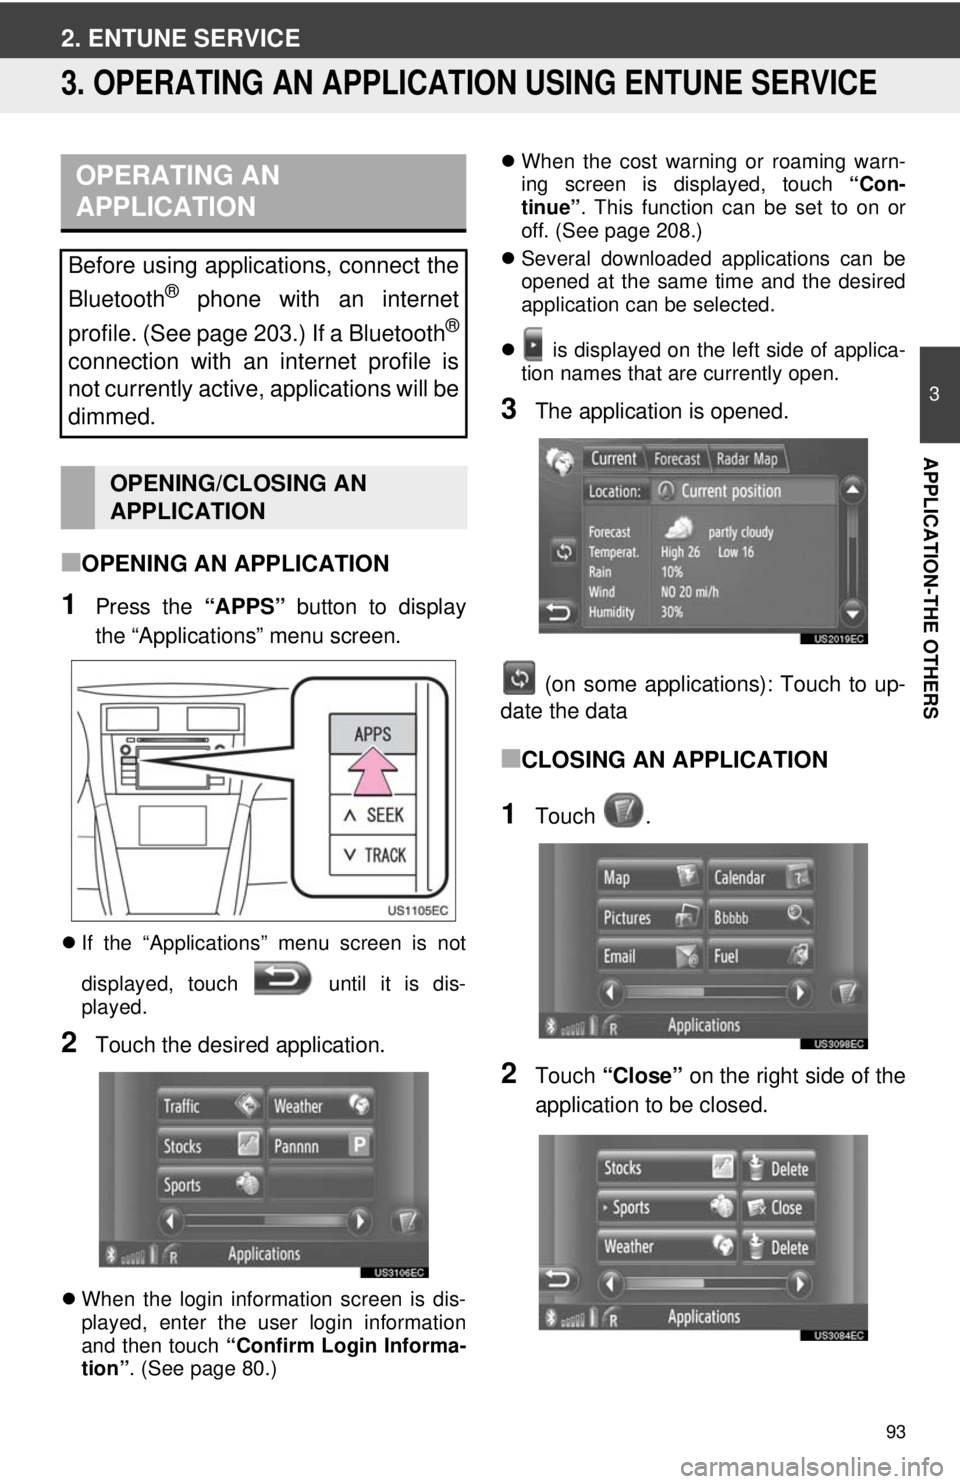
■OPENING AN APPLICATION
1Press the “APPS” button to display
the “Applications” menu screen.
If the “Applications” menu screen is not
displayed, touch until it is dis-
played.
2Touch the desired application.
When the login information screen is dis-
played, enter the user login information
and then touch “Confirm Login Informa-
tion” . (See page 80.)
When the cost warning or roaming warn-
ing screen is displayed, touch “Con-
tinue” . This function can be set to on or
off. (See page 208.)
Several downloaded applications can be
opened at the same time and the desired
application can be selected.
is displayed on the left side of applica-
tion names that are currently open.
3The application is opened.
(on some applications): Touch to up-
date the data
■CLOSING AN APPLICATION
1Touch .
2Touch “Close” on the right side of the
application to be closed.
OPERATING AN
APPLICATION
Before using applications, connect the
Bluetooth
® phone with an internet
profile. (See page 203.) If a Bluetooth
®
connection with an internet profile is
not currently active, applications will be
dimmed.
OPENING/CLOSING AN
APPLICATION
Page 94 of 228
94
2. ENTUNE SERVICE
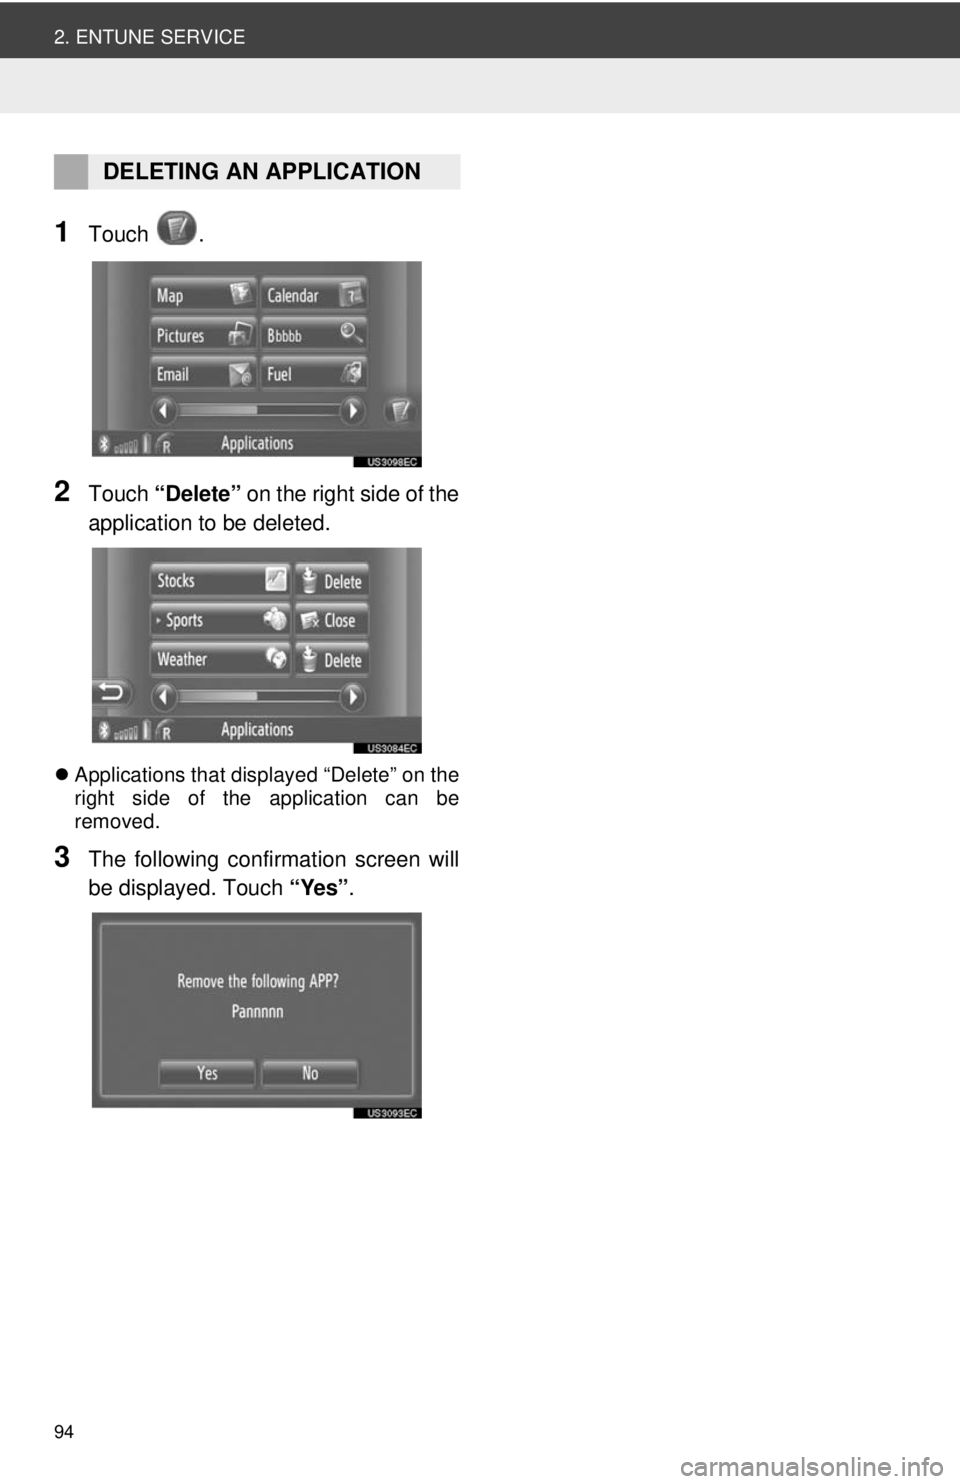
1Touch .
2Touch “Delete” on the right side of the
application to be deleted.
Applications that displayed “Delete” on the
right side of the application can be
removed.
3The following confirmation screen will
be displayed. Touch “Yes”.
DELETING AN APPLICATION
Page 95 of 228
95
2. ENTUNE SERVICE
3
APPLICATION-THE OTHERS
∗: Bluetooth is a registered trademark of Bluetooth SIG, Inc.
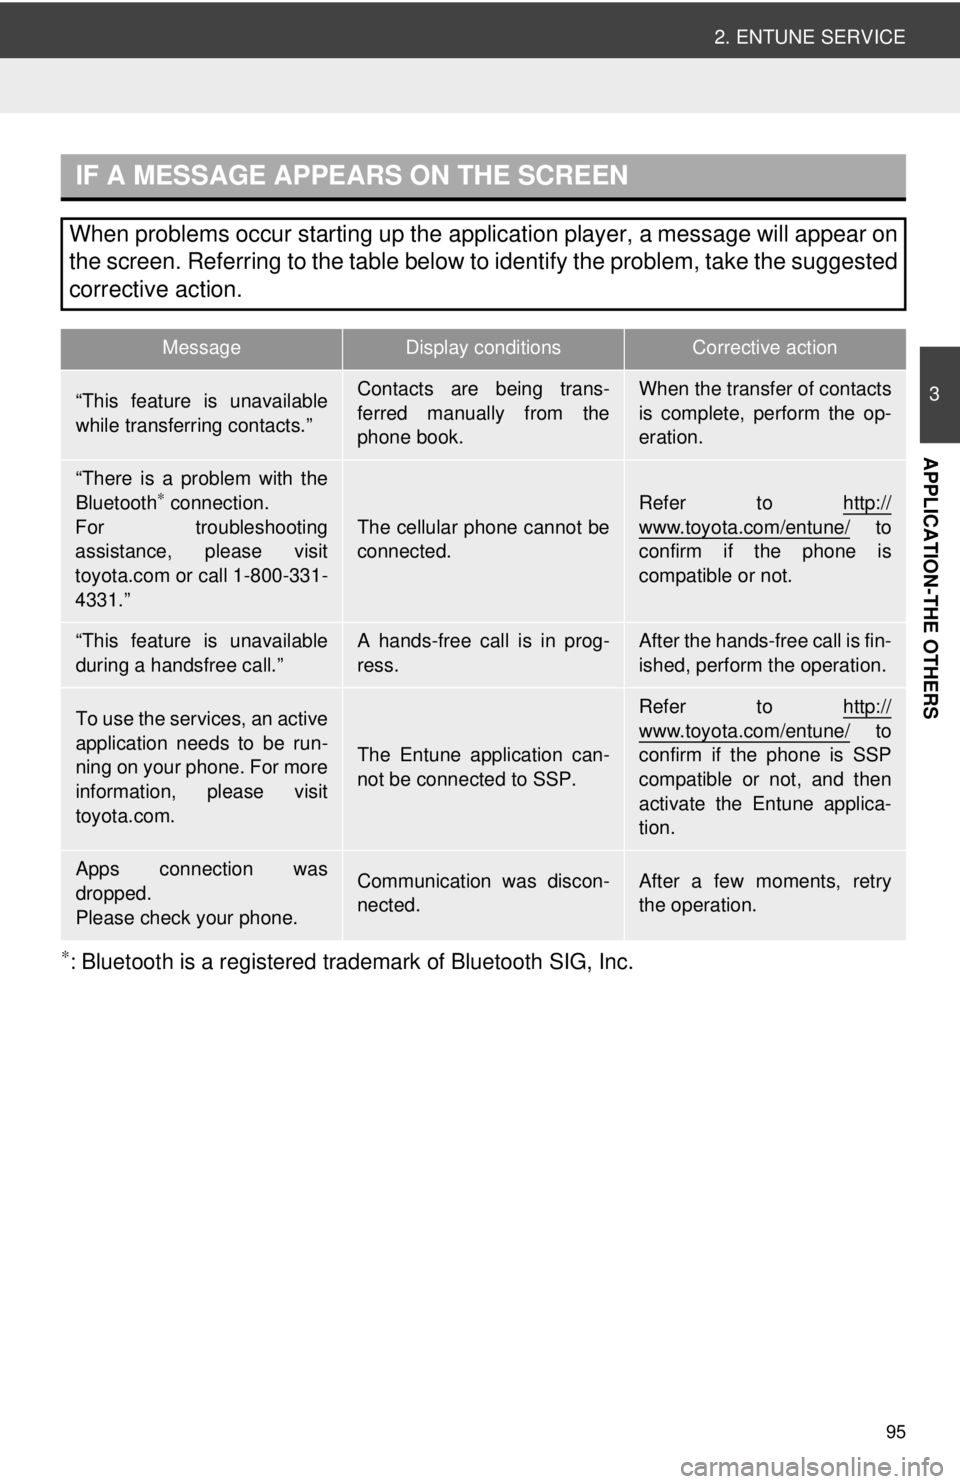
IF A MESSAGE APPEARS ON THE SCREEN
When problems occur starting up the application player, a message will appear on
the screen. Referring to the table below to identify the problem, take the suggested
corrective action.
MessageDisplay conditionsCorrective action
“This feature is unavailable
while transferring contacts.”Contacts are being trans-
ferred manually from the
phone book.When the transfer of contacts
is complete, perform the op-
eration.
“There is a problem with the
Bluetooth∗ connection.
For troubleshooting
assistance, please visit
toyota.com or call 1-800-331-
4331.”
The cellular phone cannot be
connected.
Refer to http://
www.toyota.com/entune/ to
confirm if the phone is
compatible or not.
“This feature is unavailable
during a handsfree call.”A hands-free call is in prog-
ress.After the hands-free call is fin-
ished, perform the operation.
To use the services, an active
application needs to be run-
ning on your phone. For more
information, please visit
toyota.com.
The Entune application can-
not be connected to SSP.
Refer to http://www.toyota.com/entune/ to
confirm if the phone is SSP
compatible or not, and then
activate the Entune applica-
tion.
Apps connection was
dropped.
Please check your phone.Communication was discon-
nected.After a few moments, retry
the operation.
Page 99 of 228
4
99
1
2
3
4
5
6
7
8
9
4. RADIO OPERATION(XM® Satellite Radio
BROADCAST) ........... ................ 112
HOW TO SUBSCRIBE TO AN
XM® Satellite Radio .......................... 112
DISPLAYING THE RADIO ID .............. 112
SWITCHING TO SATELLITE RADIO MODE ............................................... 113
CHANNEL CATEGORY ...................... 113
PRESETTING A CHANNEL ................ 113
SELECTING A CHANNEL ................... 114
DISPLAYING THE TITLE AND NAME ....................................... 114
IF THE SATELLITE RADIO TUNER MALFUNCTIONS .............................. 115
5. CD PLAYER OPERATION .......... 117
INSERTING OR EJECTING A DISC ... 117
SWITCHING TO CD MODE ................ 118
PLAYING AN AUDIO CD .................... 118
PLAYING A MP3/WMA DISC .............. 120
6. USB MEMORY/iPod OPERATION .............................. 123
CONNECTING A USB
MEMORY OR iPod ........................... 123
SWITCHING TO USB OR iPod MODE ........................ 124
PLAYING A USB MEMORY OR iPod ........................... 124
7. AUX DEVICE OPERATION......... 130
CONNECTING A PORTABLE AUDIO DEVICE ................................. 130
SWITCHING TO AUX MODE .............. 131
PLAYING A PORTABLE AUDIO DEVICE ................................. 131
8. Bluetooth® AUDIO
OPERATION ............................. 132
SWITCHING TO Bluetooth®
AUDIO MODE ................................... 133
CONNECTING Bluetooth
® AUDIO ...... 134
PLAYING Bluetooth® AUDIO ............... 137
9. STEERING SWITCHES............... 141
STEERING SWITCHES (WITH TWO DIRECTION
STEERING SWITCH) ........................ 141
STEERING SWITCHES (WITH FOUR DIRECTION
STEERING SWITCH) ........................ 142
10. AUDIO SYSTEM OPERATING HINTS.................. 144
RADIO RECEPTION............................ 144
iPod ...................................................... 145
USB MEMORY .................................... 146
CARING FOR YOUR CD PLAYER
AND DISCS ....................................... 146
MP3/WMA FILES ................................. 148
CD-R AND CD-RW DISCS .................. 149
TERMS ................................................ 150
Gracenote
®.......................................... 151
AUDIO SYSTEM
Page 100 of 228
100
1. AUDIO SYSTEM OPERATION
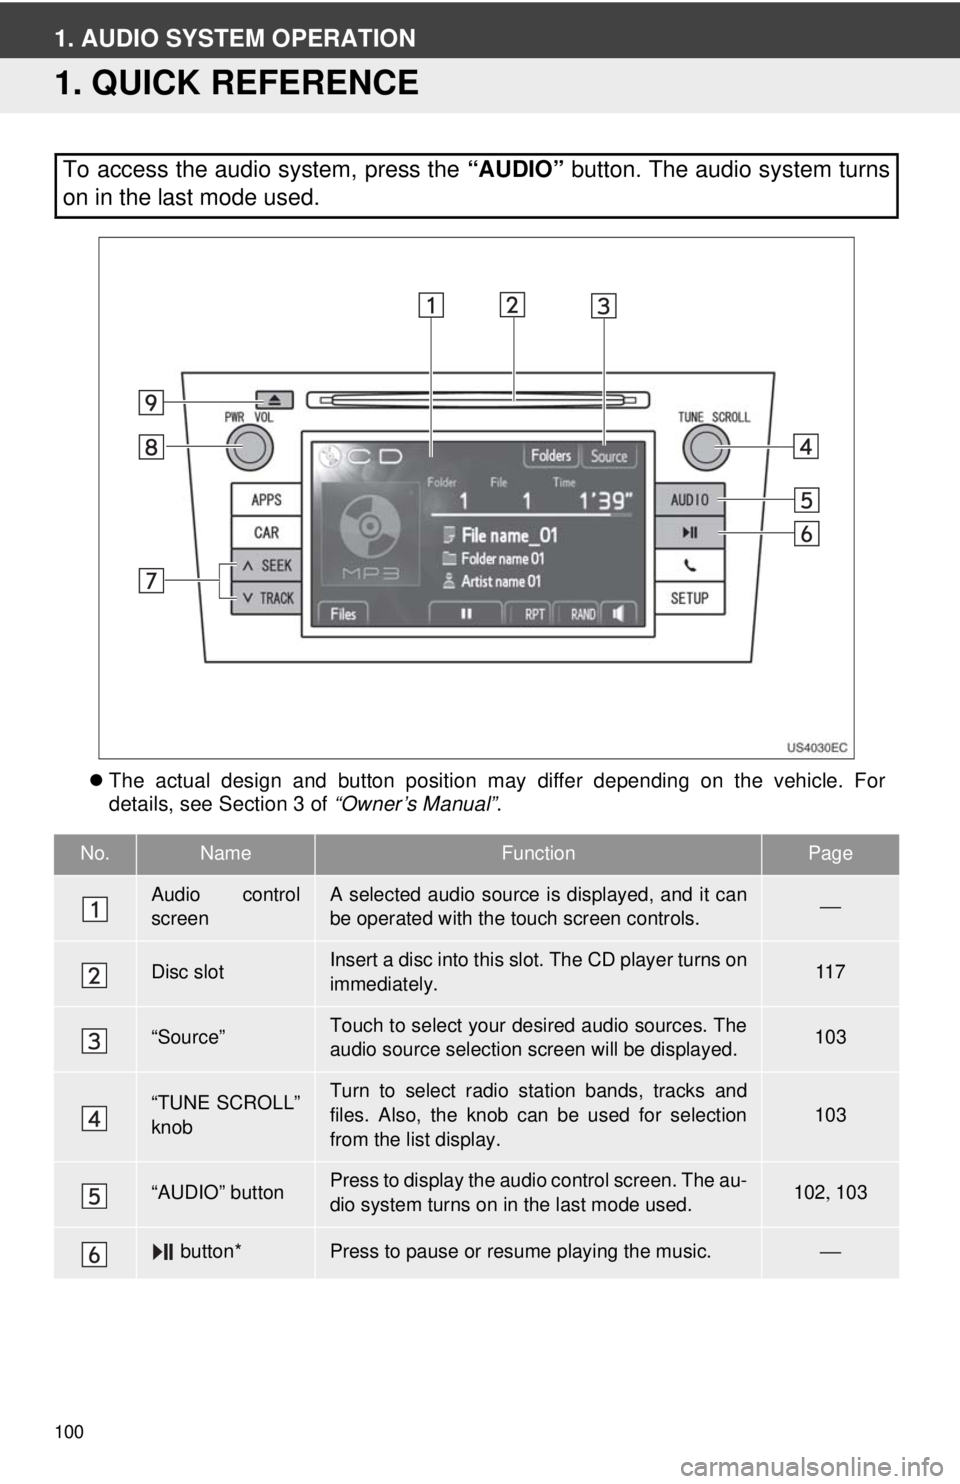
1. QUICK REFERENCE
The actual design and button position may differ depending on the vehicle. For
details, see Section 3 of “Owner’s Manual”.
To access the audio system, press the “AUDIO” button. The audio system turns
on in the last mode used.
No.NameFunctionPage
Audio control
screenA selected audio source is displayed, and it can
be operated with the touch screen controls.⎯
Disc slotInsert a disc into this slot. The CD player turns on
immediately.11 7
“Source”Touch to select your desired audio sources. The
audio source selection screen will be displayed.103
“TUNE SCROLL”
knobTurn to select radio station bands, tracks and
files. Also, the knob can be used for selection
from the list display.
103
“AUDIO” buttonPress to display the audio control screen. The au-
dio system turns on in the last mode used.102 , 103
button*Press to pause or resume playing the music.⎯
Page 103 of 228
103
1. AUDIO SYSTEM OPERATION
4
AUDIO SYSTEM
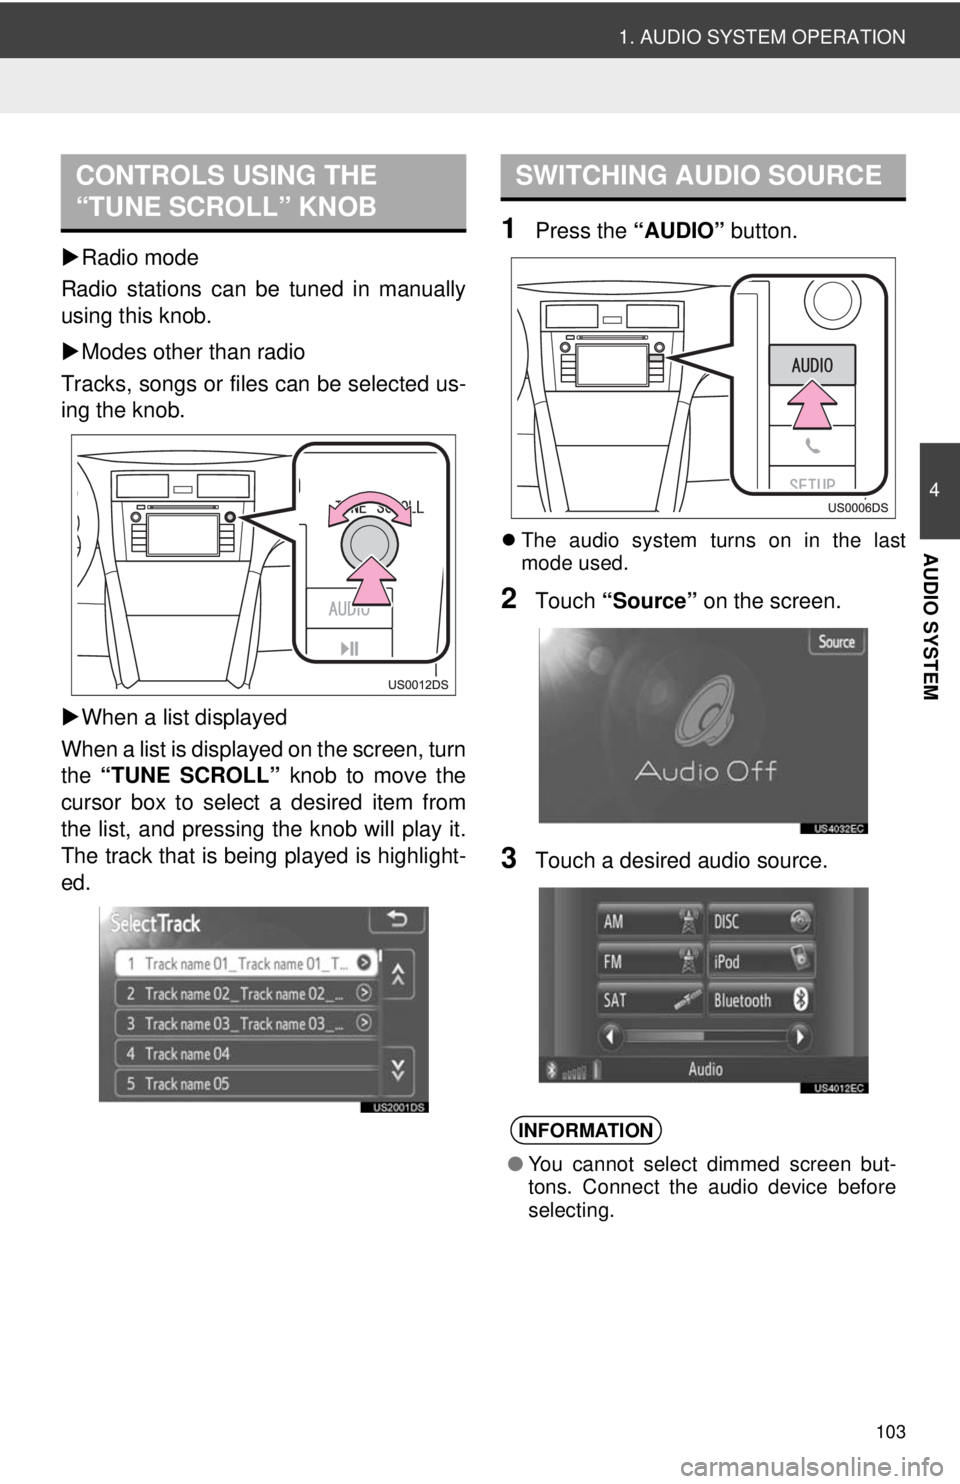
Radio mode
Radio stations can be tuned in manually
using this knob.
Modes other than radio
Tracks, songs or files can be selected us-
ing the knob.
When a list displayed
When a list is displayed on the screen, turn
the “TUNE SCROLL” knob to move the
cursor box to select a desired item from
the list, and pressing the knob will play it.
The track that is being played is highlight-
ed.
1Press the “AUDIO” button.
The audio system turns on in the last
mode used.
2Touch “Source” on the screen.
3Touch a desired audio source.
CONTROLS USING THE
“TUNE SCROLL” KNOBSWITCHING AUDIO SOURCE
INFORMATION
●You cannot select dimmed screen but-
tons. Connect the audio device before
selecting.
Page 104 of 228
104
1. AUDIO SYSTEM OPERATION
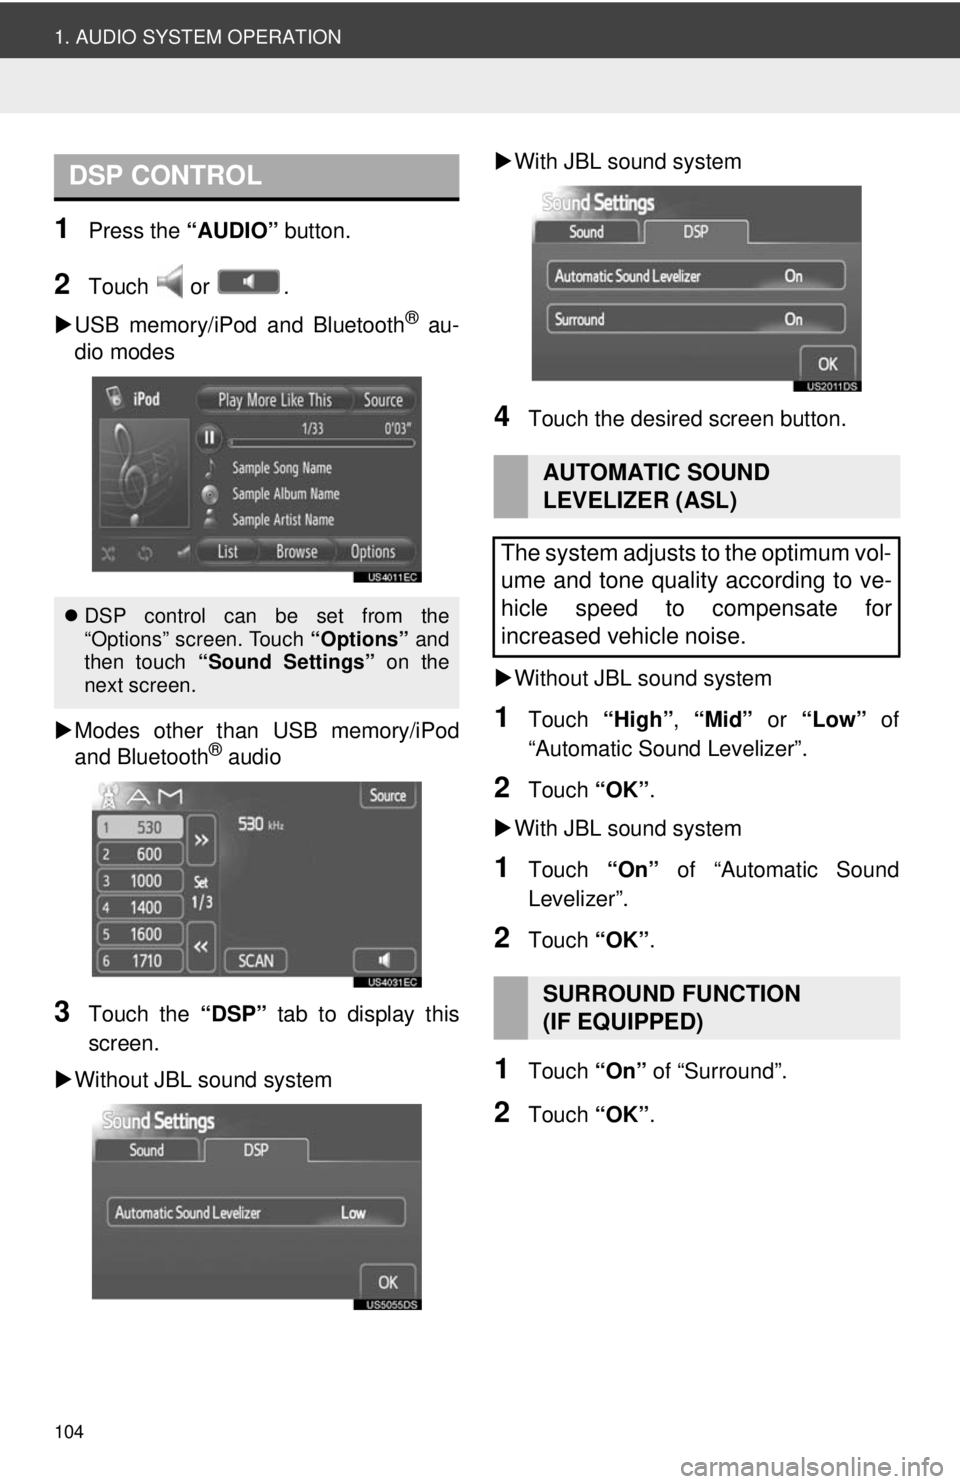
1Press the “AUDIO” button.
2Touch or .
USB memory/iPod and Bluetooth
® au-
dio modes
Modes other than USB memory/iPod
and Bluetooth
® audio
3Touch the “DSP” tab to display this
screen.
Without JBL sound system
With JBL sound system
4Touch the desired screen button.
Without JBL sound system
1Touch “High”, “Mid” or “Low” of
“Automatic Sound Levelizer”.
2Touch “OK”.
With JBL sound system
1Touch “On” of “Automatic Sound
Levelizer”.
2Touch “OK”.
1Touch “On” of “Surround”.
2Touch “OK”.
DSP CONTROL
DSP control can be set from the
“Options” screen. Touch “Options” and
then touch “Sound Settings” on the
next screen.
AUTOMATIC SOUND
LEVELIZER (ASL)
The system adjusts to the optimum vol-
ume and tone quality according to ve-
hicle speed to compensate for
increased vehicle noise.
SURROUND FUNCTION
(IF EQUIPPED)
Page 105 of 228
105
1. AUDIO SYSTEM OPERATION
4
AUDIO SYSTEM
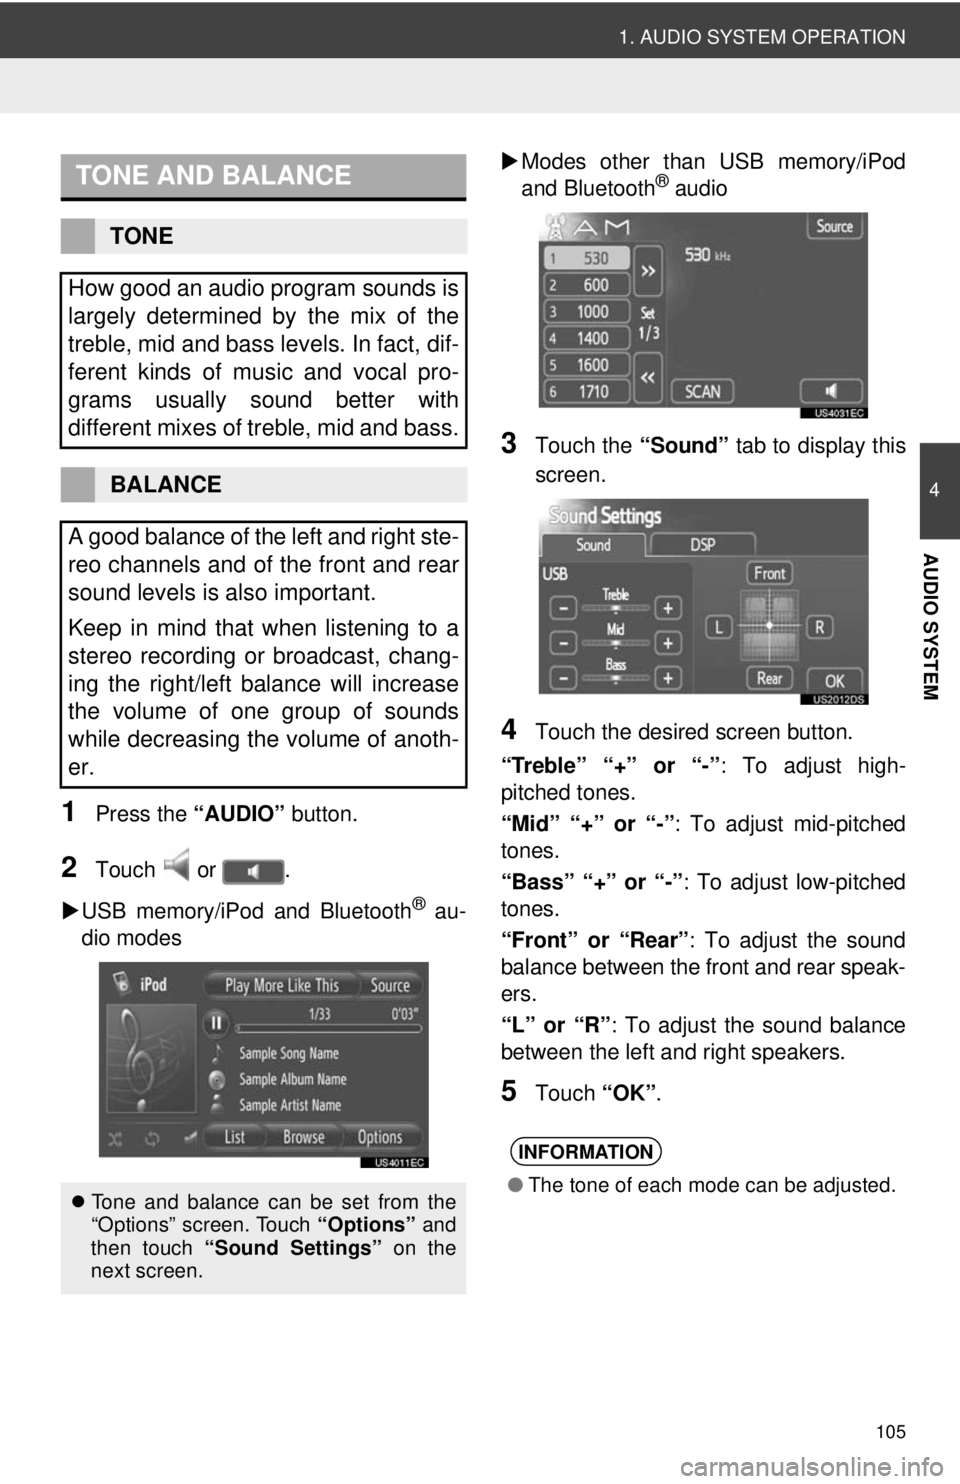
1Press the “AUDIO” button.
2Touch or .
USB memory/iPod and Bluetooth
® au-
dio modes
Modes other than USB memory/iPod
and Bluetooth
® audio
3Touch the “Sound” tab to display this
screen.
4Touch the desired screen button.
“Treble” “+” or “-” : To adjust high-
pitched tones.
“Mid” “+” or “-”: To adjust mid-pitched
tones.
“Bass” “+” or “-” : To adjust low-pitched
tones.
“Front” or “Rear” : To adjust the sound
balance between the front and rear speak-
ers.
“L” or “R” : To adjust the sound balance
between the left and right speakers.
5Touch “OK”.
TONE AND BALANCE
TONE
How good an audio program sounds is
largely determined by the mix of the
treble, mid and bass levels. In fact, dif-
ferent kinds of music and vocal pro-
grams usually sound better with
different mixes of treble, mid and bass.
BALANCE
A good balance of the left and right ste-
reo channels and of the front and rear
sound levels is also important.
Keep in mind that when listening to a
stereo recording or broadcast, chang-
ing the right/left balance will increase
the volume of one group of sounds
while decreasing the volume of anoth-
er.
Tone and balance can be set from the
“Options” screen. Touch “Options” and
then touch “Sound Settings” on the
next screen.
INFORMATION
● The tone of each mode can be adjusted.
Page 106 of 228
106
1. AUDIO SYSTEM OPERATION
3. RADIO OPERATION
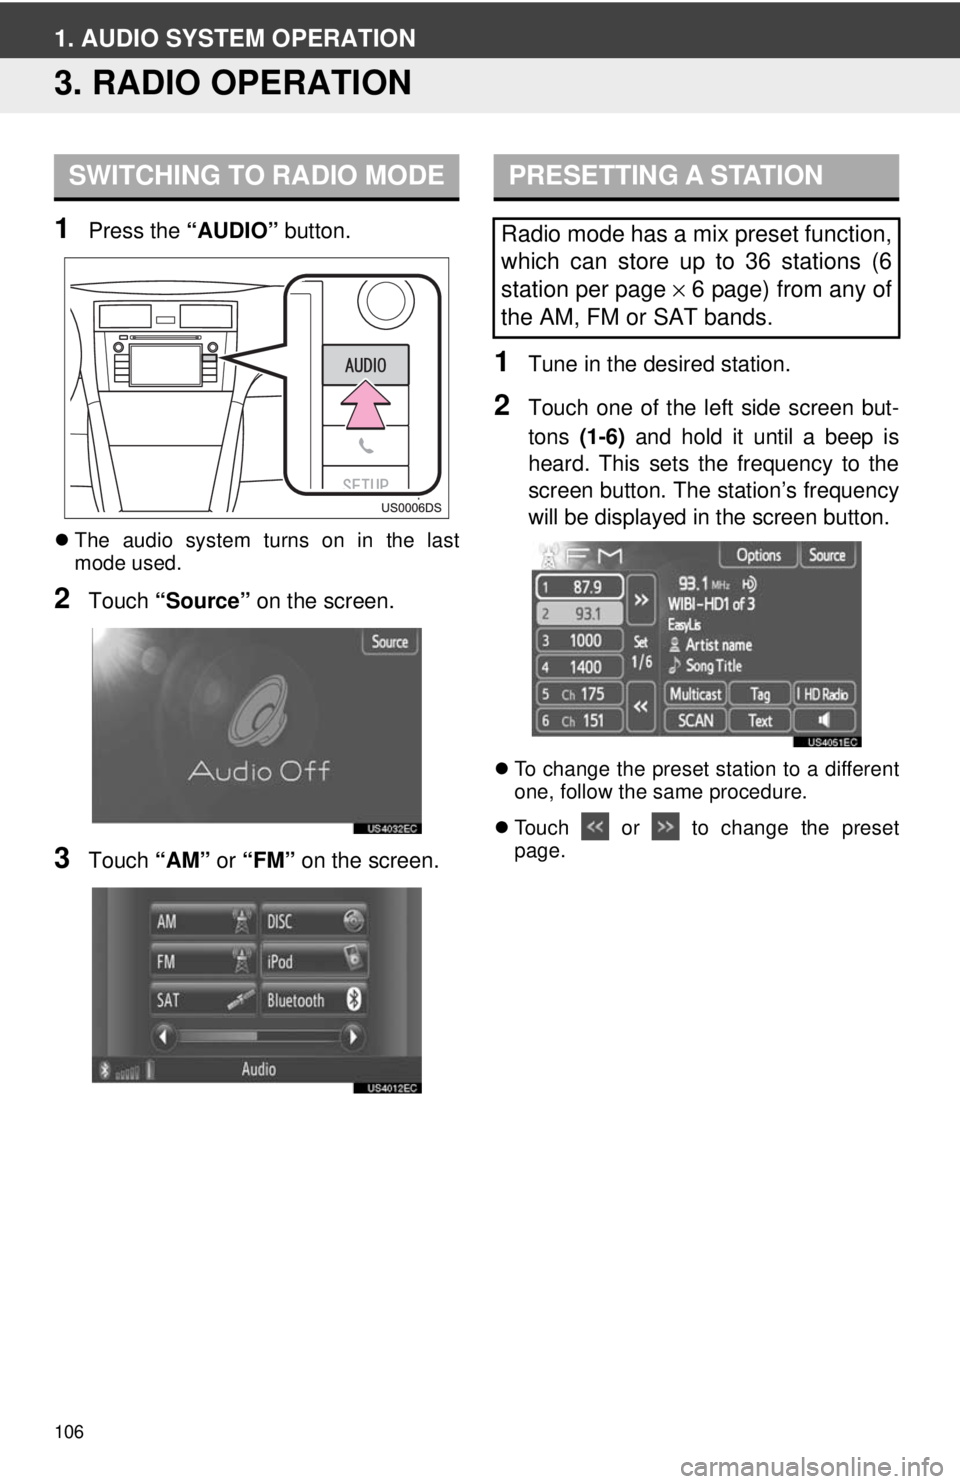
1Press the “AUDIO” button.
The audio system turns on in the last
mode used.
2Touch “Source” on the screen.
3Touch “AM” or “FM” on the screen.
1Tune in the desired station.
2Touch one of the left side screen but-
tons (1-6) and hold it until a beep is
heard. This sets the frequency to the
screen button. The station’s frequency
will be displayed in the screen button.
To change the preset station to a different
one, follow the same procedure.
Touch or to change the preset
page.
SWITCHING TO RADIO MODEPRESETTING A STATION
Radio mode has a mix preset function,
which can store up to 36 stations (6
station per page × 6 page) from any of
the AM, FM or SAT bands.
Page 107 of 228
107
1. AUDIO SYSTEM OPERATION
4
AUDIO SYSTEM
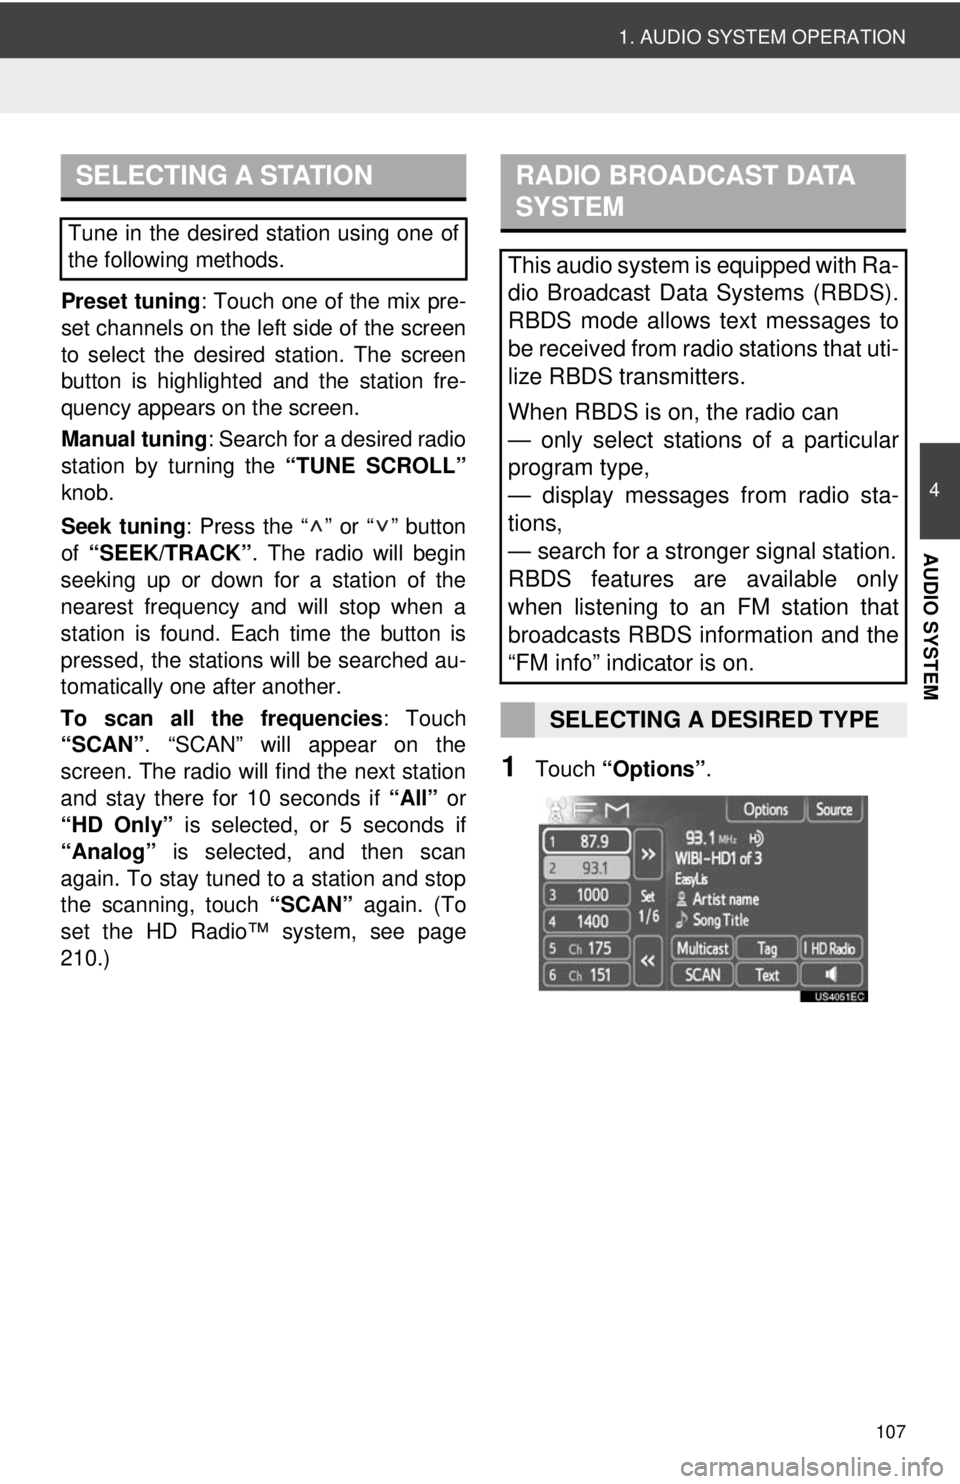
Preset tuning: Touch one of the mix pre-
set channels on the left side of the screen
to select the desired station. The screen
button is highlighted and the station fre-
quency appears on the screen.
Manual tuning: Search for a desired radio
station by turning the “TUNE SCROLL”
knob.
Seek tuning : Press the “ ” or “ ” button
of “SEEK/TRACK” . The radio will begin
seeking up or down for a station of the
nearest frequency and will stop when a
station is found. Ea ch time the button is
pressed, the stations will be searched au-
tomatically one after another.
To scan all the frequencies : Touch
“SCAN” . “SCAN” will appear on the
screen. The radio will find the next station
and stay there for 10 seconds if “All” or
“HD Only” is selected, or 5 seconds if
“Analog” is selected, and then scan
again. To stay tuned to a station and stop
the scanning, touch “SCAN” again. (To
set the HD Radio™ system, see page
210.)
1Touch “Options”.
SELECTING A STATION
Tune in the desired station using one of
the following methods.
RADIO BROADCAST DATA
SYSTEM
This audio system is equipped with Ra-
dio Broadcast Data Systems (RBDS).
RBDS mode allows text messages to
be received from radio stations that uti-
lize RBDS transmitters.
When RBDS is on, the radio can
— only select stations of a particular
program type,
— display messages from radio sta-
tions,
— search for a stronger signal station.
RBDS features are available only
when listening to an FM station that
broadcasts RBDS information and the
“FM info” indicator is on.
SELECTING A DESIRED TYPE