keyless entry TOYOTA PROACE CITY VERSO 2020 User Guide
[x] Cancel search | Manufacturer: TOYOTA, Model Year: 2020, Model line: PROACE CITY VERSO, Model: TOYOTA PROACE CITY VERSO 2020Pages: 272, PDF Size: 58.6 MB
Page 36 of 272
36
Have it checked by a TOYOTA dealer or a qualified workshop.
Automatic activation
(Depending on the country of sale)The system is activated automatically 2 minutes after the last door or the boot is closed.► To avoid triggering the alarm on entering the vehicle, first press the unlocking button on the remote control or unlock the vehicle using the “Keyless Entry and Starting” system.
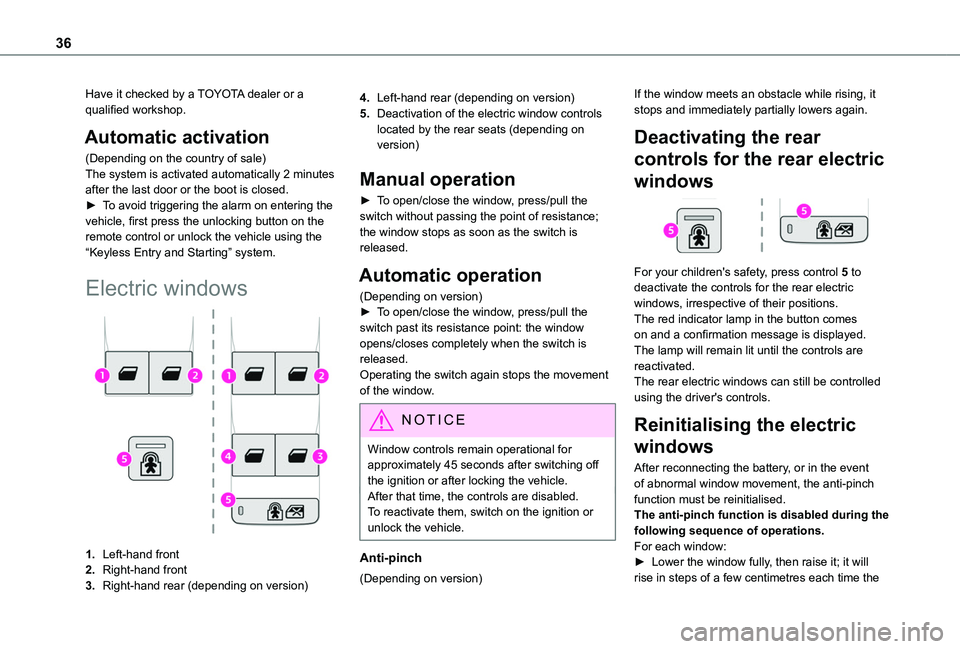
Electric windows
1.Left-hand front
2.Right-hand front
3.Right-hand rear (depending on version)
4.Left-hand rear (depending on version)
5.Deactivation of the electric window controls located by the rear seats (depending on version)
Manual operation
► To open/close the window, press/pull the switch without passing the point of resistance; the window stops as soon as the switch is released.
Automatic operation
(Depending on version)► To open/close the window, press/pull the switch past its resistance point: the window opens/closes completely when the switch is released.Operating the switch again stops the movement of the window.
NOTIC E
Window controls remain operational for approximately 45 seconds after switching off the ignition or after locking the vehicle.After that time, the controls are disabled. To reactivate them, switch on the ignition or unlock the vehicle.
Anti-pinch
(Depending on version)
If the window meets an obstacle while rising, it stops and immediately partially lowers again.
Deactivating the rear
controls for the rear electric
windows
For your children's safety, press control 5 to deactivate the controls for the rear electric windows, irrespective of their positions.The red indicator lamp in the button comes on and a confirmation message is displayed. The lamp will remain lit until the controls are reactivated.The rear electric windows can still be controlled using the driver's controls.
Reinitialising the electric
windows
After reconnecting the battery, or in the event of abnormal window movement, the anti-pinch function must be reinitialised.The anti-pinch function is disabled during the following sequence of operations.For each window:► Lower the window fully, then raise it; it will rise in steps of a few centimetres each time the
Page 37 of 272
37
Access
2
control is pressed. Repeat the operation until the window is fully closed.► Continue to pull the control upwards for at least one second after the window reaches the closed position.
WARNI NG
If an electric window meets an obstacle during operation, the movement of the
window must be reversed. To do this, press the relevant switch.When the driver operates the passengers’ electric window switches, it is important to ensure that nothing can prevent the window from closing properly.It is important to ensure that passengers use the electric windows correctly.Pay particular attention to children when operating windows.Be aware of passengers and/or other persons present when closing windows using the key or the "Keyless Entry and Starting" system.
Tilting rear door windows
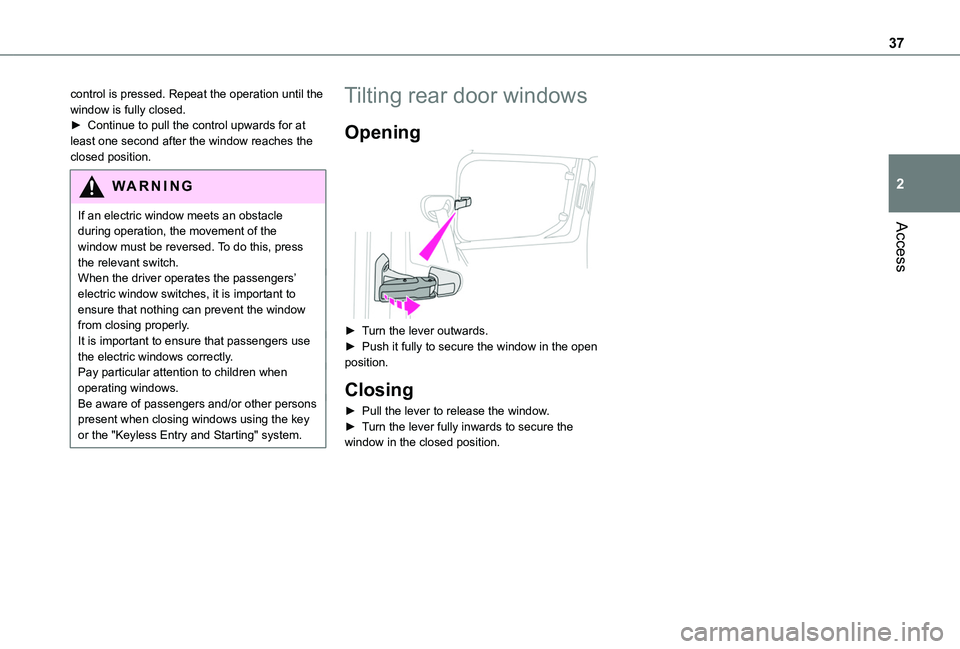
Opening
► Turn the lever outwards.► Push it fully to secure the window in the open position.
Closing
► Pull the lever to release the window.► Turn the lever fully inwards to secure the window in the closed position.
Page 49 of 272
49
Ease of use and comfort
3
NOTIC E
When the USB port is used, the portable device charges automatically.A message is displayed if the power drawn by the portable device exceeds the current supplied by the vehicle.For more information on how to use this equipment, refer to the Audio equipment and telematics section .
Port 1 also allows a smartphone to be connected by MirrorLinkTM, Android Auto® or CarPlay®, enabling certain smartphone applications to be used on the touch screen.For best results, use a cable made or approved by the device manufacturer.These applications can be managed using the steering mounted controls or the audio system controls.
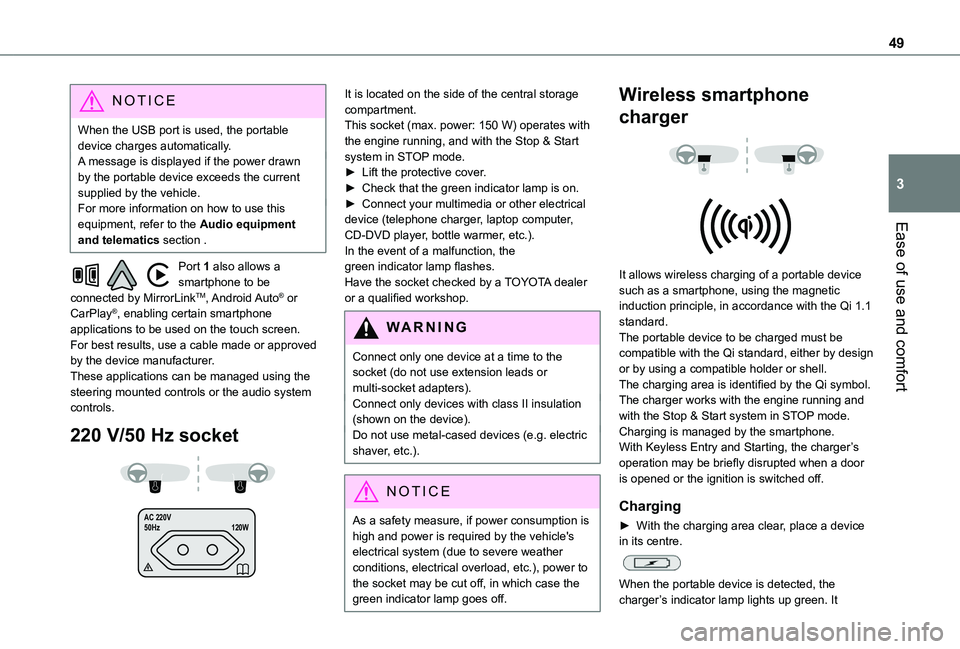
220 V/50 Hz socket
AC 220 V
50Hz 120W
It is located on the side of the central storage compartment.This socket (max. power: 150 W) operates with the engine running, and with the Stop & Start system in STOP mode.► Lift the protective cover.► Check that the green indicator lamp is on.► Connect your multimedia or other electrical device (telephone charger, laptop computer, CD-DVD player, bottle warmer, etc.).In the event of a malfunction, the green indicator lamp flashes.Have the socket checked by a TOYOTA dealer or a qualified workshop.
WARNI NG
Connect only one device at a time to the socket (do not use extension leads or multi-socket adapters).Connect only devices with class II insulation (shown on the device).Do not use metal-cased devices (e.g. electric shaver, etc.).
NOTIC E
As a safety measure, if power consumption is high and power is required by the vehicle's
electrical system (due to severe weather conditions, electrical overload, etc.), power to the socket may be cut off, in which case the green indicator lamp goes off.
Wireless smartphone
charger
It allows wireless charging of a portable device such as a smartphone, using the magnetic induction principle, in accordance with the Qi 1.1 standard.The portable device to be charged must be compatible with the Qi standard, either by design or by using a compatible holder or shell.The charging area is identified by the Qi symbol.The charger works with the engine running and with the Stop & Start system in STOP mode.Charging is managed by the smartphone.With Keyless Entry and Starting, the charger’s operation may be briefly disrupted when a door is opened or the ignition is switched off.
Charging
► With the charging area clear, place a device in its centre.
When the portable device is detected, the charger’s indicator lamp lights up green. It
Page 98 of 272
98
trying: you risk damaging the starter motor and the engine.Contact a TOYOTA dealer or a qualified workshop.
WARNI NG
To avoid any risk of jamming the pedals:– only use mats which are suited to the fixings already present in the vehicle; these fixings must be used,– never place one mat on top of another.The use of mats not approved by TOYOTA may interfere with access to the pedals and hinder the operation of the cruise control / speed limiter.The mats approved by TOYOTA have two fixings located below the seat.
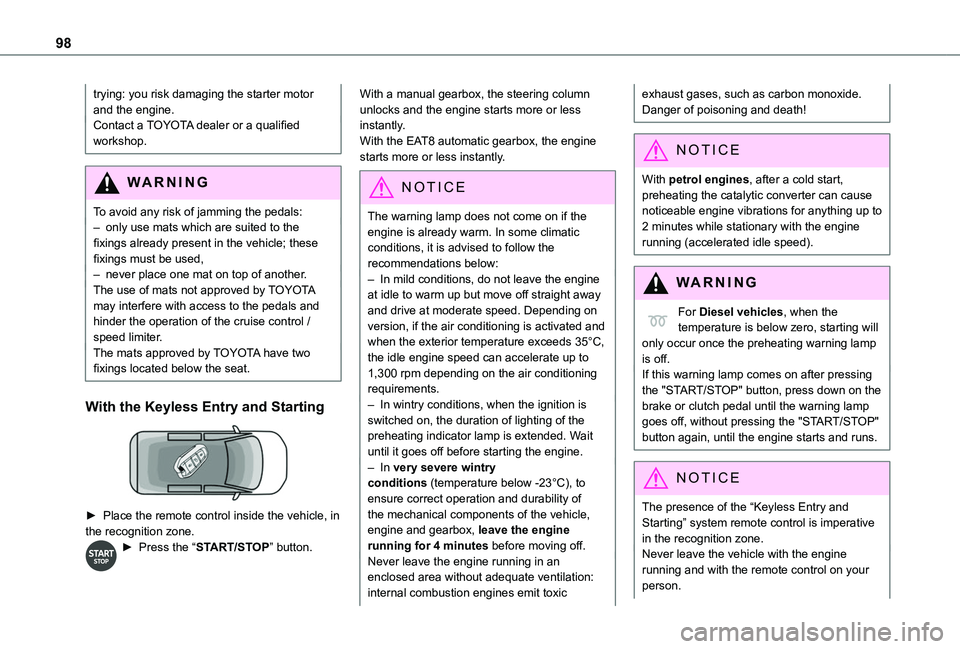
With the Keyless Entry and Starting
► Place the remote control inside the vehicle, in the recognition zone.
► Press the “START/STOP” button.
With a manual gearbox, the steering column unlocks and the engine starts more or less instantly.With the EAT8 automatic gearbox, the engine starts more or less instantly.
NOTIC E
The warning lamp does not come on if the engine is already warm. In some climatic conditions, it is advised to follow the recommendations below:– In mild conditions, do not leave the engine at idle to warm up but move off straight away and drive at moderate speed. Depending on version, if the air conditioning is activated and when the exterior temperature exceeds 35°C, the idle engine speed can accelerate up to 1,300 rpm depending on the air conditioning requirements.– In wintry conditions, when the ignition is switched on, the duration of lighting of the preheating indicator lamp is extended. Wait
until it goes off before starting the engine.– In very severe wintry conditions (temperature below -23°C), to ensure correct operation and durability of the mechanical components of the vehicle, engine and gearbox, leave the engine running for 4 minutes before moving off.Never leave the engine running in an enclosed area without adequate ventilation: internal combustion engines emit toxic
exhaust gases, such as carbon monoxide. Danger of poisoning and death!
NOTIC E
With petrol engines, after a cold start, preheating the catalytic converter can cause noticeable engine vibrations for anything up to 2 minutes while stationary with the engine running (accelerated idle speed).
WARNI NG
For Diesel vehicles, when the temperature is below zero, starting will only occur once the preheating warning lamp is off.If this warning lamp comes on after pressing the "START/STOP" button, press down on the brake or clutch pedal until the warning lamp goes off, without pressing the "START/STOP" button again, until the engine starts and runs.
NOTIC E
The presence of the “Keyless Entry and Starting” system remote control is imperative in the recognition zone.Never leave the vehicle with the engine running and with the remote control on your person.
Page 99 of 272
99
Driving
6
If the remote control leaves the recognition zone, a message is displayed.Move the remote control into the zone in order to be able to start the engine.
NOTIC E
If one of the starting conditions is not met, a message is displayed in the instrument panel. In some circumstances, it is necessary to turn
the steering wheel while pressing the "START/STOP" button to assist unlocking of the steering column. A message is displayed.
Switching off
► Immobilise the vehicle, with the engine at idle.► With a manual gearbox, ideally put the gear lever into neutral.► With an automatic gearbox, ideally select position P.
With the conventional key/With the
remote control key
► Turn the key all the way to position 1 (Stop) and remove it from the ignition.► To lock the steering column, turn the steering wheel until it locks.
NOTIC E
To facilitate unlocking of the steering column, it is recommended that the wheels be returned to the straight ahead position before switching off the engine.
► Check that the parking brake is correctly applied, particularly on sloping ground.
WARNI NG
Never switch off the ignition before the complete immobilisation of the vehicle. With the engine off, the braking and steering assistance systems are also turned off: risk of loss of control of the vehicle.
NOTIC E
As a safety measure, never leave the vehicle without taking the remote control with you, even for a short time.
NOTIC E
Avoid attaching heavy objects to the key or the remote control, which would weigh down on its blade in the ignition switch and could
cause a malfunction.
Key left in the ignition
NOTIC E
When opening the driver's door, an alert message is displayed, accompanied by an audible signal, to remind you that the key is still in the ignition switch at position 1 (Stop).If the key has been left in the ignition switch at position 2 (Ignition on), the ignition will be
switched off automatically after one hour.To switch the ignition back on, turn the key to position 1 (Stop), then back to position 2 (Ignition on).
With Keyless Entry and Starting
► With the remote control in the recognition zone, press the "START/STOP" button.With a manual gearbox, the engine switches off and the steering column locks.With the EAT8 automatic gearbox, the engine switches off.
NOTIC E
If the vehicle is not immobilised, the engine will not stop.
Page 100 of 272
100
Switching on the ignition
with Keyless Entry and
Starting
With the Keyless Entry and Starting system’s electronic key inside the vehicle, pressing the "START/STOP" button, with no action on the pedals, allows the ignition to be switched on.► Pressing this button again switches off the ignition and allows the vehicle to be locked.
Back-up starting with
Keyless Entry and Starting
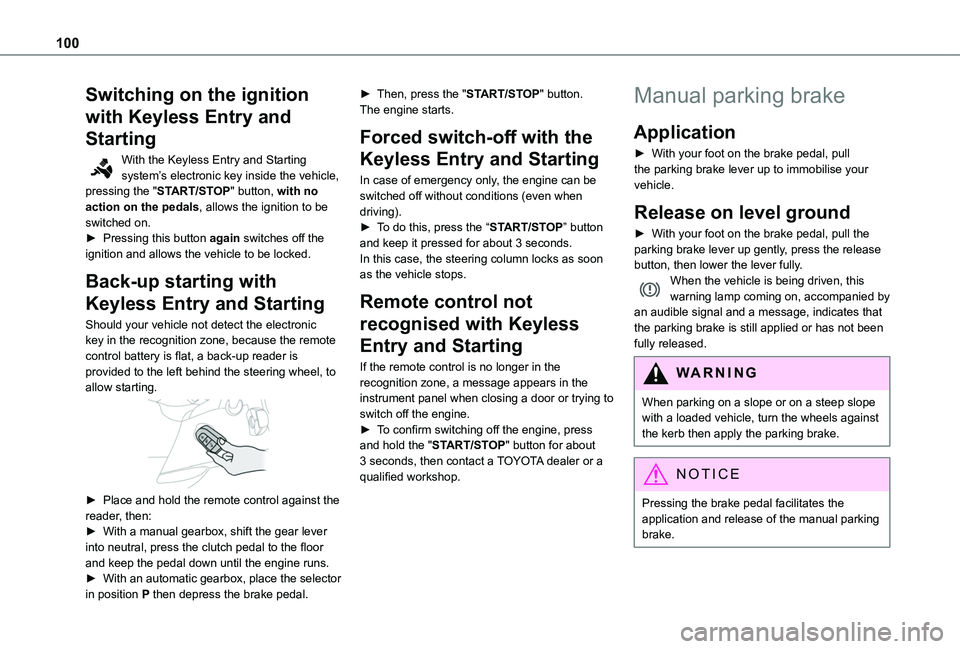
Should your vehicle not detect the electronic key in the recognition zone, because the remote control battery is flat, a back-up reader is provided to the left behind the steering wheel, to allow starting.
► Place and hold the remote control against the reader, then:► With a manual gearbox, shift the gear lever into neutral, press the clutch pedal to the floor and keep the pedal down until the engine runs.► With an automatic gearbox, place the selector in position P then depress the brake pedal.
► Then, press the "START/STOP" button.The engine starts.
Forced switch-off with the
Keyless Entry and Starting
In case of emergency only, the engine can be switched off without conditions (even when driving).► To do this, press the “START/STOP” button and keep it pressed for about 3 seconds.In this case, the steering column locks as soon as the vehicle stops.
Remote control not
recognised with Keyless
Entry and Starting
If the remote control is no longer in the recognition zone, a message appears in the instrument panel when closing a door or trying to switch off the engine.► To confirm switching off the engine, press
and hold the "START/STOP" button for about 3 seconds, then contact a TOYOTA dealer or a qualified workshop.
Manual parking brake
Application
► With your foot on the brake pedal, pull the parking brake lever up to immobilise your vehicle.
Release on level ground
► With your foot on the brake pedal, pull the parking brake lever up gently, press the release button, then lower the lever fully.When the vehicle is being driven, this warning lamp coming on, accompanied by an audible signal and a message, indicates that the parking brake is still applied or has not been fully released.
WARNI NG
When parking on a slope or on a steep slope with a loaded vehicle, turn the wheels against the kerb then apply the parking brake.
NOTIC E
Pressing the brake pedal facilitates the application and release of the manual parking brake.
Page 146 of 272
146
Compatibility of fuels
Petrol fuels conforming to the EN228 standard containing up to 5% and 10% ethanol respectively.
Diesel fuels conforming to the EN590, EN16734 and EN16709 standards and containing up to 7%, 10%, 20% and 30% fatty acid methyl ester respectively. The use of B20 or B30 fuels, even occasionally, imposes special maintenance conditions referred to as "Arduous conditions".
Paraffinic Diesel fuel conforming to the EN15940 standard.
WARNI NG
The use of any other type of (bio) fuel (vegetable or animal oils, pure or diluted, domestic fuel, etc.) is strictly prohibited (risk of damage to the engine and fuel system).
NOTIC E
The only fuel additives authorised for use are those that meet the B715001 (petrol) or B715000 (Diesel) standards.
Diesel at low temperature
At temperatures below 0 °C (+32 °F), the formation of paraffins in summer-type Diesel fuels could prevent the engine from operating correctly. In these temperature conditions, use winter-type Diesel fuel and keep the fuel tank more than 50 % full.At temperatures below -15 °C (+5 °F) to avoid problems starting, it is best to park the vehicle under shelter (heated garage).
Travelling abroad
Certain fuels could damage your vehicle’s engine.In certain countries, the use of a particular fuel may be required (specific octane rating, specific trade name, etc.) to ensure correct operation of the engine.For all additional information, consult a dealer.
Refuelling
Fuel tank capacity: approximately 61 litres (petrol) or 50 litres (Diesel).Reserve level: approximately 6 litres.
Low fuel level
/2
1 1When the low fuel level is reached, this warning lamp comes on on the instrument panel, accompanied by an onscreen message and an audible signal. When it first
comes on, about 6 litres of fuel remain in the tank.Until sufficient fuel is added, this warning lamp appears every time the ignition is switched on, accompanied by an onscreen message and an audible signal. When driving, this message and audible signal are repeated with increasing frequency as the fuel level drops towards 0.You must refuel as soon as possible to avoid running out of fuel.For more information on Running out of fuel (Diesel), refer to the corresponding section.
W
ARNI NG
Stop & StartNever refuel with the engine in STOP mode; you must switch off the ignition.
Refuelling
At least 10 litres of fuel must be added, in order to be registered by the fuel gauge.
Opening the filler cap may create a noise caused by an inrush of air. This is entirely normal and results from the sealing of the fuel system.To refuel in complete safety:► Always switch off the engine.► Unlock the vehicle using the Keyless Entry and Starting.► Open the fuel filler flap.
Page 160 of 272
160
Precautions for use
AdBlue® is a urea-based solution. This fluid is non-flammable, colourless and odourless (when kept in a cool place).In the event of contact with the skin, wash the affected area with soap and running water. In the event of contact with the eyes, immediately rinse the eyes with large amounts of water or with an eye wash solution for at least 15 minutes. Seek medical attention if you feel a persistent burning sensation or irritation.If swallowed, immediately wash out the mouth with clean water and then drink plenty of water.In certain conditions (high temperature, for example), the risk of release of ammonia cannot be excluded: do not inhale the fluid. Ammonia vapours have an irritant effect on mucous membranes (eyes, nose and throat).
WARNI NG
Store AdBlue® out of the reach of children, in its original container.
Procedure
Before starting the top-up procedure, ensure that the vehicle is parked on a flat and level surface.In wintry conditions, ensure that the temperature of the vehicle is above -11 °C. Otherwise the AdBlue® may be frozen and so cannot be poured into its tank. Park the vehicle in a warmer area
for a few hours to allow the top-up to be carried out.
WARNI NG
Never put the AdBlue® into the Diesel fuel tank.
WARNI NG
If any AdBlue® is splashed, or if there are any spillages on the bodywork, rinse immediately with cold water or wipe with a damp cloth.If the fluid has crystallised, clean it off using a sponge and hot water.
WARNI NG
Important: in the event of a top-up after a breakdown because of a lack of AdBlue, it is essential to wait around 5 minutes before switching on the ignition, without opening the driver’s door, unlocking the vehicle, introducing the key into the ignition switch, or introducing the key of the “Keyless Entry and Starting ” system into the passenger compartment.Switch on the ignition, then wait for 10 seconds before starting the engine.
► Switch off the ignition and remove the key from the switch to switch off the engine.
or► With Keyless Entry and Starting, press the "START/STOP" button to switch off the engine.
► With the vehicle unlocked and the fuel filler flap open, turn the blue cap of the AdBlue® tank anti-clockwise and remove it.► With a container of AdBlue®: after checking the expiry date, read carefully the instructions on the label before pouring the contents of the container into the vehicle's AdBlue tank.► With an AdBlue® pump: introduce the nozzle and fill the tank until the automatic cut-off of the nozzle.
WARNI NG
In order not to overfill the AdBlue® tank:– Add between 10 and 13 litres using AdBlue® containers.– Stop after the nozzle’s first automatic cut-out, if you are refilling at a service station.
WARNI NG
If the AdBlue® tank is completely empty – which is confirmed by the “Top up AdBlue:
Page 161 of 272
161
Practical information
7
Starting impossible” message – it is essential to add at least 5 litres.
After refilling
► Refit the blue cap to the tank filler and turn it clockwise, as far as it will go.► Close the fuel filler flap.
Do not dispose of AdBlue® bottles or containers in the household waste.Place them in a container reserved for this purpose or take them back to where you purchased them.
Free-wheeling
In certain situations, you must allow the vehicle to free-wheel (while being towed, on a rolling road, in an automatic car wash, or being transported by rail or sea freight, etc.).
The procedure varies according to the type of gearbox and parking brake.
With a manual gearbox and
electric parking brake /
Release procedure
► With the engine running and while depressing the brake pedal, move the gear selector to the neutral position.► While depressing the brake pedal, switch off the ignition.► Release the brake pedal, then switch on the ignition again.► While depressing the brake pedal, press the control lever to release the parking brake.► Release the brake pedal, then switch off the ignition.
Reverting to normal operation
► While depressing the brake pedal, start the engine.
With an automatic gearbox
and electric parking brake /
Release procedure
► With the engine running and while depressing the brake pedal, set the gear selector to N.► While depressing the brake pedal, switch off the ignition.► Release the brake pedal, then switch on the ignition again.► While depressing the brake pedal, press the control lever to release the parking brake.► Release the brake pedal, then switch off the
ignition.
Reverting to normal operation
► While depressing the brake pedal, start the engine.
NOTIC E
Keyless Entry and StartingYou must not depress the brake pedal while switching the ignition on or off. If you do, the engine will start, requiring you to restart the procedure.
Advice on care and
maintenance
General recommendations
Observe the following recommendations to avoid damaging your vehicle.
Exterior
WARNI NG
Never use a high-pressure jet wash in the engine compartment, due to the risk of damaging electrical components.Do not wash the vehicle in strong sunshine or extremely cold conditions.
Page 246 of 272
246
Filter, passenger compartment 54, 157Finisher 170Fitting a wheel 167–170Fitting roof bars 152–153Fittings, interior 47, 50–51Flap, fuel filler 146–147Flashing indicators 64–65, 174Fluid, brake 156Fluid, engine coolant 156Foglamp, rear 174Foglamps 173Foglamps, front 63, 171Foglamps, rear 63Folding the rear seats 43–44Frequency (radio) 232–233Fuel 7, 146Fuel consumption 7Fuel tank 146–147Fusebox, dashboard 176Fusebox, engine compartment 176–177Fuses 175–177
G
Gauge, fuel 146–147Gearbox, automatic 100, 104–11 0, 158Gearbox, manual 104–105, 11 0, 157Gear lever, automatic gearbox 105–108Gear lever, manual gearbox 104–105Gear shift indicator ~ Gear efficiency indicator 109
Glove box 47G.P.S. 225
H
Hazard warning lamps 53, 74headlamp adjustment 67Headlamp adjustment 67Headlamps, automatic dipping 66–67, 135Headlamps, automatic illumination 64–66Headlamps, dipped beam 63, 171–172Headlamps, halogen 171Headlamps, main beam 63, 171, 173Head restraints, front 46Head restraints, rear 43Head-up display 11 3–11 4Heating 54–55, 57, 59–61Heating, additional 34, 59–61Heating, programmable 34, 59–61Hill Assist Descent Control (HADC) 78–79Hill Descent Control 78–79
Hill start assist 104Horn 74
I
Ignition 99–100, 237Ignition on 100Immobiliser, electronic 96Indicator, coolant temperature 16
Indicator lamps, operation 63Indicators, direction 64Inflating tyres 158, 189Inflating tyres and accessories (using the kit) 164, 166Infrared camera 11 5Instrument panel 9, 11 6Internet browser 226, 230ISOFIX 92
J
Jack 166Jump starting 178
K
Key 23–24, 26, 28Key, electronic 23–24, 100Keyless Entry and Starting 23, 25–27, 98–99
Key with remote control 26–27Kit, hands-free 197–198, 2 11–212, 235–236Kit, puncture repair 163Kit, temporary puncture repair 163–164, 166
L
Labels 4, 45Labels, identification 189