check engine TOYOTA RAV4 2006 Service Owners Manual
[x] Cancel search | Manufacturer: TOYOTA, Model Year: 2006, Model line: RAV4, Model: TOYOTA RAV4 2006Pages: 2000, PDF Size: 45.84 MB
Page 707 of 2000
EM–702GR-FE ENGINE MECHANICAL – ENGINE UNIT
EM
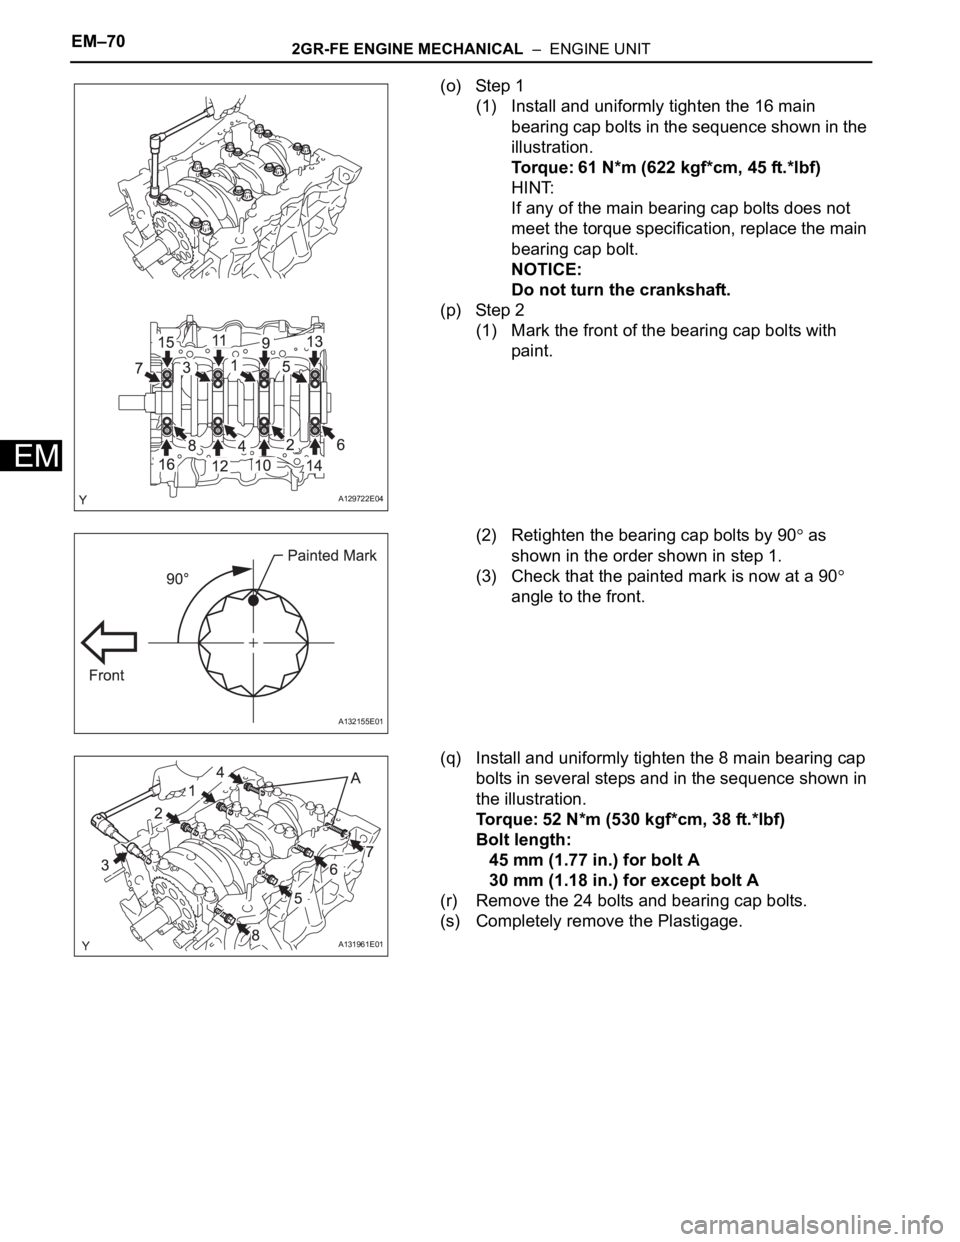
(o) Step 1
(1) Install and uniformly tighten the 16 main
bearing cap bolts in the sequence shown in the
illustration.
Torque: 61 N*m (622 kgf*cm, 45 ft.*lbf)
HINT:
If any of the main bearing cap bolts does not
meet the torque specification, replace the main
bearing cap bolt.
NOTICE:
Do not turn the crankshaft.
(p) Step 2
(1) Mark the front of the bearing cap bolts with
paint.
(2) Retighten the bearing cap bolts by 90
as
shown in the order shown in step 1.
(3) Check that the painted mark is now at a 90
angle to the front.
(q) Install and uniformly tighten the 8 main bearing cap
bolts in several steps and in the sequence shown in
the illustration.
Torque: 52 N*m (530 kgf*cm, 38 ft.*lbf)
Bolt length:
45 mm (1.77 in.) for bolt A
30 mm (1.18 in.) for except bolt A
(r) Remove the 24 bolts and bearing cap bolts.
(s) Completely remove the Plastigage.
A129722E04
A132155E01
A131961E01
Page 710 of 2000
2GR-FE ENGINE MECHANICAL – ENGINE UNITEM–73
EM
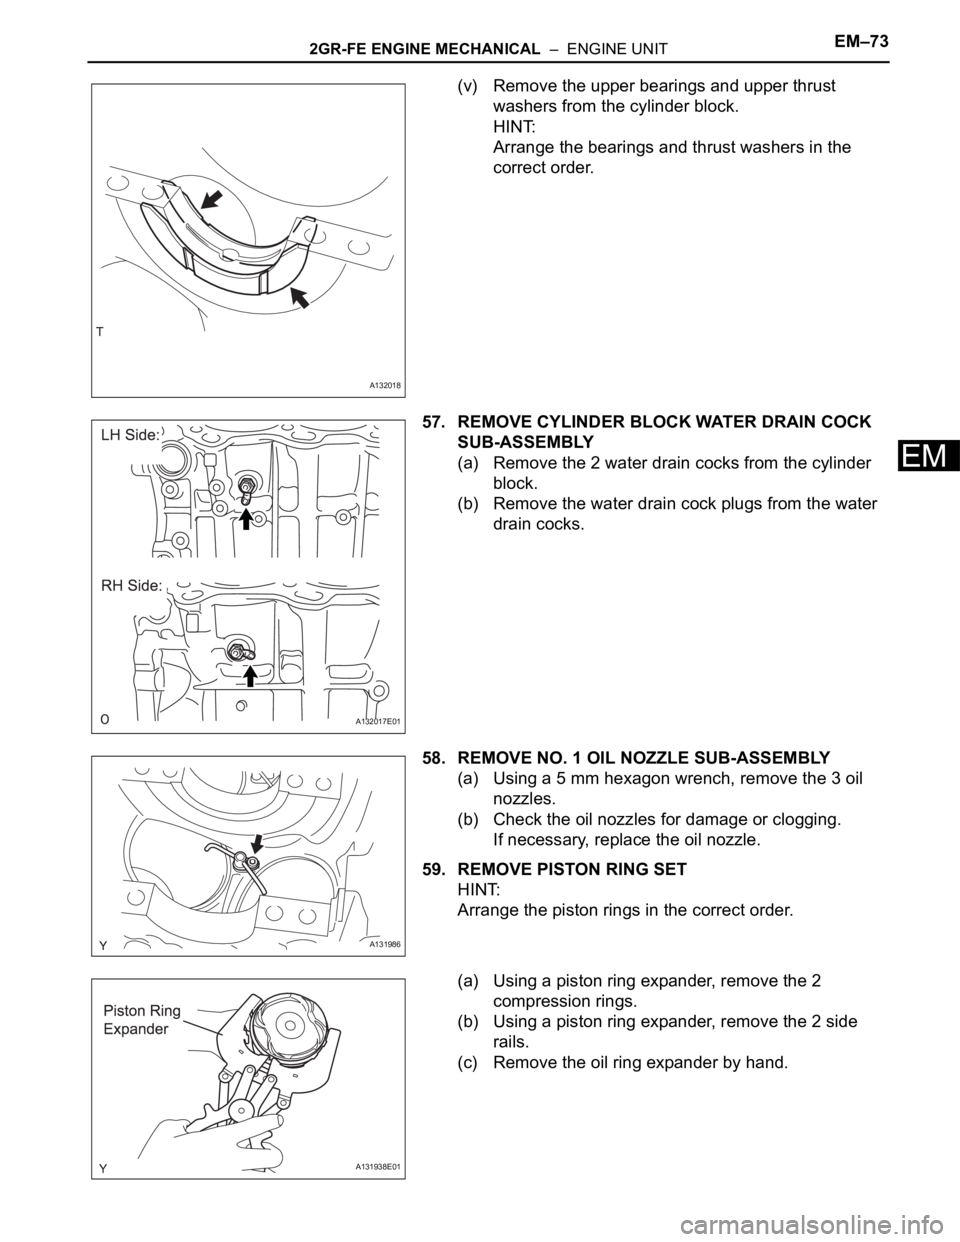
(v) Remove the upper bearings and upper thrust
washers from the cylinder block.
HINT:
Arrange the bearings and thrust washers in the
correct order.
57. REMOVE CYLINDER BLOCK WATER DRAIN COCK
SUB-ASSEMBLY
(a) Remove the 2 water drain cocks from the cylinder
block.
(b) Remove the water drain cock plugs from the water
drain cocks.
58. REMOVE NO. 1 OIL NOZZLE SUB-ASSEMBLY
(a) Using a 5 mm hexagon wrench, remove the 3 oil
nozzles.
(b) Check the oil nozzles for damage or clogging.
If necessary, replace the oil nozzle.
59. REMOVE PISTON RING SET
HINT:
Arrange the piston rings in the correct order.
(a) Using a piston ring expander, remove the 2
compression rings.
(b) Using a piston ring expander, remove the 2 side
rails.
(c) Remove the oil ring expander by hand.
A132018
A132017E01
A131986
A131938E01
Page 711 of 2000
EM–742GR-FE ENGINE MECHANICAL – ENGINE UNIT
EM
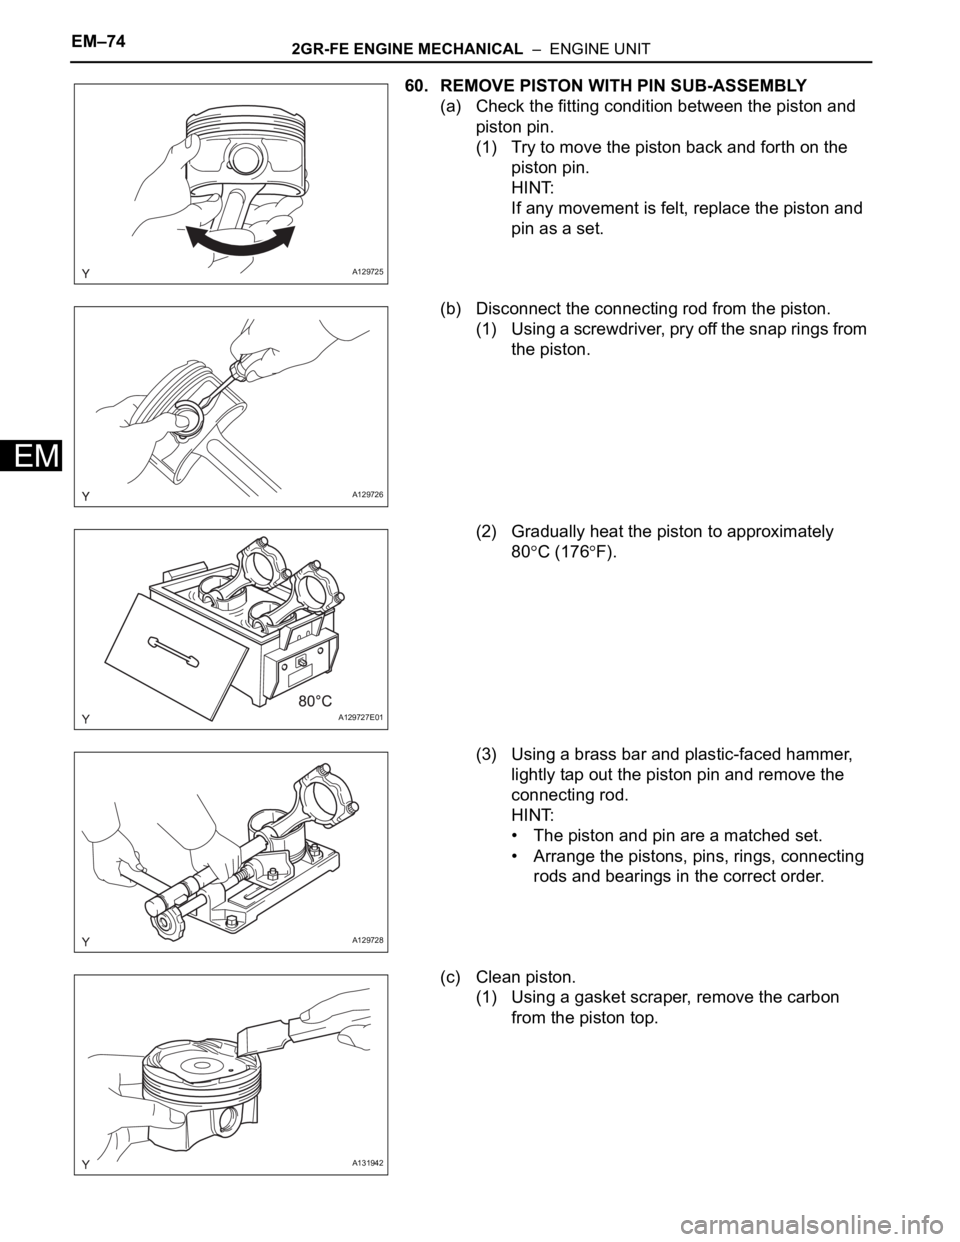
60. REMOVE PISTON WITH PIN SUB-ASSEMBLY
(a) Check the fitting condition between the piston and
piston pin.
(1) Try to move the piston back and forth on the
piston pin.
HINT:
If any movement is felt, replace the piston and
pin as a set.
(b) Disconnect the connecting rod from the piston.
(1) Using a screwdriver, pry off the snap rings from
the piston.
(2) Gradually heat the piston to approximately
80
C (176F).
(3) Using a brass bar and plastic-faced hammer,
lightly tap out the piston pin and remove the
connecting rod.
HINT:
• The piston and pin are a matched set.
• Arrange the pistons, pins, rings, connecting
rods and bearings in the correct order.
(c) Clean piston.
(1) Using a gasket scraper, remove the carbon
from the piston top.
A129725
A129726
A129727E01
A129728
A131942
Page 713 of 2000
EM–762GR-FE ENGINE MECHANICAL – ENGINE UNIT
EM
INSPECTION
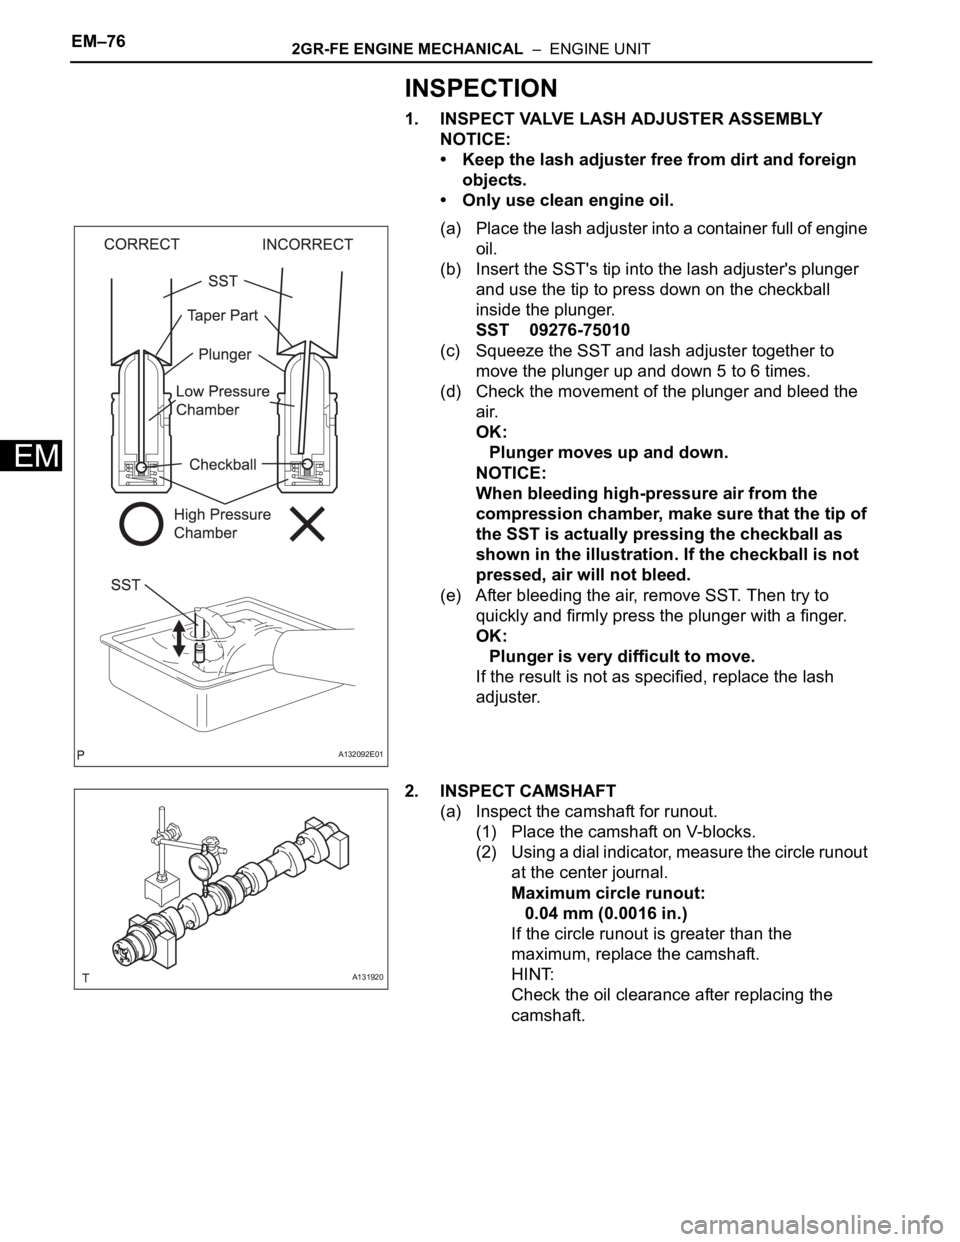
1. INSPECT VALVE LASH ADJUSTER ASSEMBLY
NOTICE:
• Keep the lash adjuster free from dirt and foreign
objects.
• Only use clean engine oil.
(a) Place the lash adjuster into a container full of engine
oil.
(b) Insert the SST's tip into the lash adjuster's plunger
and use the tip to press down on the checkball
inside the plunger.
SST 09276-75010
(c) Squeeze the SST and lash adjuster together to
move the plunger up and down 5 to 6 times.
(d) Check the movement of the plunger and bleed the
air.
OK:
Plunger moves up and down.
NOTICE:
When bleeding high-pressure air from the
compression chamber, make sure that the tip of
the SST is actually pressing the checkball as
shown in the illustration. If the checkball is not
pressed, air will not bleed.
(e) After bleeding the air, remove SST. Then try to
quickly and firmly press the plunger with a finger.
OK:
Plunger is very difficult to move.
If the result is not as specified, replace the lash
adjuster.
2. INSPECT CAMSHAFT
(a) Inspect the camshaft for runout.
(1) Place the camshaft on V-blocks.
(2) Using a dial indicator, measure the circle runout
at the center journal.
Maximum circle runout:
0.04 mm (0.0016 in.)
If the circle runout is greater than the
maximum, replace the camshaft.
HINT:
Check the oil clearance after replacing the
camshaft.
A132092E01
A131920
Page 714 of 2000
2GR-FE ENGINE MECHANICAL – ENGINE UNITEM–77
EM
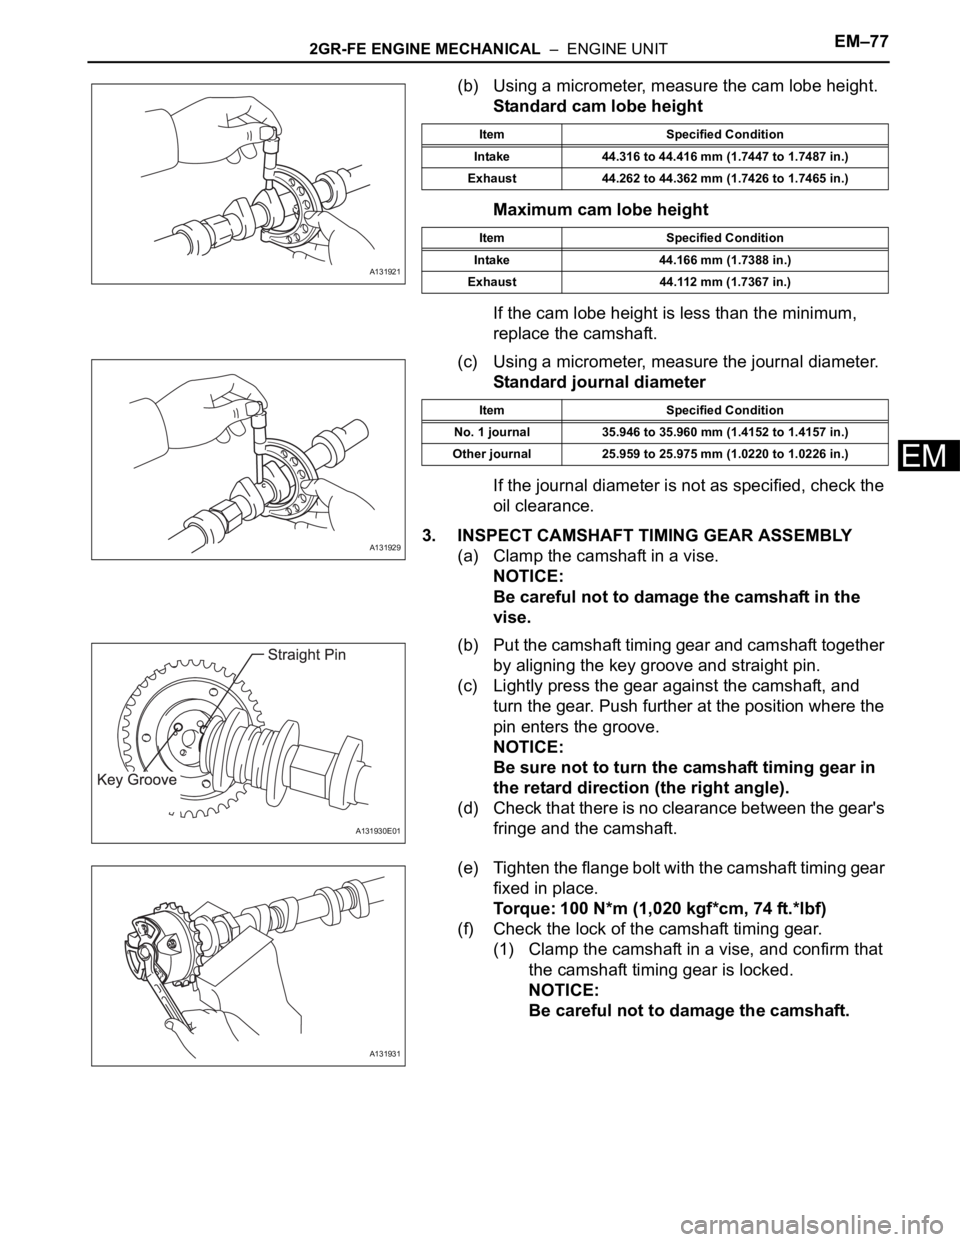
(b) Using a micrometer, measure the cam lobe height.
Standard cam lobe height
Maximum cam lobe height
If the cam lobe height is less than the minimum,
replace the camshaft.
(c) Using a micrometer, measure the journal diameter.
Standard journal diameter
If the journal diameter is not as specified, check the
oil clearance.
3. INSPECT CAMSHAFT TIMING GEAR ASSEMBLY
(a) Clamp the camshaft in a vise.
NOTICE:
Be careful not to damage the camshaft in the
vise.
(b) Put the camshaft timing gear and camshaft together
by aligning the key groove and straight pin.
(c) Lightly press the gear against the camshaft, and
turn the gear. Push further at the position where the
pin enters the groove.
NOTICE:
Be sure not to turn the camshaft timing gear in
the retard direction (the right angle).
(d) Check that there is no clearance between the gear's
fringe and the camshaft.
(e) Tighten the flange bolt with the camshaft timing gear
fixed in place.
Torque: 100 N*m (1,020 kgf*cm, 74 ft.*lbf)
(f) Check the lock of the camshaft timing gear.
(1) Clamp the camshaft in a vise, and confirm that
the camshaft timing gear is locked.
NOTICE:
Be careful not to damage the camshaft.
A131921
Item Specified Condition
Intake 44.316 to 44.416 mm (1.7447 to 1.7487 in.)
Exhaust 44.262 to 44.362 mm (1.7426 to 1.7465 in.)
Item Specified Condition
Intake 44.166 mm (1.7388 in.)
Exhaust 44.112 mm (1.7367 in.)
A131929
Item Specified Condition
No. 1 journal 35.946 to 35.960 mm (1.4152 to 1.4157 in.)
Other journal 25.959 to 25.975 mm (1.0220 to 1.0226 in.)
A131930E01
A131931
Page 715 of 2000
EM–782GR-FE ENGINE MECHANICAL – ENGINE UNIT
EM
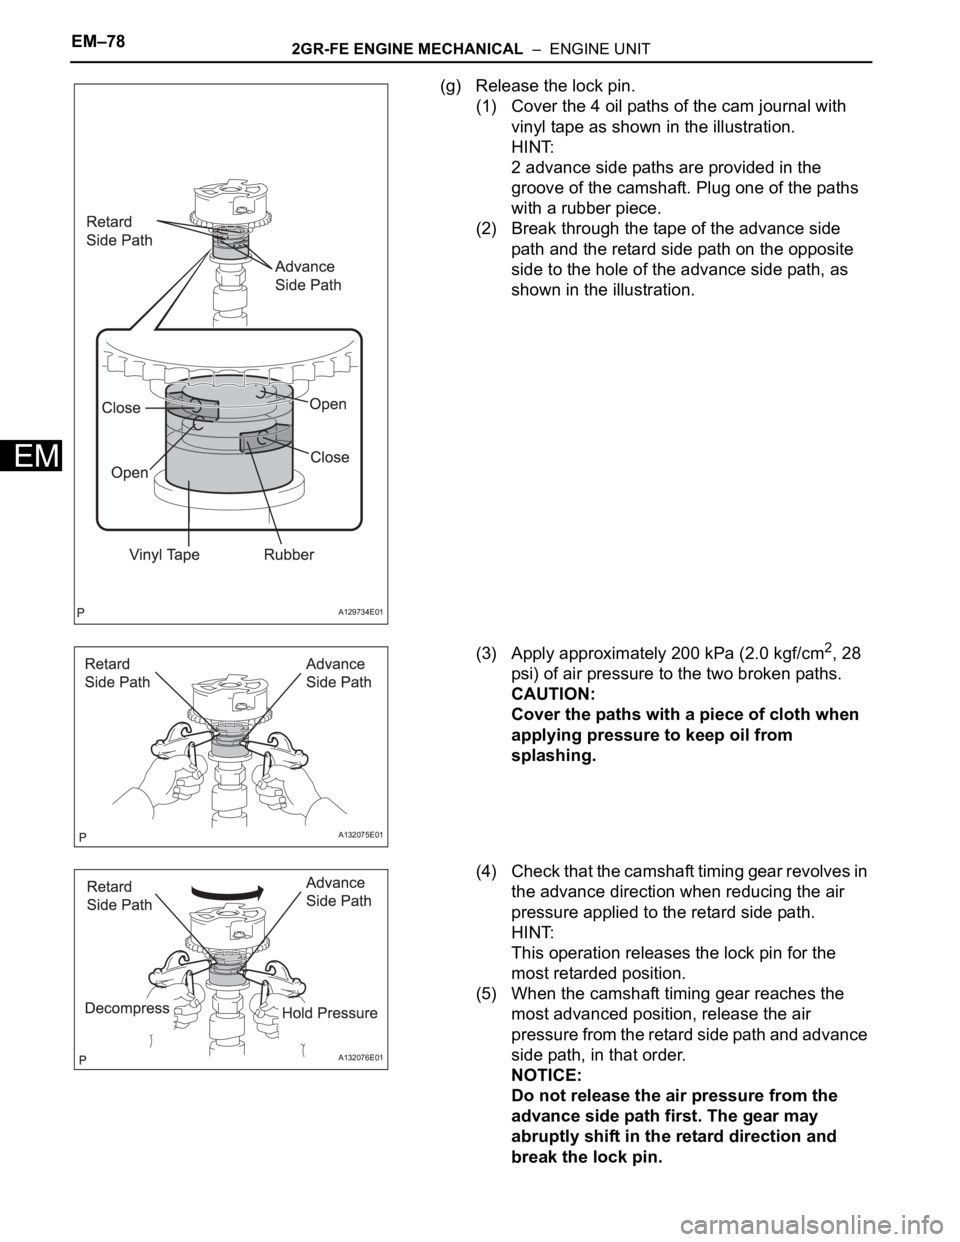
(g) Release the lock pin.
(1) Cover the 4 oil paths of the cam journal with
vinyl tape as shown in the illustration.
HINT:
2 advance side paths are provided in the
groove of the camshaft. Plug one of the paths
with a rubber piece.
(2) Break through the tape of the advance side
path and the retard side path on the opposite
side to the hole of the advance side path, as
shown in the illustration.
(3) Apply approximately 200 kPa (2.0 kgf/cm
2, 28
psi) of air pressure to the two broken paths.
CAUTION:
Cover the paths with a piece of cloth when
applying pressure to keep oil from
splashing.
(4) Check that the camshaft timing gear revolves in
the advance direction when reducing the air
pressure applied to the retard side path.
HINT:
This operation releases the lock pin for the
most retarded position.
(5) When the camshaft timing gear reaches the
most advanced position, release the air
pressure from the retard side path and advance
side path, in that order.
NOTICE:
Do not release the air pressure from the
advance side path first. The gear may
abruptly shift in the retard direction and
break the lock pin.
A129734E01
A132075E01
A132076E01
Page 716 of 2000
2GR-FE ENGINE MECHANICAL – ENGINE UNITEM–79
EM
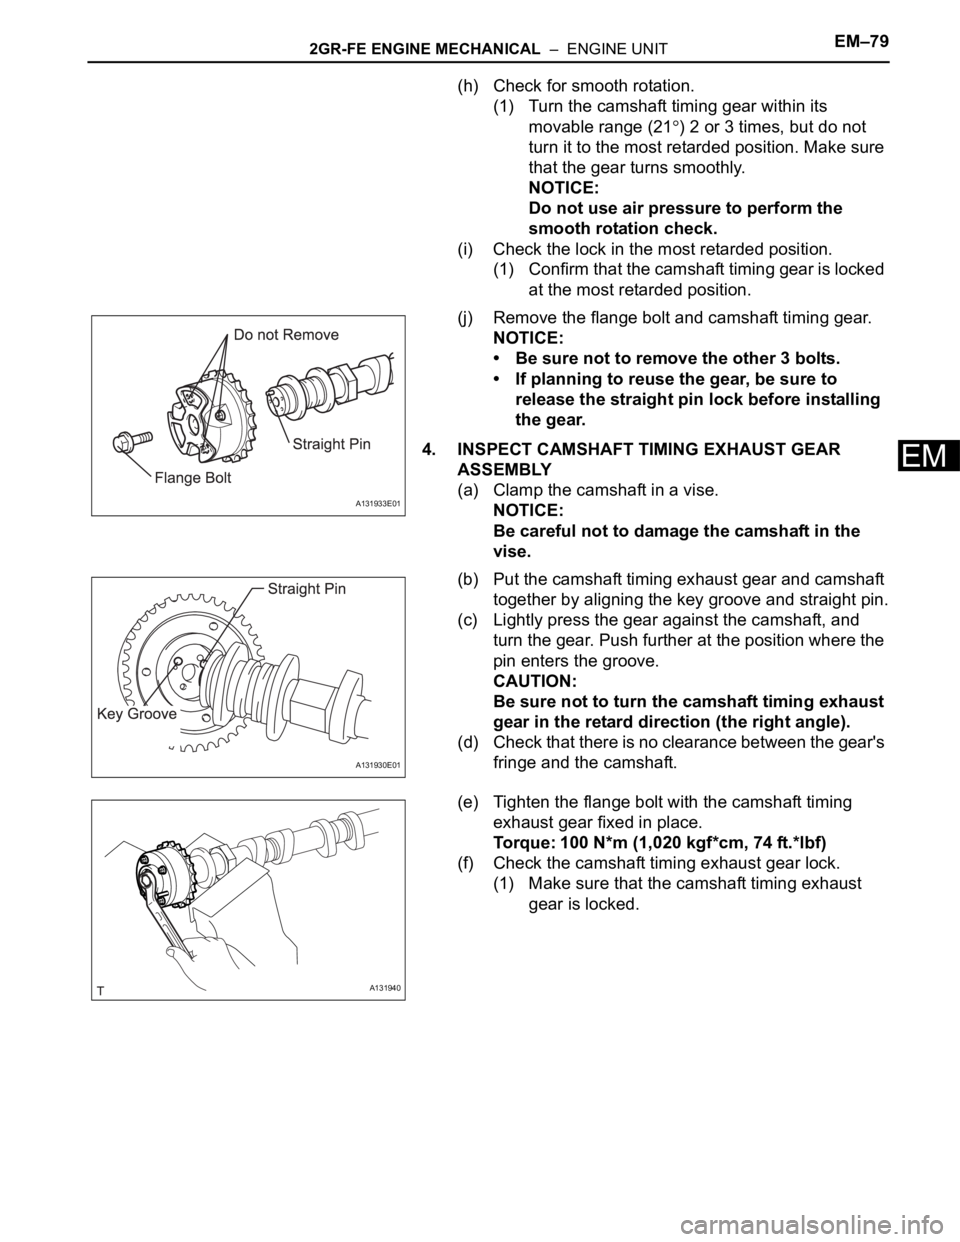
(h) Check for smooth rotation.
(1) Turn the camshaft timing gear within its
movable range (21
) 2 or 3 times, but do not
turn it to the most retarded position. Make sure
that the gear turns smoothly.
NOTICE:
Do not use air pressure to perform the
smooth rotation check.
(i) Check the lock in the most retarded position.
(1) Confirm that the camshaft timing gear is locked
at the most retarded position.
(j) Remove the flange bolt and camshaft timing gear.
NOTICE:
• Be sure not to remove the other 3 bolts.
• If planning to reuse the gear, be sure to
release the straight pin lock before installing
the gear.
4. INSPECT CAMSHAFT TIMING EXHAUST GEAR
ASSEMBLY
(a) Clamp the camshaft in a vise.
NOTICE:
Be careful not to damage the camshaft in the
vise.
(b) Put the camshaft timing exhaust gear and camshaft
together by aligning the key groove and straight pin.
(c) Lightly press the gear against the camshaft, and
turn the gear. Push further at the position where the
pin enters the groove.
CAUTION:
Be sure not to turn the camshaft timing exhaust
gear in the retard direction (the right angle).
(d) Check that there is no clearance between the gear's
fringe and the camshaft.
(e) Tighten the flange bolt with the camshaft timing
exhaust gear fixed in place.
Torque: 100 N*m (1,020 kgf*cm, 74 ft.*lbf)
(f) Check the camshaft timing exhaust gear lock.
(1) Make sure that the camshaft timing exhaust
gear is locked.
A131933E01
A131930E01
A131940
Page 718 of 2000
2GR-FE ENGINE MECHANICAL – ENGINE UNITEM–81
EM
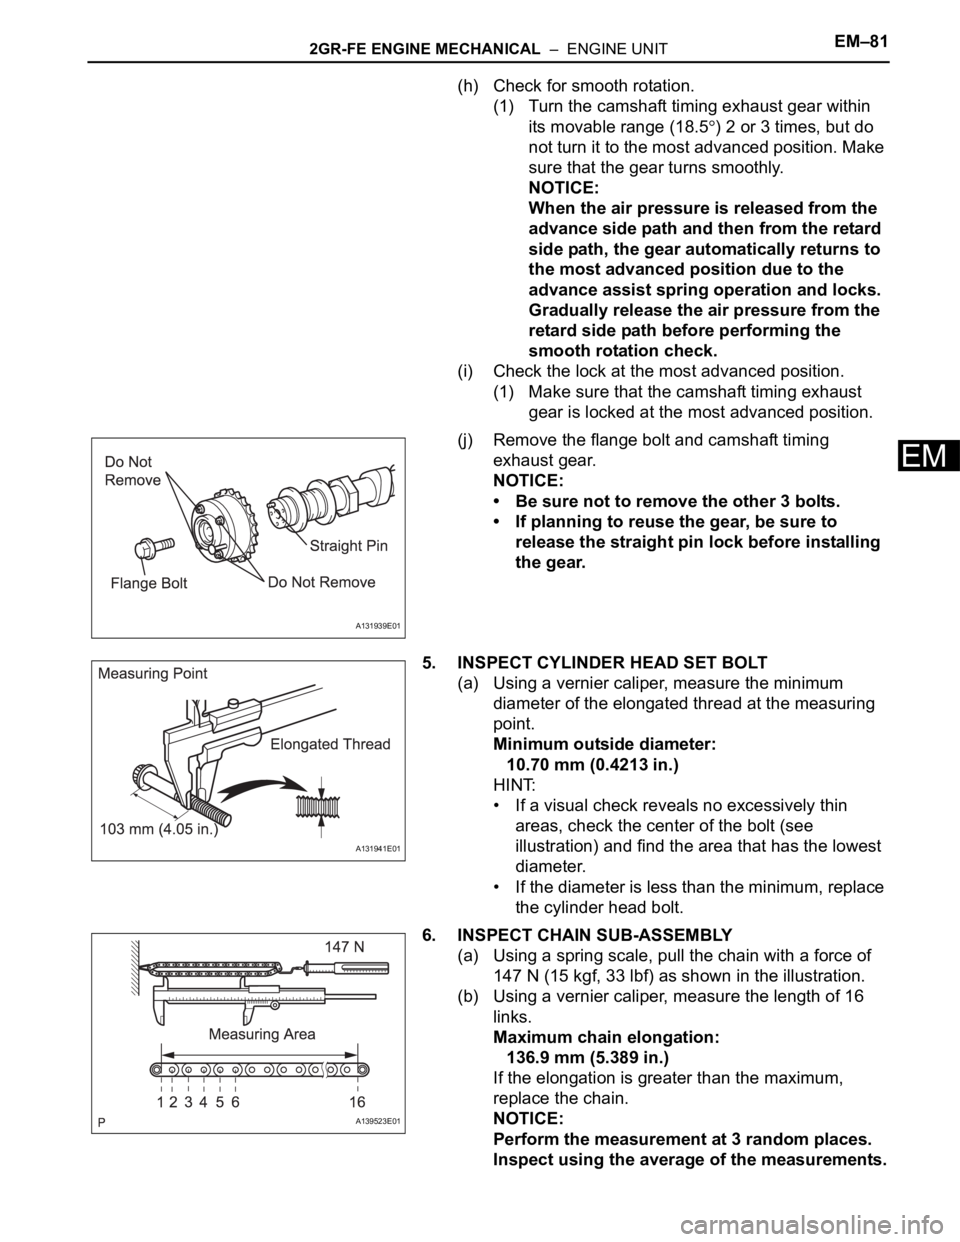
(h) Check for smooth rotation.
(1) Turn the camshaft timing exhaust gear within
its movable range (18.5
) 2 or 3 times, but do
not turn it to the most advanced position. Make
sure that the gear turns smoothly.
NOTICE:
When the air pressure is released from the
advance side path and then from the retard
side path, the gear automatically returns to
the most advanced position due to the
advance assist spring operation and locks.
Gradually release the air pressure from the
retard side path before performing the
smooth rotation check.
(i) Check the lock at the most advanced position.
(1) Make sure that the camshaft timing exhaust
gear is locked at the most advanced position.
(j) Remove the flange bolt and camshaft timing
exhaust gear.
NOTICE:
• Be sure not to remove the other 3 bolts.
• If planning to reuse the gear, be sure to
release the straight pin lock before installing
the gear.
5. INSPECT CYLINDER HEAD SET BOLT
(a) Using a vernier caliper, measure the minimum
diameter of the elongated thread at the measuring
point.
Minimum outside diameter:
10.70 mm (0.4213 in.)
HINT:
• If a visual check reveals no excessively thin
areas, check the center of the bolt (see
illustration) and find the area that has the lowest
diameter.
• If the diameter is less than the minimum, replace
the cylinder head bolt.
6. INSPECT CHAIN SUB-ASSEMBLY
(a) Using a spring scale, pull the chain with a force of
147 N (15 kgf, 33 lbf) as shown in the illustration.
(b) Using a vernier caliper, measure the length of 16
links.
Maximum chain elongation:
136.9 mm (5.389 in.)
If the elongation is greater than the maximum,
replace the chain.
NOTICE:
Perform the measurement at 3 random places.
Inspect using the average of the measurements.
A131939E01
A131941E01
A139523E01
Page 720 of 2000
2GR-FE ENGINE MECHANICAL – ENGINE UNITEM–83
EM
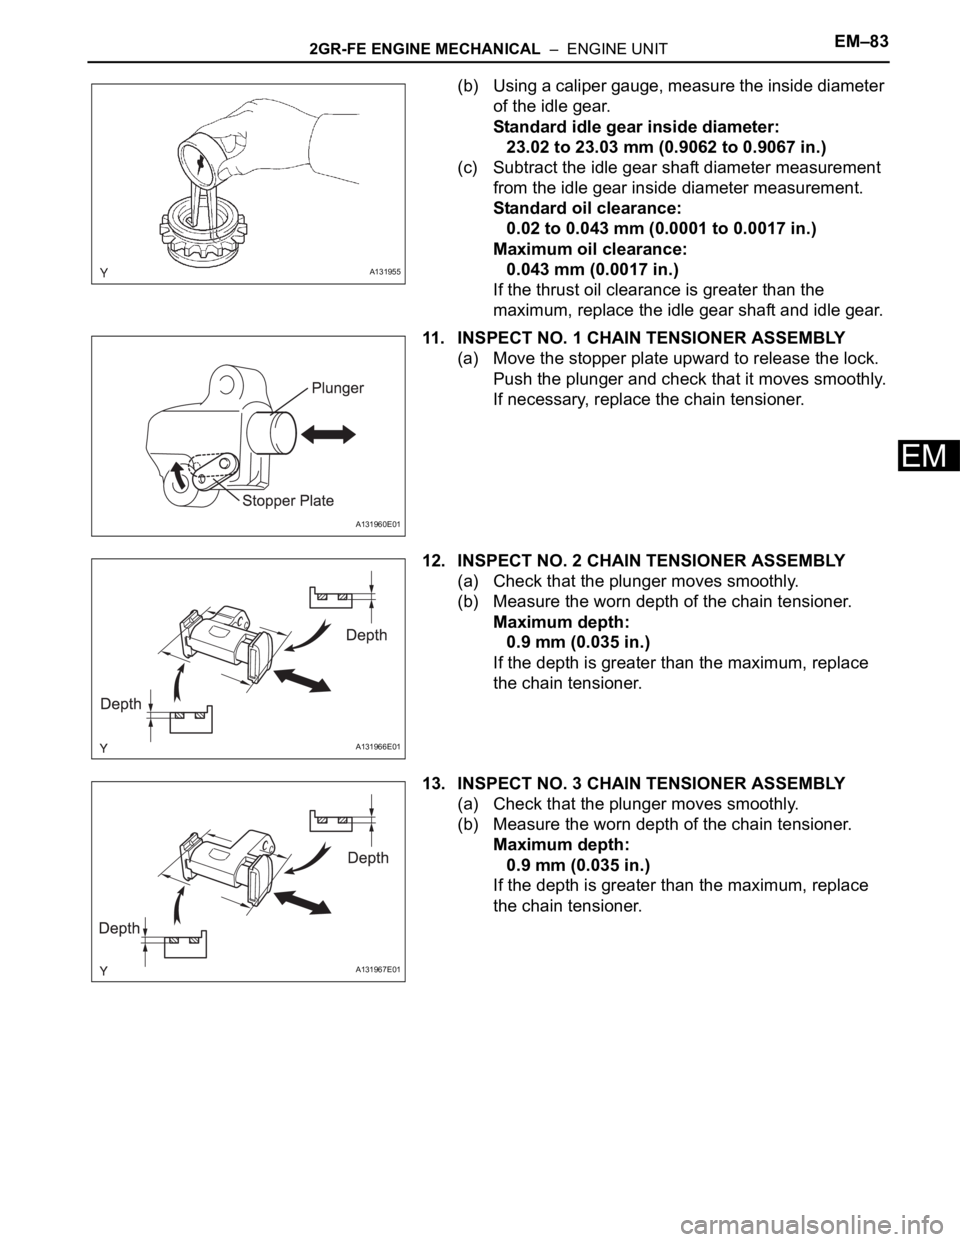
(b) Using a caliper gauge, measure the inside diameter
of the idle gear.
Standard idle gear inside diameter:
23.02 to 23.03 mm (0.9062 to 0.9067 in.)
(c) Subtract the idle gear shaft diameter measurement
from the idle gear inside diameter measurement.
Standard oil clearance:
0.02 to 0.043 mm (0.0001 to 0.0017 in.)
Maximum oil clearance:
0.043 mm (0.0017 in.)
If the thrust oil clearance is greater than the
maximum, replace the idle gear shaft and idle gear.
11. INSPECT NO. 1 CHAIN TENSIONER ASSEMBLY
(a) Move the stopper plate upward to release the lock.
Push the plunger and check that it moves smoothly.
If necessary, replace the chain tensioner.
12. INSPECT NO. 2 CHAIN TENSIONER ASSEMBLY
(a) Check that the plunger moves smoothly.
(b) Measure the worn depth of the chain tensioner.
Maximum depth:
0.9 mm (0.035 in.)
If the depth is greater than the maximum, replace
the chain tensioner.
13. INSPECT NO. 3 CHAIN TENSIONER ASSEMBLY
(a) Check that the plunger moves smoothly.
(b) Measure the worn depth of the chain tensioner.
Maximum depth:
0.9 mm (0.035 in.)
If the depth is greater than the maximum, replace
the chain tensioner.
A131955
A131960E01
A131966E01
A131967E01
Page 722 of 2000
2GR-FE ENGINE MECHANICAL – ENGINE UNITEM–85
EM
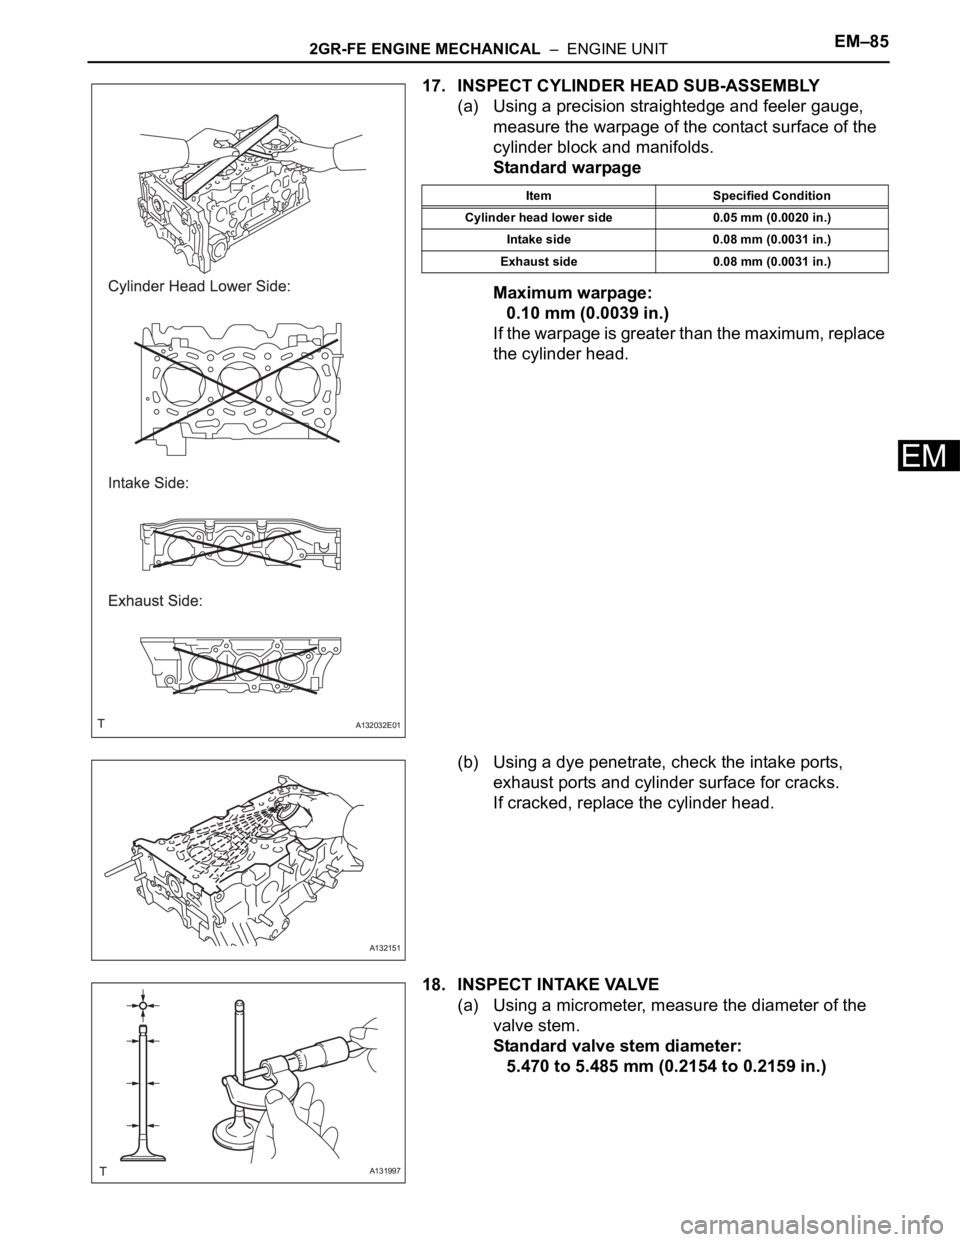
17. INSPECT CYLINDER HEAD SUB-ASSEMBLY
(a) Using a precision straightedge and feeler gauge,
measure the warpage of the contact surface of the
cylinder block and manifolds.
Standard warpage
Maximum warpage:
0.10 mm (0.0039 in.)
If the warpage is greater than the maximum, replace
the cylinder head.
(b) Using a dye penetrate, check the intake ports,
exhaust ports and cylinder surface for cracks.
If cracked, replace the cylinder head.
18. INSPECT INTAKE VALVE
(a) Using a micrometer, measure the diameter of the
valve stem.
Standard valve stem diameter:
5.470 to 5.485 mm (0.2154 to 0.2159 in.)
A132032E01
Item Specified Condition
Cylinder head lower side 0.05 mm (0.0020 in.)
Intake side 0.08 mm (0.0031 in.)
Exhaust side 0.08 mm (0.0031 in.)
A132151
A131997