TOYOTA RAV4 2006 Service Repair Manual
Manufacturer: TOYOTA, Model Year: 2006,
Model line: RAV4,
Model: TOYOTA RAV4 2006
Pages: 2000, PDF Size: 45.84 MB
TOYOTA RAV4 2006 Service Repair Manual
RAV4 2006
TOYOTA
TOYOTA
https://www.carmanualsonline.info/img/14/57463/w960_57463-0.png
TOYOTA RAV4 2006 Service Repair Manual
Trending: ignition lock cylinder, Timing chain cover, radiator, Sensor O2, torque, injector, load capacity
Page 1331 of 2000
U241E AUTOMATIC TRANSAXLE – DIFFERENTIAL CASEAX–261
AX
Standard adjusting shim thickness
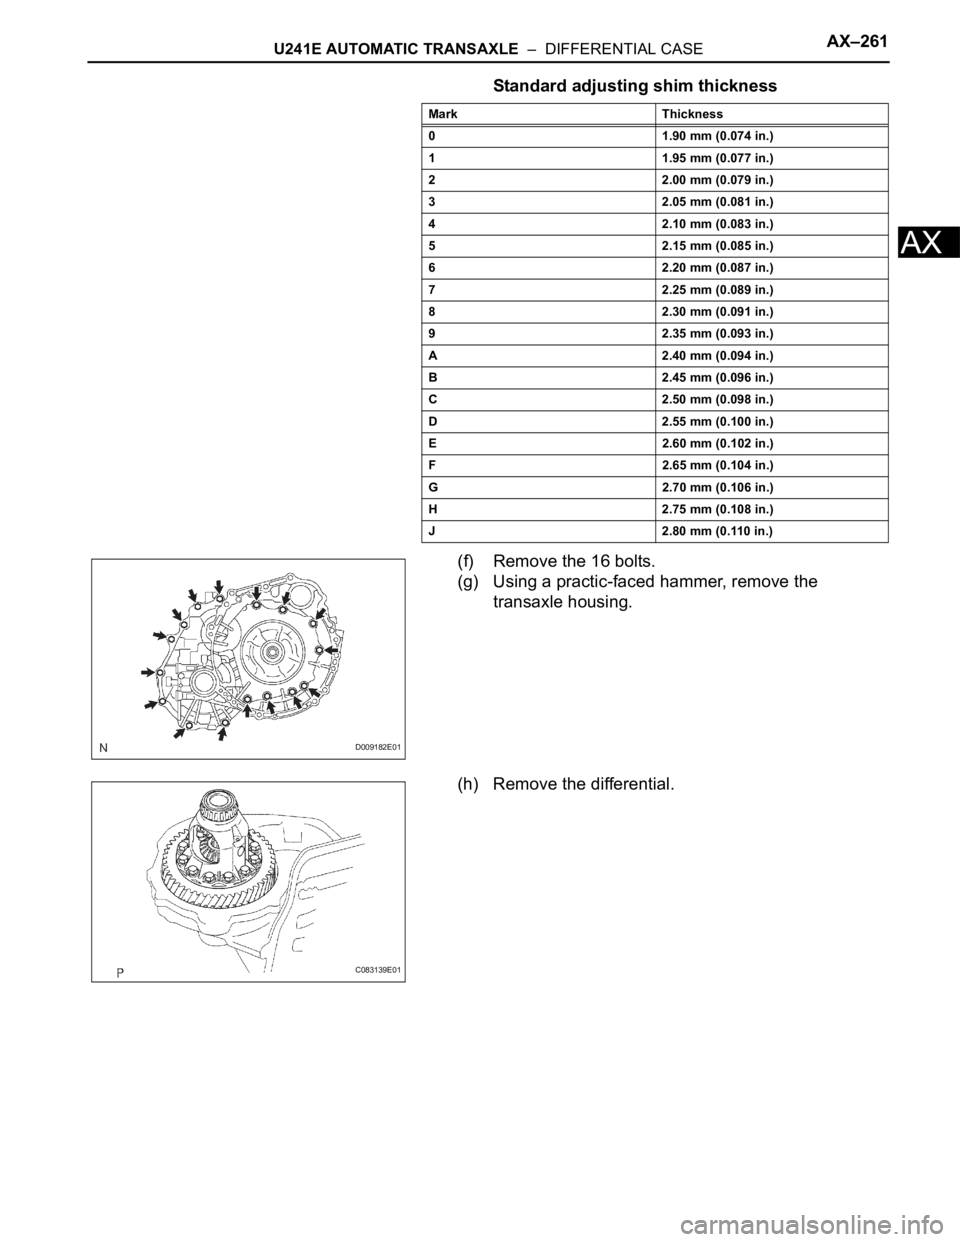
(f) Remove the 16 bolts.
(g) Using a practic-faced hammer, remove the
transaxle housing.
(h) Remove the differential.
Mark Thickness
0 1.90 mm (0.074 in.)
1 1.95 mm (0.077 in.)
2 2.00 mm (0.079 in.)
3 2.05 mm (0.081 in.)
4 2.10 mm (0.083 in.)
5 2.15 mm (0.085 in.)
6 2.20 mm (0.087 in.)
7 2.25 mm (0.089 in.)
8 2.30 mm (0.091 in.)
9 2.35 mm (0.093 in.)
A 2.40 mm (0.094 in.)
B 2.45 mm (0.096 in.)
C 2.50 mm (0.098 in.)
D 2.55 mm (0.100 in.)
E 2.60 mm (0.102 in.)
F 2.65 mm (0.104 in.)
G 2.70 mm (0.106 in.)
H 2.75 mm (0.108 in.)
J 2.80 mm (0.110 in.)
D009182E01
C083139E01
Page 1332 of 2000
AX–262U241E AUTOMATIC TRANSAXLE – DIFFERENTIAL CASE
AX
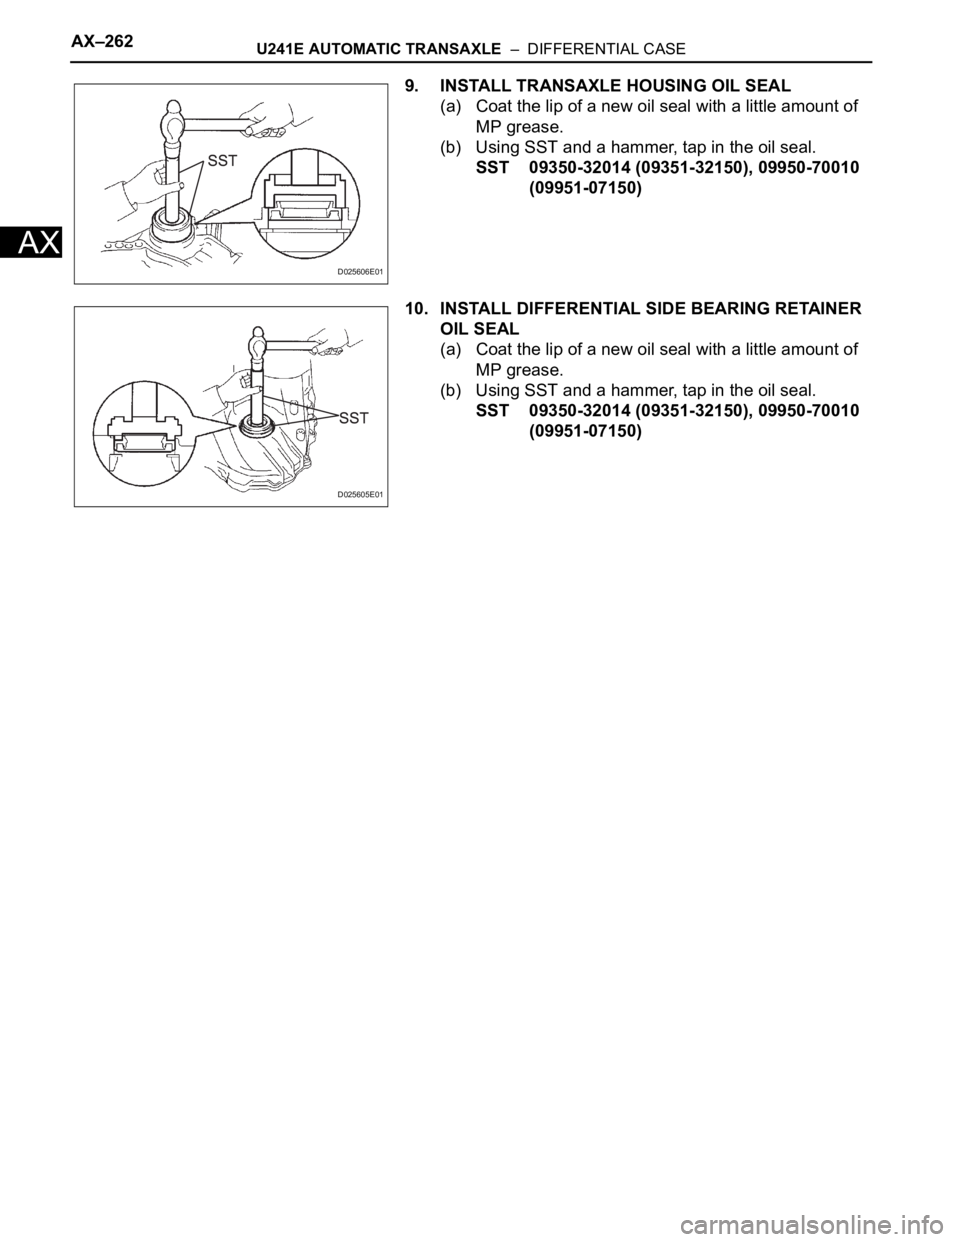
9. INSTALL TRANSAXLE HOUSING OIL SEAL
(a) Coat the lip of a new oil seal with a little amount of
MP grease.
(b) Using SST and a hammer, tap in the oil seal.
SST 09350-32014 (09351-32150), 09950-70010
(09951-07150)
10. INSTALL DIFFERENTIAL SIDE BEARING RETAINER
OIL SEAL
(a) Coat the lip of a new oil seal with a little amount of
MP grease.
(b) Using SST and a hammer, tap in the oil seal.
SST 09350-32014 (09351-32150), 09950-70010
(09951-07150)
D025606E01
D025605E01
Page 1333 of 2000
GF1A TRANSFER – ACTIVE TORQUE CONTROL 4WD SYSTEMTF–5
TF
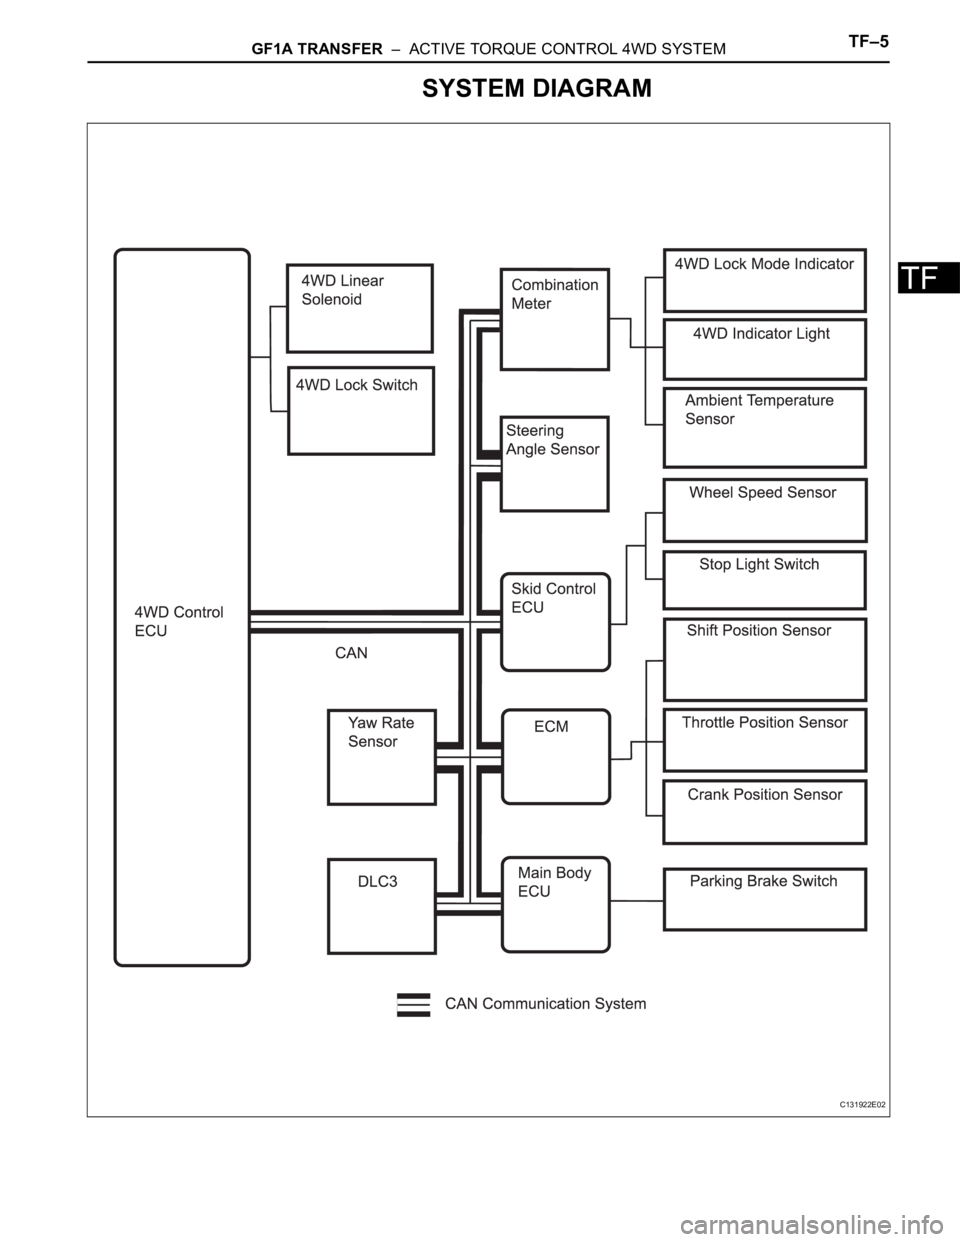
SYSTEM DIAGRAM
C131922E02
Page 1334 of 2000
TF–6GF1A TRANSFER – ACTIVE TORQUE CONTROL 4WD SYSTEM
TF
SYSTEM DESCRIPTION
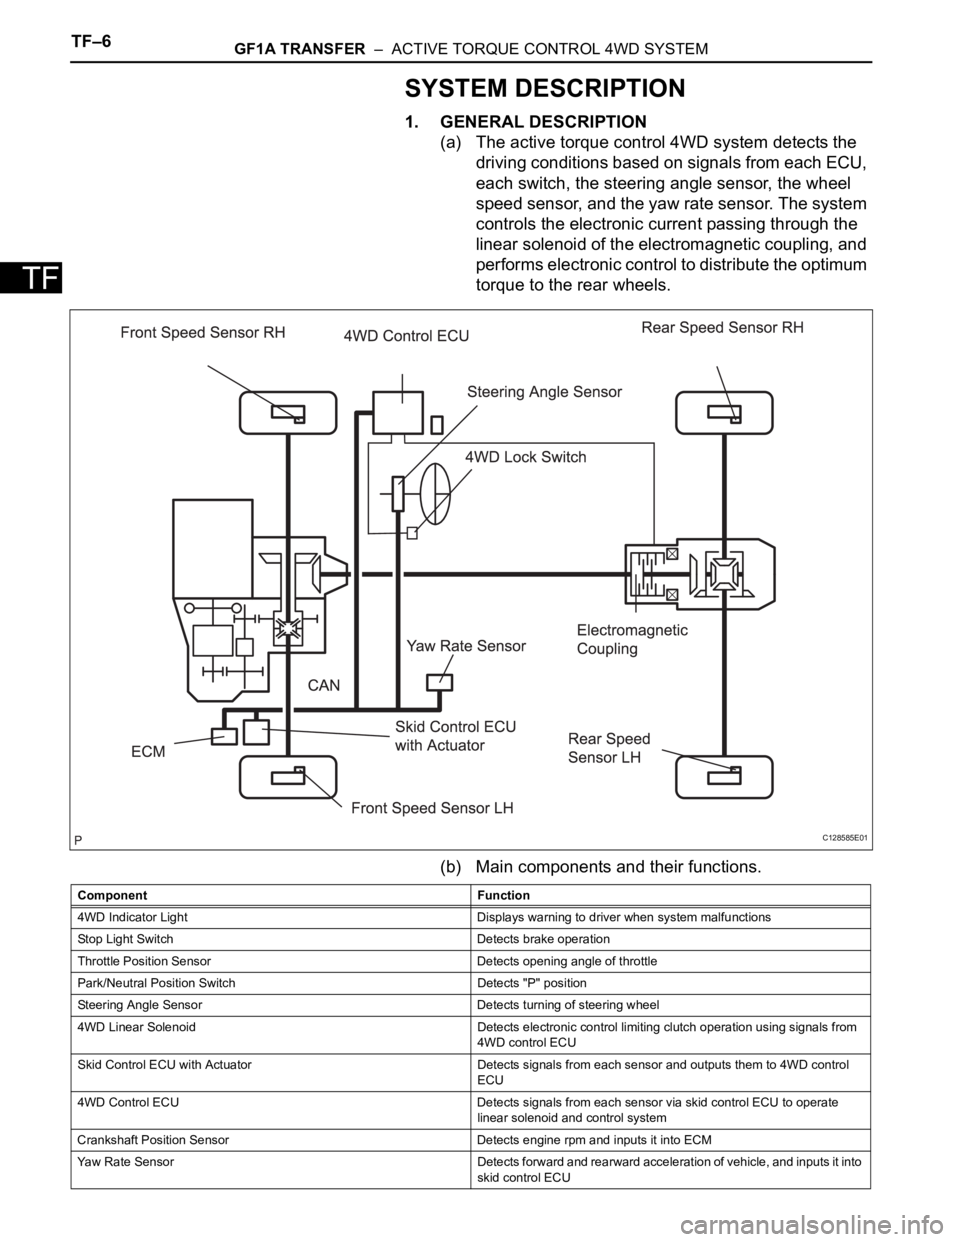
1. GENERAL DESCRIPTION
(a) The active torque control 4WD system detects the
driving conditions based on signals from each ECU,
each switch, the steering angle sensor, the wheel
speed sensor, and the yaw rate sensor. The system
controls the electronic current passing through the
linear solenoid of the electromagnetic coupling, and
performs electronic control to distribute the optimum
torque to the rear wheels.
(b) Main components and their functions.
C128585E01
Component Function
4WD Indicator Light Displays warning to driver when system malfunctions
Stop Light Switch Detects brake operation
Throttle Position Sensor Detects opening angle of throttle
Park/Neutral Position Switch Detects "P" position
Steering Angle Sensor Detects turning of steering wheel
4WD Linear Solenoid Detects electronic control limiting clutch operation using signals from
4WD control ECU
Skid Control ECU with Actuator Detects signals from each sensor and outputs them to 4WD control
ECU
4WD Control ECU Detects signals from each sensor via skid control ECU to operate
linear solenoid and control system
Crankshaft Position Sensor Detects engine rpm and inputs it into ECM
Yaw Rate Sensor Detects forward and rearward acceleration of vehicle, and inputs it into
skid control ECU
Page 1335 of 2000

GF1A TRANSFER – ACTIVE TORQUE CONTROL 4WD SYSTEMTF–7
TF2. DRIVING FUNCTION
Ambient Temperature Detects external ambient temperature and inputs it into body ECU
Electromagnetic Coupling Based on amount of current sent from 4WD control ECU, torque is
distributed to rear wheels
4WD Lock Switch Change of side auto mode for lock mode
4WD Lock Mode Indicator Light Lock mode control status is communicated to driver through indicator
light illumination
When lock mode is turned ON, indicator light blinks twice and then
remains illuminated.
When lock mode is turned OFF, indicator light turns OFF. Component Function
Vehicle Condition Status
Control at Vehicle Startup This controls the amount of sideway sliding that occurs at rear of
vehicles when accelerating from stop to improve acceleration and hill
climbing capacity
Slip Control at Vehicle Startup This helps prevent vehicle from sliding sideways. When accelerating a
stopped vehicle with the steering wheel turned, it ensures steering
stability
Slip Control This ensures high turning performance and that stability is not affected
by road surface conditions during mid and high speed running
Control During Acceleration This controls straight-line running when accelerating during mid and
high speeds to ensure straight-line stability of the vehicle
Page 1336 of 2000
TF–8GF1A TRANSFER – ACTIVE TORQUE CONTROL 4WD SYSTEM
TF
3. REFERENCE MECHANISM
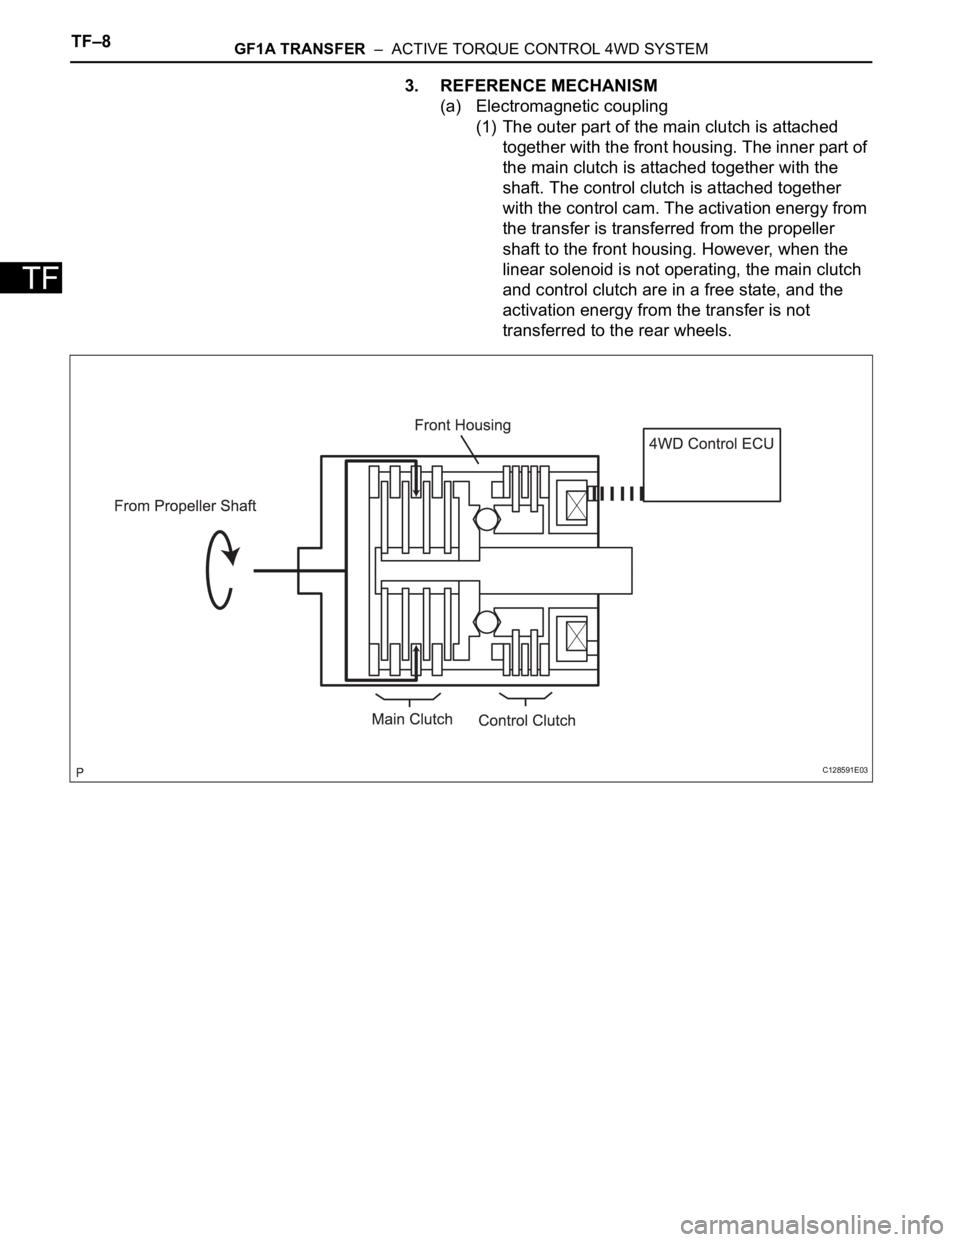
(a) Electromagnetic coupling
(1) The outer part of the main clutch is attached
together with the front housing. The inner part of
the main clutch is attached together with the
shaft. The control clutch is attached together
with the control cam. The activation energy from
the transfer is transferred from the propeller
shaft to the front housing. However, when the
linear solenoid is not operating, the main clutch
and control clutch are in a free state, and the
activation energy from the transfer is not
transferred to the rear wheels.
C128591E03
Page 1337 of 2000
GF1A TRANSFER – ACTIVE TORQUE CONTROL 4WD SYSTEMTF–9
TF
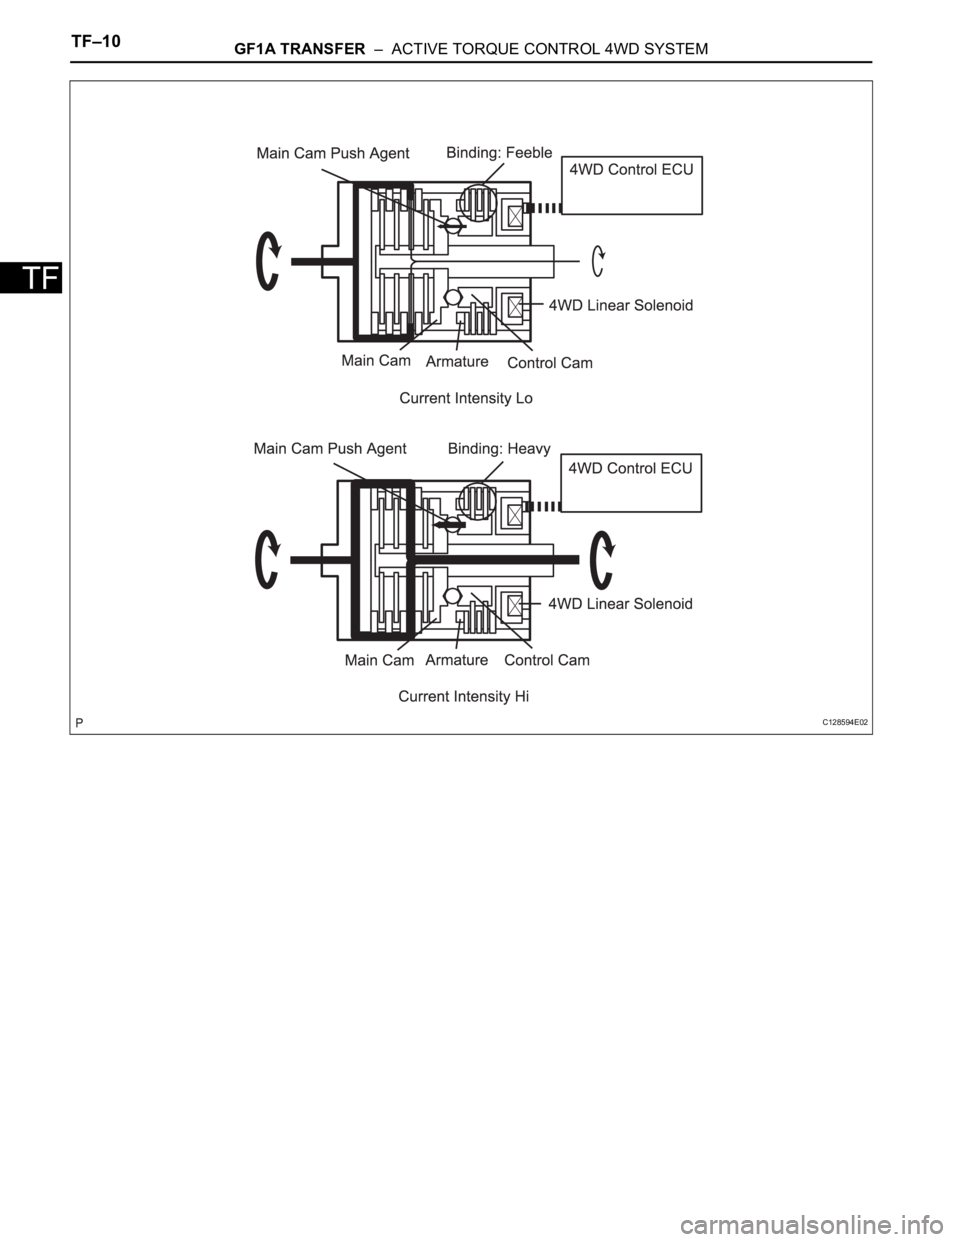
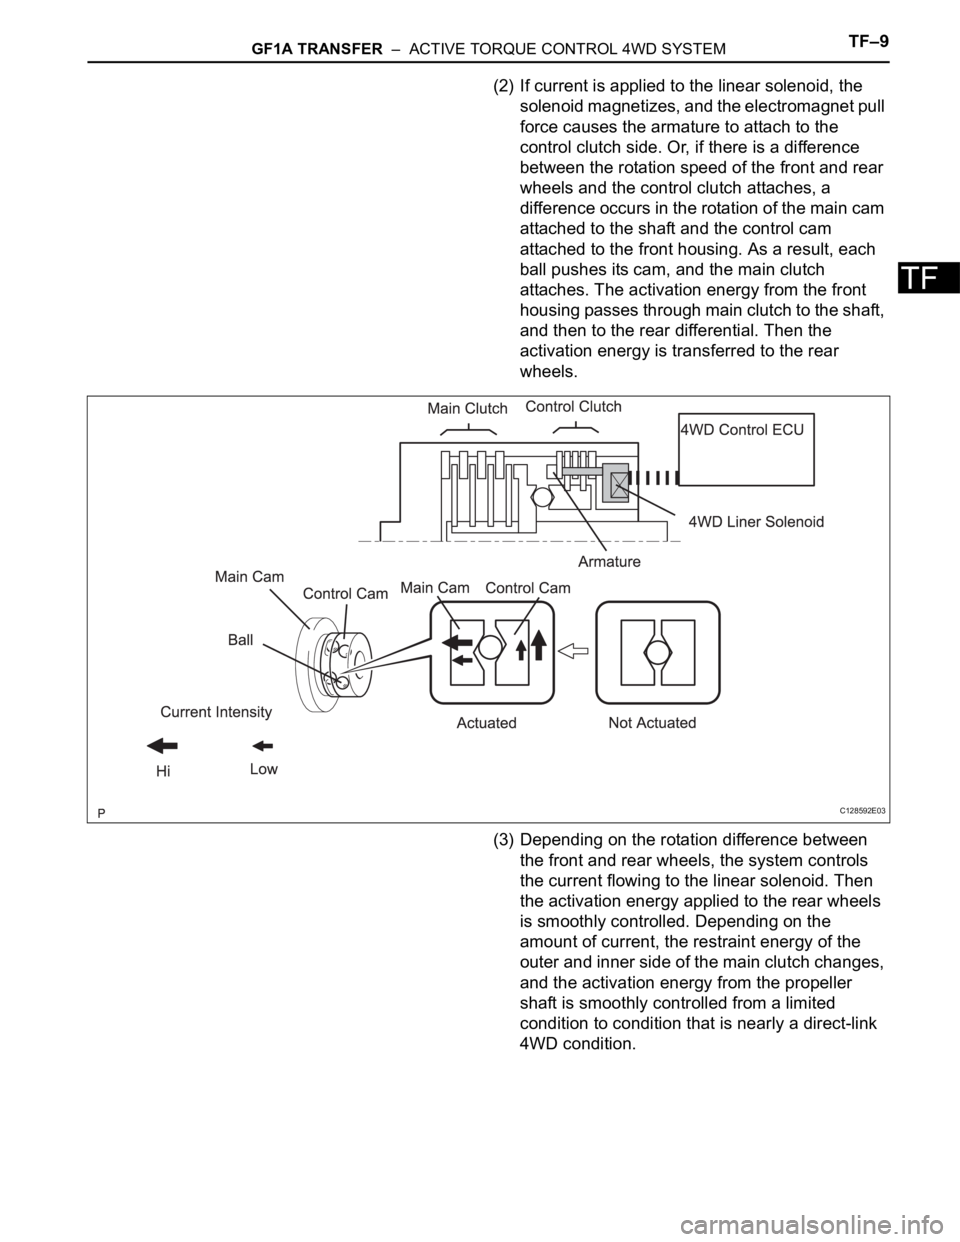
(2) If current is applied to the linear solenoid, the
solenoid magnetizes, and the electromagnet pull
force causes the armature to attach to the
control clutch side. Or, if there is a difference
between the rotation speed of the front and rear
wheels and the control clutch attaches, a
difference occurs in the rotation of the main cam
attached to the shaft and the control cam
attached to the front housing. As a result, each
ball pushes its cam, and the main clutch
attaches. The activation energy from the front
housing passes through main clutch to the shaft,
and then to the rear differential. Then the
activation energy is transferred to the rear
wheels.
(3) Depending on the rotation difference between
the front and rear wheels, the system controls
the current flowing to the linear solenoid. Then
the activation energy applied to the rear wheels
is smoothly controlled. Depending on the
amount of current, the restraint energy of the
outer and inner side of the main clutch changes,
and the activation energy from the propeller
shaft is smoothly controlled from a limited
condition to condition that is nearly a direct-link
4WD condition.
C128592E03
Page 1338 of 2000
TF–10GF1A TRANSFER – ACTIVE TORQUE CONTROL 4WD SYSTEM
TF
C128594E02
Page 1339 of 2000
GF1A TRANSFER – ACTIVE TORQUE CONTROL 4WD SYSTEMTF–11
TF
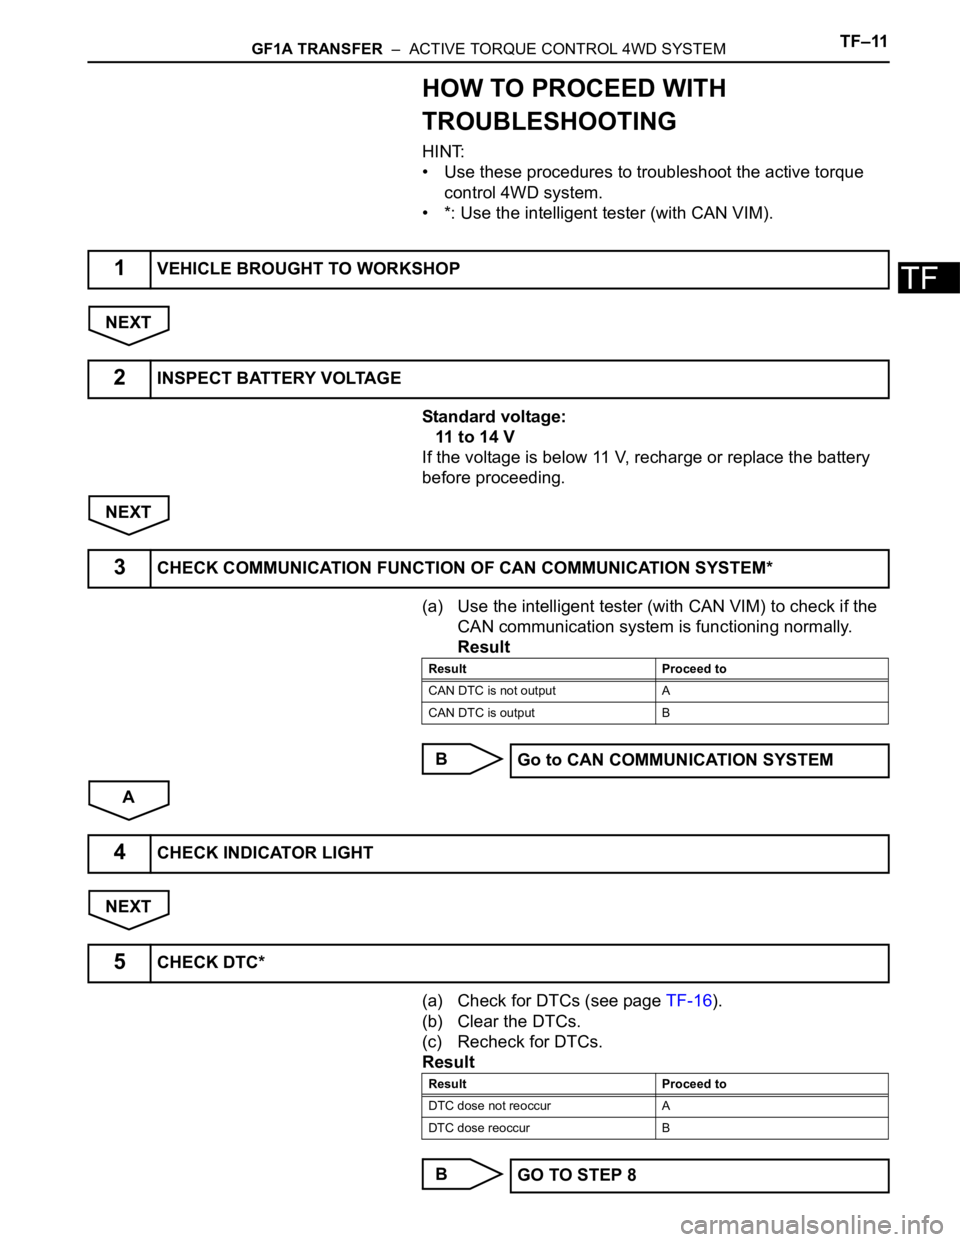
HOW TO PROCEED WITH
TROUBLESHOOTING
HINT:
• Use these procedures to troubleshoot the active torque
control 4WD system.
• *: Use the intelligent tester (with CAN VIM).
NEXT
Standard voltage:
11 to 14 V
If the voltage is below 11 V, recharge or replace the battery
before proceeding.
NEXT
(a) Use the intelligent tester (with CAN VIM) to check if the
CAN communication system is functioning normally.
Result
B
A
NEXT
(a) Check for DTCs (see page TF-16).
(b) Clear the DTCs.
(c) Recheck for DTCs.
Result
B
1VEHICLE BROUGHT TO WORKSHOP
2INSPECT BATTERY VOLTAGE
3CHECK COMMUNICATION FUNCTION OF CAN COMMUNICATION SYSTEM*
Result Proceed to
CAN DTC is not output A
CAN DTC is output B
Go to CAN COMMUNICATION SYSTEM
4CHECK INDICATOR LIGHT
5CHECK DTC*
Result Proceed to
DTC dose not reoccur A
DTC dose reoccur B
GO TO STEP 8
Page 1340 of 2000
TF–12GF1A TRANSFER – ACTIVE TORQUE CONTROL 4WD SYSTEM
TF
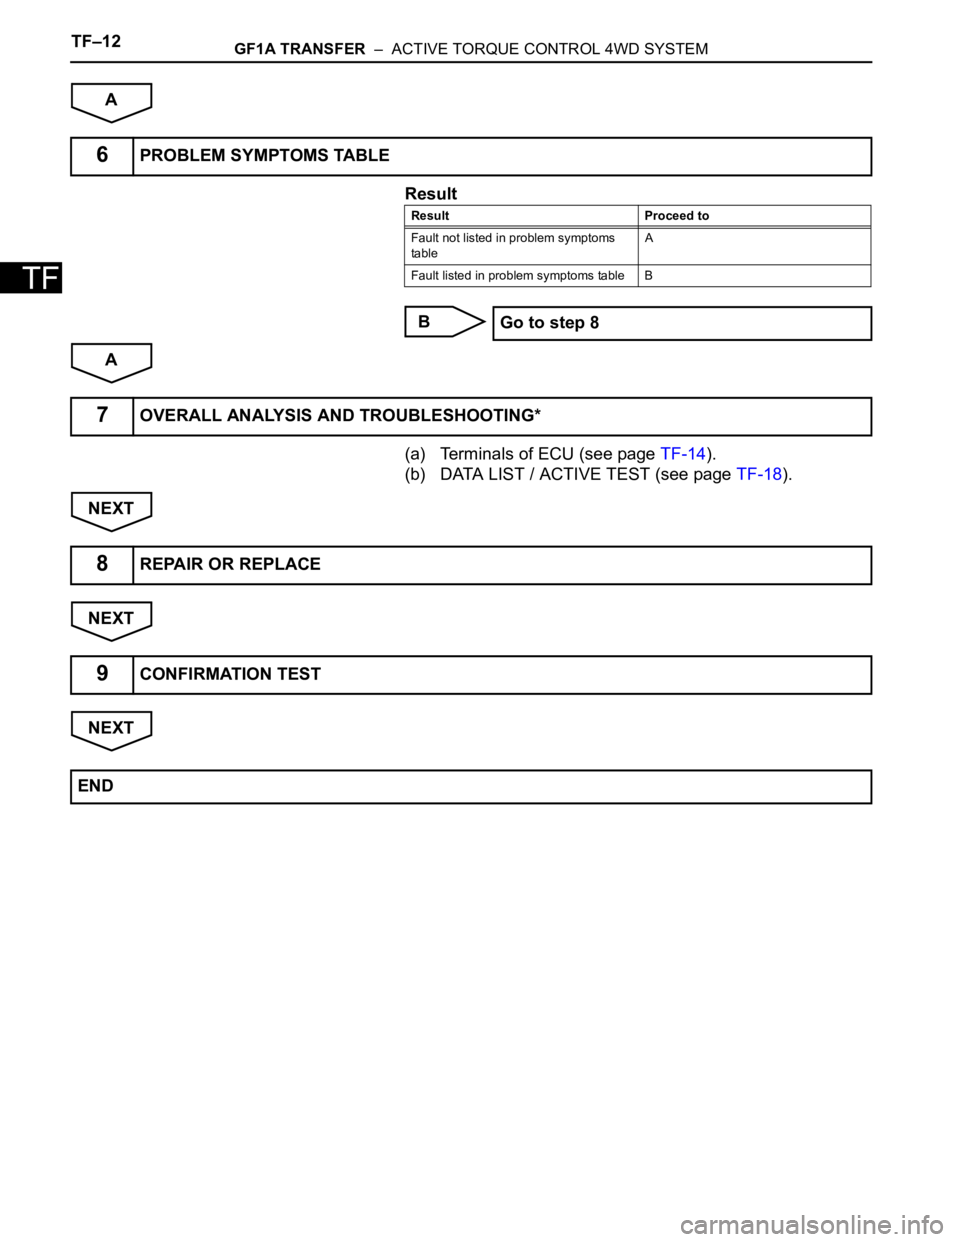
A
Result
B
A
(a) Terminals of ECU (see page TF-14).
(b) DATA LIST / ACTIVE TEST (see page TF-18).
NEXT
NEXT
NEXT
6PROBLEM SYMPTOMS TABLE
Result Proceed to
Fault not listed in problem symptoms
tableA
Fault listed in problem symptoms table B
Go to step 8
7OVERALL ANALYSIS AND TROUBLESHOOTING*
8REPAIR OR REPLACE
9CONFIRMATION TEST
END
Trending: front suspension, throttle, automatic transmission, steering, fuse diagram, turn signal bulb, Install oil pan sub-assembly
