TOYOTA RAV4 2006 Service Repair Manual
Manufacturer: TOYOTA, Model Year: 2006, Model line: RAV4, Model: TOYOTA RAV4 2006Pages: 2000, PDF Size: 45.84 MB
Page 661 of 2000
EM–1342AZ-FE ENGINE MECHANICAL – ENGINE UNIT
EM
HINT:
The thrust washer thickness is 1.93 to 1.98 mm
(0.0760 to 0.0780 in.).
65. INSPECT CRANKSHAFT OIL CLEARANCE
NOTICE:
Do not turn the crankshaft during the measurement.
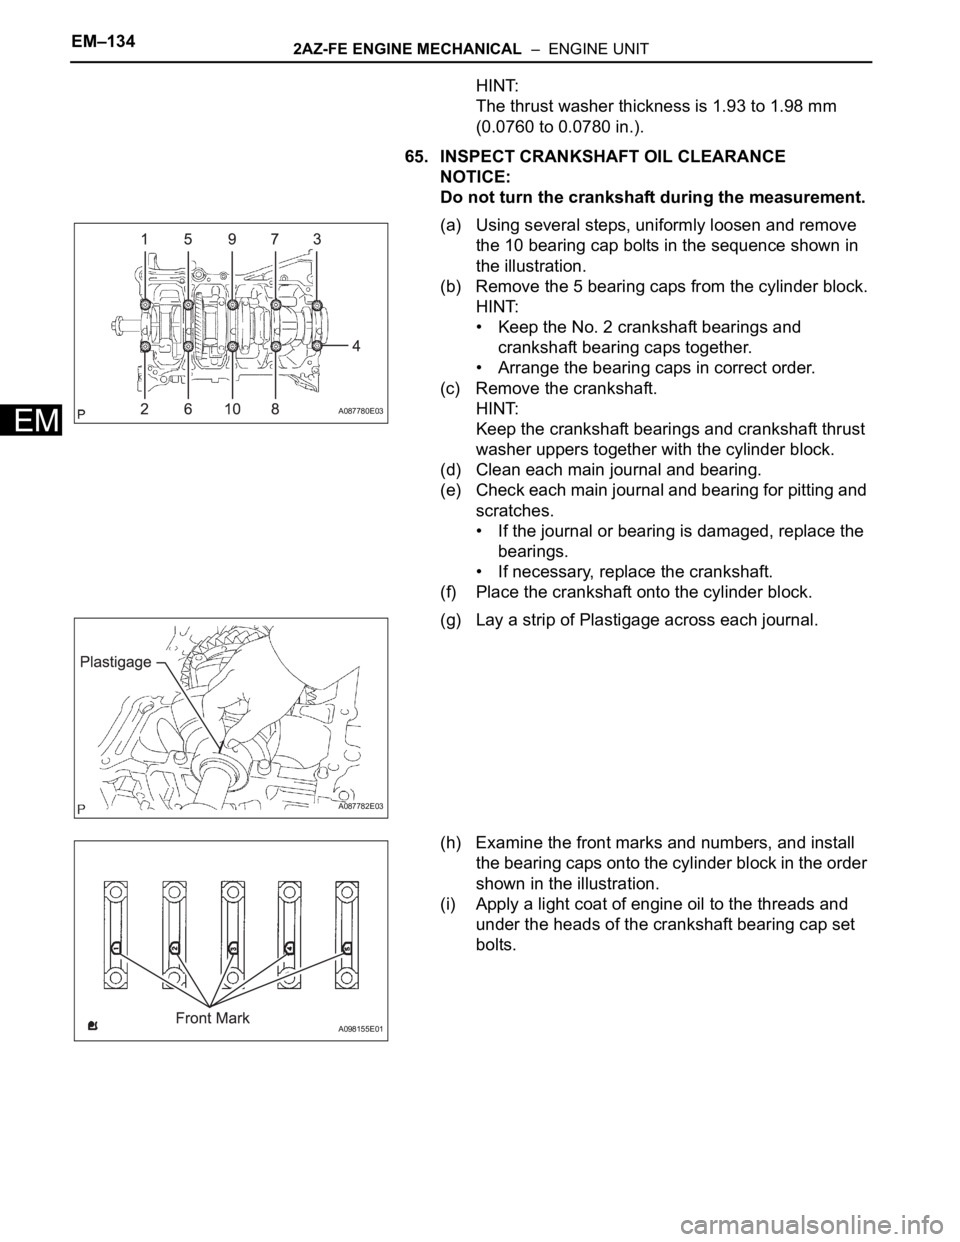
(a) Using several steps, uniformly loosen and remove
the 10 bearing cap bolts in the sequence shown in
the illustration.
(b) Remove the 5 bearing caps from the cylinder block.
HINT:
• Keep the No. 2 crankshaft bearings and
crankshaft bearing caps together.
• Arrange the bearing caps in correct order.
(c) Remove the crankshaft.
HINT:
Keep the crankshaft bearings and crankshaft thrust
washer uppers together with the cylinder block.
(d) Clean each main journal and bearing.
(e) Check each main journal and bearing for pitting and
scratches.
• If the journal or bearing is damaged, replace the
bearings.
• If necessary, replace the crankshaft.
(f) Place the crankshaft onto the cylinder block.
(g) Lay a strip of Plastigage across each journal.
(h) Examine the front marks and numbers, and install
the bearing caps onto the cylinder block in the order
shown in the illustration.
(i) Apply a light coat of engine oil to the threads and
under the heads of the crankshaft bearing cap set
bolts.
A087780E03
A087782E03
A098155E01
Page 662 of 2000
2AZ-FE ENGINE MECHANICAL – ENGINE UNITEM–135
EM
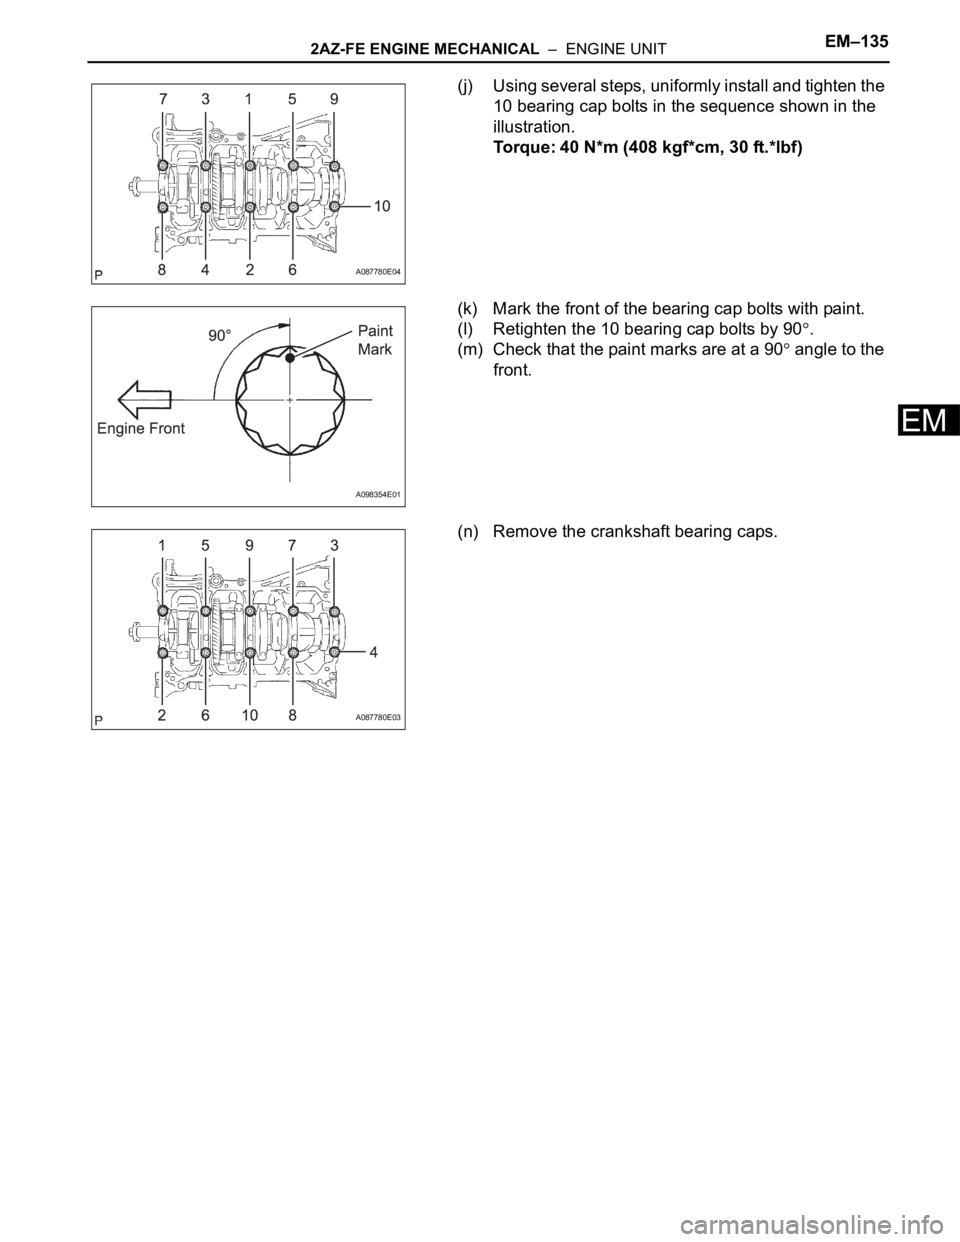
(j) Using several steps, uniformly install and tighten the
10 bearing cap bolts in the sequence shown in the
illustration.
Torque: 40 N*m (408 kgf*cm, 30 ft.*lbf)
(k) Mark the front of the bearing cap bolts with paint.
(l) Retighten the 10 bearing cap bolts by 90
.
(m) Check that the paint marks are at a 90
angle to the
front.
(n) Remove the crankshaft bearing caps.
A087780E04
A098354E01
A087780E03
Page 663 of 2000
EM–1362AZ-FE ENGINE MECHANICAL – ENGINE UNIT
EM
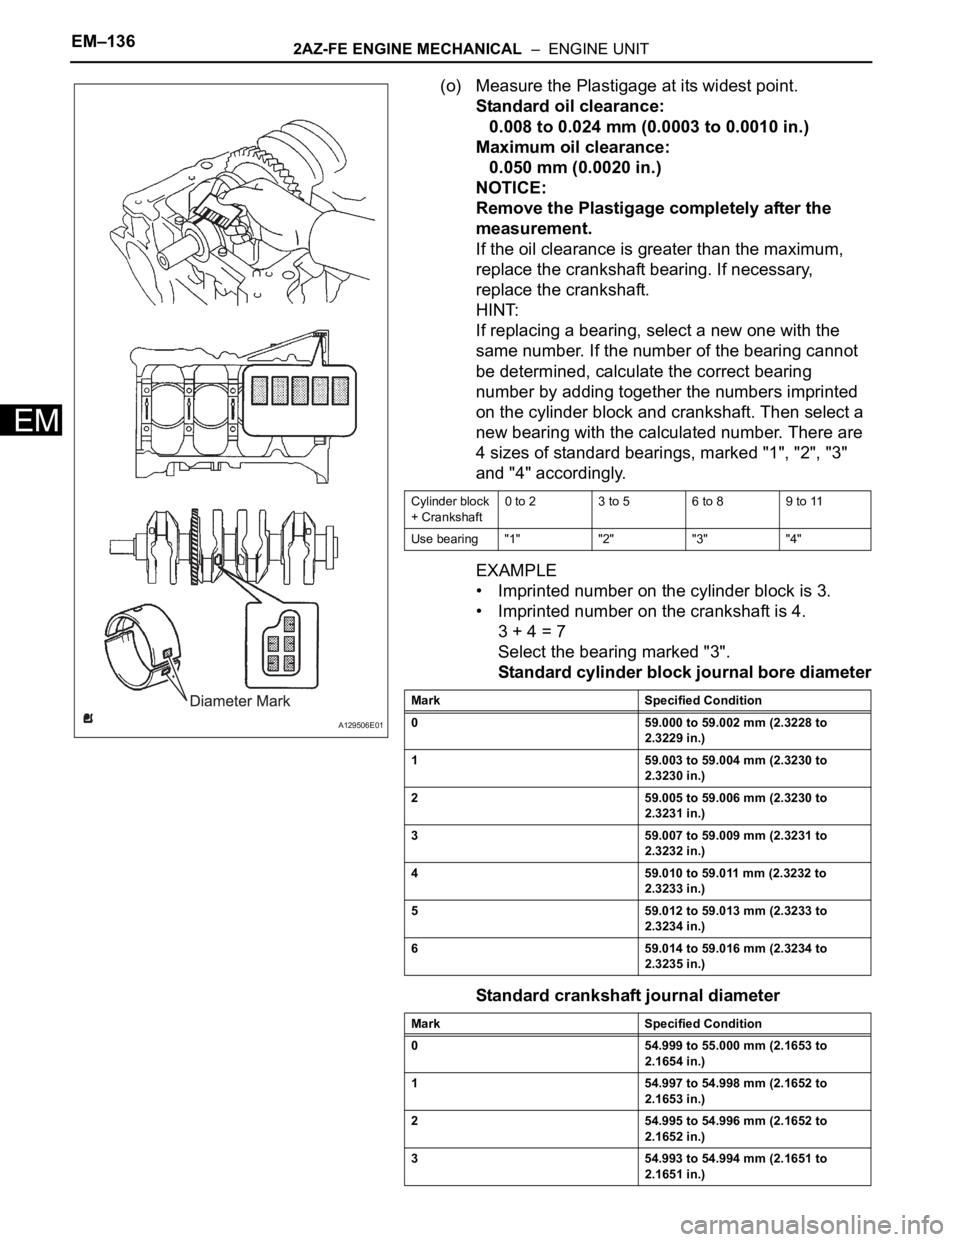
(o) Measure the Plastigage at its widest point.
Standard oil clearance:
0.008 to 0.024 mm (0.0003 to 0.0010 in.)
Maximum oil clearance:
0.050 mm (0.0020 in.)
NOTICE:
Remove the Plastigage completely after the
measurement.
If the oil clearance is greater than the maximum,
replace the crankshaft bearing. If necessary,
replace the crankshaft.
HINT:
If replacing a bearing, select a new one with the
same number. If the number of the bearing cannot
be determined, calculate the correct bearing
number by adding together the numbers imprinted
on the cylinder block and crankshaft. Then select a
new bearing with the calculated number. There are
4 sizes of standard bearings, marked "1", "2", "3"
and "4" accordingly.
EXAMPLE
• Imprinted number on the cylinder block is 3.
• Imprinted number on the crankshaft is 4.
3 + 4 = 7
Select the bearing marked "3".
Standard cylinder block journal bore diameter
Standard crankshaft journal diameter
A129506E01
Cylinder block
+ Crankshaft0 to 2 3 to 5 6 to 8 9 to 11
Use bearing "1" "2" "3" "4"
Mark Specified Condition
0 59.000 to 59.002 mm (2.3228 to
2.3229 in.)
1 59.003 to 59.004 mm (2.3230 to
2.3230 in.)
2 59.005 to 59.006 mm (2.3230 to
2.3231 in.)
3 59.007 to 59.009 mm (2.3231 to
2.3232 in.)
4 59.010 to 59.011 mm (2.3232 to
2.3233 in.)
5 59.012 to 59.013 mm (2.3233 to
2.3234 in.)
6 59.014 to 59.016 mm (2.3234 to
2.3235 in.)
Mark Specified Condition
0 54.999 to 55.000 mm (2.1653 to
2.1654 in.)
1 54.997 to 54.998 mm (2.1652 to
2.1653 in.)
2 54.995 to 54.996 mm (2.1652 to
2.1652 in.)
3 54.993 to 54.994 mm (2.1651 to
2.1651 in.)
Page 664 of 2000
2AZ-FE ENGINE MECHANICAL – ENGINE UNITEM–137
EM
Standard bearing center wall thickness
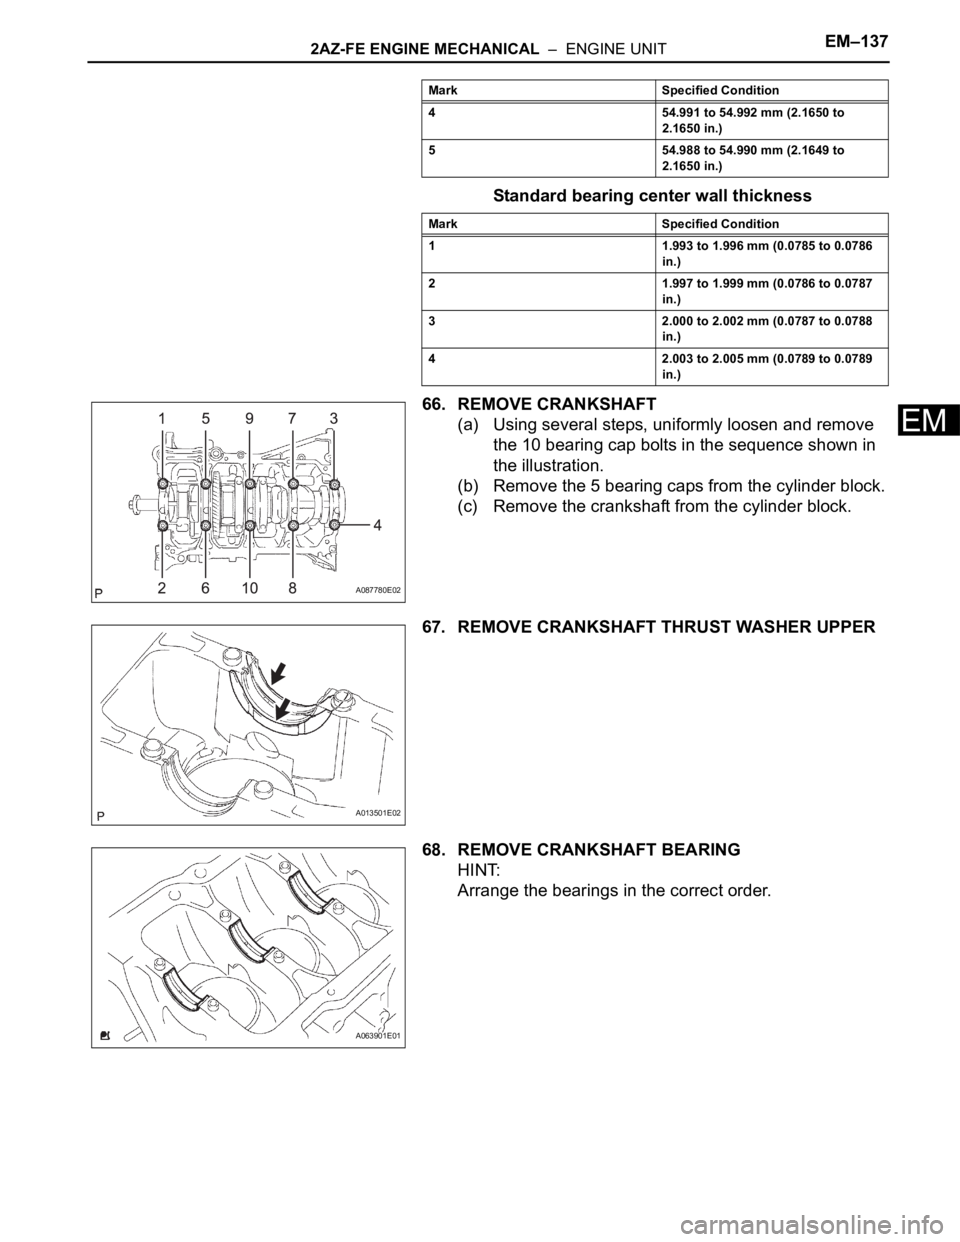
66. REMOVE CRANKSHAFT
(a) Using several steps, uniformly loosen and remove
the 10 bearing cap bolts in the sequence shown in
the illustration.
(b) Remove the 5 bearing caps from the cylinder block.
(c) Remove the crankshaft from the cylinder block.
67. REMOVE CRANKSHAFT THRUST WASHER UPPER
68. REMOVE CRANKSHAFT BEARING
HINT:
Arrange the bearings in the correct order.
4 54.991 to 54.992 mm (2.1650 to
2.1650 in.)
5 54.988 to 54.990 mm (2.1649 to
2.1650 in.)
Mark Specified Condition
1 1.993 to 1.996 mm (0.0785 to 0.0786
in.)
2 1.997 to 1.999 mm (0.0786 to 0.0787
in.)
3 2.000 to 2.002 mm (0.0787 to 0.0788
in.)
4 2.003 to 2.005 mm (0.0789 to 0.0789
in.) Mark Specified Condition
A087780E02
A013501E02
A063901E01
Page 665 of 2000
EM–1382AZ-FE ENGINE MECHANICAL – ENGINE UNIT
EM
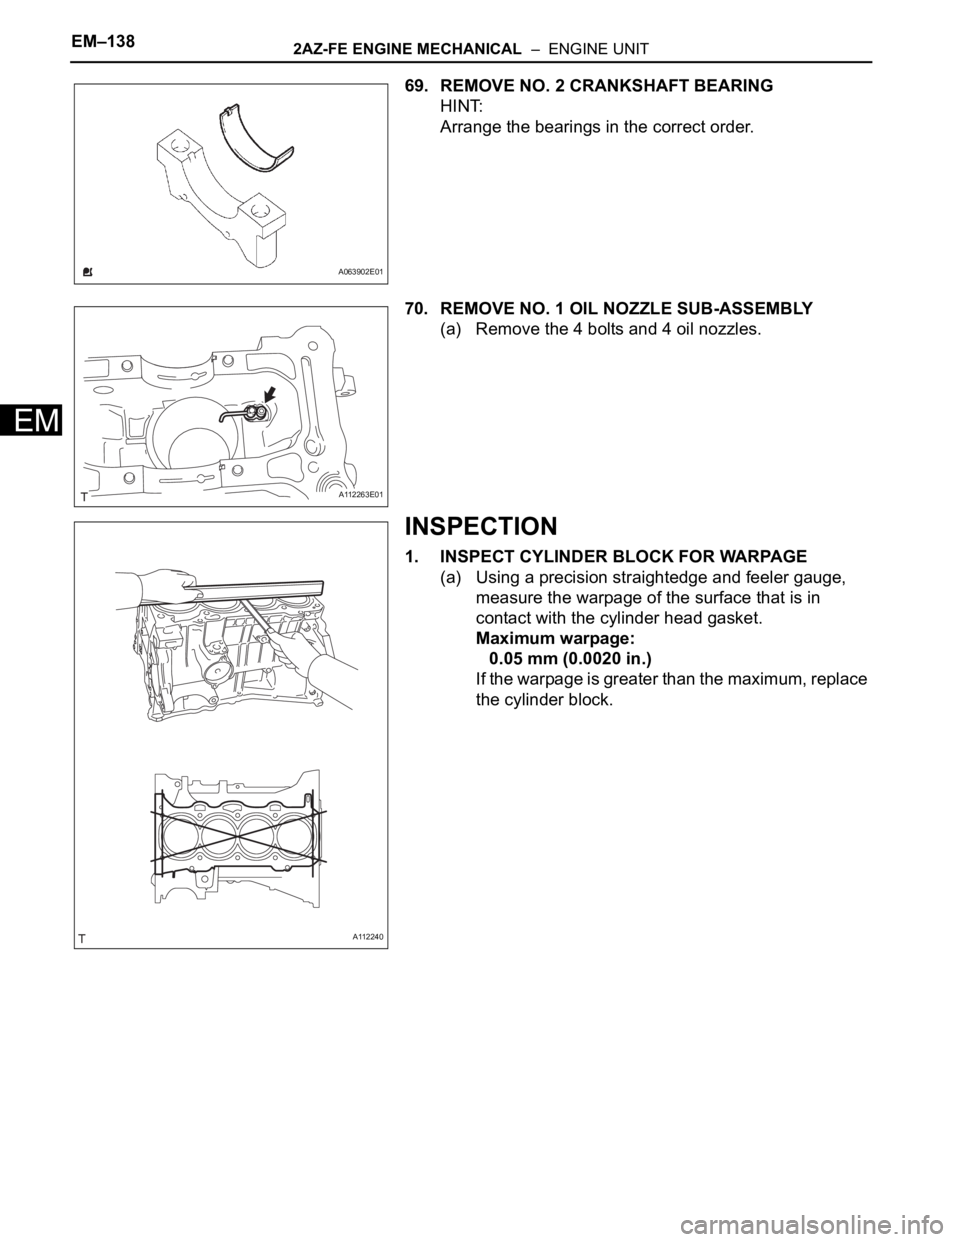
69. REMOVE NO. 2 CRANKSHAFT BEARING
HINT:
Arrange the bearings in the correct order.
70. REMOVE NO. 1 OIL NOZZLE SUB-ASSEMBLY
(a) Remove the 4 bolts and 4 oil nozzles.
INSPECTION
1. INSPECT CYLINDER BLOCK FOR WARPAGE
(a) Using a precision straightedge and feeler gauge,
measure the warpage of the surface that is in
contact with the cylinder head gasket.
Maximum warpage:
0.05 mm (0.0020 in.)
If the warpage is greater than the maximum, replace
the cylinder block.
A063902E01
A112263E01
A112240
Page 666 of 2000
2AZ-FE ENGINE MECHANICAL – ENGINE UNITEM–139
EM
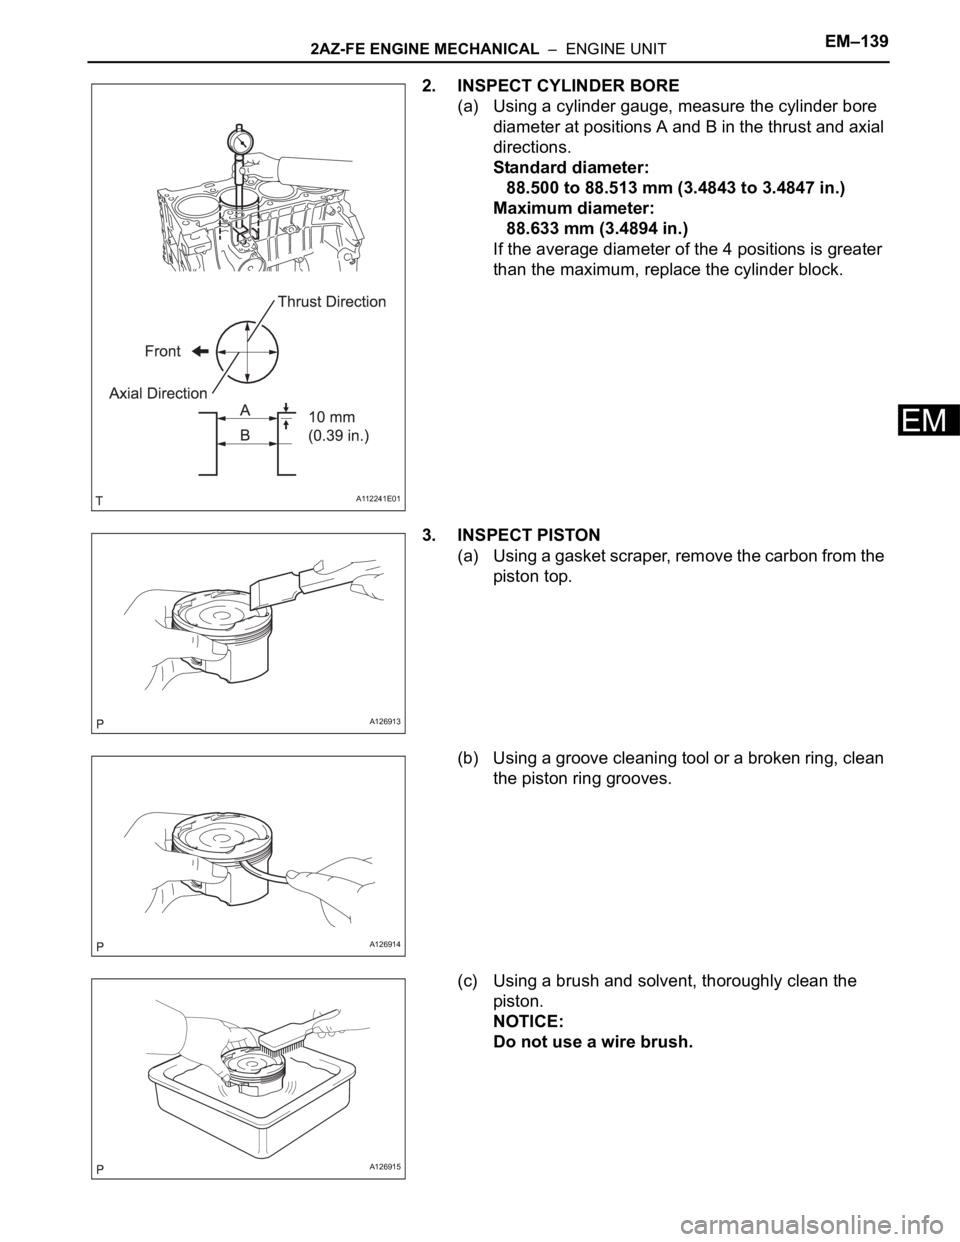
2. INSPECT CYLINDER BORE
(a) Using a cylinder gauge, measure the cylinder bore
diameter at positions A and B in the thrust and axial
directions.
Standard diameter:
88.500 to 88.513 mm (3.4843 to 3.4847 in.)
Maximum diameter:
88.633 mm (3.4894 in.)
If the average diameter of the 4 positions is greater
than the maximum, replace the cylinder block.
3. INSPECT PISTON
(a) Using a gasket scraper, remove the carbon from the
piston top.
(b) Using a groove cleaning tool or a broken ring, clean
the piston ring grooves.
(c) Using a brush and solvent, thoroughly clean the
piston.
NOTICE:
Do not use a wire brush.
A112241E01
A126913
A126914
A126915
Page 667 of 2000
EM–1402AZ-FE ENGINE MECHANICAL – ENGINE UNIT
EM
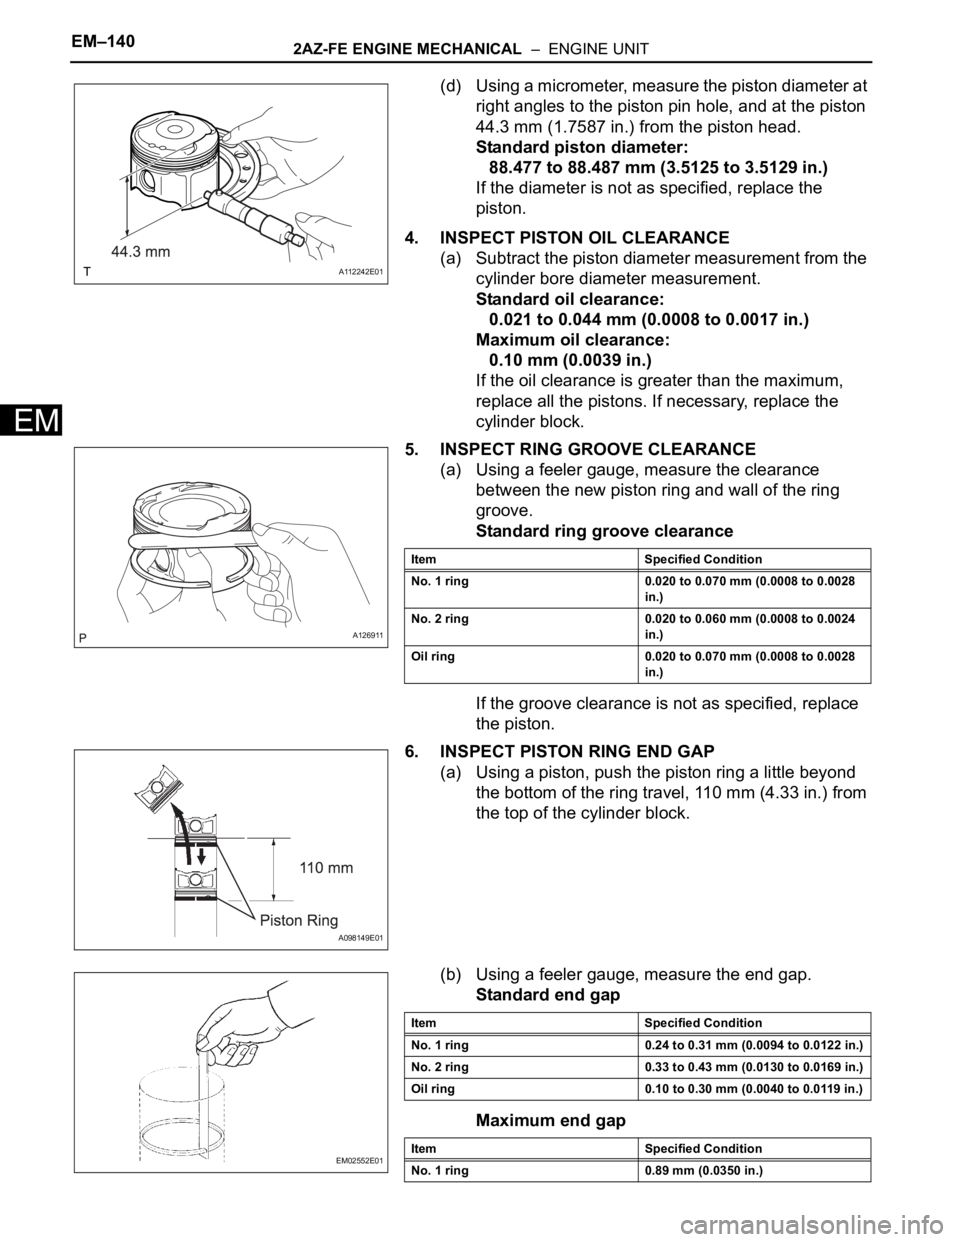
(d) Using a micrometer, measure the piston diameter at
right angles to the piston pin hole, and at the piston
44.3 mm (1.7587 in.) from the piston head.
Standard piston diameter:
88.477 to 88.487 mm (3.5125 to 3.5129 in.)
If the diameter is not as specified, replace the
piston.
4. INSPECT PISTON OIL CLEARANCE
(a) Subtract the piston diameter measurement from the
cylinder bore diameter measurement.
Standard oil clearance:
0.021 to 0.044 mm (0.0008 to 0.0017 in.)
Maximum oil clearance:
0.10 mm (0.0039 in.)
If the oil clearance is greater than the maximum,
replace all the pistons. If necessary, replace the
cylinder block.
5. INSPECT RING GROOVE CLEARANCE
(a) Using a feeler gauge, measure the clearance
between the new piston ring and wall of the ring
groove.
Standard ring groove clearance
If the groove clearance is not as specified, replace
the piston.
6. INSPECT PISTON RING END GAP
(a) Using a piston, push the piston ring a little beyond
the bottom of the ring travel, 110 mm (4.33 in.) from
the top of the cylinder block.
(b) Using a feeler gauge, measure the end gap.
Standard end gap
Maximum end gap
A112242E01
A126911
Item Specified Condition
No. 1 ring 0.020 to 0.070 mm (0.0008 to 0.0028
in.)
No. 2 ring 0.020 to 0.060 mm (0.0008 to 0.0024
in.)
Oil ring 0.020 to 0.070 mm (0.0008 to 0.0028
in.)
A098149E01
EM02552E01
Item Specified Condition
No. 1 ring 0.24 to 0.31 mm (0.0094 to 0.0122 in.)
No. 2 ring 0.33 to 0.43 mm (0.0130 to 0.0169 in.)
Oil ring 0.10 to 0.30 mm (0.0040 to 0.0119 in.)
Item Specified Condition
No. 1 ring 0.89 mm (0.0350 in.)
Page 668 of 2000
2AZ-FE ENGINE MECHANICAL – ENGINE UNITEM–141
EM
If the end gap is greater than the maximum, replace
the piston ring. If the end gap is greater than the
maximum, even with a new piston ring, replace the
cylinder block.
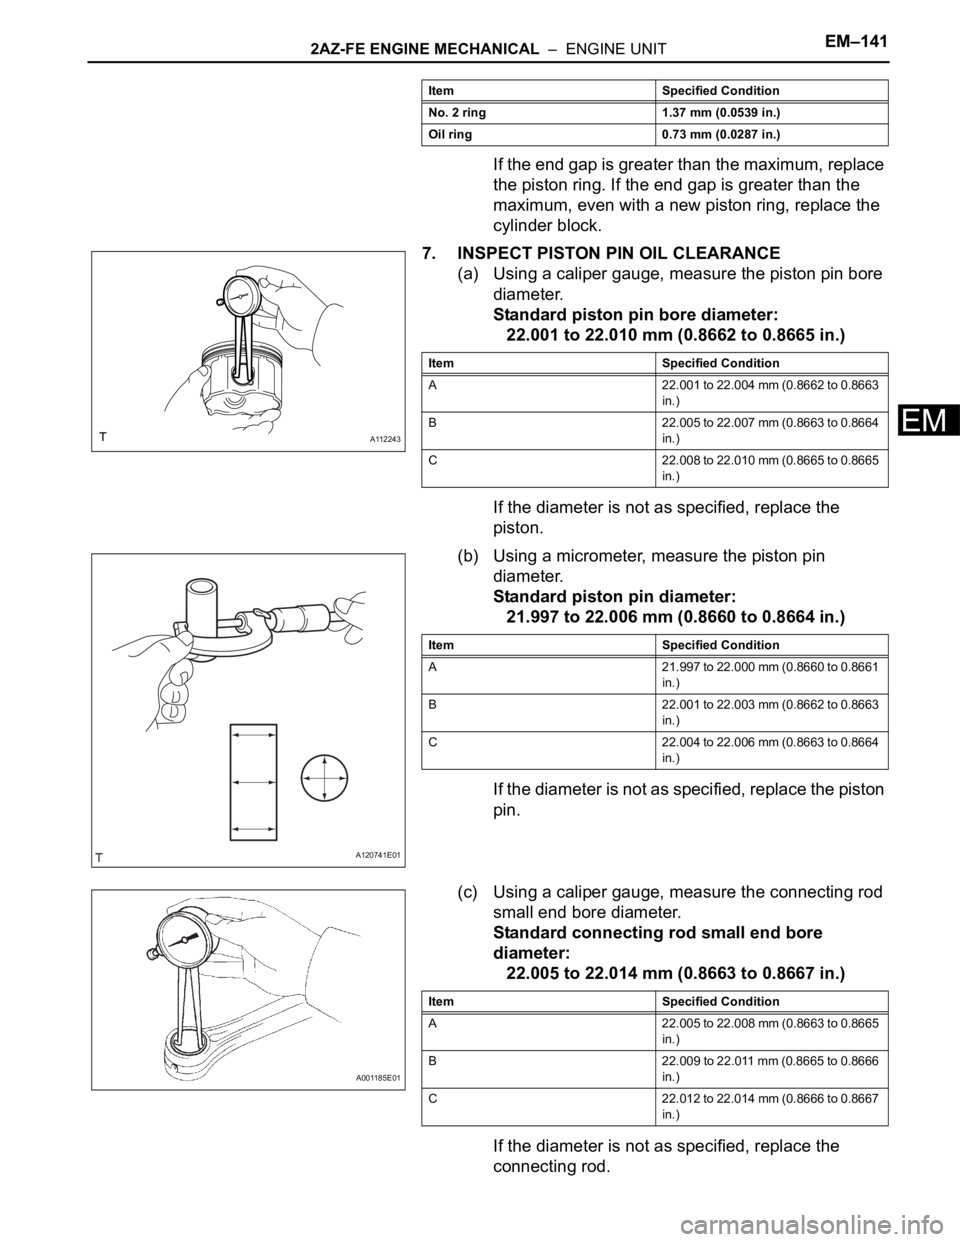
7. INSPECT PISTON PIN OIL CLEARANCE
(a) Using a caliper gauge, measure the piston pin bore
diameter.
Standard piston pin bore diameter:
22.001 to 22.010 mm (0.8662 to 0.8665 in.)
If the diameter is not as specified, replace the
piston.
(b) Using a micrometer, measure the piston pin
diameter.
Standard piston pin diameter:
21.997 to 22.006 mm (0.8660 to 0.8664 in.)
If the diameter is not as specified, replace the piston
pin.
(c) Using a caliper gauge, measure the connecting rod
small end bore diameter.
Standard connecting rod small end bore
diameter:
22.005 to 22.014 mm (0.8663 to 0.8667 in.)
If the diameter is not as specified, replace the
connecting rod.
No. 2 ring 1.37 mm (0.0539 in.)
Oil ring 0.73 mm (0.0287 in.) Item Specified Condition
A112243
Item Specified Condition
A 22.001 to 22.004 mm (0.8662 to 0.8663
in.)
B 22.005 to 22.007 mm (0.8663 to 0.8664
in.)
C 22.008 to 22.010 mm (0.8665 to 0.8665
in.)
A120741E01
Item Specified Condition
A 21.997 to 22.000 mm (0.8660 to 0.8661
in.)
B 22.001 to 22.003 mm (0.8662 to 0.8663
in.)
C 22.004 to 22.006 mm (0.8663 to 0.8664
in.)
A001185E01
Item Specified Condition
A 22.005 to 22.008 mm (0.8663 to 0.8665
in.)
B 22.009 to 22.011 mm (0.8665 to 0.8666
in.)
C 22.012 to 22.014 mm (0.8666 to 0.8667
in.)
Page 669 of 2000
EM–1422AZ-FE ENGINE MECHANICAL – ENGINE UNIT
EM
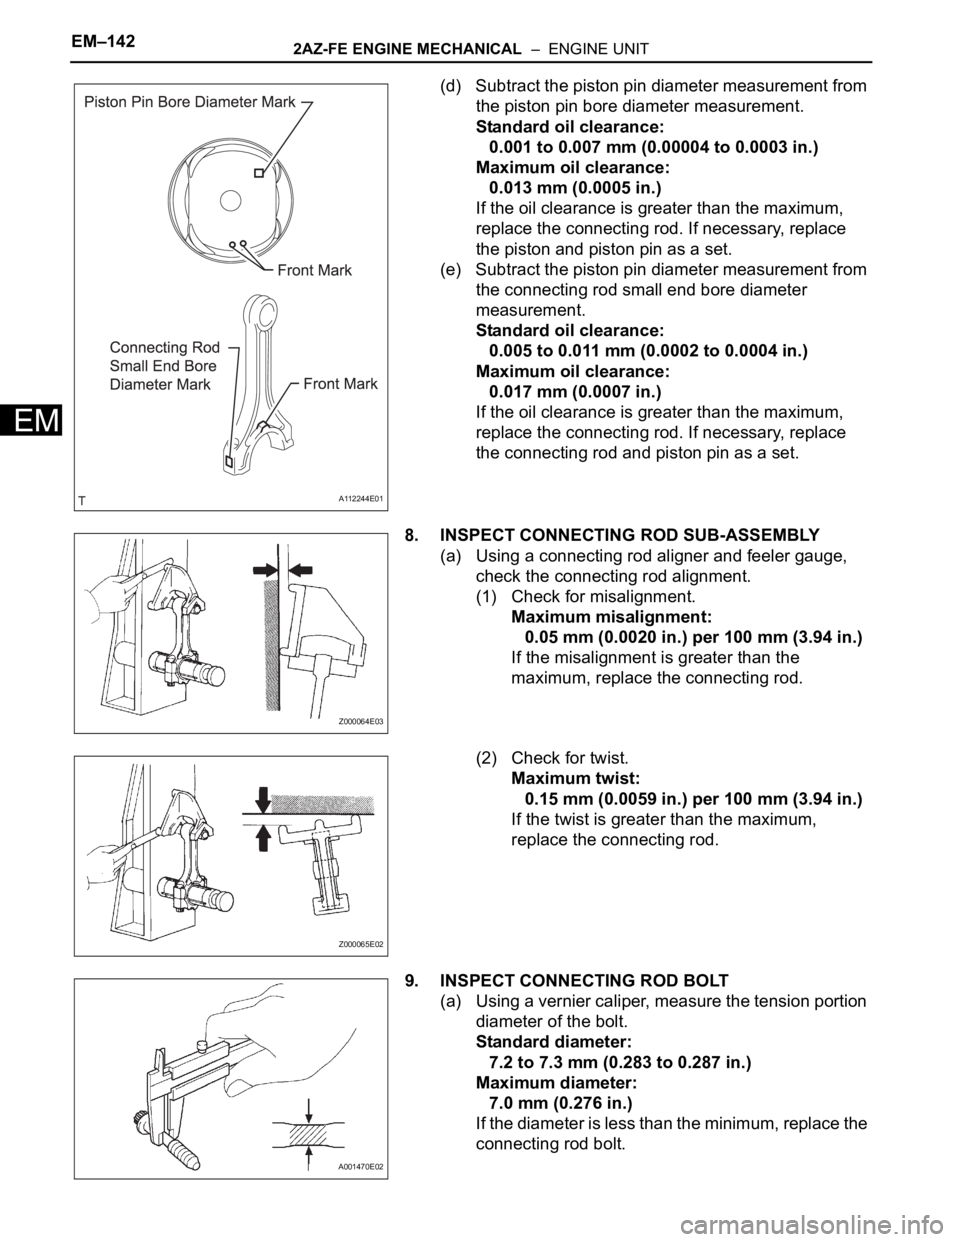
(d) Subtract the piston pin diameter measurement from
the piston pin bore diameter measurement.
Standard oil clearance:
0.001 to 0.007 mm (0.00004 to 0.0003 in.)
Maximum oil clearance:
0.013 mm (0.0005 in.)
If the oil clearance is greater than the maximum,
replace the connecting rod. If necessary, replace
the piston and piston pin as a set.
(e) Subtract the piston pin diameter measurement from
the connecting rod small end bore diameter
measurement.
Standard oil clearance:
0.005 to 0.011 mm (0.0002 to 0.0004 in.)
Maximum oil clearance:
0.017 mm (0.0007 in.)
If the oil clearance is greater than the maximum,
replace the connecting rod. If necessary, replace
the connecting rod and piston pin as a set.
8. INSPECT CONNECTING ROD SUB-ASSEMBLY
(a) Using a connecting rod aligner and feeler gauge,
check the connecting rod alignment.
(1) Check for misalignment.
Maximum misalignment:
0.05 mm (0.0020 in.) per 100 mm (3.94 in.)
If the misalignment is greater than the
maximum, replace the connecting rod.
(2) Check for twist.
Maximum twist:
0.15 mm (0.0059 in.) per 100 mm (3.94 in.)
If the twist is greater than the maximum,
replace the connecting rod.
9. INSPECT CONNECTING ROD BOLT
(a) Using a vernier caliper, measure the tension portion
diameter of the bolt.
Standard diameter:
7.2 to 7.3 mm (0.283 to 0.287 in.)
Maximum diameter:
7.0 mm (0.276 in.)
If the diameter is less than the minimum, replace the
connecting rod bolt.
A112244E01
Z000064E03
Z000065E02
A001470E02
Page 670 of 2000
2AZ-FE ENGINE MECHANICAL – ENGINE UNITEM–143
EM
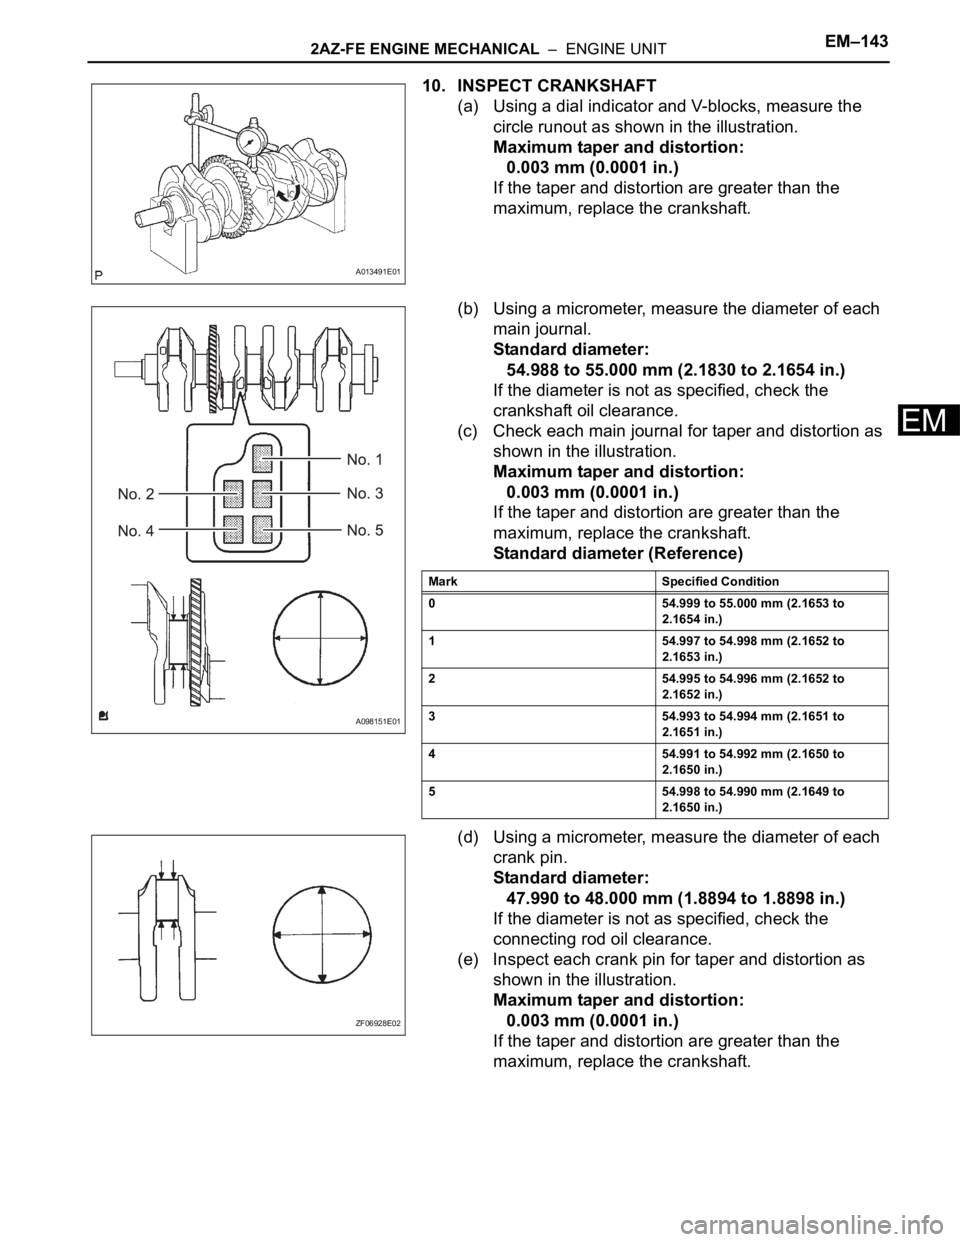
10. INSPECT CRANKSHAFT
(a) Using a dial indicator and V-blocks, measure the
circle runout as shown in the illustration.
Maximum taper and distortion:
0.003 mm (0.0001 in.)
If the taper and distortion are greater than the
maximum, replace the crankshaft.
(b) Using a micrometer, measure the diameter of each
main journal.
Standard diameter:
54.988 to 55.000 mm (2.1830 to 2.1654 in.)
If the diameter is not as specified, check the
crankshaft oil clearance.
(c) Check each main journal for taper and distortion as
shown in the illustration.
Maximum taper and distortion:
0.003 mm (0.0001 in.)
If the taper and distortion are greater than the
maximum, replace the crankshaft.
Standard diameter (Reference)
(d) Using a micrometer, measure the diameter of each
crank pin.
Standard diameter:
47.990 to 48.000 mm (1.8894 to 1.8898 in.)
If the diameter is not as specified, check the
connecting rod oil clearance.
(e) Inspect each crank pin for taper and distortion as
shown in the illustration.
Maximum taper and distortion:
0.003 mm (0.0001 in.)
If the taper and distortion are greater than the
maximum, replace the crankshaft.
A013491E01
A098151E01
Mark Specified Condition
0 54.999 to 55.000 mm (2.1653 to
2.1654 in.)
1 54.997 to 54.998 mm (2.1652 to
2.1653 in.)
2 54.995 to 54.996 mm (2.1652 to
2.1652 in.)
3 54.993 to 54.994 mm (2.1651 to
2.1651 in.)
4 54.991 to 54.992 mm (2.1650 to
2.1650 in.)
5 54.998 to 54.990 mm (2.1649 to
2.1650 in.)
ZF06928E02